Page 66 of 332

1.60
DISPLAYS AND INDICATORS (1/2)
Instrument panel A
Depending on the vehicle, you can cus-
tomise your instrument panel with the
content and colours of your choice.
From the multifunction screen , select
“System”, then “User profile”. Refer to
the handbook for the equipment.
Driving style indicator 3
Please refer to the information on “Eco-
driving” in Section 2.
A
5
3
Rev counter 4(graduations x 1000)
Speedometer 5(km or miles per hour)
This is displayed differently according
to how the instrument panel is custom-
ised.
Overspeed buzzer
Depending on the vehicle and coun-
try, a buzzer sounds for approximately
10 seconds every 40 seconds, as long
as the vehicle is travelling in excess of
72 mph (120 km/h).
6
Instrument panel in miles
(option to switch to km/h)
Vehicles not fitted with a navigation
system
– With the ignition off, press the OK
button 2 and the start button 6;
– using control 1, select “Settings”,
“Instrument panel”, then the unit;
– Press the OK button 2 to confirm.
To return to the previous mode, repeat
the same operation.
4
1
2
Page 67 of 332

1.61
DISPLAYS AND INDICATORS (2/2)
Engine oil level low warning
When the engine is started, the instru-
ment panel display A alerts you when
the minimum oil level is reached. Refer
to the information on the “Engine oil
level” in Section 4.
The first time the warning appears,
it can be cleared by pressing the OK
button 2.
Subsequent warnings will disappear
automatically after 30 seconds.
2A
Coolant temperature
indicator 7
In normal use, indicator 7 should be
before arear 8. Under “intensive” op-
erating conditions, the needle may ap-
proach this zone. This is not serious
unless the warning light
® comes
on accompanied by a message on the
instrument panel and a beep.
Fuel level gauge 9
If the level is at the minimum, warn-
ing light
M integrated in the indica-
tor comes on orange, accompanied by
a beep. Fill up as soon as possible.
9
Vehicles fitted with a navigation
system
On the multifunction screen, select
“System” , “User profile” and “Unit”.
Note: In both cases, once the battery
is switched off, the on-board computer
automatically returns to the original unit
of measurement.
Trip computer and warning
system
Refer to the information on the “Trip
computer and warning system” in
Section 1.
7
1
8
Page 78 of 332

1.72
VEHICLE SETTINGS CUSTOMISATION MENU (1/2)
Adjusting the settings
(depending on the vehicle)
Select the function to modify:
a) unlocking the driver’s door only;
b) automatic locking of the doors while driving;
c) hands-free function;
d) indicator audio volume;
e) internal welcome sound;
f) external welcome;
g) reading lamp in automatic mode;
h) rear windscreen wiping in reverse gear;
i) configuration of the driving style indi- cator;
j) Active noise control.
Select “ON” or “OFF” to activate or de-
activate the function.
For the “Light brightness intensity”
function, select the intensity by press-
ing “+” or “-”.
Depending on the vehicle equipment,
this function allows you to activate/de-
activate and adjust some of the vehi-
cle’s functions.
Vehicles fitted with a
navigation system
Accessing the settings menu
With the vehicle at a standstill, using
the multifunction screen
1, select menu
“Vehicle”, “User settings” to access the
various settings.
1
For safety reasons, carry
out any adjustments when
the vehicle is stationary.
Page 79 of 332

1.73
VEHICLE SETTINGS CUSTOMISATION MENU (2/2)
34
= function activated
< function deactivated
Once a line has been selected, press
the switch 3 OK to adjust the function.
If you select either “Parking assist” or
“Language”, you will have to make a
further selection (sound volume of the
parking distance control or instrument
panel language). In this case, make
your selection and confirm it by holding
the switch 3 OK – the selected value is
shown by a
~ in front of the line.
To exit the menu, press the control 4
upwards or downwards. It may be nec-
essary to carry out this operation sev-
eral times.
Vehicles not fitted with a
navigation system
Accessing the settings menu on
display 2
With the vehicle at a standstill, press
and hold the switch 3 OK to access the
settings menu.
Adjusting the settings
(depending on the vehicle)
Browse using the control 4 to select the
function to adjust:
a) Language;
b) Vehicle speed unit;
c) Unlocking the driver’s door only;
d) Lock doors when in motion;
e) Use handfree card;
f) Rear wipers when reverse is ON;
g) Flashers volume;
h) Welcome lights;
i) Automatic cabin lights;
j) Parking assist;
k) Parking assist audio volume;
l) Lane departure volume;
m) Lane departure sensitivity;
n) Lane departure vibration;
p) Active braking;
q) Automatic main beam lights.
The vehicle settings personalisation
menu cannot be used when driv-
ing. At speed exceeding 12 mph
(20 km/h), the instrumental panel
display switches automatically back
to trip computer and warning system
mode.
2
Page 82 of 332
1.76
CLOCK AND EXTERIOR TEMPERATURE
External temperature
indicator
Special note:
When the exterior temperature is - 3 °C
to + 3 °C, the °C characters flash (sig-
nalling a risk of ice on the road).
Display 1
Vehicles fitted with a touchscreen
multimedia screen, navigation aid
systems, etc.
The time and exterior temperature are
displayed on the multifunction screen 1.
Refer to the handbook for the equip-
ment.
External temperature
indicator
As ice formation is related
to climatic exposure, local
air humidity and temperature, the
external temperature alone is not
sufficient to detect ice.
1
If the electrical supply is cut (battery
disconnected, broken supply wire,
etc.), the clock will automatically
go back to the right time after a few
minutes once the system is capable
of receiving information GPS.
Page 110 of 332

2.6
STARTING, STOPPING THE ENGINE: vehicle with RENAULT CARD (2/5)
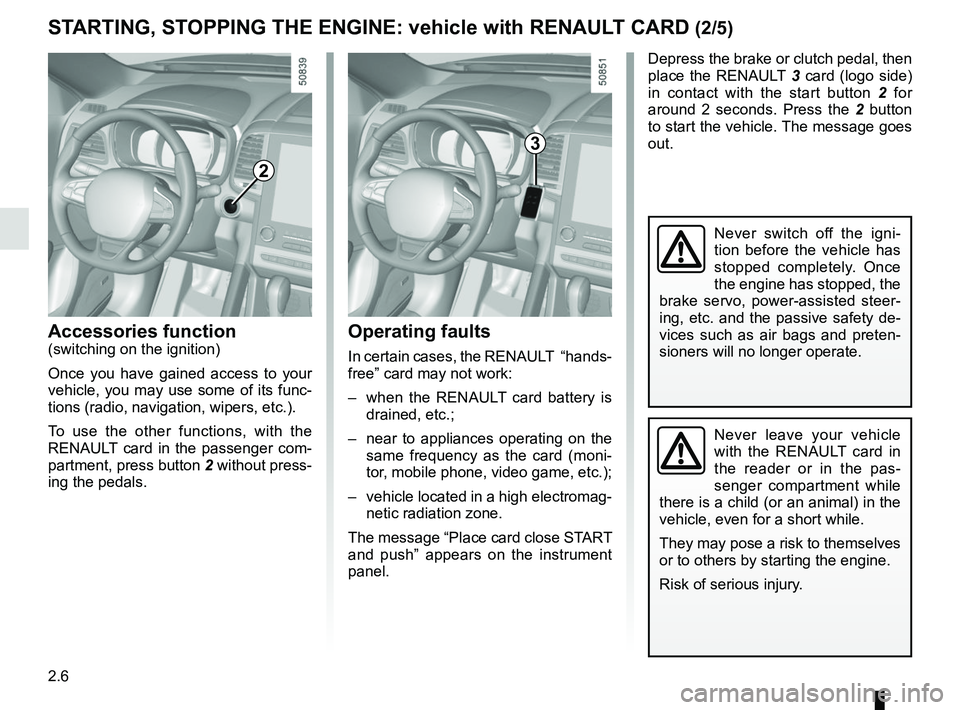
Operating faults
In certain cases, the RENAULT “hands-
free” card may not work:
– when the RENAULT card battery is drained, etc.;
– near to appliances operating on the same frequency as the card (moni-
tor, mobile phone, video game, etc.);
– vehicle located in a high electromag- netic radiation zone.
The message “Place card close START
and push” appears on the instrument
panel.
2
Accessories function(switching on the ignition)
Once you have gained access to your
vehicle, you may use some of its func-
tions (radio, navigation, wipers, etc.).
To use the other functions, with the
RENAULT card in the passenger com-
partment, press button 2 without press-
ing the pedals.
Depress the brake or clutch pedal, then
place the RENAULT 3 card (logo side)
in contact with the start button 2 for
around 2 seconds. Press the 2 button
to start the vehicle. The message goes
out.
3
Never leave your vehicle
with the RENAULT card in
the reader or in the pas-
senger compartment while
there is a child (or an animal) in the
vehicle, even for a short while.
They may pose a risk to themselves
or to others by starting the engine.
Risk of serious injury.
Never switch off the igni-
tion before the vehicle has
stopped completely. Once
the engine has stopped, the
brake servo, power-assisted steer-
ing, etc. and the passive safety de-
vices such as air bags and preten-
sioners will no longer operate.
Page 125 of 332

2.21
DRIVING ADVICE, ECO-DRIVING (1/5)
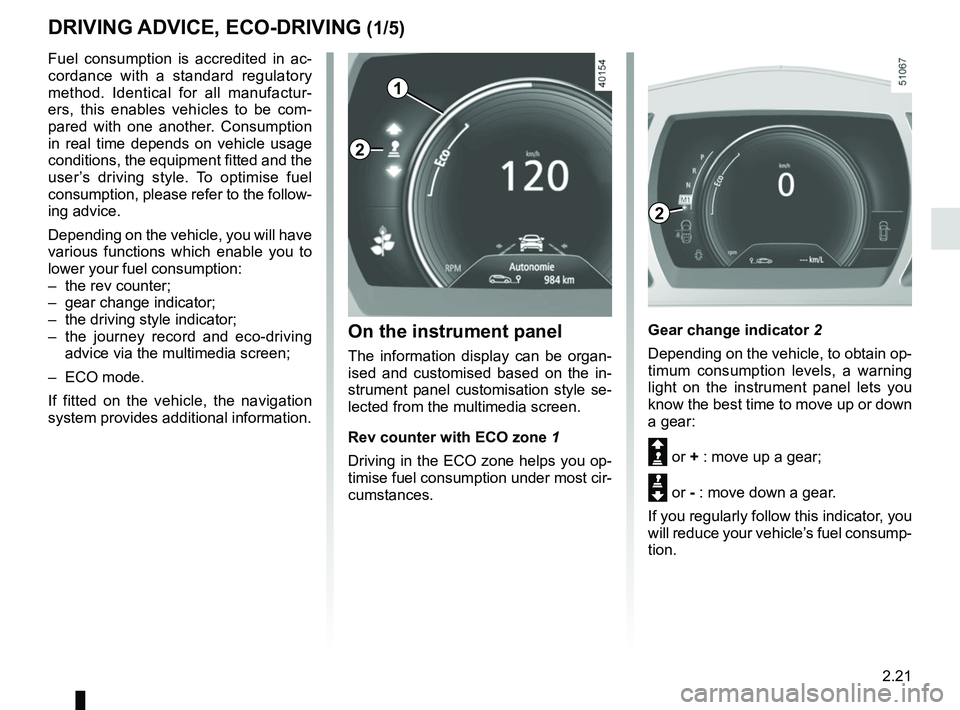
1
Gear change indicator 2
Depending on the vehicle, to obtain op-
timum consumption levels, a warning
light on the instrument panel lets you
know the best time to move up or down
a gear:
Š or + : move up a gear;
‰ or - : move down a gear.
If you regularly follow this indicator, you
will reduce your vehicle’s fuel consump-
tion.
Fuel consumption is accredited in ac-
cordance with a standard regulatory
method. Identical for all manufactur-
ers, this enables vehicles to be com-
pared with one another. Consumption
in real time depends on vehicle usage
conditions, the equipment fitted and the
user’s driving style. To optimise fuel
consumption, please refer to the follow-
ing advice.
Depending on the vehicle, you will have
various functions which enable you to
lower your fuel consumption:
– the rev counter;
– gear change indicator;
– the driving style indicator;
– the journey record and eco-driving
advice via the multimedia screen;
– ECO mode.
If fitted on the vehicle, the navigation
system provides additional information.
On the instrument panel
The information display can be organ-
ised and customised based on the in-
strument panel customisation style se-
lected from the multimedia screen.
Rev counter with ECO zone 1
Driving in the ECO zone helps you op-
timise fuel consumption under most cir-
cumstances.
2
2
Page 127 of 332

2.23
DRIVING ADVICE, ECO-DRIVING (3/5)
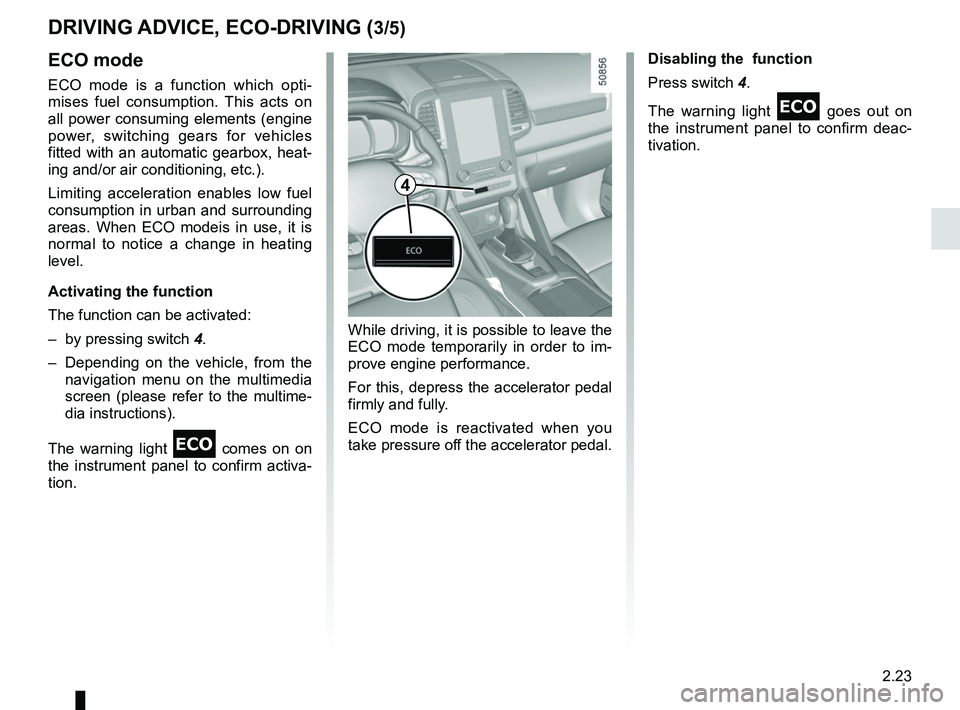
ECO mode
ECO mode is a function which opti-
mises fuel consumption. This acts on
all power consuming elements (engine
power, switching gears for vehicles
fitted with an automatic gearbox, heat-
ing and/or air conditioning, etc.).
Limiting acceleration enables low fuel
consumption in urban and surrounding
areas. When ECO modeis in use, it is
normal to notice a change in heating
level.
Activating the function
The function can be activated:
– by pressing switch 4.
– Depending on the vehicle, from the navigation menu on the multimedia
screen (please refer to the multime-
dia instructions).
The warning light
comes on on
the instrument panel to confirm activa-
tion. Disabling the function
Press switch 4.
The warning light
goes out on
the instrument panel to confirm deac-
tivation.
While driving, it is possible to leave the
ECO mode temporarily in order to im-
prove engine performance.
For this, depress the accelerator pedal
firmly and fully.
ECO mode is reactivated when you
take pressure off the accelerator pedal.
4