2018 PEUGEOT 5008 ESP
[x] Cancel search: ESPPage 82 of 364
80
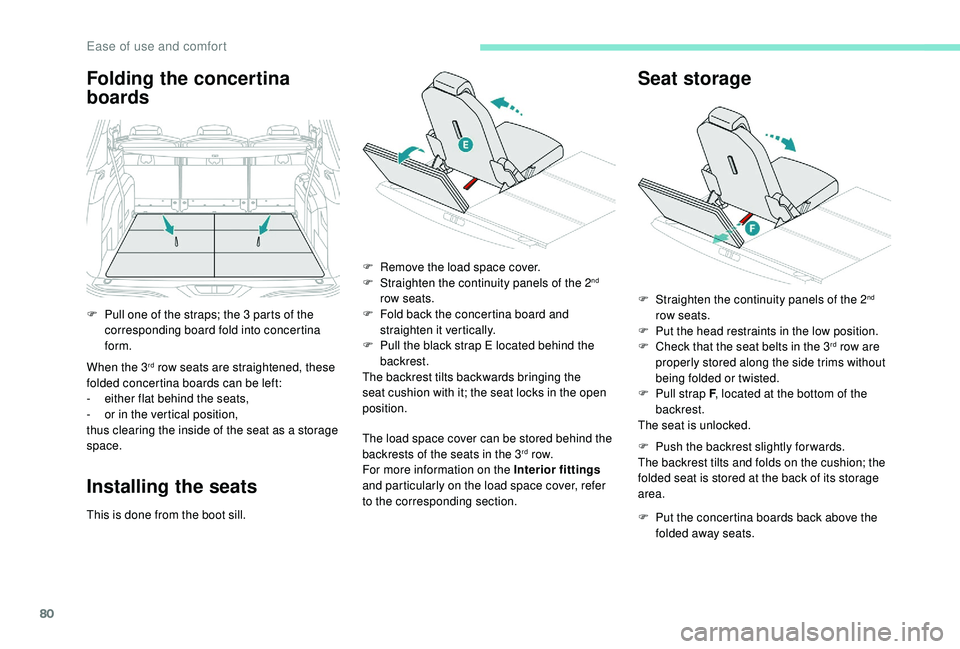
Folding the concertina
boards
When the 3rd row seats are straightened, these
folded concertina boards can be left:
-
ei
ther flat behind the seats,
-
o
r in the vertical position,
thus clearing the inside of the seat as a
storage
space.
Installing the seats
This is done from the boot sill. F
R
emove the load space cover.
F
S
traighten the continuity panels of the 2
nd
row seats.
F
F
old back the concertina board and
straighten it vertically.
F
P
ull the black strap E located behind the
backrest.
The backrest tilts backwards bringing the
seat cushion with it; the seat locks in the open
position.
The load space cover can be stored behind the
backrests of the seats in the 3
rd row.
For more information on the Interior fittings
and particularly on the load space cover, refer
to the corresponding section.
Seat storage
F Pull one of the straps; the 3 parts of the
corresponding board fold into concertina
form. F
S traighten the continuity panels of the 2
nd
row seats.
F
P
ut the head restraints in the low position.
F
C
heck that the seat belts in the 3
rd row are
properly stored along the side trims without
being folded or twisted.
F
P
ull strap F , located at the bottom of the
backrest.
The seat is unlocked.
F
P
ush the backrest slightly for wards.
The backrest tilts and folds on the cushion; the
folded seat is stored at the back of its storage
area.
F
P
ut the concertina boards back above the
folded away seats.
Ease of use and comfort
Page 83 of 364
81
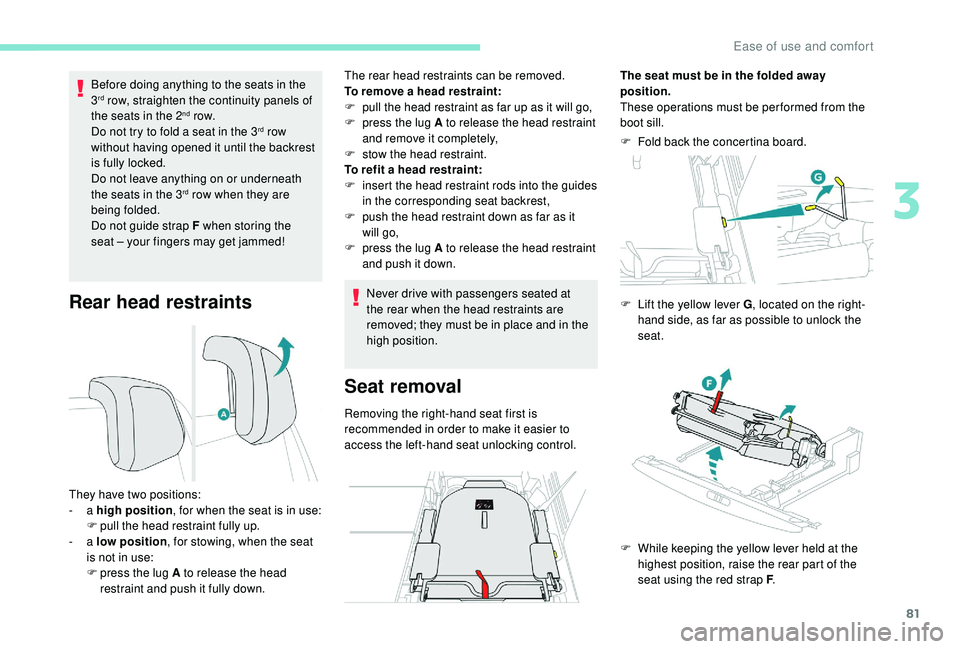
Rear head restraints
Before doing anything to the seats in the
3rd row, straighten the continuity panels of
the seats in the 2nd row.
Do not try to fold a
seat in the 3rd row
without having opened it until the backrest
is fully locked.
Do not leave anything on or underneath
the seats in the 3
rd row when they are
being folded.
Do not guide strap F when storing the
seat – your fingers may get jammed!
They have two positions:
-
a high position , for when the seat is in use:
F
p
ull the head restraint fully up.
-
a low position , for stowing, when the seat
is not in use:
F
p
ress the lug A to release the head
restraint and push it fully down. The rear head restraints can be removed.
To remove a
head restraint:
F
p
ull the head restraint as far up as it will go,
F
p
ress the lug A to release the head restraint
and remove it completely,
F
s
tow the head restraint.
To refit a head restraint:
F i nsert the head restraint rods into the guides
in the corresponding seat backrest,
F
p
ush the head restraint down as far as it
will go,
F
p
ress the lug A to release the head restraint
and push it down.
Never drive with passengers seated at
the rear when the head restraints are
removed; they must be in place and in the
high position.
Seat removal
Removing the right-hand seat first is
recommended in order to make it easier to
access the left-hand seat unlocking control. F
F
old back the concertina board.
The seat must be in the folded away
position.
These operations must be performed from the
boot sill.
F
L
ift the yellow lever G
, located on the right-
hand side, as far as possible to unlock the
seat.
F
W
hile keeping the yellow lever held at the
highest position, raise the rear part of the
seat using the red strap F .
3
Ease of use and comfort
Page 88 of 364
86
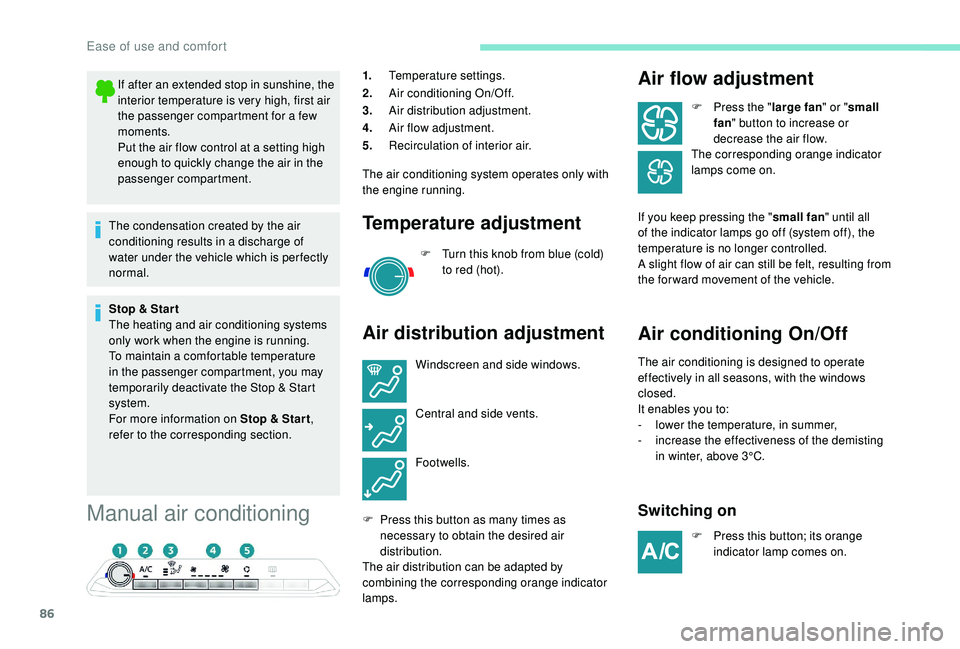
Manual air conditioning
1.Temperature settings.
2. Air conditioning On/Off.
3. Air distribution adjustment.
4. Air flow adjustment.
5. Recirculation of interior air.
The air conditioning system operates only with
the engine running.
Temperature adjustment
F Turn this knob from blue (cold) to red (hot).
Air distribution adjustment Air flow adjustment
F Press the "
large fan" or "small
fan " button to increase or
decrease the air flow.
The corresponding orange indicator
lamps come on.
If you keep pressing the " small fan" until all
of the indicator lamps go off (system off), the
temperature is no longer controlled.
A slight flow of air can still be felt, resulting from
the for ward movement of the vehicle.
Air conditioning On/Off
The air conditioning is designed to operate
effectively in all seasons, with the windows
closed.
It enables you to:
-
l
ower the temperature, in summer,
-
i
ncrease the effectiveness of the demisting
in winter, above 3°C.
Switching on
F Press this button; its orange indicator lamp comes on.
If after an extended stop in sunshine, the
interior temperature is very high, first air
the passenger compartment for a
few
moments.
Put the air flow control at a
setting high
enough to quickly change the air in the
passenger compartment.
The condensation created by the air
conditioning results in a
discharge of
water under the vehicle which is per fectly
normal.
Stop & Star t
The heating and air conditioning systems
only work when the engine is running.
To maintain a
comfortable temperature
in the passenger compartment, you may
temporarily deactivate the Stop & Start
system.
For more information on Stop & Star t ,
refer to the corresponding section. Windscreen and side windows.
Central and side vents.
Footwells.
F
P
ress this button as many times as
necessary to obtain the desired air
distribution.
The air distribution can be adapted by
combining the corresponding orange indicator
lamps.
Ease of use and comfort
Page 89 of 364
87
The air conditioning does not operate
when the air flow adjustment is set to off.
To obtain cool air more quickly, you can
activate recirculation of the interior air for
a few moments.
Switching off
F Press this button again; its indicator lamp goes off.
Switching off the air conditioning may result in
some discomfort (humidity, condensation).
Semi-automatic mono-
zone air conditioning
Press the Air conditioning menu
button to display the system controls
page. The air conditioning system operates only with
the engine running.
The temperature at the nozzles and vents
is regulated by the system according to the
temperature in the passenger compartment
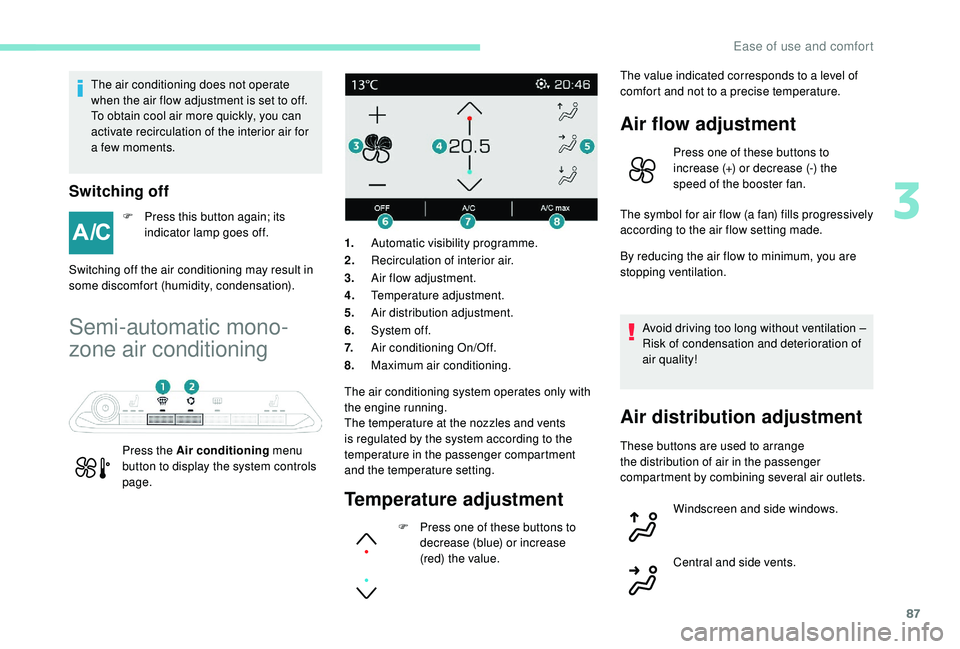
and the temperature setting.1.
Automatic visibility programme.
2. Recirculation of interior air.
3. Air flow adjustment.
4. Temperature adjustment.
5. Air distribution adjustment.
6. System of f.
7. Air conditioning On/Off.
8. Maximum air conditioning.
Temperature adjustment
F Press one of these buttons to
decrease (blue) or increase
(red) the value. The value indicated corresponds to a
level of
comfort and not to a precise temperature.
Air flow adjustment
Press one of these buttons to
increase (+) or decrease (-) the
speed of the booster fan.
The symbol for air flow (a fan) fills progressively
according to the air flow setting made.
By reducing the air flow to minimum, you are
stopping ventilation.
Avoid driving too long without ventilation –
Risk of condensation and deterioration of
air quality!
Air distribution adjustment
These buttons are used to arrange
the distribution of air in the passenger
compartment by combining several air outlets. Windscreen and side windows.
Central and side vents.
3
Ease of use and comfort
Page 90 of 364
88
Air conditioning On/Off
The air conditioning is designed to operate
effectively in all seasons, with the windows
closed.
It enables you to:
-
l
ower the temperature, in summer,
-
i
ncrease the effectiveness of the demisting
in winter, above 3°C.
Switching on
F Press this button, its indicator lamp comes on. The air conditioning does not operate
when the air flow adjustment is set to off.
To obtain cool air more quickly, you can
use recirculation of the interior air for
a
few moments. Then return to the intake
of exterior air.
Switching off
F Press this button again, its indicator lamp goes off.
Switching off the air conditioning may result in
some discomfort (humidity, condensation).
Maximum air conditioning
This function allows faster cooling of the air in
the passenger compartment.
The system automatically adjusts the
temperature setting to the lowest possible, air
distribution towards the centre and outer vents,
air flow to maximum and activates recirculation
of interior air.
F
P
ress this button to activate
the function; its indicator lamp
comes on.
Automatic visibility
programme
For more information on Front demist -
defrost , refer to the corresponding section.
Switching off the system
F Press this button; its indicator
lamp comes on and all other
indicator lamps of the system
go of f.
Avoid driving for too long with the system
switched off – Risk of condensation and
deterioration of air quality!
Pressing any button reactivates the
system with the settings that were
previously in use.
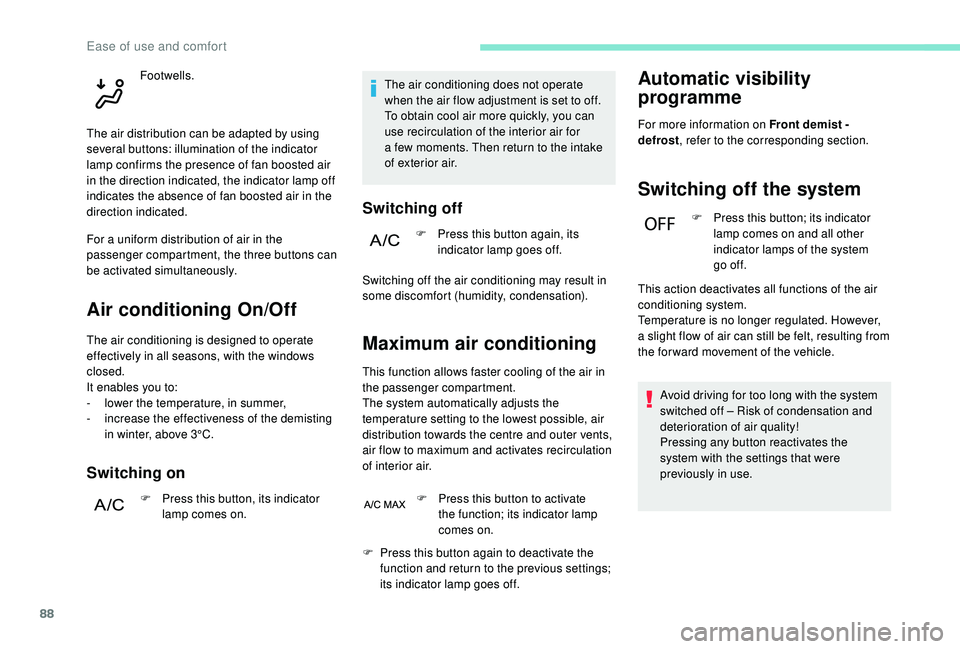
Footwells.
The air distribution can be adapted by using
several buttons: illumination of the indicator
lamp confirms the presence of fan boosted air
in the direction indicated, the indicator lamp off
indicates the absence of fan boosted air in the
direction indicated.
For a
uniform distribution of air in the
passenger compartment, the three buttons can
be activated simultaneously.
F
P
ress this button again to deactivate the
function and return to the previous settings;
its indicator lamp goes off. This action deactivates all functions of the air
conditioning system.
Temperature is no longer regulated. However,
a slight flow of air can still be felt, resulting from
the for ward movement of the vehicle.
Ease of use and comfort
Page 91 of 364

89
Automatic dual-zone air
conditioning
Press the Air conditioning menu
button to display the system controls
page. 1.
Automatic visibility programme.
2. Recirculation of interior air.
3. Temperature adjustment on the left side.
4. Temperature adjustment on the right side.
5. Air distribution adjustment.
6. Air flow adjustment.
7. System of f.
8. Air conditioning On/Off.
9. Automatic comfort programme On/Off.
10. Maximum air conditioning.
11. Access to the secondary page.
12 . Selection of settings for the automatic
comfort programme (Soft/Normal/Fast).
13. "AQS" (Air Quality System) function (with
pollution sensor).
14 . Mono-zone/Dual-zone.
15. "REAR" function (depending on version).
The air conditioning system operates with
the engine running, but the ventilation and its
controls are available with the ignition on.
Operation of the air conditioning and regulation
of temperature, air flow and air distribution in
the passenger compartment are automatic.
Temperature adjustment Automatic comfort
programme
F Press this button to activate or
deactivate the automatic mode
of the air conditioning system.
The driver and front passenger can each
choose their own temperature setting. The value indicated corresponds to a
level of
comfort and not to a precise temperature.
F
P
ress one of these buttons to
increase the value.
F
P
ress one of these buttons to
decrease the value.
It is recommended that you avoid a difference
of more than 3°C in the settings for left and
right.
When the indicator lamp in the button is on, the
air conditioning system operates automatically:
the system manages the temperature, air
flow and air distribution in the passenger
compartment in an optimum way according to
the comfort level you have selected.
It is possible to modulate the intensity of the
automatic comfort programme by choosing one
of three settings offered in the secondary page,
accessible from the " OPTIONS" button.
3
Ease of use and comfort
Page 92 of 364

90
�$�8�7�2
�)�$�6�7
�$�8�7�2
�1�2�5�0�$�/
�6�2�)�7
�$�8�7�2
To change the current setting, shown by
illumination of the corresponding indicator
lamp, press this button repeatedly until the
desired setting is displayed:"Normal ": offers the best
compromise between
a
comfortable temperature and
quiet operation (default setting).
" Fast ": provides strong and
effective air flow.
Use the " Normal" or "Fast" setting to assure
the comfort of passengers in the rear seats.
This setting is associated with automatic mode
only. However, on deactivation of AUTO mode,
the indicator for the last setting remains on.
Changing the setting does not reactivate AUTO
mode if deactivated. In cold weather with the engine cold, the
air flow is increased gradually until the
comfort setting has been reached, in order
to limit the delivery of cold air into the
passenger compartment.
On entering the vehicle, if the interior
temperature is much colder or warmer
than the comfort setting requested, there
is no need to alter the value displayed
in order to reach more quickly the
required level of comfort. The system
compensates automatically and corrects
the temperature difference as quickly as
possible.
Automatic visibility
programme
For more information on Front demist –
defrost
, refer to the corresponding section.
"Air Quality System " (AQS)
function
Using a pollution sensor, this function
a utomatically activates recirculation of the
interior air once it detects a
certain level of
polluting substances in the exterior air.
When the air quality returns to a
satisfactory
level, recirculation of interior air is automatically
deactivated. To activate or deactivate the function, go to the
secondary page by pressing the "
OPTIONS"
button.
Manual control
You can manually adjust one or more settings,
while retaining automatic control of the other
functions:
-
a
ir flow,
-
a
ir distribution.
As soon as you modify a
setting, the indicator
lamp in the " AUTO" button goes off.
F
P
ress this button again to
reactivate the automatic comfort
programme.
"
Soft ": provides soft and quiet
operation by limiting air flow. This function is not designed to detect
unpleasant odours.
Recirculation is automatically activated when
the front screenwash is used or when reverse
gear is engaged.
The function does not operate if the exterior
temperature is below 5°C, to avoid the risk of
misting of the windscreen and side windows.
Ease of use and comfort
Page 94 of 364
92
"REAR " function.
Ventilation with the ignition on
When the ignition is switched on, you can
use the ventilation system to adjust the air
flow settings and the air distribution in the
passenger compartment depending on the
battery charge.
This function does not operate the air
conditioning.
System switch-off
F Press this button.
Its indicator lamp comes on and all
other indicator lamps for the system
go of f.
This action deactivates all functions
of the air conditioning system.
By reducing the air flow to a
minimum, you are Avoid driving for too long with the
ventilation off or the system deactivated –
Risk of misting and deterioration of the air
quality!
Pressing any button reactivates the
system with the settings that were
previously in use.
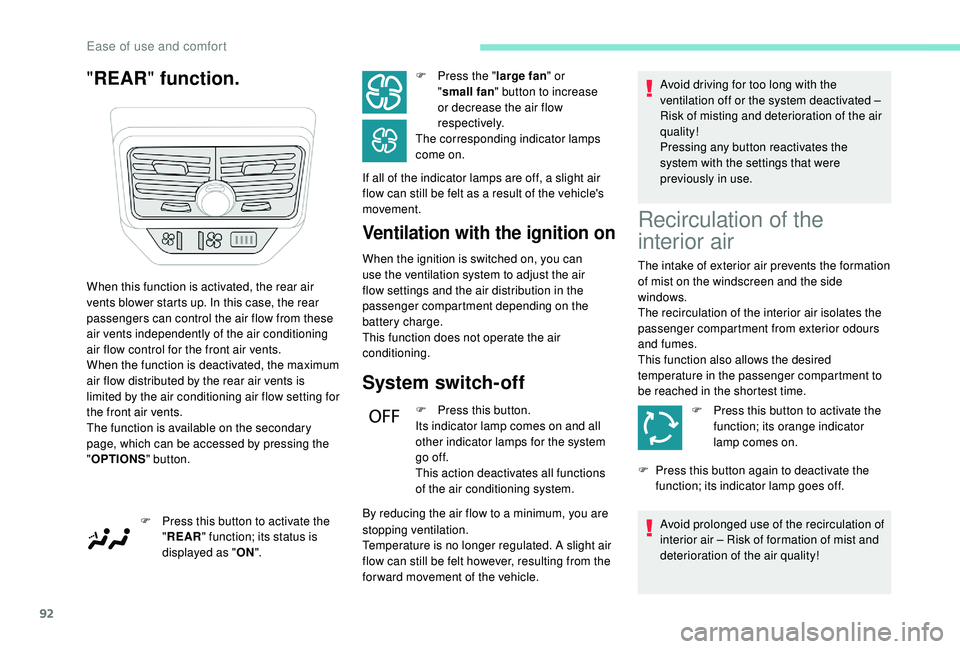
When this function is activated, the rear air
vents blower starts up. In this case, the rear
passengers can control the air flow from these
air vents independently of the air conditioning
air flow control for the front air vents.
When the function is deactivated, the maximum
air flow distributed by the rear air vents is
limited by the air conditioning air flow setting for
the front air vents.
The function is available on the secondary
page, which can be accessed by pressing the
" OPTIONS " button.
F
P
ress this button to activate the
" REAR " function; its status is
displayed as " ON". F
P
ress the "
large fan " or
" small fan " button to increase
or decrease the air flow
respectively.
The corresponding indicator lamps
come on.
If all of the indicator lamps are off, a slight air
flow can still be felt as a result of the vehicle's
movement.
stopping ventilation.
Temperature is no longer regulated. A slight air
flow can still be felt however, resulting from the
for ward movement of the vehicle.
Recirculation of the
interior air
The intake of exterior air prevents the formation
of mist on the windscreen and the side
windows.
The recirculation of the interior air isolates the
passenger compartment from exterior odours
and fumes.
This function also allows the desired
temperature in the passenger compartment to
be reached in the shortest time.
F
P
ress this button to activate the
function; its orange indicator
lamp comes on.
F
P
ress this button again to deactivate the
function; its indicator lamp goes off.
Avoid prolonged use of the recirculation of
interior air – Risk of formation of mist and
deterioration of the air quality!
Ease of use and comfort