2018 PEUGEOT 5008 engine
[x] Cancel search: enginePage 241 of 364
239
If any AdBlue® is splashed, or if there are
any spillages on the side of the bodywork,
rinse immediately with cold water or wipe
with a
damp cloth.
If the fluid has crystallised, clean it off
using a
sponge and hot water.
Important: in the event of a
top-up after
a
breakdown because of a lack of
AdBlue, you must wait around 5
minutes
before switching on the ignition, without
opening the driver's door, locking the
vehicle, introducing the key into the
ignition switch, or introducing the key of
the
K
eyless Entr y and Star ting system
into the passenger compartment .
Switch on the ignition, then wait for
10
seconds before starting the engine.
F
S
witch off the ignition and remove the key
from the switch to switch off the engine.
or
F
W
ith
K
eyless Entry and Starting, press the
" START/STOP " button to switch off the
engine. F
O
btain an
AdBlue
® container. After first
checking the use-by date, read the
instructions on the label carefully before
pouring the contents of the container or
bottle into your vehicle's AdBlue tank.
Or
F
I
nsert the AdBlue
® pump nozzle and refill
the tank until the nozzle stops automatically. Important:
-
T
o avoid over flowing the AdBlue
® tank,
it is recommended:
•
T
o top up between 10
and 13
litres
using AdBlue
® containers.
Or
•
N
ot to keep on trying after the
nozzle's first automatic stop if you
are refuelling at a
filling station.
-
I
f your vehicle's AdBlue
® tank is
completely empty – which is confirmed
by the alert messages and the
impossibility of starting the engine –
you must add at least 5
litres.
After refilling
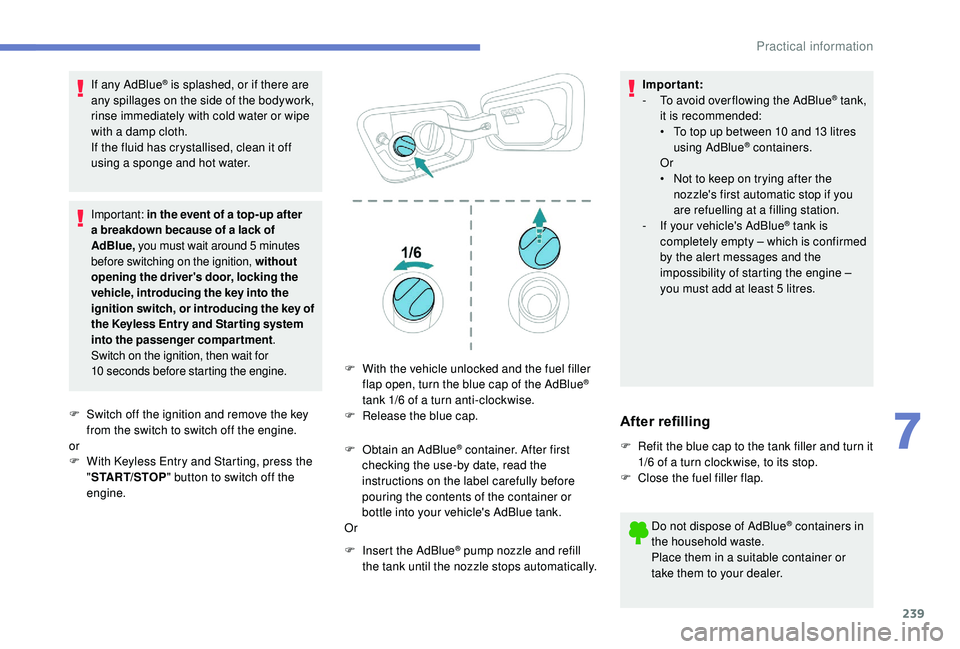
F Refit the blue cap to the tank filler and turn it 1/6 of a turn clockwise, to its stop.
F
C
lose the fuel filler flap.
Do not dispose of AdBlue
® containers in
the household waste.
Place them in a
suitable container or
take them to your dealer.
F
W
ith the vehicle unlocked and the fuel filler
flap open, turn the blue cap of the AdBlue
®
tank 1/6
of a
turn anti-clockwise.
F
R
elease the blue cap.
7
Practical information
Page 242 of 364

240
Warning triangle
As a safety precaution, before leaving your
v ehicle to set up and install the triangle, switch
on the hazard warning lamps and put on your
high visibility vest.
Storage compartment Assembling the triangle
For versions supplied with a triangle as original
e quipment:
F
r
emove the triangle from its case,
F
u
nfold the legs,
F
o
pen out the two sides of the triangle,
F
c
lip them together to complete the
assembly.
For other versions, refer to the instructions
provided with the triangle.
Positioning the triangle
F Place the triangle behind the vehicle, as required by local legislation.
There is a
compartment in the interior trim of
the tailgate to store a
triangle.
F
O
pen the tailgate.
F
R
elease the cover by turning the screw
a
quarter turn anti-clockwise.
Running out of fuel
(Diesel)
On vehicles fitted with Diesel engines, the fuel
system must be primed if you run out of fuel.
If the engine does not start first time, do not
keep trying, but start the procedure again from
the beginning. For more information on Misfuel
prevention (Diesel)
, refer to the
corresponding section.
With 1.6 BlueHDi and
2 .0 BlueHDi 150 S&S engines
F Fill the fuel tank with at least 5 litres of
Diesel.
F
S
witch on the ignition (without starting the
engine).
F
W
ait around 6 seconds and switch off the
ignition.
F
R
epeat the operation 10
times.
F
O
perate the starter to run the engine.
With 1.5 BlueHDi and
2 .0 BlueHDi 180 S&S engines
F Fill the fuel tank with at least 5 litres of
Diesel.
F
S
witch on the ignition (without starting the
engine).
F
W
ait around 1 minute and switch off the
ignition.
F
O
perate the starter to run the engine.
If the engine does not start, repeat the
procedure.
In the event of a breakdown
Page 243 of 364
241
With 2.0 HDi engines
F Fill the fuel tank with at least five litres of Diesel.
F
O
pen the bonnet.
F
I
f necessary, unclip the cover to access the
priming pump.
F
L
oosen the degassing screw.
F
U
se the priming pump until fuel appears in
the transparent tube.
F
R
etighten the degassing screw.
F
O
perate the starter until the engine starts (if
the engine does not start at the first attempt,
wait around 15
seconds before trying
again).
F
I
f the engine does not start after a few
attempts, operate the priming pump again
then start the engine.
F
P
ut it back in place, clip in the cover and
ensure it is clipped in.
F
C
lose the bonnet.
Tool kit
This is a set of tools provided with the vehicle.
I ts content depends on your vehicle's
equipment:
-
t
emporary puncture repair kit,
-
spar
e wheel.
List of tools
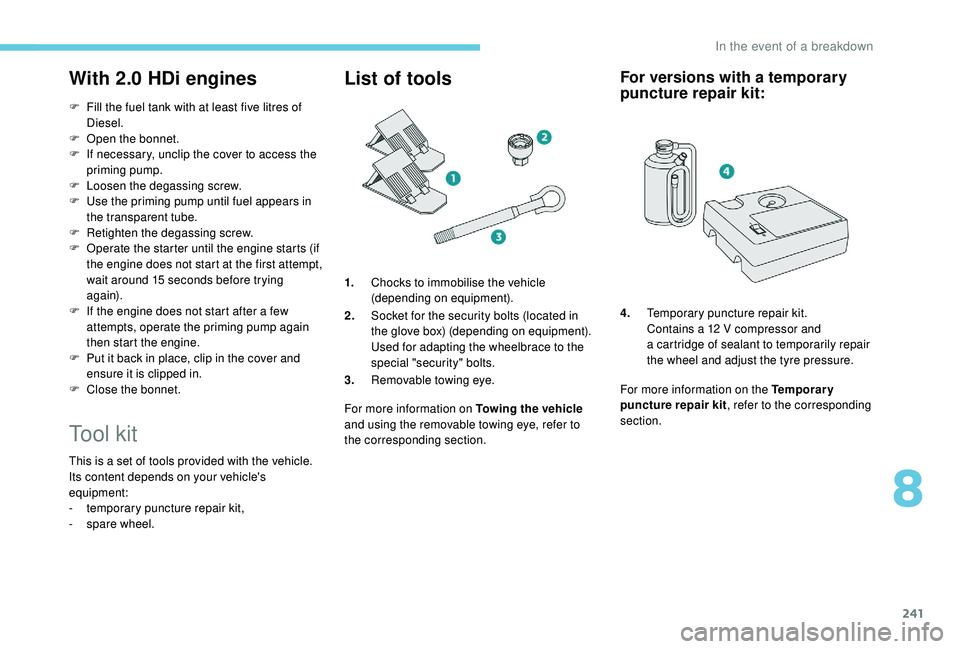
1.Chocks to immobilise the vehicle
(depending on equipment).
2. Socket for the security bolts (located in
the glove box) (depending on equipment).
Used for adapting the wheelbrace to the
special "security" bolts.
3. Removable towing eye.
For more information on Towing the vehicle
and using the removable towing eye, refer to
the corresponding section.
For versions with a temporary
p uncture repair kit:
4. Temporary puncture repair kit.
Contains a
12 V compressor and
a
cartridge of sealant to temporarily repair
the wheel and adjust the tyre pressure.
For more information on the Temporary
puncture repair kit , refer to the corresponding
section.
8
In the event of a breakdown
Page 255 of 364
253
Model with halogen headlamps
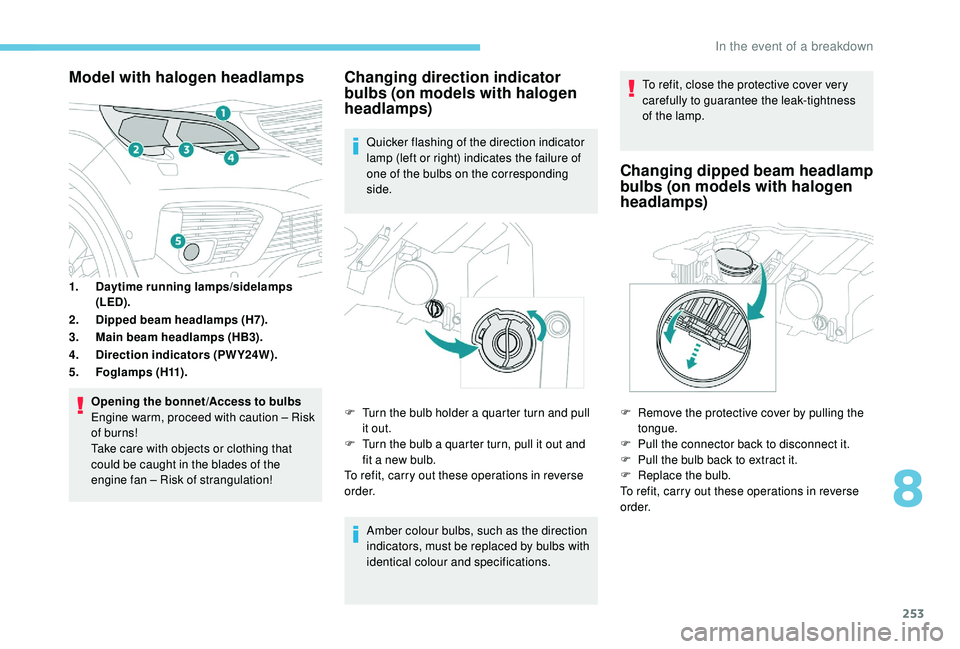
1.Daytime running lamps/sidelamps
(LED).
2. Dipped beam headlamps (H7).
3. Main beam headlamps (HB3).
4. Direction indicators (PWY24W).
5. Fo g l a m p s ( H11) .
Opening the bonnet /Access to bulbs
Engine warm, proceed with caution – Risk
of burns!
Take care with objects or clothing that
could be caught in the blades of the
engine fan – Risk of strangulation!
Changing direction indicator
bulbs (on models with halogen
headlamps)
Quicker flashing of the direction indicator
lamp (left or right) indicates the failure of
one of the bulbs on the corresponding
side.
Amber colour bulbs, such as the direction
indicators, must be replaced by bulbs with
identical colour and specifications. To refit, close the protective cover very
carefully to guarantee the leak-tightness
of the lamp.
Changing dipped beam headlamp
bulbs (on models with halogen
headlamps)
F Remove the protective cover by pulling the
tongue.
F
P
ull the connector back to disconnect it.
F
P
ull the bulb back to extract it.
F
R
eplace the bulb.
To refit, carry out these operations in reverse
o r d e r.
F
T
urn the bulb holder a
quarter turn and pull
it out.
F
T
urn the bulb a
quarter turn, pull it out and
fit a
new bulb.
To refit, carry out these operations in reverse
o r d e r.
8
In the event of a breakdown
Page 263 of 364
261
Engine compartment fuses
The fusebox is placed in the engine
compartment near the battery.
Access to the fusesVersion 1 (Full)
Fuse N°
Rating (A) Functions
F14 15
AScreenwash pump.
F15 5
APower steering.
F20 25
AScreenwash pump.
F22 15
AHorn.
F23 15
ARight-hand main beam headlamp.
F24 15
ALeft-hand main beam headlamp.
Fuse N° Rating (A) Functions
F8 30
ADiesel emissions control system (AdBlue)
F12 15
AAutomatic gearbox.
F14 5
AAutomatic gearbox.
Version 2 (Eco)
Fuse N° Rating (A) Functions
F16 25
AFront foglamps.
F18 10
ARight-hand main beam headlamp.
F19 10
ALeft-hand main beam headlamp.
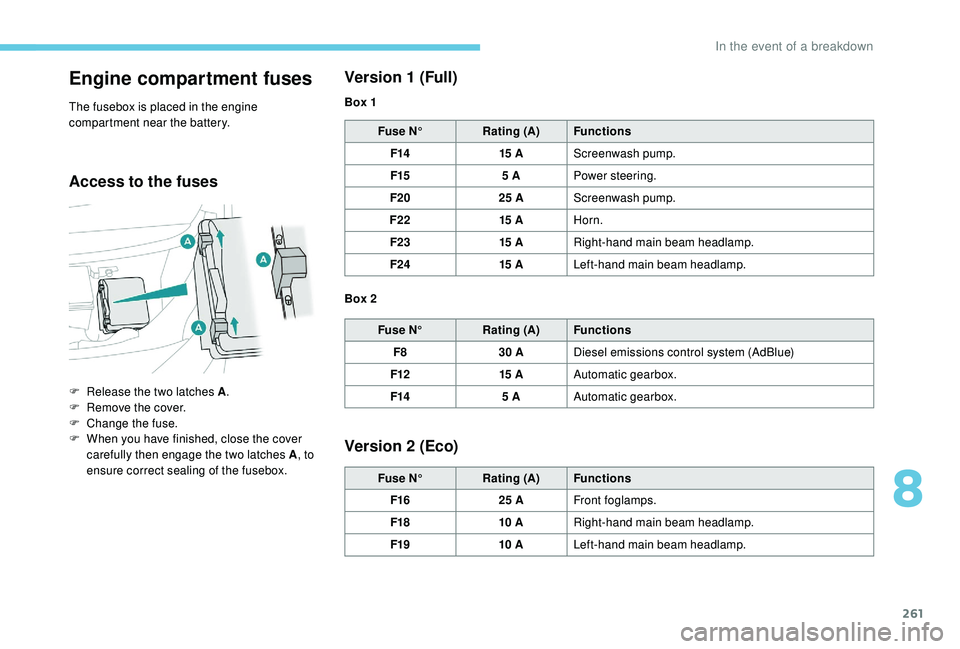
F
R
elease the two latches A
.
F
R
emove the cover.
F
C
hange the fuse.
F
W
hen you have finished, close the cover
carefully then engage the two latches A , to
ensure correct sealing of the fusebox. Box 1
Box 2
8
In the event of a breakdown
Page 264 of 364
262
12 V battery
Procedure for starting the engine using another
battery or charging a
discharged battery.
General points
Lead-acid starter batteries
Batteries contain harmful substances
such as sulphuric acid and lead.
They must be disposed of in accordance
with regulations and must not, in any
circumstances, be discarded with
household waste.
Take used remote control batteries and
vehicle batteries to a
special collection
point.
Protect your eyes and face before
handling the battery.
All operations on the battery must be
carried out in a
well ventilated area and
away from naked flames and sources of
sparks, so as to avoid the risk of explosion
or fire.
Wash your hands afterwards.
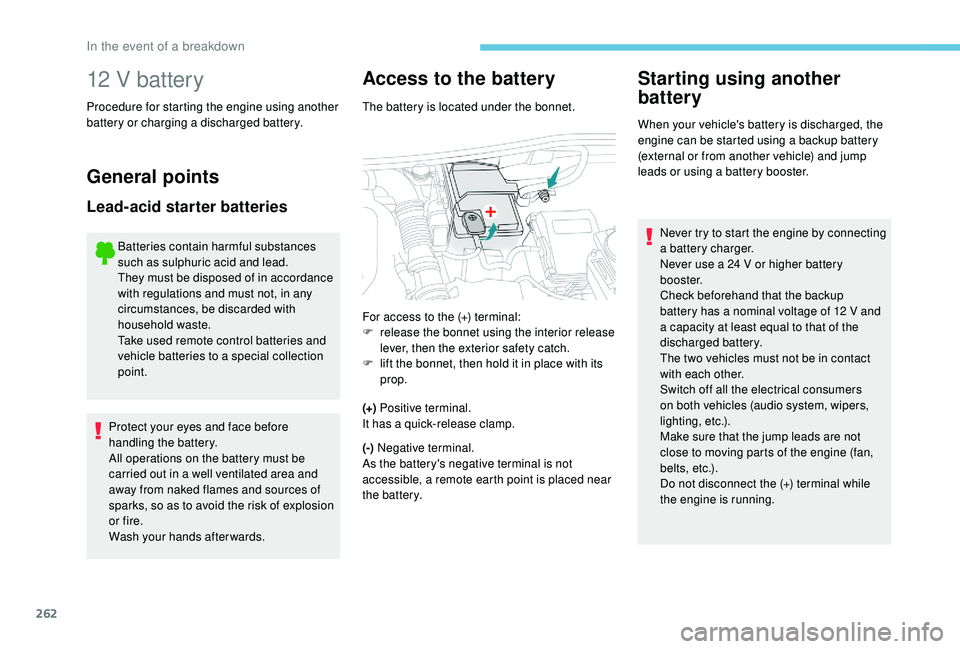
Access to the battery
The battery is located under the bonnet.
(+) Positive terminal.
It has a
quick-release clamp.
(-) Negative terminal.
As the battery's negative terminal is not
accessible, a remote earth point is placed near
the battery.
Starting using another
battery
When your vehicle's battery is discharged, the
engine can be started using a backup battery
(external or from another vehicle) and jump
leads or using a
battery booster.
For access to the (+) terminal:
F
r
elease the bonnet using the interior release
lever, then the exterior safety catch.
F
l
ift the bonnet, then hold it in place with its
prop. Never try to start the engine by connecting
a
battery charger.
Never use a
24 V or higher battery
b o o s t e r.
Check beforehand that the backup
battery has a
nominal voltage of 12 V and
a
capacity at least equal to that of the
discharged battery.
The two vehicles must not be in contact
with each other.
Switch off all the electrical consumers
on both vehicles (audio system, wipers,
lighting, etc.).
Make sure that the jump leads are not
close to moving parts of the engine (fan,
belts, etc.).
Do not disconnect the (+) terminal while
the engine is running.
In the event of a breakdown
Page 265 of 364
263
F Start the engine of the vehicle with the good battery and leave it running for a few
minutes.
F
O
perate the starter on the broken down
vehicle and let the engine run.
If the engine does not start straight away,
switch off the ignition and wait a
few moments
before trying again. F
W
ait for it to return to idle.
F
D
isconnect the jump lead cables in reverse
o r d e r.
F
R
efit the plastic cover to the (+) terminal, if
your vehicle has one.
F
A
llow the engine to run for at least
30 minutes, by driving or with the vehicle
stationary, so that the battery reaches an
adequate state of charge.
If your vehicle has an automatic gearbox,
do not try to start the engine by pushing
the vehicle.
Charging the battery using
a battery charger
For optimum ser vice life of the battery, it is
essential to maintain an adequate state of
charge.
In some circumstances it may be necessary to
charge the battery:
-
i
f you only use your vehicle for short
journeys,
-
i
f the vehicle is to be taken off the road for
several weeks.
Contact a
PEUGEOT dealer or a qualified
workshop.
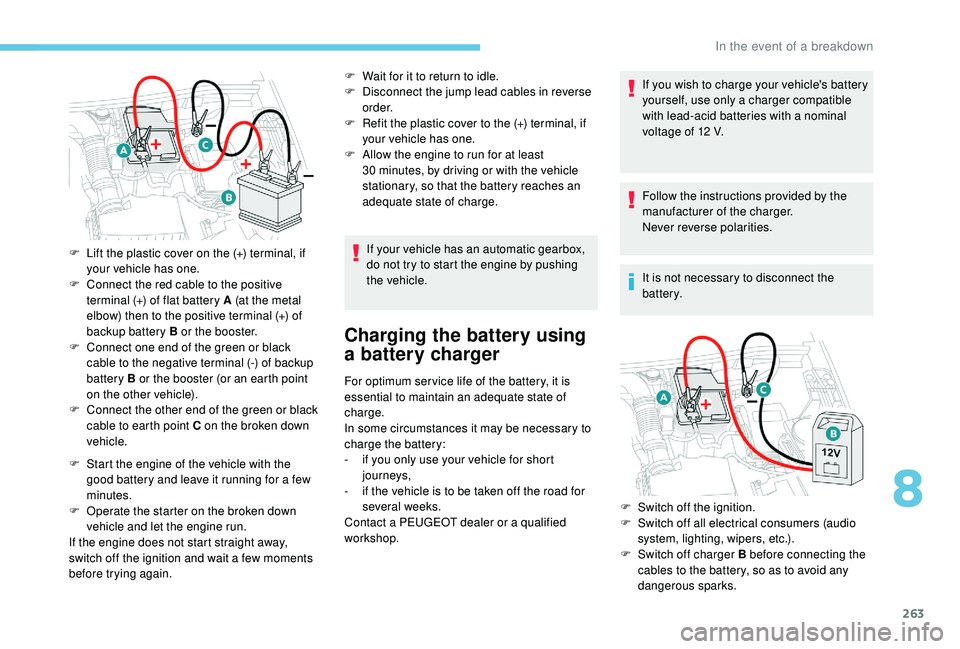
F
L
ift the plastic cover on the (+) terminal, if
your vehicle has one.
F
C
onnect the red cable to the positive
terminal (+) of flat battery A (at the metal
elbow) then to the positive terminal (+) of
backup battery B or the booster.
F
C
onnect one end of the green or black
cable to the negative terminal (-) of backup
battery B or the booster (or an earth point
on the other vehicle).
F
C
onnect the other end of the green or black
cable to earth point C on the broken down
vehicle. If you wish to charge your vehicle's battery
yourself, use only a
charger compatible
with lead-acid batteries with a nominal
voltage of 12 V.
Follow the instructions provided by the
manufacturer of the charger.
Never reverse polarities.
It is not necessary to disconnect the
battery.
F
S
witch off the ignition.
F
S
witch off all electrical consumers (audio
system, lighting, wipers, etc.).
F
S
witch off charger B before connecting the
cables to the battery, so as to avoid any
dangerous sparks.
8
In the event of a breakdown
Page 266 of 364
264
Never try to charge a frozen battery – risk
o f explosion!
If the battery has frozen, have it checked
by a
PEUGEOT dealer or by a qualified
workshop who will check that the internal
components have not been damaged and
that the container has not cracked, which
would mean a
risk of toxic and corrosive
acid leaking.
F
E
nsure that the charger cables are in good
condition.
F
R
aise the plastic cover, if your vehicle has
one, on the (+) terminal.
F
C
onnect charger B cables as follows:
-
t
he positive (+) red cable to the (+)
terminal of battery A ,
-
t
he negative (-) black cable to earth point
C on the vehicle.
F
A
t the end of the charging operation, switch
off charger B before disconnecting the
cables from battery A .
If this label is present, it is essential to
use only a
12
V charger to avoid causing
irreversible damage to the electrical
components related to the Stop & Start
system. Some functions, including Stop & Start,
are not available if the battery is not
sufficiently charged.
Disconnecting the battery
In order to maintain an adequate state
of charge for starting the engine, it is
recommended that the battery be disconnected
if the vehicle is taken out of ser vice for a
long
period.
Before disconnecting the battery:
F
c
lose all openings (doors, tailgate, windows,
sunroof),
F
s
witch off all electrical consumers (audio
system, wipers, lighting, etc.),
F
s
witch off the ignition and wait for four
minutes.
At the battery, it is only necessary to
disconnect the (+) terminal.
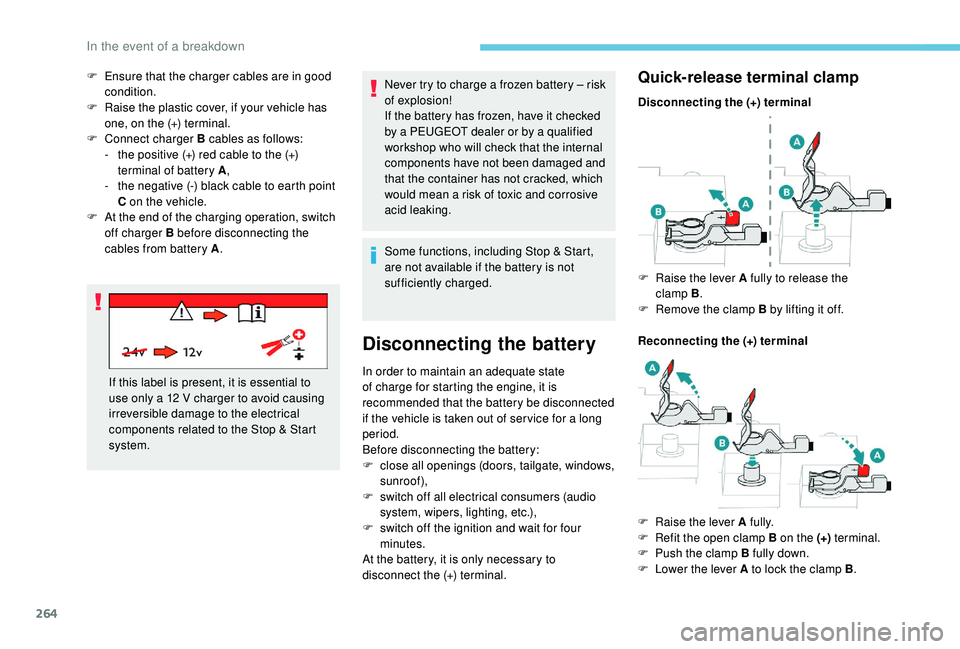
Quick-release terminal clamp
Disconnecting the (+) terminal
Reconnecting the (+) terminal F
Ra
ise the lever A fully to release the
clamp B .
F
R
emove the clamp B by lifting it off.
F
Ra
ise the lever A fully.
F
R
efit the open clamp B on the (+) terminal.
F
P
ush the clamp B fully down.
F
L
ower the lever A to lock the clamp B .
In the event of a breakdown