2018 Peugeot 308 tailgate
[x] Cancel search: tailgatePage 36 of 324
34
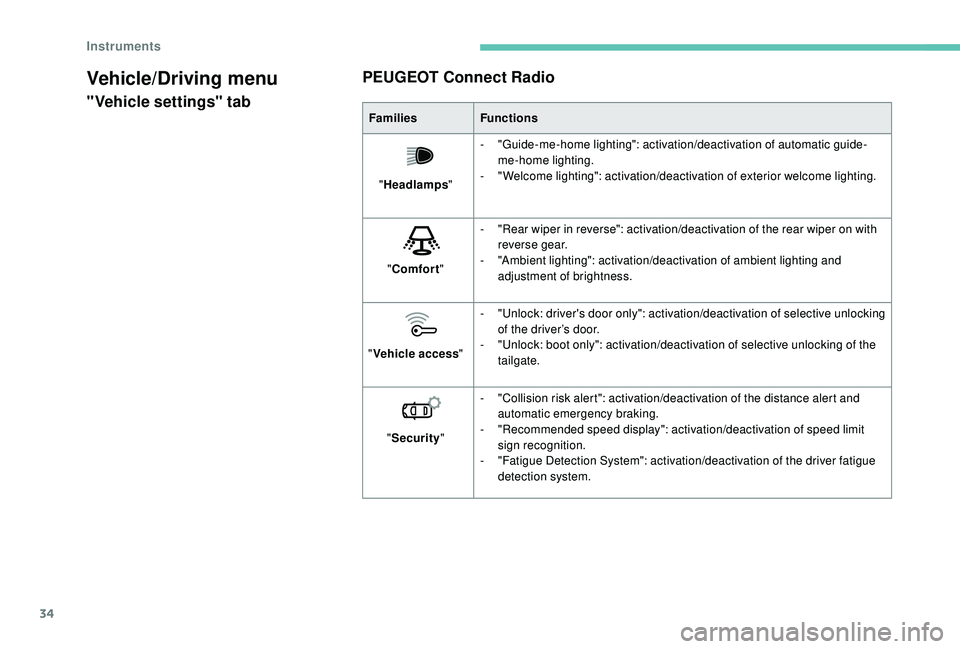
Vehicle/Driving menu
"Vehicle settings" tabPEUGEOT Connect RadioFamilies
Functions
" Headlamps "-
"
Guide-me-home lighting": activation/deactivation of automatic guide-
me-home lighting.
-
"
Welcome lighting": activation/deactivation of exterior welcome lighting.
" Comfort "-
"
Rear wiper in reverse": activation/deactivation of the rear wiper on with
reverse gear.
-
"
Ambient lighting": activation/deactivation of ambient lighting and
adjustment of brightness.
" Vehicle access "-
"
Unlock: driver's door only": activation/deactivation of selective unlocking
of the driver’s door.
-
"
Unlock: boot only": activation/deactivation of selective unlocking of the
tailgate.
" Security "-
"
Collision risk alert": activation/deactivation of the distance alert and
automatic emergency braking.
-
"
Recommended speed display": activation/deactivation of speed limit
sign recognition.
-
"
Fatigue Detection System": activation/deactivation of the driver fatigue
detection system.
Instruments
Page 37 of 324
35
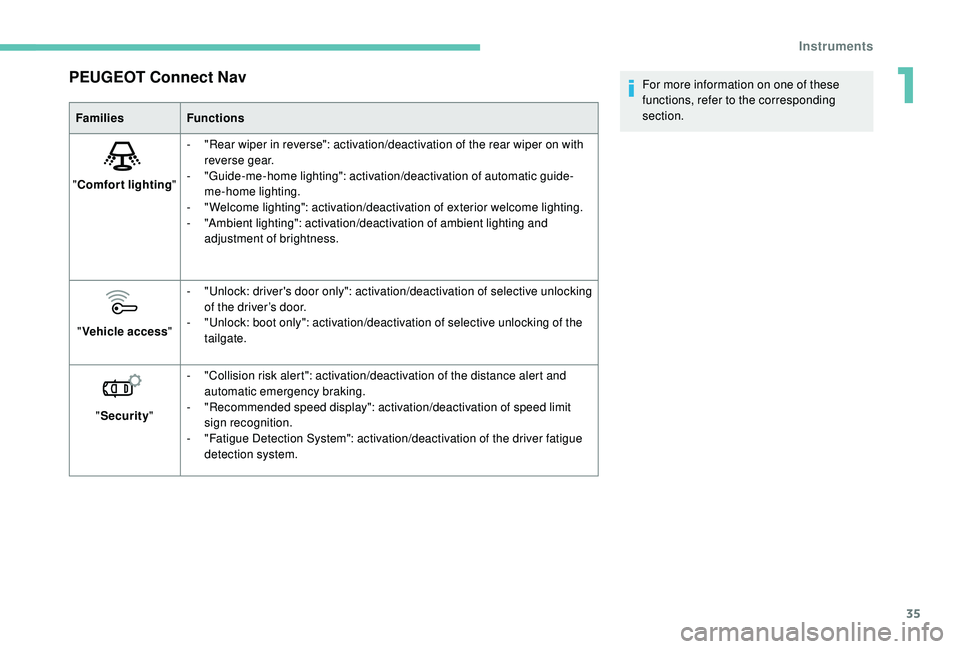
PEUGEOT Connect Nav
FamiliesFunctions
" Comfort lighting "-
"
Rear wiper in reverse": activation/deactivation of the rear wiper on with
reverse gear.
-
"
Guide-me-home lighting": activation/deactivation of automatic guide-
me-home lighting.
-
"
Welcome lighting": activation/deactivation of exterior welcome lighting.
-
"
Ambient lighting": activation/deactivation of ambient lighting and
adjustment of brightness.
" Vehicle access "-
"
Unlock: driver's door only": activation/deactivation of selective unlocking
of the driver’s door.
-
"
Unlock: boot only": activation/deactivation of selective unlocking of the
tailgate.
" Security "-
"
Collision risk alert": activation/deactivation of the distance alert and
automatic emergency braking.
-
"
Recommended speed display": activation/deactivation of speed limit
sign recognition.
-
"
Fatigue Detection System": activation/deactivation of the driver fatigue
detection system. For more information on one of these
functions, refer to the corresponding
section.
1
Instruments
Page 44 of 324
42
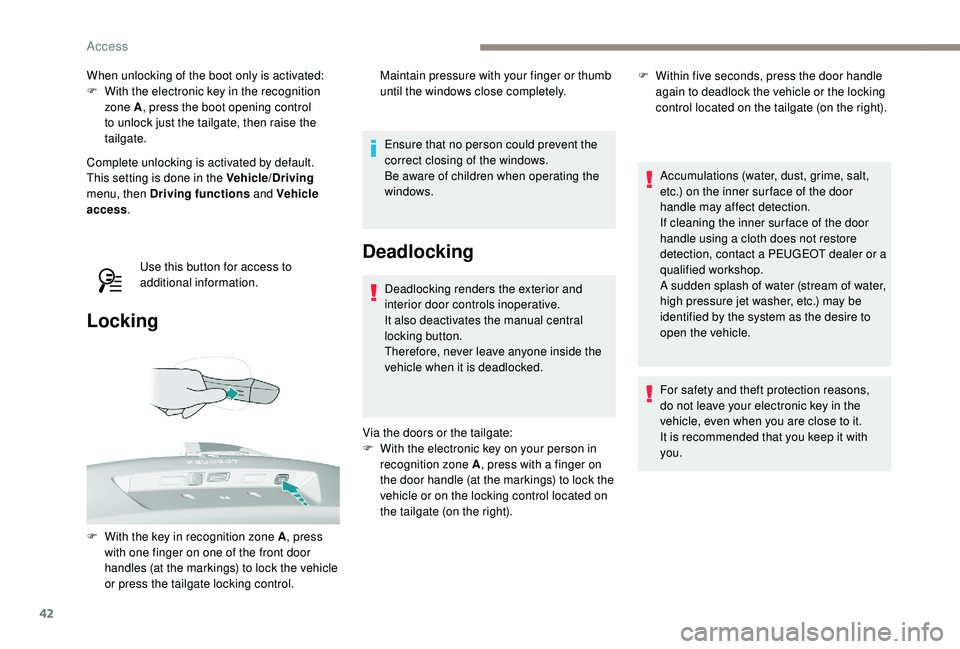
When unlocking of the boot only is activated:
F W ith the electronic key in the recognition
zone A , press the boot opening control
to unlock just the tailgate, then raise the
tailgate.
Complete unlocking is activated by default.
This setting is done in the Vehicle/Driving
menu, then Driving functions and Vehicle
access .
Use this button for access to
additional information.
Locking
Ensure that no person could prevent the
correct closing of the windows.
Be aware of children when operating the
windows.
Deadlocking
Deadlocking renders the exterior and
interior door controls inoperative.
It also deactivates the manual central
locking button.
Therefore, never leave anyone inside the
vehicle when it is deadlocked.
Via the doors or the tailgate:
F
W
ith the electronic key on your person in
recognition zone A , press with a finger on
the door handle (at the markings) to lock the
vehicle or on the locking control located on
the tailgate (on the right). Accumulations (water, dust, grime, salt,
etc.) on the inner sur face of the door
handle may affect detection.
If cleaning the inner sur face of the door
handle using a cloth does not restore
detection, contact a PEUGEOT dealer or a
qualified workshop.
A sudden splash of water (stream of water,
high pressure jet washer, etc.) may be
identified by the system as the desire to
open the vehicle.
For safety and theft protection reasons,
do not leave your electronic key in the
vehicle, even when you are close to it.
It is recommended that you keep it with
you.
F
W
ith the key in recognition zone A , press
with one finger on one of the front door
handles (at the markings) to lock the vehicle
or press the tailgate locking control. Maintain pressure with your finger or thumb
until the windows close completely.
F
W
ithin five seconds, press the door handle
again to deadlock the vehicle or the locking
control located on the tailgate (on the right).
Access
Page 49 of 324

47
Closing
If a door or the boot is not closed
correctly with the engine running or the
vehicle moving (speed above 6 mph
(10
km/h)), a message appears for a
few seconds.
Boot
Opening
F With the vehicle unlocked or with the electronic key of the K eyless Entry and
Starting system in the recognition zone,
press the central tailgate control.
F
L
ift the tailgate.
For more information on the Remote control
or
K
eyless Entr y and Star ting , refer to the
corresponding section.
In the event of a fault or difficulties
encountered in manoeuvring the tailgate
when opening or closing it, have it
quickly checked by a PEUGEOT dealer
or a qualified workshop to stop this issue
getting worse and so as to not cause the
tailgate to drop, and serious injuries.
Closing
F Lower the tailgate using one of the interior grab handles.
If the tailgate is not closed correctly (the lock
has two positions): with the engine running or
when moving (speed above 6
mph (10 km/h),
a message appears for a few seconds.
In the event of a fault or difficulties felt in
manoeuvring the tailgate when opening
or closing it, have it quickly checked by a
PEUGEOT dealer or a qualified workshop
to stop this issue getting worse and so
as to not cause the tailgate to drop, and
serious injuries.
Back-up release
System allowing the mechanical unlocking
of the boot in the event of a battery or central
locking system malfunction.
Unlocking Locking after closing
If the fault persists after closing again, the boot
will remain locked. F
F
old the rear seats to gain access to the
lock from inside the boot.
F
I
nsert a small screwdriver into hole A of the
lock to unlock the boot.
F
M
ove the latch to the right.
Bicycle/accessory carrier
Do not fit an accessory carrier to the
tailgate.
2
Access
Page 160 of 324
158
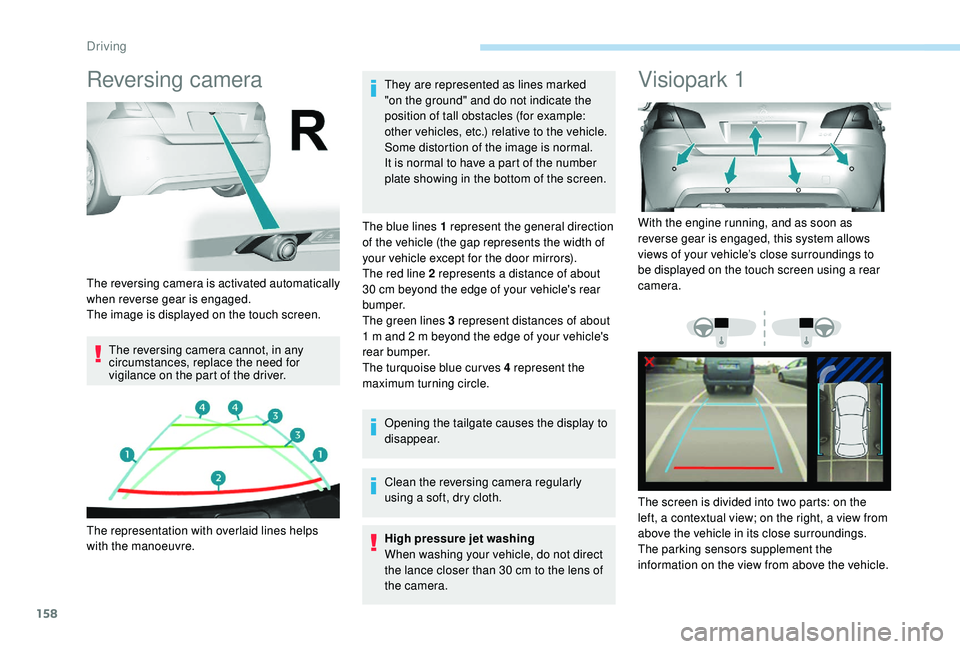
Reversing camera
The reversing camera cannot, in any
circumstances, replace the need for
vigilance on the part of the driver.They are represented as lines marked
"on the ground" and do not indicate the
position of tall obstacles (for example:
other vehicles, etc.) relative to the vehicle.
Some distortion of the image is normal.
It is normal to have a part of the number
plate showing in the bottom of the screen.
The blue lines 1 represent the general direction
of the vehicle (the gap represents the width of
your vehicle except for the door mirrors).
The red line 2 represents a distance of about
30 cm beyond the edge of your vehicle's rear
b u m p e r.
The green lines 3 represent distances of about
1 m and 2 m beyond the edge of your vehicle's
rear bumper.
The turquoise blue curves 4 represent the
maximum turning circle.
Opening the tailgate causes the display to
disappear.
Clean the reversing camera regularly
using a soft, dry cloth.
High pressure jet washing
When washing your vehicle, do not direct
the lance closer than 30
cm to the lens of
the camera.
Visiopark 1
The reversing camera is activated automatically
when reverse gear is engaged.
The image is displayed on the touch screen.
The representation with overlaid lines helps
with the manoeuvre. With the engine running, and as soon as
reverse gear is engaged, this system allows
views of your vehicle’s close surroundings to
be displayed on the touch screen using a rear
camera.
The screen is divided into two parts: on the
left, a contextual view; on the right, a view from
above the vehicle in its close surroundings.
The parking sensors supplement the
information on the view from above the vehicle.
Driving
Page 162 of 324

160
The function will be deactivated:
- I f a trailer is attached or a bicycle
carrier is fitted on a towbar (vehicle
fitted with a towbar installed in line with
the manufacturer's recommendations).
-
A
bove about 6 mph (10 km/h).
-
O
n opening the tailgate.
-
W
hen shifting out of reverse (the image
remains displayed for 7
seconds).
-
B
y pressing the red cross in the top
left-hand corner of the touch screen.
Check the cleanliness of the camera lens
regularly.
Clean the reversing camera regularly
using a soft, dry cloth.
AUTO mode
Standard view Zoom view"Zoom view".
"AUTO m o de".
This mode is activated by default.
Using sensors in the rear bumper, the
automatic view changes from a rear view
(standard) to a view from above (zoom), as an
obstacle is approached at the level of the red
line (less than 30
cm) during a manoeuvre.The blue lines 1 represent the width of your
vehicle, with the mirrors unfolded; the direction
changes depending on the position of the
steering wheel.
The red line 2 represents a distance of 30
cm
from the rear bumper; the two blue lines 3 and
4 represent 1
m and 2 m, respectively.
This view is available with AUTO mode or in the
view selection menu.
The area behind the vehicle is displayed on the
screen. The camera records the vehicle's surroundings
during the manoeuvre in order to create a
view from above the rear of the vehicle in its
near surroundings, allowing the vehicle to be
manoeuvred around obstacles nearby.
This view is available with AUTO mode or in the
view selection menu.
Driving
Page 211 of 324
209
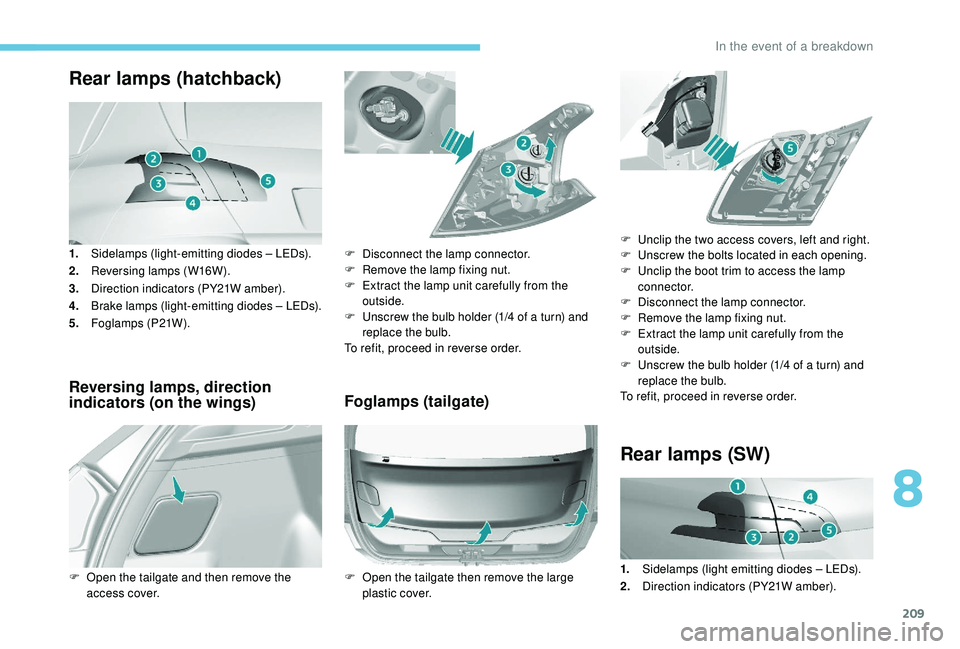
Rear lamps (hatchback)
1.Sidelamps (light-emitting diodes – LEDs).
2. Reversing lamps (W16W).
3. Direction indicators (PY21W amber).
4. Brake lamps (light-emitting diodes – LEDs).
5. Foglamps (P21W).
Reversing lamps, direction
indicators (on the wings) Foglamps (tailgate)
F Open the tailgate and then remove the
access cover. F
D
isconnect the lamp connector.
F
R
emove the lamp fixing nut.
F
E
xtract the lamp unit carefully from the
outside.
F
U
nscrew the bulb holder (1/4 of a turn) and
replace the bulb.
To refit, proceed in reverse order.
F O pen the tailgate then remove the large
plastic cover.
Rear lamps (SW)
F Unclip the two access covers, left and right.
F U nscrew the bolts located in each opening.
F
U
nclip the boot trim to access the lamp
connector.
F
D
isconnect the lamp connector.
F
R
emove the lamp fixing nut.
F
E
xtract the lamp unit carefully from the
outside.
F
U
nscrew the bulb holder (1/4 of a turn) and
replace the bulb.
To refit, proceed in reverse order.
1. Sidelamps (light emitting diodes – LEDs).
2. Direction indicators (PY21W amber).
8
In the event of a breakdown
Page 212 of 324
210
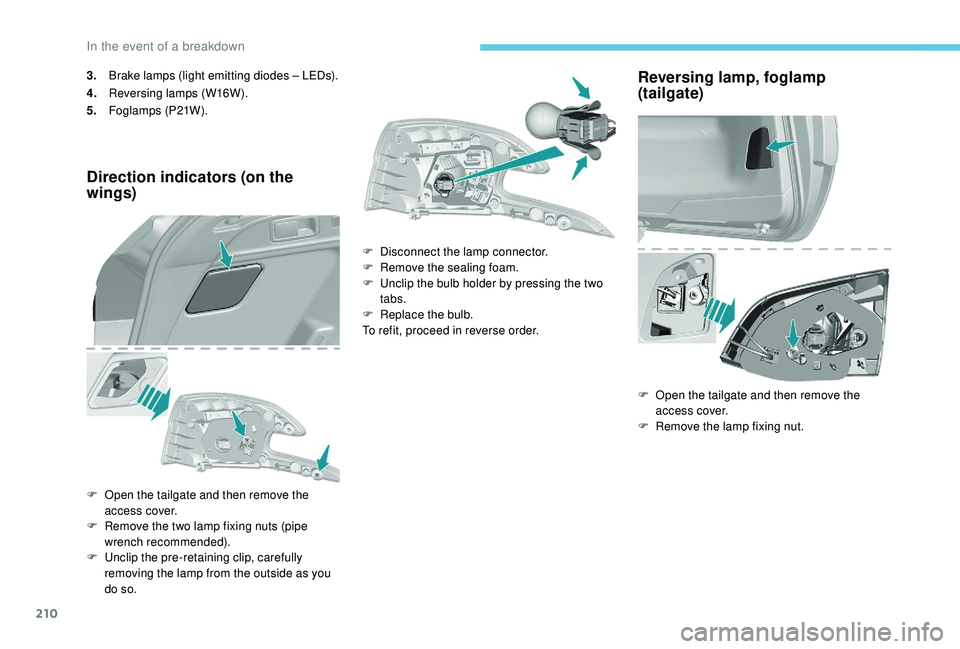
3.Brake lamps (light emitting diodes – LEDs).
4. Reversing lamps (W16W).
5. Foglamps (P21W).
Direction indicators (on the
wings)
F Open the tailgate and then remove the
access cover.
F
R
emove the two lamp fixing nuts (pipe
wrench recommended).
F
U
nclip the pre-retaining clip, carefully
removing the lamp from the outside as you
do so. F
D
isconnect the lamp connector.
F
R
emove the sealing foam.
F
U
nclip the bulb holder by pressing the two
tabs.
F
R
eplace the bulb.
To refit, proceed in reverse order.
Reversing lamp, foglamp
(tailgate)
F Open the tailgate and then remove the access cover.
F
R
emove the lamp fixing nut.
In the event of a breakdown