2018 Peugeot 308 Page 1
[x] Cancel search: Page 1Page 101 of 324
99
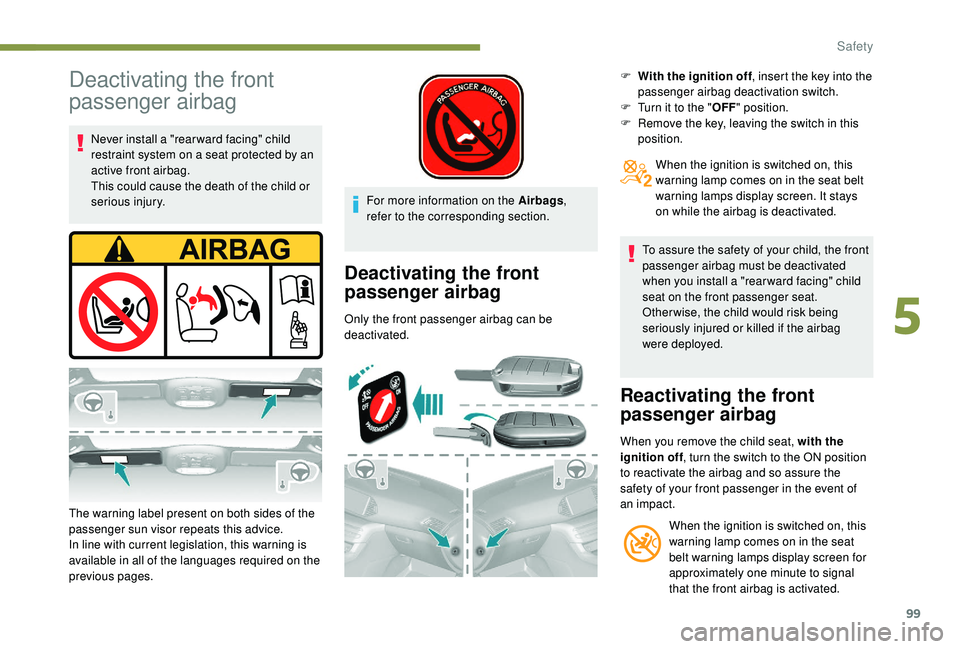
Deactivating the front
passenger airbag
Never install a "rear ward facing" child
restraint system on a seat protected by an
active front airbag.
This could cause the death of the child or
serious injury.
The warning label present on both sides of the
passenger sun visor repeats this advice.
In line with current legislation, this warning is
available in all of the languages required on the
previous pages. For more information on the Airbags
,
refer to the corresponding section.
Deactivating the front
passenger airbag
Only the front passenger airbag can be
deactivated. F
W
ith the ignition off
, insert the key into the
passenger airbag deactivation switch.
F
T
urn it to the "
OFF" position.
F
R
emove the key, leaving the switch in this
position.
When the ignition is switched on, this
warning lamp comes on in the seat belt
warning lamps display screen. It stays
on while the airbag is deactivated.
To assure the safety of your child, the front
passenger airbag must be deactivated
when you install a "rear ward facing" child
seat on the front passenger seat.
Otherwise, the child would risk being
seriously injured or killed if the airbag
were deployed.
Reactivating the front
passenger airbag
When you remove the child seat, with the
ignition off , turn the switch to the ON position
to reactivate the airbag and so assure the
safety of your front passenger in the event of
an impact.
When the ignition is switched on, this
warning lamp comes on in the seat
belt warning lamps display screen for
approximately one minute to signal
that the front airbag is activated.
5
Safety
Page 196 of 324
194
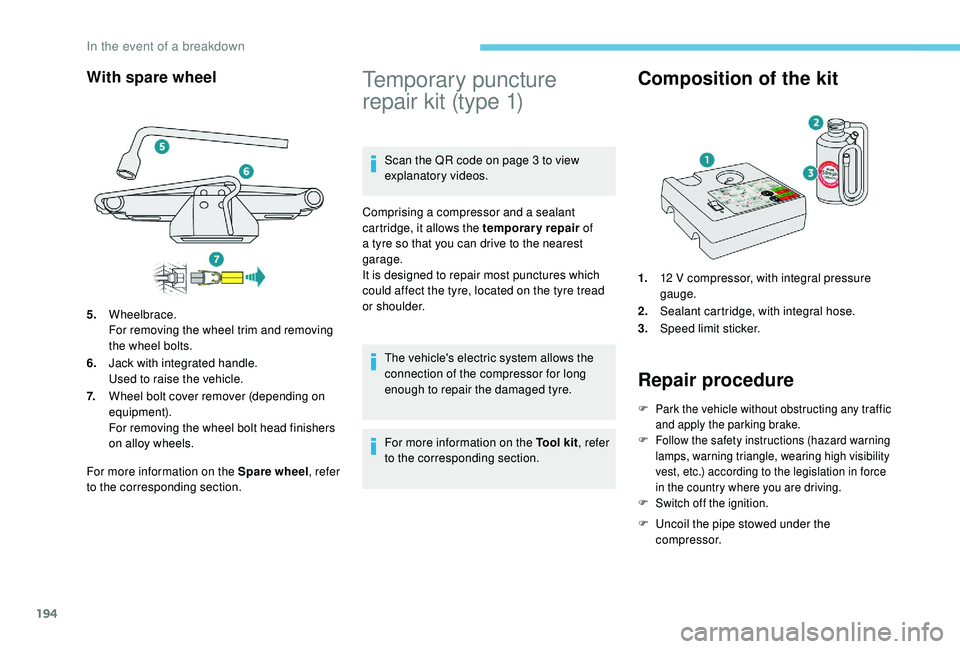
With spare wheel
For more information on the Spare wheel, refer
to the corresponding section.
Temporary puncture
repair kit (type 1)
Scan the QR code on page 3 to view
explanatory videos.
Comprising a compressor and a sealant
cartridge, it allows the temporary repair of
a tyre so that you can drive to the nearest
garage.
It is designed to repair most punctures which
could affect the tyre, located on the tyre tread
or shoulder.
The vehicle's electric system allows the
connection of the compressor for long
enough to repair the damaged tyre.
For more information on the Tool kit , refer
to the corresponding section.
Composition of the kit
1. 12 V compressor, with integral pressure
gauge.
2. Sealant cartridge, with integral hose.
3. Speed limit sticker.
Repair procedure
F Park the vehicle without obstructing any traffic
and apply the parking brake.
F
F
ollow the safety instructions (hazard warning
lamps, warning triangle, wearing high visibility
vest, etc.) according to the legislation in force
in the country where you are driving.
F
S
witch off the ignition.
F Uncoil the pipe stowed under the compressor.
5.
Wheelbrace.
For removing the wheel trim and removing
the wheel bolts.
6. Jack with integrated handle.
Used to raise the vehicle.
7. Wheel bolt cover remover (depending on
equipment).
For removing the wheel bolt head finishers
on alloy wheels.
In the event of a breakdown
Page 199 of 324
197
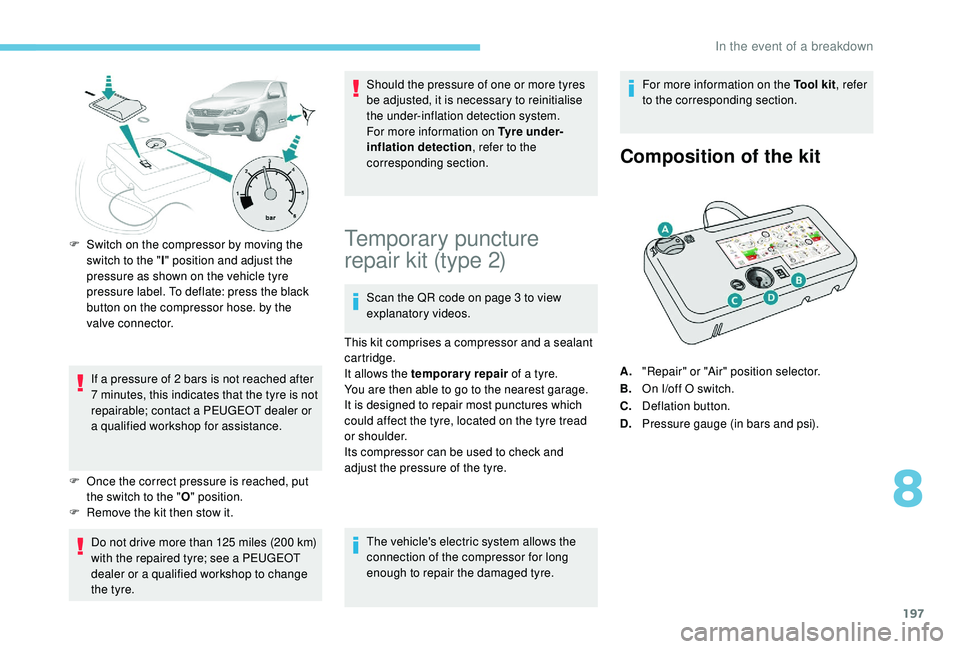
F Switch on the compressor by moving the switch to the " I" position and adjust the
pressure as shown on the vehicle tyre
pressure label. To deflate: press the black
button on the compressor hose. by the
valve connector.
If a pressure of 2
bars is not reached after
7
m
inutes, this indicates that the tyre is not
repairable; contact a PEUGEOT dealer or
a qualified workshop for assistance.
F
O
nce the correct pressure is reached, put
the switch to the " O" position.
F
R
emove the kit then stow it.
Do not drive more than 125 miles (200 km)
with the repaired tyre; see a PEUGEOT
dealer or a qualified workshop to change
the tyre. Should the pressure of one or more tyres
be adjusted, it is necessary to reinitialise
the under-inflation detection system.
For more information on Tyre under-
inflation detection
, refer to the
corresponding section.Temporary puncture
repair kit (type 2)
Scan the QR code on page 3 to view
explanatory videos.
This kit comprises a compressor and a sealant
cartridge.
It allows the temporary repair of a tyre.
You are then able to go to the nearest garage.
It is designed to repair most punctures which
could affect the tyre, located on the tyre tread
or shoulder.
Its compressor can be used to check and
adjust the pressure of the tyre.
The vehicle's electric system allows the
connection of the compressor for long
enough to repair the damaged tyre. For more information on the Tool kit
, refer
to the corresponding section.
Composition of the kit
A. "Repair" or "Air" position selector.
B. On I/off O switch.
C. Deflation button.
D. Pressure gauge (in bars and psi).
8
In the event of a breakdown
Page 203 of 324
201
F Adjust the pressure using the compressor (to inflate: switch B in position " I"; to deflate:
switch B in position " O" and press button
C ), according to the vehicle's tyre pressure
label.
If after approximately seven minutes this
pressure is not reached, this indicates
that the tyre is not repairable; contact a
PEUGEOT dealer or a qualified workshop
for assistance.
F
R
emove the kit then stow it.
Do not drive more than 125
miles (200 km)
with the repaired tyre; see a PEUGEOT
dealer or a qualified workshop to change
the tyre.
Should the pressure of one or more tyres
be adjusted, it is necessary to reinitialise
the under-inflation detection system.
For more information on Tyre under-
inflation detection , refer to the
corresponding section.Spare wheel
Scan the QR code on page 3 to view
explanatory videos.
Procedure for changing a damaged wheel with
the spare wheel using the tools provided with
the vehicle. For more information on the Tool kit , refer
to the corresponding section.
The jack must only be used to change
a wheel with a damaged or punctured tyre.
The jack does not require any
maintenance.
The jack meets European standards,
as defined in the Machinery Directive
2006/42/EC.
Wheel with wheel trim
When refitting the wheel , refit the wheel
trim, starting by placing its aperture in
line with the valve and then pushing it into
place all round its edge with the palm of
your hand. F
P
ark the vehicle without obstructing any
traffic and apply the parking brake.
F F ollow the safety instructions (hazard
warning lamps, warning triangle, wearing
high visibility vest, etc.) according to the
legislation in force in the country where you
are driving.
F
S
witch off the ignition.
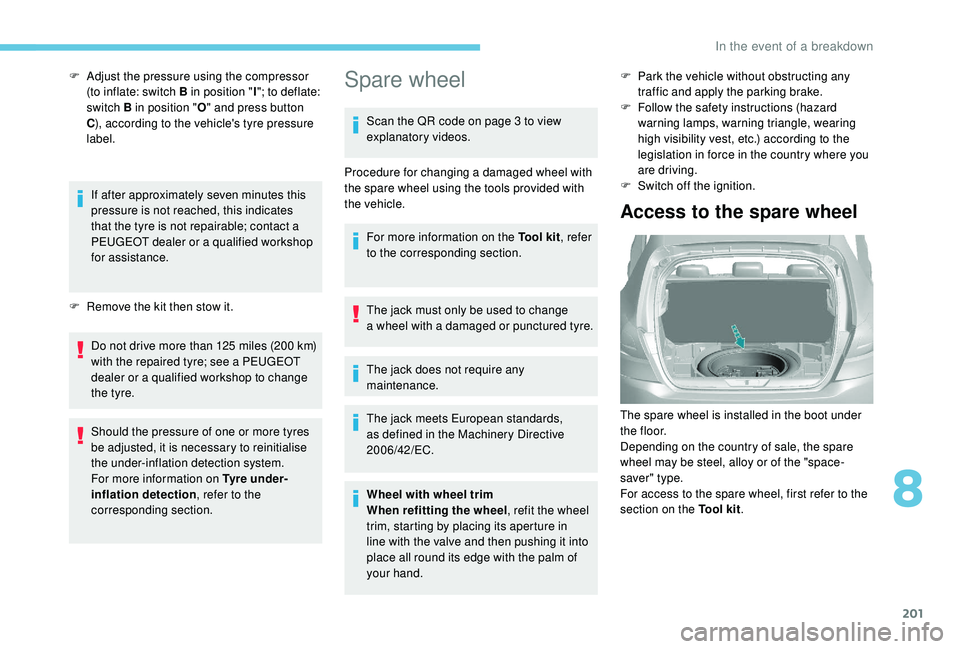
Access to the spare wheel
The spare wheel is installed in the boot under
t h e f l o o r.
Depending on the country of sale, the spare
wheel may be steel, alloy or of the "space-
saver" type.
For access to the spare wheel, first refer to the
section on the Tool kit.
8
In the event of a breakdown
Page 257 of 324
5
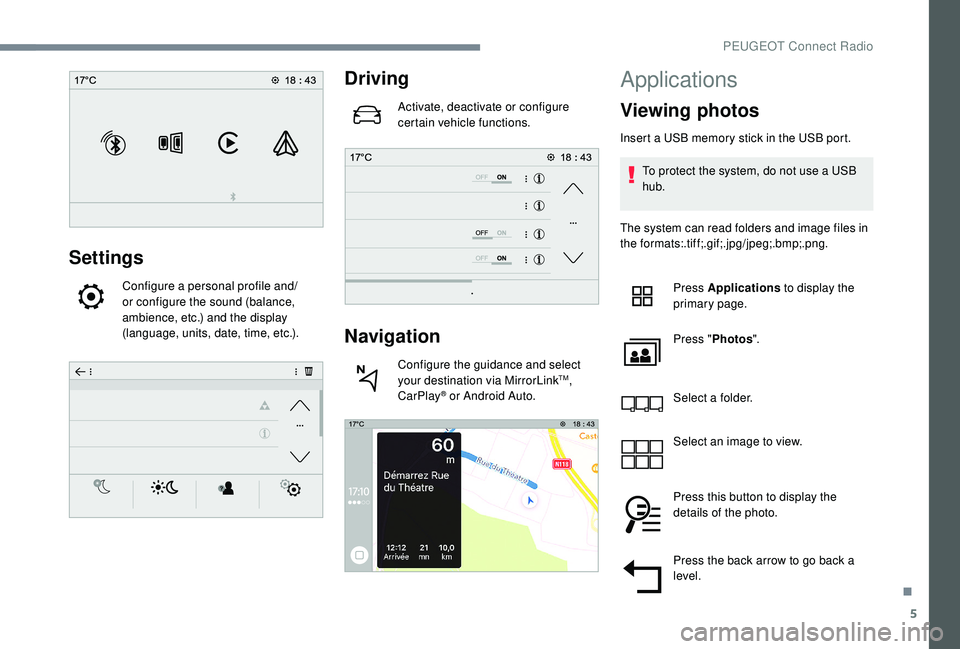
Settings
Configure a personal profile and/
or configure the sound (balance,
ambience, etc.) and the display
(language, units, date, time, etc.).
Driving
Activate, deactivate or configure
certain vehicle functions.
Navigation
Configure the guidance and select
your destination via MirrorLinkTM,
CarPlay® or Android Auto.
Applications
Viewing photos
Insert a USB memory stick in the USB port.
To protect the system, do not use a USB
hub.
The system can read folders and image files in
the formats:.tif f;.gif;.jpg/jpeg;.bmp;.png.
Press Applications to display the
primary page.
Press " Photos ".
Select a folder.
Select an image to view.
Press this button to display the
details of the photo.
Press the back arrow to go back a
level.
.
PEUGEOT Connect Radio
Page 258 of 324
6
Managing messages
Press Applications to display the
primary page.
Press "SMS".
Select the "SMS" tab.
Press this button to select the
display settings for messages.
Press this button to search for a
contact.
Select the "Quick messages" tab.
Press this button to select the
display settings for messages.
Radio
Selecting a station
Press Radio Media to display the
primary page. Press one of the buttons for an
automatic search for radio stations.
Or Move the cursor for a manual search
for frequencies up or down.
Or Press the frequency.
Enter the FM and AM waveband
values using the virtual keypad.
Press "OK" to confirm.
Radio reception may be affected by the
use of electrical equipment not approved
by the Brand, such as a USB charger
connected to the 12 V socket.
The external environment (hills, buildings,
tunnels, basement car parks, etc.) may
block reception, including in RDS mode.
This is a normal effect of the way in
which radio waves are transmitted and
does not indicate any failure of the audio
equipment.
Changing waveband
Press Radio Media to display the
primary page.
Press the " OPTIONS" button to go to the
secondary page.
Press "Band" to change waveband.
Press in the grey zone to confirm.
Presetting a station
Select a radio station or frequency. Make a short press on the star
outline. If the star is filled in, the
radio station is already preset.
Or
Select a radio station or frequency.
Press " Preset".
Make a long press on one of the
buttons to preset the station.
PEUGEOT Connect Radio
Page 259 of 324
7
Activating/Deactivating RDS
Press Radio Media to display the
primary page.
Press the " OPTIONS" button to go to the
secondary page.
Activate/Deactivate " RDS".
Press in the grey area to confirm.
The RDS, if activated, enables you to continue
listening to the same station by automatically
retuning to alternative frequencies. However,
in certain conditions, coverage of this RDS
station may not be assured throughout the
entire country as radio stations do not cover
100% of the territory. This explains the loss of
reception of the station during a journey.
Display text information
The "Radio Text" function allows
information transmitted by the radio
station and related to the station or the
song playing to be displayed. Press Radio Media
to display the
primary page.
Press the " OPTIONS" button to go to the
secondary page.
Activate/Deactivate " News"/" Info ".
Press in the grey zone to confirm.
Play TA messages
The TA (Traffic Announcement) function
gives priority to TA alert messages.
To operate, this function needs good
reception of a radio station that carries
this type of message. While traffic
information is being broadcast, the current
media is automatically interrupted so that
the TA message can be heard. Normal
play of the media previously playing is
resumed at the end of the message.
Press Radio Media to display the
primary page.
Press the " OPTIONS" button to go to the
secondary page. Activate/Deactivate "
TA".
Press in the grey zone to confirm.
Audio settings
Press Radio Media to display the
primary page.
Press the " OPTIONS" button to go to the
secondary page.
Press "Audio settings ".
Select the " To n e" or "Balance "
or " Ringtones " or "Sound " tab to
configure the audio settings.
Press the back arrow to confirm.
.
PEUGEOT Connect Radio
Page 260 of 324
8
In the "To n e" tab, the Ambience audio
settings, as well as Bass , Medium and
Tr e b l e are different and independent for
each audio source.
In the " Balance " tab, the All passengers ,
Driver and Front only settings are
common to all sources.
In the " Sound" tab, activate or deactivate
" Volume linked to speed ", "Auxiliary
input " and " Touch tones ".
The balance/distribution (or spatialisation
with the Arkamys
© system) is audio
processing that allows the quality of the
sound to be adapted according to the
number of passengers in the vehicle.
Onboard audio: the Arkamys
© Sound
Staging optimises the balance/distribution
of sound in the passenger compartment.
DAB (Digital Audio
Broadcasting) radio
Terrestrial Digital Radio
Digital radio provides higher quality
reception.
The different "multiplex/ensemble"
ser vices offer a choice of radio stations
arranged in alphabetical order.
Press Radio Media to display the
primary page.
Press the " OPTIONS" button to go to the
secondary page.
Press "Waveband " to select the
" DAB band ".
Press in the grey zone to confirm.
FM-DAB Tracking
"DAB" does not cover 100% of the
te r r i to r y.
When the digital radio signal is poor,
the "FM-DAB Tracking" allows you to
continue listening to the same station,
by automatically switching to the
corresponding FM analogue station (if
there is one). Press Radio Media to display the
primary page.
Press the " OPTIONS" button to go to the
secondary page.
Activate/Deactivate " FM- DAB
Tracking ".
Press in the grey zone to confirm.
If "FM-DAB Tracking" is activated, there
is a difference of a few seconds when the
system switches to FM analogue radio
with sometimes a variation in volume.
When the digital signal quality becomes
good, the system automatically switches
back to "DAB".
PEUGEOT Connect Radio