2018 PEUGEOT 108 weight
[x] Cancel search: weightPage 34 of 180
32
Front seats
For safety reasons, only adjust seats
when the vehicle is stationary.
Before moving the seat backwards,
ensure that there is nothing that might
prevent the full travel of the seat.
There is a risk of trapping or pinching
passengers if present in the rear seats
or jamming the seat if large objects are
placed on the floor behind the seat.
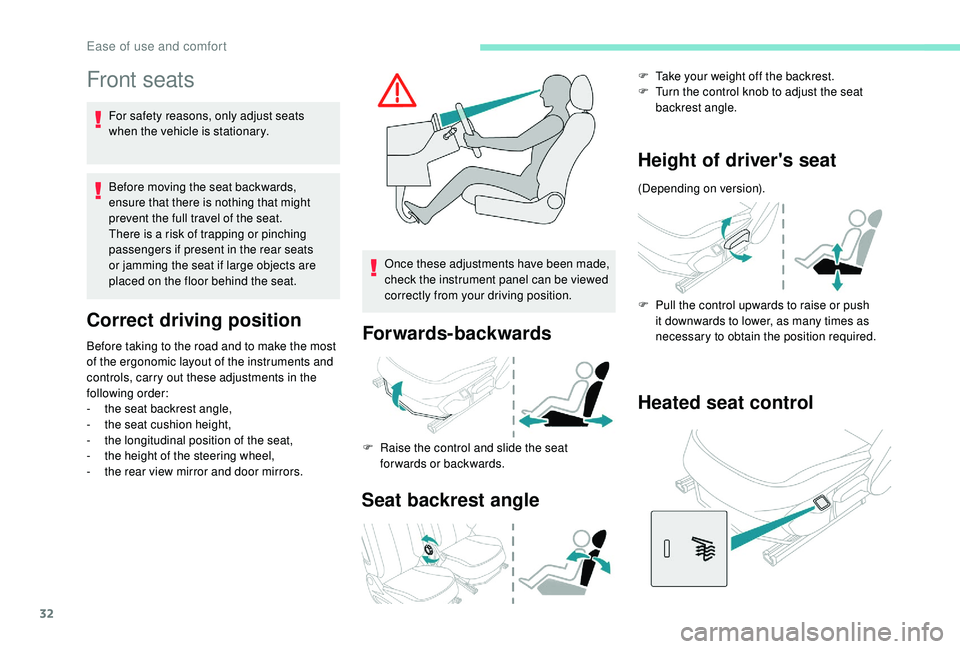
Correct driving position
Before taking to the road and to make the most
of the ergonomic layout of the instruments and
controls, carry out these adjustments in the
following order:
-
t
he seat backrest angle,
-
t
he seat cushion height,
-
t
he longitudinal position of the seat,
-
t
he height of the steering wheel,
-
t
he rear view mirror and door mirrors. Once these adjustments have been made,
check the instrument panel can be viewed
correctly from your driving position.Forwards-backwards
F Raise the control and slide the seat
forwards or backwards.
Seat backrest angle
F Take your weight off the backrest.
F T urn the control knob to adjust the seat
backrest angle.
Height of driver's seat
(Depending on version).
F
P
ull the control upwards to raise or push
it downwards to lower, as many times as
necessary to obtain the position required.
Heated seat control
Ease of use and comfort
Page 47 of 180
45
Do not place heavy objects on the shelf,
this may cause it to become unclipped.
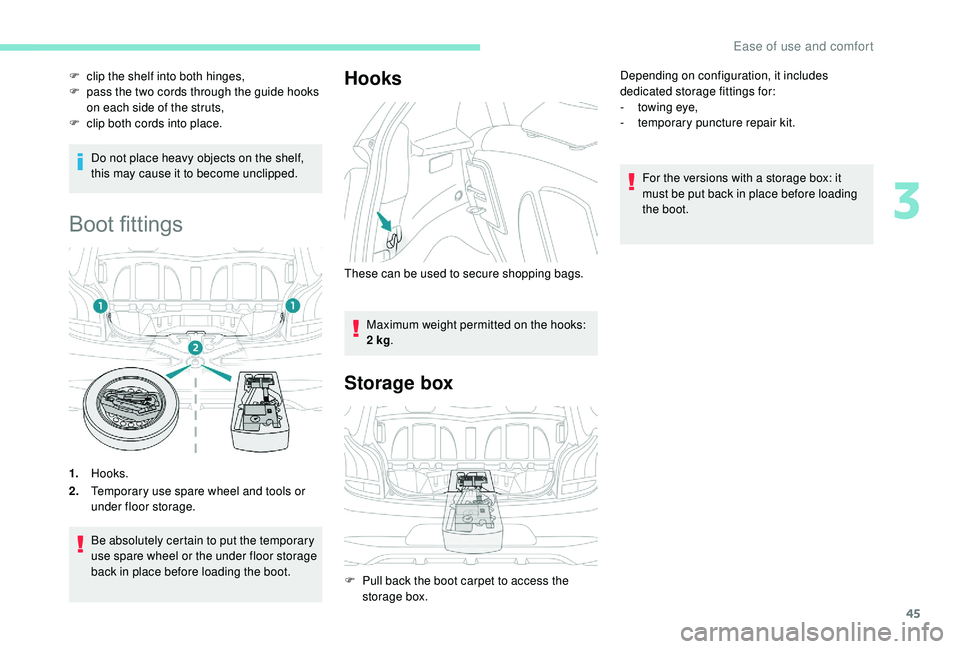
Boot fittings
1.Hooks.
2. Temporary use spare wheel and tools or
under floor storage.
Be absolutely certain to put the temporary
use spare wheel or the under floor storage
back in place before loading the boot.
Hooks
Maximum weight permitted on the hooks:
2
kg .
Storage box
Depending on configuration, it includes
dedicated storage fittings for:
-
t
owing eye,
-
t
emporary puncture repair kit.
For the versions with a
storage box: it
must be put back in place before loading
the boot.
F
c
lip the shelf into both hinges,
F
p
ass the two cords through the guide hooks
on each side of the struts,
F
c
lip both cords into place.
These can be used to secure shopping bags.
F
P
ull back the boot carpet to access the
storage box.
3
Ease of use and comfort
Page 61 of 180

59
Front airbags
Do not drive holding the steering wheel
by its spokes or resting your hands on the
centre part of the wheel.
Passengers must not place their feet on
the dashboard.
Do not smoke as deployment of the
airbags can cause burns or the risk of
injury from a cigarette or pipe.
Never remove or pierce the steering wheel
or hit it violently.
Do not fit or attach anything to the steering
wheel or dashboard, this could cause
injuries with deployment of the airbags.
Curtain airbags
Do not attach anything or hang anything to
the roof, as this could cause head injuries
when the curtain airbag is deployed.
If fitted to your vehicle, do not remove the
grab handles installed on the roof, they
play a
part in securing the curtain airbags. Lateral airbags
Use only approved covers on the seats,
compatible with the deployment of the
lateral airbags. For information on the
product range of seat covers suitable for
your vehicle, contact a
PEUGEOT dealer.
Do not attach anything to or hang anything
from the seat backrests (clothes, etc.) as
this could cause injuries to the thorax or
arm when the lateral airbag is deployed.
Do not sit with the upper part of the body
any nearer to the door than necessary.
General points relating to
child seats
The regulations on carrying children are
specific to each country. Refer to the
legislation in force in your country. -
S
tatistically, the safest seats in your
vehicle for carr ying children are the rear
seats.
-
A c
hild weighing less than 9 kg must
travel in the rear ward-facing position
both in the front and in the rear.
It is recommended that children travel on
the rear seats of your vehicle:
- "
rearward facing " up to the age of 3,
- "
forward facing " over the age of 3.
Ensure that the seat belt is positioned and
tightened correctly.
For child seats with a support leg, ensure
that the latter is in firm and steady contact
with the floor.
In the front: if necessary, adjust the
passenger seat.
At the rear: if necessary, adjust the
relevant front seat.
For maximum safety, please obser ve the
following recommendations:
-
I
n accordance with European regulations,
all children under the age of 12
or less
than one and a
half metres tall must
travel in approved child seats suited to
their weight , on seats fitted with a
seat belt
or ISOFIX mountings.
5
Safety
Page 67 of 180
65
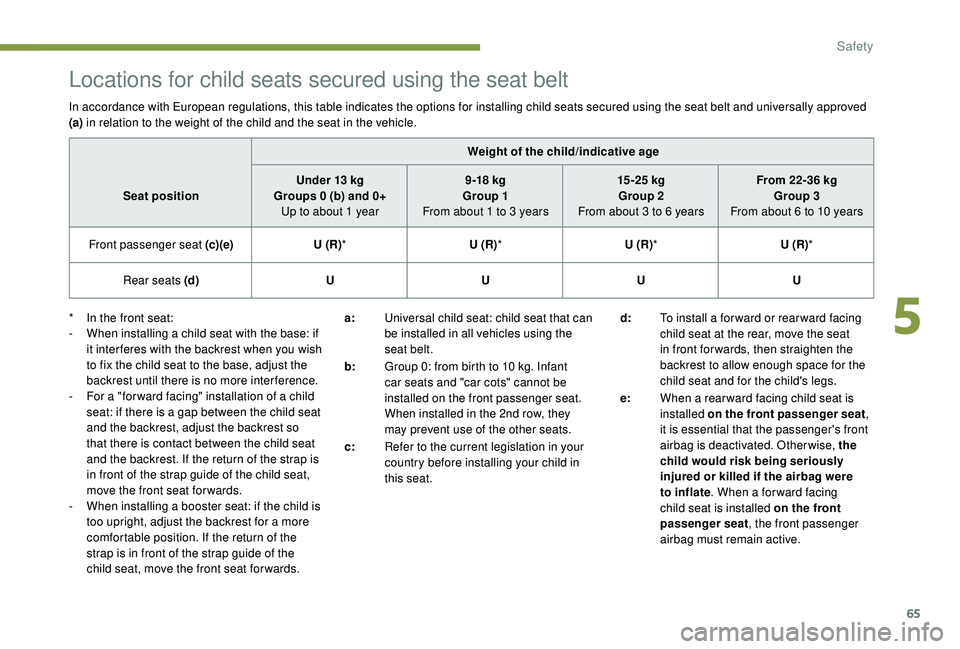
Locations for child seats secured using the seat belt
In accordance with European regulations, this table indicates the options for installing child seats secured using the seat belt and universally approved
(a) in relation to the weight of the child and the seat in the vehicle.
Weight of the child/indicative age
Seat position Under 13
kg
Groups 0 (b) and 0+ Up to about 1
year9 -18
kg
Group 1
From about 1
to 3 years15 -25
kg
Group 2
From about 3
to 6 yearsFrom 22-36
kg
Group 3
From about 6
to 10 years
Front passenger seat (c) (e)U (R)* U (R)* U (R)* U (R)*
Rear seats (d) UUUU
d: To install a
forward or rearward facing
child seat at the rear, move the seat
in front for wards, then straighten the
backrest to allow enough space for the
child seat and for the child's legs.
e: When a
rear ward facing child seat is
installed on the front passenger seat ,
it is essential that the passenger's front
airbag is deactivated. Otherwise, the
child would risk being seriously
injured or killed if the airbag were
to inflate . When a
for ward facing
child seat is installed on the front
passenger seat , the front passenger
airbag must remain active.
*
I
n the front seat:
-
W
hen installing a child seat with the base: if
it inter feres with the backrest when you wish
to fix the child seat to the base, adjust the
backrest until there is no more inter ference.
-
F
or a "for ward facing" installation of a child
seat: if there is a
gap between the child seat
and the backrest, adjust the backrest so
that there is contact between the child seat
and the backrest. If the return of the strap is
in front of the strap guide of the child seat,
move the front seat for wards.
-
W
hen installing a booster seat: if the child is
too upright, adjust the backrest for a
more
comfortable position. If the return of the
strap is in front of the strap guide of the
child seat, move the front seat for wards. a:
Universal child seat: child seat that can
be installed in all vehicles using the
seat belt.
b: Group 0: from birth to 10
kg. Infant
car seats and "car cots" cannot be
installed on the front passenger seat.
When installed in the 2nd row, they
may prevent use of the other seats.
c: Refer to the current legislation in your
country before installing your child in
this seat.
5
Safety
Page 71 of 180
69
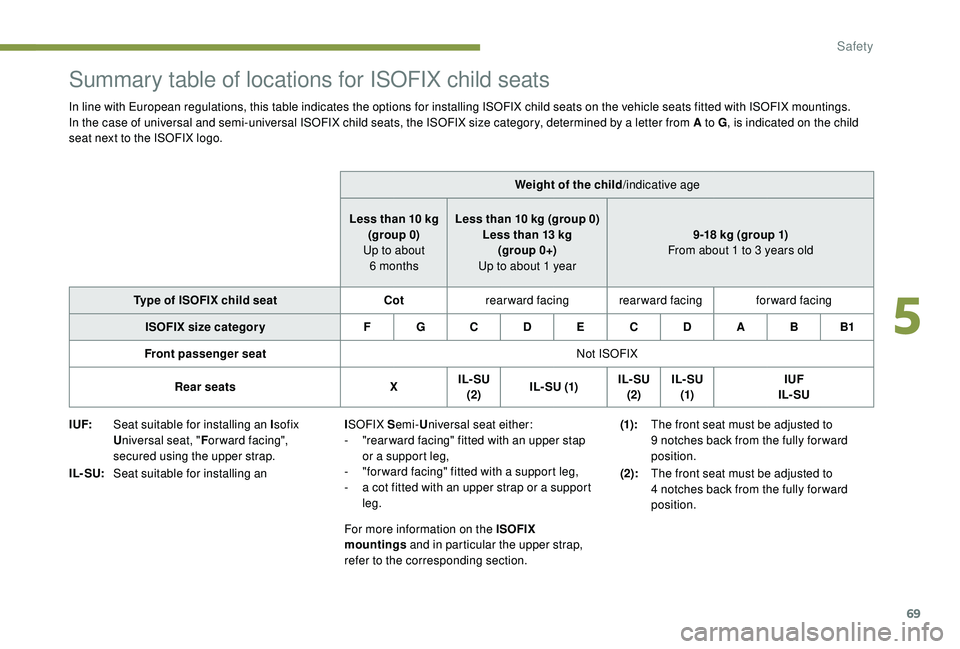
Summary table of locations for ISOFIX child seats
In line with European regulations, this table indicates the options for installing ISOFIX child seats on the vehicle seats fitted with ISOFIX mountings.
In the case of universal and semi-universal ISOFIX child seats, the ISOFIX size category, determined by a letter from A to G, is indicated on the child
seat next to the ISOFIX logo.
Weight of the child/indicative age
Less than 10
kg
(group 0)
Up to about 6
monthsLess than 10
kg (group 0)
Less than 13
kg
(group 0+)
Up to about 1
year9-18
kg (group 1)
From about 1
to 3 years old
Type of ISOFIX child seat Cotrearward facing rearward facing forward facing
ISOFIX size categor y F G C D E C D A B B1
Front passenger seat Not ISOFIX
Rear seats XIL- SU
(2) I L- SU (1) IL- SU
(2) IL- SU
(1) IUF
IL- SU
I UF: Seat suitable for installing an I sofix
U niversal seat, " For ward facing",
secured using the upper strap.
IL- SU: Seat suitable for installing an I
SOFIX S emi-Universal seat either:
-
"
rear ward facing" fitted with an upper stap
or a
support leg,
-
"
for ward facing" fitted with a support leg,
-
a c
ot fitted with an upper strap or a support
leg.
For more information on the ISOFIX
mountings and in particular the upper strap,
refer to the corresponding section. (1):
The front seat must be adjusted to
9
notches back from the fully for ward
position.
(2): The front seat must be adjusted to
4
notches back from the fully for ward
position.
5
Safety
Page 100 of 180

98
Energy economy mode
(Only for vehicles equipped with the Keyless
Entry and Starting system.)
System which manages the duration of use of
certain functions to conser ve a sufficient level
of charge in the battery.
After the engine has stopped, you can still
use functions such as the audio system,
windscreen wipers, dipped beam headlamps,
courtesy lamps, etc. for a
max. combined time
of 20
minutes.
This period may be greatly reduced if the
battery is not fully charged.
Entry into the mode
Once this time has elapsed, the active
functions are put on standby.
Exiting the mode
These functions will be automatically restored
the next time the vehicle is used.
To restore the use of these functions
immediately, start the engine and allow it run
for at least 5
minutes. Let the engine run for the duration
specified to ensure that the battery charge
is sufficient.
Do not repeatedly and continuously restart
the engine in order to charge the battery.
A flat battery prevents the engine from
starting.
For more information on the 12
V batter y
,
refer to the corresponding section.
Fitting roof bars
Maximum authorised weight on the roof
bars, with a loading height not exceeding
40
cm (except bicycle carriers): 40 kg.
If the height exceeds 40
cm, adapt the
speed of the vehicle to the profile of the
road to avoid damaging the roof bars.
Please refer to national legislation
to comply with the regulations for
transporting objects that are longer than
the vehicle.
Use the accessories recommended by
PEUGEOT to install transverse roof bars,
following the manufacturer's recommendations.
For more information, contact a
PEUGEOT
dealer or a
qualified workshop.
Bonnet
Opening
F Pull the interior release lever, located in the lower dashboard, towards you.
Practical information
Page 126 of 180
124
Failure to follow this instruction may cause
damage to some components (braking,
transmission, etc.) and the absence of
braking assistance when the engine is
restarted.
F
U
nlock the steering and release the parking
brake.
F
S
witch on the hazard warning lamps on
both vehicles.
Never use the radiator crossmember.
When towing, the speed limiter must be
deactivated, as well as the "Active City
Brake" system if so equipped. General recommendations
Obser ve the legislation in force in the
country where you are driving.
Ensure that the weight of the towing
vehicle is higher than that of the towed
vehicle.
The driver must remain at the wheel of
the towed vehicle and must have a
valid
driving licence.
When towing a
vehicle with all four
wheels on the ground, always use an
approved towing arm; rope and straps are
prohibited.
The towing vehicle must move off gently.
When the vehicle is towed with its engine
off, there is no longer braking and steering
assistance.
In the following cases, you must always
call on a
professional recovery ser vice:
-
v
ehicle broken down on a motor way or
fast road,
-
w
hen it is not possible to put the
gearbox into neutral, unlock the
steering, or release the parking brake,
-
t
owing with only two wheels on the
ground,
-
w
here there is no approved towbar
available.
F
W
ith an ETG gearbox: move the selector to
position N .
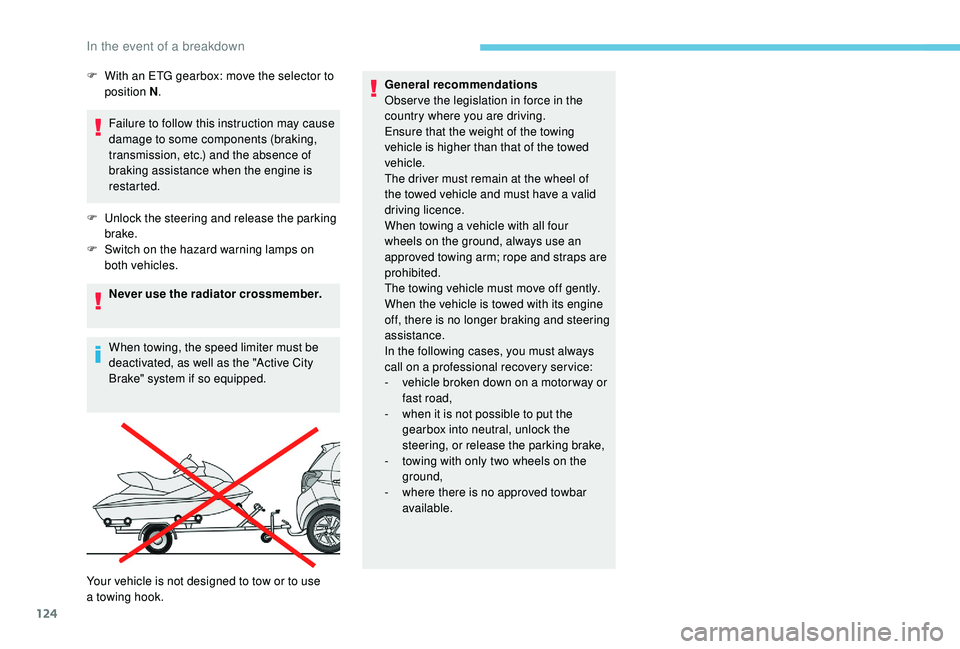
Your vehicle is not designed to tow or to use
a
towing hook.
In the event of a breakdown