2018 PEUGEOT 108 steering wheel
[x] Cancel search: steering wheelPage 61 of 180

59
Front airbags
Do not drive holding the steering wheel
by its spokes or resting your hands on the
centre part of the wheel.
Passengers must not place their feet on
the dashboard.
Do not smoke as deployment of the
airbags can cause burns or the risk of
injury from a cigarette or pipe.
Never remove or pierce the steering wheel
or hit it violently.
Do not fit or attach anything to the steering
wheel or dashboard, this could cause
injuries with deployment of the airbags.
Curtain airbags
Do not attach anything or hang anything to
the roof, as this could cause head injuries
when the curtain airbag is deployed.
If fitted to your vehicle, do not remove the
grab handles installed on the roof, they
play a
part in securing the curtain airbags. Lateral airbags
Use only approved covers on the seats,
compatible with the deployment of the
lateral airbags. For information on the
product range of seat covers suitable for
your vehicle, contact a
PEUGEOT dealer.
Do not attach anything to or hang anything
from the seat backrests (clothes, etc.) as
this could cause injuries to the thorax or
arm when the lateral airbag is deployed.
Do not sit with the upper part of the body
any nearer to the door than necessary.
General points relating to
child seats
The regulations on carrying children are
specific to each country. Refer to the
legislation in force in your country. -
S
tatistically, the safest seats in your
vehicle for carr ying children are the rear
seats.
-
A c
hild weighing less than 9 kg must
travel in the rear ward-facing position
both in the front and in the rear.
It is recommended that children travel on
the rear seats of your vehicle:
- "
rearward facing " up to the age of 3,
- "
forward facing " over the age of 3.
Ensure that the seat belt is positioned and
tightened correctly.
For child seats with a support leg, ensure
that the latter is in firm and steady contact
with the floor.
In the front: if necessary, adjust the
passenger seat.
At the rear: if necessary, adjust the
relevant front seat.
For maximum safety, please obser ve the
following recommendations:
-
I
n accordance with European regulations,
all children under the age of 12
or less
than one and a
half metres tall must
travel in approved child seats suited to
their weight , on seats fitted with a
seat belt
or ISOFIX mountings.
5
Safety
Page 75 of 180

73
Starting/Switching off the
engine with the key
Ignition switch
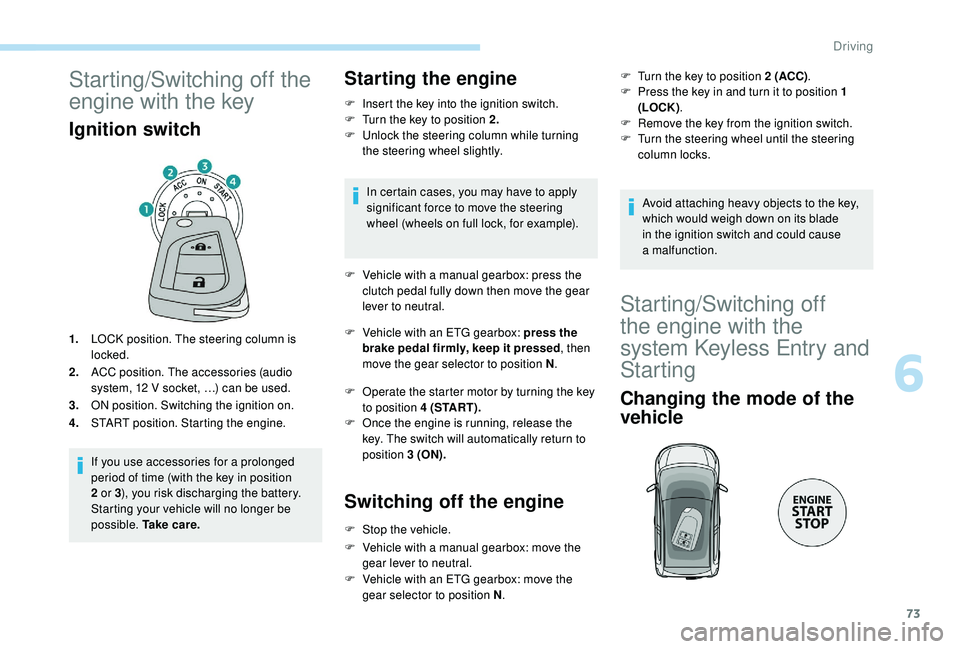
1.LOCK position. The steering column is
locked.
2. ACC position. The accessories (audio
system, 12
V socket, …) can be used.
3. ON position. Switching the ignition on.
4. START position. Starting the engine.
If you use accessories for a
prolonged
period of time (with the key in position
2
or 3), you risk discharging the battery.
Starting your vehicle will no longer be
possible. Ta k e c a r e .
Starting the engine
F Insert the key into the ignition switch.
F T urn the key to position 2.
F
U
nlock the steering column while turning
the steering wheel slightly.
In certain cases, you may have to apply
significant force to move the steering
wheel (wheels on full lock, for example).
F
V
ehicle with a manual gearbox: press the
clutch pedal fully down then move the gear
lever to neutral.
F
V
ehicle with an ETG gearbox: press the
brake pedal firmly, keep it pressed , then
move the gear selector to position N .
F
O
perate the starter motor by turning the key
to position 4 (START).
F
O
nce the engine is running, release the
key. The switch will automatically return to
position 3 (ON).
Switching off the engine
F Stop the vehicle.
F
V
ehicle with a manual gearbox: move the
gear lever to neutral.
F
V
ehicle with an ETG gearbox: move the
gear selector to position N .F
T
urn the key to position 2 (ACC)
.
F
P
ress the key in and turn it to position 1
(LOCK) .
F
R
emove the key from the ignition switch.
F
T
urn the steering wheel until the steering
column locks.
Avoid attaching heavy objects to the key,
which would weigh down on its blade
in the ignition switch and could cause
a
malfunction.
Starting/Switching off
the engine with the
system
K
eyless Entry and
Starting
Changing the mode of the
vehicle
6
Driving
Page 76 of 180

74
With the electronic key inside the vehicle: each
press of the "START/STOP " button, without
action on the pedals , allows the mode of the
vehicle to be changed:
F
F
irst press (" ACC" mode). The accessories
(audio system, 12
V socket, etc.) can be
used.
F
Sec
ond press (" ON" mode). Ignition on.
F
T
hird press (" OFF" m o d e).
If you use accessories for a
prolonged
period of time, the vehicle will
automatically transfer into " OFF" mode
after about 20
minutes.
Be careful , to avoid discharging the
battery.
Starting the engine
At the first press of the " S TA R T/
STOP " button, this indicator lamp
flashes slowly in the instrument panel.
Electronic key inside the vehicle.
F V ehicle with a manual gearbox: move the
gear lever to the neutral position and press
the clutch pedal fully down.
F
V
ehicle with an electronic gearbox: move
the gear selector to N and press the brake
pedal firmly.
This indicator lamp lights up on the
instrument panel.
Depending on the outside temperature,
each start attempt can last up to about
30
seconds. During this time, do not press
the " START/STOP " button again, and do
not release the clutch pedal nor the brake
pedal (depending on the gearbox type).
After this time, if the engine has not
started, press the " START/STOP" button
again to carry out a
new attempt.
F
P
ress the " START/STOP " button and
release it. If one of the starting conditions is not met,
the indicator for the "Keyless Entry and
Starting" system will flash rapidly on the
instrument panel. In some circumstances,
it may be necessary to turn the steering
wheel slightly while pressing the "
S TA R T/
STOP " button, to help unlock the steering
column.
The presence of the electronic key in the
vehicle is essential for ignition and starting
the engine. Once the engine has started,
make sure the electronic key is always
on board until the end of the journey:
other wise you will not be able to lock the
vehicle.
Switching off the engine
F Stop the vehicle.
F V ehicle with a manual gearbox: move the
gear lever to neutral.
F
V
ehicle with an ETG gearbox: move the
gear selector to N .
With the electronic key inside the vehicle, press
the " START/STOP " button.
The engine stops.
The steering column locks when a
door is
opened or the vehicle is locked.
Driving
Page 80 of 180

78
F Select position E with the gear selector.
The gearbox then operates in auto-adaptive
mode, without any action needed from the
driver.
It continuously selects the gear best adapted to
the following parameters:
-
f
uel consumption optimisation,
-
s
tyle of driving,
-
r
oad conditions,
-
v
ehicle load.
To obtain the best acceleration, for instance
when overtaking another vehicle, press hard on
the accelerator pedal and go through the point
of resistance.
At any time, you can change the mode by
moving the gear selector from position E to
position M and vice versa.
Never select neutral (position N ) when the
vehicle is moving.
Temporary control of gear
changing
You can temporarily take control of gear
changes using the steering mounted control
paddles + and -.
Manual mode
During braking or deceleration, the gearbox
changes down automatically to be in the
correct gear for the vehicle to accelerate again.
Under strong acceleration, the gearbox will not
change up without action by the driver at the
gear selector or the controls under the steering
wheel (unless the engine speed is close to its
maximum speed).Automatic mode (EASY)The gear change requests are acted upon only
if the engine speed allows. If they are rejected,
an audible signal sounds.
The gear engaged is displayed in the
instrument panel.
This function allows you to anticipate certain
situations, such as overtaking another vehicle
or approaching a
bend in the road.
After a
few moments with no action on the
control paddles, the gearbox returns to
automatic operation.
F
M
ove the gear selector to position M .
F
C
hange gears using:
-
t
he gear selector, by moving it:
-
b
ackwards, + to change up a gear,
-
f
or wards, - to change down a gear,
-
o
r the steering mounted control paddles +
or -.
The gear engaged is displayed.
The gear change requests are acted upon only
if the engine speed allows.
It is not necessary to release the accelerator
when changing gear. If a
change is rejected, an
audible signal sounds. You can change mode at any time by moving
the gear selector from position M to position E
and vice versa.
Never select neutral (position N ) when the
vehicle is moving.
Reverse gear
To engage reverse gear, the vehicle must be
stationary with your foot on the brake pedal.
F
Sel
ect position R .
An audible signal indicates that reverse gear
has been engaged.
Stopping the vehicle
The vehicle can be stopped regardless of the
position of the gear selector ( N, E or R ).
However, if the driver's door is opened when
the gear selector is not in position N , an audible
signal will sound.
Driving
Page 86 of 180

84
- when towing,
- d riving with a space-saver type spare wheel
or snow chains fitted,
-
p
uncture repair using the temporary repair
kit,
-
y
oung drivers, etc.
The following situations may inter fere with the
operation of the system or prevent it working:
-
p
oor visibility (inadequate street lighting,
falling snow, rain, fog),
-
w
indscreen area located in front of the
camera: dirty, misted, frost-covered, snow-
covered, damaged or covered by a
sticker,
-
f
ault with the camera,
-
h
idden road signs (other vehicles,
vegetation, snow),
-
s
peed limit signs that do not conform to the
standard, are damaged or distorted.
If an app on your smart phone is used
via Mirror Screen, the sign displayed by
the system may be temporarily hidden. It
will be redisplayed as soon as you pass
another sign.Speed limiter
System which prevents the
vehicle from exceeding the speed
programmed by the driver.
The limiter is switched on manually: this
can be done regardless of the vehicle speed.
However, if you are travelling at less than
18
mph (30 km/h), the programmed speed will
be set at 18
mph (30 km/h).
The speed limiter is paused using the control.
The programmed speed can be exceeded
temporarily by pressing the accelerator firmly
beyond the point of resistance.
To return to the programmed speed, simply
release the accelerator pedal until the set limit
speed has been reached again.
The programmed speed is erased when
the ignition is switched off.
The limiter cannot, under any
circumstances, replace respect for speed
limits, nor the vigilance of the driver.
Steering mounted control
The controls for this system are grouped
together on this steering mounted control.
1.Activation/deactivation of the limiter: by
pressing on the end of the control.
2. Programming the speed/decreasing the
value: by pressing the control downwards.
3. Resuming speed limitation/increasing the
value: by pressing the control upwards.
4. Pause limitation: by pulling the control
towards you.
Driving
Page 90 of 180

88
Setting the thresholds for
triggering the alertDeactivation/reactivation
Press this button for more than 3 seconds.
T his warning lamp comes on in the
instrument panel and the message
"PCS OFF" is displayed. Press this button again to reactivate the
system.
This indicator lamp lights up on the
instrument panel.
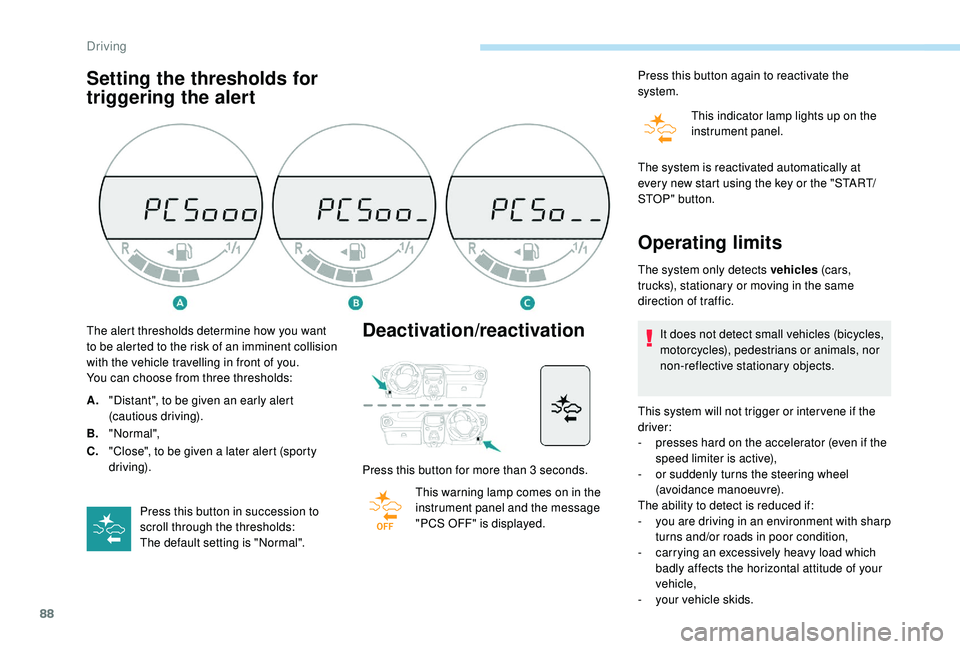
The alert thresholds determine how you want
to be alerted to the risk of an imminent collision
with the vehicle travelling in front of you.
You can choose from three thresholds:
A. "Distant", to be given an early alert
(cautious driving).
B. "Normal",
C. "Close", to be given a
later alert (sporty
driving).
Press this button in succession to
scroll through the thresholds:
The default setting is "Normal". The system is reactivated automatically at
every new start using the key or the "START/
STOP " button.
Operating limits
The system only detects vehicles
(c ar s,
trucks), stationary or moving in the same
direction of traffic.
It does not detect small vehicles (bicycles,
motorcycles), pedestrians or animals, nor
non-reflective stationary objects.
This system will not trigger or inter vene if the
driver:
-
p
resses hard on the accelerator (even if the
speed limiter is active),
-
o
r suddenly turns the steering wheel
(avoidance manoeuvre).
The ability to detect is reduced if:
-
y
ou are driving in an environment with sharp
turns and/or roads in poor condition,
-
c
arrying an excessively heavy load which
badly affects the horizontal attitude of your
vehicle,
-
y
our vehicle skids.
Driving
Page 92 of 180

90
Lane departure warning
system
System that detects involuntary crossing of
longitudinal markings of roads, using a camera
that recognises the continuous or broken lines.
To increase your safety, the camera analyses
the image then triggers a
warning if the driver's
attention drops and the vehicle drifts over
a
lane marking (speed greater than 30 mph
(50
km/h)).
This system is particularly suited to motor ways
and dual carriageways.
The lane departure warning system
cannot under any circumstances replace
the need for vigilance on the part of the
driver.
You must obser ve the driving regulations
and take a
break every two hours.
When driving with snow chains or with the
spare wheel fitted, you must deactivate
the system.
Activation
Detection
You are alerted by an audible signal and the
lighting of a warning lamp in the instrument panel.
No warning is given while the direction indicator
is flashing and for approximately 20 seconds
after the direction indicator is switched off.
Displays in the instrument panel
Display in the
instrument panelComments
The function is activated
(green indicator lamp).
The system has detected
the markings on the road
(green indicator lamp).
The system alerts you to
crossing a
line (green and
orange indicator lamp).
The display of this
indicator lamp is
accompanied by an
audible signal.
Deactivation
F Press this button, located on the steering wheel.
F
P
ress this button again.
The system state remains in memory when the
ignition is switched off.
Driving
Page 94 of 180

92
Under-inflation detection
The system monitors the pressure in all four
tyres, once the vehicle is moving.
It compares the information given by the
wheel speed sensors with reference values,
which must be reinitialised after ever y tyre
pressure adjustment or wheel change.
The system triggers an alert as soon as it
detects a
drop in the pressure of one or more
tyres. The tyre under-inflation detection system
does not replace the need for vigilance on
the part of the driver.
This system still requires you to check the
tyre inflation pressure (including the spare
wheel) every month as well as before
a
long journey.
Driving with under-inflated tyres impairs
handling, extends braking distances and
causes early tyre wear, particularly in
adverse conditions (heavy loads, high
speeds, long journeys).
Driving with under-inflated tyres
increases fuel consumption. The tyre pressure specifications for your
vehicle can be found on the tyre pressure
label.
For more information on the
Identification markings
, refer to the
corresponding section.
Tyre pressures should be checked when
the tyres are "cold" (vehicle stopped for
1 hour or after a journey of less than
6 miles (10 km) at moderate speeds).
Other wise (when hot), add 0.3 bar to the
pressures shown on the label.Under-inflation alert
This is shown by the warning lamp
coming on, fixed, accompanied by
an audible signal.
F
R
educe speed immediately, avoid excessive
steering movements and sudden braking.
F
S
top as soon as it is safe to do so.
This system automatically monitors the tyre
pressure while driving.
Detection of loss of pressure does not
always bring about a visible deformation
of the tyre. Do not make do with just
a
visual check.
Driving