2018 NISSAN VERSA AUX
[x] Cancel search: AUXPage 15 of 354

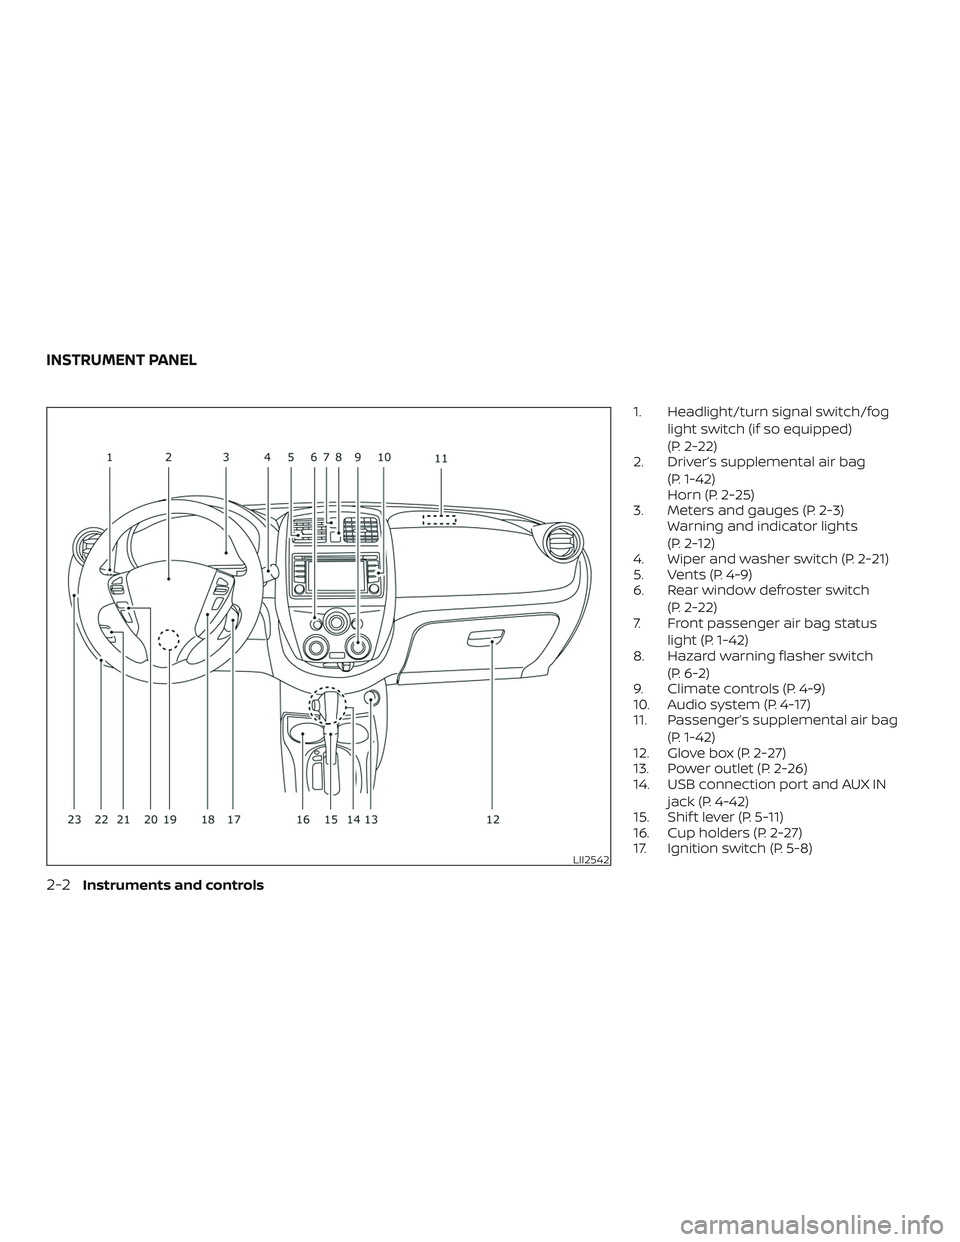
1. Headlight/turn signal switch/fog
light switch (if so equipped)
(P. 2-22)
2. Driver’s supplemental air bag
(P. 1-42)
Horn (P. 2-25)
3. Meters and gauges (P. 2-3)
Warning and indicator lights
(P. 2-12)
4. Wiper and washer switch (P. 2-21)
5. Vents (P. 4-9)
6. Rear window defroster switch
(P. 2-22)
7. Front passenger air bag status
light (P. 1-42)
8. Hazard warning flasher switch
(P. 6-2)
9. Climate controls (P. 4-9)
10. Audio system (P. 4-17)
11. Passenger’s supplemental air bag
(P. 1-42)
12. Glove box (P. 2-27)
13. Power outlet (P. 2-26)
14. USB connection port and AUX IN
jack (P. 4-42)
15. Shif t lever (P. 5-11)
16. Cup holders (P. 2-27)
17. Ignition switch (P. 5-8)
LII2542
INSTRUMENT PANEL
0-6Illustrated table of contents
Page 83 of 354

1. Headlight/turn signal switch/fog
light switch (if so equipped)
(P. 2-22)
2. Driver’s supplemental air bag
(P. 1-42)
Horn (P. 2-25)
3. Meters and gauges (P. 2-3)
Warning and indicator lights
(P. 2-12)
4. Wiper and washer switch (P. 2-21)
5. Vents (P. 4-9)
6. Rear window defroster switch
(P. 2-22)
7. Front passenger air bag status
light (P. 1-42)
8. Hazard warning flasher switch
(P. 6-2)
9. Climate controls (P. 4-9)
10. Audio system (P. 4-17)
11. Passenger’s supplemental air bag
(P. 1-42)
12. Glove box (P. 2-27)
13. Power outlet (P. 2-26)
14. USB connection port and AUX IN
jack (P. 4-42)
15. Shif t lever (P. 5-11)
16. Cup holders (P. 2-27)
17. Ignition switch (P. 5-8)
LII2542
INSTRUMENT PANEL
2-2Instruments and controls
Page 162 of 354

FM/AM RADIO WITH COMPACT
DISC (CD) PLAYER (Type A) (if so
equipped)
For additional information, refer to “Audio
operation precautions” in this section.1.
CD eject button
2. CD insert slot
3. SCAN button
4. DISP (display) button5. RPT (repeat )/ RDM (random) button
6. TUNE/FOLDER knob / MENU button
7. AUX IN jack
8. AUX button
9. CD button
10. AM button
11. FM button
12. VOL (volume) control knob
/
(power) button
13. Station select (1 - 6) buttons
14. TRACK
button
15.
SEEK button
Audio main operation
VOL (volume) control knob/(power)
button
Place the ignition switch in the ACC or ON
position, then press the
(power) but-
ton. If you listen to the radio with the engine
not running, place the ignition in the ACC
position. The mode (radio or CD) that was
playing immediately before the system
was turned off resumes playing.
LHA8804
Display screen, heater, air conditioner, audio and phone systems4-27
Page 163 of 354

When no CD is loaded, the radio comes on.
Pressing the
(power) button again
turns the system off.
Turn the VOL (volume) control knob to the
right to increase volume or to the lef t to
decrease volume.
MENU button (Bass, Treble, Balance,
Fade, Speed Sensitive Volume and
Clock)
Press the MENU button to change the
mode as follows:
Bass→Treble→Balance→Fade→Spd.
Sen. Vol. (Speed Sensitive Volume)→AUX IN
Volume→Clock→Clock Adjust
To adjust the Bass, Treble, Fade and Bal-
ance, press the MENU button until the de-
sired mode appears in the display. Press
the
SEEK or TRACKbutton to
adjust the setting to the desired level (-5 to
+5). Balance adjusts the sound between
the right and lef t speakers. Fade adjusts
the sound between the front and rear
speakers.
Once you have adjusted the sound quality
to the desired level, press the MENU button
repeatedly until the radio or CD display re-appears. Otherwise, the radio or CD display
will automatically reappear af ter about
10 seconds.
Speed Sensitive Volume adjusts the vol-
ume of the audio system as the vehicle’s
driving speed changes. It can be set as
follows:
OFF→LOW→MID→HIGH
DISP (display) button
Press the DISP (display) button while a CD is
playing to change the text shown in the
audio display as follows:
For CDs:
Running Time→Album Title:→Artist
Name:→Song Title
For MP3 CDs:
Running Time→Folder Title:→Album Title:
→Artist Name:→Song Title:
If the text information is too long to fully be
displayed on the screen; press and hold the
DISP button for longer than 1.5 seconds to
scroll through the rest of the text.
Press the DISP (display) button while the
radio is playing to toggle the audio display
between station number and RDS.Clock operation
To turn the clock display on or off, press the
MENU button repeatedly until “Clock” ap-
pears on the display. Turn the
TUNE/FOLDER knob to toggle the setting
(ON or OFF).
Clock set
1. Press the MENU button repeatedly until
“Adjust Clock: NO” appears on the dis-
play.
2. Turn the TUNE/FOLDER knob to
change to “Adjust Clock: YES”.
3. Press the MENU button.
4. When “Change Hour” appears, turn the
TUNE/FOLDER knob to adjust the
hours.
5. Press MENU button.
6. When “Change Minute” appears, turn
the TUNE/FOLDER knob to adjust min-
utes.
7. Press MENU button to finish.
The display will return to the regular clock
display af ter 10 seconds if no further ad-
justment is performed.
4-28Display screen, heater, air conditioner, audio and phone systems
Page 165 of 354

SEEK and TRACK (Fast For-
ward, Rewind) buttons
When the SEEK buttonor
TRACK
button is pressed while the
compact disc is playing, the compact disc
plays at an increased speed while fast for-
warding or rewinding. When the button is
released, the compact disc returns to nor-
mal play speed.
SEEK and TRACK but-
tons
When the SEEK
button is pressed
while the compact disc is playing, the next
track following the present one starts to
play from the beginning. Press the
SEEK
button several times to skip
several tracks. Each time the button is
pressed, the CD advances one additional
track. The track number appears in the dis-
play window. (When the last track on the
compact disc is skipped, the first track is
played.)
When the TRACK
button is pressed,
the track being played returns to the be-
ginning. Press the TRACK
button sev-
eral times to skip back several tracks. Each
time the button is pressed the CD moves
back one track.RPT (repeat)/RDM (random) button
Press the RPT/RDM button while a com-
pact disc is playing to change the play pat-
tern as follows:
CD:
TRACK REPEAT→DISC RANDOM→DISC
REPEAT
MP3/WMA CD:
FOLDER REPEAT→TRACK REPEAT→DISC
RANDOM→FOLDER RANDOM→DISC RE-
PEAT
TRACK REPEAT: The track that is currently
playing will be repeated.
DISC RANDOM: The order of the tracks on
the disc will be mixed during play.
DISC REPEAT: The disc currently playing will
be repeated.
FOLDER REPEAT: The tracks in the current
folder will be repeated.
FOLDER RANDOM: The order of the tracks in
the folder will be mixed during play.
SCAN (CDs) button
Press the SCAN button for less than 1.5 sec-
onds to scan all tracks of the current discfor 10 seconds per track. The SCAN icon is
flashed during scan mode.
The scan mode is canceled once it scans
through all tracks on the disc, or if the SCAN
button is pressed during scan mode.
CD EJECT
When the
button is pressed with a
compact disc loaded, the compact disc will
be ejected.
When the
button is pressed while the
compact disc is playing, the compact disc
will eject and the system will turn off.
AUX (Auxiliary) button
The AUX IN jack is located on the CD player.
The AUX IN audio input jack accepts any
standard analog audio input such as from
a portable cassette tape/CD player, MP3
player or laptop computers.
Press the AUX button to play a compatible
device when it is plugged into the AUX IN
jack.
Press the MENU button repeatedly until
“AUX IN Volume” appears on the screen to
control the incoming volume level of the
auxiliary input device. Turn the
TUNE/FOLDER knob to adjust the level be-
tween 0 and +3.
4-30Display screen, heater, air conditioner, audio and phone systems
Page 166 of 354

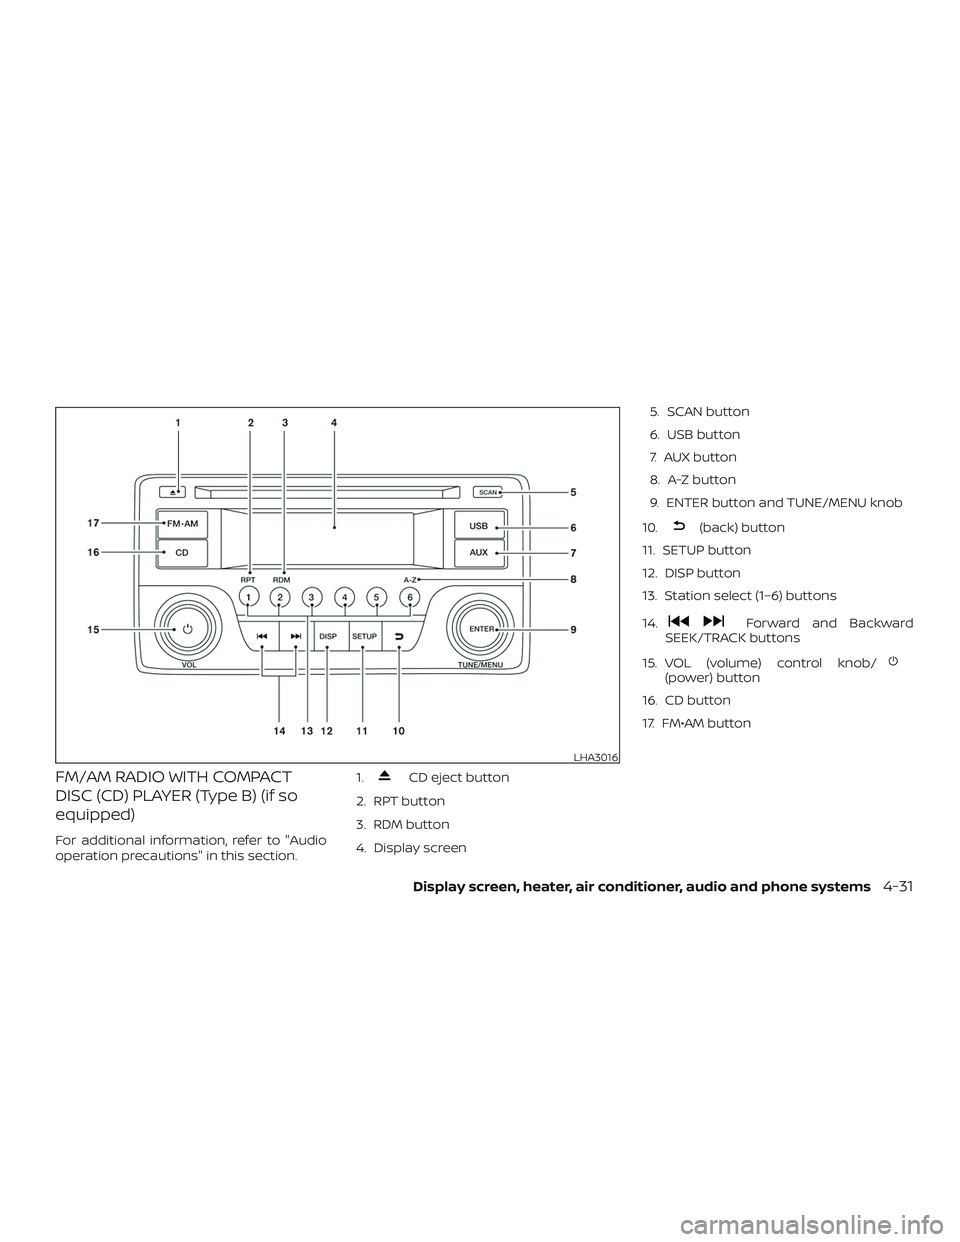
FM/AM RADIO WITH COMPACT
DISC (CD) PLAYER (Type B) (if so
equipped)
For additional information, refer to "Audio
operation precautions" in this section.1.
CD eject button
2. RPT button
3. RDM button
4. Display screen5. SCAN button
6. USB button
7. AUX button
8. A-Z button
9. ENTER button and TUNE/MENU knob
10.
(back) button
11. SETUP button
12. DISP button
13. Station select (1–6) buttons
14.
Forward and Backward
SEEK/TRACK buttons
15. VOL (volume) control knob/
(power) button
16. CD button
17. FM•AM button
LHA3016
Display screen, heater, air conditioner, audio and phone systems4-31
Page 167 of 354

Audio main operation
(power) button/ VOL (volume)
control knob
Place the ignition switch in the ACC or ON
position, then press the
(power) but-
ton. If you listen to the radio with the engine
not running, place the ignition in the ACC
position. The mode (radio or CD) that was
playing immediately before the system
was turned off resumes playing.
When no CD is loaded, the radio comes on.
Pressing the
(power) button again
turns the system off.
Turn the VOL (volume) control knob to the
right to increase volume or to the lef t to
decrease volume.AUX button
The AUX IN audio input jack accepts any
standard analog audio input such as from
a portable cassette tape/CD player, MP3
player or a laptop computer. Press the AUX
button to play a compatible device
plugged into the AUX IN jack. Pressing the
AUX button repeatedly will cycle through
available input sources:
AUX line in→USB (if so equipped)→AUX
line in
NOTE:
Sources only shown in menu if they are
connected and/or detected.DISP (display) button
Pressing the DISP button displays song in-
formation, if available, such as artist, album,
track name, folder name, and source.
NOTE:
The DISP button only provides this infor-
mation in non-radio modes.
4-32Display screen, heater, air conditioner, audio and phone systems
Page 168 of 354

How to use the SETUP button
To select and/or adjust several functions,
features and modes that are available for
your vehicle:
1. Press the SETUP button.
2. Turn the TUNE/MENU knob until the de-
sired item is selected on the menu list
and then press the ENTER button.
Menu itemResult
Audio Selecting this item allows user to adjust various audio settings.
Bass Adjusts the bass to the desired level.
Treble Adjusts the treble to the desired level.
Balance Adjusts the balance to the desired level. Balance adjusts the sound level between the lef t and right speakers.
Fade Adjusts the fade to the desired level. Fade adjusts the sound level between the front and rear speakers.
AUX Vol. Controls the volume level of incoming sound when an auxiliary device is connected to the system. Available options
are LOW, MID, and HIGH.
Clock Selecting this item allows user to adjust various clock settings.
Set Time Allows user to set time manually.
ON/OFF Switches clock display on or off.
Format 12h:24h Allows user to change time format between 12 hour and 24 hour.
Bluetooth For additional information, refer to “Bluetooth® Hands-Free Phone System (Type A)” in this section.
Language Allows user to change system language.
List of Languages Available language are Spanish, Portuguese, English, and French.
Scroll Direction Allows user to change the scrolling direction used by the TUNE/MENU knob.
Clockwise Select up or down and press ENTER button.
Display screen, heater, air conditioner, audio and phone systems4-33