2018 NISSAN NV PASSENGER VAN reset
[x] Cancel search: resetPage 220 of 426
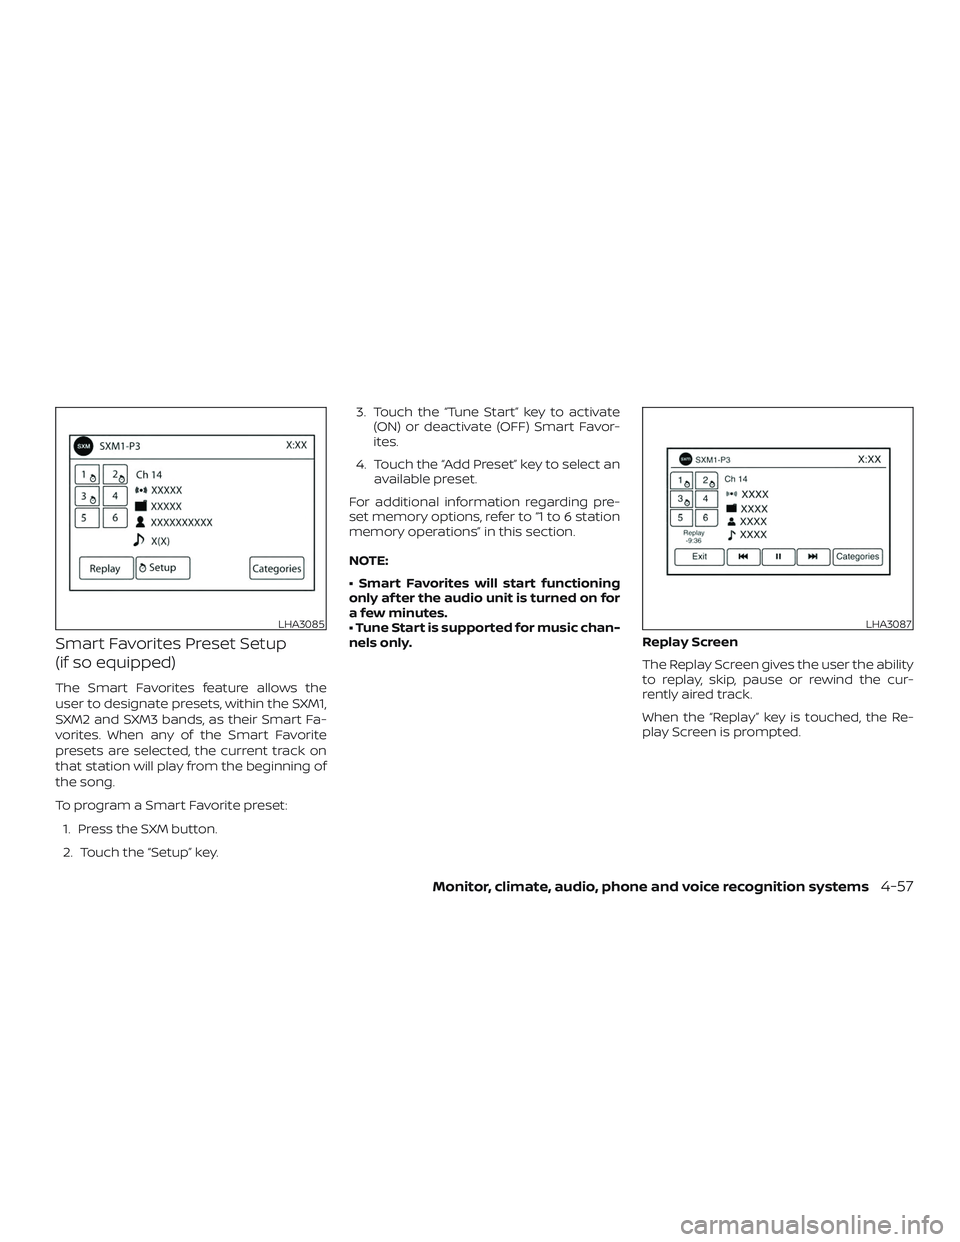
Smart Favorites Preset Setup
(if so equipped)
The Smart Favorites feature allows the
user to designate presets, within the SXM1,
SXM2 and SXM3 bands, as their Smart Fa-
vorites. When any of the Smart Favorite
presets are selected, the current track on
that station will play from the beginning of
the song.
To program a Smart Favorite preset:1. Press the SXM button.
2. Touch the “Setup” key. 3. Touch the “Tune Start” key to activate
(ON) or deactivate (OFF) Smart Favor-
ites.
4. Touch the “Add Preset” key to select an available preset.
For additional information regarding pre-
set memory options, refer to “1 to 6 station
memory operations” in this section.
NOTE:
• Smart Favorites will start functioning
only af ter the audio unit is turned on for
a few minutes.
• Tune Start is supported for music chan-
nels only. Replay Screen
The Replay Screen gives the user the ability
to replay, skip, pause or rewind the cur-
rently aired track.
When the “Replay” key is touched, the Re-
play Screen is prompted.
LHA3085LHA3087
Monitor, climate, audio, phone and voice recognition systems4-57
Page 236 of 426
SOURCE switch
Press the SOURCE switch to change the
mode in the following sequence:
AM→FM1 →FM2 →(XM1 →XM2 →XM3
(satellite radio, if so
equipped))→(SXM1→SXM2→SXM3 (satellite,
if so equipped))→ CD*→USB/iPod®* →
Bluetooth® Audio* (if so equipped) →AUX*
→ AM.
* These modes are only available when
compatible media storage is inserted into
the device or connected to the system.
Volume control switch
Push the + or – volume control switch to
increase or decrease the volume.
Tuning switch
While the display is showing a map or audio
screen, tilt the Tuning switch upward or
downward to select a station, track, CD or
folder. For most audio sources, tilting the
switch up/down for more than 1.5 seconds
provides a different function than a tilting
up/down for less than 1.5 seconds. AM and FM
∙ Tilt up/down for less than 1.5 seconds to increase or decrease the preset station.
∙ Tilt up/down for more than 1.5 seconds to seek up or down to the next station.
XM/SXM (if so equipped) ∙ Tilt up/down for less than 1.5 seconds to increase or decrease the preset station.
∙ Tilt up/down for more than 1.5 seconds to go to the next or previous category.
iPod® ∙ Tilt up/down for less than 1.5 seconds to increase or decrease the track number.
CD ∙ Tilt up/down for less than 1.5 seconds to increase or decrease the track number.
∙ Tilt up/down for more than 1.5 seconds to increase or decrease the folder num-
ber (if playing compressed audio files)
or to fast forward or rewind the current
track. USB
∙ Tilt up/down for less than 1.5 seconds to increase or decrease the track number.
Bluetooth® Audio ∙ Tilt up/down for less than 1.5 seconds to skip ahead or back to the next song.
ANTENNA
The antenna cannot be shortened, but can
be removed. When you need to remove the
antenna, turn the antenna rod counter-
clockwise.
To install the antenna rod, turn the antenna
clockwise. Tighten the antenna rod to
specification using a suitable tool such as
an open-end wrench. The antenna rod
tightening specification is 3.4 – 3.6 N·m (30 –
32 in-lb). Do not use pliers to tighten the
antenna as they can leave marks on the
antenna surface. The antenna rod cannot
be hand tightened to the proper specification.
CAUTION
Always properly tighten the antenna
rod during installation or the antenna
rod may break during vehicle operation.
Monitor, climate, audio, phone and voice recognition systems4-73
Page 268 of 426
∙ The TIRE PRES warning does not appearif the low tire pressure warning light illu-
minates to indicate a TPMS malfunc-
tion. Instead, TPMS ERROR will appear in
the trip computer.
∙ Tire pressure rises and falls depending on the heat caused by the vehicle’s op-
eration and the outside temperature.
Do not reduce the tire pressure af ter
driving because the tire pressure rises
af ter driving. Low outside temperature
can lower the temperature of the air
inside the tire which can cause a lower
tire inflation pressure. This may cause
the low tire pressure warning light to
illuminate. If the warning light illumi-
nates, check the tire pressure for all four
tires.
∙ The Tire and Loading Information label is located in the driver’s door opening.
For additional information, refer to “Low tire
pressure warning light” in the “Instruments
and controls” section and “Tire Pressure
Monitoring System (TPMS)” in the “In case of
emergency” section of this manual.WARNING
∙ Radio waves could adversely affect electric medical equipment. Those
who use a pacemaker should contact
the electric medical equipment
manufacturer for the possible influ-
ences before use.
∙ If the low tire pressure warning light illuminates while driving, avoid sud-
den steering maneuvers or abrupt
braking, reduce vehicle speed, pull off
the road to a safe location and stop
the vehicle as soon as possible. Driv-
ing with under-inflated tires may per-
manently damage the tires and in-
crease the likelihood of tire failure.
Serious vehicle damage could occur
and may lead to an accident and could
result in serious personal injury.
Check the tire pressure for all four
tires. Adjust the tire pressure to the
recommended COLD tire pressure
shown on the Tire and Loading Infor-
mation label to turn the low tire pres-
sure warning light off. If you have a flat
tire, replace it with a spare tire as soon
as possible. (For additional informa-
tion, refer to “Flat tire” in the “In case of
emergency ” section of this manual.) ∙ When replacing a wheel without the
TPMS such as the spare tire, when a
spare tire is mounted or a wheel is
replaced, tire pressure will not be indi-
cated, the TPMS will not function and
the low tire pressure warning light will
flash for approximately 1 minute. The
light will remain on af ter 1 minute.
Have your tires replaced and/or TPMS
system reset as soon as possible. It is
recommended that you visit a NISSAN
dealer for this service.
∙ Replacing tires with those not origi- nally specified by NISSAN could affect
the proper operation of the TPMS.
∙ Do not inject any tire liquid or aerosol tire sealant into the tires, as this may
cause a malfunction of the tire pres-
sure sensors.
CAUTION
Do not place metalized film or any
metal parts (antenna, etc.) on the win-
dows. This may cause poor reception of
the signals from the tire pressure sen-
sors, and the TPMS will not function
properly.
Starting and driving5-5
Page 282 of 426
∙ If the cruise control system malfunc-tions, it cancels automatically. The SET
indicator light illuminates in the trip
computer then blinks to warn the driver.
For additional information, refer to
“Cruise set switch indicator light” in the
“Instruments and controls” section of
this manual.
∙ If the SET indicator light blinks, push the ON/OFF switch off and have the system
checked. It is recommended that you
visit a NISSAN dealer for this service.
∙ The SET indicator light may blink when the ON/OFF switch is pushed on while
pushing the ACCEL/RES, COAST/SET, or
CANCEL switch. To properly set the
cruise control system, use the following
procedures.
WARNING
Do not use the cruise control when driv-
ing under the following conditions:
∙ When it is not possible to keep thevehicle at a set speed.
∙ In heavy traffic or in traffic that varies in speed.
∙ On winding or hilly roads. ∙ On slippery roads (rain, snow, ice, etc.).
∙ In very windy areas.
Doing so could cause a loss of vehicle
control and result in an accident.
CRUISE CONTROL OPERATIONS
The cruise control allows driving at a speed
between 25 - 89 mph (40 - 144 km/h) without
keeping your foot on the accelerator pedal.
To turn on the cruise control,
push the
ON/OFF switch on. The CRUISE indicator
light in the trip computer will illuminate.
To set cruising speed, accelerate the ve-
hicle to the desired speed, push the
COAST/SET switch and release it. The SET
indicator light in the trip computer will illu-
minate. Take your foot off the accelerator
pedal. Your vehicle maintains the set
speed.
∙ To pass another vehicle, depress the
accelerator pedal. When you release the
pedal, the vehicle returns to the previ-
ously set speed.
∙ The vehicle may not maintain the set speed when going up or down steep
hills. If this happens, drive without the
cruise control. To cancel the preset speed,
use one of the
following three methods:
∙ Push the CANCEL switch; the SET indi- cator light in the trip computer goes
out.
∙ Tap the brake pedal; the SET indicator light goes out.
∙ Push the ON/OFF switch off. Both the CRUISE indicator light and SET indicator
light in the trip computer go out.
The cruise control is automatically can-
celed and the SET light in the trip computer
goes out if: ∙ You depress the brake pedal while pushing the ACCEL/RES or SET/COAST
switch. The preset speed is deleted
from memory.
∙ The vehicle slows down more than 8 mph (13 km/h) below the set speed.
∙ You move the shif t lever to N (Neutral).
To reset at a faster cruising speed, use
one of the following three methods:
∙ Depress the accelerator pedal. When the vehicle attains the desired speed,
push and release the COAST/SET
switch.
Starting and driving5-19
Page 283 of 426
∙ Push and hold the ACCEL/RES switch.When the vehicle attains the speed you
desire, release the switch.
∙ Push and release the ACCEL/RES switch. Each time you do this, the set
speed increases by about 1 mph
(1.6 km/h).
To reset at a slower cruising speed, use
one of the following three methods:
∙ Lightly tap the brake pedal. When the vehicle attains the desired speed, push
the COAST/SET switch and release it.
∙ Push and hold the COAST/SET switch. Release the switch when the vehicle
slows to the desired speed.
∙ Push and release the COAST/SET switch. Each time you do this, the set
speed decreases by about 1 mph
(1.6 km/h).
To resume the preset speed, push and
release the ACCEL/RES switch. The vehicle
returns to the last set cruising speed when
the vehicle speed is over 25 mph (40 km/h).CAUTION
During the first 1,200 miles (2,000 km),
follow these recommendations to ob-
tain maximum engine performance
and ensure the future reliability and
economy of your new vehicle. Failure to
follow these recommendations may re-
sult in shortened engine life and re-
duced engine performance.
∙ Avoid driving for long periods at con- stant speed, either fast or slow, and do
not run the engine over 4,000 RPM.
∙ Do not accelerate at full throttle in any gear.
∙ Avoid quick starts.
∙ Avoid hard braking as much as pos- sible.
∙ Do not tow a trailer for the first 500 miles (805 kilometers). Your engine, axle or
other parts could be damaged. Follow these easy-to-use Fuel Efficient
Driving Tips to help you achieve the most
fuel economy from your vehicle.
1. Use Smooth Accelerator and
Brake Pedal Application
∙ Avoid rapid starts and stops.
∙ Use smooth, gentle accelerator and brake application whenever possible.
∙ Maintain constant speed while com- muting and coast whenever pos-
sible.
2. Maintain Constant Speed
∙ Look ahead to try and anticipate and minimize stops.
∙ Synchronizing your speed with traffic lights allows you to reduce your num-
ber of stops.
∙ Maintaining a steady speed can mini- mize red light stops and improve fuel
efficiency.
BREAK-IN SCHEDULE FUEL EFFICIENT DRIVING TIPS
5-20Starting and driving
Page 290 of 426
The VDC system uses various sensors to
monitor driver inputs and vehicle motion.
Under certain driving conditions, the VDC
system helps to perform the following
functions:∙ Controls brake pressure to reduce wheel slip on one slipping drive wheel
so power is transferred to a non-
slipping drive wheel on the same axle.
∙ Controls brake pressure and engine output to reduce drive wheel slip based
on vehicle speed (traction control func-
tion).
∙ Controls brake pressure at individual wheels and engine output to help the
driver maintain control of the vehicle in
the following conditions:
– Understeer (vehicle tends to not fol- low the steered path despite in-
creased steering input)
– Oversteer (vehicle tends to spin due to certain road or driving conditions)
The VDC system can help the driver to
maintain control of the vehicle, but it can-
not prevent loss of vehicle control in all driv-
ing situations. When the VDC system operates, the
indicator in the instrument panel flashes to
note the following:
∙ The road may be slippery or the system may determine some action is required
to help keep the vehicle on the steered
path.
∙ You may feel a pulsation in the brake pedal and hear a noise or vibration from
under the hood. This is normal and indi-
cates that the VDC system is working
properly.
∙ Adjust your speed and driving to the road conditions.
For additional information, refer to “Slip in-
dicator light” and “Vehicle Dynamic Control
(VDC) OFF indicator light” in the “Instru-
ments and controls” section of this manual.
If a malfunction occurs in the system,
the
indicator light comes on in the
instrument panel. The VDC system auto-
matically turns off when the indicator light
is on.
The VDC OFF switch is used to turn off the
VDC system. The
indicator illumi-
nates to indicate the VDC system is off.
When the VDC OFF switch is used to turn off
the system, the VDC system still operates to prevent one drive wheel from slipping by
transferring power to a non-slipping drive
wheel. The
indicator flashes if this oc-
curs. All other VDC functions are off and
the
indicator will not flash.
The VDC system is automatically reset to
ON when the ignition switch is placed in the
OFF position then back to the ON position.
The computer has a built-in diagnostic fea-
ture that tests the system each time you
start the engine and move the vehicle for-
ward or in reverse at a slow speed. When
the self-test occurs, you may hear a clunk
noise and/or feel a pulsation in the brake
pedal. This is normal and is not an indica-
tion of a malfunction.
WARNING
∙ The VDC system is designed to help the driver maintain stability but does
not prevent accidents due to abrupt
steering operation at high speeds or
by careless or dangerous driving
techniques. Reduce vehicle speed and
be especially careful when driving and
cornering on slippery surfaces and al-
ways drive carefully.
VEHICLE DYNAMIC CONTROL (VDC)
SYSTEM
Starting and driving5-27
Page 300 of 426
WARNING
∙ Radio waves could adversely affectelectric medical equipment. Those
who use a pacemaker should contact
the electric medical equipment
manufacturer for the possible influ-
ences before use.
∙ If the low tire pressure warning light illuminates while driving, avoid sud-
den steering maneuvers or abrupt
braking, reduce vehicle speed, pull off
the road to a safe location and stop
the vehicle as soon as possible. Driv-
ing with under-inflated tires may per-
manently damage the tires and in-
crease the likelihood of tire failure.
Serious vehicle damage could occur
and may lead to an accident and could
result in serious personal injury.
Check the tire pressure for all four
tires. Adjust the tire pressure to the
recommended COLD tire pressure
shown on the Tire and Loading Infor-
mation label to turn the low tire pres-
sure warning light OFF. If you have a
flat tire, replace it with a spare tire as
soon as possible. ∙ When replacing a wheel without TPMS
such as the spare tire, TPMS will not
function and the low tire pressure
warning light will flash for approxi-
mately 1 minute. The light will remain
on af ter 1 minute. Have your tires re-
placed and/or TPMS system reset as
soon as possible. It is recommended
that you visit a NISSAN dealer for
these services.
∙ Replacing tires with those not origi- nally specified by NISSAN could affect
the proper operation of the TPMS.
∙ Do not inject any tire liquid or aerosol tire sealant into the tires, as this may
cause a malfunction of the tire pres-
sure sensors.
CHANGING A FLAT TIRE
If you have a flat tire, follow the instructions
below:
Stopping the vehicle
1. Safely move the vehicle off the road and
away from traffic.
2. Turn on the hazard warning flashers. 3. Park on a level surface and apply the
parking brake. Move the shif t lever to P
(Park).
4. Turn off the engine.
5. Raise the hood to warn other traffic and to signal professional road assis-
tance personnel that you need assis-
tance.
6. Have all passengers get out of the ve- hicle and stand in a safe place, away
from traffic and clear of the vehicle.
WARNING
∙ Make sure the parking brake is se-curely applied and the shif t lever is
shif ted into P (Park).
∙ Never change tires when the vehicle is on a slope, ice or slippery areas. This is
hazardous.
∙ Never change tires if oncoming traffic is close to your vehicle. Wait for pro-
fessional road assistance.
In case of emergency6-3
Page 361 of 426
damaged and/or vehicle handling and
performance may be adversely affected.
Tire chains must be installed only on the
rear wheels and not on the front wheels.
Do not use tire chains on dry roads. Driving
with chains in such conditions can cause
damage to the various mechanisms of the
vehicle due to some overstress.
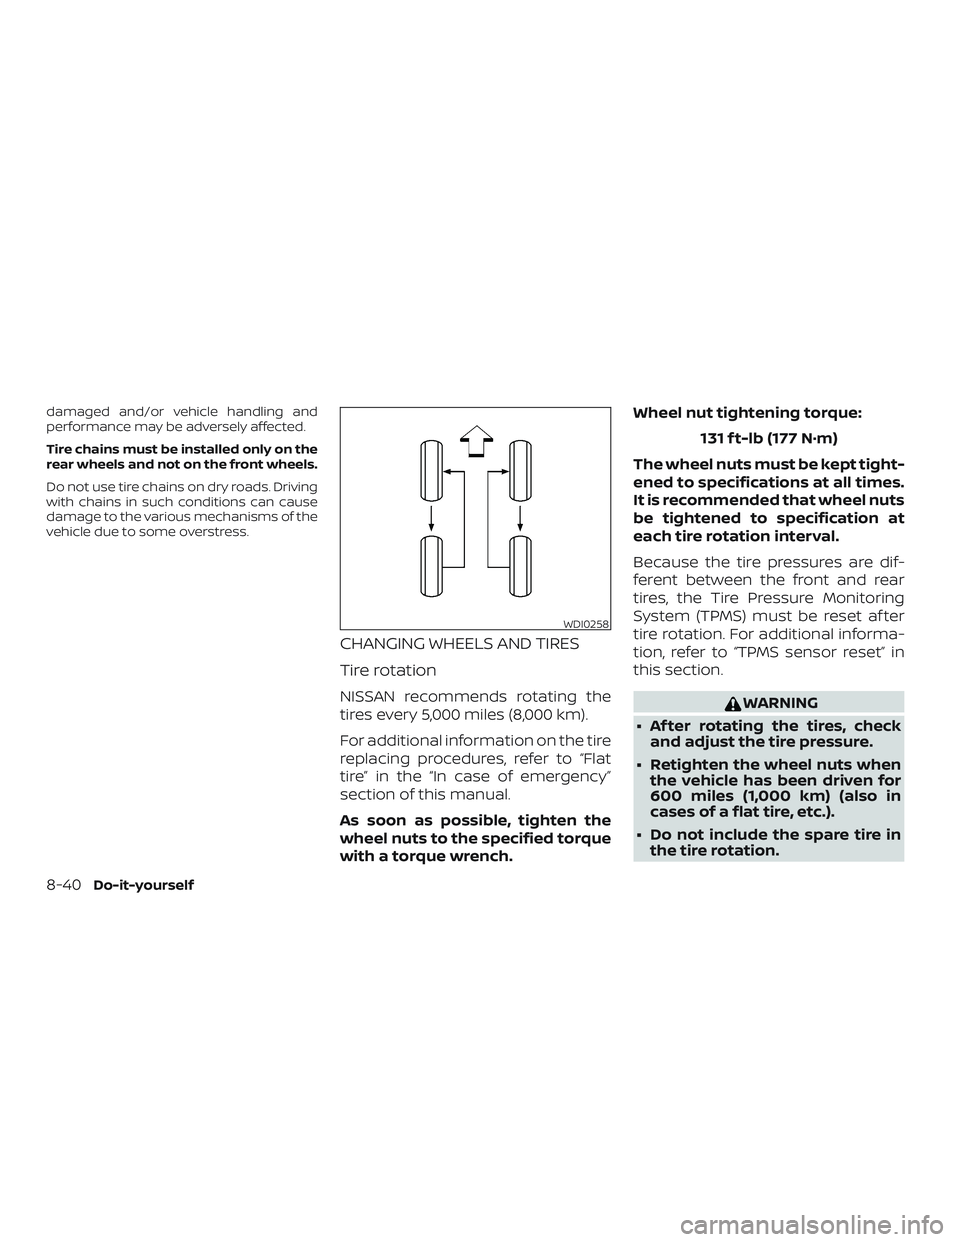
CHANGING WHEELS AND TIRES
Tire rotation
NISSAN recommends rotating the
tires every 5,000 miles (8,000 km).
For additional information on the tire
replacing procedures, refer to “Flat
tire” in the “In case of emergency”
section of this manual.
As soon as possible, tighten the
wheel nuts to the specified torque
with a torque wrench.Wheel nut tightening torque:
131 f t-lb (177 N·m)
The wheel nuts must be kept tight-
ened to specifications at all times.
It is recommended that wheel nuts
be tightened to specification at
each tire rotation interval.
Because the tire pressures are dif-
ferent between the front and rear
tires, the Tire Pressure Monitoring
System (TPMS) must be reset af ter
tire rotation. For additional informa-
tion, refer to “TPMS sensor reset” in
this section.WARNING
∙ Af ter rotating the tires, check and adjust the tire pressure.
∙ Retighten the wheel nuts when the vehicle has been driven for
600 miles (1,000 km) (also in
cases of a flat tire, etc.).
∙ Do not include the spare tire in the tire rotation.
WDI0258
8-40Do-it-yourself