Page 9 of 22
 8SAFETY
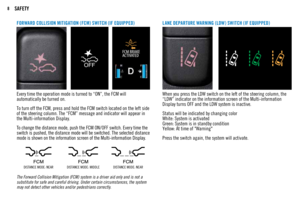
Every time the operation mode is turned to “ON”, the FCM will
automatically be turned on.
To turn off the FCM, press and hold the FCM switch located on the left side
of the steering colu")
8SAFETY
Every time the operation mode is turned to “ON”, the FCM will
automatically be turned on.
To turn off the FCM, press and hold the FCM switch located on the left side
of the steering column. The “FCM” message and indicator will appear in
the Multi-information Display.
To change the distance mode, push the FCM ON/OFF switch. Every time the
switch is pushed, the distance mode will be switched. The selected distance
mode is shown on the information screen of the Multi-information Display.
DISTANCE MODE: NEARDISTANCE MODE: MIDDLE DISTANCE MODE: NEAR
The Forward Collision Mitigation (FCM) system is a driver aid only and is not a
substitute for safe and careful driving. Under certain circumstances, the system
may not detect other vehicles and/or pedestrians correctly.
FORWARD COLLISION MITIGATION (FCM) SWITCH (IF EQUIPPED)
When you press the LDW switch on the left of the steering column, the
“LDW” indicator on the information screen of the Multi-information
Display turns OFF and the LDW system is inactive.
Status will be indicated by changing color
White: System is activated
Green: System is in standby condition
Yellow: At time of "Warning"
Press the switch again, the system will activate.
LANE DEPARTURE WARNING (LDW) SWITCH (IF EQUIPPED)
Page 10 of 22
 9SAFETY
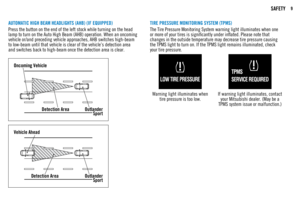
AUTOMATIC HIGH BEAM HEADLIGHTS (AHB) (IF EQUIPPED)
Press the button on the end of the left stock while turning on the head
lamp to turn on the Auto High Beam (AHB) operation. When an oncoming")
9SAFETY
AUTOMATIC HIGH BEAM HEADLIGHTS (AHB) (IF EQUIPPED)
Press the button on the end of the left stock while turning on the head
lamp to turn on the Auto High Beam (AHB) operation. When an oncoming
vehicle or/and preceding vehicle approaches, AHB switches high-beam
to low-beam until that vehicle is clear of the vehicle’s detection area
and switches back to high-beam once the detection area is clear.
Oncoming VehicleDetection Area Outlander
Sport
Vehicle Ahead
Detection Area Outlander
Sport
TIRE PRESSURE MONITORING SYSTEM (TPMS)
The Tire Pressure Monitoring System warning light illuminates when one
or more of your tires is significantly under inflated. Please note that
changes in the outside temperature may decrease tire pressure causing
the TPMS light to turn on. If the TPMS light remains illuminated, check
your tire pressure.
Warning light illuminates when tire pressure is too low.
If warning light illuminates, contact your Mitsubishi dealer. (May be a
TPMS system issue or malfunction.)
Page 11 of 22
 10TECHNOLOGY
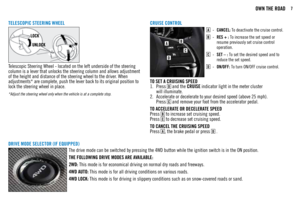
ENGINE START SWITCH (IF EQUIPPED)STARTING THE ENGINE
1. Make sure the parking brake is applied.
2. Press and hold the brake pedal down with your foot.
3. Make sure the drive selector le")
10TECHNOLOGY
ENGINE START SWITCH (IF EQUIPPED)STARTING THE ENGINE
1. Make sure the parking brake is applied.
2. Press and hold the brake pedal down with your foot.
3. Make sure the drive selector lever is in the “P” (Park) position.
4. Press the engine switch.
STOPPING THE ENGINE
1. Stop the vehicle.
2. Fully engage the parking brake while depressing the
brake pedal.
3. Move the selector lever to the “P” (Park) position and then
press the engine switch to stop the engine.
FAST-KEY (IF EQUIPPED)
The Free-hand Advanced Security Transmitter (FAST-key)
enables the engine to be started and the operation mode to be
changed simply by carrying it. While carrying the FAST-key, press
the driver’s door lock/unlock
switch
.
KEYLESS ENTRY SYSTEM
FAST-KEYNORMAL KEY
LOCK ( ) BUTTON
Press: Lock all doors
UNLOCK (
) BUTTON
Press: Once – Unlock driver door
Twice – Unlock all doors
PANIC BUTTON
Press and hold to sound alarm.
Press any button to turn off panic alarm.
ECO DRIVING When the ECO indicator light is on, your current driving style
supports good fuel economy. The ECO light will only work in
normal mode.
Page 12 of 22
11TECHNOLOGY
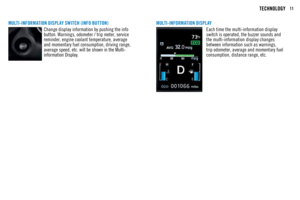
MULTI-INFORMATION DISPLAY SWITCH (INFO BUT TON)Change display information by pushing the info
button. Warnings, odometer / trip meter, service
reminder, engine coolant temperature, average
and momentary fuel consumption, driving range,
average speed, etc. will be shown in the Multi-
information Display. MULTI-INFORMATION DISPL AY
Each time the multi-information display
switch is operated, the buzzer sounds and
the multi-information display changes
between information such as warnings,
trip odometer, average and momentary fuel
consumption, distance range, etc.
Page 13 of 22
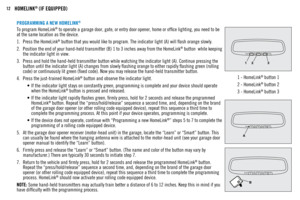
 12HOMELINK® (IF EQUIPPED)
PROGRAMMING A NEW HOMELINK®
To program HomeLink® to operate a garage door, gate, or entry door opener, home or office lighting, you need to be
at the same location as the")
12HOMELINK® (IF EQUIPPED)
PROGRAMMING A NEW HOMELINK®
To program HomeLink® to operate a garage door, gate, or entry door opener, home or office lighting, you need to be
at the same location as the device.
1. Press the HomeLink
® button that you would like to program. The indicator light (A) will flash orange slowly.
2. Position the end of your hand-held transmitter (B) 1 to 3 inches away from the HomeLink
® button while keeping
the indicator light in view.
3. Press and hold the hand-held transmitter button while watching the indicator light (A). Continue pressing the
button until the indicator light (A) changes from slowly flashing orange to either rapidly flashing green (rolling
code) or continuously lit green (fixed code). Now you may release the hand-held transmitter button.
4. Press the just-trained HomeLink
® button and observe the indicator light.
• If the indicator light stays on constantly green, programming is complete and your device should operate
when the HomeLink
® button is pressed and released.
• If the indicator light rapidly flashes green, firmly press, hold for 2 seconds and release the programmed
HomeLink
® button. Repeat the “press/hold/release” sequence a second time, and, depending on the brand
of the garage door opener (or other rolling code equipped device), repeat this sequence a third time to
complete the programming process. At this point if your device operates, programming is complete.
• If the device does not operate, continue with “Programming a new HomeLink
®” steps 5 to 7 to complete the
programming of a rolling code equipped device.
5. At the garage door opener receiver (motor-head unit) in the garage, locate the “Learn” or “Smart” button. This
can usually be found where the hanging antenna wire is attached to the motor-head unit (see your garage door
opener manual to identify the “Learn” button).
6. Firmly press and release the “Learn” or “Smart” button. (The name and color of the button may vary by
manufacturer.) There are typically 30 seconds to initiate step 7.
7. Return to the vehicle and firmly press, hold for 2 seconds and release the programmed HomeLink
® button.
Repeat the “press/hold/release” sequence a second time, and, depending on the brand of the garage door
opener (or other rolling code equipped device), repeat this sequence a third time to complete the programming
process. HomeLink
® should now activate your rolling code equipped device.
NOTE: Some hand-held transmitters may actually train better a distance of 6 to 12 inches. Keep this in mind if you
have difficulty with the programming process. 1 - HomeLink
® button 1
2 - HomeLink
® button 2
3 - HomeLink
® button 3
Page 14 of 22
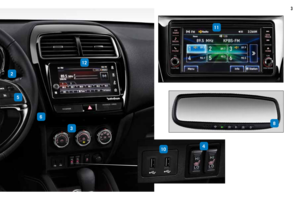
13AUDIO SYSTEM
AUDIO REMOTE CONTROL SWITCH
VOLUME UPSEEK
Change station or track
VOLUME DOWN MODE
Change the audio source
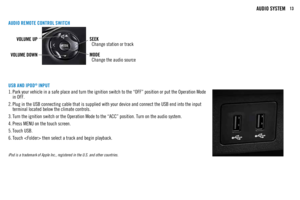
USB AND IPOD® INPUT
1. Park your vehicle in a safe place and turn the ignition switch to the “OFF” position or put the Operation Mode
in OFF.
2. Plug in the USB connecting cable that is supplied with your device and connect the USB end into the input
terminal located below the climate controls.
3. Turn the ignition switch or the Operation Mode to the “ACC” position. Turn on the audio system.
4. Press MENU on the touch screen.
5. Touch USB.
6. Touch then select a track and begin playback.
iPod is a trademark of Apple Inc., registered in the U.S. and other countries.
Page 15 of 22
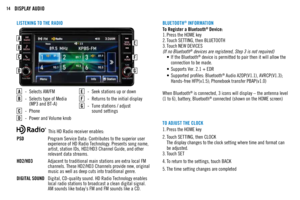
 14DISPLAY AUDIO
LISTENING TO THE RADIO
- Selects AM/FM
- Selects type of Media
(MP3 and BT-A)
- Phone
- Power and Volume knob
- Seek stations up or down
- Returns to the initial display
-")
14DISPLAY AUDIO
LISTENING TO THE RADIO
- Selects AM/FM
- Selects type of Media
(MP3 and BT-A)
- Phone
- Power and Volume knob
- Seek stations up or down
- Returns to the initial display
- Tune stations / adjust
sound settings
TO ADJUST THE CLOCK
1. Press the HOME key
2. Touch SETTING, then CLOCK
The display changes to the clock setting where time and format can
be adjusted.
3. Touch SET
4. To return to the settings, touch BACK
5. The time setting changes are completed
This HD Radio receiver enables:
PSD Program Service Data: Contributes to the superior user
experience of HD Radio Technology. Presents song name,
artist, station IDs, HD2/HD3 Channel Guide, and other
relevant data streams.
HD2/HD3 Adjacent to traditional main stations are extra local FM
channels. These HD2/HD3 Channels provide new, original
music as well as deep cuts into traditional genre.
DIGITAL SOUND Digital, CD-quality sound. HD Radio Technology enables
local radio stations to broadcast a clean digital signal.
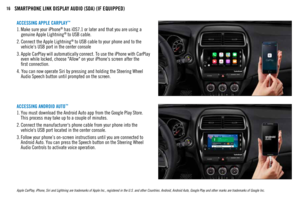
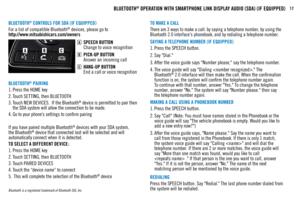
AM sounds like today’s FM and FM sounds like a CD. To Register a Bluetooth
® Device:
1. Press the HOME key
2. Touch SETTING, then BLUETOOTH
3. Touch NEW DEVICES
(If no Bluetooth
® devices are registered, Step 3 is not required)
• If the Bluetooth® device is permitted to pair then it will allow the
connection to be made.
• Supports Ver. 2.1 + EDR
• Supported profiles: Bluetooth
® Audio A2DP(V1.1), AVRCP(V1.3);
Hands-free HFP(v1.5); Phonebook transfer PBAP(v1.0)
When Bluetooth
® is connected, 3 icons will display – the antenna level
(1 to 6), battery, Bluetooth® connected (shown on the HOME screen)
BLUETOOTH
® INFORMATION
AEB
C
D
F
G
Page 16 of 22
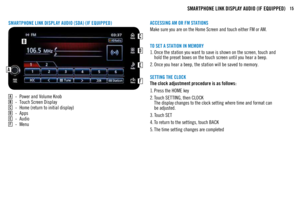
15SMARTPHONE LINK DISPLAY AUDIO (IF EQUIPPED)
A - Power and Volume Knob
B - Touch Screen Display
C - Home (return to initial display)
D - Apps
E - Audio
F - Menu
SMARTPHONE LINK DISPLAY AUDIO (SDA) (IF EQUIPPED)


 11TECHNOLOGY
MULTI-INFORMATION DISPLAY SWITCH (INFO BUT TON)Change display information by pushing the info
button. Warnings, odometer / trip meter, service
reminder, engine coolant temperature, aver")
 13AUDIO SYSTEM
AUDIO REMOTE CONTROL SWITCH
VOLUME UPSEEK
Change station or track
VOLUME DOWN MODE
Change the audio source
USB AND IPOD® INPUT
1. Park your vehicle in a safe place and turn the ig")
 15SMARTPHONE LINK DISPLAY AUDIO (IF EQUIPPED)
A - Power and Volume Knob
B - Touch Screen Display
C - Home (return to initial display)
D - Apps
E - Audio
F - Menu
SMARTPHONE LINK DISPLAY AUDIO (SD")