2018 MITSUBISHI OUTLANDER SPORT light
[x] Cancel search: lightPage 3 of 22
2
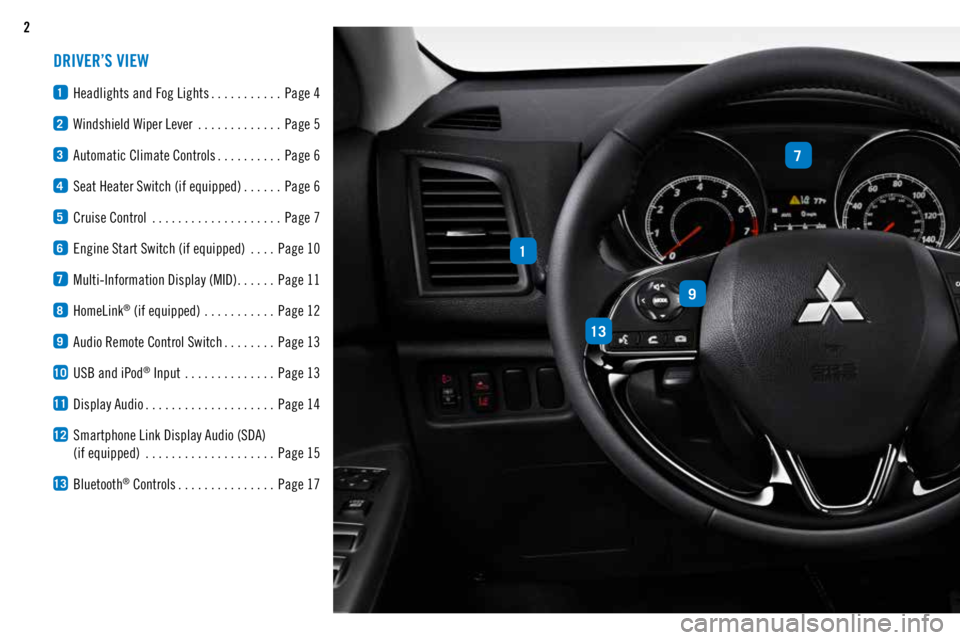
DRIVER’S VIEW
1 Headlights and Fog Lights ...........
Page 4
2 Windshield Wiper Lever
.............Page 5
3 Automatic Climate Controls ..........
Page 6
4 Seat Heater Switch (if equipped) ......
Page 6
5 Cruise Control
.................... Page 7
6 Engine Start Switch (if equipped)
....Page 10
7 Multi-Information Display (MID) ......
Page 11
8 HomeLink® (if equipped)
........... Page 12
9 Audio Remote Control Switch ........
Page 13
10 USB and iPod® Input
.............. Page 13
11 Display Audio ....................
Page 14
12 Smartphone Link Display Audio (SDA)
(if equipped) .................... Page 15
13 Bluetooth® Controls ...............
Page 17
1
7
9
13
Page 5 of 22
4CONTROLS
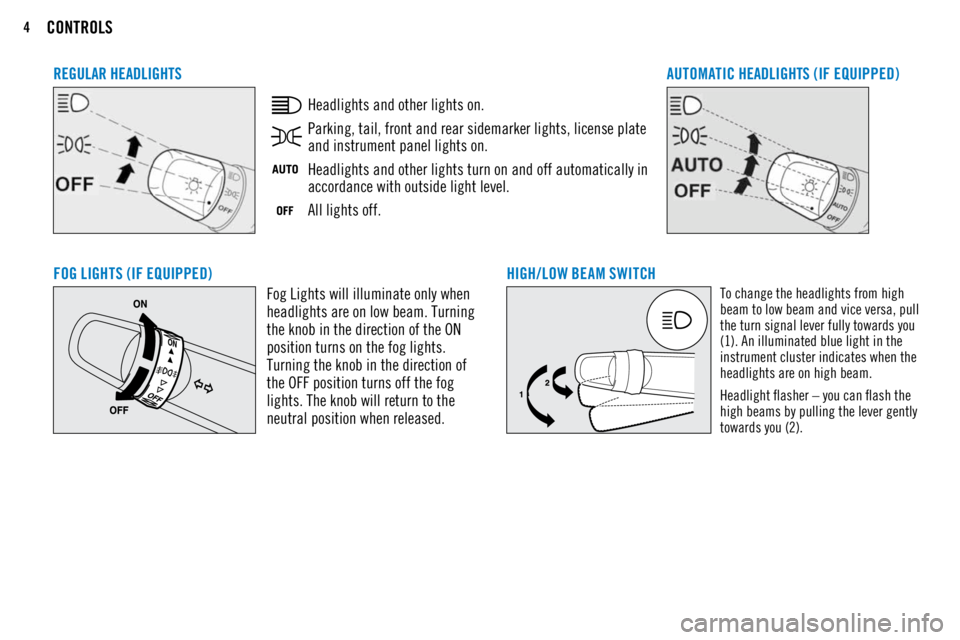
FOG LIGHTS (IF EQUIPPED)Fog Lights will illuminate only when
headlights are on low beam. Turning
the knob in the direction of the ON
position turns on the fog lights.
Turning the knob in the direction of
the OFF position turns off the fog
lights. The knob will return to the
neutral position when released. HIGH /LOW BEAM SWITCH
To change the headlights from high
beam to low beam and vice versa, pull
the turn signal lever fully towards you
(1). An illuminated blue light in the
instrument cluster indicates when the
headlights are on high beam.
Headlight flasher – you can flash the
high beams by pulling the lever gently
towards you (2).
REGULAR HEADLIGHTSAUTOMATIC HEADLIGHTS (IF EQUIPPED)
Headlights and other lights on.
Parking, tail, front and rear sidemarker lights, license plate
and instrument panel lights on.
Headlights and other lights turn on and off automatically in
accordance with outside light level.
All lights off.
Page 7 of 22
6
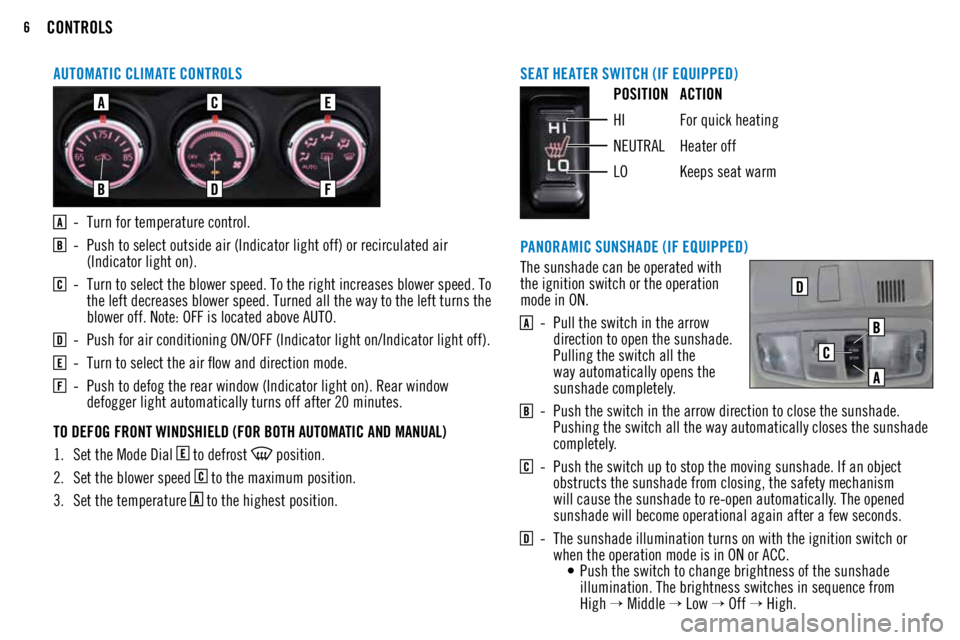
SEAT HEATER SWITCH (IF EQUIPPED)POSITION ACTION
HI For quick heating
NEUTRAL Heater off
LO Keeps seat warm
- Turn for temperature control.
- Push to select outside air (Indicator light off) or recirculated air
(Indicator light on).
- Turn to select the blower speed. To the right increases blower speed. To
the left decreases blower speed. Turned all the way to the left turns the
blower off. Note: OFF is located above AUTO.
- Push for air conditioning ON/OFF (Indicator light on/Indicator light off).
- Turn to select the air flow and direction mode.
- Push to defog the rear window (Indicator light on). Rear window
defogger light automatically turns off after 20 minutes.
TO DEFOG FRONT WINDSHIELD (FOR BOTH AUTOMATIC AND MANUAL)
1. Set the Mode Dial
to defrost position.
2. Set the blower speed
to the maximum position.
3. Set the temperature
to the highest position.
PANORAMIC SUNSHADE (IF EQUIPPED)
The sunshade can be operated with
the ignition switch or the operation
mode in ON.
- Push the switch in the arrow direction to close the sunshade.
Pushing the switch all the way automatically closes the sunshade
completely.
- Push the switch up to stop the moving sunshade. If an object
obstructs the sunshade from closing, the safety mechanism
will cause the sunshade to re-open automatically. The opened
sunshade will become operational again after a few seconds.
- The sunshade illumination turns on with the ignition switch or
when the operation mode is in ON or ACC.
• Push the switch to change brightness of the sunshade
illumination. The brightness switches in sequence from
High → Middle → Low → Off → High.
Page 8 of 22
7OWN THE ROAD
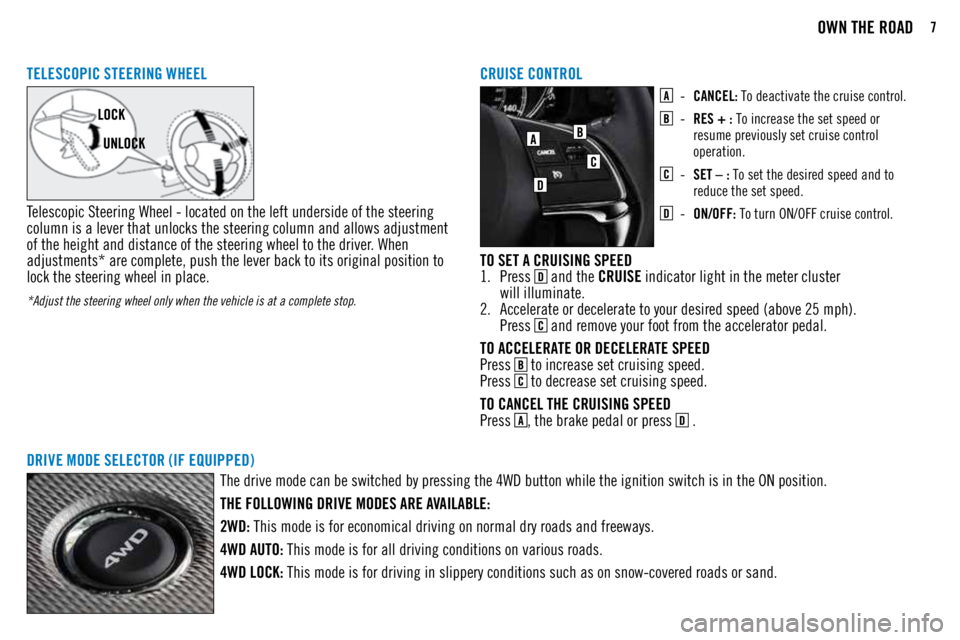
TELESCOPIC STEERING WHEEL
Telescopic Steering Wheel - located on the left underside of the steering
column is a lever that unlocks the steering column and allows adjustment
of the height and distance of the steering wheel to the driver. When
adjustments* are complete, push the lever back to its original position to
lock the steering wheel in place.
*Adjust the steering wheel only when the vehicle is at a complete stop.
- CANCEL: To deactivate the cruise control.
- RES + : To increase the set speed or
resume previously set cruise control
operation.
- SET – : To set the desired speed and to
reduce the set speed.
- ON/OFF: To turn ON/OFF cruise control.
CRUISE CONTROL
TO SET A CRUISING SPEED
1. Press
and the CRUISE indicator light in the meter cluster
will illuminate.
2. Accelerate or decelerate to your desired speed (above 25 mph).
Press
and remove your foot from the accelerator pedal.
TO ACCELERATE OR DECELERATE SPEED
Press
to increase set cruising speed.
Press
to decrease set cruising speed.
TO CANCEL THE CRUISING SPEED
Press
, the brake pedal or press .
DRIVE MODE SELECTOR (IF EQUIPPED) The drive mode can be switched by pressing the 4WD button while the ignition switch is in the ON position.
THE FOLLOWING DRIVE MODES ARE AVAILABLE:
2WD: This mode is for economical driving on normal dry roads and freeways.
4WD AUTO: This mode is for all driving conditions on various roads.
4WD LOCK: This mode is for driving in slippery conditions such as on snow-covered roads or sand.
Page 10 of 22
9SAFETY
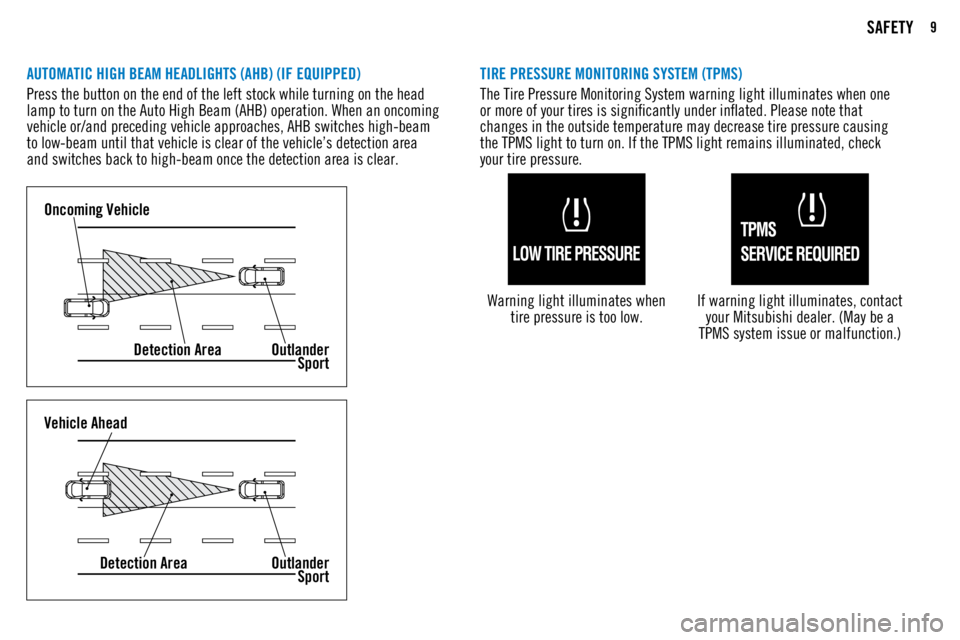
AUTOMATIC HIGH BEAM HEADLIGHTS (AHB) (IF EQUIPPED)
Press the button on the end of the left stock while turning on the head
lamp to turn on the Auto High Beam (AHB) operation. When an oncoming
vehicle or/and preceding vehicle approaches, AHB switches high-beam
to low-beam until that vehicle is clear of the vehicle’s detection area
and switches back to high-beam once the detection area is clear.
Oncoming VehicleDetection Area Outlander
Sport
Vehicle Ahead
Detection Area Outlander
Sport
TIRE PRESSURE MONITORING SYSTEM (TPMS)
The Tire Pressure Monitoring System warning light illuminates when one
or more of your tires is significantly under inflated. Please note that
changes in the outside temperature may decrease tire pressure causing
the TPMS light to turn on. If the TPMS light remains illuminated, check
your tire pressure.
Warning light illuminates when tire pressure is too low.
If warning light illuminates, contact your Mitsubishi dealer. (May be a
TPMS system issue or malfunction.)
Page 11 of 22
10TECHNOLOGY
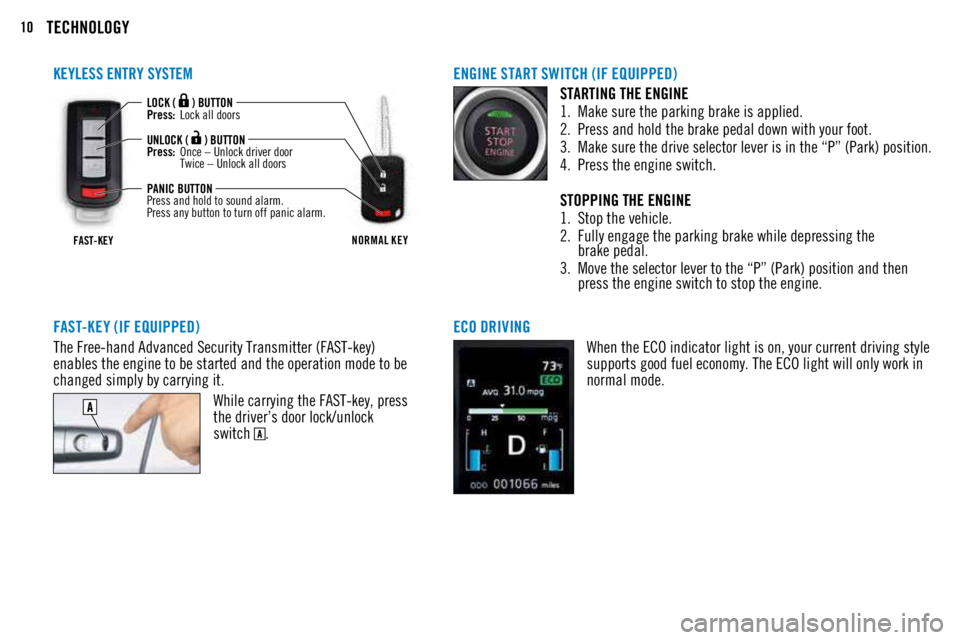
ENGINE START SWITCH (IF EQUIPPED)STARTING THE ENGINE
1. Make sure the parking brake is applied.
2. Press and hold the brake pedal down with your foot.
3. Make sure the drive selector lever is in the “P” (Park) position.
4. Press the engine switch.
STOPPING THE ENGINE
1. Stop the vehicle.
2. Fully engage the parking brake while depressing the
brake pedal.
3. Move the selector lever to the “P” (Park) position and then
press the engine switch to stop the engine.
FAST-KEY (IF EQUIPPED)
The Free-hand Advanced Security Transmitter (FAST-key)
enables the engine to be started and the operation mode to be
changed simply by carrying it. While carrying the FAST-key, press
the driver’s door lock/unlock
switch
.
KEYLESS ENTRY SYSTEM
FAST-KEYNORMAL KEY
LOCK ( ) BUTTON
Press: Lock all doors
UNLOCK (
) BUTTON
Press: Once – Unlock driver door
Twice – Unlock all doors
PANIC BUTTON
Press and hold to sound alarm.
Press any button to turn off panic alarm.
ECO DRIVING When the ECO indicator light is on, your current driving style
supports good fuel economy. The ECO light will only work in
normal mode.
Page 13 of 22
12HOMELINK® (IF EQUIPPED)
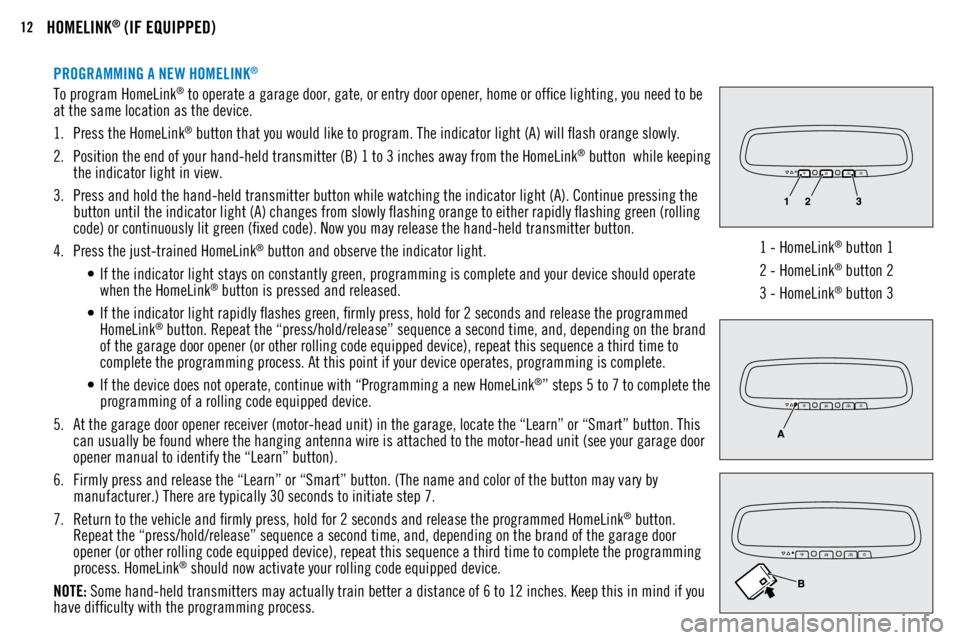
PROGRAMMING A NEW HOMELINK®
To program HomeLink® to operate a garage door, gate, or entry door opener, home or office lighting, you need to be
at the same location as the device.
1. Press the HomeLink
® button that you would like to program. The indicator light (A) will flash orange slowly.
2. Position the end of your hand-held transmitter (B) 1 to 3 inches away from the HomeLink
® button while keeping
the indicator light in view.
3. Press and hold the hand-held transmitter button while watching the indicator light (A). Continue pressing the
button until the indicator light (A) changes from slowly flashing orange to either rapidly flashing green (rolling
code) or continuously lit green (fixed code). Now you may release the hand-held transmitter button.
4. Press the just-trained HomeLink
® button and observe the indicator light.
• If the indicator light stays on constantly green, programming is complete and your device should operate
when the HomeLink
® button is pressed and released.
• If the indicator light rapidly flashes green, firmly press, hold for 2 seconds and release the programmed
HomeLink
® button. Repeat the “press/hold/release” sequence a second time, and, depending on the brand
of the garage door opener (or other rolling code equipped device), repeat this sequence a third time to
complete the programming process. At this point if your device operates, programming is complete.
• If the device does not operate, continue with “Programming a new HomeLink
®” steps 5 to 7 to complete the
programming of a rolling code equipped device.
5. At the garage door opener receiver (motor-head unit) in the garage, locate the “Learn” or “Smart” button. This
can usually be found where the hanging antenna wire is attached to the motor-head unit (see your garage door
opener manual to identify the “Learn” button).
6. Firmly press and release the “Learn” or “Smart” button. (The name and color of the button may vary by
manufacturer.) There are typically 30 seconds to initiate step 7.
7. Return to the vehicle and firmly press, hold for 2 seconds and release the programmed HomeLink
® button.
Repeat the “press/hold/release” sequence a second time, and, depending on the brand of the garage door
opener (or other rolling code equipped device), repeat this sequence a third time to complete the programming
process. HomeLink
® should now activate your rolling code equipped device.
NOTE: Some hand-held transmitters may actually train better a distance of 6 to 12 inches. Keep this in mind if you
have difficulty with the programming process. 1 - HomeLink
® button 1
2 - HomeLink
® button 2
3 - HomeLink
® button 3
Page 17 of 22
16SMARTPHONE LINK DISPLAY AUDIO (SDA) (IF EQUIPPED)
Apple CarPlay, iPhone, Siri and Lightning are trademarks of Apple Inc., registered in the U.S. and other Countries. Android, Android Auto, Google Play and other marks are trademarks of Google Inc.
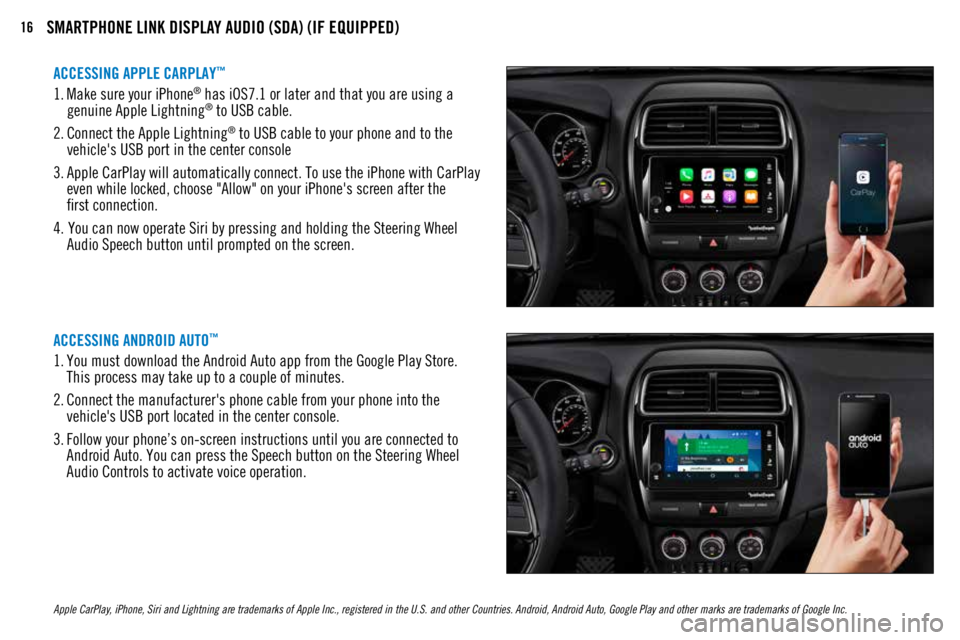
1. Make sure your iPhone® has iOS7.1 or later and that you are using a
genuine Apple Lightning® to USB cable.
2. Connect the Apple Lightning
® to USB cable to your phone and to the
vehicle's USB port in the center console
3. Apple CarPlay will automatically connect. To use the iPhone with CarPlay
even while locked, choose "Allow" on your iPhone's screen after the
first connection.
4. You can now operate Siri by pressing and holding the Steering Wheel Audio Speech button until prompted on the screen.
ACCESSING APPLE CARPLAY
™
1.
You must download the Android Auto app from the Google Play Store.
This process may take up to a couple of minutes.
2. Connect the manufacturer's phone cable from your phone into the
vehicle's USB port located in the center console.
3. Follow your phone’s on-screen instructions until you are connected to
Android Auto. You can press the Speech button on the Steering Wheel
Audio Controls to activate voice operation.
ACCESSING ANDROID AUTO
™