2018 MITSUBISHI OUTLANDER PHEV Page 5
[x] Cancel search: Page 5Page 97 of 538

NOTElRepeated continuous operation of the handle
could activate the protection circuit and tem-
porarily prevent the tailgate easy closer from
operating.
If this occurs, wait about 1 minute before
operating the tailgate easy closer again.Inside tailgate release
E00303401370
The inside tailgate release is designed to pro-
vide a way to open the tailgate in the case of a discharged auxiliary battery.
The tailgate release (see illustration) is moun- ted on the tailgate.
You and your family should familiarise your- selves with the location and operation of the
tailgate release.
To open
1. Open the lid (A) inside of the tailgate.
2. Move the lever (B) to open the tailgate.
3. Push out on the tailgate to open it.
CAUTIONl Always keep the release lever lid on the tail-
gate closed when driving so that your lug- gage cannot accidentally bump against thelever and open the tailgate.Security alarm system*
E00301502172
The security alarm system is for alerting thesurrounding area of suspicious behaviour to
prevent unlawful entry into the vehicle by op- erating an alarm if a door, the tailgate or the bonnet is opened when the vehicle has not
been unlocked using the keyless entry system or the keyless operation function.
Also, for vehicles equipped with the interior
alarm sensor, the alarm will be activated if
any of the following occurs:
l attempt to an unlawful moving of the ve-
hicle (the vehicle inclination detection
function)
l detection of a motion in the vehicle (the
interior intrusion detection function)
l disconnection of the battery terminal
The security alarm system is set to “active”.
When making changes to the settings, please follow the procedure listed in the section ti-
tled “Changing the security alarm settings” on page 4-30.
Inside tailgate release
4-27OGGE18E1Locking and unlocking4 Vehicles without
electric tailgateVehicles with
electrictailgate
Page 98 of 538

On vehicles equipped with the Smartphone
Link Display Audio or the MITSUBISHI
Multi-Communication System (MMCS),
screen operations can be used to make the ad- justment. Refer to the separate owner’s man-
ual for details.CAUTIONl Do not modify or add parts to the security
alarm system.
Doing so could cause the security alarm to malfunction.NOTEl The alarm system will not be activated if the
doors and the tailgate have been locked us-ing a key, the inside lock knob or the central
door lock switch (instead of the keyless en- try system or the keyless operation func-
tion).NOTEl For vehicles equipped with the interior alarm
sensor, if the turn-signal lamps do not blink after the locking and unlocking operation us-ing the keyless entry system or the keyless
operation function, the security alarm system
may be malfunctioning.
Have the vehicle inspected at a MITSUBISHI MOTORS Authorized Serv-
ice Point.
If the confirmation function (blinking of the turn-signal lamps by locking and unlocking
the doors and the tailgate) is deactivated, the turn-signal lamps do not blink after the lock-
ing and unlocking operation.
For information on the confirmation func- tion, refer to “Keyless entry system” on page
4-03 and “To operate using the keyless oper-
ation function” on page 4-09.
l For vehicles equipped with the interior alarm
sensor, the security alarm system could be activated in the following situations.
• Using a car wash
• Taking the vehicle on a ferry
• Parking in an automated car park
• Leaving someone or a pet in the vehicle
• Leaving a window or the sunroof open
• Leaving an unstable object such as a stuf-
fed toy or accessory in the vehicle
• Suffering a continuous impact or vibra-
tion by hail, thunder, etc.NOTE• Air flows by the Remote Climate Control.
According to the situations, please deacti-
vate the vehicle inclination detection function and the interior intrusion detec-
tion function.
Refer to “To deactivate the vehicle incli-
nation detection function and the interior intrusion detection function” on page 4-32.
l For vehicles equipped with the interior alarm
sensor, the sensitivity of the interior intru- sion detection function can be adjusted. For details, please contact a MITSUBISHI
MOTORS Authorized Service Point.
Security alarm system*
4-28OGGE18E1Locking and unlocking4
Page 99 of 538

The security alarm has fourmodes:
System preparation mode (ap- proximately 20 seconds)
(The buzzer sounds intermittently and the se-curity indicator (A) blinks.)
The system preparation time extends fromthe point at which all of the doors and the
tailgate are locked by pressing the LOCK
switch on the remote control switch or the
keyless operation function to the point at which the system armed mode goes into ef- fect.
During this time, it is possible to temporarily
open a door or the tailgate without using the
keyless entry system or the keyless operation function and without causing the alarm tosound (for example, when you forget some-
thing inside the vehicle or realize that a win- dow is open).
System armed mode
(The buzzer stops and the security indicator continues to blink with the indicator’s re-
duced lit-up duration time.)
Once the system preparation mode has ended,
the system armed mode starts.
If an unlawful opening of any of the doors,
tailgate or bonnet is detected during the sys- tem armed mode, the alarm will be activated
to warn people around the vehicle of an ab-
normal condition.
Also, for vehicles equipped with the interior alarm sensor, if unlawful moving of the vehi-
cle is attempted or a vehicle intrusion is de-
tected, the alarm will be activated.
Alarm activation
Inside alarm (approximately 10 seconds):
The buzzer sounds, warning those inside the vehicle of an abnormal condition.
(except for vehicles equipped with the interi-
or alarm sensor)
Outside alarm (approximately 30 seconds):
The turn-signal lamps blink and the horn (the
siren for vehicles equipped with the interior alarm sensor) sounds, warning people around
the vehicle of an abnormal condition.
Refer to “Alarm activation” on page 4-33.NOTEl The alarm will resume if unlawful actions
are taken again, even if the alarm has stop-
ped.
System cancellation
It is possible to cancel the system activation
during the system preparation mode or the system armed mode.
In addition, it is possible to cancel the alarm
once it has been activated.
Refer to “Cancelling the system” on page 4-32, “Cancelling the alarm” on page 4-34.
NOTEl When lending the vehicle to another person
or allowing the vehicle to be driven bysomeone who is unfamiliar with the securityalarm system, be sure to give the person a
proper explanation of the security alarm sys- tem.
If a person who is unfamiliar with the securi-
ty alarm system accidentally unlocked the vehicle, causing the alarm to sound, the
alarm would be a nuisance to people nearby.
Security alarm system*
4-29OGGE18E1Locking and unlocking4
Page 113 of 538

Rear seatsE00401301549
To adjust the seatback, pull the lever up andadjust the seatback by hand to the desired po-
sition, and release the lever.
Armrest
E00401701732
To use the armrest, fold it down.
To return to the original position, push it
backward level with the seat.NOTEl Do not climb or sit on the armrest.
Doing so could damage the armrest.
l The top surface of the armrest contains a cup
holder for rear seat occupants.
Refer to “Cup holder” on page 8-82.Head restraints
E00403302654WARNINGlDriving without the head restraints in
place can cause you and your passengers
serious injury or death in an accident. To reduce the risk of injury in an accident, always make sure the head restraints are
installed and properly positioned when the seat is occupied.WARNINGl Never place a cushion or similar device on
the seatback. This can adversely affect head restraint performance by increasing
the distance between your head and the restraint.
l When a person sits in the rear seats, pull
up the head restraint to a height at which
it locks in position. Be sure to make this adjustment before starting to drive. Seri- ous injuries could otherwise be suffered asthe result of an impact.
To adjust height
Adjust the head restraint height so that the
centre of the head restraint is as close as pos-
sible to ear level to reduce the chances of in- jury in the event of collision. Any person too
tall for the head restraint to reach their seated ear level, should adjust the restraint as highas possible.
Rear seats
5-05OGGE18E1Seats and seat belts5
Page 115 of 538

CAUTIONlWhen folding the seat, be sure not to catch
your hand or leg.NOTEl It is possible to fold the seat independently
on each side.
To fold
1. Lower the head restraints of the rear seat
to the lowest position.
Refer to “Head restraints” on page 5-05.
2. Store the seat belt for the rear centre
seating position.
Refer to “Rear-centre 3-point type seat belt” on page 5-13.
3. Lift the front end of the seat cushion.
4. Flip the seat cushion forward.
5. Fold the seat belt buckles forward.
CAUTIONl Do not allow any person to get on the plastic
cover (A), and do not place luggage on it.
Doing so could damage cover.6. Pull up the lever, then fold the seatback
forward.CAUTIONl Do not allow any person to sit on the flipped
seat cushion, and do not place luggage on it.
The seat’s mounting fittings could bend un-
der the weight, making it impossible for the
seat to be retained on the vehicle.
To return
1. Raise the seatback until it locks securely
into place.
Making a luggage area
5-07OGGE18E1Seats and seat belts5
Page 116 of 538

2.While lifting the seat belt’s buckle (A),
gently lower the seat cushion. Make sure that there is a hook (B) at the positionshown in the illustration.3. Push down the seat cushion until it locks
into place.
4. Make sure the seat belt’s buckle is on
the seat cushion.
Making a flat seat
E00404301931
By removing the head restraints and fully re-
clining the seatbacks of the seats, one large flat seat is achieved.
WARNINGl Never drive with passengers on the flat
seat. This is highly dangerous.CAUTIONl To make a flat seat, stop the vehicle in a safe
place.
l Make sure the seat is adjusted by an adult or
with adult supervision for correct and safe
operation.
l Do not walk around on top of the seats after
they have been laid flat.
l To ensure the seats are locked securely, at-
tempt to move them back and forth.
l Do not jump on, or impact the seatbacks
heavily.
l To raise the seatback, put a hand on the seat-
back and raise slowly. Never have a child do
this operation, or an unexpected accident
may result.
1. Remove the head restraints from the
front seats, raise the armrest and remove
the cargo area cover. (Refer to “Head re-
straints” on page 5-05, “Armrest” on
page 5-05 and “Cargo area cover” on
page 8-83)
Making a flat seat
5-08OGGE18E1Seats and seat belts5
Page 117 of 538
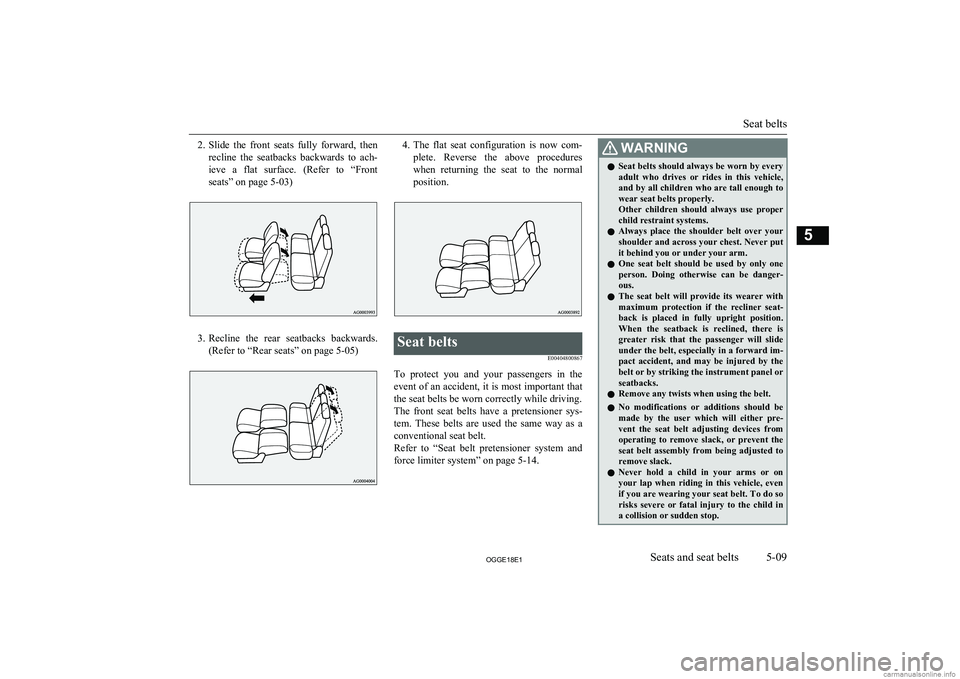
2.Slide the front seats fully forward, then
recline the seatbacks backwards to ach- ieve a flat surface. (Refer to “Front
seats” on page 5-03)
3. Recline the rear seatbacks backwards.
(Refer to “Rear seats” on page 5-05)
4. The flat seat configuration is now com-
plete. Reverse the above procedures
when returning the seat to the normal
position.Seat belts
E00404800867
To protect you and your passengers in theevent of an accident, it is most important thatthe seat belts be worn correctly while driving.
The front seat belts have a pretensioner sys- tem. These belts are used the same way as a
conventional seat belt.
Refer to “Seat belt pretensioner system and force limiter system” on page 5-14.
WARNINGl Seat belts should always be worn by every
adult who drives or rides in this vehicle,
and by all children who are tall enough to wear seat belts properly.
Other children should always use proper child restraint systems.
l Always place the shoulder belt over your
shoulder and across your chest. Never put
it behind you or under your arm.
l One seat belt should be used by only one
person. Doing otherwise can be danger-
ous.
l The seat belt will provide its wearer with
maximum protection if the recliner seat-
back is placed in fully upright position.
When the seatback is reclined, there is greater risk that the passenger will slide
under the belt, especially in a forward im-
pact accident, and may be injured by the
belt or by striking the instrument panel or seatbacks.
l Remove any twists when using the belt.
l No modifications or additions should be
made by the user which will either pre- vent the seat belt adjusting devices fromoperating to remove slack, or prevent the
seat belt assembly from being adjusted to
remove slack.
l Never hold a child in your arms or on
your lap when riding in this vehicle, even
if you are wearing your seat belt. To do so risks severe or fatal injury to the child in
a collision or sudden stop.
Seat belts
5-09OGGE18E1Seats and seat belts5
Page 118 of 538
WARNINGlAlways adjust the belt to a snug fit.
l Always wear the lap portion of the belt
over your hips.3-point type seat belt (with
emergency locking mechanism)
E00404902918
This type of belt requires no length adjust- ment. Once worn, the belt adjusts itself to the
movement of the wearer, but in the event of a sudden or strong shock, the belt automatical-
ly locks to hold the wearer’s body.
NOTEl You can check if the belt locks by pulling it
forward quickly.
l If the seat belt buckles in the rear seating po-
sition are not found, you will find them un-
der the rear seat cushion. Refer to “Making a
luggage area” on page 5-06 for how to put
the seat belt buckles at the proper position.
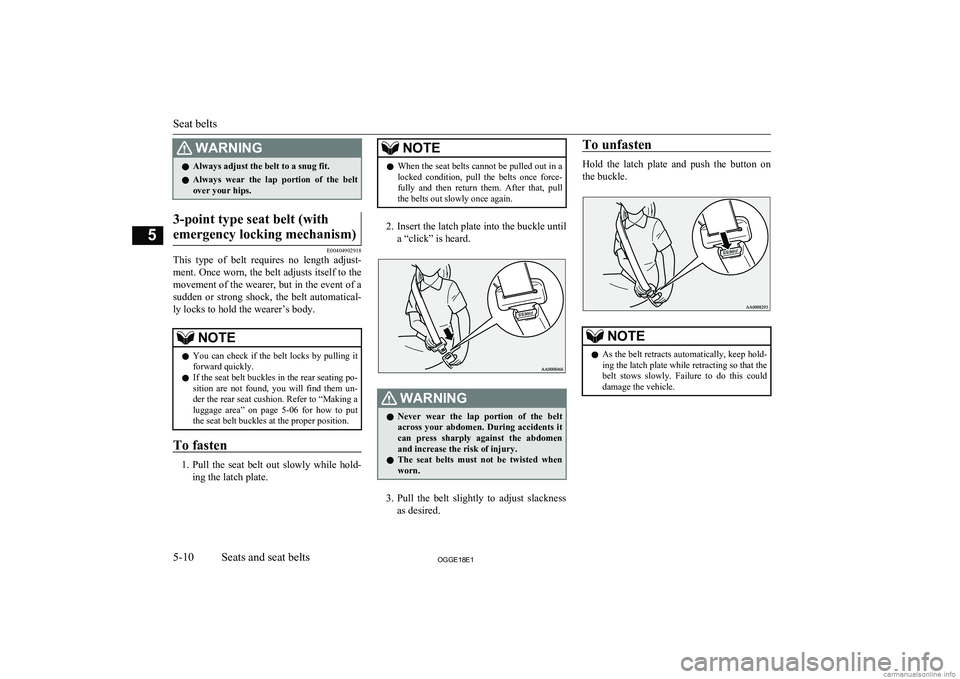
To fasten
1. Pull the seat belt out slowly while hold-
ing the latch plate.
NOTEl When the seat belts cannot be pulled out in a
locked condition, pull the belts once force-
fully and then return them. After that, pull
the belts out slowly once again.
2. Insert the latch plate into the buckle until
a “click” is heard.
WARNINGl Never wear the lap portion of the belt
across your abdomen. During accidents it
can press sharply against the abdomen and increase the risk of injury.
l The seat belts must not be twisted when
worn.
3. Pull the belt slightly to adjust slackness
as desired.
To unfasten
Hold the latch plate and push the button on
the buckle.
NOTEl As the belt retracts automatically, keep hold-
ing the latch plate while retracting so that the
belt stows slowly. Failure to do this could damage the vehicle.
Seat belts
5-10OGGE18E1Seats and seat belts5