2018 MERCEDES-BENZ SLC ROADSTER sensor
[x] Cancel search: sensorPage 68 of 298
Locking/unlockingcentrally
You can start,lockorunlock thevehicle using
KEYLESS-GO .Todothis, you onl yneedc arry the
SmartKey with you. You can combine th efunc-
tions of KEYLESS-GO with those of aconven-
tional SmartKey. Unlockt hevehicle by using
KEYLESS-GO ,for instance, and lockitu singthe
& button on th eSmartKey.
The driver' sdoor and th edoor at whicht hehan-
dle is used, must bothbec losed. The SmartKey
must be outside th evehicle .When locking or
unlocking with KEYLESS-GO ,the distance
between th ekey and th ecorresponding door
handle must not be greater than 3ft(1m).
Ac heck whichp eriodicallyestablishesar adio
connectio nbetween th evehicle and th eSmart-
Key determine swhether avalid SmartKey is in
th ev ehicle .This occurs, for example:
Rwhen starting th eengine
Rwhile driving
Rwhen th eexternal door handles are touched
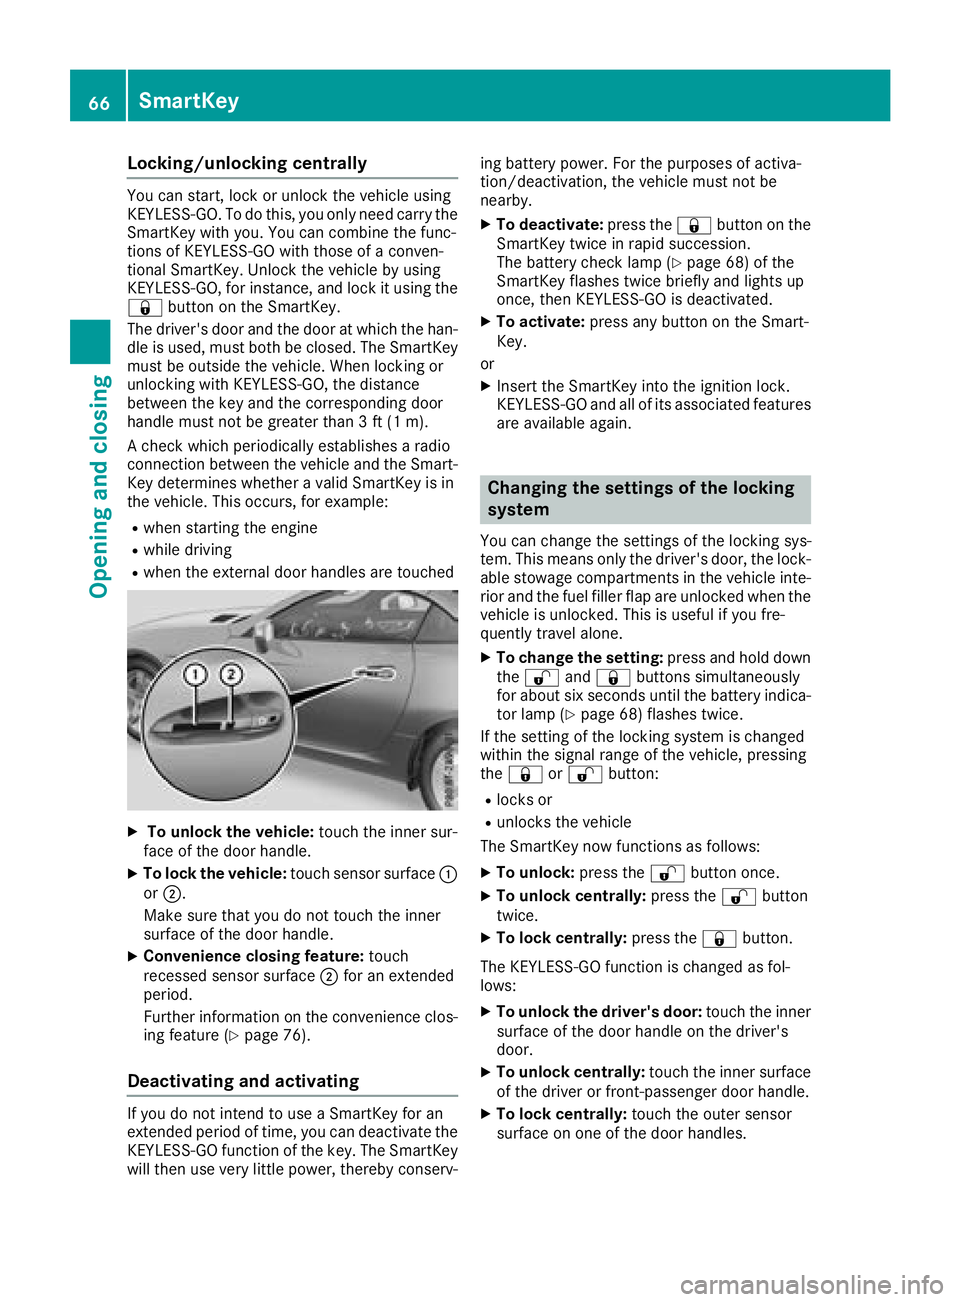
XTo unlock th evehicle: touch th einner sur-
fac eoft hedoor handle.
XTo lock th evehicle: touch sensor surface :
or ;.
Makes ure that you do not touch th einner
surface of th edoor handle.
XConvenience closing feature: touch
recesseds ensor surface ;for an extended
period.
Further informatio nontheconvenience clos-
ing feature (
Ypage 76).
Deactivating and activating
If you do not intend to use aSmartKey for an
extended perio doftime, you can deactivate the
KEYLESS-GO function of th ekey. The SmartKey
will then use veryl ittle power,therebyc onserv- ing battery power.F
or thepurposes of activa-
tion/deactivation, th evehicle must not be
nearby.
XTo deactivate: pressthe& button on the
SmartKey twic einrapid succession.
The battery check lamp (
Ypage 68 )ofthe
SmartKey flashes twic ebriefly and lightsu p
once, then KEYLESS-GO is deactivated.
XTo activate: pressany button on th eSmart-
Key.
or
XInsertt heSmartKey int othe ignitio nlock.
KEYLESS-GO and all of its associate dfeatures
are available again.
Changing th esettings of th elocking
system
You can change th esettings of th elockin gsys-
tem .This meanso nlyt he driver' sdoor,t helock-
able stowage compartments in th evehicle inte-
rior and th efuel filler flap are unlocked when the
vehicle is unlocked. This is useful if you fre-
quently travel alone.
XTo change th esetting: pressand hold down
the % and& buttons simultaneously
for about six second suntil th ebattery indica-
to rlamp (
Ypage 68 )flashes twice.
If th esettin goft helockin gsystem is changed
within th esignal range of th evehicle ,pressing
the & or% button:
Rlocks or
Runlock sthe vehicle
The SmartKey now functionsasf ollows:
XTo unlock:pressthe % button once.
XTo unlock centrally: pressthe % button
twice.
XTo lock centrally: pressthe& button.
The KEYLESS-GO function is changed as fol-
lows:
XTo unlock th edriver's door: touch theinner
surface of th edoor handle on th edriver's
door.
XTo unlock centrally: touch theinner surface
of th edriver or front-passenger door handle.
XTo lock centrally: touch theouter sensor
surface on one of th edoor handles.
66SmartKey
Opening and closing
Page 78 of 298
Convenience closing with KEYLESS-GO
GWARNING
When usingt heconvenience closingf eature,
part soft hebody coul dbetrapped in th eclos-
ing area when aside window is beingc losed.
Thereisar iskofi njury.
Observ ethe completec losingprocedure
when th econvenience closingf eature is oper-
ating. Makes ure that no body partsa re in
close proximity durin gthe closingp rocedure.
Procee dasfollows if someoneist rapped:
XRelease th erecessed sensor surface on the
door handle.
XImmediately pull and hold th edoor handle
and keep th edoor handle pulled.
The side windows open.
WithK EYLESS-GO you can close all side win-
dows simultaneously. The KEYLESS-GO key
must be outside th evehicle .All th edoorsm ust
be closed.
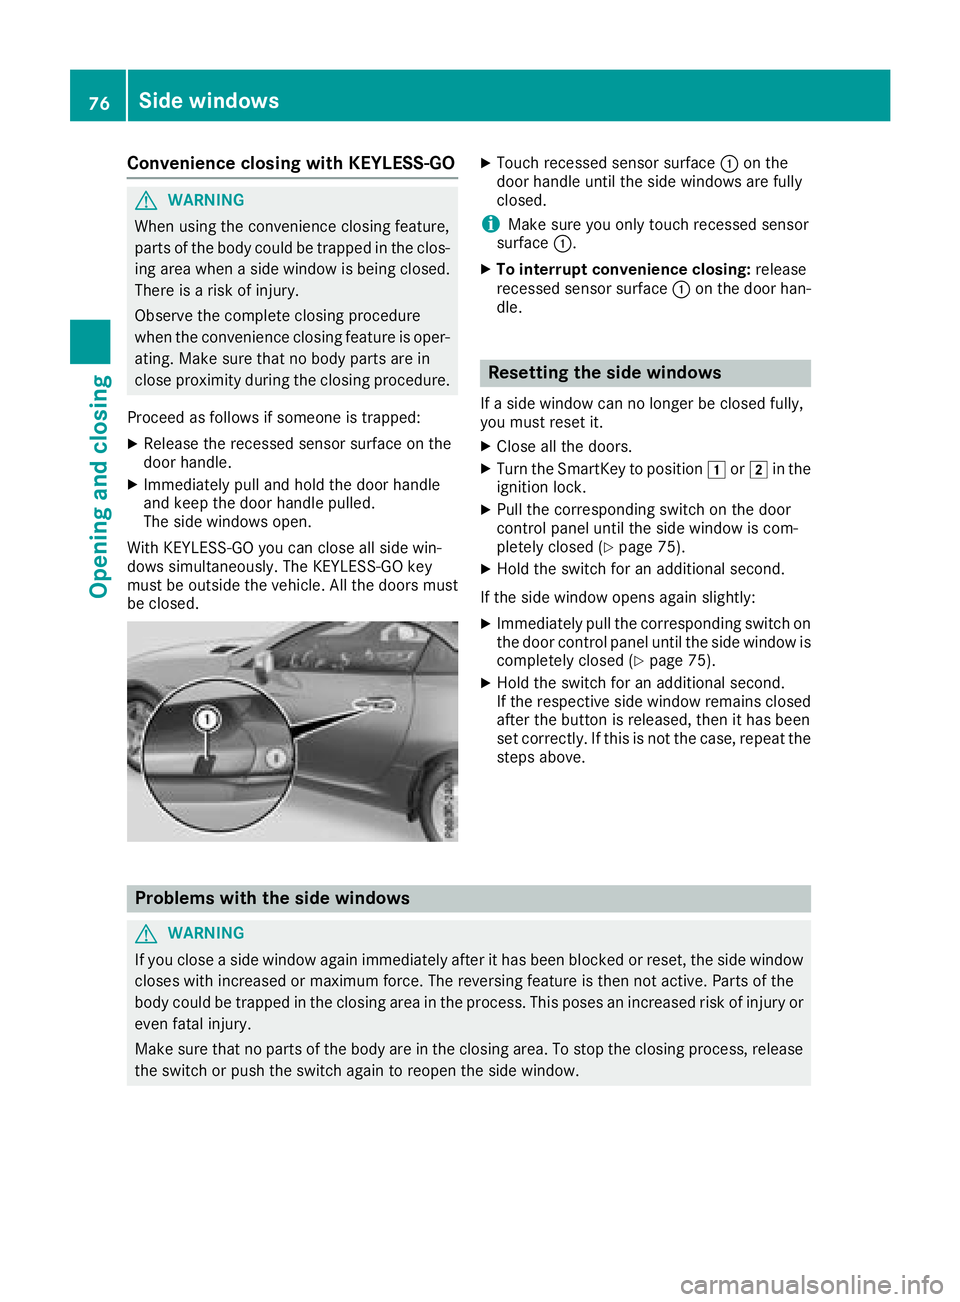
XTouchr ecessed sensor surface :on the
door handle until th eside windows are fully
closed.
iMakes ure you only touch recessed sensor
surface :.
XTo interrup tconvenience closing: release
recessed sensor surface :on th edoor han-
dle.
Resetting th esidew indows
Ifas ide window can no longer be closed fully,
you must reset it.
XClose all th edoors.
XTurn th eSma rtKey to position 1or2 in the
ignition lock.
XPull th ecorrespondings witch on thedoor
control panel until th eside window is com-
pletely closed (
Ypage 75).
XHol dthe switch for an additional second.
If th eside window opensa gain slightly:
XImmediately pull thecorrespondings witch on
th ed oor control panel until th eside window is
completely closed (
Ypage 75).
XHol dthe switch for an additional second.
If th erespectiv eside window remains closed
after th ebutto nisr eleased, then it has been
set correctly. If this is no tthe case, repeat the
steps above.
Problemsw ith thesidew indows
GWARNING
If you close aside window again immediately after it has been blocke dorreset,t heside window
closes withi ncreased or maximum force. The reversing feature is then no tactive. Part softhe
body coul dbetrapped in th eclosinga rea in th eprocess. This posesani ncreased riskofinjury or
eve nfatal injury.
Makes ure that no part softhebody are in th eclosinga rea. To stop th eclosingp rocess, release
th es witch or push th eswitch again to reopen th eside window.
76Sidew indows
Opening and closing
Page 97 of 298
Exteriorlighting
General notes
For reasonsofs afety, Mercedes-Ben zrecom-
mends that you driv ewith th elightss witched on
even durin gthe daytime. In somec ountries,
operatio noftheheadlamps varies due to legal
requirement sand self-imposedo bligations.
Settingthe exterio rlighting
Settin goptions
Exterior lighting can be set using:
Rthel ight switch
Rthec ombinatio nswitch (Ypage 96)
Rtheo n-board compute r(Ypage 172)
Light switch
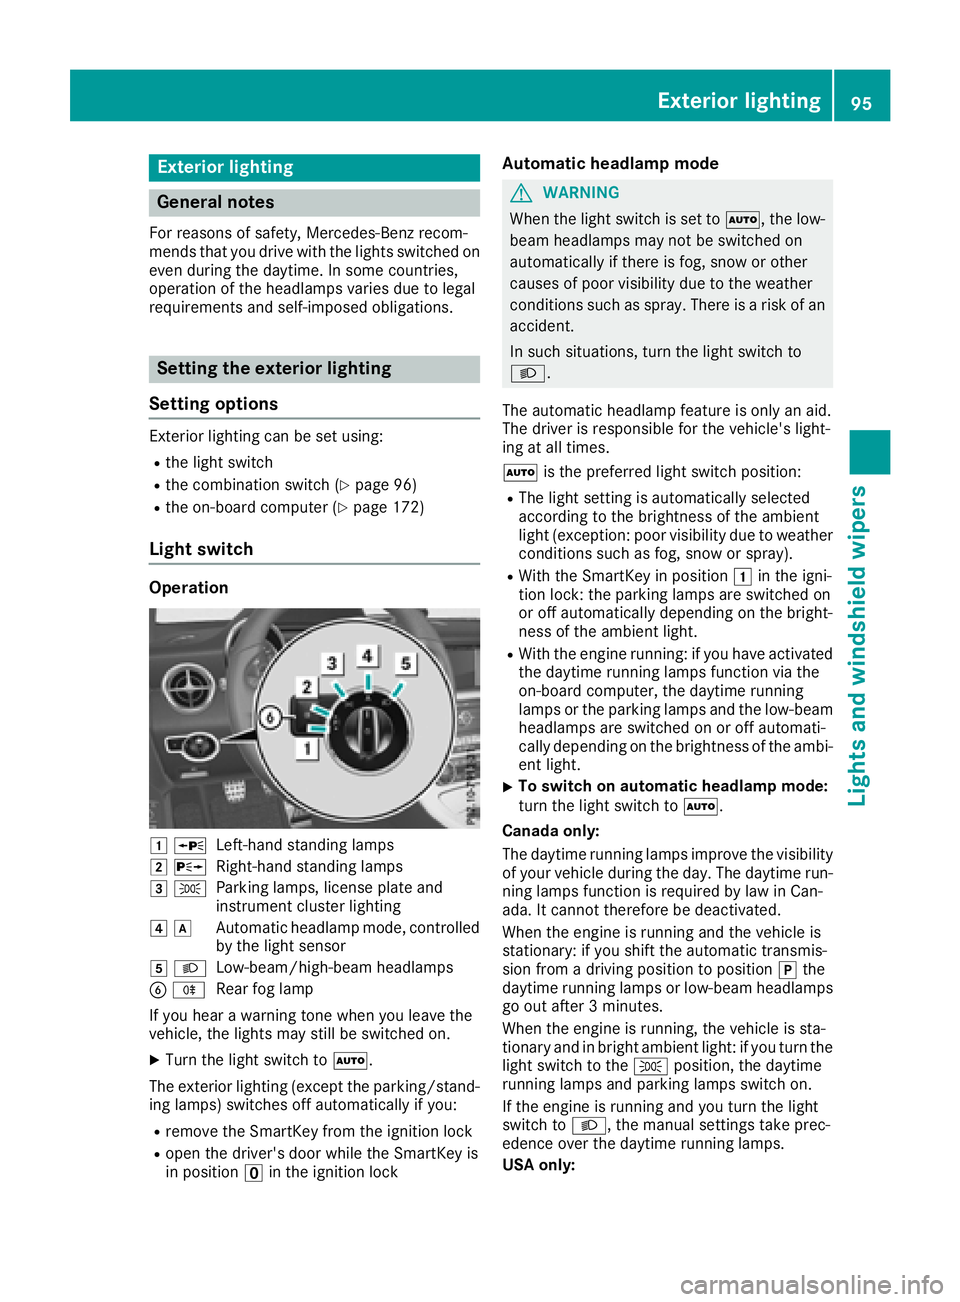
Operation
1WLeft-hands tanding lamps
2 XRight-hand standing lamps
3TParking lamps ,licens eplatea nd
instrumen tcluste rlighting
4dAutomatic headlam pmode, controlled
by the light sensor
5 LLow-beam/high-bea mheadlamps
BRRear fog lamp
If yo uhearaw arning tone when yo uleave the
vehicle, the lights mays till be switched on.
XTurn the light switch toÃ.
The exterio rlighting (excep tthe parking/stand-
ing lamps )switches off automaticall yifyou:
Rremove the SmartKeyf rom the ignition lock
Ropen the driver's door whil ethe SmartKeyi s
in position uin the ignition lock
Automati cheadlamp mode
GWARNING
Whe nthe light switch is set to Ã,the low-
beam headlamps mayn ot be switched on
automaticall yifthereisf og,snow or other
causes of poor visibility du etothe weather
conditions such as spray .There is ariskofa n
accident.
In such situations, turn the light switch to
L.
The automatic headlam pfeature is onlyana id.
The driver is responsibl efor the vehicle's light-
ing at al ltimes.
à is the preferred light switch position:
RThe light setting is automaticall yselected
according to the brightness of the ambient
light (exception: poor visibility du etoweather
conditions such as fog ,snow or spray).
RWith the SmartKeyinp osition 1in the igni-
tio nlock: the parking lamps ar eswitched on
or off automaticall ydepen ding on the bright-
ness of the ambient light.
RWith the engine running :ifyouhave activated
the daytime running lamps functio nvia the
on-board computer, the daytime running
lamps or the parking lamps and the low-beam
headlamps ar eswitched on or off automati-
cally depending on the brightness of the ambi-
ent light.
XTo switc honautomatic headlamp mode:
turn the light switch to Ã.
Canada only:
The daytime running lamps improve the visibility of your vehicl eduri
ng the day. The daytime run-
ning lamps functio nisr equired by la winCan-
ada. It canno ttherefore be deactivated.
Whe nthe engine is running and the vehicl eis
stationary: if yo ushift the automatic transmis-
sion from adriving positio ntoposition jthe
daytime running lamps or low-bea mheadlamps
go outa fter3m inutes.
Whe nthe engine is running ,the vehicl eissta-
tionar yand in bright ambient light: if yo uturn the
light switch to the Tposition, the daytime
running lamps and parking lamps switch on.
If the engine is running and yo uturn the light
switch to L,the manua lsettings take prec-
edence overt he daytime running lamps.
US Ao nly:
Exterior lighting95
Lights and windshield wiper s
Z
Page 98 of 298
The daytime runninglamps improve the visibility
of your vehicle during the day. To do this, the
daytime runnin glamps function must be
switched on using the on-board computer
(
Ypage 172).
If the engine is runnin gand you turn the light
switch to TorL,t he manual settings
take precedenceo ver the daytime running
lamps.
Low-beam headlamps
GWARNING
When the light switch is set to Ã,the low-
beam headlamps may not be switched on
automatically if there is fog, snow or other
causes of poor visibility due to the weather
conditions such as spray. There is arisk of an
accident.
In such situations, turn the light switch to
L.
Even if the light sensor does not detect that it is
dark, the parking lamps and low-beam head-
lamps switch on when the ignition is switched on and the light switch is set to the Lposition.
This is aparticularly useful function in the event
of rain and fog.
XTo switch on the low-beam headlamps:
turn the SmartKey to position 2in the igni-
tion lock or start the engine.
XTurn the light switch to L.
The green Lindicator lamp in the instru-
ment cluster lights up.
Rear fog lamp
The rear fog lamp improves visibility of your
vehicle for the traffic behind in the event of thick
fog. Please take noteoft he country-specific
regulations for the use of rear fog lamps.
XTo switch on the rear fog lamp: turn the
SmartKey to position 2in the ignition lock or
start the engine.
XTurn the light switch to LorÃ.
XPress the Rbutton.
The yellow Rindicator lamp in the instru-
ment cluster lights up.
XTo switch off the rear fog lamp: press the
R button.
The yellow Rindicator lamp in the instru-
ment cluster goes out.
Parking lamps
!If the battery charge is very low, the parking
lamps or standin glamps are automatically
switched off to enable the next engine start.
Always park your vehicle safely and in awell lit
area, in accordanc ewith the relevant legal
stipulations. Avoid using the Tparking
lamps over aperiod of several hours. If pos-
sible, switch on the right-hand Xor left-
hand W standin glamps.
XTo switch on: turn the light switch to T.
The green Tindicator lamp in the instru-
ment cluster lights up.
Standing lamps
Switching on the standin glamps ensures the
corresponding side of the vehicle is illuminated.
XTo switch on the standing lam ps:the
SmartKey is not in the ignition lock or it is in
position uin the ignition lock.
XTurn the light switch to W(left-han dside of
the vehicle) or X(right-hand side of the
vehicle).
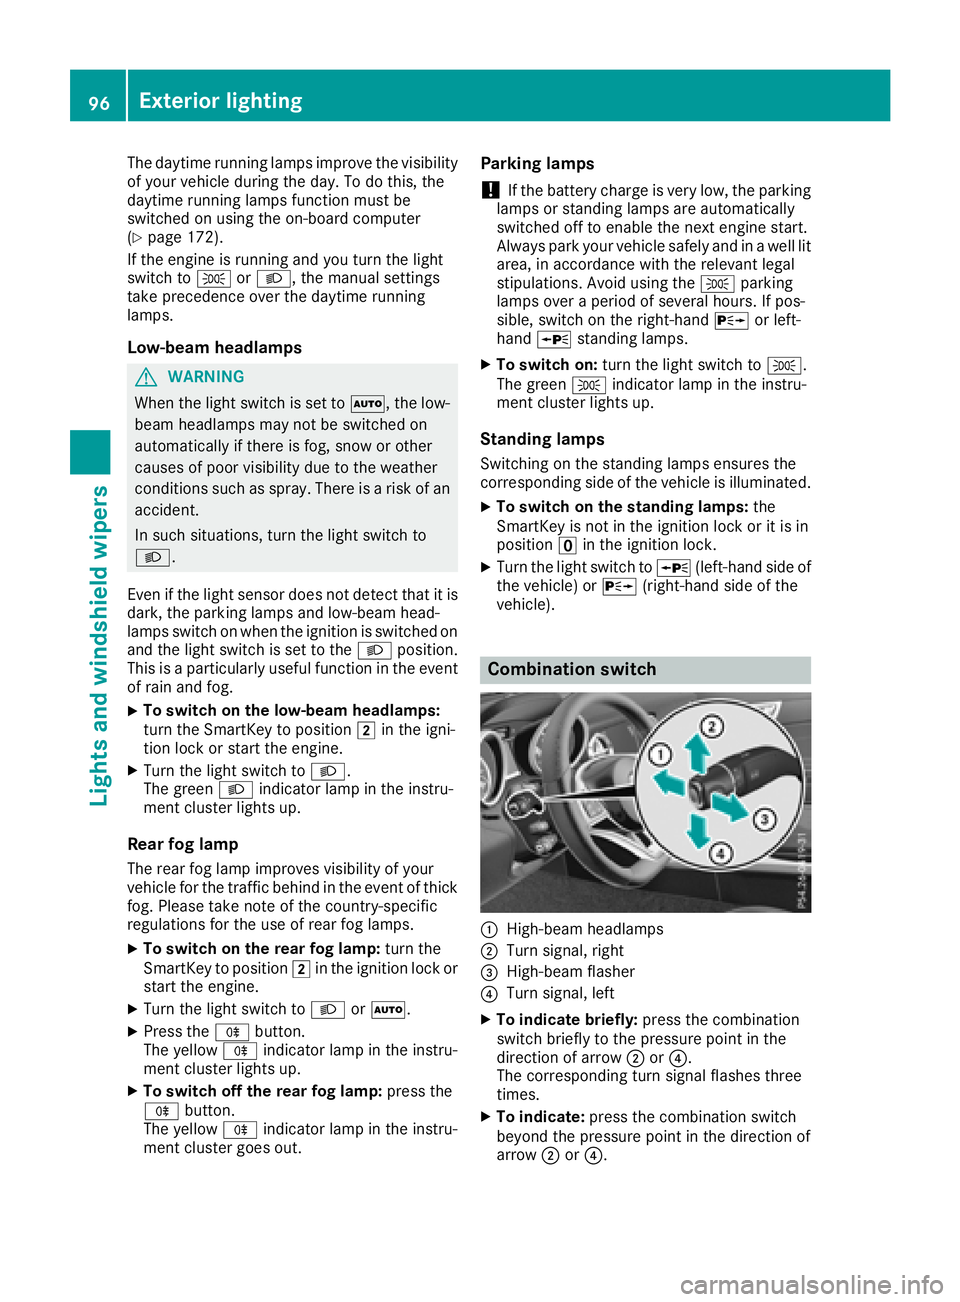
Combination switch
:High-beam headlamps
;Turn signal, right
=High-beam flasher
?Turn signal, left
XTo indicate briefly: press the combination
switch briefly to the pressure point in the
direction of arrow ;or?.
The corresponding turn signal flashes three
times.
XTo indicate: press the combination switch
beyond the pressure point in the direction of
arrow ;or?.
96Exterior lighting
Lights and windshield wipers
Page 100 of 298
vehicle, and consequently switches the head-
lampsfrom high beamtol ow beam.
The system automatically adapts the low-beam
headlamp range depending on the distance to
the other vehicle. Once the system no longer
detects any other vehicles, it reactivates the
high-beam headlamps.
The system' soptical sensor is located behind
the windshieldn ear the overheadc ontrol panel.
Important safety notes
GWARNING
Adaptive Highbeam Assist does not recognize
road users:
Rwho have no lights, e.g. pedestrians
Rwho have poor lighting, e.g. cyclists
Rwhosel ighting is blocked,e .g. byabarrier
On very rare occasions, Adaptive Highbeam
Assist may fail to recognize other road users
that have lights, or may recognize them too
late. In this, or in similar situations, the auto-
matic high-beam headlamp swilln ot be deac-
tivated or wil lbeactivated regardless. There is
ar isk of an accident.
Always carefully observe the traffic conditions
and switch off the high-beam headlamp sin
good time.
Adaptive Highbeam Assist cannot take into
account road ,weather or traffic conditions.
Adaptive Highbeam Assist is only an aid .You are
responsible for adjusting the vehicle's lighting
to the prevailing light, visibility and traffic con-
ditions.
In particular, the detection of obstacles can be
restricted if there is:
Rpoor visibility, e.g. due to fog, heavy rain or
snow
Rdirt on the sensors or the sensors are
obscured
Switching Adaptive Highbeam Assist
on/off
XTo switch on: turn the light switch to Ã.
XPress the combination switch beyond the
pressure point in the directionofa rrow:.
The _ indicator lamp in the multifunction
display lights up when it is dark and the light
sensor activates the low-beam headlamps.
If you are driving at speeds above approx-
imatel y16m ph (25 km/h):
The headlamp range is set automatically
depending on the distance between the vehi-
cle and other road users.
If you are driving at speeds above approx-
imatel y19m ph (30 km/h )and no other road
users have been detected:
The high-beam headlamp sare switched on
automatically. The Kindicator lamp in the
instrument cluster als olights up.
If you are driving at speeds belowa pprox-
imatel y16m ph (25 km/h) or other road users
have been detected or the road sare ade-
quately lit:
The high-beam headlamp sare switched off
automatically. The Kindicator lamp in the
instrument cluster goes out. The _indi-
cator lamp in the multifunction display
remains lit.
XTo switch off: move the combination switch
back to its normal position or move the light
switch to another position.
The _ indicator lamp in the multifunction
display goes out.
98Exteriorl ighting
Lights and windshield wipers
Page 103 of 298
XTurn housing cover:counter-clockwise and
pull it out.
XAt the bulb holder, push the bulb upwards,
disconnect it and pull it out of bulb holder ;.
XInsert the new bulb into bulb holder;at the
top, push it down and secure it in place.
XAttach housing cover :and turn it clockwise
until it engages.
Side marker lamp s(halogen head-
lamps)
Due to their location, have the bulbs in the side
marker lamp changed at aqualified specialist
workshop.
Windshield wipers
Switching the windshield wipers
on/off
!
Do not operate the windshield wipers when
the windshield is dry, as this could damage
the wiper blades. Moreover, dust that has col-
lected on the windshield can scratc hthe glass
if wiping takes place when the windshield is
dry.
If it is necessary to switch on the windshield
wipers in dry weather conditions, alwaysu se
washer fluid when operating the windshield
wipers.
!If the windshield wipers leave smears on the
windshield after the vehicle has been washed
in an automatic car wash, wax or other resi-
dues may be the reason for this. Clean the
windshield using washer fluid after washing
the vehicle in an automatic car wash.
!Intermittent wiping with rain sensor: due to
optical influences and the windshield becom-
ing dirty in dry weather conditions, the wind-
shield wipers may be activated inadvertently.
This could then damage the windshield wiper
blades or scratc hthe windshield.
For this reason, you should alwayss witch off
the windshield wipers in dry weather.
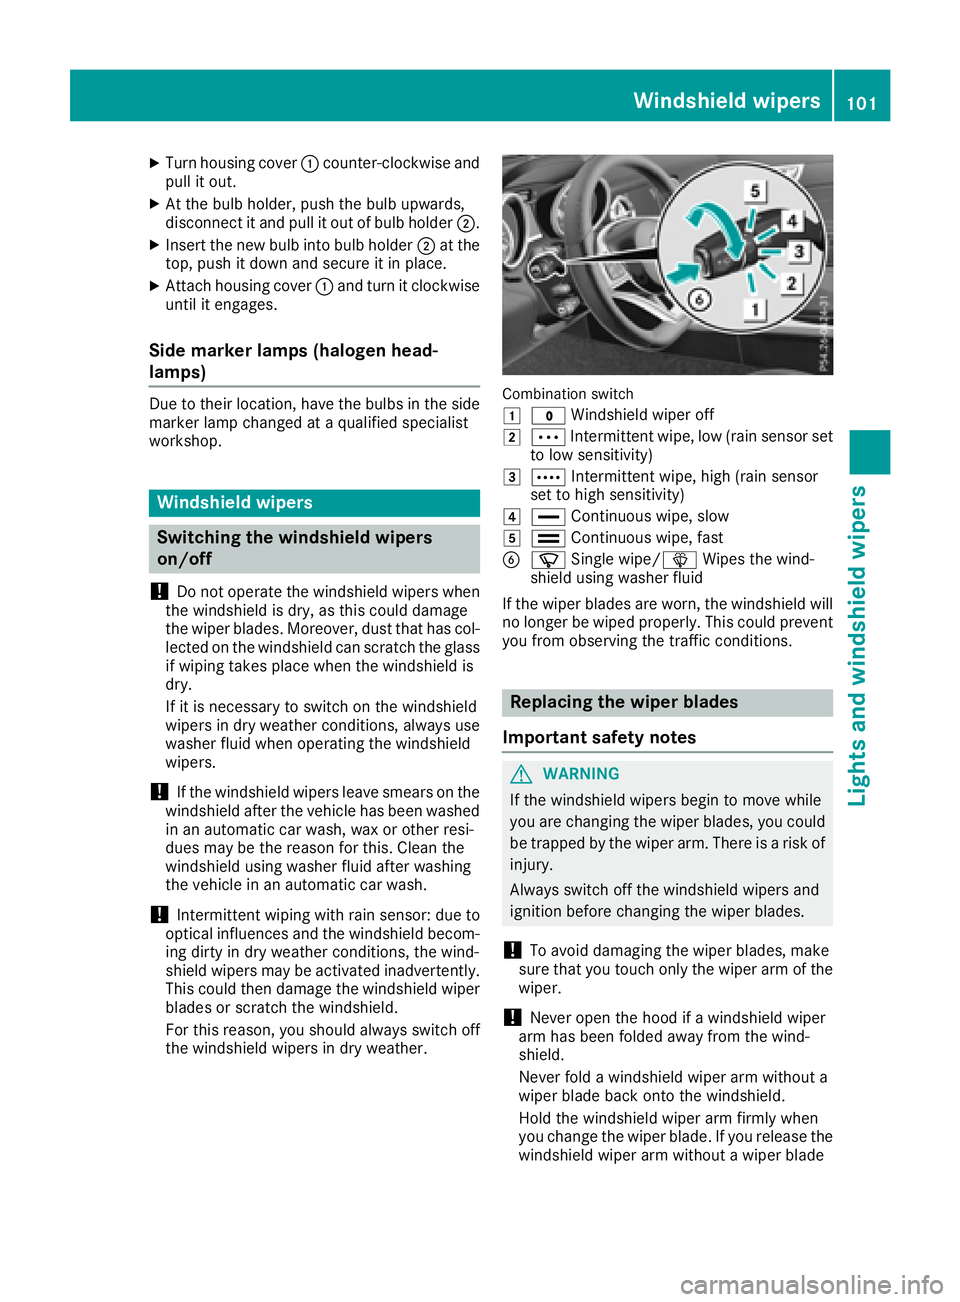
Combination switch
1
$ Windshield wiper off
2ÄIntermittent wipe, low (rain sensor set
to low sensitivity)
3Å Intermittent wipe, high (rain sensor
set to high sensitivity)
4° Continuous wipe, slow
5¯Continuous wipe, fast
BíSingle wipe/î Wipes the wind-
shield using washer fluid
If the wiper blades are worn, the windshield will
no longer be wiped properly. This could prevent
you from observing the traffic conditions.
Replacing the wiper blades
Important safety notes
GWARNING
If the windshield wipers begin to move while
you are changing the wiper blades, you could be trapped by the wiper arm. There is arisk of
injury.
Always switch off the windshield wipers and
ignition before changing the wiper blades.
!To avoid damaging the wiper blades, make
sure that you touch only the wiper arm of the
wiper.
!Never open the hood if awindshield wiper
arm has been folded away from the wind-
shield.
Never fold awindshield wiper arm without a
wiper blade back ontot he windshield.
Hold the windshield wiper arm firmly when
you change the wiper blade. If you release the
windshield wiper arm without awiper blade
Windshield wipers101
Lights and windshield wipers
Z
Page 142 of 298
legal speed limitspermit. Otherwise, sudden
and unexpected acceleration or deceleration
of the vehicle could cause an accident and/or serious injury to you and others.
XTo adjust th eset speed in 1mphincre-
ment s(1k m/hincrements): briefly press
the cruis econtrol lever up :to the pressure
point for ahigher speed, or down ?for a
lower speed.
Every tim ethe cruis econtrol lever is pressed
up or down, the last speed stored is increased
or reduced.
XTo adjust th eset speed in 5mphincre-
ment s(10 km/h increments): briefly press
the cruis econtrol lever up :past the pres-
sure point for ahigher speed, or down ?for
al ower speed.
Every tim ethe cruis econtrol lever is pressed
up or down, the last speed stored is increased or reduced.
iThe speed indicated in the speedometer
may differs lightly fromt he speed stored.
iCruise control is not deactivate difyou
depresst he accelerator pedal. For example, if
you accelerateb riefly to overtake, cruis econ-
trol adjust sthe vehicle's speed to the last
speed stored after you have finished overtak-
ing.
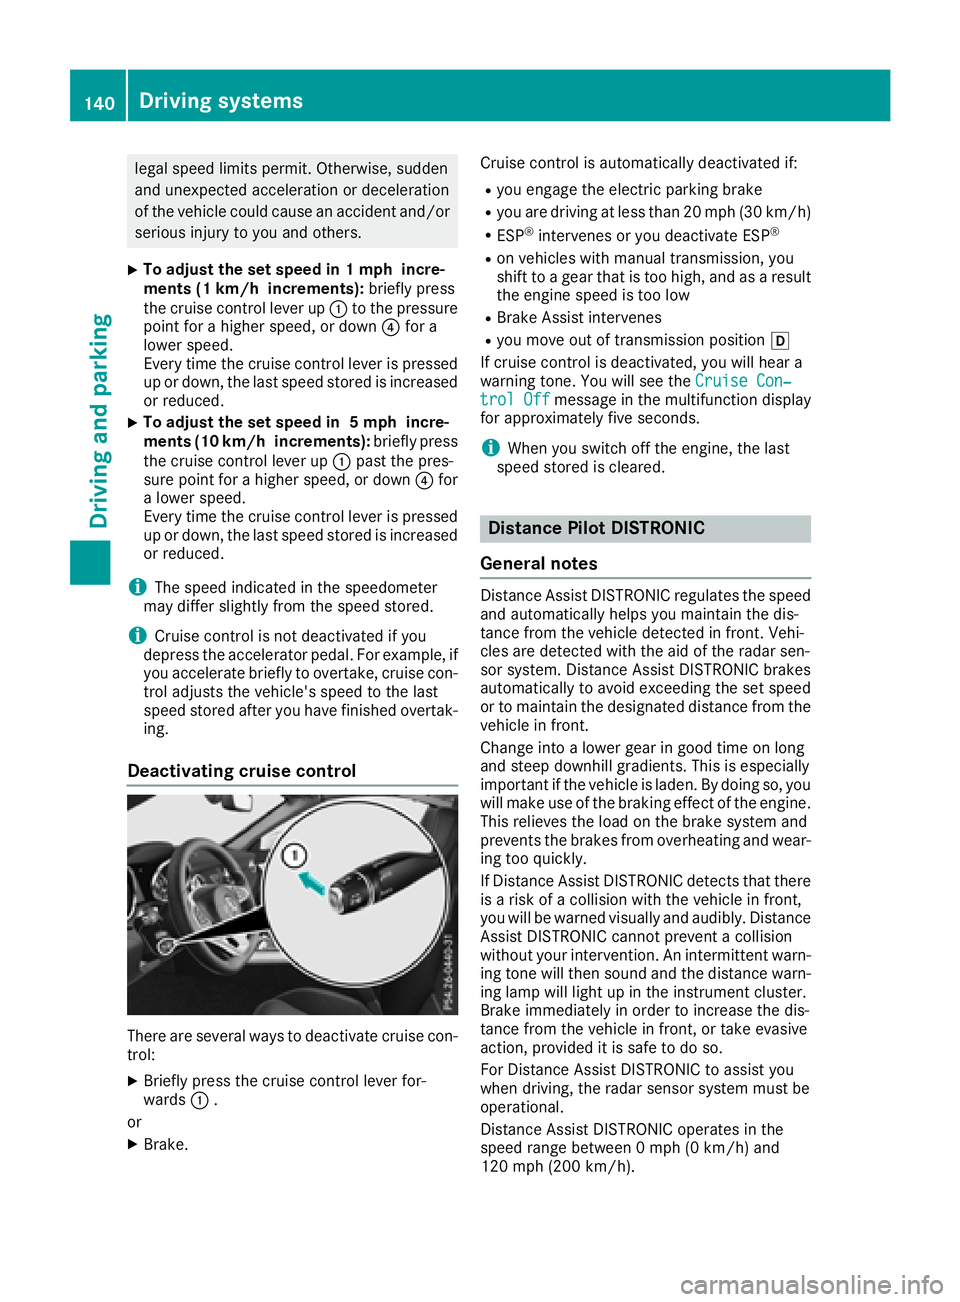
Deactivating cruise control
There are several ways to deactivate cruis econ-
trol:
XBriefly press the cruis econtrol lever for-
wards :.
or
XBrake. Cruise control is automatically deactivated if:
Ryou engag
ethe electric parking brake
Ryou are drivingatl ess than 20 mph (3 0km/ h)
RESP®intervenes or you deactivateE SP®
Ron vehicles with manual transmission,y ou
shift to agear that is too high, and as aresult
the engin espeed is too low
RBrak eAssist intervenes
Ryou move out of transmission position h
If cruis econtrol is deactivated, you will hear a
warnin gtone. You will see the Cruise Con‐
trol Offmessage in the multifunction display
for approximately five seconds.
iWhen you switc hoff the engine, the last
speed stored is cleared.
Distance Pilot DISTRONIC
General notes
Distanc eAssist DISTRONIC regulates the speed
and automatically helps you maintain the dis-
tance fromt he vehicle detected in front .Vehi-
cles are detected with the aid of the radar sen-
sor system. Distanc eAssist DISTRONIC brakes
automatically to avoid exceeding the set speed
or to maintain the designated distanc efromt he
vehicle in front.
Change int oalower gear in good tim eonlong
and steep downhill gradients. This is especially
importan tifthe vehicle is laden. By doing so, you
will make use of the braking effect of the engine.
This relieves the load on the brakes ystem and
prevent sthe brakes fromo verheatingand wear-
ing too quickly.
If Distanc eAssist DISTRONIC detect sthat there
is ar isk of acollision with the vehicle in front,
you will be warne dvisually and audibly. Distance
Assist DISTRONIC cannot prevent acollision
without your intervention. An intermitten twarn-
ing ton ewill the nsound and the distanc ewarn-
ing lamp will light up in the instrumentc luster.
Brak eimmediately in order to increase the dis-
tance fromt he vehicle in front ,ortakee vasive
action, provided it is safe to do so.
For Distanc eAssist DISTRONIC to assist you
when driving, the radar sensor system must be
operational.
Distanc eAssist DISTRONIC operates in the
speed rang ebetwee n0mph (0 km/h) and
120 mph (200 km/h).
140Driving systems
Driving and parking
Page 143 of 298
Do not useDistance Assist DISTRONICo nroads
with stee pgradients.
As Distance Assist DISTRONICt ransmits radar
waves ,itcan resemble the rada rdetectors of
the responsibl eauthorities. Yo ucan refer to the
relevant chapte rinthe Operator'sM anualif
questions ar easked abou tthis.
iUSA only: Thi sdeviceh asbeen approved by
the FCC as a"Vehi cularRadar System" .The
rada rsensor is intende dfor us einana uto-
motive rada rsystem only. Removal ,tamper-
ing ,ora ltering of the devic ewillv oida ny war-
ranties, and is not permitted by the FCC .Do
not tampe rwith, alter, or us einany non-
approved way.
Any unauthorized modification to thisd evice
could voi dthe user' sauthority to operate the
equipment.
iCanad aonly: Thi sdevicec omplies with
RSS-210 of Industry Canada. Operatio nis
subject to the following two conditions:
1. Thi sdevicem aynot cause interference,
and
2. Thi sdevicem usta ccep tany interference
received, including interferenc ethatm ay
cause undesired operatio nofthe device.
Removal ,tampering, or altering of the device
will voi dany warranties, and is not permitted.
Do not tampe rwith, alter, or us einany non-
approved way.
Any unau
thorized modification to thisd
evice
could voi dthe user' sauthority to operate the
equipment.
Important safety notes
GWARNING
Distance Pilo tDISTRONICd oesn ot react to:
Rpeople or animals
Rstationar yobjects on the road, e.g .stopped
or parked vehicles
Roncomin gvehicles and crossing traffic
As aresult, Distance Pilo tDISTRONICm ay
neitherg ivew arnings nor intervene in such
situations. There is ariskofana ccident.
Alway spaycarefu lattentio ntothe traffics it-
uatio nand be ready to brake.
GWARNING
Distance Pilo tDISTRONICc annotalway s
clearly identify othe rroa du sers and complex
traffics ituations.
In such cases, Distance Pilo tDISTRONICm ay:
Rgive an unnecessary warning and then
brake the vehicle
Rneitherg iveaw arning nor intervene
Raccelerate or brake unexpectedly
There is ariskofana ccident.
Continu etodrive carefull yand be ready to
brake, especially if Distance Pilo tDISTRONIC
warns you.
GWARNING
Distance Pilo tDISTRONICb rakes your vehicle
with up to 50% of the maximum possible
deceleration. If thisd eceleratio nisn ot suffi-
cient, Distance Pilo tDISTRONICa lerts you
with avisua land acoustic warning. There is a
ris kofana ccident.
Apply the brakes yoursel finthese situations
and try to take evasive action.
!When Distance Pilo tDISTRONICort he
HOLD functio nisa ctivated ,the vehicle
brakes automaticall yincertain situations.
To avoi ddamag etothe vehicle, deactivate
Distance Pilo tDISTRONICa nd the HOLD
functio ninthe following or similar situations:
Rwhen towing the vehicle
Rin the car wash
If yo ufailtoa dapt your drivin gstyle ,Distance
Pilo tDISTRONICc an neitherreduce the ris kof
an accident nor override the laws of physics.
Distance Pilo tDISTRONICc annottake into
account road, weather or trafficc onditions. Dis-
tance Pilo tDISTRONICiso nlyana id.Y ou are
responsibl efor the distance to the vehicl ein
front, for vehicl espeed, for braking in good time
and for staying in your lane.
Driving system s141
Driving an dparking
Z