2018 MERCEDES-BENZ SLC ROADSTER lock
[x] Cancel search: lockPage 21 of 298

Maximum load onatire (defini-
tion) ............................................... 279
Maximum loaded vehicle weight
(definition) .....................................2 79
Maximum permissible tire pres-
sure (definition) .............................2 79
Maximum tire load. ........................ 277
Maximum tire load( definition) ....... 279
MOExtended tires .......................... 262
Optional equipment weight (defi-
nition) ............................................ 280
Overview ........................................ 260
PSI (pounds per square inch) (def-
inition) ...........................................2 79
Replacing ....................................... 280
Service life ..................................... 261
Sidewall (definition) ....................... 279
Speed rating (definition) ................ 279
Storing ...........................................2 81
Structure and characteristics
(definition) ..................................... 278
Summer tires ................................. 262
Temperature .................................. 274
TIN (Tire Identification Number)
(definition) ..................................... 280
Tire bead( definition) ......................2 79
Tire pressure (definition) ................ 279
Tire pressure s(recommended). ..... 278
Tire size (data) ............................... 284
Tire size designation, load-bearing
capacity, speedr ating .................... 275
Tire tread ....................................... 261
Tire tread (definition) ..................... 279
Total loadl imit (definition) ............. 280
Traction ......................................... 274
Traction (definition) ....................... 280
Treadw ear..................................... 274
Uniform Tire Quality Grading
Standard s...................................... 273
Uniform Tire Quality Grading
Standard s(de finition) .................... 278
Wea rindicator (definition) ............. 280
Wheel and tire combination ........... 284
Wheel rim (definiti on) .................... 278
se
e Fla ttire
Tow-starting
Emergency engine starting ............ 258
Important safety notes .................. 256 Towin
gaway
Important safety guideline s........... 256
Installing the towing eye. ............... 256
Removing the towing eye. .............. 257
Transporting the vehicl e................ 258
With both axles on the ground ....... 257
With the reara xler aised ................ 257
Trafficr eports
see also Digital Operator's Man-
ua l.................................................. 211
Transmission
Selector lever ................................ 122
see Automati ctransmission
Transmissio nposition display ......... 122
Transporting the vehicle .................. 258
Trip computer (on-board com-
puter) .................................................. 166
Trip odometer
Calling up ....................................... 166
Resetting (on-board computer) ...... 167
Trunk
Emergency release .......................... 73
Important safety notes .................... 72
Locking separately. .......................... 73
Opening/closing (manuall yfrom
outside) ............................................ 73
Overview .......................................... 72
Trunk lid
Displa ymessage ............................ 200
Opening dimensions ...................... 295
Trunk partition
Displa ymessage ............................ 200
Generaln otes .................................. 79
Opening/closing .............................. 80
Turn signals
Displa ymessage ............................ 189
Switching on/off. ............................. 96
Two-wa yradio
Frequencie s................................... 288
Installation ..................................... 288
Transmission output( maximum) .... 288
Type identificatio nplate
see Vehicl eide ntification plate
U
Unlocking
Emergency unlocking ....................... 72
Index19
Page 22 of 298
From inside the vehicle (central
unlocking button) ............................. 71
Upshift indicator
(on-board computer, Mercedes-
AMG SLC 43) .................................1 75
USB devices
Connecting to the MediaI nter-
face ............................................... 218
V
Vehicle
Correct use ...................................... 27
Data acquisition ............................... 28
Display message ............................ 198
Electronics ..................................... 288
Equipment ....................................... 24
Individua lsettings .......................... 172
Limited Warranty .............................2 8
Loading .......................................... 271
Locking (in an emergency) ............... 72
Locking (SmartKey) .......................... 65
Lowering ........................................ 284
Maintenance .................................... 25
Parking for along period. ............... 133
Pulling awa y................................... 118
Raising ........................................... 281
Reporting problems ......................... 27
Securing from rolling away ............ 281
Tow-starting ................................... 256
Towing away .................................. 256
Transporting .................................. 258
Unlocking (i nanemergency) ........... 72
Unlocking (SmartKey). ..................... 65
Vehicl edata. .................................. 295
Vehicl ebattery
see Battery (vehicle)
Vehicl edata ....................................... 295
Vehicl edimensions ........................... 295
Vehicl eemergencyl ocking ................ 72
Vehicl eidentificatio nnumber
see VIN
Vehicl eidentificatio nplate .............. 289
Vehicl etoolkit.................................. 245
Video
Operating the DVD ......................... 169
see also Digital Operator's Man-
ual.................................................. 211 VIN
Seat. .............................................. 290
Type plate ...................................... 289
W
Warning and indicator lamps
ABS ................................................ 204
Active Brake Assist ........................ 209
Brake Assist ................................... 209
Brakes ........................................... 204
Check Engine ................................. 207
Coolant .......................................... 207
Distance Pilo tDISTRONIC ............. 209
Distance warning ........................... 209
ESP
®.............................................. 205
ESP®OFF ....................................... 206
Fue ltank ........................................ 207
Generaln otes ................................ 202
Parking brake ................................ 206
PASSENGER AIR BAG ...................... 39
Reserve fue l................................... 207
Restraint system ............................ 206
Seatb elt. ....................................... 203
SPORTh andling mode. .................. 206
Tire pressure monitor .................... 210
Warning triangle ................................ 244
Warranty .............................................. 24
Washer fluid
Displa ymessage ............................ 201
Weather display (COMAND)
see also Digital Operator's Man-
ual.................................................. 211
Wheel and tire combinations
Tires ............................................... 284
Wheel bolt tightenin gtorque ........... 284
Wheel chock ...................................... 281
Wheels
Changing awheel .......................... 280
Checking ........................................ 260
Cleaning ......................................... 241
Emergency spare wheel. ................ 285
Important safety notes .................. 260
Information on driving .................... 260
Interchanging/changing ................ 280
Mounting anew wheel. .................. 283
Mounting awheel .......................... 281
Overview ........................................ 260
20Index
Page 33 of 298
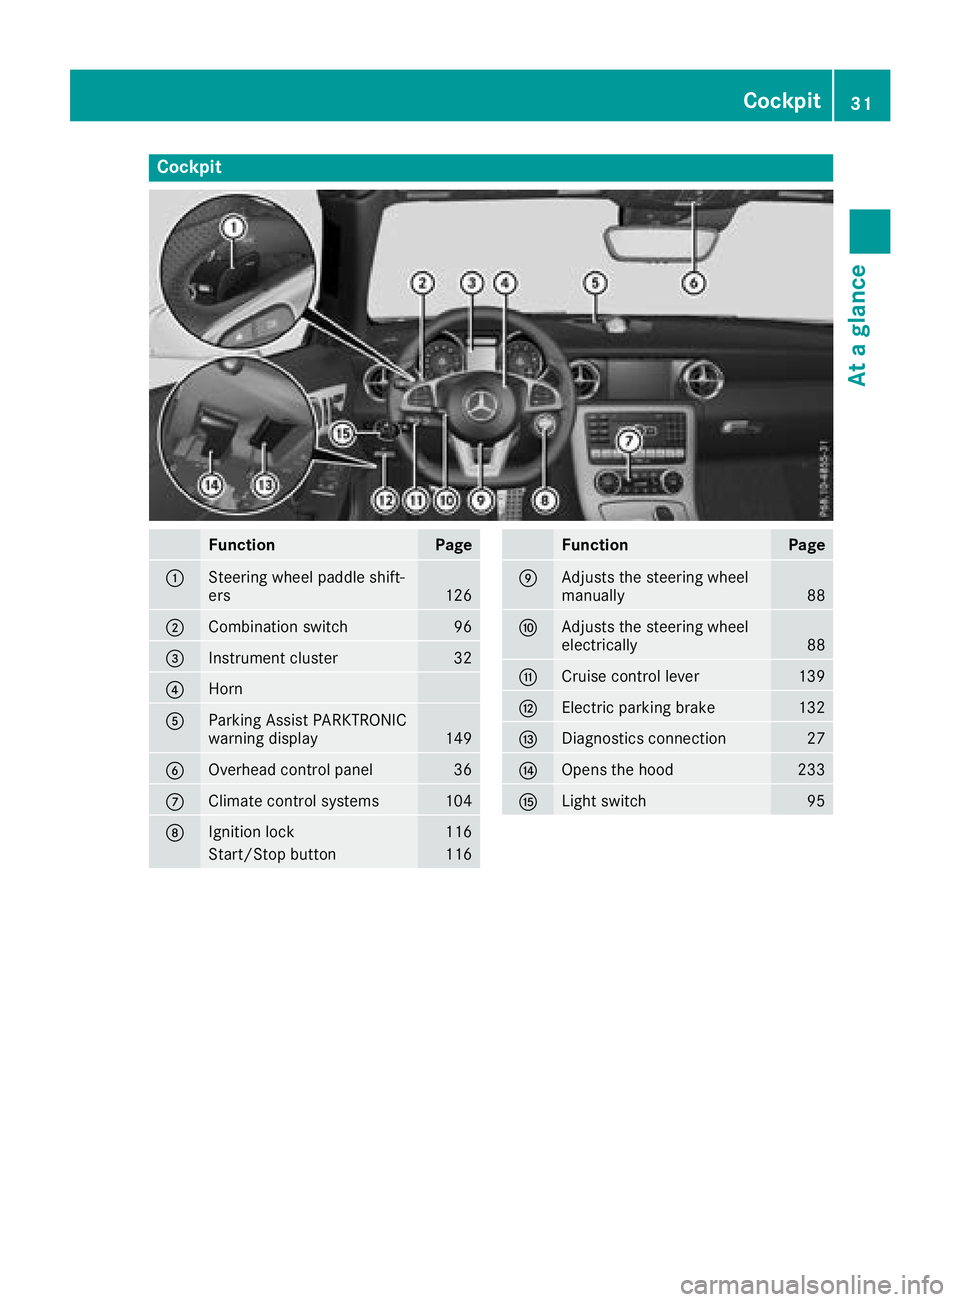
Cockpit
FunctionPage
:Steering wheel paddle shift-
ers126
;Combination switch96
=Instrumentcluster32
?Horn
AParking Assist PARKTRONIC
warning display149
BOverhead control panel36
CClimatecontrol systems104
DIgnition lock116
Start/Sto pbutton116
FunctionPage
EAdjusts th esteering wheel
manually88
FAdjusts th esteering wheel
electrically88
GCruis econtrol lever139
HElectric parking brake132
IDiagnostics connection27
JOpenst hehood233
KLights witch95
Cockpit31
Atag lance
Page 39 of 298
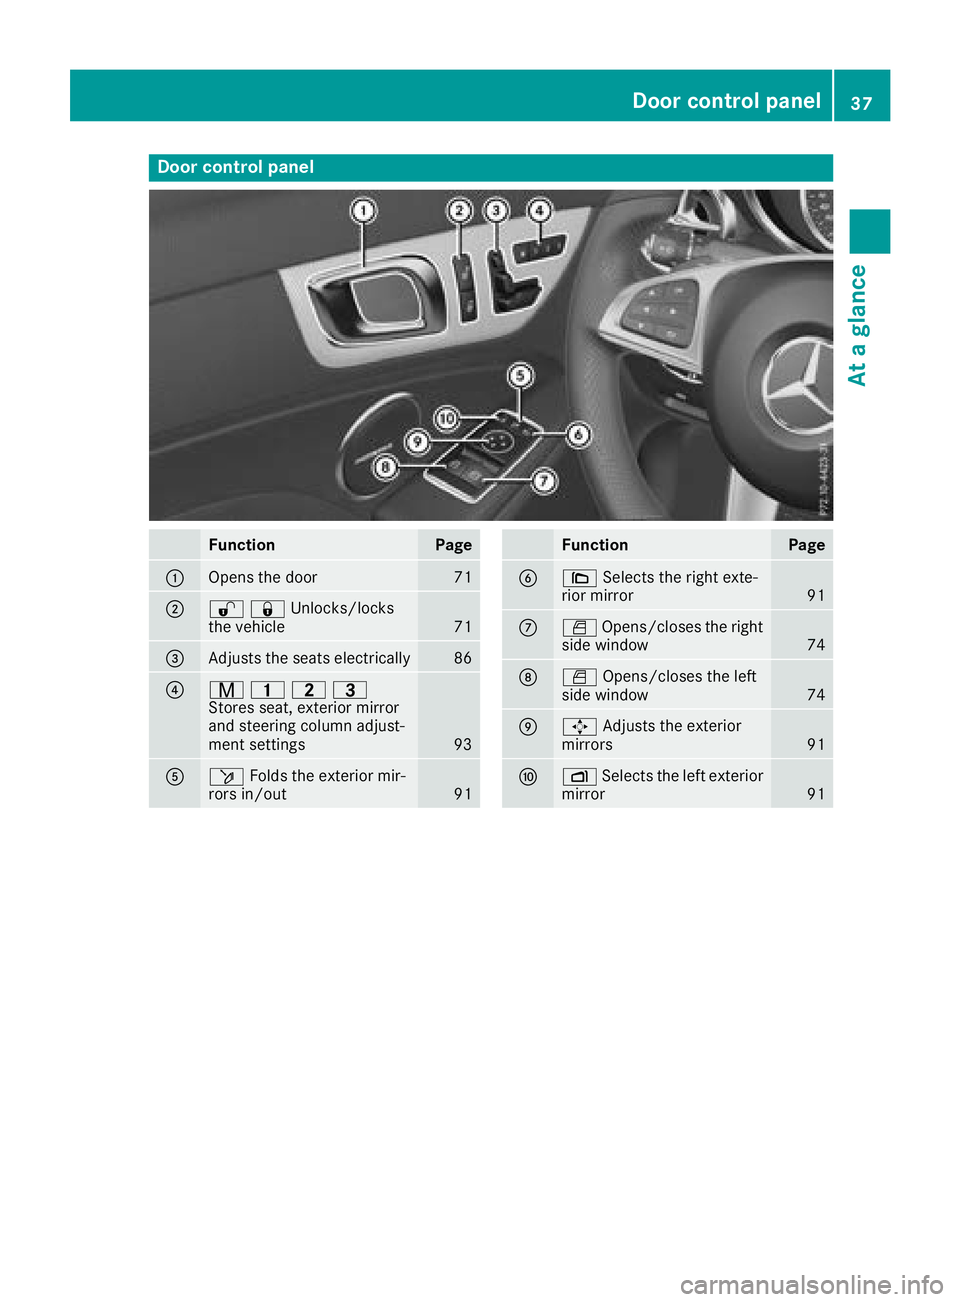
Door controlpanel
FunctionPage
:Opens th edoor71
;%&Unlocks/locks
the vehicle71
=Adjusts the seats electrically86
?r 45=
Stores seat, exterior mirror
and steering column adjust-
ment settings
93
Aö Folds the exterior mir-
rors in/out91
FunctionPage
B\ Selects the right exte-
rio rm irror91
CW Opens/closes the right
sid ew indow74
DW Opens/closes the left
sid ew indow74
E7 Adjusts the exterior
mirrors91
FZ Selects the left exterior
mirror91
Door control panel37
At ag lance
Page 40 of 298
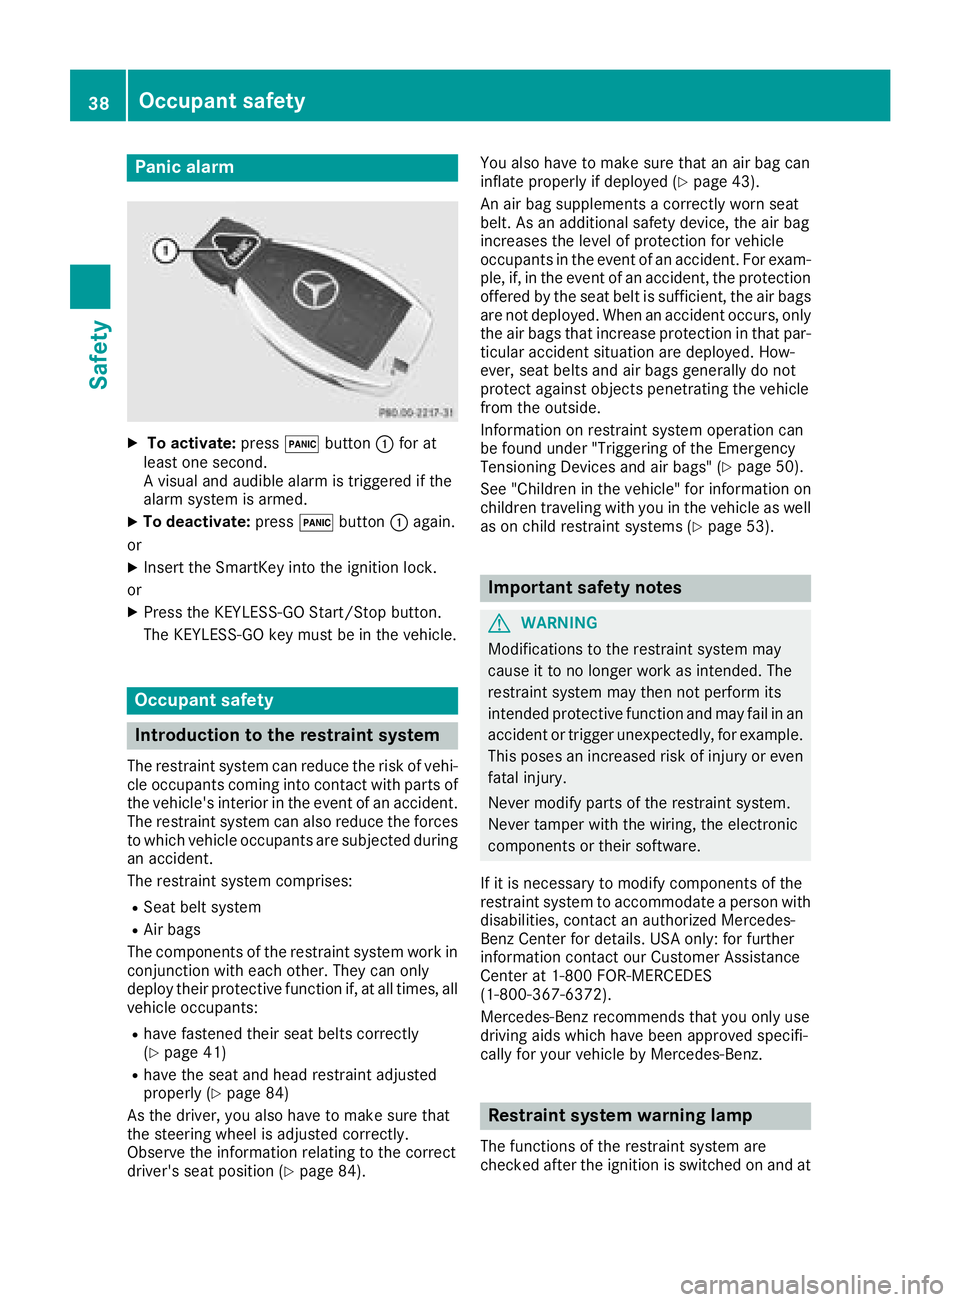
Panic alarm
XTo activate:press!button :for at
least one second.
Av isual and audible alarm is triggered if the
alarm system is armed.
XTo deactivate: press!button :again.
or
XInsert the SmartKey into the ignition lock.
or
XPress the KEYLESS-GO Start/Stop button.
The KEYLESS-GO key must be in the vehicle.
Occupant safety
Introduction to the restraint system
The restraint system can reduce the risk of vehi- cle occupants coming into contact with parts of
the vehicle's interior in the event of an accident.
The restraint system can also reduce the forces to which vehicle occupants are subjected during
an accident.
The restraint system comprises:
RSeat belt system
RAir bags
The components of the restraint system work in
conjunction with each other. They can only
deploy their protective function if, at all times, all vehicle occupants:
Rhave fastened their seat belts correctly
(Ypage 41)
Rhave the seat and head restraint adjusted
properly (Ypage 84)
As the driver, you also have to make sure that
the steering wheel is adjusted correctly.
Observe the information relating to the correct
driver's seat position (
Ypage 84). You also have to make sure that an air bag can
inflate properly if deployed(
Ypage 43).
An air bag supplements acorrectly worn seat
belt. As an additional safety device, the air bag
increases the level of protection for vehicle
occupants in the event of an accident. For exam-
ple, if, in the event of an accident, the protection
offered by the seat belt is sufficient, the air bags are not deployed. When an accident occurs, only
the air bags that increase protection in that par-ticular accident situation are deployed. How-
ever, seat belts and air bags generally do not
protect against object spenetrating the vehicle
from the outside.
Information on restraint system operation can
be found under "Triggering of the Emergency
Tensioning Devices and air bags" (
Ypage 50).
See "Children in the vehicle" for information on
children traveling with you in the vehicle as well
as on child restraint systems (
Ypage 53).
Important safety notes
GWARNING
Modifications to the restraint system may
cause it to no longer work as intended. The
restraint system may then not perform its
intended protective function and may fail in an
accident or trigger unexpectedly, for example.
This poses an increased risk of injury or even fatal injury.
Never modify parts of the restraint system.
Never tamper with the wiring, the electronic
components or their software.
If it is necessary to modify components of the
restraint system to accommodate aperson with
disabilities, contact an authorized Mercedes-
Benz Center for details. USA only: for further
information contact our Customer Assistance
Center at 1-800F OR-MERCEDES
(1‑800‑367‑6372).
Mercedes-Benz recommends that you only use
driving aids which have been approved specifi-
cally for your vehicle by Mercedes-Benz.
Restraint system warning lamp
The functions of the restraint system are
checked after the ignition is switched on and at
38Occupant safety
Safety
Page 42 of 298
occupant in the best position in relation to the
air bag.
The seat belt system comprises:
RSeat belts
REmergency TensioningDevices and seat belt
force limiters
If the seat belt is pulled quickly or sharply by the
seat belt guide, the inertia reel locks. The belt
strap cannot be extracted any further.
The Emergency TensioningD evice tightensthe
seat belt in an accident,p ulling the belt close
against the body. However it does not pull the
vehicle occupant back in the direction of the
backrest.
The Emergency TensioningD evice does not cor-
rect an incorrect seat position or the routing of
an incorrectly fastened seat belt.
When triggered, aseat belt force limiter helps to
reduce the force exerted by the seat belt on the
vehicle occupant.
The seat belt force limiters are synchronized
with the front air bags which absorb part of the
deceleration force. This can reduce the force
exerted on the vehicle occupantsd uring an acci-
dent.
!If the front-passenger seat is not occupied,
do not engage the seat belt tongue in the
buckle on the front-passenger seat. Other-
wise, in the event of an accident the Emer-
gency TensioningD evice and the side impact
air bag, in addition to other systems, may be
triggered and have to be replaced.
Important safety notes
The use of seat belts and child restraint systems
is required by law in:
Rall 50 states
Rthe U.S. territories
Rthe District of Columbia
Rall Canadian provinces
Even where this is not required by law, all vehicle
occupantss hould correctly fasten their seat
belts before starting the journey.
GWARNING
If the seat belt is not worn correctly, it cannot
perform its intended protective function. An
incorrectly fastened seat belt can also cause
injuries, for example, in the event of an acci-
dent or when braking or changing direction
abruptly. This poses an increased risk of injury or even fatal injury.
Always ensure that all vehicle occupantsh ave
their seat belts fastened correctly and are sit-
ting properly.
The components of the restraint system work in
conjunction with each other. They can only
deploy their protective function if, at all times, all vehicle occupants:
Rhave fastened their seat belts correctly
(Ypage 41)
Rhave the seat and head restraint adjusted
properly (Ypage 84)
GWARNING
The seat belt does not offer the intended level of protection if you have not moved the back-
rest to an almost vertical position. When brak-
ing or in the event of an accident,y ou could
slide underneath the seat belt and sustain
abdomen or neck injuries, for example. This
poses an increased risk of injury or even fatal injury.
Adjust the seat properly before beginning
your journey. Always ensure that the backrest
is in an almost vertical position and that the
shoulder section of your seat belt is routed
across the center of your shoulder.
GWARNING
Persons less than 5ft(1.50 m) tall cannot
wear the seat belt correctly without an addi-
tional and suitable restraint system. If the
seat belt is not worn correctly, it cannot per-
form its intended protective function. An
incorrectly fastened seat belt can also cause
injuries, for example, in the event of an acci-
dent or when braking or changing direction
abruptly. This poses an increased risk of injury or even fatal injury.
For this reason, alwayss ecure persons under
5ft( 1.50 m) tall in suitable additional restraint
systems.
40Occupant safety
Safety
Page 48 of 298
The system does not deactivate:
Rthe side impact air bag
Rthe headbag
Rthe Emergency TensioningDevices
Requirements
To be classified correctly, the front passenger
must sit:
Rwith the seat belt fastened correctly
Rin an almost upright position with their back
against the seat backrest
Rwith their feet restin gonthe floor, if possible
If the front passenger does not observe these
conditions, OCS may produce afalse classifica-
tion, e.g. because the front passenger:
Rtransfers their weight by supporting them-
selves on avehicle armrest
Rsits in such away that their weight is raised
from the seat cushion
If you install achild restraint system on the
front-passenger seat, be sure to observe the
correctp ositioningofthe child restraint system.
Never place object sunder or behind the child
restraint system, e.g. acushion. The entir ebase
of the child restraint system must alwaysr est on
the seat cushion of the front-passenger seat.
The backrest of the forward-facing child
restraint system must lie as flat as possible
against the backrest of the front-passenger
seat.
The child restraint system must not touch the
roof or be subjected to aload by the head
restraint. Adjust the angle of the seat backrest
and the head restraint position accordingly.
Only then can OCS be guaranteed to function
correctly. Always observe the child restraint sys-
tem manufacturer's installation and operating
instructions.
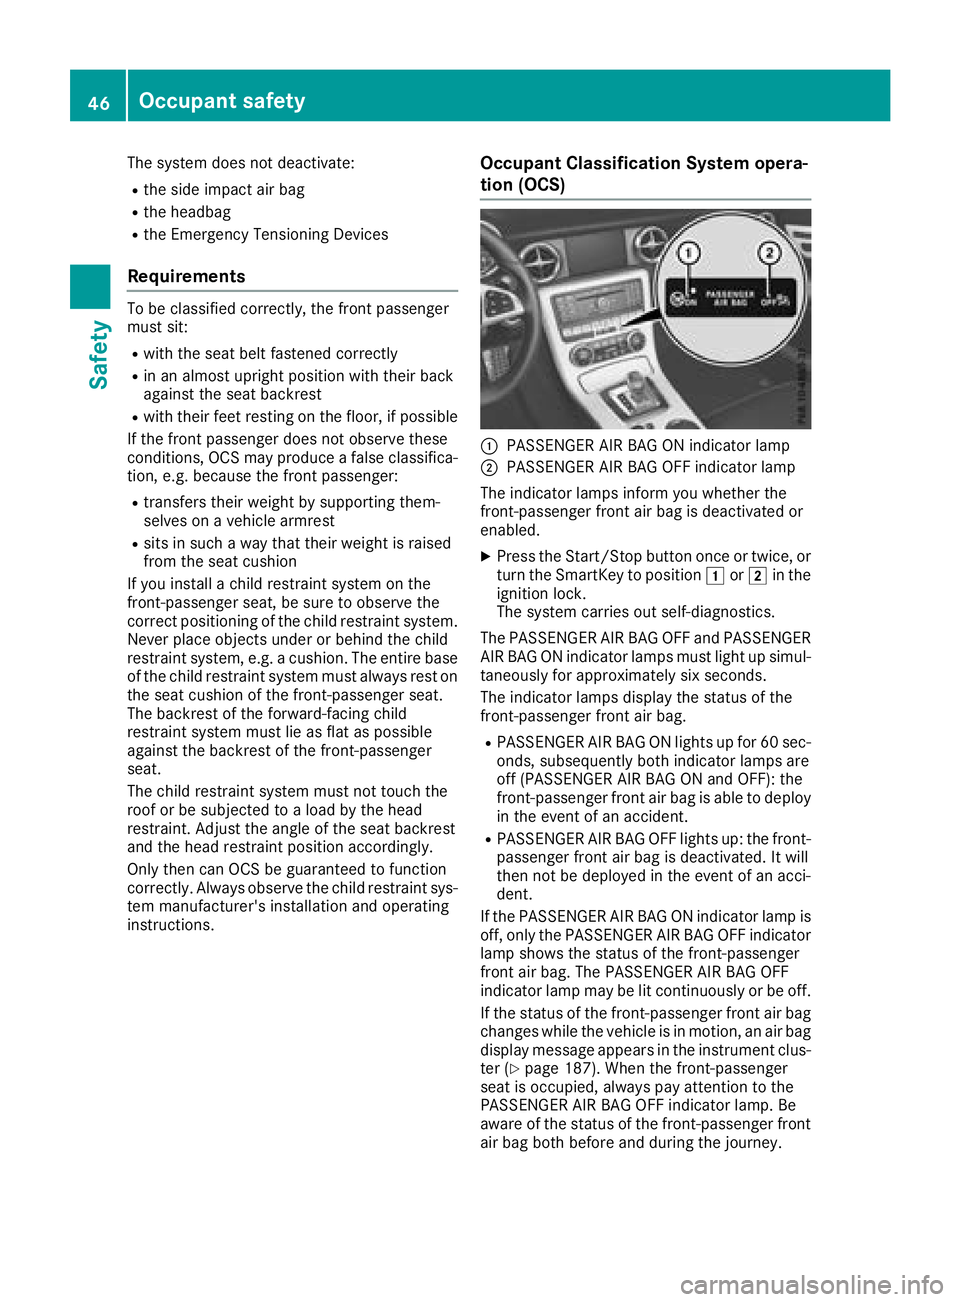
Occupant Classification System opera-
tion (OCS)
:PASSENGER AIR BAG ON indicator lamp
;PASSENGER AIR BAG OFF indicator lamp
The indicator lamps inform you whether the
front-passenger front air bag is deactivated or
enabled.
XPress the Start/Stop button once or twice, or
turn the SmartKey to position 1or2 in the
ignition lock.
The system carries out self-diagnostics.
The PASSENGER AIR BAG OFF and PASSENGER AIR BAG ON indicator lamps must light up simul-
taneously for approximately six seconds.
The indicator lamps display the status of the
front-passenger front air bag.
RPASSENGER AIR BAG ON lights up for 60 sec-
onds, subsequently both indicator lamps are
off (PASSENGER AIR BAG ON and OFF): the
front-passenger front air bag is able to deploy
in the event of an accident.
RPASSENGER AIR BAG OFF lights up: the front-
passenger front air bag is deactivated. It will
then not be deployed in the event of an acci-
dent.
If the PASSENGER AIR BAG ON indicator lamp is
off, only the PASSENGER AIR BAG OFF indicator lamp shows the status of the front-passenger
front air bag. The PASSENGER AIR BAG OFF
indicator lamp may be lit continuously or be off.
If the status of the front-passenger front air bag
changes while the vehicle is in motion,ana ir bag
display message appears in the instrument clus-
ter (
Ypage 187). When the front-passenger
seat is occupied, alwaysp ay attention to the
PASSENGER AIR BAG OFF indicator lamp. Be
aware of the status of the front-passenger front air bag both before and during the journey.
46Occupant safety
Safety
Page 55 of 298
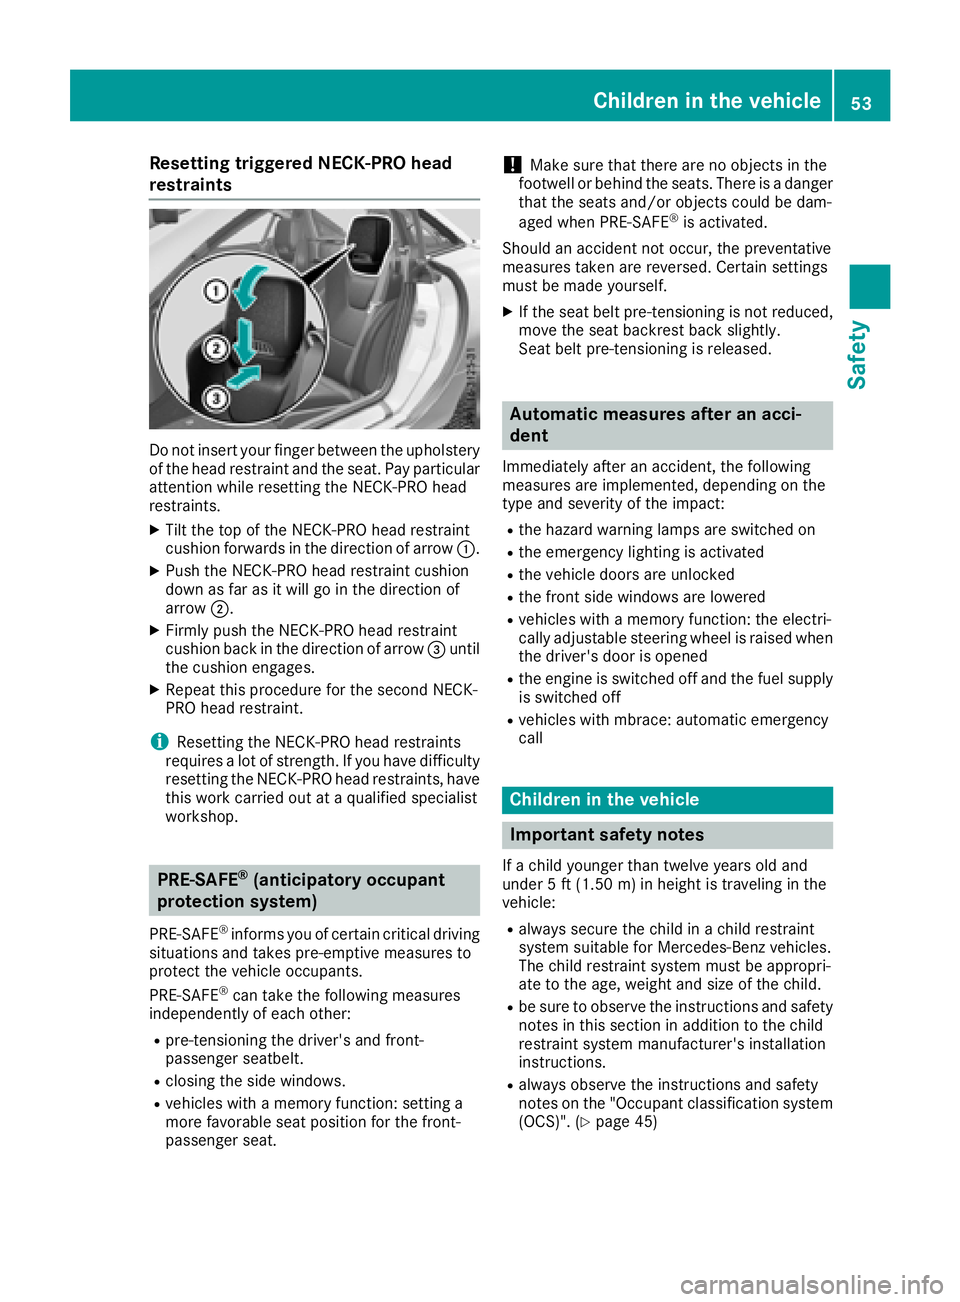
Resetting triggeredNECK-PRO head
restraints
Do not insert your finger between the upholstery of the headr estraint and the seat. Payp articular
attention whil eresetting the NECK-PROh ead
restraints.
XTilt the top of the NECK-PROh eadrestraint
cushio nforward sinthe direction of arrow :.
XPush the NECK-PROh eadrestraint cushion
dow nasfar as it will go in the direction of
arrow ;.
XFirmly push the NECK-PROh eadrestraint
cushio nbackint he direction of arrow =until
the cushio nengages.
XRepea tthis procedure for the second NECK-
PROh eadrestraint.
iResetting the NECK-PROh eadrestraints
requires alot of strength. If yo uhaved ifficulty
resetting the NECK-PROh eadrestraints, have
this work carrie doutataq uali fied specialist
workshop.
PRE-SAFE®(anticipatory occupant
protection system)
PRE-SAFE®informs yo uofcertain critical driving
situations and take spre-emptive measures to
protect the vehicl eoccupants.
PRE-SAFE
®can take the following measures
independentl yofeacho ther:
Rpre-tensioning the driver'sa nd front-
passenger seatbelt.
Rclosing the sid ewindows.
Rvehicles with amemory function: setting a
more favorabl eseatp osition for the front-
passenger seat.
!Make sure that there are no objects in the
footwell or behind the seats. There is adanger
that the seats and/or objects could be dam-
aged when PRE-SAFE
®is activated.
Should an accident not occur, the preventative
measures take nare reversed. Certai nsettings
mus tbem adey ourself.
XIf the seatb eltp re-tensioning is not reduced,
move the seatb ackrest back slightly.
Seatb eltp re-tensioning is released.
Automatic measures after an acci-
dent
Immediately afte ranaccident, the following
measures are implemented, depending on the
typ eand severity of the impact:
Rthe hazard warning lamps are switched on
Rthe emergency lighting is activated
Rthe vehicl edoors are unlocked
Rthe front sid ewindow sare lowered
Rvehicles with amemory function: the electri-
cally adjustabl esteering wheel is raised when
the driver'sd ooriso pened
Rthe engine is switched off and the fue lsuppl y
is switched off
Rvehicles with mbrace: automatic emergency
call
Childrenint he vehicle
Important safety notes
Ifac hild younger than twelve years olda nd
under 5ft(1.50 m) in height is traveling in the
vehicle:
Ralways secur ethe child in achild restraint
systems uitabl efor Mercedes-Benz vehicles.
The child restraint systemm ustbea ppropri-
ate to the age, weight and size of the child.
Rbe sure to observe the instructions and safety
notesint hissectio nina dditiontot he child
restraint systemm anufacturer's installation
instructions.
Ralways observe the instructions and safety
notesont he "Occupant classification system
(OCS)". (
Ypage 45)
Children in the vehicle53
Safety
Z