2018 MERCEDES-BENZ SLC ROADSTER ESP
[x] Cancel search: ESPPage 213 of 298
General notes
The multimedia system section in this Opera-
tor's Manualdescribes the basicp rinciples for
operation. More information can be found in the Digital Operator's Manual.
Important safety notes
GWARNING
If you operate information systems and com-
municatio nequipment integrated in the vehi-
cle when driving, you may be distracted from
the traffic situation. You could also lose con-
trol of the vehicle.T here isarisk of an acci-
dent.
Only operate this equipment when the traffic
situation permits. If you are not sure that this
is possible, park the vehicle paying attention
to traffic conditions and operate the equip-
ment when the vehicle is stationary.
You must observe the legalr equirements for the
country in which you are currently driving when
operating the multimedia system.
The multimedia system calculates the route to
the destination withoutt aking the following into
account, for example:
Rtraffic lights
Rstop and yield signs
Rparking or stopping restrictions
Rroad narrowing
Rother road and traffic rule sand regulations
The multimedia system may give incorrect nav-
igation recommendations if the actual street/
traffic situation does not correspond with the
digital map's data.
For example:
Rad iverted route
Rthe road layout or the direction of aone-way
street has been changed
For this reason, you must alwayso bserve road
and traffic rule sand regulations during your
journey. Roa dand traffic rule sand regulations
alwaysh ave priority over multimedia system
driving recommendations. Navigation announcements are intended to
direct you whiled
riving withoutdiverting your
attention from the road and driving.
Please alwaysu se this feature instead of con-
sulting the map display for directions. Looking
at the icons or map display can distract you from
traffic conditions and driving, and increase the
risk of an accident.
This equipment complies with FCC radiation
exposure limits set forth for uncontrolled equip-
ment and meets the FCC radiof requency (RF)
Exposure Guidelines in Supplement CtoOET65.
This equipment has very low levelsofRFe nergy
that is deemedtoc omply withoutmaximum
permissive exposure evaluation (MPE). How-
ever, it is recommended to insta
ll it atadistance
of at least 8inches (approx. 20 cm) betweent he
radiation source and aperson's body (not
including limbss uch as hands, wrists, feet and
legs).
GWARNING
Modifications to electronic components, their software as wellasw iring can impair their
function and/or the function of other net-
worked components. In particular, systems
relevant to safety could also be affected. As a
result, these may no longer function as inten-
ded and/or jeopardize the operating safety of
the vehicle.T here is an increasedr isk of an
accident and injury.
Never tamper with the wiring as wellase lec-
tronic components or their software .You
shoul dhave all work to electricala nd elec-
tronic equipment carried out at aqualified
specialist workshop.
Function restrictions
For safety reasons, some functions are restric-
ted or unavailable whilet he vehicle is in motion.
You willn otice this, for example, because either
you willn ot be abletos elect certain menu items
or am essag ewillappear to this effect.
Function restrictions211
Multimedia system
Z
Page 216 of 298
Traffic reports on the route for the route guid-
ance are taken into account (not availablein
all countries).
RDynamic TRF. Route After Request
You can decide whether or not current traffic reports should be included in the route cal-
culation (not availableina ll countries).
RCalculate Alternative Routes
Different routes are being calculated. In order
to do so, instead of Start,select the menu
item Continue.
XTo avoid/use rout eoptions: selectAvoid
Options.
XSelect aroute option.
Notes for route options:
RUse Toll Roads
The route calculation includes roads which
require you to pay ausage fee (toll).
RNumber of Occupants in the Vehicle:(only availableint he USA)
Prerequisite: your vehicle meets the access
conditions for carpool lanes.
Carpool lanes will be included if the carpool
lanes option is activated.
Entering an address
Multimedia system:
XSelect NaviQNavigation.
The map shows the vehicle's current position.
XSlide 6the controller.
XSelect DestinationQAddress Entry.
Enter an address, e.g. as follows:
Rcity or ZIP code, street ,house number
Rstate/province, city or ZIP code
Rcity or ZIP code, center
Rstreet ,city or ZIP code, intersection
XSelect City.
The city in which the vehicle is currently loca-
ted (current vehicle position) is at the top.
Below this, you will see locations for which
route guidance has already been carried out.
XEnter the city.
The Gsymbol: the location is contained on
the digital map multiple times.
XTo switch to the list: slide5the control-
ler.
XSelect the location.
If available, the ZIP code is shown. If there are
different ZIP codes availablef or the location,
the corresponding digits are displayed with an
X
.
XEnter the street and house number.
The address is in the menu.
Further options for destination entry:
Rsearch for akeyword
The keyword search finds destinations using
fragmentsofw ords.
Rselect the last destination
Rselectacontact
Rselect aPOI
You can search for aPOI by location, name or
telephone number.
Rselect destination on the map
Renter intermediate destination
You can map the route to the destination
yourself with up to four intermediate destina-
tions.
Rselect destinations from Mercedes-Benz
Apps
Rselect geo-coordinates
Calculating the route
Prerequisite: the address has been entered and
is in the menu.
XSelect StartorContinue.
The route is calculated with the selected route
type and the selected route options.
If route guidance has already been activated,
ap rompt will appear asking whether you wish
to end the current route guidance.
XSelect Cancel Active Route Guidanceor
Set as IntermediateD estination.
Cancel Active Route Guidancecancels
the current route guidance and start sroute
calculation to the new destination.
Set as IntermediateD estination
adds
the new destination in addition to the existing
destination and opens the intermediate des-
tinations list.
214Operating system
Multimedia system
Page 223 of 298
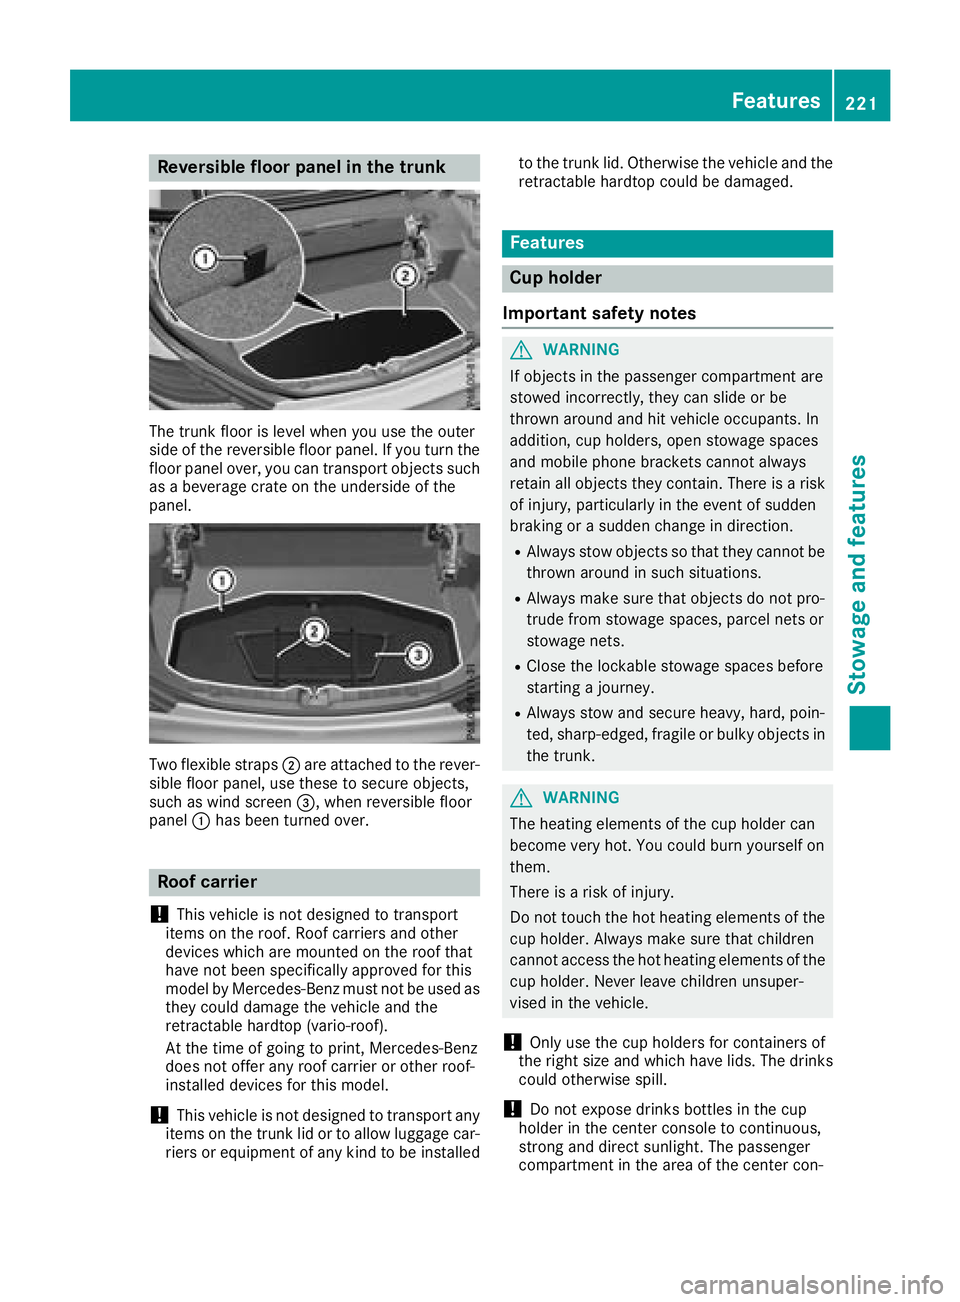
Reversible floor panelinthe trunk
The trunk floor is level when yo uusethe outer
sid eoft he reversibl efloor panel.Ify outurn the
floor panel over, yo ucan transpor tobjects such
as ab everage crate on the undersid eofthe
panel.
Twof lexible straps ;are attached to the rever-
sible floor panel,u sethesetos ecure objects,
such as wind screen =,whenr eversibl efloor
panel :hasb eent urne dover.
Roo fcarrier
!
Thisv ehicleisn ot designed to transport
item sont he roof. Roof carriers and other
device swhich are mounted on the rooft hat
have not bee nspecifically approved for this
model by Mercedes-Benz mus tnot be used as
they could damag ethe vehicl eand the
retractable hardto p(vario-roof).
At the time of going to print, Mercedes-Benz
doe snot offera ny roofcarrieroro therr oof-
installed device sfor this model.
!Thisv ehicleisn ot designed to transpor tany
item sont he trunk li dortoallowluggage car-
riers or equipment of any kind to be installed to the trunk lid. Otherwise the vehicl
eand the
retractable hardto pcould be damaged.
Features
Cup holder
Important safety notes
GWARNING
If objects in the passenger compartment are
stowed incorrectly, they can slide or be
throwna round and hit vehicl eoccupants. In
addition, cup holders, ope nstowag espaces
and mobil ephone brackets canno talway s
retain al lobjects they contain. There is arisk
of injury, particularly in the event of sudden
braking or asudde nchange in direction.
RAlway sstow objects so that they canno tbe
throwna round in such situations.
RAlwaysmake sure that objects do not pro-
trud efrom stowag espaces, parcel nets or
stowag enets.
RClose the lockable stowag espaces before
starting ajourney.
RAlway sstow and secure heavy, hard, poin-
ted, sharp-edged, fragile or bulky objects in
the trunk.
GWARNING
The heating elements of the cup holder can
become very hot. Yo ucould burn yourselfo n
them.
There is ariskofi njury.
Do not touch the hot heating elements of the
cup holder .Alway smake sure that children
canno taccess the hot heating elements of the
cup holder .Neverl eave children unsuper-
vised in the vehicle.
!Only us ethe cup holder sfor containers of
the right size and which have lids. The drinks could otherwise spill.
!Do not expose drinks bottles in the cup
holder in the center console to continuous,
strong and direct sunlight. The passenger
compartment in the are aofthe center con-
Features221
Stowage and features
Z
Page 226 of 298

mbrace
General notes
Yo um usth aveal icens eagreemen ttoactivate
the mbrac eservice. Make sure tha tyou rsystem
is activate dand operational .Tologin, press the
ï MB Info call button. If any of the steps
mentioned ar enot carried out, the syste mmay
not be activated.
If yo uhaveq uest ions abou tthe activation, con-
tac tone of the following telephone hotlines:
RUSA: Mercedes-Benz Customer Assistance
Center at 1-800-FOR-MERCedes
(1-800-367-6372) or 1-866-990-9007
RCanada: Customer Service at
1-888-923-8367
Shortlya fter successfull yregistering with the
service, auserIDa nd password will be sent to
yo ubyp ost.
USA only: yo ucan uset hisp assword to lo gonto
the mbrac eareau nder "Owners Online "at
http://www.mbusa.com .
Th es ystemisa vailable if:
Rit hasbeena ctivate dand is operational
Rthe corresponding mobil ephone network is
availabl efor transmitting data to the Cus-
tome rCenter
Ras ervice subscription is available
Rthe starterb atter yiss ufficiently charged
iDetermining the locatio nofthe vehicl eona
mapiso nlyp ossibl eif:
RGP Sreceptio nisa vailable.
Rthe vehicl eposit ionc an be forwarde dto
the Customer Assistanc eCenter.
The mbrac esystem
To adjus tthe volum edurin gac all,procee das
follows:
XPress the WorX button on the multi-
function steering wheel.
or
XUse the volum econtrolle rofthe audi osys-
tem/COMAND.
Th es ystemo ffers variou sservices ,e.g.:
RAutomatic and manua lemergency call
RRoadside Assistanc ecall
RMB Info call USA only: yo
ucan find information and a
description of al lavailable features under "Own-
ers Online "athttp://www.mbusa.com.
System self-test
Aftery ouhave switched on the ignition, the sys-
tem carries ou taself-diagnosis.
Am alfunctio nint he syste mhasbeen detected
if one of the following occurs:
RTh eindicator lamp in the SOS button does not
com eond uringthe syste mself-test.
RTheindicator lamp in the FRoadside
Assistanc ebutton does not ligh tupd urin g
self-diagnosis of the system.
RTh eindicator lamp in the ïMB Info call
button does not ligh tupd urin gself- diagnosis
of the system.
RTh eindicator lamp in one or mor eofthe fol-
lowing buttons continue stolightup red after
the syste mself-diagnosis:
-SOS button
-F Roadside Assistanc ecallb utton
-ï MB Info call button
RAftert he syste mself-diagnosis ,the Inoper‐ativeorServiceNotActivatedmessage
appear sinthe multifunction display.
If am alfunctio nisindicated as outlined above,
the syste mmaynot operate as expected. In the
event of an emergency,h elpw illh avetob e
summoned by other means.
Have the syste mchecked at the neares tauthor-
ize dM ercedes-Benz Center or contact the fol-
lowing service hotlines:
RUSA: Mercedes-Benz Customer Assistance
Center at 1-800-FOR-MERCedes
(1-800-367-6372) or 1-866-990-9007
RCanada: Customer Service at
1-888-923-8367
224Features
Stowag eand featur es
Page 227 of 298
Emergency call
Important safety notes
GWARNING
It can be dangerous to remain in th evehicle,
even if you have pressed th eSOS button in an
emergency if:
Ryou see smoke inside or outside of th evehi-
cle ,e.g.ift here is afirea fter an accident
Rthev ehicle is on adangerous sectio nof
road
Rth ev ehicle is no tvisible or canno teasily be
seen by other road users, particularly when
dark or in poor visibilityc onditions
Thereisar isk of an accidenta nd injury.
Leavet hevehicle immediately in this or simi-
lar situations as soon as it is safe to do so.
Movetoas afe locationalongw ith other vehi-
cle occupants. In suchs ituations,secure the
vehicle in accordanc ewith national regula-
tions ,e.g.w ith aw arning triangle.
You must have alicens eagreementtoa ctivate
th em brace service. Makes ure that your system
is activated and operational. To register, press
the ï MB Info call button.Ifa ny of thesteps
mentioned are no tcarried out,t hesystem may
no tbea ctivated.
If you have questionsa bout theactivation,c on-
tac tone of th efollowingt elephone hotlines:
RUSA: Mercedes-Ben zCustomerA ssistance
Center at 1-800-FOR-MERCedes
(1-800-367-6372 )or1 -866-990-9007
RCanada: Customer Service at
1-888-923-8367
General notes
An emergencyc all is dialed automatically if an
air bag or Emergency TensioningD evice is trig-
gered.
iYou cannot end an automatically triggered
emergency
c all yourself.
An emergencyc all can also be initiated man-
ually.
As soon as the emergencyc all has been initi-
ated, the indicator lamp in the SOS button
flashes. The multifunction display shows the
Connecting Call
message. The audio output is muted.
Once the connection has been made, the
Call
Connectedmessage appears in the multifunc-
tion display.
All important information on the emergencyi s
transmitted, for example:
Rcurrent location of the vehicle (as determined
by the GPS system)
Rvehicle identification number
Rinformation on the severity of the accident
Shortly after the emergencyc all has been initi-
ated, avoice connection is automatically estab-
lished between the Customer Assistance Center
and the vehicle occupants.
RIf the vehicle occupantsr espond, the
Mercedes-Benz Customer Assistance Center
attempt stoget more information on the
emergency.
RIf there is no response from the vehicle occu-
pants, an ambulance is immediately sent to
the vehicle.
If no voice connection can be established to the
Mercedes-Benz Customer Assistance Center,
the system has been unable to initiate an emer-
gency call.
This can occur, for example, if the relevant
mobile phone network is not available. The indi-
cator lamp in the SOS button flashes continu-
ously.
The Call Failed
message appears in the mul-
tifunction display and must be confirmed.
In this case, summon assistance by other
means.
Making an emergency call
Features225
Stowage and features
Z
Page 228 of 298

XTo initiate an emergencycallm anually:
press cover :briefl ytoo pen.
XPress SOS button ;briefly.
The indicator lamp in SOS button ;flashes
unti lthe emergency cal lisconcluded.
XWait for avoice connectio ntothe Mercedes-
Benz Customer Assistance Center.
XAfter the emergency call, close cover :.
iIf the mobilephone network is unavailable,
mbrace will not be able to make the emer-
genc ycall. If yo uleave the vehicl eimmedi-
ately afte rpressing the SOS button, yo uwill
not know whethe rmbrace place dthe emer-
genc ycall. In thisc ase, always summon assis-
tance by othe rmeans.
Breakdow nassistanc ebutton
XPress Roadside Assistance button :.
Thi sinitiates acalltot he Mercedes-Benz Cus-
tomerA ssistance Center.
The indicator lamp in Roadside Assistance
button :flashesw hilethe cal lisactive. The
multifunctio ndisplay shows the Connect‐
ing Callmessage. The audi ooutputi s
muted.
If ac onnectio ncan be made ,the CallC on‐
nectedmessage appears in the multifunction
display.
If am obilephone network and GP Sreception
are available ,the system transfers data to the
Mercedes-Benz Customer Assistance Center,
for example:
RCurrent location of the vehicle
RVehicl eide ntificatio nnumber
iThe display of the multimedia system indi-
cate sthatac allisa ctive. During the call, you
can change to the navigatio nmenu by press- ing the NAVI button on COMAND, for exam-
ple.
iVoice outputi
snot available.
Av oice connectio nise stablished between the
Mercedes-Benz Customer Assistance Center
and the vehicl eoccupants.
From the remote malfunctio ndiagn osis, the
Mercedes-Benz Customer Assistance Center
can ascertain the nature of the problem
(
Ypage 227).
The Mercedes-Benz Customer Assistance Cen-
ter either send saqualified Mercedes-Benz tech-
nician or makes arrangements for your vehicle
to be transported to the nearestM ercedes-Benz
Service Center.
Yo um aybe chargedf or servicessuchasr epair
work and/or towing.
Further details are available in your mbrace
manual.
iThe system hasn ot been able to initiate a
Roadside Assistance call, if:
Rthe indicator lamp for Roadside Assistance
cal lbutton :is flashing continuously.
Rno voice connectio ntothe Mercedes-Benz
Customer Assistance Center wa sestab-
lished.
Thi scan occurift he relevant mobil ephone
network is not available ,for example.
The CallF ailed
message appears in the
multifunctio ndisplay.
XTo en dacall:press the ~button on the
multifunctio nsteering wheel.
or
XPress the corresponding multimedia system
button for ending aphone call.
MB Info cal lbutton
226Features
Stowag eand featur es
Page 229 of 298
XPress MB Info call button:.
This initiates acall to the Mercedes-Benz Cus-
tomer Assistance Center.
The indicator lamp in MB Info call button :
flashes while the connection is being made.
The multifunction display shows the Con‐
nectingCallmessage. The audio system is
muted.
If ac onnection can be made, the Call Con‐
nectedmessage appears in the multifunction
display.
If am obile phone networ kand GPS reception
are available, the system transfers data to the
Mercedes-Benz Customer Assistance Center,
for example:
Rcurrentl ocation of the vehicle
Rvehicle identification number
iThe display of the multimedia system indi-
cates that acall is active. During the call, you
can change to the navigation menu by press-
ing the NAVI button on COMAND,f or exam-
ple.
Voice output is not available.
Av oice connection is established between the
Mercedes-Benz Customer Assistance Center
and the vehicle occupants.
You receive information about operating your
vehicle, about the nearest authorized
Mercedes-Benz Center and about other prod-
ucts and services from Mercedes-Benz.
USA only: you can find further information on
the mbrace system under "Owners Online" at
http://www.mbusa.com.
iThe system has not been able to initiate an
MB Info call, if:
Rthe indicator lamp in MB Info call button :
is flashing continuously.
Rno voice connection to the Mercedes-Benz
Customer Assistance Center was estab-
lished.
This can occur if the relevant mobile phone
networ kisnot available, for example.
The Call Failed
message appears in the
multifunction display.
XTo end acall: press the ~button on the
multifunction steerin gwheel.
or
XPress the corresponding multimedia system
button for ending aphone call.
Call priority
When service calls are active, e.g. Roadside
Assistance or MB Info calls, an emergencyc all
can still be initiated. In this case, an emergency
call will take priority and override all other active
calls.
The indicator lamp of the respective button
flashes until the call is ended.
An emergencyc all can only be terminated by the
Mercedes-Benz Customer Assistance Center.
All other calls can be ended by pressing:
Rthe ~ button on the multifunction steering
wheel
Rthe corresponding button on the audio sys-
tem or on COMAND for ending atelephone
call
iWhen acall is initiated, the audio system is
muted. The mobile phone is no longer con-
nected to COMAND.H owever, if you want to
use your mobile phone, do so only when the
vehicle is stationary and in asafe location.
Vehicle Health Check
With the Vehicle Health Check, the Customer
Assistance Center can provide improved sup-
port for problems with your vehicle. During an
existin gcall, vehicle data is transferred to the
Customer Assistance Center. The customer ser-
vice representative can use the received data to
decide what kind of assistanc eisrequired. You
are then ,for example, guided to the nearest
Mercedes-Benz ServiceC enter orarecovery
vehicle is called.
If vehicle data needs to be transferred during an
MB Info call or aRoadside Assistance call, this is
initiated by the Customer Assistance Center.
You will see the Roadside Assistance Con‐
nectedmessage in the COMAND display. If the
vehicle remotem alfunction diagnosis can be
started, the Request for vehicle diagno‐
sisreceived.Startvehiclediagnosis?message appears in the display.
XConfirm the message with Yes.
XWhen theVehicle diagnosis: Pleasestart ignitionmessage appears, turn the
SmartKey to position 2in the ignition lock
(
Ypage 116).
XWhen the Please follow the instruc‐tions received by phone and moveyour vehicle to asafe positionmes-
Features227
Stowage and features
Z
Page 231 of 298
Programming
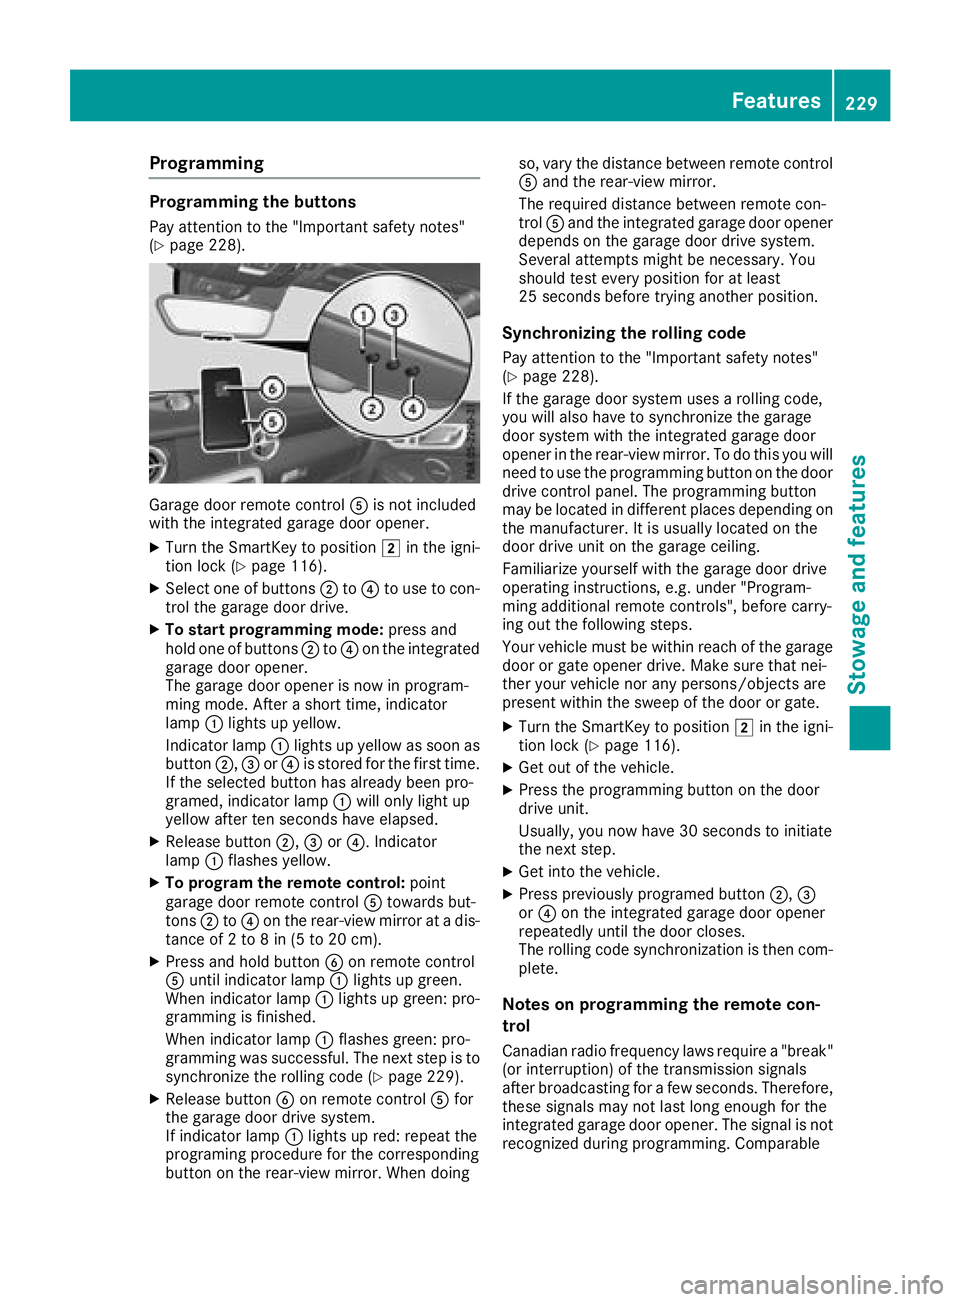
Programming the buttons
Pay attention to the "Important safety notes"
(Ypage 228).
Garage door remote controlAis not included
with the integrated garage door opener.
XTurn the SmartKey to position 2in the igni-
tion lock (Ypage 116).
XSelect one of buttons ;to? to use to con-
trol the garage door drive.
XTo startp rogramming mode: press and
hold one of buttons ;to? on the integrated
garage door opener.
The garage door opener is now in program-
ming mode. After ashort time, indicator
lamp :lights up yellow.
Indicator lamp :lights up yellow as soon as
button ;,=or? is stored for the first time.
If the selected button has already been pro-
gramed, indicator lamp :will only light up
yellow after ten seconds have elapsed.
XRelease button ;,=or?.I ndicator
lamp :flashes yellow.
XTo programt he remote control: point
garage door remote control Atowards but-
tons ;to? on the rear-view mirror at adis-
tance of 2to8in(5to20c m).
XPress and hold button Bon remote control
A until indicator lamp :lights up green.
When indicator lamp :lights up green: pro-
gramming is finished.
When indicator lamp :flashes green: pro-
gramming was successful. The next step is to synchronize the rolling code (
Ypage 229).
XRelease button Bon remote control Afor
the garage door drive system.
If indicator lamp :lights up red: repeat the
programing procedure for the corresponding
button on the rear-view mirror. When doing so, vary the distance between remote control
A
and the rear-view mirror.
The required distance between remote con-
trol Aand the integrated garage door opener
depends on the garage door drive system.
Several attemptsm ight be necessary. You
should test every position for at least
25 seconds before trying another position.
Synchronizing the rolling code
Pay attention to the "Important safety notes"
(Ypage 228).
If the garage door system uses arolling code,
you will also have to synchronize the garage
door system with the integrated garage door
opener in the rear-view mirror. To do this you will
need to use the programming button on the door
drive control panel. The programming button
may be located in different places depending on
the manufact
urer. It is usually located on the
door drive unit on the garage ceiling.
Familiarize yourself with the garage door drive
operating instructions, e.g. under "Program-
ming additional remote controls", before carry-
ing out the following steps.
Your vehicle must be within reach of the garage
door or gate opener drive. Make sure that nei-
ther your vehicle nor any persons/objects are
present within the sweep of the door or gate.
XTurn the SmartKey to position 2in the igni-
tion lock (Ypage 116).
XGet out of the vehicle.
XPress the programming button on the door
drive unit.
Usually,y ou now have 30 seconds to initiate
the next step.
XGet into the vehicle.
XPress previously programed button ;,=
or ? on the integrated garage door opener
repeatedly until the door closes.
The rolling code synchronization is then com-
plete.
Notes on programming the remote con-
trol
Canadianr adio frequency laws require a"break"
(or interruption) of the transmission signals
after broadcasting for afew seconds. Therefore,
these signals may not last long enough for the
integrated garage door opener. The signal is not
recognized during programming. Comparable
Features229
Stowage and features
Z