2018 MERCEDES-BENZ SL ROADSTER tow
[x] Cancel search: towPage 75 of 322
SmartKey
Important safety notes
GWARNING
If children are left unsupervised in the vehicle,
they could:
Roperate the vehicle's equipment.
Additionally, children could set the vehicle in
motion if, for example, they:
Rrelease the parking brake
Rshift the automatic transmission out of park
position P
Rstart the engine
There is a risk of an accident and injury.
Never leave children or animals unattended in
the vehicle.
When leaving the vehicle, always take the
SmartKey with you and lock the vehicle. This
also applies to mobile phones if the "Digital
Car Key in smartphone" function is activated
via the Mercedes me connect web app.
GWARNING
If you attach heavy or large objects to the
SmartKey, the SmartKey could be uninten-
tionally turned in the ignition lock. This could
cause the engine to be switched off. There is a risk of an accident.
Do not attach any heavy or large objects to the
SmartKey. Remove any bulky key rings before
inserting the SmartKey into the ignition lock.
!Keep the SmartKey away from strong mag-
netic fields. Otherwise, the remote control
function could be affected.
Strong magnetic fields can occur in the vicin-
ity of powerful electrical installations.
Do not keep the SmartKey:
Rwith electronic devices, e.g. a mobile phone
or another SmartKey
Rwith metallic objects, e.g. coins or metal foil
Rinside metallic objects, e.g. a metal case
This can affect the functionality of the Smart- Key.
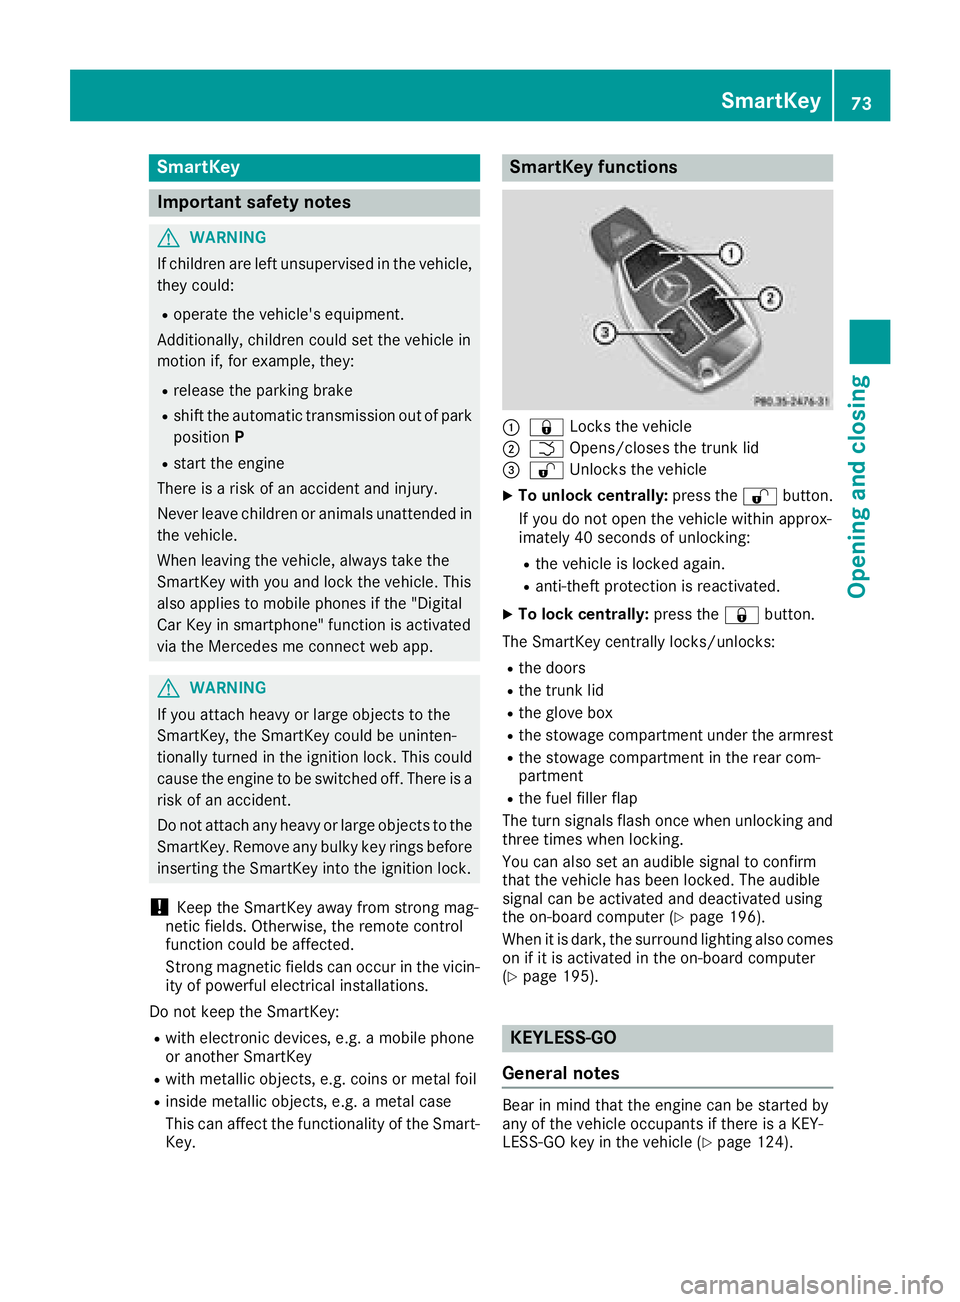
SmartKey functions
:& Locks the vehicle
;FOpens/closes the trunk lid
=%Unlocks the vehicle
XTo unlock centrally: press the%button.
If you do not open the vehicle within approx-
imately 40 seconds of unlocking:
Rthe vehicle is locked again.
Ranti-theft protection is reactivated.
XTo lock centrally: press the&button.
The SmartKey centrally locks/unlocks:
Rthe doors
Rthe trunk lid
Rthe glove box
Rthe stowage compartment under the armrest
Rthe stowage compartment in the rear com-
partment
Rthe fuel filler flap
The turn signals flash once when unlocking and
three times when locking.
You can also set an audible signal to confirm
that the vehicle has been locked. The audible
signal can be activated and deactivated using
the on-board computer (
Ypage 196).
When it is dark, the surround lighting also comes
on if it is activated in the on-board computer
(
Ypage 195).
KEYLESS-GO
General notes
Bear in mind that the engine can be started by
any of the vehicle occupants if there is a KEY-
LESS-GO key in the vehicle (
Ypage 124).
SmartKey73
Opening and closing
Z
Page 76 of 322
Locking/unlocking centrally
You can start, lock or unlock the vehicle using
KEYLESS-GO. To do this, you only need carry the
SmartKey with you. You can combine the func-
tions of KEYLESS-GO with those of a conven-
tional SmartKey. Unlock the vehicle by using
KEYLESS-GO, for instance, and lock it using the
&button on the SmartKey.
The driver's door and the door at which the han-
dle is used, must both be closed. The SmartKey
must be outside the vehicle. When locking or
unlocking with KEYLESS-GO, the distance
between the key and the corresponding door
handle must not be greater than 3 ft (1 m).
A check which periodically establishes a radio
connection between the vehicle and the Smart-
Key determines whether a valid SmartKey is in
the vehicle. This occurs, for example:
Rwhen starting the engine
Rwhile driving
Rwhen using HANDS-FREE ACCESS
Rwhen the external door handles are touched
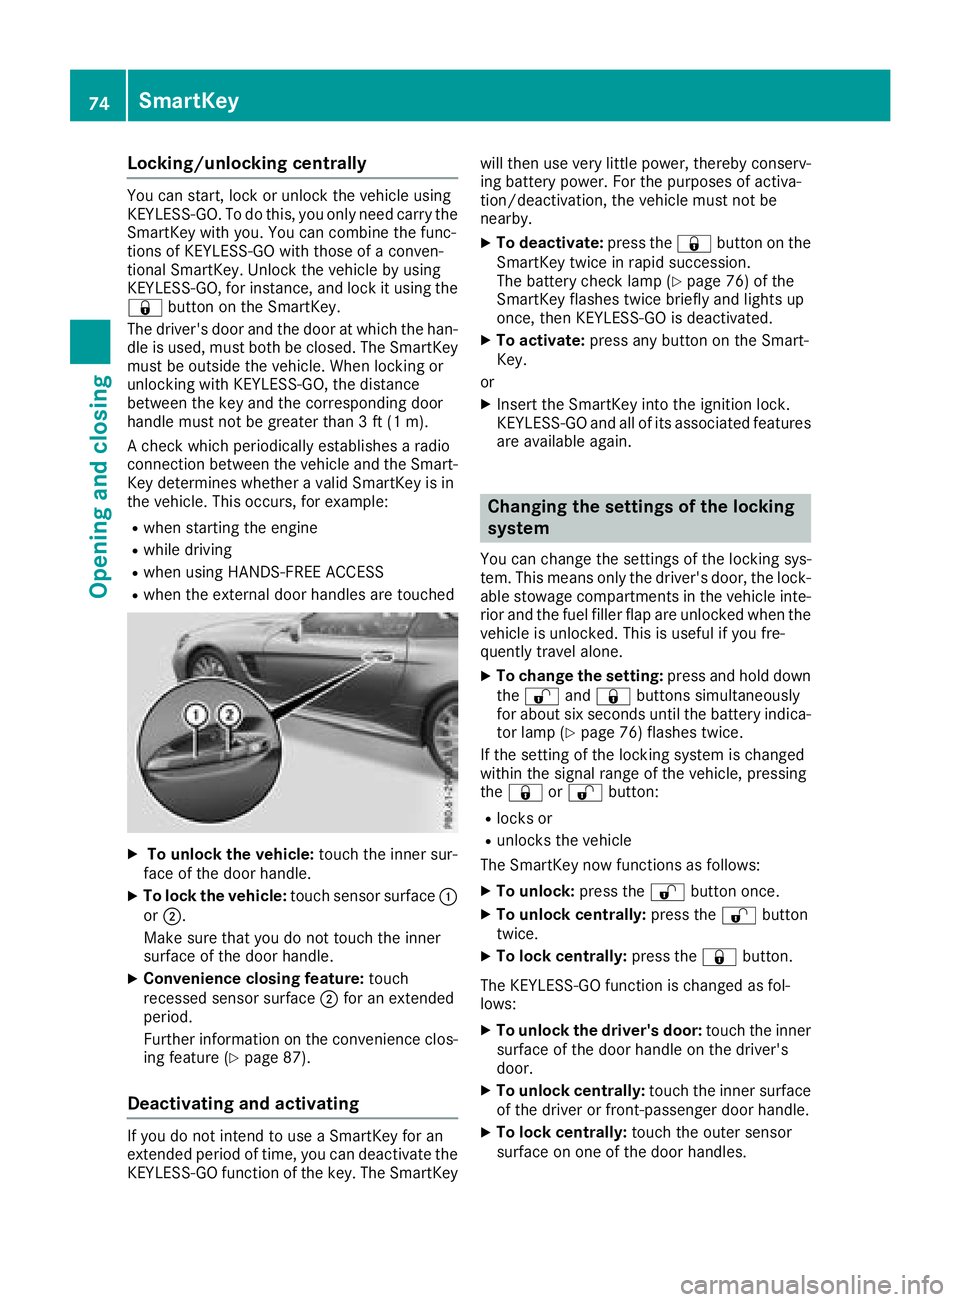
XTo unlock the vehicle: touch the inner sur-
face of the door handle.
XTo lock the vehicle: touch sensor surface :
or ;.
Make sure that you do not touch the inner
surface of the door handle.
XConvenience closing feature: touch
recessed sensor surface ;for an extended
period.
Further information on the convenience clos-
ing feature (
Ypage 87).
Deactivating and activating
If you do not intend to use a SmartKey for an
extended period of time, you can deactivate the
KEYLESS-GO function of the key. The SmartKey will then use very little power, thereby conserv-
ing battery power. For the purposes of activa-
tion/deactivation, the vehicle must not be
nearby.
XTo deactivate: press the&button on the
SmartKey twice in rapid succession.
The battery check lamp (
Ypage 76) of the
SmartKey flashes twice briefly and lights up
once, then KEYLESS-GO is deactivated.
XTo activate: press any button on the Smart-
Key.
or
XInsert the SmartKey into the ignition lock.
KEYLESS-GO and all of its associated features
are available again.
Changing the settings of the locking
system
You can change the settings of the locking sys-
tem. This means only the driver's door, the lock-
able stowage compartments in the vehicle inte-
rior and the fuel filler flap are unlocked when the
vehicle is unlocked. This is useful if you fre-
quently travel alone.
XTo change the setting: press and hold down
the % and& buttons simultaneously
for about six seconds until the battery indica-
tor lamp (
Ypage 76) flashes twice.
If the setting of the locking system is changed
within the signal range of the vehicle, pressing
the & or% button:
Rlocks or
Runlocks the vehicle
The SmartKey now functions as follows:
XTo unlock: press the%button once.
XTo unlock centrally: press the%button
twice.
XTo lock centrally: press the&button.
The KEYLESS-GO function is changed as fol-
lows:
XTo unlock the driver's door: touch the inner
surface of the door handle on the driver's
door.
XTo unlock centrally: touch the inner surface
of the driver or front-passenger door handle.
XTo lock centrally: touch the outer sensor
surface on one of the door handles.
74SmartKey
Opening and closing
Page 81 of 322
When leaving the vehicle, always take the
SmartKey with you and lock the vehicle. This
also applies to mobile phones if the "Digital
Car Key in smartphone" function is activated
via the Mercedes me connect web app.
Unlocking and opening doors from
the inside
!
The side windows will not open/close if the
battery is discharged or if the side windows
have iced up. It will then not be possible to
close the door. Do not attempt to force the
door closed. You could otherwise damage the door or the side window.
You can open a door from inside the vehicle
even if it has been locked.
If the vehicle has previously been locked from
the outside, opening a door from the inside will
trigger the anti-theft alarm system. Switch off
the alarm (
Ypage 72).
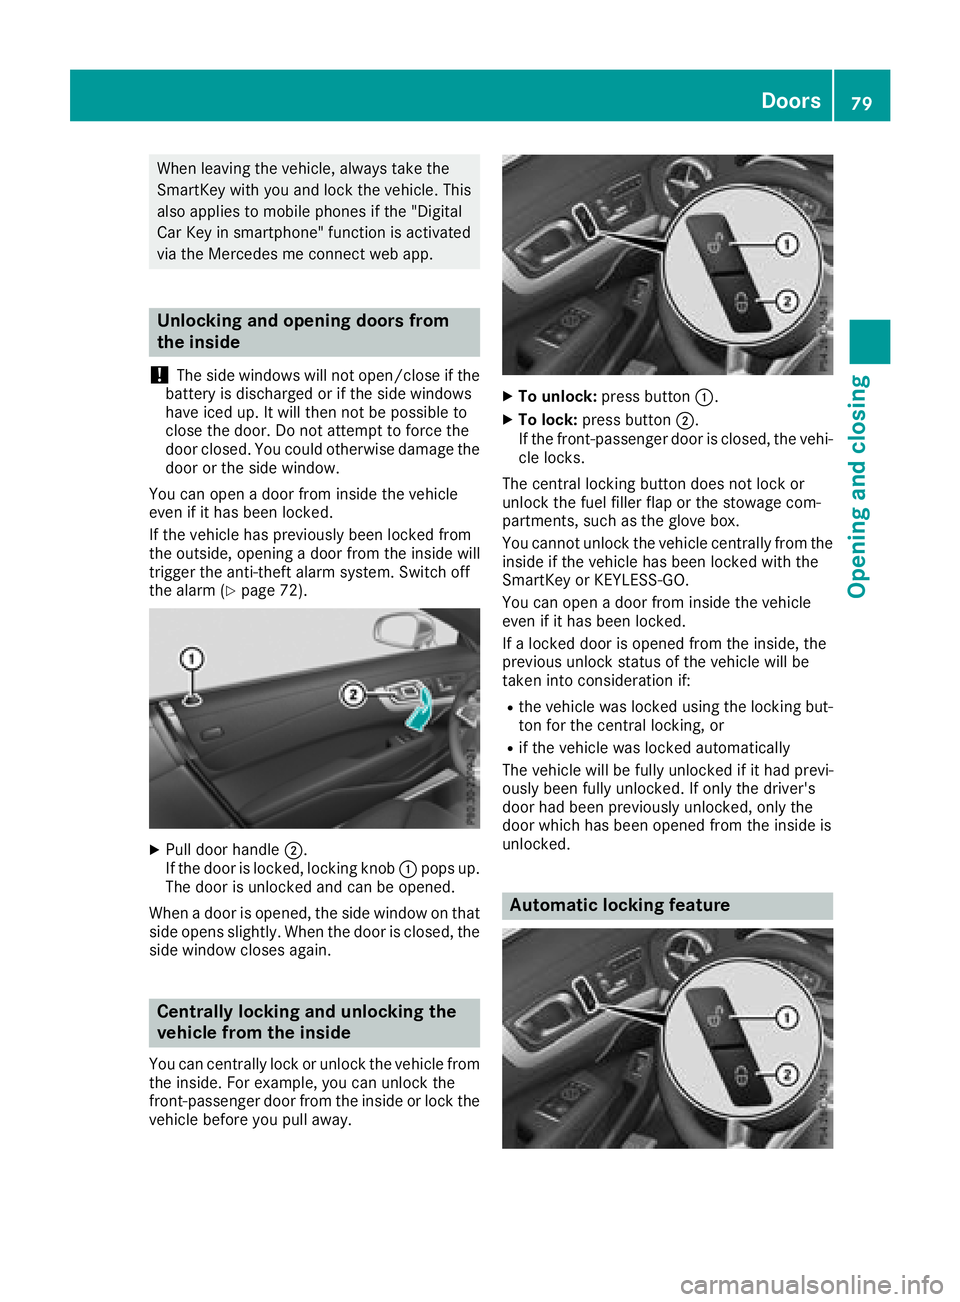
XPull door handle ;.
If the door is locked, locking knob :pops up.
The door is unlocked and can be opened.
When a door is opened, the side window on that
side opens slightly. When the door is closed, the
side window closes again.
Centrally locking and unlocking the
vehicle from the inside
You can centrally lock or unlock the vehicle from
the inside. For example, you can unlock the
front-passenger door from the inside or lock the
vehicle before you pull away.
XTo unlock: press button :.
XTo lock:press button ;.
If the front-passenger door is closed, the vehi-
cle locks.
The central locking button does not lock or
unlock the fuel filler flap or the stowage com-
partments, such as the glove box.
You cannot unlock the vehicle centrally from the
inside if the vehicle has been locked with the
SmartKey or KEYLESS-GO.
You can open a door from inside the vehicle
even if it has been locked.
If a locked door is opened from the inside, the
previous unlock status of the vehicle will be
taken into consideration if:
Rthe vehicle was locked using the locking but-
ton for the central locking, or
Rif the vehicle was locked automatically
The vehicle will be fully unlocked if it had previ-
ously been fully unlocked. If only the driver's
door had been previously unlocked, only the
door which has been opened from the inside is
unlocked.
Automatic locking feature
Doors79
Opening and closing
Z
Page 82 of 322
XTo deactivate:press and hold button :for
about five seconds until a tone sounds.
XTo activate: press and hold button ;for
about five seconds until a tone sounds.
If you press one of the two buttons and do not
hear a tone, the relevant setting has already
been selected.
The vehicle is locked automatically when the
ignition is switched on and the wheels are turn-
ing.
You could therefore lock yourself out if:
Rthe vehicle is being pushed.
Rthe vehicle is being towed.
Rthe vehicle is on a roller dynamometer.
You can also switch the automatic locking func-
tion on and off using the on-board computer
(
Ypage 196).
Power closing
Power closing pulls the doors and trunk lid into
their locks automatically even if they are only
partly closed.
XPower closing feature (doors): push the
door past the first detent position into the
lock.
Power closing will pull the door fully closed.
XTo power close the trunk lid: lightly push
the trunk lid closed.
The power closing function pulls the trunk lid
closed.
Unlocking/locking the driver's door
using the mechanical key
i
If you want to centrally lock the vehicle using
the mechanical key, begin by pressing the
locking button for the interior locking mech-
anism while the driver's door is open. Then
lock the driver's door using the mechanical
key.
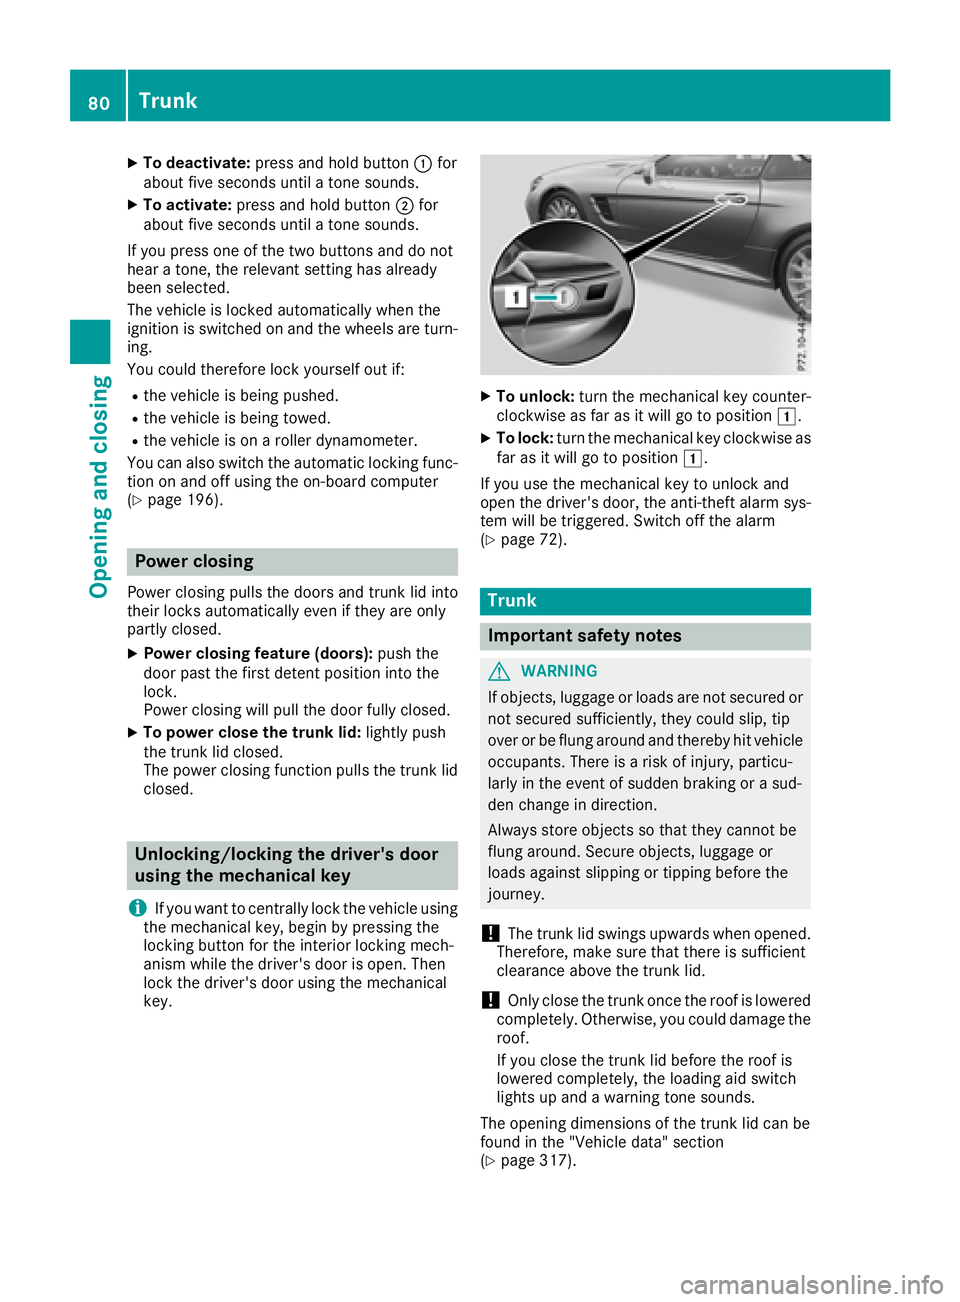
XTo unlock: turn the mechanical key counter-
clockwise as far as it will go to position 1.
XTo lock:turn the mechanical key clockwise as
far as it will go to position 1.
If you use the mechanical key to unlock and
open the driver's door, the anti-theft alarm sys-
tem will be triggered. Switch off the alarm
(
Ypage 72).
Trunk
Important safety notes
GWARNING
If objects, luggage or loads are not secured or
not secured sufficiently, they could slip, tip
over or be flung around and thereby hit vehicle
occupants. There is a risk of injury, particu-
larly in the event of sudden braking or a sud-
den change in direction.
Always store objects so that they cannot be
flung around. Secure objects, luggage or
loads against slipping or tipping before the
journey.
!The trunk lid swings upwards when opened.
Therefore, make sure that there is sufficient
clearance above the trunk lid.
!Only close the trunk once the roof is lowered
completely. Otherwise, you could damage the
roof.
If you close the trunk lid before the roof is
lowered completely, the loading aid switch
lights up and a warning tone sounds.
The opening dimensions of the trunk lid can be
found in the "Vehicle data" section
(
Ypage 317).
80Trunk
Opening and closing
Page 91 of 322
Roof
Important safety notes
GWARNING
If you do not fully open/close the soft top, the
soft-top hydraulics depressurize after a short
time. This causes the soft top to lower unex-
pectedly and may cause you or others to be
trapped. There is a risk of injury.
Always open or close the soft top completely.
GWARNING
Closing the roof manually is a complicated
and technically demanding procedure, which
requires a lot of strength. You or others can
become trapped. There is a risk of injury.
Only have the soft top closed manually at a
qualified specialist workshop.
!Never sit on the rear compartment trim or
stow heavy objects there. You will otherwise
damage the roof and rear compartment trim
of the vehicle.
!Do not forget that the weather can change
abruptly. Make certain that the roof is closed
when you leave the vehicle. The vehicle elec-
tronics can be damaged if water enters the
vehicle interior.
!When opening and closing the roof, make
sure that:
Rthere is sufficient clearance, as the roof
swings upwards.
Rthere is sufficient clearance behind the
vehicle, as the trunk lid swings backwards
beyond the bumper.
Rthe trunk is only loaded to below the trunk
partition.
Rthe trunk partition is not pushed up by the
load.
Rthe trunk partition is closed.
Rthe trunk lid is closed.
Rthe outside temperature is above 5 ‡
( Ò15 †).
You could otherwise damage the roof, trunk
and other parts of the vehicle.
The vehicle dimensions for opening/closing the
roof can be found in the "Vehicle data" section
(
Ypage 317). Make sure that the roof and rear window are
clean and d
ry before opening the roof. Other-
wise, water or dirt could enter the vehicle inte-
rior or trunk.
Opening and closing using the roof
switch
Important safety notes
GWARNING
When opening or closing the roof, body parts
could be trapped by, for example, the roof
mechanism, trunk lid or side windows. There
is a risk of injury.
When raising or lowering the roof, make sure
that no body parts are in the vicinity of moving
components. If someone becomes trapped,
release the button.
For safety reasons, you can only open or close
the roof when the vehicle is stationary.
!Operating the roof while pulling away:
RObserve the following traffic carefully.
RDo not drive faster than 25 mph (40 km/h).
RAvoid abrupt braking and swerving maneu-
vers.
Do not operate the roof when cornering, driv-
ing on uneven surfaces or during strong
winds. The vehicle may otherwise be dam-
aged.
iIf the traffic conditions mean that you have
to drive off while opening/closing the roof,
the procedure which was started while sta-
tionary can be continued at speeds of up to
approximately 25 mph (40 km/h).
Roof89
Opening and closing
Z
Page 92 of 322
Opening and closing
XClose the trunk lid (Ypage 80).
If the trunk is loaded correctly, the trunk par-
tition closes automatically.
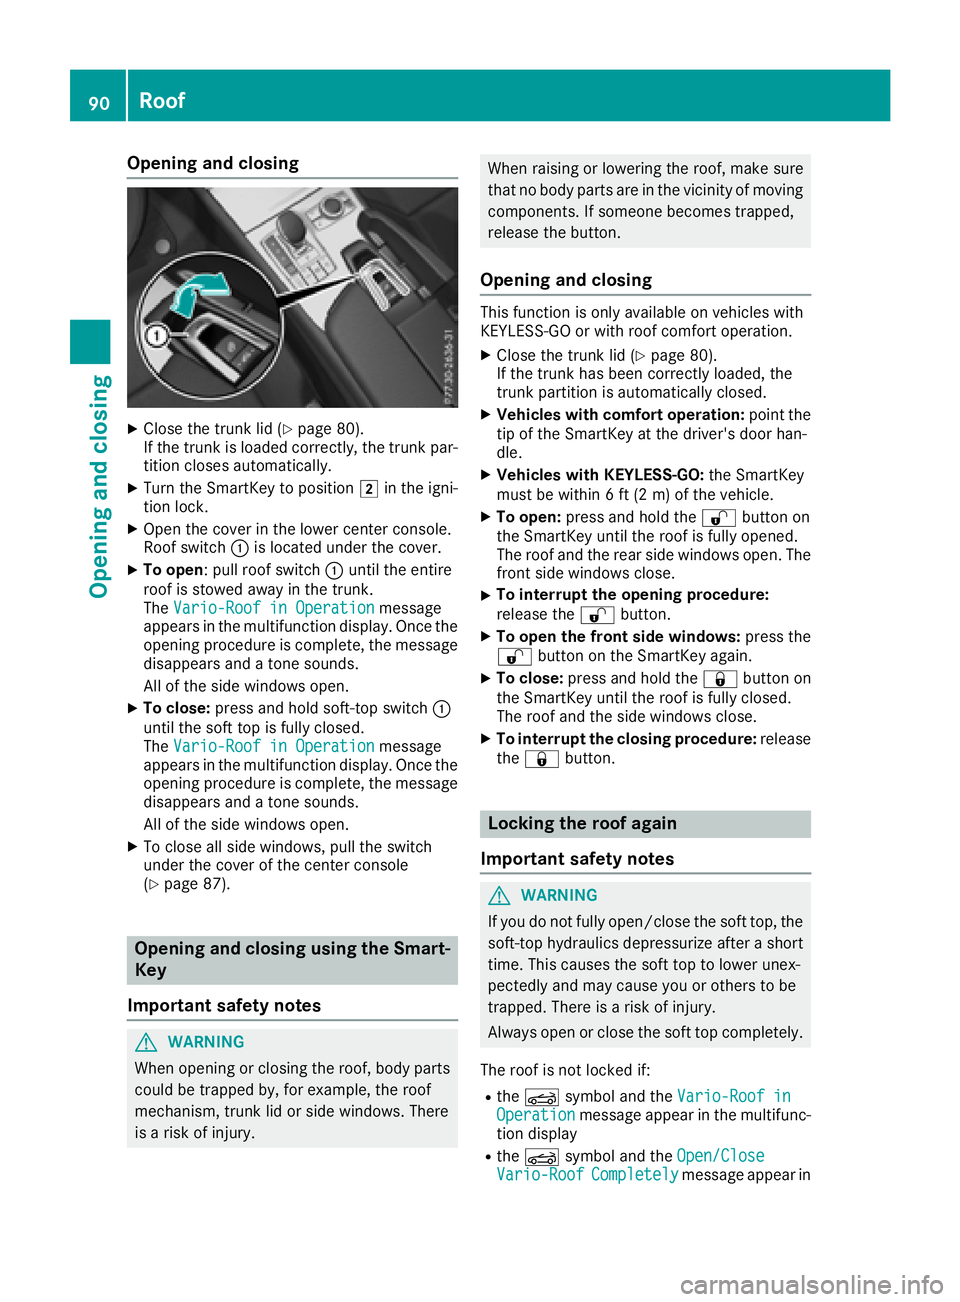
XTurn the SmartKey to position 2in the igni-
tion lock.
XOpen the cover in the lower center console.
Roof switch :is located under the cover.
XTo open: pull roof switch :until the entire
roof is stowed away in the trunk.
The Vario-Roof in Operation
message
appears in the multifunction display. Once the
opening procedure is complete, the message
disappears and a tone sounds.
All of the side windows open.
XTo close: press and hold soft-top switch :
until the soft top is fully closed.
The Vario-Roof in Operation
message
appears in the multifunction display. Once the opening procedure is complete, the message
disappears and a tone sounds.
All of the side windows open.
XTo close all side windows, pull the switch
under the cover of the center console
(
Ypage 87).
Opening and closing using the Smart-
Key
Important safety notes
GWARNING
When opening or closing the roof, body parts
could be trapped by, for example, the roof
mechanism, trunk lid or side windows. There
is a risk of injury.
When raising or lowering the roof, make sure
that no body parts are in the vicinity of moving components. If someone becomes trapped,
release the button.
Opening and closing
This function is only available on vehicles with
KEYLESS-GO or with roof comfort operation.
XClose the trunk lid (Ypage 80).
If the trunk has been correctly loaded, the
trunk partition is automatically closed.
XVehicles with comfort operation: point the
tip of the SmartKey at the driver's door han-
dle.
XVehicles with KEYLESS-GO: the SmartKey
must be within 6 ft (2 m) of the vehicle.
XTo open: press and hold the %button on
the SmartKey until the roof is fully opened.
The roof and the rear side windows open. The
front side windows close.
XTo interrupt the opening procedure:
release the %button.
XTo open the front side windows: press the
% button on the SmartKey again.
XTo close: press and hold the &button on
the SmartKey until the roof is fully closed.
The roof and the side windows close.
XTo interrupt the closing procedure: release
the & button.
Locking the roof again
Important safety notes
GWARNING
If you do not fully open/close the soft top, the
soft-top hydraulics depressurize after a short
time. This causes the soft top to lower unex-
pectedly and may cause you or others to be
trapped. There is a risk of injury.
Always open or close the soft top completely.
The roof is not locked if:
Rthe K symbol and the Vario-Roof inOperationmessage appear in the multifunc-
tion display
Rthe K symbol and the Open/CloseVario-RoofCompletelymessage appear in
90Roof
Opening and closing
Page 100 of 322
Observe the safety guidelines for seat belts
(Ypage 42).
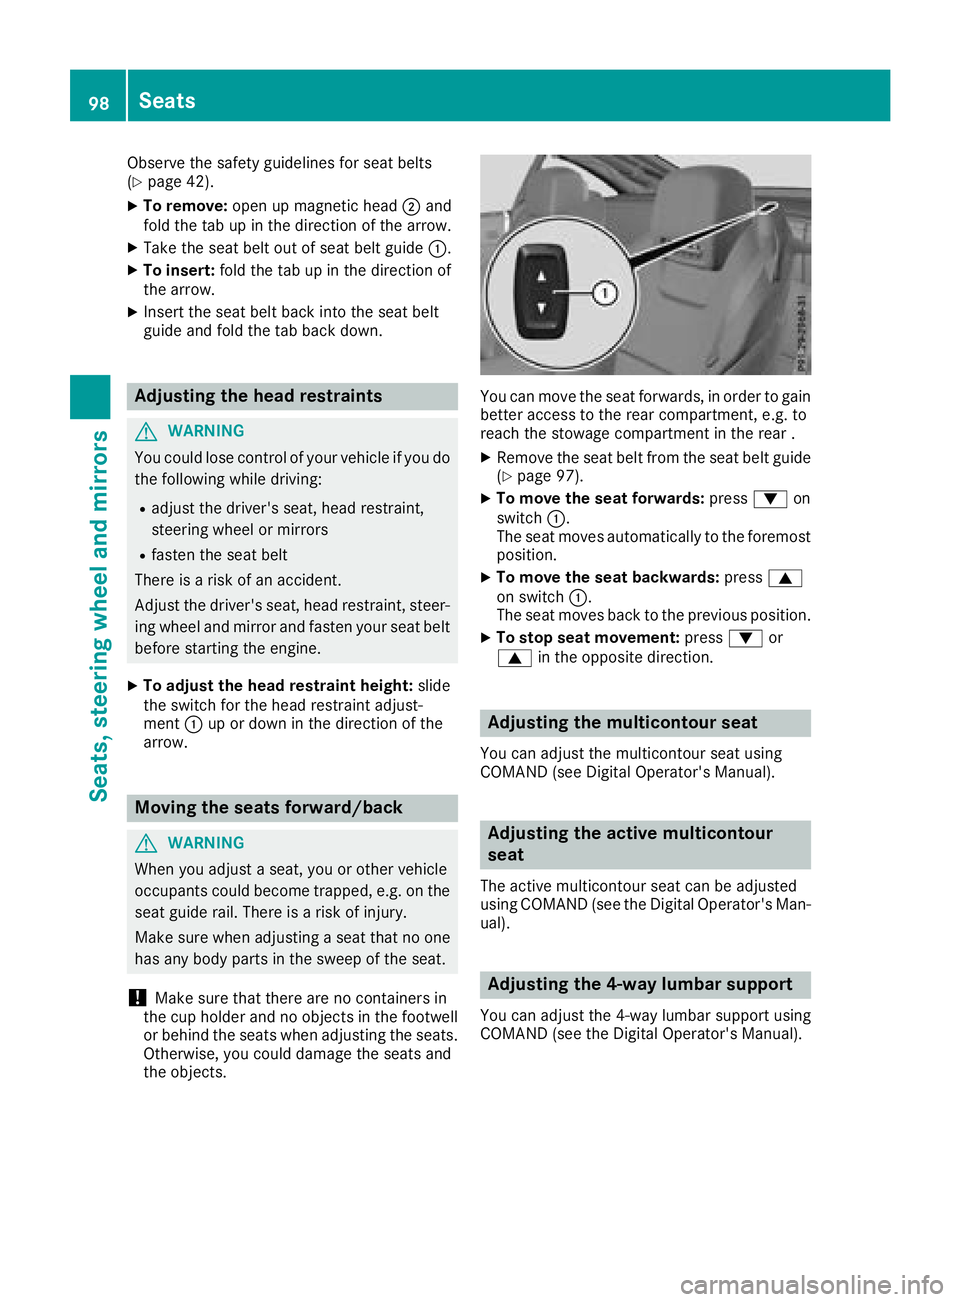
XTo remove:open up magnetic head ;and
fold the tab up in the direction of the arrow.
XTake the seat belt out of seat belt guide :.
XTo insert:fold the tab up in the direction of
the arrow.
XInsert the seat belt back into the seat belt
guide and fold the tab back down.
Adjusting the head restraints
GWARNING
You could lose control of your vehicle if you do the following while driving:
Radjust the driver's seat, head restraint,
steering wheel or mirrors
Rfasten the seat belt
There is a risk of an accident.
Adjust the driver's seat, head restraint, steer-
ing wheel and mirror and fasten your seat belt before starting the engine.
XTo adjust the head restraint height: slide
the switch for the head restraint adjust-
ment :up or down in the direction of the
arrow.
Moving the seats forward/back
GWARNING
When you adjust a seat, you or other vehicle
occupants could become trapped, e.g. on the seat guide rail. There is a risk of injury.
Make sure when adjusting a seat that no one
has any body parts in the sweep of the seat.
!Make sure that there are no containers in
the cup holder and no objects in the footwell
or behind the seats when adjusting the seats.
Otherwise, you could damage the seats and
the objects.
You can move the seat forwards, in order to gain
better access to the rear compartment, e.g. to
reach the stowage compartment in the rear .
XRemove the seat belt from the seat belt guide
(Ypage 97).
XTo move the seat forwards: press:on
switch :.
The seat moves automatically to the foremost position.
XTo move the seat backwards: press9
on switch :.
The seat moves back to the previous position.
XTo stop seat movement: press:or
9 in the opposite direction.
Adjusting the multicontour seat
You can adjust the multicontour seat using
COMAND (see Digital Operator's Manual).
Adjusting the active multicontour
seat
The active multicontour seat can be adjusted
using COMAND (see the Digital Operator's Man-
ual).
Adjusting the 4-way lumbar support
You can adjust the 4-way lumbar support using
COMAND (see the Digital Operator's Manual).
98Seats
Seats, steering wheel and mirrors
Page 134 of 322
Engaging park position P automatically
Park positionjis automatically engaged if:
Ryou switch off the engine using the SmartKey
and remove the SmartKey
Ryou switch off the engine using the SmartKey
or using the Start/Stop button and open the
driver's door or front-passenger door
Ryou open the driver's door when the vehicle is
stationary or when driving at a very low speed
and the transmission is in position hork
Under certain conditions, the automatic trans-
mission shifts automatically to transmission
position jif the HOLD function or Distance
Pilot DISTRONIC is activated. Observe the infor-
mation on the HOLD function (
Ypage 160) and
on Distance Pilot DISTRONIC (Ypage 154).
Engaging reverse gear R
!Only move the automatic transmission to
k when the vehicle is stationary.
XDepress the brake and keep it pressed.
XPush the selector lever forwards past the first
point of resistance.
The ECO start/stop function is not available
when reverse gear is engaged. Further informa-
tion on the ECO start/stop function
(
Ypage 125).
Shifting to neutral N
GWARNING
If children are left unsupervised in the vehicle,
they could:
Roperate the vehicle's equipment.
Additionally, children could set the vehicle in
motion if, for example, they:
Rrelease the parking brake
Rshift the automatic transmission out of park
position P
Rstart the engine
There is a risk of an accident and injury.
Never leave children or animals unattended in
the vehicle.
When leaving the vehicle, always take the
SmartKey with you and lock the vehicle. This
also applies to mobile phones if the "Digital
Car Key in smartphone" function is activated
via the Mercedes me connect web app.
XWhen the vehicle is stationary, depress the
brake pedal.
XPush the selector lever forwards or back to
the first point of resistance.
If you switch the engine off with the transmis-
sion in position korh, the automatic trans-
mission shifts to iautomatically.
With the SmartKey: if you then open the driv-
er's door or the front-passenger door or remove
the SmartKey from the ignition, the automatic
transmission shifts to jautomatically.
With KEYLESS-GO: if you then open the driver's
or front-passenger door, the automatic trans-
mission shifts to jautomatically.
If you want the automatic transmission to
remain in neutral i, e.g. when having the vehi-
cle cleaned in an automatic car wash with a
towing system:
XVehicles with KEYLESS-GO: remove the
Start/Stop button from the ignition lock.
XInsert the SmartKey into the ignition lock.
XAll vehicles: switch the ignition on.
XDepress the brake pedal and keep it
depressed.
XEngage neutral i.
XRelease the brake pedal.
XRelease the electric parking brake.
XSwitch off the ignition and leave the SmartKey
in the ignition lock.
Engaging drive position D
XWhen the vehicle is stationary, depress the
brake pedal.
XPush the selector lever back past the first
point of resistance.
132Automatic transmission
Driving and parking