2018 MERCEDES-BENZ SL ROADSTER stop start
[x] Cancel search: stop startPage 42 of 322
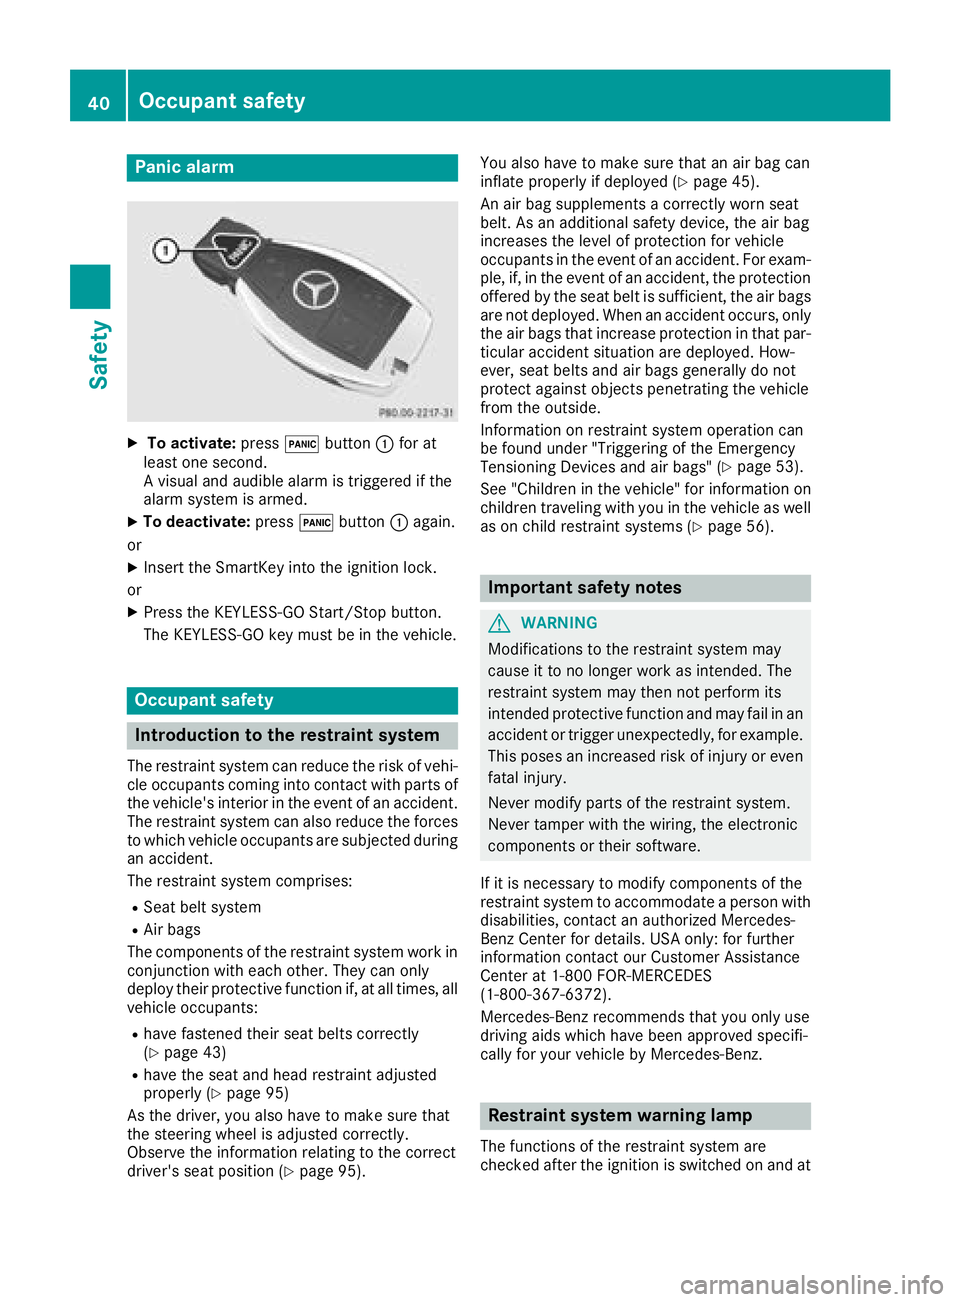
Panic alarm
XTo activate:press!button :for at
least one second.
A visual and audible alarm is triggered if the
alarm system is armed.
XTo deactivate: press!button :again.
or
XInsert the SmartKey into the ignition lock.
or
XPress the KEYLESS-GO Start/Stop button.
The KEYLESS-GO key must be in the vehicle.
Occupant safety
Introduction to the restraint system
The restraint system can reduce the risk of vehi- cle occupants coming into contact with parts of
the vehicle's interior in the event of an accident.
The restraint system can also reduce the forces to which vehicle occupants are subjected during
an accident.
The restraint system comprises:
RSeat belt system
RAir bags
The components of the restraint system work in
conjunction with each other. They can only
deploy their protective function if, at all times, all vehicle occupants:
Rhave fastened their seat belts correctly
(Ypage 43)
Rhave the seat and head restraint adjusted
properly (Ypage 95)
As the driver, you also have to make sure that
the steering wheel is adjusted correctly.
Observe the information relating to the correct
driver's seat position (
Ypage 95). You also have to make sure that an air bag can
inflate properly if deployed (
Ypage 45).
An air bag supplements a correctly worn seat
belt. As an additional safety device, the air bag
increases the level of protection for vehicle
occupants in the event of an accident. For exam-
ple, if, in the event of an accident, the protection
offered by the seat belt is sufficient, the air bags are not deployed. When an accident occurs, only
the air bags that increase protection in that par-ticular accident situation are deployed. How-
ever, seat belts and air bags generally do not
protect against objects penetrating the vehicle
from the outside.
Information on restraint system operation can
be found under "Triggering of the Emergency
Tensioning Devices and air bags" (
Ypage 53).
See "Children in the vehicle" for information on
children traveling with you in the vehicle as well
as on child restraint systems (
Ypage 56).
Important safety notes
GWARNING
Modifications to the restraint system may
cause it to no longer work as intended. The
restraint system may then not perform its
intended protective function and may fail in an
accident or trigger unexpectedly, for example.
This poses an increased risk of injury or even fatal injury.
Never modify parts of the restraint system.
Never tamper with the wiring, the electronic
components or their software.
If it is necessary to modify components of the
restraint system to accommodate a person with
disabilities, contact an authorized Mercedes-
Benz Center for details. USA only: for further
information contact our Customer Assistance
Center at 1-800 FOR-MERCEDES
(1‑800‑367‑6372).
Mercedes-Benz recommends that you only use
driving aids which have been approved specifi-
cally for your vehicle by Mercedes-Benz.
Restraint system warning lamp
The functions of the restraint system are
checked after the ignition is switched on and at
40Occupant safety
Safety
Page 50 of 322
The system does not deactivate:
Rthe side impact air bag
Rthe headbag
Rthe Emergency Tensioning Devices
Requirements
To be classified correctly, the front passenger
must sit:
Rwith the seat belt fastened correctly
Rin an almost upright position with their back
against the seat backrest
Rwith their feet resting on the floor, if possible
If the front passenger does not observe these
conditions, OCS may produce a false classifica-
tion, e.g. because the front passenger:
Rtransfers their weight by supporting them-
selves on a vehicle armrest
Rsits in such a way that their weight is raised
from the seat cushion
If you install a child restraint system on the
front-passenger seat, be sure to observe the
correct positioning of the child restraint system.
Never place objects under or behind the child
restraint system, e.g. a cushion. Fully retract the
seat cushion length. The entire base of the child
restraint system must always rest on the seat
cushion of the front-passenger seat. The back-
rest of the forward-facing child restraint system must lie as flat as possible against the backrest
of the front-passenger seat.
The child restraint system must not touch the
roof or be subjected to a load by the head
restraint. Adjust the angle of the seat backrest
and the head restraint position accordingly.
Only then can OCS be guaranteed to function
correctly. Always observe the child restraint sys-
tem manufacturer's installation and operating
instructions.
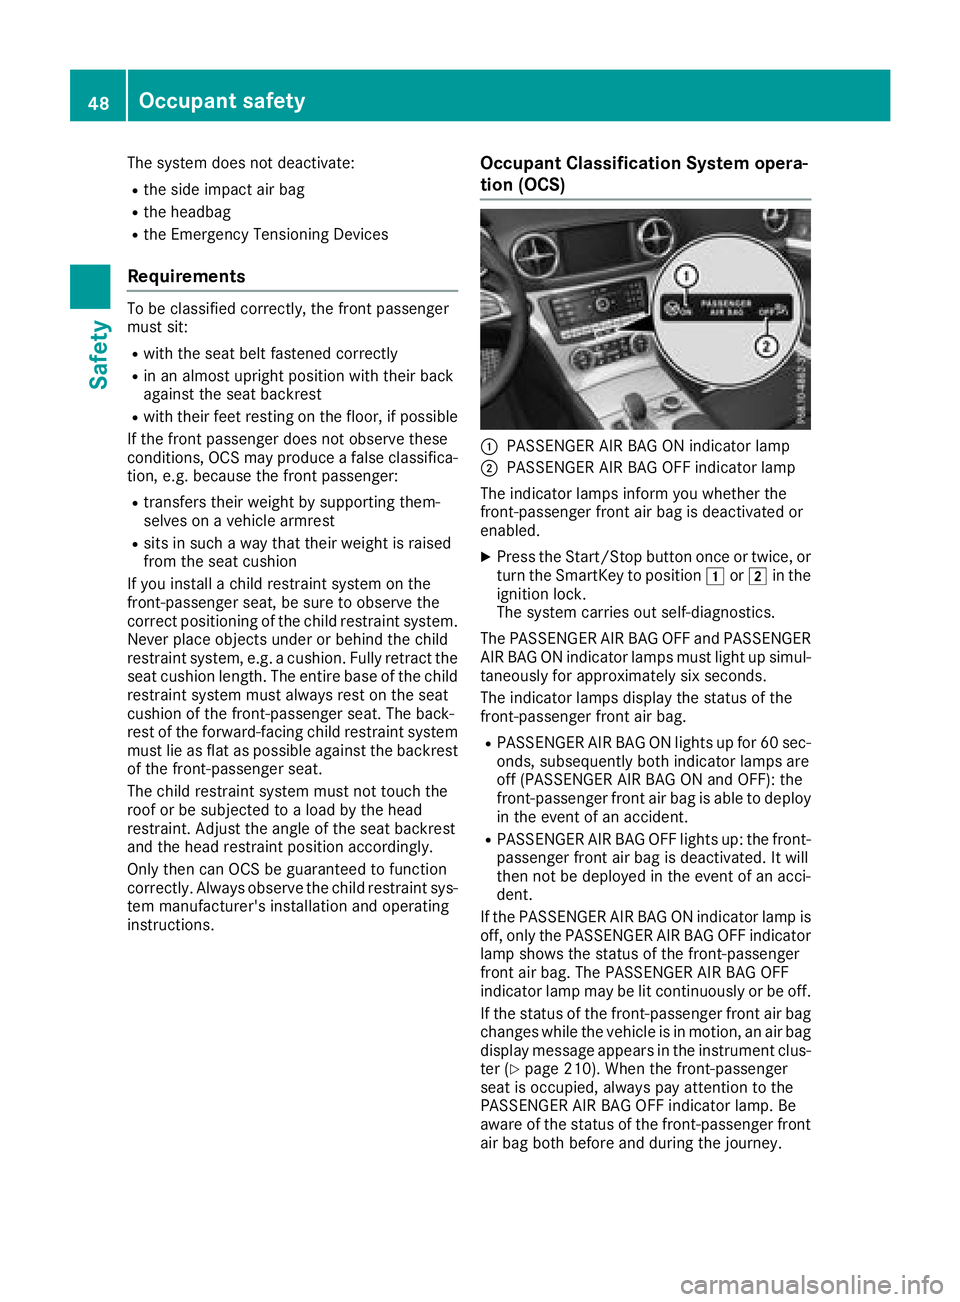
Occupant Classification System opera-
tion (OCS)
:PASSENGER AIR BAG ON indicator lamp
;PASSENGER AIR BAG OFF indicator lamp
The indicator lamps inform you whether the
front-passenger front air bag is deactivated or
enabled.
XPress the Start/Stop button once or twice, or turn the SmartKey to position 1or2 in the
ignition lock.
The system carries out self-diagnostics.
The PASSENGER AIR BAG OFF and PASSENGER
AIR BAG ON indicator lamps must light up simul-
taneously for approximately six seconds.
The indicator lamps display the status of the
front-passenger front air bag.
RPASSENGER AIR BAG ON lights up for 60 sec-
onds, subsequently both indicator lamps are
off (PASSENGER AIR BAG ON and OFF): the
front-passenger front air bag is able to deploy
in the event of an accident.
RPASSENGER AIR BAG OFF lights up: the front-
passenger front air bag is deactivated. It will
then not be deployed in the event of an acci-
dent.
If the PASSENGER AIR BAG ON indicator lamp is off, only the PASSENGER AIR BAG OFF indicator
lamp shows the status of the front-passenger
front air bag. The PASSENGER AIR BAG OFF
indicator lamp may be lit continuously or be off.
If the status of the front-passenger front air bag
changes while the vehicle is in motion, an air bag
display message appears in the instrument clus-
ter (
Ypage 210). When the front-passenger
seat is occupied, always pay attention to the
PASSENGER AIR BAG OFF indicator lamp. Be
aware of the status of the front-passenger front
air bag both before and during the journey.
48Occupant safety
Safety
Page 59 of 322
The child restraint system must be appropri-
ate to the age, weight and size of the child.
Rbe sure to observe the instructions and safetynotes in this section in addition to the child
restraint system manufacturer's installation
instructions.
Ralways observe the instructions and safety
notes on the "Occupant classification system
(OCS)". (
Ypage 47)
GWARNING
If you leave children unsupervised in the vehi-
cle, they could set it in motion by, for example:
Rrelease the parking brake.
Rshift the automatic transmission out of the
parking position P.
Rstart the engine.
In addition, they may operate vehicle equip-
ment and become trapped. There is a risk of
an accident and injury.
When leaving the vehicle, always take the
SmartKey with you and lock the vehicle. Never
leave children unsupervised in the vehicle.
GWARNING
If persons, particularly children are subjected to prolonged exposure to extreme heat or
cold, there is a risk of injury, possibly even
fatal. Never leave children unattended in the
vehicle.
GWARNING
If the child restraint system is subjected to
direct sunlight, parts may get very hot. Chil-
dren may burn themselves on these parts,
particularly on the metal parts of the child
restraint system. There is a risk of injury.
If you leave the vehicle, taking the child with
you, always ensure that the child restraint
system is not exposed to direct sunlight. Pro- tect it with a blanket, for example. If the child
restraint system has been exposed to direct
sunlight, let it cool down before securing the
child in it. Never leave children unattended in
the vehicle.
Always ensure that all vehicle occupants have
their seat belts fastened correctly and are sitting properly. Particular attention must be paid to
children.
Observe the safety notes on the seat belt
(
Ypage 42) and the notes on correct use of seat
belts (Ypage 43).
A booster seat may be necessary to achieve
proper seat belt positioning for children over
40 lbs (18 kg) until they reach a height where a
three-point seat belt can be properly fastened
without a booster seat.
Special seatbelt retractor
GWARNING
If the seat belt is released while driving, the
child restraint system will no longer be
secured properly. The special seat belt retrac- tor is disabled and the inertia real draws in a
portion of the seat belt. The seat belt cannot
be immediately refastened. There is an
increased risk of injury, possibly even fatal.
Stop the vehicle immediately, paying atten-
tion to road and traffic conditions. Reactivate
the special seat belt retractor and secure the
child restraint system properly.
The seat belt on the front-passenger's side is
equipped with a special seat belt retractor.
When activated, the special seat belt retractor
ensures that the seat belt cannot slacken once
the child seat is secured.
Installing a child restraint system:
XMake sure you observe the child restraint
system manufacturer's installation instruc-
tions.
XPull the seat belt smoothly out of the seat belt
guide.
XEngage seat belt tongue in belt buckle.
Activating the special seat belt retractor:
XPull the seat belt out fully and let the inertia
reel retract it again.
While the seat belt is retracting, you should
hear a ratcheting sound. The special seat belt
retractor is enabled.
XPush the child restraint system down so that
the seat belt is tight and does not loosen.
Children in the vehicle57
Safety
Z
Page 68 of 322
iOnly use wheels with the recommended tire
sizes. Only then will ESP®function properly.
Characteristics of ESP®
General information
If the ÷ ESP®warning lamp goes out before
beginning the journey, ESP®is automatically
active.
If ESP
®intervenes, the ÷ESP®warning lamp
flashes in the instrument cluster. If ESP
®intervenes:
XDo not deactivate ESP®under any circum-
stances.
XOnly depress the accelerator pedal as far as
necessary when pulling away.
XAdapt your driving style to suit the prevailing
road and weather conditions.
The influence of drive programs on ESP®
The drive programs allow ESP®to adapt to different weather conditions, road conditions and the
desired driving style. You can set the drive programs using the DYNAMIC SELECT button
(
Ypage 128) or on AMG vehicles using the DYNAMIC SELECT controller (Ypage 129).
Drive programESP®modeCharacteristics
C Comfort
E EconomyESP®onThis drive program offers the best compromise
between traction and stability.
Select drive program Eor Cin difficult road con-
ditions such as snow and ice or on wet roads.
S SportESP®onThis drive program offers the best compromise
between traction and stability.
S+ Sport PlusESP®SportThe vehicle's own oversteering and understeer-
ing characteristics are emphasized. This enables
a more active driving style.
This drive program requires increased driver
interaction.
Select this drive program only when road condi-
tions are good, e.g. the roads are dry and the
route is clear.
Always adapt your driving style and drive program to the prevailing road and weather conditions.
Additional information for drive programs (
Ypage 134).
ECO start/stop function
The ECO start/stop function switches the
engine off automatically when the vehicle stops
moving. The engine starts automatically when
the driver wants to pull away again. ESP
®
remains in its previously selected status, e.g. if
ESP®was deactivated before the engine was
automatically switched off.
Deactivating/activating ESP®(except
Mercedes ‑AMG vehicles)
Important safety notes
iObserve the "Important safety notes" sec-
tion (Ypage 60).
You can select between the following states of
ESP
®:
RESP®is activated
RESP®is deactivated
66Driving safety systems
Safety
Page 73 of 322
XBrake immediately to defuse the situation.
or
XTake evasive action provided it is safe to do
so.
Active Brake Assist with cross-traffic function
can also brake the vehicle automatically under
the following conditions:
Rthe driver and front-passenger have their seat
belts fastened
and
Rthe vehicle speed is between approximately
4 mph (7 km/h) and 124 mph (200 km/h)
Up to a speed of approximately 44 mph
(70 km/h), Active Brake Assist with cross-traffic
function may react to:
Rstationary objects in the path of your vehicle,
e.g. stopped or parked vehicles
Rpedestrians in the path of your vehicle
iIf there is an increased risk of a collision,
preventive passenger protection measures
(PRE-SAFE
®) are triggered (Ypage 55).
If the risk of collision with the vehicle in front
remains and you do not brake, take evasive
action or accelerate significantly, the vehicle
may perform automatic emergency braking, up
to the point of full brake application. Automatic emergency braking is not performed until imme-
diately prior to an imminent accident.
You can prevent the intervention of Active Brake
Assist with cross-traffic function at any time by:
Rdepressing the accelerator pedal further
Ractivating kickdown
Rreleasing the brake pedal.
The braking application of Active Brake Assist
with cross-traffic function is ended automati-
cally if:
Ryou maneuver to avoid the obstacle
Rthere is no longer a risk of collision
Ran obstacle is no longer detected in front of
your vehicle.
STEER CONTROL
General information
STEER CONTROL helps you by transmitting a
noticeable steering force to the steering wheel
in the direction required for vehicle stabilization. This steering assistance is provided in particular
if:
Rboth right wheels or both left wheels are on a
wet or slippery road surface when you brake
Rthe vehicle starts to skid
Important safety notes
iObserve the "Important safety notes" sec-
tion (Ypage 60).
No steering support is provided from STEER
CONTROL, if:
RESP®is deactivated
RESP®is malfunctioning
Rthe steering is faulty
If ESP®is malfunctioning, you will be assisted
further by the electrical power steering.
Protection against theft
Immobilizer
XTo activate with the SmartKey: remove the
SmartKey from the ignition lock.
XTo activate with KEYLESS-GO: switch the
ignition off and open the driver's door.
XTo deactivate: switch on the ignition.
The immobilizer prevents your vehicle from
being started without the correct SmartKey.
When leaving the vehicle, always take the
SmartKey with you and lock the vehicle. The
engine can be started by anyone with a valid
SmartKey that is left inside the vehicle.
iThe immobilizer is always deactivated when
you start the engine.
In the event that the engine cannot be started
(yet the vehicle's battery is charged), the sys- tem is not operational. Contact an authorized
Mercedes-Benz Center or call
1-800-FOR-MERCedes (in the USA) or
1-800-387-0100 (in Canada).
Protection against theft71
Safety
Z
Page 74 of 322
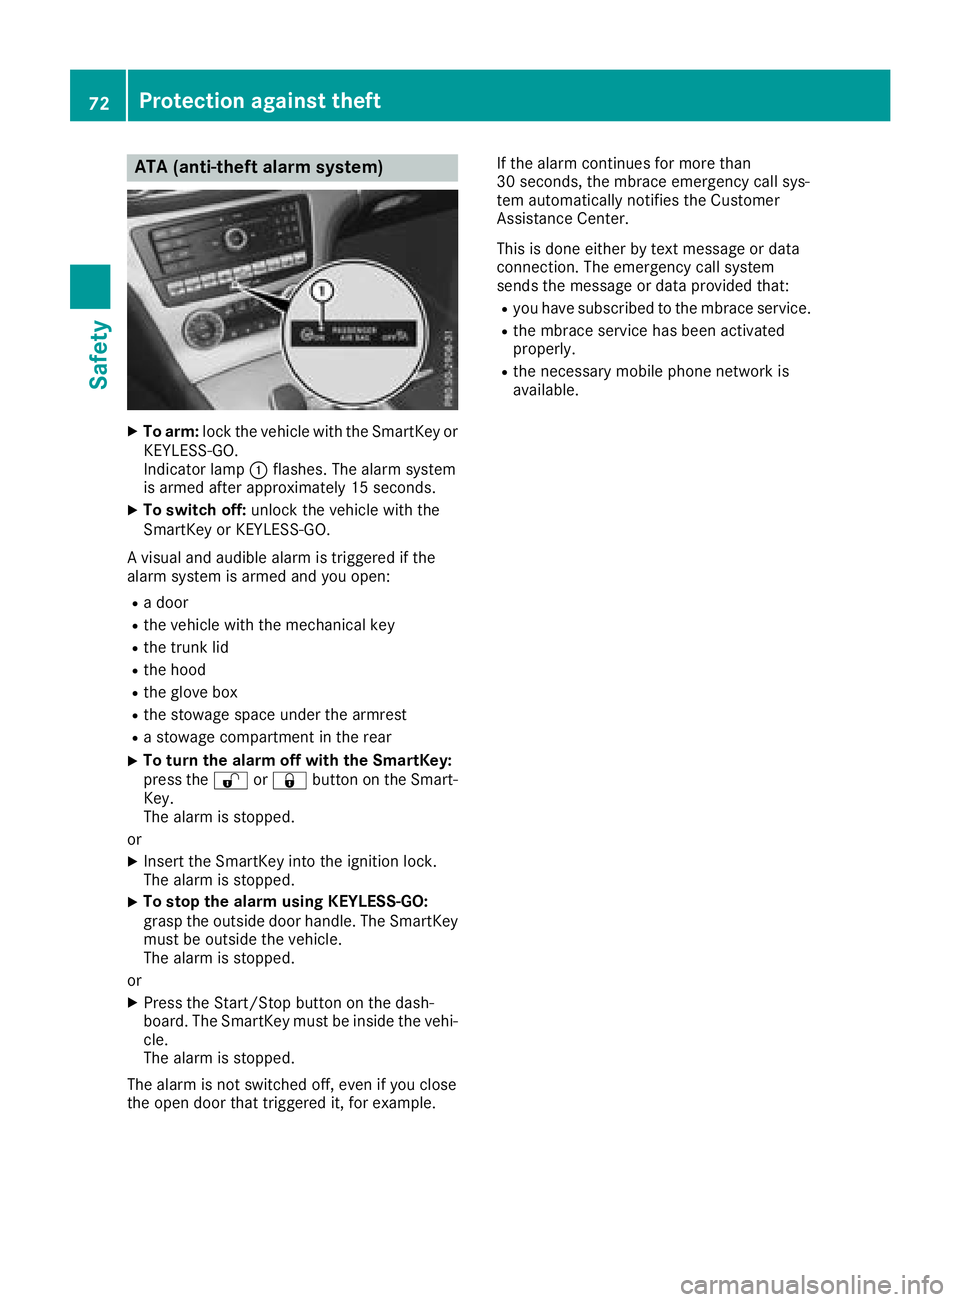
ATA (anti-theft alarmsystem)
XTo arm: lockth evehicl ewit hth eSmartKey or
KEYLESS-GO .
Indicato rlamp :flashes .The alarm system
is armed after approximately 15 seconds.
XTo switch off :unloc kth evehicl ewit hth e
SmartKey or KEYLESS-GO .
A visual and audible alarm is triggered if th e
alarm system is armed and you open :
Radoor
Rth evehicl ewit hth emechanical ke y
Rthetrunk lid
Rth ehoo d
Rtheglov ebox
Rth estowage spac eunder th earmres t
Rastowage compartmen tin th erear
XTo turn th ealarm off wit hth eSmartKey :
press th e% or& buttonon th eSmart -
Key.
The alarm is stopped.
or
XInser tth eSmartKey int oth eignition lock.
The alarm is stopped.
XTo stop th ealarm using KEYLESS-GO:
gras pth eoutside door handle. The SmartKey
mus tbe outside th evehicle.
The alarm is stopped.
or
XPress th eStart/Sto pbutto non th edash -
board. The SmartKey mus tbe inside th evehi-
cle .
The alarm is stopped.
The alarm is no tswitched off ,eve nif you close
th eopen door that triggered it ,for example. If th
ealarm continues for mor ethan
30 seconds, th embrace emergenc ycall sys-
te m automatically notifie sth eCustome r
Assistance Center.
This is don eeither by text mess
age or dat
a
connection .The emergenc ycall system
sends th emessage or dat aprovided that:
Ryou hav esubscribed to th embrace service.
Rth embrace servic ehas been activated
properly.
Rth enecessar ymobile phone network is
available.
72Protection against theft
Safety
Page 85 of 322
vehicle in the detection range of KEYLESS-
GO.
RWhen making the kicking movement, make
sure that you are standing firmly on the
ground and that there is sufficient clearance
to the rear of the vehicle. You could otherwise
lose your balance, for example on ice.
Important safety notes
GWARNING
The vehicle exhaust system can become very
hot. If you use HANDS-FREE ACCESS, you
could burn yourself by touching the exhaust
system. There is a risk of injury. Always
ensure that you make the kicking movement
only within the detection range of the sensors.
!If the SmartKey is within the rear detection
range of KEYLESS-GO, the following situa-
tions, for example, could lead to the uninten-
tional opening of the trunk lid:
Rwhen using an automatic car wash
Rwhen using a power washer
Make sure that the SmartKey is at least 10 ft
(3 m) away from the vehicle.
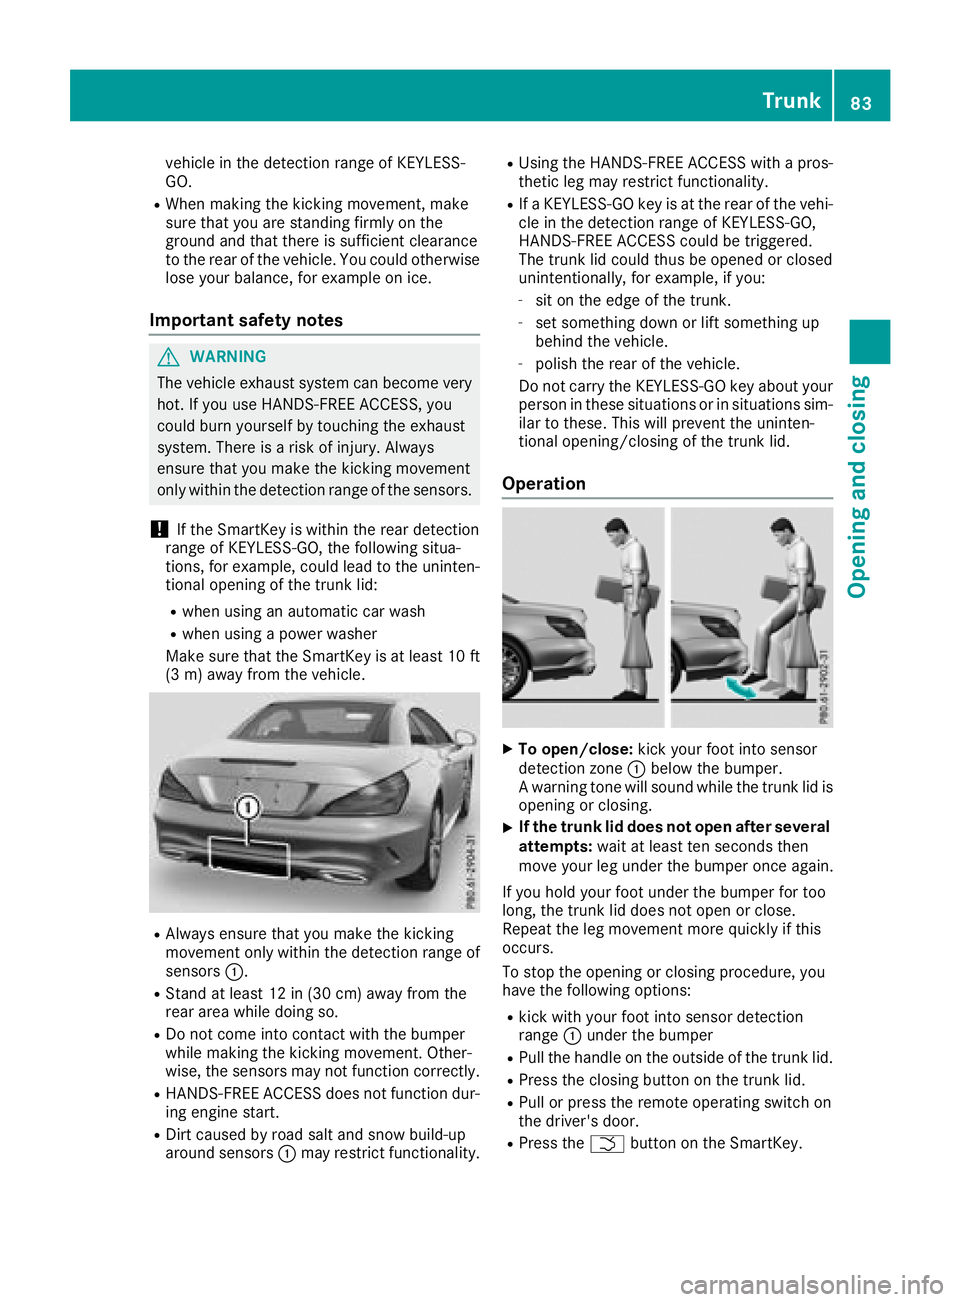
RAlways ensure that you make the kicking
movement only within the detection range of
sensors :.
RStand at least 12 in (30 cm) away from the
rear area while doing so.
RDo not come into contact with the bumper
while making the kicking movement. Other-
wise, the sensors may not function correctly.
RHANDS-FREE ACCESS does not function dur-
ing engine start.
RDirt caused by road salt and snow build-up
around sensors :may restrict functionality.
RUsing the HANDS-FREE ACCESS with a pros-
thetic leg may restrict functionality.
RIf a KEYLESS-GO key is at the rear of the vehi-
cle in the detection range of KEYLESS-GO,
HANDS-FREE ACCESS could be triggered.
The trunk lid could thus be opened or closed
unintentionally, for example, if you:
-sit on the edge of the trunk.
-set something down or lift something up
behind the vehicle.
-polish the rear of the vehicle.
Do not carry the KEYLESS-GO key about your
person in these situations or in situations sim-
ilar to these. This will prevent the uninten-
tional opening/closing of the trunk lid.
Operation
XTo open/close: kick your foot into sensor
detection zone :below the bumper.
A warning tone will sound while the trunk lid is
opening or closing.
XIf the trunk lid does not open after several
attempts: wait at least ten seconds then
move your leg under the bumper once again.
If you hold your foot under the bumper for too
long, the trunk lid does not open or close.
Repeat the leg movement more quickly if this
occurs.
To stop the opening or closing procedure, you
have the following options:
Rkick with your foot into sensor detection
range :under the bumper
RPull the handle on the outside of the trunk lid.
RPress the closing button on the trunk lid.
RPull or press the remote operating switch on
the driver's door.
RPress the Fbutton on the SmartKey.
Trunk83
Opening and closing
Z
Page 88 of 322
GWARNING
If children operate the side windows they
could become trapped, particularly if they are left unsupervised. There is a risk of injury.
When leaving the vehicle, always take the
SmartKey with you and lock the vehicle. Never
leave children unsupervised in the vehicle.
Side window reversing feature
The front side windows are equipped with an
automatic reversing feature. If a solid object
blocks or restricts the upward movement of one
of the front side windows during the closing
process, the side window opens again automat-
ically. During the manual closing process, the
side window only opens again automatically
after the corresponding switch is released. How-
ever, the automatic reversing feature is only an
aid and does not relieve you of the responsibility
of paying attention when closing a side window.
GWARNING
The reversing feature does not react:
Rto soft, light and thin objects, e.g. small fin-
gers
Rover the last 1/6 in(4 mm) of the closing
movement
Rduring resetting
Rwhen closing the side window again man-
ually immediately after automatic reversing
This means that the reversing feature cannot
prevent someone being trapped in these sit-
uations. There is a risk of injury.
Make sure that no body parts are in close
proximity during the closing procedure. If
someone becomes trapped, press the switch
to open the side window again.
Opening and closing the side win-
dows
Opening and closing the side windows
in the front
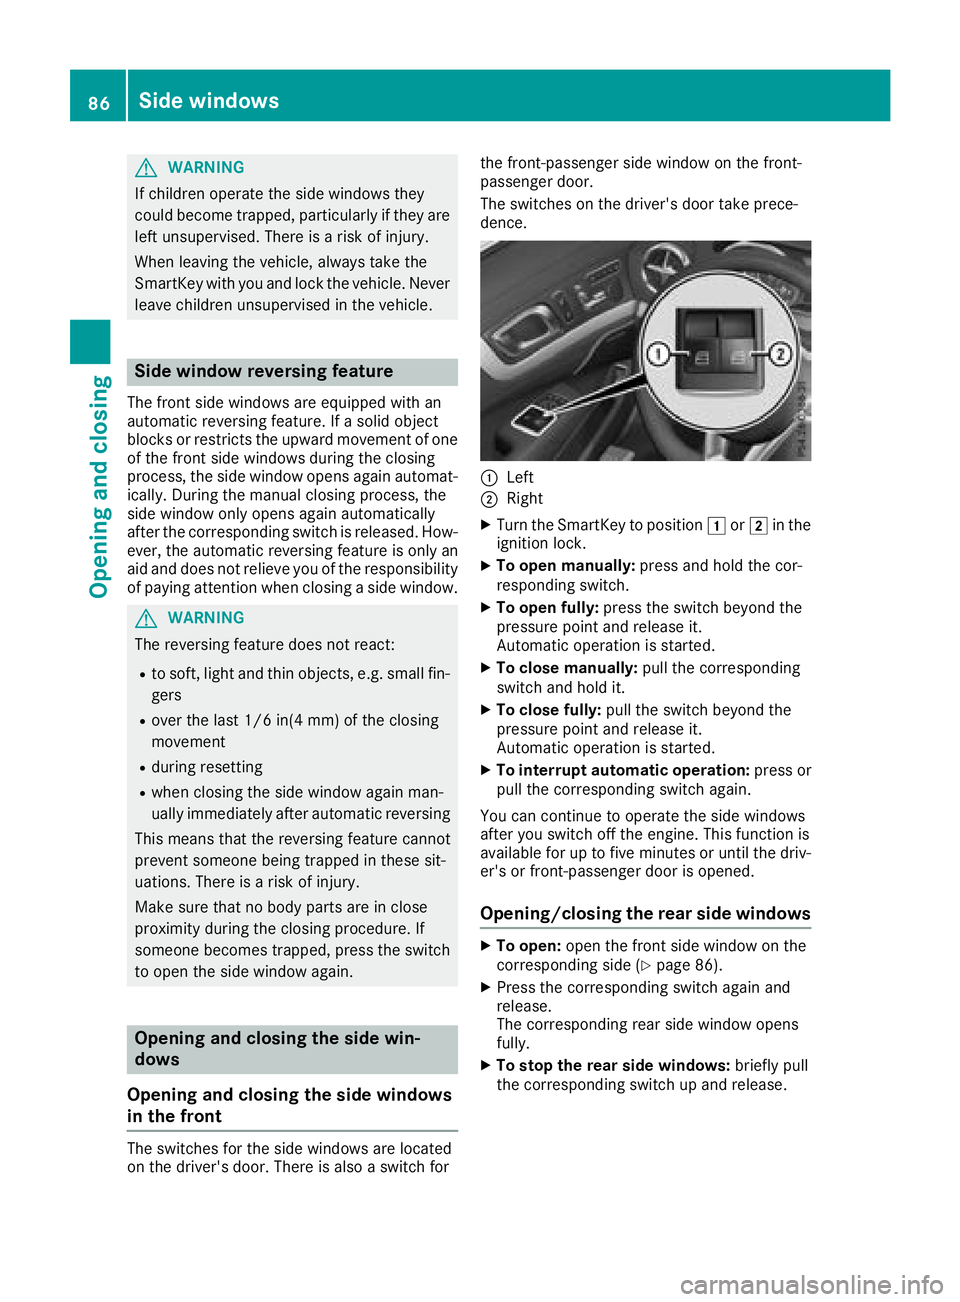
The switches for the side windows are located
on the driver's door. There is also a switch for the front-passenger side window on the front-
passenger door.
The switches on the driver's door take prece-
dence.
:Left
;Right
XTurn the SmartKey to position
1or2 in the
ignition lock.
XTo open manually: press and hold the cor-
responding switch.
XTo open fully: press the switch beyond the
pressure point and release it.
Automatic operation is started.
XTo close manually: pull the corresponding
switch and hold it.
XTo close fully: pull the switch beyond the
pressure point and release it.
Automatic operation is started.
XTo interrupt automatic operation: press or
pull the corresponding switch again.
You can continue to operate the side windows
after you switch off the engine. This function is
available for up to five minutes or until the driv-
er's or front-passenger door is opened.
Opening/closing the rear side windows
XTo open: open the front side window on the
corresponding side (Ypage 86).
XPress the corresponding switch again and
release.
The corresponding rear side window opens
fully.
XTo stop the rear side windows: briefly pull
the corresponding switch up and release.
86Side windows
Opening and closing