Page 364 of 562
Rear passenger co mpartment displa ys
Rear passenger co mpartment displa ys over‐
view
1Displ ay
2Socketfo r corded headphones with a
3.5 mm stereo jack The
rear passenger compartment displa ysare
located behind the head restra ints of the front
seats.
Setting the display angle
#Selecting a rear display on there mo tecon‐
trol (→page 363).
#Press the/ button.
#Toshow the menu: pressthe= button.
#Select �(�Q�W�H�U�W�D�L�Q�P�H�Q�W �V�H�W�W�L�Q�J�V .
#Select�'�L�V�S�O�D�\ �D�Q�J�O�H .
#Select�8�Sor�'�R�Z�Q.
Re mo tecontro l
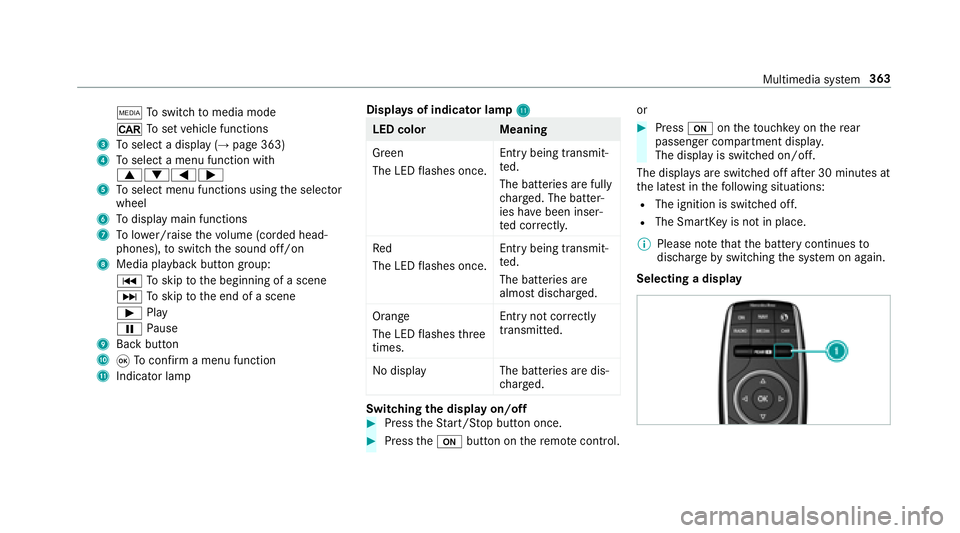
Remo tecontro love rview
1To switch the display on and off
2Main functions button group:
ß Toswitch navigation on
z Tocall up online and Internet functions
$ Toswitch on thera dio
362
Multimedia sy stem
Page 365 of 562

ÕToswitch tomedia mode
/ Toset vehicle functions
3To select a display (→page 363)
4Toselect a menu function with
9:=;
5To select menu functions using the selector
wheel
6To display main functions
7Tolowe r/raise thevo lume (corded head‐
phones), toswitch the sound off/on
8Media playback button group:
C Toskip tothe beginning of a scene
D Toskip tothe end of a scene
Ì Play
Ë Pause
9Back butto n
A9Toconfirm a menu function
BIndicator la mp Displa
ysof indica tor lamp B
LED colo rM eaning
Green
The LED flashes once. Entry being transmit‐
te
d.
The batteries are fully
ch arge d. The batter‐
ies ha vebeen inser‐
te d cor rectl y.
Re d
The LED flashes once. Entry being transmit‐
te
d.
The batteries are
almost dischar ged.
Orange
The LED flashes thre e
times. Entry not cor
rectly
transmitted.
No displ ay The batteries are dis‐
charge d.
Switching the display on/off#Press theSt art/ Stop button once.
#Press theu button on there mo tecontrol. or
#Press
uontheto uchk eyon there ar
passenger compartment displa y.
The display is switched on/off.
The displa ysare switch ed off after 30 minutes at
th e latest in thefo llowing situations:
RThe ignition is switched off.
RThe SmartK eyis not in place.
% Please no tethat the battery continues to
dischar gebyswitching the sy stem on again.
Selecting a display
Multimedia sy stem 363
Page 366 of 562
#Turn dial 1.
CO MAND: multimedia sy stem
L REAR: left rear passenger compartment
display
R REAR: right rear passenger compartment
display
Re placing batteries (remo tecontro l)
Re quirements:
RThe remo tecontrol requ ires two type AA A,
1. 5 V batteries.
Observ eth e saf etyand environmen tal no te
(
→page 360).
The battery compartment is located on the
re ve rse side.
#Push the catch tab down wards and take off
th e battery compartment co ver.
#Re mo vedischar ged batteries from the bat‐
te ry compart ment.
#Insert new batteries. Obser vethe polarity
markings on the batteries and battery com‐
partment.
#Fir stplace the battery compartment co ver
on there tai ning lugs in the battery compart‐
ment.
#Allow the catch tabto engage in the battery
compartment.
Headphones
Headphones overview
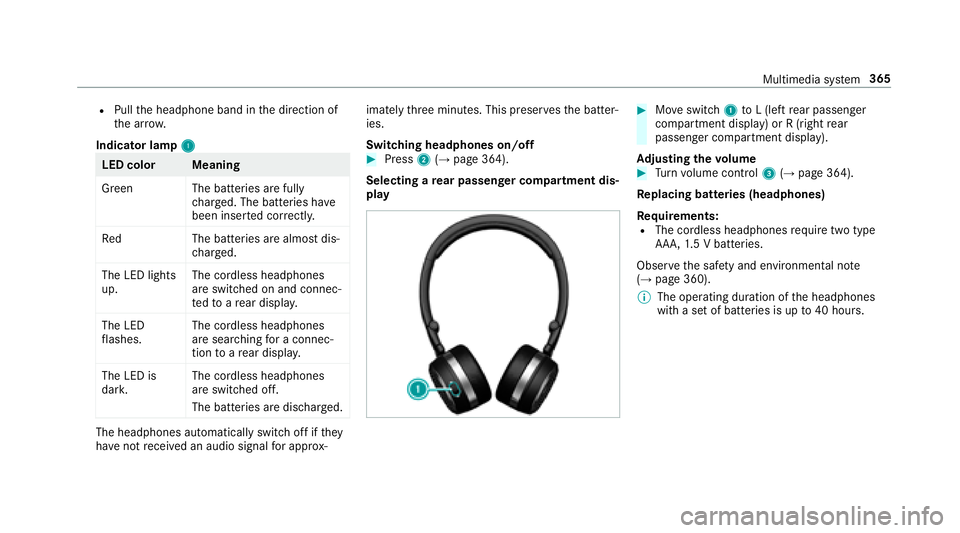
1Indicator lamp
2On/off switch
3Vo lume control
Ad just thefit of the headphones:
RPull bo thsides of the headphones outwards.
364
Multimedia sy stem
Page 367 of 562

RPullthe headphone band in the direction of
th e ar row.
Indicator lamp 1
LED color Meaning
Green The batte ries are fully
ch arge d. The batteries ha ve
been inser ted cor rectly.
Re dT he batteries are almost dis‐
ch arge d.
The LED lights
up. The cordless headphones
are switched on and connec‐
te
dto are ar displa y.
The LED
fl ashes. The cordless headphones
are sear
ching for a connec‐
tion toare ar displa y.
The LED is
dar k. The cordless headphones
are switched off.
The batteries are discharged.
The headphones automatically switch off if
they
ha ve not receive d an audio signal for app rox‐ ima
tely thre e minutes. This preser vesth e batter‐
ies.
Switching headphones on/off
#Press 2(→page 364).
Selecting a rear passenger co mpartment dis‐
play
#Mo veswitch 1toL (left rear passenger
compartment display) or R (right rear
passenger compartment display).
Ad justing the volume
#Turn volume control 3(→page 364).
Re placing batteries (headphones)
Re quirements:
RThe cordless headphones require two type
AA A,1.5 V batteries.
Observ eth e saf etyand environmen tal no te
(
→page 360).
% The operating duration of the headphones
with a set of batteries is up to40 hours .
Multimedia sy stem 365
Page 368 of 562
The battery compartment is located onthe left
headphone.
#Switch the headphones off.
#Tu rn battery compartment co ver1 counter-
clockwise and remo ve.
#Re mo vedischar ged batteries from the bat‐
te ry compart ment.
#Insert new batteries. Obser vethe polarity
markings on the batteries and battery com‐
partment.
#Re place battery compartment co ver1 and
turn it clockwise until it engages.
#Switch the headphones on.
If th e batteries ha vebeen inser ted cor rectly,
th e indicator lamp will light up green.
Blu- ray drive overview
1Disc slot
2To inse rt/eject data storage medium
Depending on theve hicle equipment, the Blu-ray
drive is located:
RAt there ar of the center console under the
automatic climate control panel.
366 Multimedia sy stem
Page 373 of 562
RiPod®
RiPhone®
RMTP devices
RBluetooth®audio
Blue tooth
®audio equipment can only be
authorized using the multimedia sy stem.
The Rear Seat En tertainment Sy stem supports a
tot al of up to50,000 files. The Rear Seat En ter‐
ta inment Sy stem can also access files on the
multimedia sy stem.
Fu rther information about audio mode
(
→page 337).
Fu rther information about Blue tooth
®audio
(→page 346).
is a trademark of DVDFo rm at/Logo
Licensing Corporation.
Blu- rayDisc™, Blu- ray™ and the logos are trade‐
mar ksofthe Blu-ray Disc Association.
Java is a regis tere d trademark of Oracle and/or
its af filiates.
Multimedia sy stem 37
1
Page 375 of 562

"Madefor iPod", and "Made for iPhone," mean
th at an electronic accessory has been designed
to connect specifically toiPod, or iPhone,
re spectivel y,and has been certified bythe de vel‐
oper tomeet Apple per form ance standards.
Apple is not responsible forth e operation of this
device or its compliance with saf etyand regula‐
to ry standards. Please no tethat the use of this
accessory with iPod, or iPhone may af fect wi re‐
less per form ance.
Fo r the USA: iPhone
®, iPod®, iPod classic®,
iPod nano®, and iPod touch®are trademar ksof
Apple Inc., regis tere d in theU. S. and other coun‐
tries. Lightning™ is a trademark of Apple Inc.
Fo r Canada: iPhone, iPod, iPod classic, iPod
nano, and iPod touch are trademar ksof Apple
Inc., regis tere d in theU. S. and other countries.
Lightning is a trademark of Apple Inc.
Cinavia notice: this product uses Cinavia tech ‐
nology tolimit the use of unauthorized copies of
some commercially-produced film and videos
and their soundtra cks. When a prohibited use of
an unauthorized copy is de tected, a message will
be displ ayed and playback or copying will be inter
rupted. More information about Cinavia
te ch nology is pr ovided at Cinavia Online Con‐
sumer Information Center at http://
www.cinavia.com. Torequ est additional informa‐
tion about Cinavia
byma
il, send a postcard with
yo ur mailing addressto: Cinavia Consumer Infor‐
mation Center, P.O. Box 8685 1,San Diego, CA,
92 13 8, US A.
This product incorporates proprie tary tech nology
under license from Verance Co rporation and is
pr otected byU.S. Patent 7,369,6 77and other
U. S. and worldwide patents issued and pending
as well as copyright and trade secr etprotection
fo r cer tain aspects of such tech nology. Cinavia is
a tradema rkofVerance Co rporation. Copyright
2004-20 12Verance Co rporation. All rights
re ser vedby Verance. Reverse Engineering or dis‐
assembly is prohibited.
Inserting a disc
& WARNING Risk of injury from laserradi‐
ation from the Blu-ray drive
The Blu-ray drive is a class 1 laser product. If
yo u open the housing of the Blu-ray drive,
there is a risk of exposure toinvisible laser
ra diation.
Laser radiation can damage your retina.
#Do not open the housing.
#Alw ays ha vemaintenance workand
re pairs car ried out byaqu alified spe‐
cialist workshop.
Re ar Seat En tertainment Sy stem:
,�0�H�G�L�D.à �0�H�G�L�D �6�R�X�U�F�H�V.�'�L�V�F
Inserting
#Insert the disc into the drive (→page 366).
The side tobe pla yed must face down wards.
Re moving
#Press the button toeject the disc
(→page 366).
#Re mo vethe disc.
Multimedia sy stem 37
3
Page 447 of 562
Thefollowing can be used in theve hicle without
re strictions:
RRF transmitters wi tha maximum transmis‐
sion output of up to100 mW
RRF transmitters with transmitter frequencies
inthe 380 - 410 MHz frequency band and a
maximum transmission output of up to2 W
(trunked radio sy stem/T etra )
RMobile phones (2G/3G/4G)
There are no restrictions when positioning the
antenna on the outside of theve hicle for some
frequency bands.
This applies tothefo llowing frequency bands:
RTrunked radio sy stem/T etra
R70 cm waveband
R2G/3G/4G
Ve hicle identification plate, VIN and engine
number overview
Ve hicle identification plate
Vehicle identification plate (USA only)
1Perm issible grossmass
2Pe rm issible front axle load
3Perm issible rear axle load
4Pa int code
5VIN (vehicle identification number)
Tech nical da ta44
5