2018 MERCEDES-BENZ GLS SUV eco start
[x] Cancel search: eco startPage 189 of 398
HOLD function
General notes
The HOLD function can assist the driver in the
following situations:
Rwhen pulling away, especially on steep slopes
Rwhen maneuvering on steep slopes
Rwhen waiting in traffic
The vehicle is kept stationary without the driver having to depress the brake pedal.
The braking effect is canceled and the HOLD
function deactivated when you depress the
accelerator pedal to pull away.
iDo not use the HOLD function when driving
off-road, on steep uphill or downhill gradients
or on slippery or loose surfaces. The HOLD
function cannot hold the vehicle on such sur-
faces.
Important safety notes
GWARNING
If the vehicle is only braked using the HOLD
function, the vehicle may roll away in the fol-
lowing situations when you leave the vehicle:
Rif there is a malfunction in the system or in the voltage supply
Rif the HOLD function is deactivated by
depressing the accelerator pedal or brake
pedal, e.g. by a vehicle occupant
Rif the electrical system in the engine com-
partment, the battery or the fuses are tam-
pered with or the battery is disconnected
There is a risk of an accident.
Always deactivate the HOLD function and
secure the vehicle against rolling away before
you leave it.
!When Distance Pilot DISTRONIC or the
HOLD function is activated, the vehicle
brakes automatically in certain situations.
To avoid damage to the vehicle, deactivate
Distance Pilot DISTRONIC and the HOLD
function in the following or similar situations:
Rwhen towing the vehicle
Rin the car wash
Deactivate the HOLD function (
Ypage 187).
Activation conditions
You can activate the HOLD function if:
Rthe vehicle is stationary
Rthe engine is running or if it has been auto-
matically switched off by the ECO start/stop
function
Rthe driver's door is closed or your seat belt is
fastened
Rthe electric parking brake is released
Rthe transmission is in position h,kori
RDistance Pilot DISTRONIC is deactivated
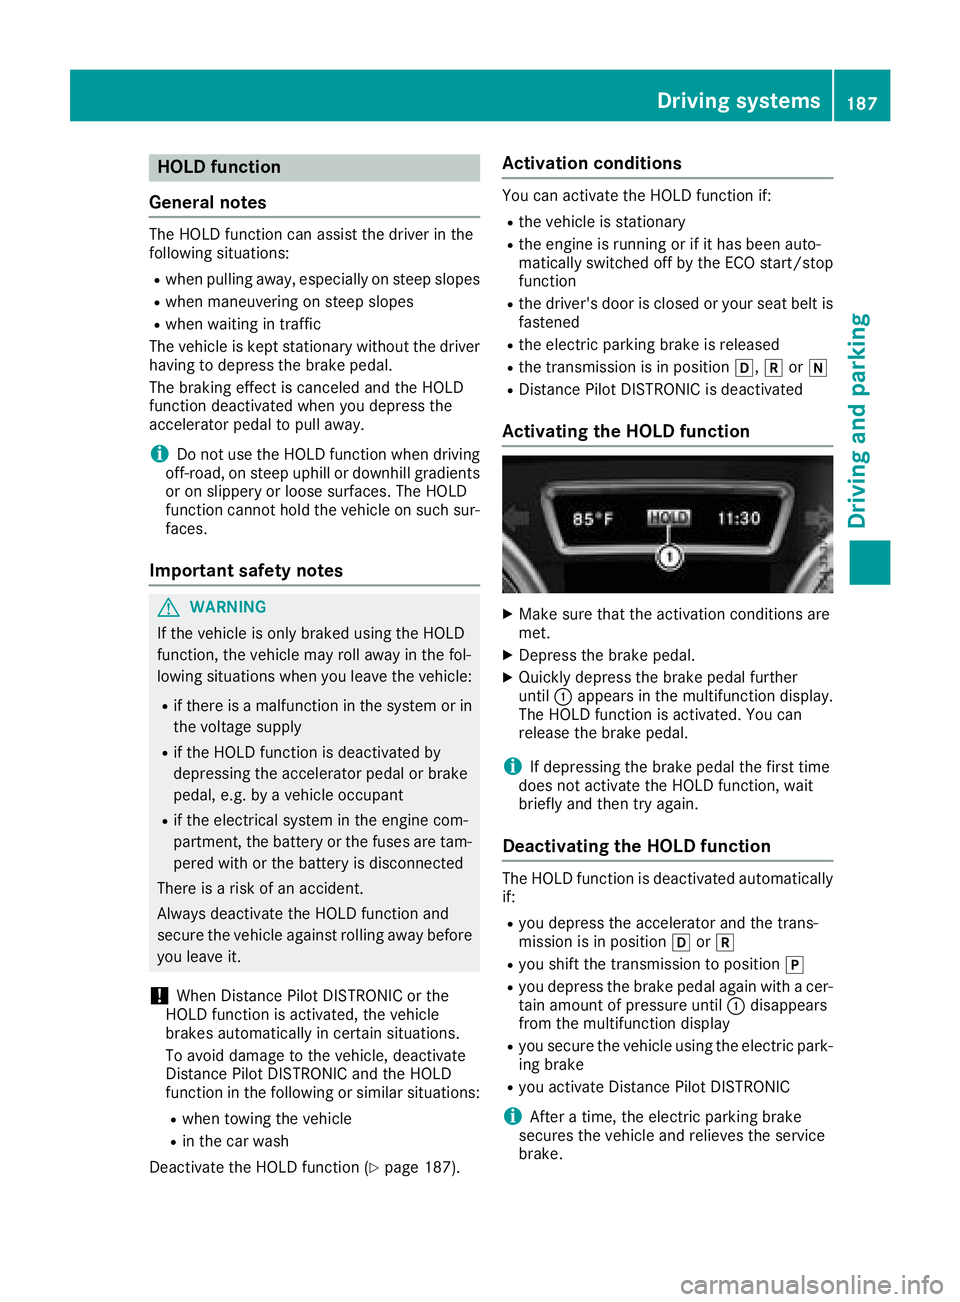
Activating the HOLD function
XMake sure that the activation conditions are
met.
XDepress the brake pedal.
XQuickly depress the brake pedal further
until :appears in the multifunction display.
The HOLD function is activated. You can
release the brake pedal.
iIf depressing the brake pedal the first time
does not activate the HOLD function, wait
briefly and then try again.
Deactivating the HOLD function
The HOLD function is deactivated automatically
if:
Ryou depress the accelerator and the trans-
mission is in position hork
Ryou shift the transmission to position j
Ryou depress the brake pedal again with a cer-
tain amount of pressure until:disappears
from the multifunction display
Ryou secure the vehicle using the electric park- ing brake
Ryou activate Distance Pilot DISTRONIC
iAfter a time, the electric parking brake
secures the vehicle and relieves the service
brake.
Driving systems187
Driving and parking
Z
Page 190 of 398
When the HOLD function is activated, the trans-
mission is automatically shifted to positionj
if:
Rthe driver's door is open and the driver's seat
belt is unfastened
Rthe engine is switched off, unless it is auto-
matically switched off by the ECO start/stop
function
The electric parking brake secures the vehicle
automatically if the HOLD function is activated
when the vehicle is stationary and:
Ra system malfunction occurs
Rthe power supply is insufficient
On steep uphill or downhill gradients or if there
is a malfunction, the transmission may also be
automatically shifted to position j.
AIRMATIC package
General notes
AIRMATIC is an air suspension system with var-
iable damping for improved driving comfort.
Level control ensures the best possible suspen-
sion and constant ground clearance, even with a
laden vehicle. When you drive fast, the vehicle is
lowered automatically to improve driving safety
and to reduce fuel consumption. There is also
the option to manually adjust the vehicle level.
AIRMATIC consists of:
Rlevel settings
Rlevel control and
RADS or ADS PLUS (Adaptive Damping Sys-
tem)
All vehicles (except Mercedes-AMG vehi-
cles): your vehicle may also be equipped with
the ACTIVE CURVE SYSTEM (
Ypage 189).
Mercedes-AMG vehicles: your vehicle is equip-
ped with the ACTIVE CURVE SYSTEM
(
Ypage 189).
Observe the notes on driving with a trailer
(
Ypage 225).
The vehicle level can be set using the DYNAMIC
SELECT controller (
Ypage 147) or the level but-
ton (Ypage 190). The setting always corre-
sponds to the last selected function.
Important safety notes
GWARNING
When the vehicle is being lowered, people
could become trapped if their limbs are
between the vehicle body and the wheels or
underneath the vehicle. There is a risk of
injury.
Make sure no one is underneath the vehicle or
in the immediate vicinity of the wheel arches
when the vehicle is being lowered.
If you unlock the vehicle or open a door, the
vehicle begins to compensate for load discrep-
ancies while still parked. However, for signifi-
cant level changes, such as after the vehicle has
been stationary for a long period, the engine
must be on. For safety reasons, the vehicle is
only lowered when the doors are closed. Low-
ering is interrupted if a door is opened, and it
continues once the door has been closed.
ADS and ADS PLUS (Adaptive Damping
System)
General notes
The Adaptive Damping System automatically
controls the calibration of the dampers. The
damping characteristics adapt to the current
operating and driving situation.
The damping is tuned individually to each wheel
and depends on:
Ryour driving style, e.g. sporty
Rthe road surface conditions
Rthe drive program selected
Rthe vehicle level setting
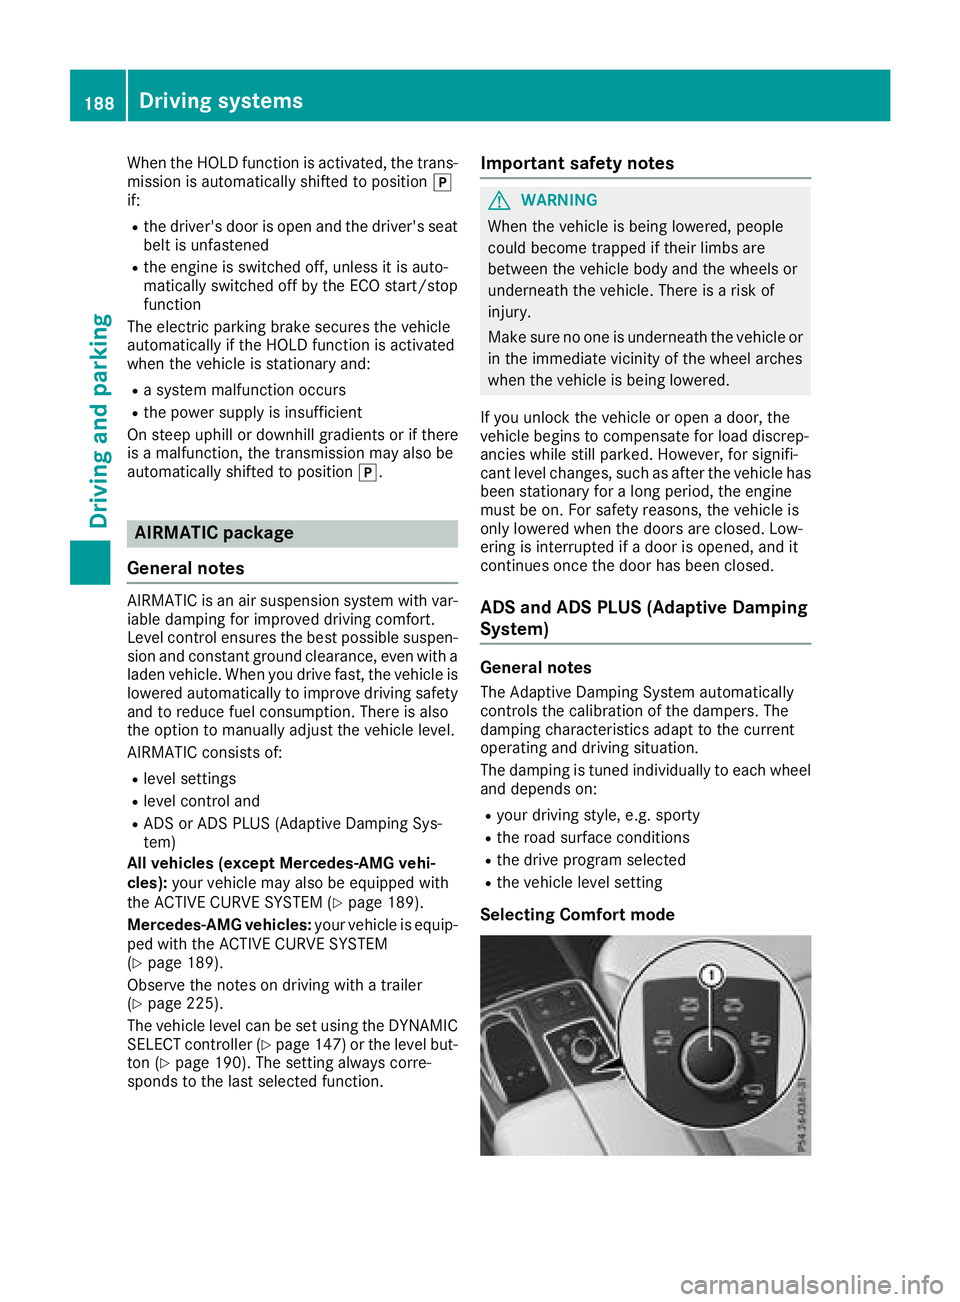
Selecting Comfort mode
188Driving systems
Driving and parking
Page 192 of 398
Mercedes-AMG vehicles:if you have selected
the Sport Plus drive program:
Rthe roll angle is reduced even more signifi-
cantly
Rthe driving is designed for maximum dyna-
mism
Vehicle level
Important safety notes
GWARNING
When the vehicle is being lowered, people
could become trapped if their limbs are
between the vehicle body and the wheels or
underneath the vehicle. There is a risk of
injury.
Make sure no one is underneath the vehicle or
in the immediate vicinity of the wheel arches
when the vehicle is being lowered.
GWARNING
When you drive with the vehicle raised, the
driving characteristics could be impaired by
the vehicle's raised center of gravity. The vehi-
cle could rollover more easily, for example on
a bend. There is a risk of an accident.
Always select as low a vehicle level as possi-
ble and adjust your driving style.
GWARNING
When you drive with the chassis lowered or
raised, the vehicle's braking and driving char-
acteristics can be significantly impaired. You
could also exceed the permissible vehicle
height if the chassis is raised. There is a risk of an accident.
Adjust the vehicle level before pulling away.
GWARNING
Due to the high center of gravity, the vehicle
may start to skid and roll over in the event of
an abrupt steering maneuver and/or when
the vehicle's speed is not adapted to the road
conditions. There is a risk of an accident.
Always adapt your speed and driving style to
the vehicle's driving characteristics and to the
prevailing road and weather conditions.
!When driving on extremely rough terrain,
select a high vehicle level in good time. Make
sure there is always sufficient ground clear-
ance. You will otherwise damage the vehicle.
RUtility vehicles have a significantly higher roll- over rate than other types of vehicles.
Failure to operate this vehicle safely may
result in an accident, rollover of the vehicle,
and severe or fatal injury.
RIn a rollover crash, an unbelted person is sig-
nificantly more likely to die than a person
wearing a seat belt.
You and all vehicle occupants should always
wear your seat belts.
General notes
Only select raised level if this is appropriate for
the road conditions. Otherwise, fuel consump-
tion may increase and handling may be affected.
Make changes to the vehicle level while the
vehicle is in motion. This enables the vehicle to
adjust to the new level as quickly as possible.
The vehicle level may change visibly if you park
the vehicle and the outside temperature
changes. If the temperature drops, the vehicle
level is lower; with an increase in temperature,
the vehicle level rises.
If you unlock the vehicle or open a door, the
vehicle begins to compensate for load discrep-
ancies while still parked. However, for signifi-
cant level changes, such as after the vehicle has
been stationary for a long period, the engine
must be on. For safety reasons, the vehicle is
only lowered when the doors are closed. Low-
ering is interrupted if a door is opened, and it
continues once the door has been closed.
Vehicles with no trailer coupled: below a
speed of 37 mph (60 km/h) you can choose
between the normal and raised vehicle level.
Sel
ect the normal vehicle level for normal road
surfaces and the raised vehicle level for driving
with snow chains or on particularly poor road
surfaces. Your selection remains stored even if
you remove the SmartKey from the ignition lock.
If you try to select raised level at a speed above
37 mph (60 km/h), the Drive More Slowly
message appears in the multifunction display.
190Driving systems
Driving and parking
Page 193 of 398
Vehicles with a trailer coupled:below a speed
of 19 mph (30 km/h), you can choose between
the normal and raised vehicle level.
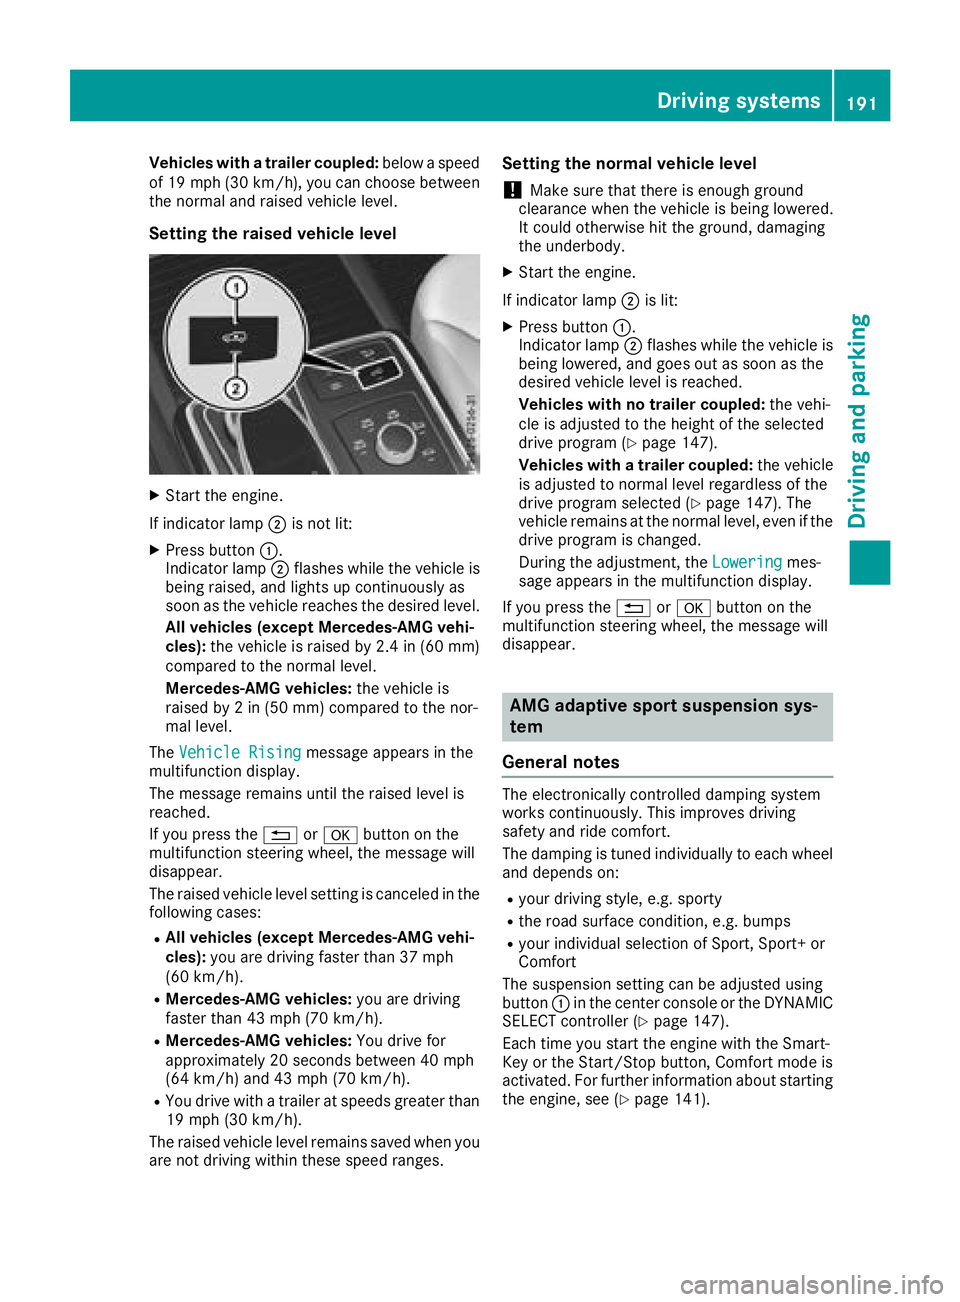
Setting the raised vehicle level
XStart the engine.
If indicator lamp ;is not lit:
XPress button :.
Indicator lamp ;flashes while the vehicle is
being raised, and lights up continuously as
soon as the vehicle reaches the desired level.
All vehicles (except Mercedes-AMG vehi-
cles): the vehicle is raised by 2.4 in (60 mm)
compared to the normal level.
Mercedes-AMG vehicles: the vehicle is
raised by 2 in (50 mm) compared to the nor-
mal level.
The Vehicle Rising
message appears in the
multifunction display.
The message remains until the raised level is
reached.
If you press the %ora button on the
multifunction steering wheel, the message will
disappear.
The raised vehicle level setting is canceled in the
following cases:
RAll vehicles (except Mercedes-AMG vehi-
cles): you are driving faster than 37 mph
(60 km/h).
RMercedes-AMG vehicles: you are driving
faster than 43 mph (70 km/h).
RMercedes-AMG vehicles: You drive for
approximately 20 seconds between 40 mph
(64 km/h) and 43 mph (70 km/h).
RYou drive with a trailer at speeds greater than
19 mph (30 km/h).
The raised vehicle level remains saved when you
are not driving within these speed ranges.
Setting the normal vehicle level
!Make sure that there is enough ground
clearance when the vehicle is being lowered.
It could otherwise hit the ground, damaging
the underbody.
XStart the engine.
If indicator lamp ;is lit:
XPress button :.
Indicator lamp ;flashes while the vehicle is
being lowered, and goes out as soon as the
desired vehicle level is reached.
Vehicles with no trailer coupled: the vehi-
cle is adjusted to the height of the selected
drive program (
Ypage 147).
Vehicles with a trailer coupled: the ve
hicle
is adjusted to normal level regardless of the
drive program selected (
Ypage 147). The
vehicle remains at the normal level, even if the
drive program is changed.
During the adjustment, the Lowering
mes-
sage appears in the multifunction display.
If you press the %ora button on the
multifunction steering wheel, the message will
disappear.
AMG adaptive sport suspension sys-
tem
General notes
The electronically controlled damping system
works continuously. This improves driving
safety and ride comfort.
The damping is tuned individually to each wheel
and depends on:
Ryour driving style, e.g. sporty
Rthe road surface condition, e.g. bumps
Ryour individual selection of Sport, Sport+ or
Comfort
The suspension setting can be adjusted using
button :in the center console or the DYNAMIC
SELECT controller (
Ypage 147).
Each time you start the engine with the Smart-
Key or the Start/Stop button, Comfort mode is
activated. For further information about starting
the engine, see (
Ypage 141).
Driving systems191
Driving and parking
Z
Page 200 of 398
pedal. The braking effect is canceled when you
depress the accelerator pedal.
Parking Pilot no longer supports you with steer-
ing interventions and brake applications. When
Parking Pilot is finished, you must steer and
brake again yourself. Parking Assist
PARKTRONIC is still available.
Parking tips:
RThe way your vehicle is positioned in the park-
ing space after parking is dependent on vari-
ous factors. These include the position and
shape of the vehicles parked in front and
behind it and the conditions of the location. It
may be the case that Parking Pilot guides you
too far into a parking space, or not far enough
into it. In some cases, it may also lead you
across or onto the curb. Cancel the parking
procedure with Parking Pilot if necessary.
RYou can also select preselect transmission
positionD. The vehicle redirects and does not
drive as far into the parking space. Should the
transmission change take place too early, the
parking procedure will be canceled. A sensi-
ble parking position can no longer be ach-
ieved from this position.
Exiting a parking space
In order for Parking Pilot to assist you:
Rthe border of the parking space must be high enough at the front and the rear. A curb is too
small, for example.
Rthe border of the parking space must not be
too wide. Your vehicle can be maneuvered
into a position at a maximum of 45° to the
starting position in the parking space.
Ra maneuvering distance of at least 3.3 ft
(1.0 m) must be available.
Parking Pilot can assist you with exiting a park-
ing space only if you have parked the vehicle
parallel to the direction of travel using the Park-
ing Pilot.
iIf Parking Assist PARKTRONIC detects
obstacles, Parking Pilot brakes automatically whilst the vehicle is exiting the parking space.
You are responsible for braking in good time.
XStart the engine.
XRelease the electric parking brake.
XSwitch on the turn signal in the direction you
will drive out of the parking space.
XShift the transmission to position Dor R.
The Start Parking Pilot? Yes: OK No:
% message appears in the multifunction
display.
XTo cancel the procedure: press the%
button on the multifunction steering wheel or
pull away.
or
XTo exit a parking space using Parking
Pilot: press the abutton on the multi-
function steering wheel.
The Parking Pilot Active Accelerate
and Brake Observe Surroundingsmes-
sage appears in the multifunction display.
XLet go of the multifunction steering wheel.
XPull away, being ready to brake at all times. Do
not exceed a maximum speed of approx-
imately 6 mph (10 km/h) when exiting a park-
ing space. Otherwise, Parking Pilot is can-
celed immediately.
XShift the transmission to position Dor Ras
required or according to the message while
the vehicle is stationary.
Parking Pilot immediately steers in the other
direction. The Parking Pilot Active
Accelerate and Brake Observe Sur‐roundingsmessage appears in the multi-
function display.
iYou will achieve the best results by waiting
for the steering procedure to complete before
pulling away.
If you back up after activation, the steering
wheel is moved to the straight-ahead posi-
tion.
XDrive forwards and back up as prompted by
the Parking Assist PARKTRONIC warning dis-
plays, several times if necessary.
Once you have exited the parking space com-
pletely, the steering wheel is moved to the
straight-ahead position. You hear a tone and the
Parking
PilotFinishedmessage appears in
the multifunction display. You will then have to
steer and merge into traffic on your own. Park-
ing Assist PARKTRONIC is still available. You can
take over the steering before the vehicle has
exited the parking space completely. This is
useful, for example when you recognize that it is
already possible to pull out of the parking space.
198Driving systems
Driving and parking
Page 229 of 398
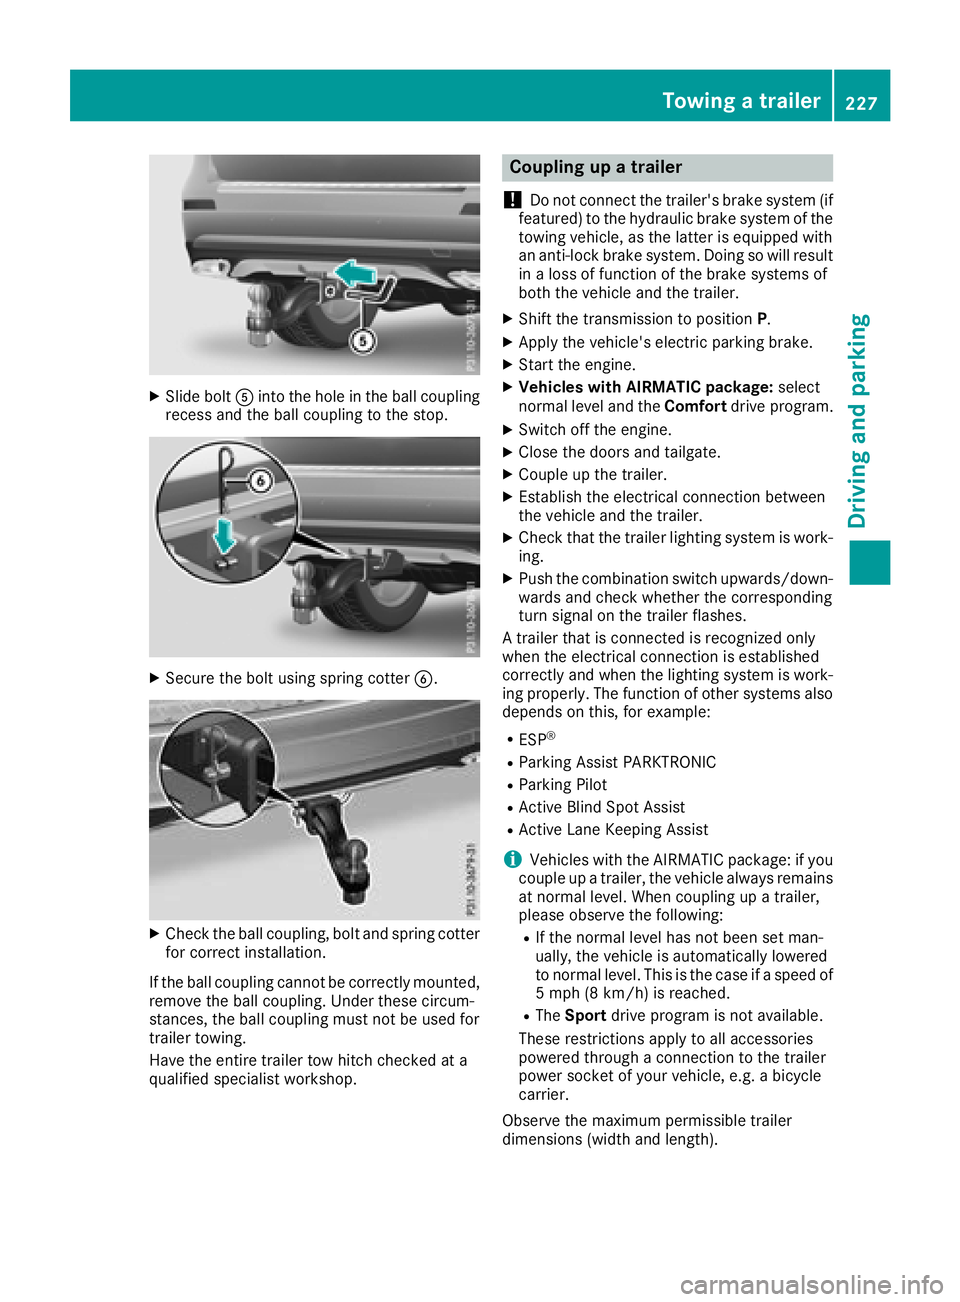
XSlide boltAinto the hole in the ball coupling
recess and the ball coupling to the stop.
XSecure the bolt using spring cotter B.
XCheck the ball coupling, bolt and spring cotter
for correct installation.
If the ball coupling cannot be correctly mounted,
remove the ball coupling. Under these circum-
stances, the ball coupling must not be used for
trailer towing.
Have the entire trailer tow hitch checked at a
qualified specialist workshop.
Coupling up a trailer
!
Do not connect the trailer's brake system (if
featured) to the hydraulic brake system of the
towing vehicle, as the latter is equipped with
an anti-lock brake system. Doing so will result
in a loss of function of the brake systems of
both the vehicle and the trailer.
XShift the transmission to position P.
XApply the vehicle's electric parking brake.
XStart the engine.
XVehicles with AIRMATIC package: select
normal level and the Comfortdrive program.
XSwitch off the engine.
XClose the doors and tailgate.
XCouple up the trailer.
XEstablish the electrical connection between
the vehicle and the trailer.
XCheck that the trailer lighting system is work-
ing.
XPush the combination switch upwards/down-
wards and check whether the corresponding
turn signal on the trailer flashes.
A trailer that is connected is recognized only
when the electrical connection is established
correctly and when the lighting system is work-
ing properly. The function of other systems also
depends on this, for example:
RESP®
RParking Assist PARKTRONIC
RParking Pilot
RActive Blind Spot Assist
RActive Lane Keeping Assist
iVehicles with the AIRMATIC package: if you
couple up a trailer, the vehicle always remains
at normal level. When coupling up a trailer,
please observe the foll
owing:
RIf the normal level has not been set man-
ually, the vehicle is automatically lowered
to normal level. This is the case if a speed of
5 mph (8 km/h) is reached.
RThe
Sport drive program is not available.
These restrictions apply to all accessories
powered through a connection to the trailer
power socket of your vehicle, e.g. a bicycle
carrier.
Observe the maximum permissible trailer
dimensions (width and length).
Towing a trailer227
Driving and parking
Z
Page 231 of 398
Decouplingatrailer
GWARNING
If you uncoupl e atrailer wit hth eoverrun
brake engaged, you could trap your han d
between th evehicle and th etrailer drawbar .
There is aris kof injury.
Do no tuncoupl e atrailer if th eoverrun brake
is engaged.
GWARNING
Vehicles wit hlevel control:
The vehicle is lowered as soo nas you discon-
nect th etrailer cable. Thi scould result in your
limbs or those of other people that are
between th evehicle bod yand tires or under-
neat hth evehicle bein gtrapped. There is a
ris kof injury.
Mak esur ethat nobod yis in th eimmediate
vicinit yof th ewhee lhousings or under th e
vehicle when you disconnec tth etrailer cable.
!Do no tdisconnec t atrailer wit han engage d
overrun brake .Otherwise ,your vehicle could
be damaged by th ereboundin gof th eoverrun
brake .
XShift th etransmissio nto position P.
XApply thevehicle' selectric parking brake .
XStart theengine.
XClos eth edoors and tailgate.
XApply th etrailer's parking brake .
XDetach thetrailer cable and decoupl eth e
trailer .
XSwitchof fth eengine.
Permissible trailer loads an ddrawbar
loads
Weight specifications
Maximum allowable gross mass
The gross vehicle weight of th etrailer is calcu-
lated by addin gth eweight of th etrailer to th e
weight of th eload and equipmen ton th etrailer .
You will fin dinstallin gdimensions and load s
under "Technical data" (
Ypage 395).
Permissible noseweigh t
You will findinstallin gdimensions and load s
under "Technical data" (Ypage 395).
Loadingatrailer
RWhe nloadin gth etrailer ,mak esur ethat nei-
ther th epermissible gross weight of th etrailer
no rth egross vehicle weight are exceeded.
The permissible gross vehicle weight is indi-
cated on th eidentification plat elocated on
th eB-pilla ron th edriver's sid eof th evehicle.
You can fin dth emaximum permissible values
on th etyp eplates of your vehicle and th e
trailer .Whe ncalculatin ghow muc hweight
th evehicle and trailer may carry, pay atten-
tion to th erespective lowest values.
RThe trailer drawbar load on th eball couplin g
mus tbe adde dto th erea raxl eload to avoid
exceedin gth epermissible gross axl eweight .
The permissible gross vehicle weight is indi-
cated on th eidentification plat elocated on
th eB-pilla ron th edriver's sid eof th evehicle.
iMercedes-Ben zrecommends atrailer load
wher eth etrailer drawbar noseweigh t
accounts fo r 8 %to 15 %of th etrailer's per -
missible gross weight .
iThe weight of additional accessories ,pas-
sengers, and cargo reduce sth epermissible
trailer load and drawbar load fo ryour vehicle.
Checking th evehicle an dtrailer weigh t
RTo checkthat th eweight sof th etowin gvehi-
cl e and th etrailer compl ywit hth emaximum
permissible values, hav eth evehicle/trailer
combination (includin gth edriver ,passen -
gers, and cargo wit h afullylade ntrailer )
weighed on acalibrated weighbridge .
RCheckth egross axl eweight ratin gof th efron t
and rea raxles, th egross weight of th etrailer
and th etrailer drawbar noseweight.
Removin gth eball coupling
XRemov eth esprin gcotter.
XRemov eth ebolt from th eball couplin g
recess .
XRemov eth eball couplin gfrom th eball cou-
plin grecess .
Towing a trailer229
Driving and parking
Z
Page 237 of 398
Left control panel
=
;RCalls up the menu and menu bar
9
:Press briefly:
RScrolls in lists
RSelects a submenu or function
RIn theAudiomenu: selects the
previous or next station, when the
preset list or station list is active,
or the previous or next audio track
or video scene
RIn the Tel(Telephone) menu:
switches to the phone book and
selects a name or telephone num-
ber
9
:Press and hold:
RIn the Audiomenu: selects a pre-
set list or a station list in the
desired frequency range or an
audio track or video scene using
rapid scrolling
RIn the Tel(Telephone) menu:
starts rapid scrolling if the phone
book is open
aRConfirms the selection or display
message
RIn the Tel(Telephone) menu:
switches to the phone book and
starts dialing the selected number
%Press briefly:
RBack
RSwitches off voice-operated con-
trol for navigation or the Voice
Control System
RHides display messages or calls up
the last Tripmenu function used
RExits the telephone book/redial
memory
%Press and hold:
RCalls up the standard display in the
Tripmenu
Right control panel
~RRejects or ends a call
RExits the telephone book/redial
memory
6RMakes or accepts a call
RSwitches to the redial memory
W
XRAdjusts the volume
8RMute
?RSwitches on voice-operated con-
trol for navigation or the Voice
Control System
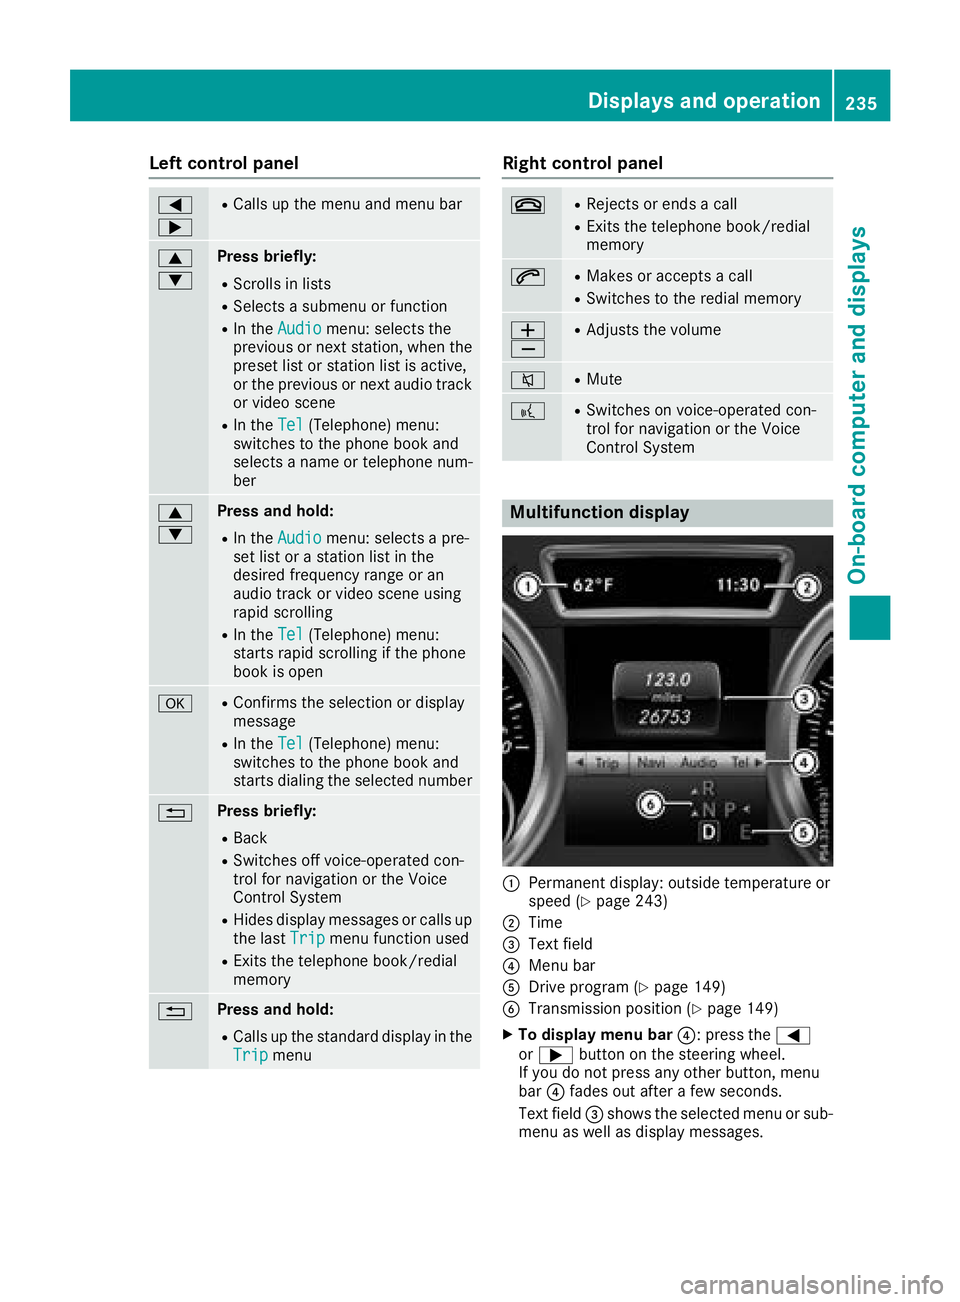
Multifunction display
:Permanent display: outside temperature or
speed (Ypage 243)
;Time
=Text field
?Menu bar
ADrive program (Ypage 149)
BTransmission position (Ypage 149)
XTo display menu bar ?: press the=
or ; button on the steering wheel.
If you do not press any other button, menu
bar ?fades out after a few seconds.
Text field =shows the selected menu or sub-
menu as well as display messages.
Displays and operation235
On-board computer and displays
Z