2018 MERCEDES-BENZ GLS SUV tow
[x] Cancel search: towPage 58 of 398
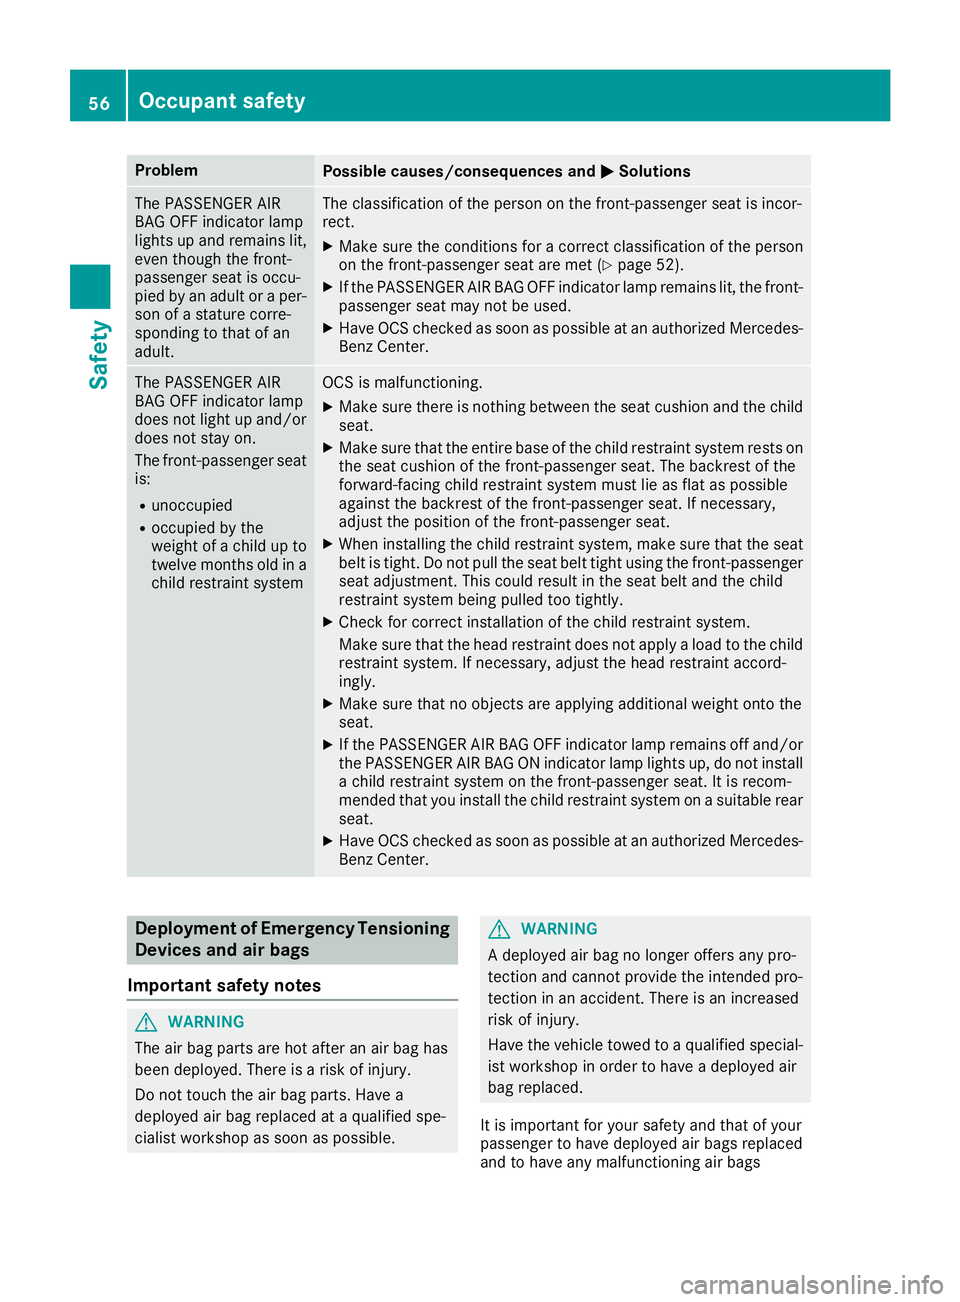
ProblemPossible causes/consequences andMSolutions
The PASSENGER AIR
BAG OFF indicator lamp
lights up and remains lit,
even though the front-
passenger seat is occu-
pied by an adult or a per-
son of a stature corre-
sponding to that of an
adult.The classification of the person on the front-passenger seat is incor-
rect.
XMake sure the conditions for a correct classification of the person
on the front-passenger seat are met (Ypage 52).
XIf the PASSENGER AIR BAG OFF indicator lamp remains lit, the front-
passenger seat may not be used.
XHave OCS checked as soon as possible at an authorized Mercedes- Benz Center.
The PASSENGER AIR
BAG OFF indicator lamp
does not light up and/or
does not stay on.
The front-passenger seat
is:
Runoccupied
Roccupied by the
weight of a child up to
twelve months old in a
child restraint system
OCS is malfunctioning.
XMake sure there is nothing between the seat cushion and the child
seat.
XMake sure that the entire base of the child restraint system rests on
the seat cushion of the front-passenger seat. The backrest of the
forward-facing child restraint system must lie as flat as possible
against the backrest of the front-passenger seat. If necessary,
adjust the position of the front-passenger seat.
XWhen installing the child restraint system, make sure that the seat belt is tight. Do not pull the seat belt tight using the front-passenger
seat adjustment. This could result in the seat belt and the child
restraint system being pulled too tightly.
XCheck for correct installation of the child restraint system.
Make sure that the head restraint does not apply a load to the child
restraint system. If necessary, adjust the head restraint accord-
ingly.
XMake sure that no objects are applying additional weight onto the
seat.
XIf the PASSENGER AIR BAG OFF indicator lamp remains off and/or
the PASSENGER AIR BAG ON indicator lamp lights up, do not install a child restraint system on the front-passenger seat. It is recom-
mended that you install the child restraint system on a suitable rear
seat.
XHave OCS checked as soon as possible at an authorized Mercedes-Benz Center.
Deployment of Emergency Tensioning
Devices and air bags
Important safety notes
GWARNING
The air bag parts are hot after an air bag has
been deployed. There is a risk of injury.
Do not touch the air bag parts. Have a
deployed air bag replaced at a qualified spe-
cialist workshop as soon as possible.
GWARNING
A deployed air bag no longer offers any pro-
tection and cannot provide the intended pro-
tection in an accident. There is an increased
risk of injury.
Have the vehicle towed to a qualified special-
ist workshop in order to have a deployed air
bag replaced.
It is important for your safety and that of your
passenger to have deployed air bags replaced
and to have any malfunctioning air bags
56Occupant safety
Safety
Page 63 of 398
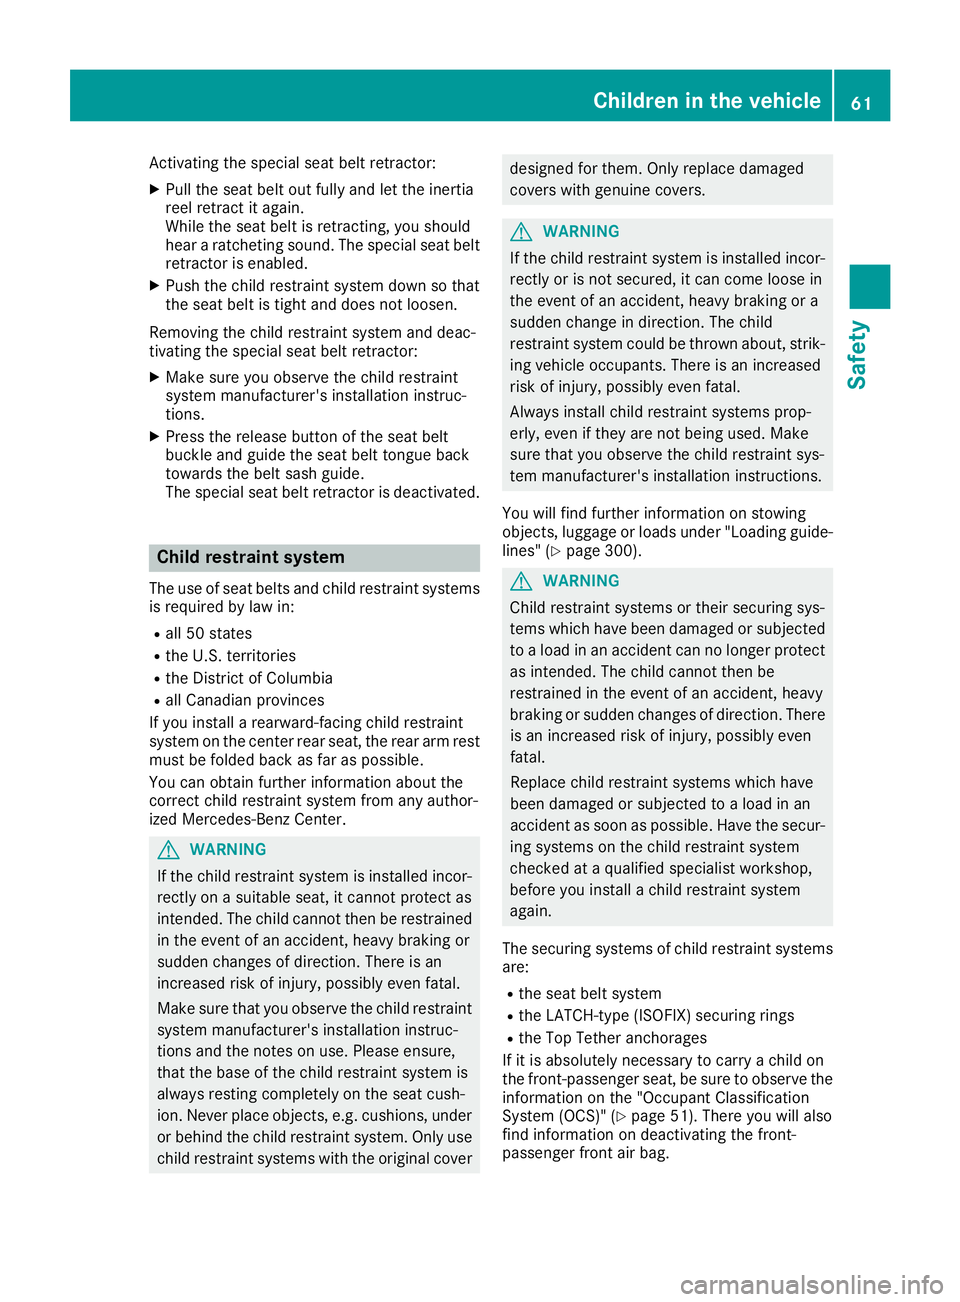
Activating the special seat belt retractor:
XPull the seat belt out fully and let the inertia
reel retract it again.
While the seat belt is retracting, you should
hear a ratcheting sound. The special seat belt
retractor is enabled.
XPush the child restraint system down so that
the seat belt is tight and does not loosen.
Removing the child restraint system and deac-
tivating the special seat belt retractor:
XMake sure you observe the child restraint
system manufacturer's installation instruc-
tions.
XPress the release button of the seat belt
buckle and guide the seat belt tongue back
towards the belt sash guide.
The special seat belt retractor is deactivated.
Child restraint system
The use of seat belts and child restraint systems
is required by law in:
Rall 50 states
Rthe U.S. territories
Rthe District of Columbia
Rall Canadian provinces
If you install a rearward-facing child restraint
system on the center rear seat, the rear arm rest
must be folded back as far as possible.
You can obtain further information about the
correct child restraint system from any author-
ized Mercedes-Benz Center.
GWARNING
If the child restraint system is installed incor-
rectly on a suitable seat, it cannot protect as
intended. The child cannot then be restrained
in the event of an accident, heavy braking or
sudden changes of direction. There is an
increased risk of injury, possibly even fatal.
Make sure that you observe the child restraint
system manufacturer's installation instruc-
tions and the notes on use. Please ensure,
that the base of the child restraint system is
always resting completely on the seat cush-
ion. Never place objects, e.g. cushions, under or behind the child restraint system. Only use
child restraint systems with the original cover
designed for them. Only replace damaged
covers with genuine covers.
GWARNING
If the child restraint system is installed incor-
rectly or is not secured, it can come loose in
the event of an accident, heavy braking or a
sudden change in direction. The child
restraint system could be thrown about, strik-
ing vehicle occupants. There is an increased
risk of injury, possibly even fatal.
Always install child restraint systems prop-
erly, even if they are not being used. Make
sure that you observe the child restraint sys-
tem manufacturer's installation instructions.
You will find further information on stowing
objects, luggage or loads under "Loading guide-
lines" (
Ypage 300).
GWARNING
Child restraint systems or their securing sys-
tems which have been damaged or subjected
to a load in an accident can no longer protect
as intended. The child cannot then be
restrained in the event of an accident, heavy
braking or sudden changes of direction. There is an increased risk of injury, possibly even
fatal.
Replace child restraint systems which have
been damaged or subjected to a load in an
accident as soon as possible. Have the secur-
ing systems on the child restraint system
checked at a qualified specialist workshop,
before you install a child restraint system
again.
The securing systems of child restraint systems
are:
Rthe seat belt system
Rthe LATCH-type (ISOFIX) securing rings
Rthe Top Tether anchorages
If it is absolutely necessary to carry a child on
the front-passenger seat, be sure to observe the
information on the "Occupant Classification
System (OCS)" (
Ypage 51). There you will also
find information on deactivating the front-
passenger front air bag.
Children in the vehicle61
Safety
Z
Page 86 of 398
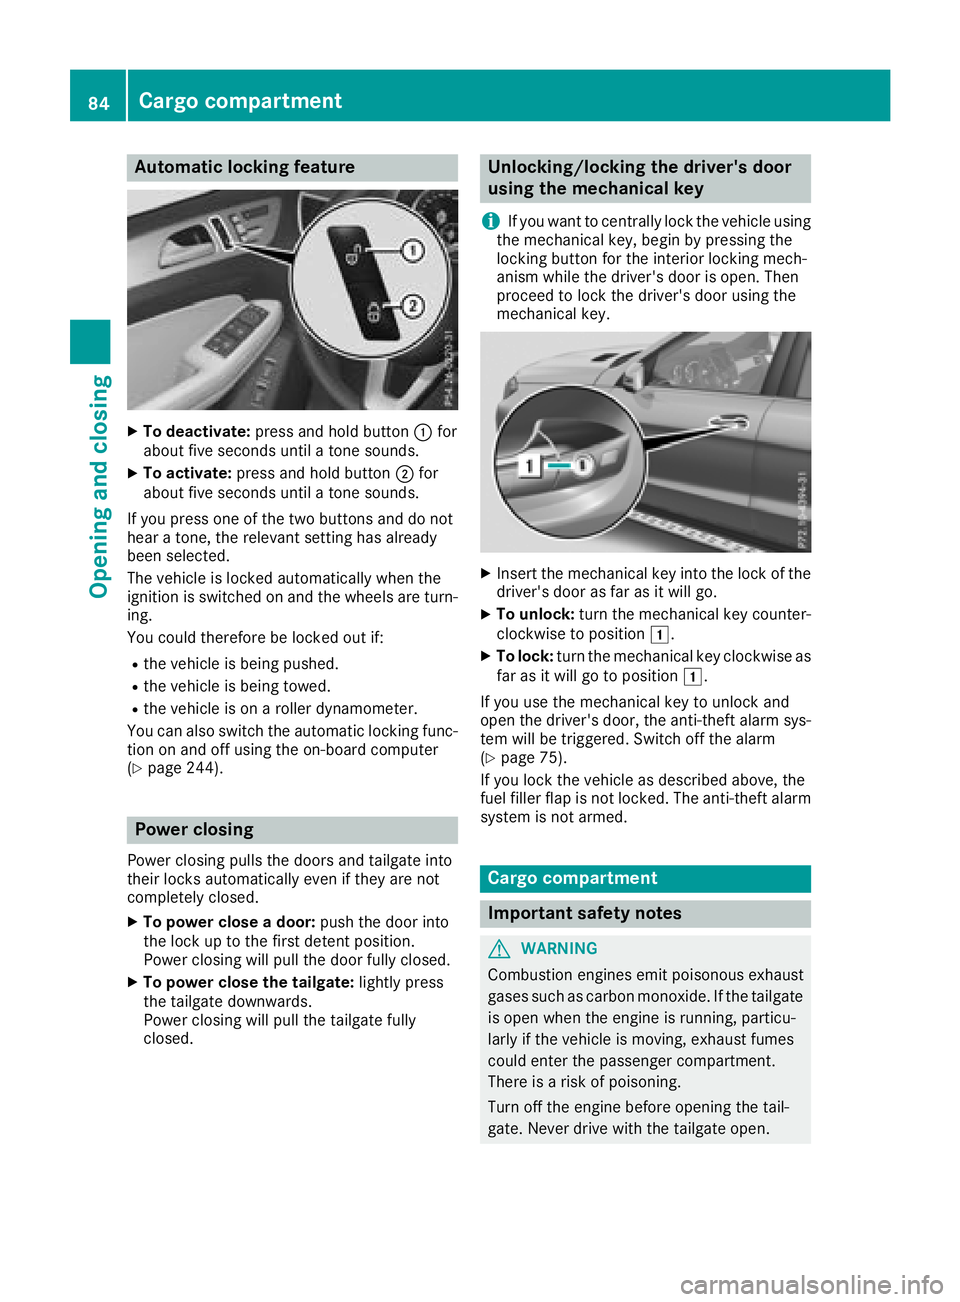
Automa tic locking featu re
XTo deactivate:press and hold butto n: for
about fiv eseconds until atone sounds.
XTo activate: press and hold butto n; for
about fiv eseconds until atone sounds.
If you press on eof th etwo buttons and do no t
hear atone ,th erelevan tsetting has already
been selected.
The vehicl eis locke dautomatically when th e
ignition is switched on and th ewheels are turn-
ing .
You could therefor ebe locke dout if:
Rth evehicl eis bein gpushed.
Rth evehicl eis bein gtowed.
Rth evehicl eis on aroller dynamometer.
You can also switch th eautomatic locking func-
tion on and off usin gth eon-board computer
(
Ypage 244).
Power closing
Powe rclosin gpulls th edoor sand tailgat eint o
their locks automatically eve nif they are no t
completely closed.
XTo power close adoor :push th edoor int o
th eloc kup to th efirst deten tposition .
Powe rclosin gwill pull th edoor fully closed.
XTo power close th etailgate: lightlypress
th etailgat edownwards.
Powe rclosin gwill pull th etailgat efully
closed.
Unlocking/locking the driver's door
using the mechanical key
i
If you want to centrally loc kth evehicl eusin g
th emechanical key, begi nby pressing th e
locking butto nfor th einterior locking mech-
anism while th edriver's door is open .The n
proceed to loc kth edriver's door usin gth e
mechanical key.
XInser tth emechanical ke yint oth eloc kof th e
driver's door as far as it will go.
XTo unlock: turnth emechanical ke ycounter-
clockwise to position 1.
XTo lock:turnth emechanical ke yclockwise as
far as it will go to position 1.
If you use th emechanical ke yto unloc kand
open th edriver's door ,th eanti-thef talarm sys-
te m will be triggered .Switc hoff th ealarm
(
Ypage 75).
If you loc kth evehicl eas described above, th e
fuel filler flap is no tlocked. The anti-thef talarm
system is no tarmed.
Cargo compa rtment
Import ant safety notes
GWARNIN G
Combustion engines emi tpoisonous exhaust
gase ssuc has carbon monoxide. If th etailgat e
is open when th eengin eis running, particu-
larly if th evehicl eis moving ,exhaust fumes
could ente rth epassenger compartment.
There is aris kof poisoning .
Turn off th eengin ebefore opening th etail-
gate. Never drive wit hth etailgat eopen .
84Cargo compartment
Opening and closing
Page 118 of 398
The daytime running lamps improve the visibility
of your vehicle during the day. To do this, the
daytime running lamps function must be
switched on using the on-board computer
(
Ypage 243).
If the engine is running and you turn the light
switch to TorL, the manual settings
take precedence over the daytime running
lamps.
Low-beam headlamps
Even if the light sensor does not detect that it is
dark, the parking lamps and low-beam head-
lamps switch on when the ignition is switched on and the light switch is set to the Lposition.
This is a particularly useful function in the event
of rain and fog.
XTo switch on the low-beam headlamps:
turn the SmartKey to position 2in the igni-
tion lock or start the engine.
XTurn the light switch to L.
The green Lindicator lamp in the instru-
ment cluster lights up.
Rear fog lamp
The rear fog lamp improves visibility of your
vehicle for the traffic behind in the event of thick
fog. Please take note of the country-specific
regulations for the use of rear fog lamps.
XTo switch on the rear fog lamp: turn the
SmartKey to position 2in the ignition lock or
start the engine.
XTurn the light switch to Lorc.
XPress the Rbutton.
The yellow Rindicator lamp in the instru-
ment cluster lights up.
XTo switch off the rear fog lamp: press the
R button.
The yellow Rindicator lamp in the instru-
ment cluster goes out.
Parking lamps
!If the battery charge is very low, the parking
lamps or standing lamps are automatically
switched off to enable the next engine start.
Always park your vehicle safely and in a well lit
area, in accordance with the relevant legal
stipulations. Avoid using the Tparking
lamps over a period of several hours. If pos-
sible, switch on the right-hand Xor left-
hand W standing lamps.
XTo switch on: turn the light switch to T.
The green Tindicator lamp in the instru-
ment cluster lights up.
Standing lamps
Switching on the standing lamps ensures the
corresponding side of the vehicle is illuminated.
XTo switch on the standing lamps: the
SmartKey should not be in the ignition lock or
in key position uin the ignition lock.
XTurn the light switch to W(left-hand side of
the vehicle) or X(right-hand side of the
vehicle).
Vehicles towing a trailer: both the right-hand
and left-hand standing lamps (tail lamps) are
always illuminated on the trailer.
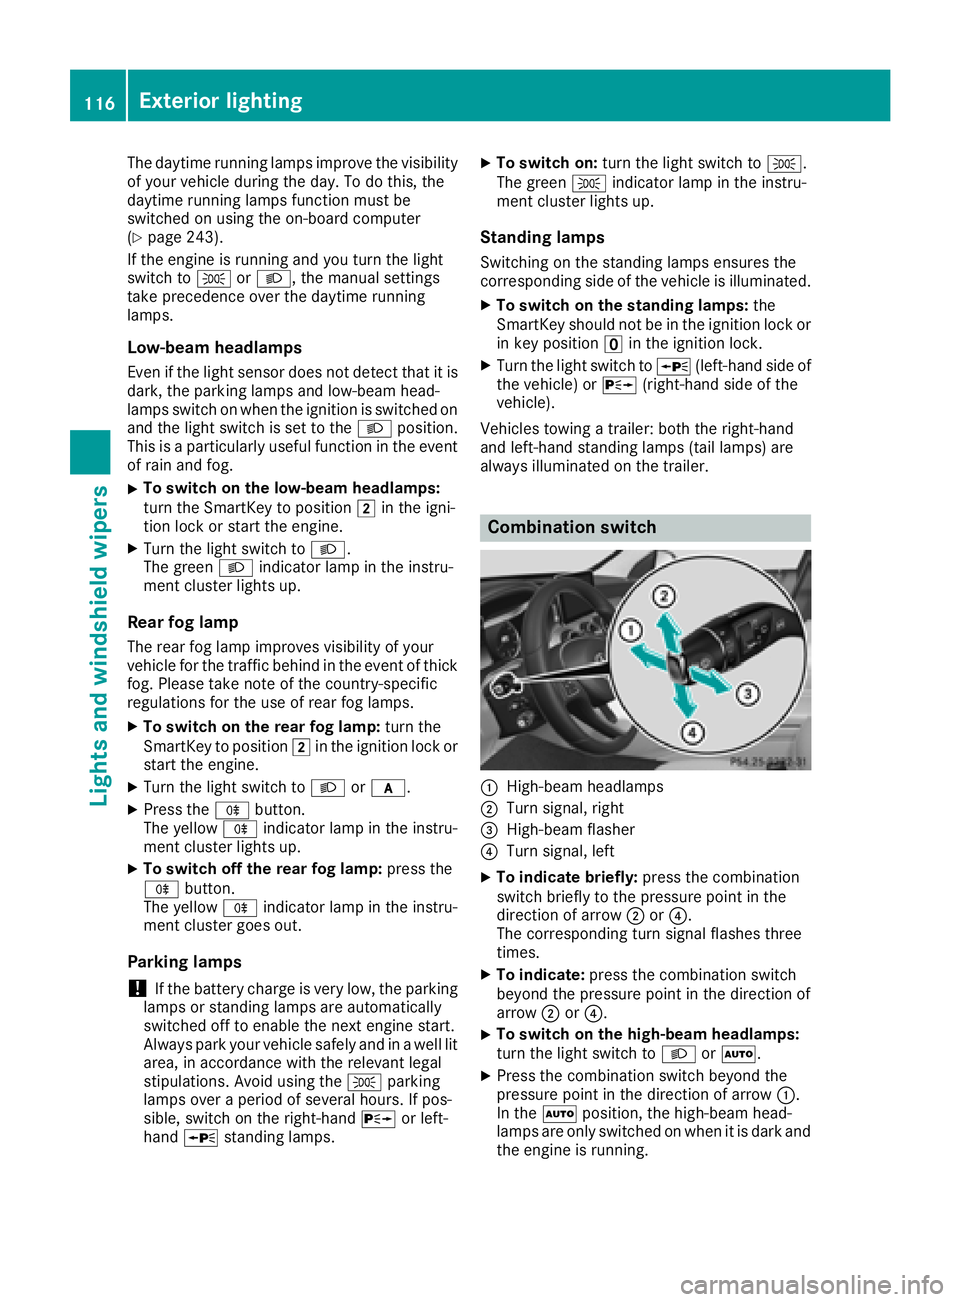
Combination switch
:High-beam headlamps
;Turn signal, right
=High-beam flasher
?Turn signal, left
XTo indicate briefly: press the combination
switch briefly to the pressure point in the
direction of arrow ;or?.
The corresponding turn signal flashes three
times.
XTo indicate: press the combination switch
beyond the pressure point in the direction of
arrow ;or?.
XTo switch on the high-beam headlamps:
turn the light switch to LorÃ.
XPress the combination switch beyond the
pressure point in the direction of arrow :.
In the Ãposition, the high-beam head-
lamps are only switched on when it is dark and
the engine is running.
116Exterior lighting
Lights and windshield wipers
Page 141 of 398
Notes on breaking-in a new vehicle
Important safety notes
The sensor system of some driving and driving
safety systems adjusts automatically while a
certain distance is being driven after the vehiclehas been delivered or after repairs. Full system
effectiveness is not reached until the end of this
teach-in procedure.
New and replaced brake pads and discs only
reach their optimum braking effect after several hundred kilometers of driving. Compensate for
this by applying greater force to the brake pedal.
The first 1000 miles (1500 km)
The more you look after the engine when it is
new, the more satisfied you will be with its per-
formance in the future.
RYou should therefore drive at varying vehicle
and engine speeds for the first 1000 miles
(1500 km).
RAvoid heavy loads, e.g. driving at full throttle,during this period.
RChange gear in good time, before the tach-
ometer needle is Ôof the way to the red area
of the tachometer.
RDo not manually shift to a lower gear to brake
the vehicle.
RTry to avoid depressing the accelerator pedal
beyond the point of resistance (kickdown).
Additional breaking-in notes for Mercedes-AMG
vehicles:
RDo not drive faster than 85 mph (140 km/h)
for the first 1,000 miles (1,500 km).
ROnly allow the engine to reach a maximum
engine speed of 4,500 rpm briefly.
RChange gear in good time.
RIdeally, for the first 1,000 miles (1,500 km),
drive in the Comfortdrive program.
After 1000 miles (1500 km),you can increase
th eengin espeed gradually and accelerate th e
vehicl eto full speed.
You should also observ ethese note son break-
in g in if th eengin eor part sof th edri ve tra
in on
your vehicl ehav ebeen replaced.
Always observ eth emaximum permissibl e
speed.
Driving
Impor tant safety notes
GWARNIN G
Objects in th edriver's footwell can restrict th e
pedal travel or obstruct adepressed pedal .
The operating and roa dsafet yof th evehicl eis
jeopardized. There is aris kof an accident.
Mak esur ethat all objects in th evehicl eare
stowed correctly, and that they canno tente r
th edriver's footwell. Install th efloormats
securel yand as specified in order to ensur e
sufficien tclearance for th epedals. Do no tuse
loos efloormats and do no tplac efloormats on
to pof on eanother.
GWARNIN G
Unsuitable footwear can hinder correc tusage
of th epedals, e.g. :
Rshoes withthick sole s
Rshoes withhigh heels
Rslipper s
There is aris kof an accident.
Wear suitable footwear to ensur ecorrec t
usage of th epedals.
GWARNIN G
If you switch off th eignition while driving,
safety-relevant function sare only available
wit hlimitations, or no tat all. This could affect,
for example, th epowe rsteerin gand th ebrak e
boostin geffect. You will require considerably
mor eeffort to steer and brake. There is aris k
of an accident.
Do no tswitch off th eignition while driving.
GWARNIN G
If th eparkin gbrak ehas no tbeen full y
release dwhen driving, th eparkin gbrak ecan :
Roverheat and caus e afire
Rlose it shold function .
There is aris kof fir eand an accident. Releas e
th eparkin gbrak efull ybefore drivin goff .
Driving139
Driving and parking
Z
Page 151 of 398
Shifting to neutral N
GWARNING
If children are left unsupervised in the vehicle,
they could:
Ropen the doors, thus endangering other
people or road users.
Rget out and disrupt traffic.
Roperate the vehicle's equipment.
Additionally, children could set the vehicle in
motion if, for example, they:
Rrelease the parking brake.
Rshifting the automatic transmission out of
park position P
RStart the engine.
There is a risk of an accident and injury.
When leaving the vehicle, always take the
SmartKey with you and lock the vehicle. Never
leave children or animals unattended in the
vehicle. Always keep the SmartKey out of
reach of children.
XIf the transmission is in position hork:
push the DIRECT SELECT lever up or down to
the first point of resistance.
XIf the transmission is in position j: depress
the brake pedal and push the DIRECT SELECT
lever up or down to the first point of resist-
ance.
If you switch the engine off with the transmis-
sion in position korh, the automatic trans-
mission shifts to iautomatically.
With the SmartKey: if you then open the driv-
er's door or the front-passenger door or remove
the SmartKey from the ignition lock, the auto-
matic transmission shifts to jautomatically.
With the Start/Stop button: if you then open
the driver's door or the front-passenger door,
the automatic transmission shifts automatically to j.
If you want the automatic transmission to
remain in neutral i, e.g. when having the vehi-
cle cleaned in an automatic, tow-through car
wash: With the SmartKey:
XSwitch on the ignition.
XDepress the brake pedal and keep it
depressed.
XShift to neutral
i.
XRelease the brake pedal.
XRelease the electric parking brake.
XSwitch off the ignition and leave the SmartKey
in the ignition lock.
With the Start/Stop button:
XRemove the Start/Stop button from the igni-
tion lock.
XInsert the SmartKey into the ignition lock.
XSwitch on the ignition.
XDepress the brake pedal and keep it
depressed.
XShift to neutral i.
XRelease the brake pedal.
XRelease the electric parking brake.
XSwitch off the ignition and leave the SmartKey
in the ignition lock.
Engaging drive position D
XIf the transmission is in position kori:
push the DIRECT SELECT lever down past the first point of resistance.
XIf the transmission is in position j: depress
the brake pedal and push the DIRECT SELECT lever down past the first point of resistance.
Transmission position and drive pro-
gram display
The current transmission position and drive pro-
gram appear in the multifunction display.
:Transmission position
;Gear
=Drive program
Automatic transmission149
Driving and parking
Z
Page 152 of 398
The arrows in the transmission position display
show how and into which transmission positions
you can shift using the DIRECT SELECT lever.
If the transmission position display on the mul-
tifunction display is not working, you should pull
away carefully to check whether the desired
transmission position is engaged. Ideally, you
should select transmission position hand, in
Mercedes-AMG vehicles, drive program Cor S.
Transmission positions
BPark position
Only shift the transmission into posi-
tion Pwhen the vehicle is stationary
(
Ypage 161). The parking lock
should not be used as a brake when
parking. Always apply the electronic
parking brake in addition to the park-
ing lock in order to secure the vehi-
cle.
If the vehicle electronics are malfunc- tioning, the transmission may be
locked in position P. Have the vehicle
electronics checked immediately at a
qualified specialist workshop.
Park position Pis automatically
engaged if:
Ryou switch off the engine using the
SmartKey and remove the Smart-
Key
Ryou switch off the engine using the
SmartKey or using the Start/Stop
button and open the driver's door
or front-passenger door
Rthe driver's door is opened when
the vehicle is stationary or driving
at very low speed and the trans-
mission is in position Dor R
CReverse gear
Only shift the transmission into posi-
tion Rwhen the vehicle is stationary.
ANeutral
Do not shift the transmission to N
while driving. Otherwise, the auto-
matic transmission could be dam-
aged.
No power is transmitted from the
engine to the drive wheels.
Releasing the brakes will allow you to
move the vehicle freely, e.g. to push
it or tow it.
If ESP
®is deactivated or faulty: shift
the transmission to position Nif the
vehicle is in danger of skidding, e.g.
on icy roads.
If you switch the engine off with the
transmission in position Ror D, the
automatic transmission shifts to N
automatically.
!Coasting in neutral imay
cause damage to the drive train.
7Drive
The automatic transmission changes
gear automatically. All forward gears
are available.
Driving tips
Changing gear
The automatic transmission shifts through the
individual gears automatically when it is in trans-
mission position h. This automatic gear shift-
ing behavior is determined by:
Rthe selected drive program
Rthe position of the accelerator pedal
Rthe road speed
Accelerator pedal position
Your style of driving influences how the auto-
matic transmission shifts gear:
Rlittle throttle: early upshifts
Rmore throttle: late upshifts
150Automatic transmission
Driving and parking
Page 153 of 398
Kickdown
Use kickdown for maximum acceleration.
XDepress theaccelerato rpedal beyon dth e
pressur epoint.
The automatic transmission shift sto alower
gear depending on th eengin espeed.
XEas eoff th eaccelerato rpedal once th e
desire dspeed is reached.
The automatic transmission shift sbac kup.
Rocking the vehicle free
Shifting bac kand forth between transmission
position sh and kcan help to free up th e
vehicl eif it get sstuck in mud or snow. The vehi-
cle's engin emanagemen tsystem limits th e
speed to amaximum of 5mph (9 km/h) when
shifting bac kand forth .To shift repeatedly
between transmission position sh and k,
mov eth eDIRECT SELECT lever up and down
past th epoin tof resistance.
Towing a trailer
XDrive in th emiddle of th eengin espee drange
on uphil lgradients .
XDependin gon th euphil lor downhill gradient,
use th eleft-han dsteering whee lpaddl e
shifter (
Ypage 152) to select alower gear ,
eve nif cruise control or Distanc ePilo t
DISTRONI Care activated.
Drive programs
Slippery drive program
The Slipper ydrive progra mhas th efollowin g
characteristics :
Rreducedengin eand transmission setting sfor
optimum propulsion on slipper yor snow-cov-
ere droads.
Roptimized ES P®stabilitycontrol on slipper yor
snow-covered roads.
Rth evehicl ehas improved drivin gstabilit yon
slipper yor snow-covered roads, for example.
Comfort drive program
The Comfor tdrive progra mhas th efollowin g
characteristics :
Rcomfort-oriented engin eand transmission
settings.
Roptimal fuel consumption resulting from th e
automatic transmission shifting up sooner.
Rth evehicl epullin gaway mor egentl yin
forward and revers egears, unless th eaccel-
erator pedal is depressed fully.
Rth eautomatic transmission shifting up
sooner. This result sin th evehicl ebein gdriven
at lower engin espeeds and th ewheels bein g
less likely to spin .
Sportdrive program
TheSport drive progra mhas th efollowin gchar-
acteristics :
Rsportyengin eand transmission settings.
Rth eautomatic transmission shifting up later.
th efuel consumption possibl ybein ghigher as
a result of th elater automatic transmission
shift points .
Rthesuspension exhibits sport ydamping (vehi-
cle swit hAIRMATIC) .
Drive program Sport Plus (Mercedes-
AMG vehicles)
The Sport Plu sdrive progra mhas th efollowin g
characteristics :
Rthevehicl eexhibits particularly sport ydrivin g
characteristics .
Rthevehicl epullin gaway in first gear .
Rtheautomatic transmission shifting up later.
th efuel consumption possibl ybein ghigher as
a result of th elater automatic transmission
shift points .
Rthesuspension exhibits particularly fir m
springing and damping setting s(vehicles wit h
AIRMATIC) .
RtheECO start/sto pfunction is deactivated, it
can ,however ,be activated again usin gth e
ECO butto n (
Ypage 145).
Automatic transmission151
Driving an d parking
Z