Page 57 of 194
 in the route calculation.
If you use HOV or carpool lanes, please observe
the applicable laws as well as the local and t")
Using car pool lanes
You can include carpool lanes (HOV or car shar-
ing lanes) in the route calculation.
If you use HOV or carpool lanes, please observe
the applicable laws as well as the local and time
limitation conditions.
Carpool lanes may only be used under certain
conditions. They can normally be used when
there are two people in the vehicle. However,
there are also carpool lanes which can only be
used when there are three or more people in the
vehicle. In California, single drivers may also use
the carpool lanes if the vehicle's emission or
consumption values are below the prescribed
levels.
Carpool lanes may be reserved for specific
times (e.g. during the peak period).
Carpool lanes are indicated by a diamond sym-
bol on specific road signs and on the road sur-
face. The road signs may also include the des-
ignation CARPOOL. The lanes are arranged as a
separate lane next to the others or are built as a
physically separate lane.
Depending on the setting underNumber of
Occupants in the Vehicle:, the navigation
system uses carpool lanes when calculating the
route. During route guidance, visual and audible
driving directions provide guidance into and out
of carpool lanes.
XTo switch to navigation mode: press the
ß button.
XTo show the menu: press the controller.
XTo selectOptions: turn and press the con-
troller.
XSelect Route Settings.
XSelectAvoid Options.
XSelectNumber of Occupants in theVehicle:.
A menu appears. The #dot indicates the cur-
rent setting.
XTo select the number: turn and press the con- troller.
Destination entry
Important safety notes
GWARNING
If you operate information systems and com-
munication equipment integrated in the vehi-
cle while driving, you will be distracted from
traffic conditions. You could also lose control
of the vehicle. There is a risk of an accident.
Only operate the equipment when the traffic
situation permits. If you are not sure that this
is possible, park the vehicle paying attention
to traffic conditions and operate the equip-
ment when the vehicle is stationary.
You must observe the legal requirements for the
country in which you are currently driving when
operating the multimedia system.
Destination entry may be blocked while driving,
depending on the country specifications.
Using an address
Calling up the address entry menu
XTo switch to navigation mode: press the
Ø button.
XTo show the menu: slide6the controller.
XTo select Destination: turn and press the
controller.
XSelect Address Entry.
Address entry options
Examples of how you can enter an address:
Rcity or ZIP code, street, house number
Rcity or ZIP code, street
Destination entry55
Navigation
Z
Page 58 of 194

Rcity or ZIP code, center
Rcity or ZIP code, street, intersection
Rstreet, city or ZIP code, house number
Rstreet, city or ZIP code, intersection
The address can be entered faster by entering
the street before the city if the address has an
unusual street name.
While entering an address in the character bar,
you can call up other destination entry options:
Rkeyword search using è(Ypage 58)
Rthe map via Map(Ypage 62)
RPOIs viaPOIs(Ypage 60)
Entering an address
The example shows you how to enter a city,
street and house number for an address, e.g. for
your home address.
XIn the address entry menu, select Street:
press the controller (Ypage 55).
The city in which the vehicle is currently loca-
ted is at the top of the list.
XEnter BROADWAY. Character entry (Ypage 30).
XTo call up the list: slide5the controller
repeatedly until the character bar disappears.
or
XTo select the ¬symbol: turn and press the
controller.
XTo select Town: press the controller.
XEnter the city, e.g. NewYork. Then call up the
list and select an entry. Proceed in the same
way as when entering a street.
XTo select No.: press the controller.
XEnter the house number. Then call up the list
and select an entry. Proceed in the same way
as when entering a street.
The address entry menu shows the address.
The city in which the vehicle is currently located
(current vehicle position) is at the top of the list
of cities. When destinations are entered using
the character bar, the locations for which route guidance has already been carried out are more
prominently available.
You can enter any of the cities, streets, ZIP
codes, etc. which are stored in the digital map.
However, ZIP codes are not available for some
countries.
State/province and city are sufficient to start
navigating. You can enter either a city or a ZIP
code. The street and house number complete
the destination address.
Entering additional address data
You can enter additional address data:
RState/province
You can use Last Used
to select the last
selected state (USA) or province (Canada).
You can also select Mexico and The Bahamas.
RZIP code
Entering a ZIP code will delete a previously
entered city.
RCenter
Entering a center will delete a previously
entered street.
RIntersection
Entering an intersection will delete a previ-
ously entered house number.
56Destination entry
Navigation
Page 59 of 194
.
XTo selectState/Province,ZIP Code,Cen‐teror Intersection: turn, slide 6and
press the controller.
XSelect an entry (Ypage 56).
Saving an address
You can sto")
XSelect the address entry menu (Ypage 55).
XTo selectState/Province,ZIP Code,Cen‐teror Intersection: turn, slide 6and
press the controller.
XSelect an entry (Ypage 56).
Saving an address
You can store the address entered as:
Ra home address in the address book
Ra navigable address book contact
For further information on the address book,
see (
Ypage 103)
Ra personal destination on the SD card
(Ypage 79)
XCall up the address entry menu (Ypage 55).
XTo select Save: slide6, turn and press the
controller.
XAs the home address: selectAs "My
Address".
The home address is stored in the list of con-
tacts under the entry My Address
.
XAs a contact:selectAs New Contact.
XSelect Not Classified,Homeor Work.
XEnter a surname and first name (Ypage 30).
XTo select the ¬symbol: turn and press the
controller.
The destination address is saved in the
address book as a navigable contact.
Starting route calculation
The entered destination appears in the address
entry menu.
XTo confirm StartorContinue: press the
controller.
If you select Start
: the route is calculated
with the current route settings (Ypage 53).
While route calculation is in progress, an
arrow will indicate the direction to your des-
tination. Once the route has been calculated,
route guidance begins. If the vehicle is trav-
eling on a non-digitized road, the system dis-
plays the linear distance to the destination,
the direction to the destination and the Road
Not Mappedmessage.
Selection Continue
: IfCalculate Alter‐native Routesis activated, alternative
routes are calculated (Ypage 53). You can
display these and select them for route guid-
ance (
Ypage 73).
If route guidance has already been activated,
a prompt will appear asking whether you wish
to end the current route guidance.
XTo select Cancel Active Route GuidanceorSet as Intermediate Destination:
turn and press the controller.
Cancel Active Route Guidance
cancels
the current route guidance and starts route
calculation to the new destination.
Set as Intermediate Destination
adds
the new destination in addition to the existing
destination and opens the intermediate des-
tinations list.
Destination entry57
Navigation
Z
Page 60 of 194

iThe route is calculated using the digital map
data. The calculation time depends on the
distance from the destination, for example.
The route may differ from the ideal route, e.g. due to incomplete map data. Please also refer
to the notes about the digital map
(
Ypage 86).
Keyword search
Entering keywords
The keyword search is used to help find desti-
nations using fragments of words. If you enable
the appropriate setting in the search options,
the keyword search is tolerant of errors
(
Ypage 59).
It can be used for an address or a POI. For exam-
ple, you can search for the Empire State Building
in New York.
The keyword search finds geographically toler-
ant hits. If, for example, you are searching for a
street located on the edge of a major city, the
search will also cover adjacent smaller cities.
The keyword search supports the character sets
of the system languages available.
XTo switch to navigation mode: press the
Ø button.
XTo show the menu: slide6the controller.
XTo select Destination: turn and press the
controller.
XSelect Keyword Search.
XEnter the first few letters of the city and
street, e.g. NEWandEMP.
While entering the information, the number of
exact matches and total number of matches
is shown.
---/---
is displayed if fewer than three char-
acters have been entered. 999+
is displayed if there are too many hits.
XSelect the
¬symbol.
The search results are displayed
(
Ypage 58).
Selecting search results
The search results are divided into categories,
such as addresses. The number of exact
matches and total number of matches is shown
in brackets.
Further search results are displayed, if POI
Searchand/orFuzzy Searchare activated in
the search options (Ypage 59).
XTo select an address: press the controller.
The search results are displayed.
Exact hits are shown at the very top of the list.
Hits are listed alphabetically. The search term
that you entered is highlighted in orange in the
entries.
XSelect an entry: turn and press the controller.
The address entry menu appears, showing the
destination address.
XTo start route calculation: select Start.
58Destination entry
Navigation
Page 61 of 194

XTo select POI:selectPOIs in the Vicin‐
ityorAllPOIsby turning and pressing con-
troller.
A list appears. The search results are dis-
played according to the linear distance, start-
ing with those closest.
XSelect a POI.
The POI is shown.
XTo start route calculation: select Start.
XTo select online search:selectOnline
Searchby turning and pressing the control-
ler.
The search switches to the online functions.
Online search requirement (USA): mbrace
must be activated for Internet access
(
Ypage 122).
Requirement for the online map display (Can-
ada): a mobile phone is connected to the mul-
timedia system via Bluetooth
®(Ypage 90)
or USB (Ypage 154).
Selecting search options
XTo switch to navigation mode: press the
Ø button.
XTo show the menu: slide6the controller.
XTo select Destination: turn and press the
controller.
XSelect Keyword Search.
XTo select Search Options: slide5, turn
and press the controller.
XSelect Fuzzy SearchorPOI Search.
Switch the setting on Oor off ª.
The error-tolerant search is useful if parts of
the address are incomplete or the spelling is
unclear.
The POI search takes into account points of
interest in the search.
Selecting a state/province
XTo switch to navigation mode: press the
Ø button.
XTo show the menu: slide6the controller.
XTo select Destination: turn and press the
controller.
XSelect Keyword Search.
XTo select State/Province: slide5, turn
and press the controller.
The states or provinces are sorted alphabeti-
cally.
XTo select a state/province: turn and press the
controller.
Using online search
Requirement (USA): mbrace must be activated
for Internet access (Ypage 122).
Requirement (Canada): a mobile phone is con-
nected to the multimedia system via Bluetooth
®
(Ypage 90) or USB (Ypage 154).
XTo switch to navigation mode: press the
Ø button.
XTo show the menu: slide6the controller.
XTo select Destination: turn and press the
controller.
XSelect Keyword Search.
XEnter the first few letters of the city and
street.
XTo select OnlineSearch: slide5, turn and
press the controller.
The search switches to the online functions.
Selecting a destination from the list of
last destinations
The last 50 destinations are stored automati-
cally.
XTo switch to navigation mode: press the
Ø button.
XTo show the menu: slide6the controller.
XTo select Destination: turn and press the
controller.
XSelect From Last Destinations.
Destination entry59
Navigation
Z
Page 62 of 194

XSelect the destination.
The address entry menu appears, showing the
destination address.
XTo start route calculation:selectStart.
Selecting an address book contact as
a destination
You can select navigable address book contacts
as the destination. These are identified by the
Lsymbol. If you have already entered and
saved your home address, you can select this as
the destination by using My Address
.
XTo switch to navigation mode: press the
Ø button.
XTo show the menu: slide6the controller.
XTo select Destination: turn and press the
controller.
XSelect From Contacts.
XSelect the destination.
The address entry menu appears, showing the
contact and associated destination address.
XTo start route calculation: selectStart.
Selecting a destination from POIs
Calling up the POI menu
XTo switch to navigation mode: press the
Ø button.
XTo show the menu: slide6the controller.
XTo select Destination: turn and press the
controller.
XSelect From POIs.
Defining the position for the POI search
SelectionInstructions
Near Destination
(when route guidance is
active)
XCall up the POI menu (Ypage 60).
XTo select Near Destination: turn and press the controller.
XSelect a POI category (Ypage 61).
Current Position
Searches in the vicinity of
the current vehicle posi-
tion.
XCall up the POI menu (Ypage 60).
XTo selectCurrent Position: turn and press the controller.
XSelect a POI category (Ypage 61).
60Destination entry
Navigation
Page 63 of 194
.
XTo selectOther City: turn and press the c")
SelectionInstructions
Other City
After entering a city, the
search is performed
within the city's bounda-
ries
Option 1
XCall up the POI menu (Ypage 60).
XTo selectOther City: turn and press the controller.
XSelect the state/province (Ypage 56), if desired.
XEnter the city (Ypage 56).
XSelect a POI category (Ypage 61).
Option 2
XEnter a city in the address entry menu (Ypage 56).
XTo select POIs: slide6, turn and press the controller.
XSelect a POI category (Ypage 61).
Search By Name
Searches for all POIs on
the digital map or around
one of the three previ-
ously specified positions
XCall up the POI menu (Ypage 60).
XTo select Search By Name: turn and press the controller.
XSelectAllPOIsor one of the three previously selected positions.
The POI list with character bar appears.
XEnter a name.
or
XTo select Mercedes-BenzService: turn and press the controller.
Search By Phone Num‐ber
All POIs with a telephone
number can be selected.
XCall up the POI menu (Ypage 60).
XTo select SearchByPhoneNumber: turn and press the control-
ler.
You will see a list of phone numbers.
XEnter the telephone number.
The telephone number consists of:
Rthe country code (international dialing code)
Rthe area code
When entering the area code, omit the leading "0"
Rthe telephone number of the participating caller
Selecting a POI category
POI categories appear after choosing the menu
items Near Destination,Current Positionand after entering another city.
Destination entry61
Navigation
Z
Page 64 of 194

radius around the selected posi")
XTurn and press the controller.
TheGsymbol after an entry shows that fur-
ther categories are available.
XSelect a sub-category.
The POI search covers a 240 mi (400 km)
radius around the selected position.
Once the search is completed, the POI list is
displayed.
The search results display the following infor-
mation:
Ran arrow that shows the linear direction to
the POI (search around vehicle position)
Rthe linear distance to the POI
Rthe name of the POI
XSelect a POI.
The complete address of the POI is shown.
Selecting a POI
Requirement for "Calling up a POI": a mobile
phone must be connected to the multimedia
system (
Ypage 90).
Requirements for "Viewing the vicinity of the
destination" and "Loading data from the Inter-
net" (USA): mbrace must be activated for Inter-
net access (
Ypage 122).
Requirements for "Viewing the vicinity of the
destination" and "Loading data from the Inter-
net" (Canada): a mobile phone must be connec-
ted to the multimedia system via Bluetooth
®
(Ypage 90) or USB (Ypage 154).
The complete address of the POI is shown.
XTo view the vicinity of the destination:
select :by turning and pressing the con-
troller.
If street images are available, the street in the
vicinity of the destination address is shown.
XTo call up the map: selectMap.
XMove the map, change the map scale
(Ypage 62) and select the POI.
XTo call up a POI: selectCall.
If a phone number is available, the multimedia
system switches to the telephone function.
XTo load data from the Internet: selectwww.
If an Internet address is available, data is loa-
ded from the Internet.
XTo store a POI: selectSave.
The POI can be saved as:
Rhome address
Ra navigable address book contact
(Ypage 103)
Ra personal destination on the SD card
(Ypage 79)
XTo start route calculation: to selectStart
orContinue: turn and press the controller.
If Calculate Alternative Routes
is ena-
bled in the basic settings, the menu item
Continue
is displayed instead of
Start(Ypage 53).
Using the map
:Crosshair
;Distance of crosshair position from current
vehicle position
XTo switch to navigation mode: press the
ß button.
XTo show the menu: slide6the controller.
XTo select Destination: turn and press the
controller.
XSelect Using Map.
The map with crosshair is shown.
XTo move the map: slide1, 4or2
the controller.
XTo change the map scale: turn the controller
until the desired map scale is selected.
The scale is displayed at the bottom of the
display.
62Destination entry
Navigation
 1
1 2
2 3
3 4
4 5
5 6
6 7
7 8
8 9
9 10
10 11
11 12
12 13
13 14
14 15
15 16
16 17
17 18
18 19
19 20
20 21
21 22
22 23
23 24
24 25
25 26
26 27
27 28
28 29
29 30
30 31
31 32
32 33
33 34
34 35
35 36
36 37
37 38
38 39
39 40
40 41
41 42
42 43
43 44
44 45
45 46
46 47
47 48
48 49
49 50
50 51
51 52
52 53
53 54
54 55
55 56
56 57
57 58
58 59
59 60
60 61
61 62
62 63
63 64
64 65
65 66
66 67
67 68
68 69
69 70
70 71
71 72
72 73
73 74
74 75
75 76
76 77
77 78
78 79
79 80
80 81
81 82
82 83
83 84
84 85
85 86
86 87
87 88
88 89
89 90
90 91
91 92
92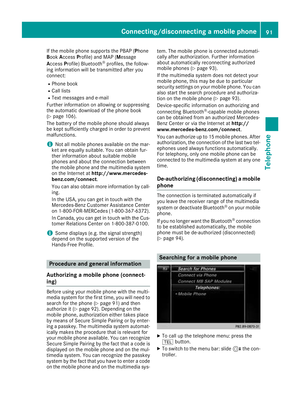 93
93 94
94 95
95 96
96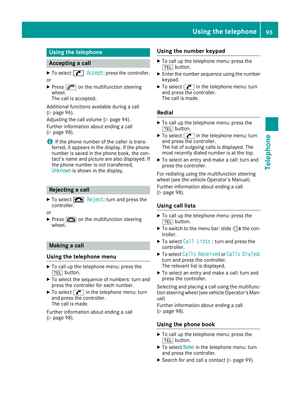 97
97 98
98 99
99 100
100 101
101 102
102 103
103 104
104 105
105 106
106 107
107 108
108 109
109 110
110 111
111 112
112 113
113 114
114 115
115 116
116 117
117 118
118 119
119 120
120 121
121 122
122 123
123 124
124 125
125 126
126 127
127 128
128 129
129 130
130 131
131 132
132 133
133 134
134 135
135 136
136 137
137 138
138 139
139 140
140 141
141 142
142 143
143 144
144 145
145 146
146 147
147 148
148 149
149 150
150 151
151 152
152 153
153 154
154 155
155 156
156 157
157 158
158 159
159 160
160 161
161 162
162 163
163 164
164 165
165 166
166 167
167 168
168 169
169 170
170 171
171 172
172 173
173 174
174 175
175 176
176 177
177 178
178 179
179 180
180 181
181 182
182 183
183 184
184 185
185 186
186 187
187 188
188 189
189 190
190 191
191 192
192 193
193