Page 137 of 194

Sirius XM®Satellite Radio uses a fleet of high-
performance satellites to broadcast around the
clock throughout the USA and Canada.
The satellite radio program is available for a
monthly fee. Details are available from the Sirius
XM
®Service Center and at
http://www.siriusxm.com (USA) or
http://www.siriusxm.ca (Canada).
Your new Mercedes-Benz vehicle comes with
Sirius XM
®Satellite Radio pre-installed at the
factory. This service is free for a six-month trial
period. About a month before the trial period
ends, information will be provided on how to
extend this subscription. An acoustic signal
sounds and a message is shown, describing how
the subscription can be extended.
iSirius, XM and all related marks and logos
are trademarks of Sirius XM Radio Inc. and its
subsidiaries. All other marks, channel names
and logos are the property of their respective
owners. All rights reserved.
Registering satellite radio
:Phone number of provider
;Sirius XM®ID of your satellite receiver
XSwitch on SatRadio mode (Ypage 135).
The satellite radio main menu appears show-
ing the preview channel. You cannot select
any other stations.
XTo select Optionsin the radio menu bar: turn
and press the controller.
XTo select Service: turn and press the con-
troller.
The service information screen appears. Once the telephone connection has been estab-
lished:
XFollow the instructions of the service staff.
The activation process may take up to ten
minutes. If the activation is completed suc-
cessfully, the
Updating Channels...
mes-
sage appears in the display, followed by the
satellite radio main menu.
iYou can also have the satellite service acti-
vated online. To do this, visit
http://www.siriusxm.com (USA) or
http://www.siriusxm.ca (Canada).
iIf registration is not included when purchas-
ing the system, your credit card details will be
required to activate your account.
If the satellite receiver is not installed correctly,
the Device
Unavailablemessage will appear.
Switching to satellite radio
XTo show the main function bar: slide 5the
controller.
XTo select Radio: turn and press the controller.
The radio display appears. You will hear the
last station set on the waveband selected
last.
XTo select Radioin radio mode: slide 5and
press the controller.
The menu with the available radio modes
appears.
XTo select SatRadio: turn and press the con-
troller.
The No
Servicemessage appears if there is no
signal.
Satellite radio135
Radio
Page 138 of 194

Satellite radio overview
:Main function bar
;Preset
=Channel name and channel number
?Channel information
AStation presets menu
BCategory list
CKeyword search
DOptions menu
Channel information ?can be viewed in detail
(
Ypage 138).
Selecting a category
Satellite radio channels are sorted into catego-
ries. You can choose between various catego-
ries such as News/Discussions, Sports and
Country (if available). The category list is sorted
alphabetically. The content of the categories is
sorted by channel numbers.
XTo call up the category list: selectCate‐
goryin the menu bar by turning and pressing
the controller.
The category list appears.
XTo select a category: turn the controller and
press to confirm.
The category selected is shown in the display.
You hear the channel last selected for this
category.
The #dot indicates the current setting.
When you select a specific category, the
channels are filtered exclusively according to
this category. Select the All Channels
cat-
egory in order to see all of the available chan-
nels. Only this category enables you to
browse all available stations.
Selecting a channel
Changing channels
XWhen the display/selection window in the
satellite radio display is selected, slide 1
or turn the controller.
The multimedia system switches to the next
available channel.
Entering channel numbers directly
XTo select Optionsin the radio menu bar: turn
and press the controller.
The satellite radio menu appears.
XTo select EnterChannel: turn and press the
controller.
An input menu appears.
XEnter the desired channel in the entry field.
or
XPress the gkey on the number keypad.
An input menu appears.
XFor the channel number, press the corre-
sponding number keys on the control panel
one after the other.
XPress the zkey on the number keypad.
The multimedia system sets the selected
channel.
iYou can only select currently permitted dig-
its.
Selecting a channel via the satellite
radio station list
You can select the channel using the station list
displaying the artists and tracks that are cur-
rently playing.
136Satellite radio
Radio
Page 139 of 194

XTo selectOptionsin the radio menu bar: turn
and press the controller.
XTo select Station List with Artist &Title: turn and press the controller.
The channel list appears.
or
XPress the controller in the main display field.
XSelect the desired channel
Keyword search
XTo select the keyword search èin the
menu bar: turn and press the controller.
XTo enter the required search term: turn and
press the controller.
Direct and indirect results are shown.
XSelect the required result.
The relevant channel is played.
Memory functions
i
There are 100 presets available.
XTo store a channel using the edit function:
select Preset
in the radio menu bar by turn-
ing and pressing the controller.
XTo select Edit Station Preset: turn and
press the controller.
The list of saved channels appears.
XTo select the preset: turn the controller and
press for about two seconds.
The newly saved channel overwrites the exist-
ing preset.
or
XTo quick store: press and hold a number key,
for example, for two seconds.
The channel is saved to the second position in
the radio channel presets.
or
XSet the desired channel in satellite radio
mode.
XPress and hold the controller until the preset
list appears.
XTo select the preset number: turn and press
the controller.
A tone confirms that the storing process was
successful. Deleting the highlighted channel
XTo select
Presetin the radio menu bar: turn
and press the controller.
XSelect Edit Station Preset.
XTo select the required preset entry: turn the
controller.
XSlide9the controller.
XTo select the Delete Highlighted Sta‐tion/Channeloption in the additional menu:
turn and press the controller.
or
XPress the $button.
A prompt appears.
XTo select Yes: turn and press the controller.
The highlighted station is deleted.
or
XTo select No: press the controller.
The process is canceled.
Activating/deactivating the station
presets display
You can use this function to change to the sta-
tion presets display.
Activating
XIn radio mode: slide 6the controller.
XTo select Preset: turn and press the con-
troller.
XTo select Station Preset View: On: turn
and press the controller.
The station preset display appears.
XTo switch between the stored stations: turn
the controller.
Deactivating
XIn radio mode: slide 6the controller.
XTo select Preset: turn and press the con-
troller.
XTo select StationPresetView:Off: turn
and press the controller.
The view of the last heard waveband appears.
Music and sports alerts
General notes
This function makes it possible to store a pro-
gram alert for your favorite artists, tracks or
sporting events.
Satellite radio137
Radio
Page 140 of 194
.
Music alerts can only be saved whilst a track is
being played. You can also specify sports alerts
via the menu option. The system then conti")
You can store up to 30 music and sports alerts
(favorites).
Music alerts can only be saved whilst a track is
being played. You can also specify sports alerts
via the menu option. The system then continu-
ously searches through all the channels. If a
match is found with a saved message, you will
be informed. A window appears with the respec-
tive information.
Setting a music alert
XTo selectOptionsin the radio menu bar: turn
and press the controller.
XTo select Alert for Artist, Track &SportsEvent: turn and press the controller.
A menu appears.
XSelect Add New Alert.
A window with a prompt appears.
XSelect ArtistorTrack.
The alert is set for the current artist or track.
iIf an alert cannot be set, the No AlertsAvailablemessage appears.
Setting a sports alert
XTo selectOptionsin the menu bar: turn and
press the controller.
XTo select Alert for Artist, Track &SportsEvent: turn and press the controller.
A menu appears.
XSelect Manage Sports Alerts.
A menu appears.
XSelect Select New AlertsSelect NewAlerts.
A menu appears.
XSelect the desired team from a league, e.g.
college, NBA, NHL, NFL or MLB.
The alert function for the sports team is
added.
A window with music and sport alerts
appears
XTo select Change ToorIgnore: turn and
press the controller.
If you select Change To
, the channel is
changed and the favorite artist or track is
played.
If you select Ignore
, the current channel will
continue playing.
Editing music and sports alerts
XTo select Alert for Artist, Track &SportsEvent: turn and press the controller.
A menu appears.
XSelect Manage Music AlertsorManageSports Alerts.
A list of set alerts appears.
Switching music and sport alerts on/off
XWith Oorª in front of Activate MusicAlertsyou can determine whether music
alerts should be switched on or off.
XWith Oorª in front of ActivateSportsAlertsyou can determine whether sport
alerts should be switched on or off.
Tagging music tracks
If the channel supports this function, you are
able to transfer the music track currently playing
to an Apple
®device. You can then purchase it in
the iTunes®store.
XTo select Optionsin the radio menu bar: turn
and press the controller.
XTo select Tag This Track: turn and press
the controller.
A message about saving this music track on
the Apple
®device appears.
Displaying information
138Satellite radio
Radio
Page 141 of 194

XTo selectInfoin the radio menu bar: turn and
press the controller.
Information on the currently received pro-
gram is displayed.
If available, you will see:
Rthe channel logo
Rthe channel abbreviation
Rthe artist of the track that is currently being
played
Rthe track that is currently being played
Rcategory
Rcomposer
XTo return to the radio display: selectInfoby sliding 6and pressing the controller.
Displaying service information
The provider's customer service center is avail-
able by phone at any time to answer any general
questions or questions on the versions availa-
ble.
XTo select Optionsin the menu bar: turn and
press the controller.
XTo select Service: turn and press the con-
troller.
The Sirius XM
®ID of your satellite receiver
and the telephone number of the provider
appear.
XTo return to the main display: press the
% button.
Channel list updates
During reception of a new channel list, the
Updating Channels...message is shown.
The channel last selected is switched to mute
until the update has been completed. Satellite
radio mode is not available during this process. Once the update has been completed, the sat-
ellite radio basic menu appears. The channel
previously selected will be played if it is still
available.
Sound settings
Information on sound settings (Ypage 162).
Satellite radio139
Radio
Page 142 of 194

Your multimediasyste mequipment
These operatin ginstruction sdescribe all th e
standar dan doptional equipment of your multi-
media system, as available at th etime of going
to press. Country-specifi cdifference sare pos -
sible. Bear in min dthat your vehicle may no t
feature all function sdescribed here. Thi salso
applies to safety-relevan tsystems an dfunc-
tions.
Read th einformation on qualifie dspecialis t
workshop sin th evehicle Operator's Manual.
Activating medi amode
General notes
There are severa lways to activat emedia sour-
ce susin gth emultimedia system.
The relevant section sof th eOperator's Manual
describe th esimples tway to activat e amedia
source.
Thi ssection describes all option sfo ractivatin g
media sources.
Connections for externa lmedi asour-
ces
The followin gexternal media sources can be
used :
RApple®devices (e.g. iPhon e®)
RUSBdevices (e.g. US Bstick, MP3 player)
Two US Bports are located in th estowag e
spac eunder th earmrest.
RCD
RDV Dvideo
RSD cards
RDevices wit hBluetoot h®connection
Activating medi ausing th ebutton
XPress th eÕ button.
The last media sourc eyou hav eset is dis -
played.
XPress th eÕ buttonagain .
The men uappears wit hth eavailable media
sources.
XTo selec tmedia sources: turn th econtroller
until th edesire dmedia sourc eis in th ecenter.
Press th econtroller .
Dependin gon th evehicle equipment ,th efol-
lowing media sources will be available :
RDisc
RMemory Card
RMediaInterfac e 1
RMediaInterfac e 2
RBluetoothAudi o
Switching on automatically
Whenan external media sourc eis connected,
CD an dSD memor ycar dfunction sare automat -
ically switched on by th emultimedia system.
Whe nusin gwit hUS Bdevices, switch to th e
respective basi cdisplay.
If playable music files are found ,they will be
playe dby th emultimedia system.
iIf amedia function is already switched on in
th emultimedia system, this will be interrup-
ted. The basi cdisplay of th enewly connecte d
devic ewill appear (except when usin gwit h
USB/iPo d
®). If another function ,suc has nav-
igation ,is bein goperated, th ebasi cdisplay
will no tchange.
Activating medi ausing th emain func-
tion ba r
XTo display th emain function bar :slid e5 the
controller .
XTo selectMedi a:turn an dpress th econtroller .
The last media sourc eyou hav eset is dis -
played.
140Activating media mode
Media
Page 143 of 194

XTo selectMediain media mode: slide 5and
press the controller.
The menu appears with the available media
sources.
XTo select the media source: turn the control-
ler and press to confirm.
If the media source contains music or video
files, these will be played. The corresponding
basic menu will be shown.
Activating media using the number
keypad
XTo select a media source: press the corre-
sponding number key.
If the media source contains music or video
files, these will be played. The corresponding
basic menu will be shown.
XTo enter the track number: press the g
button.
A menu appears.
XUse the number keypad to enter the track
number.
The track is played.
Use the sbutton to show the track infor-
mation for the track that is currently playing.
Activating media using the device list
XIn Media mode, slide 6the controller.
The media menu bar appears.
XTo select Devices: turn and press the con-
troller.
The available media sources will be shown.
The #dot indicates the current setting.
XSelect the media source.
If the media source contains music or video
files, these will be played. The corresponding
basic menu will be shown.
Audio/video mode
Important safety notes
GWARNING
The CD/DVD drive is a class 1 laser product.
If you open the housing of the CD/DVD drive,
there is a risk of exposure to invisible laser
radiation. This laser radiation could damage
your retina. There is a risk of injury.
Never open the housing. Always have main-
tenance and repair work carried out at a quali- fied specialist workshop.
GWARNING
Handling discs while driving may distract you from traffic conditions. You could also lose
control of the vehicle. There is a risk of an
accident.
Handle discs only when the vehicle is station-
ary.
Bear in mind that at a speed of only 30 mph
(approximately 50 km/h), the vehicle covers a
distance of 44 ft (approximately 14 m)per sec-
ond.
Notes on audio/video mode
Permissible data carriers
RCD audio, CD-R and CD-RW
RDVD video, DVD-R and DVD-RW (audio for-
mats PCM DTS®and Dolby®Digital)
RSD card
RUSB storage device
RApple®devices
iManufactured under license from Dolby
Laboratories. Dolby and the double-D symbol
are trademarks of Dolby Laboratories.
iFor DTS patents see
http://patents.dts.com. Manufactured
under license from DTS Licensing Limited.
DTS, the Symbol & DTS and the Symbol
together are registered trademarks, and DTS
Digital Surround is a trademark of DTS, Inc.
©
DTS, Inc. All rights reserved.
Audio/video mode141
Media
Z
Page 144 of 194

Permissible file systems
RISO 9660/Joliet standard for CDs
RUDF for video DVDs
RFAT16, FAT32, exFAT and NTFS for SD card
and USB storage media
RHFS and HFS+ for Apple®devices
iWriting access is not possible on NTFS.
Multisession CDs
For multi-session CDs, the content of the first
CD session determines how the multimedia sys-
tem will process the CD. The multimedia system
only plays back one CD session and gives prior-
ity to the first session on the CD.
File structure of a data carrier
When you create a disc with compressed music
files, the tracks can be organized in folders. A
folder may also contain subfolders. The disc
may contain no more than eight directory levels
(a root and seven sub-levels). Files beyond the
eighth level will not be recognized by the sys-
tem.
iThe multimedia system supports up to
25,000 files for all of the connected sources.
Track and file names
When you create a disc with compressed music
files, you can assign names to the tracks and
folders.
You should observe the following when assign-
ing track names:
Rtrack names must have at least one character
Rtrack names must have an extension of a sup-
ported audio or video format, e.g. mp3, aac or m4v
Rthere must be a dot between the track name
and the extension
Example of a correct track name:
"Track1.mp3".
Permissible formats
The multimedia system supports the following
audio and video formats:
Audio for-
matsMP3, WMA, CDA, AAC for-
mats (.aac, .mp4, .m4a
and .m4b)
Video for-
matsDVD-V, MPEG, WMV, M4V,
AVI up to 720p
Copy-protected iTunes®music files with
the .m4p file extension are not supported.
Permissible sampling and data rates
The multimedia system supports MP3 and WMA
files of the following type:
FormatData rate
[kbit/s]Sampling
rates [kHz]
MP332-320
(fixed and varia-
ble data rates)8-48
WMA5-384
(fixed and varia-
ble data rates)8-48
The multimedia system does not support WMA
files of the following type:
RDRM (Digital Rights Management) encrypted
files
RWMA Pro
R5.1 surround sound
iOnly use tracks with a data rate of at least
128 kbit/s and a sampling rate of at least
44.1 kHz. Lower rates can cause a noticeable deterioration in quality. This is especially the
case if you have activated a surround sound
function.
Selecting an active partition (USB mass
storage devices only)
You can select this function for USB storage
devices if the storage device is partitioned. Up
to nine partitions (primary or logical, FAT,
FAT32, exFAT and NTFS) are supported.
142Audio/video mode
Media
 1
1 2
2 3
3 4
4 5
5 6
6 7
7 8
8 9
9 10
10 11
11 12
12 13
13 14
14 15
15 16
16 17
17 18
18 19
19 20
20 21
21 22
22 23
23 24
24 25
25 26
26 27
27 28
28 29
29 30
30 31
31 32
32 33
33 34
34 35
35 36
36 37
37 38
38 39
39 40
40 41
41 42
42 43
43 44
44 45
45 46
46 47
47 48
48 49
49 50
50 51
51 52
52 53
53 54
54 55
55 56
56 57
57 58
58 59
59 60
60 61
61 62
62 63
63 64
64 65
65 66
66 67
67 68
68 69
69 70
70 71
71 72
72 73
73 74
74 75
75 76
76 77
77 78
78 79
79 80
80 81
81 82
82 83
83 84
84 85
85 86
86 87
87 88
88 89
89 90
90 91
91 92
92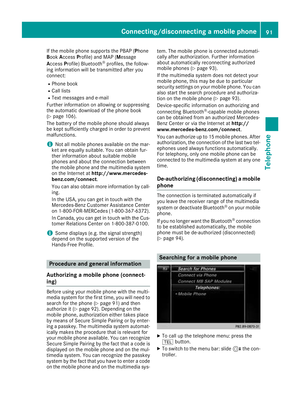 93
93 94
94 95
95 96
96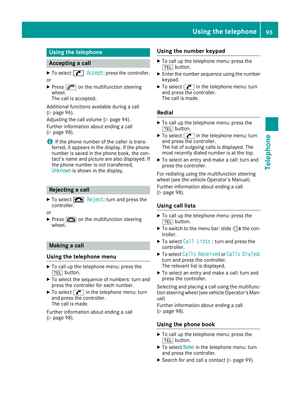 97
97 98
98 99
99 100
100 101
101 102
102 103
103 104
104 105
105 106
106 107
107 108
108 109
109 110
110 111
111 112
112 113
113 114
114 115
115 116
116 117
117 118
118 119
119 120
120 121
121 122
122 123
123 124
124 125
125 126
126 127
127 128
128 129
129 130
130 131
131 132
132 133
133 134
134 135
135 136
136 137
137 138
138 139
139 140
140 141
141 142
142 143
143 144
144 145
145 146
146 147
147 148
148 149
149 150
150 151
151 152
152 153
153 154
154 155
155 156
156 157
157 158
158 159
159 160
160 161
161 162
162 163
163 164
164 165
165 166
166 167
167 168
168 169
169 170
170 171
171 172
172 173
173 174
174 175
175 176
176 177
177 178
178 179
179 180
180 181
181 182
182 183
183 184
184 185
185 186
186 187
187 188
188 189
189 190
190 191
191 192
192 193
193