2018 MERCEDES-BENZ G-CLASS width
[x] Cancel search: widthPage 129 of 294
Have brake pads installed and brake fluid
replaced at a qualified specialist workshop.
If the brake system has only been subject to
moderate loads, you should test the functional-
ity of your brakes at regular intervals.
Information on BAS (Brake Assist) (
Ypage 59).
For safety reasons, Mercedes-Benz recom-
mends only installing the following brake disks
and brake pads/linings:
Rbrake disks that have been approved by
Mercedes-Benz
Rbrake pads/linings that have been approved
by Mercedes-Benz or that are of an equivalent
standard of quality
Other brake disks or brake pads/linings can
compromise the safety of your vehicle.
Always replace all brake disks and brake pads/ linings on an axle at the same time. Always
install new brake pads/linings when replacing
brake disks.
The vehicle is equipped with lightweight brake
disks to which the wheel assembly with rim and
threaded connection is matched.
The use of brake discs other than those
approved by Mercedes-Benz may alter track
width and is subject to approval, if applicable.
Shock-type loads when handling the brake
discs, such as when changing wheels, can lead
to a reduction in comfort when driving with light- weight brake discs. Avoid shock-type loads on
the lightweight brake disks, particularly on the
brake plate.
Mercedes-Benz recommends that you only use
brake fluid that has been specially approved for
your vehicl
e by Mercedes-Benz, or which corre-
sponds to an equivalent quality standard. Brake
fluid which has not been approved for
Mercedes-Benz vehicles or which is not of an
equivalent quality could affect your vehicle's
operating safety.
High-performance brake (Mercedes-
AMG vehicles)
The AMG brake systems are designed for heavy
loads. This may lead to noise when braking.
This will depend on:
RSpeed
RBraking force
RAmbient conditions, e.g. temperature and
humidity The wear of individual brake system compo-
nents such as the brake pads/linings or brake
discs depends on individual driving style and
operating conditions.
For this reason, it is impossible to state a mile-
age that will be valid under all circumstances. An
aggressive driving style will lead to high wear.
You can obtain more information on this from a
qualified specialist workshop.
New and replaced brake pads and discs only
reach their optimum braking effect after several
hundred kilometers of driving. Compensate for
this by applying greater force to the brake pedal.
Keep this in mind, and adapt your driving and
braking accordingly during this break-in period.
Excessive heavy braking results in correspond-
ingly high brake wear. If the brake pads/linings
have reached their wear limit, the multifunction
display shows a corresponding message. Espe-
cially for high performance driving, it is impor-
tant to maintain and have the brake system
checked regularly.
Driving on slippery surfaces
!
Where possible, avoid spinning the drive
wheels when pulling away on slippery roads.
You could otherwise damage the drive train.
This type of damage is not covered by the
terms of the Mercedes-Benz warranty.
XEngage the differential locks if necessary
(Ypage 151).
Driving on wet roads
Hydroplaning
If water has accumulated to a certain depth on
the road surface, there is a danger of hydro-
planing occurring, even if:
Ryou drive at low speeds
Rthe tires have adequate tread depth
For this reason, in the event of heavy rain or in
conditions in which hydroplaning may occur,
you must drive in the following manner:
Rlower your speed
Ravoid ruts
Ravoid sudden steering movements
Rbrake carefully
Driving tips127
Driving and parking
Z
Page 142 of 294
DISTRONIC PLUS is automatically deactivated
if:
Ryou apply the parking brake
Ryou are driving slower than 15 mph (25 km/h)
and there is no vehicle in front, or if the vehicle
in front is no longer detected
RESP®intervenes or you deactivate ESP®
Rthe automatic transmission is in positionj,
k ori
Ryou pull the cruise control lever towards you
in order to pull away and the front-passenger
door or one of the rear doors is open
Rthe vehicle slips
If DISTRONIC PLUS is deactivated, an intermit-
tent warning tone sounds and the DISTRONIC
PLUSOffmessage appears in the multifunction
display for approximately five seconds.
Tips for driving with DISTRONIC PLUS
Pay particular attention in the following traffic
situations:
RCornering, entering and exiting a bend: the
ability of DISTRONIC PLUS to detect vehicles
when cornering is limited. Your vehicle may
brake unexpectedly or late.
RDriving on a different line: DISTRONIC PLUS
may not detect vehicles which are not driving
in the middle of their lane. The distance to the
vehicle in front will be too short.
ROther vehicles changing lane: DISTRONIC
PLUS has not detected the vehicle cutting in
yet. The distance to this vehicle will be too
short.
RNarrow vehicles: DISTRONIC PLUS does not
detect the vehicle in front on the edge of the
road because of its narrow width. The dis-
tance to the vehicle in front will be too short.
RObstacles and stationary vehicles:
DISTRONIC PLUS does not brake for obsta-
cles or stationary vehicles. If, for example, the detected vehicle turns a corner and reveals an
obstacle or stationary vehicle, DISTRONIC
PLUS will not brake for these.
RCrossing vehicles: DISTRONIC PLUS may mis-
takenly detect vehicles that are crossing your
lane. Activating DISTRONIC PLUS at traffic
lights with crossing traffic, for example, could
cause your vehicle to pull away uninte
ntion-
ally.
In such situations, brake if necessary.
DISTRONIC PLUS is then deactivated.
Blind Spot Assist
General notes
Blind Spot Assist monitors the areas on either
side of the vehicle that are not visible to the
driver with two lateral, rear-facing radar sen-
sors. A warning lamp lights up in the exterior
mirrors and draws your attention to vehicles
detected in the monitored area. If you then
switch on the corresponding turn signal to
change lane, you will also receive an optical and
audible warning.
Blind Spot Assist supports you from a speed of
approximately 20 mph (30 km/h).
Important safety notes
GWARNING
Blind Spot Assist does not react to:
Rvehicles overtaken too closely on the side,
placing them in the blind spot area
Rvehicles which approach with a large speed
differential and overtake your vehicle
As a result, Blind Spot Assist may not give
warnings in such situations. There is a risk of
an accident.
Always observe the traffic conditions care-
fully, and maintain a safe lateral distance.
Blind Spot Assist is only an aid. It may fail to
detect some vehicles and is no substitute for
attentive driving. Always ensure that there is
sufficient distance to the side for other road
users and obstacles.
iUSA only:
This device has been approved by the FCC as
a "Vehicular Radar System". The radar sensor
is intended for use in an automotive radar
system only. Removing, tampering with, or
altering the device will void any warranties,
and is not permitted by the FCC. Do not tam-
per with, alter, or use in any non-approved
way.
Any unauthorized modification to this device
could void the user’s authority to operate the
equipment.
140Driving system s
Driving an d parking
Page 149 of 294
The field of vision and other functions of the rear
view camera may be restricted due to additionalaccessories on the rear of the vehicle (e.g.
license plate holder, bicycle rack).
Activating/deactivating the rear view
camera
XTo activate: make sure that the SmartKey is
in position 2in the ignition lock.
XMake sure that the "Rear view camera" func-
tion is selected in the multimedia system (see
Digital Operator's Manual).
XEngage reverse gear.
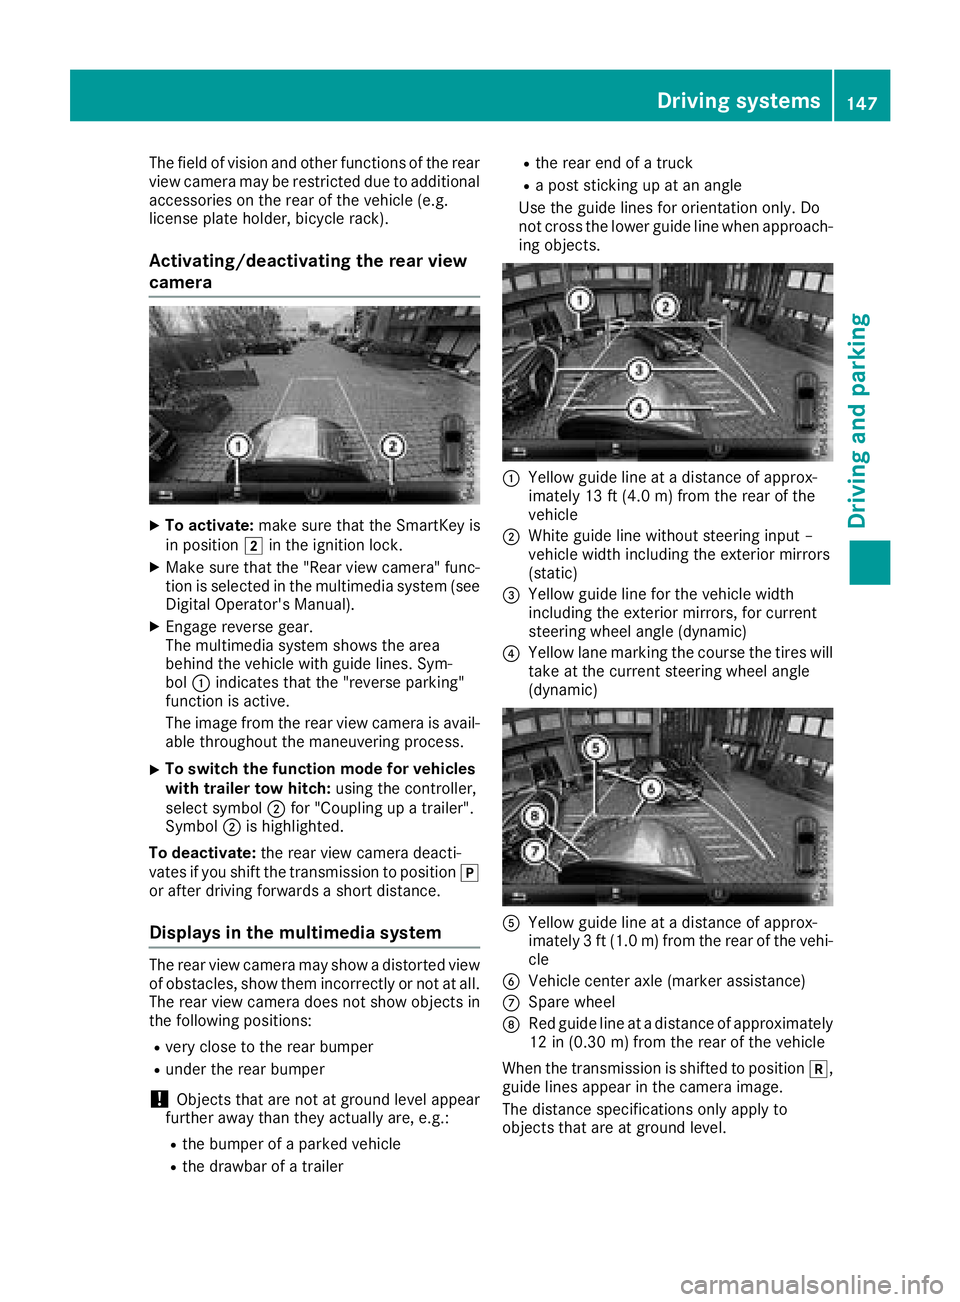
The multimedia system shows the area
behind the vehicle with guide lines. Sym-
bol :indicates that the "reverse parking"
function is active.
The image from the rear view camera is avail-
able throughout the maneuvering process.
XTo switch the function mode for vehicles
with trailer tow hitch: using the controller,
select symbol ;for "Coupling up a trailer".
Symbol ;is highlighted.
To deactivate: the rear view camera deacti-
vates if you shift the transmission to position j
or after driving forwards a short distance.
Displays in the multimedia system
The rear view camera may show a distorted view
of obstacles, show them incorrectly or not at all.
The rear view camera does not show objects in
the following positions:
Rvery close to the rear bumper
Runder the rear bumper
!Objects that are not at ground level appear
further away than they actually are, e.g.:
Rthe bumper of a parked vehicle
Rthe drawbar of a trailer
Rthe rear end of a truck
Ra post sticking up at an angle
Use the guide lines for orientation only. Do
not cross the lower guide line when approach-
ing objects.
:Yellow guide line at a distance of approx-
imately 13 ft (4.0 m) from the rear of the
vehicle
;White guide line without steering input –
vehicle width including the exterior mirrors
(static)
=Yellow guide line for the vehicle width
including the exterior mirrors, for current
steering wheel angle (dynamic)
?Yellow lane marking the course the tires will take at the current steering wheel angle
(dynamic)
AYellow guide line at a distance of approx-
imately 3 ft (1.0 m) from the rear of the vehi-
cle
BVehicle center axle (marker assistance)
CSpare wheel
DRed guide line at a distance of approximately
12 in (0.30 m)from the rear of the vehicle
When the transmission is shifted to position k,
guide lines appear in the camera image.
The distance specifications only apply to
objects that are at ground level.
Driving systems147
Driving and parking
Z
Page 159 of 294
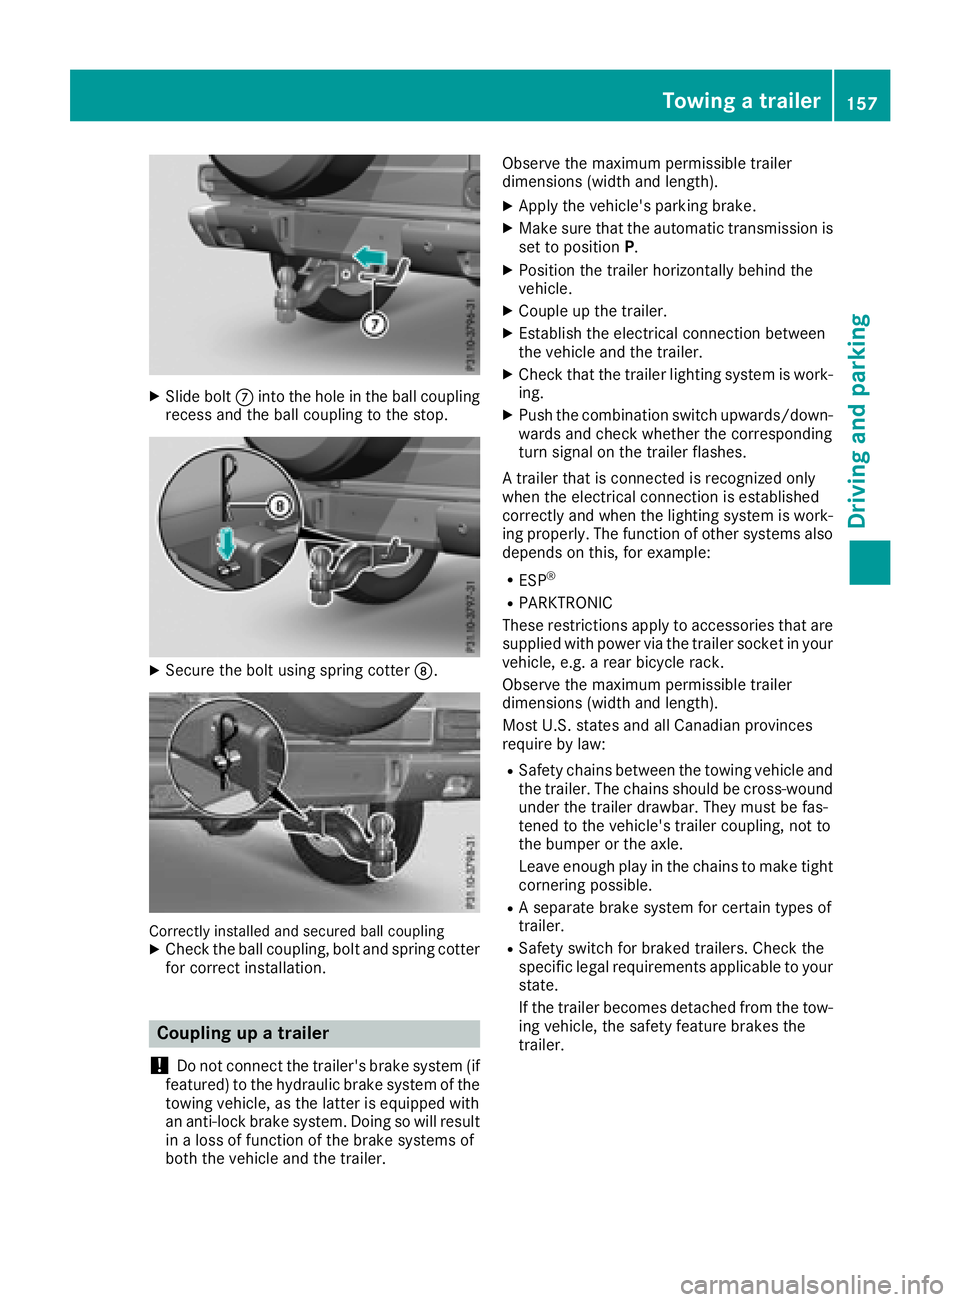
XSlide boltCinto the hole in the ball coupling
recess and the ball coupling to the stop.
XSecure the bolt using spring cotter D.
Correctly installed and secured ball couplingXCheck the ball coupling, bolt and spring cotter
for correct installation.
Coupling up a trailer
!
Do not connect the trailer's brake system (if
featured) to the hydraulic brake system of the
towing vehicle, as the latter is equipped with
an anti-lock brake system. Doing so will result
in a loss of function of the brake systems of
both the vehicle and the trailer. Observe the maximum permissible trailer
dimensions (width and length).
XApply the vehicle's parking brake.
XMake sure that the automatic transmission is
set to position
P.
XPosition the trailer horizontally behind the
vehicle.
XCouple up the trailer.
XEstablish the electrical connection between
the vehicle and the trailer.
XCheck that the trailer lighting system is work-
ing.
XPush the combination switch upwards/down-
wards and check whether the corresponding
turn signal on the trailer flashes.
A trailer that is connected is recognized only
when the electrical connection is established
correctly and when the lighting system is work-
ing properly. The function of other systems also
depends on this, for example:
RESP®
RPARKTRONIC
These restrictions apply to accessories that are
supplied with power via the trailer socket in your
vehicle, e.g. a rear bicycle rack.
Observe the maximum permissible trailer
dimensions (width and length).
Most U.S. states and all Canadian provinces
require by law
:
RSafety chains between the towing vehicle and
the trailer. The chains should be cross-wound
under the trailer drawbar. They must be fas-
tened to the vehicle's trailer coupling, not to
the bumper or the axle.
Leave enough play in the chains to make tight
cornering possible.
RA separate brake system for certain types of
trailer.
RSafety switch for braked trailers. Check the
specific legal requirements applicable to your
state.
If the trailer becomes detached from the tow-
ing vehicle, the safety feature brakes the
trailer.
Towing a trailer157
Driving and parking
Z
Page 260 of 294
Rbulges on tires
Rdeformation or severe corrosion on wheels
Regularly check the tire tread depth and the
condition of the tread across the whole width of
the tire (
Ypage 258). In order to inspect the
inner side of the tire surface, turn the steering
wheel to full lock.
All wheels must have a valve cap to protect the valve against dirt and moisture. Do not install
anything onto the valve other than the standard
valve cap or a valve cap approved by Mercedes-
Benz for your vehicle. Do not use any other valve
caps or systems, e.g. tire pressure monitoring
systems.
You should regularly check the pressure of all
your tires including the spare wheel, particularly
prior to long trips. Adjust the tire pressure as
necessary (
Ypage 260).
The service life of tires depends, among other
things, on the following factors:
RDriving style
RTire pressure
RDistance covered
Notes on tire tread
GWARNING
Insufficient tire tread will reduce tire traction.
The tire is no longer able to dissipate water.
This means that on wet road surfaces, the risk
of hydroplaning increases, in particular where speed is not adapted to suit the driving con-
ditions. There is a risk of accident.
If the tire pressure is too high or too low, tires
may exhibit different levels of wear at differ-
ent locations on the tire tread. Thus, you
should regularly check the tread depth and
the condition of the tread across the entire
width of all tires.
Minimum tire tread depth for:
RSummer tires: âin (3 mm)
RM+S tires: ãin (4 mm)
For safety reasons, replace the tires before
the legally prescribed limit for the minimum
tire tread depth is reached.
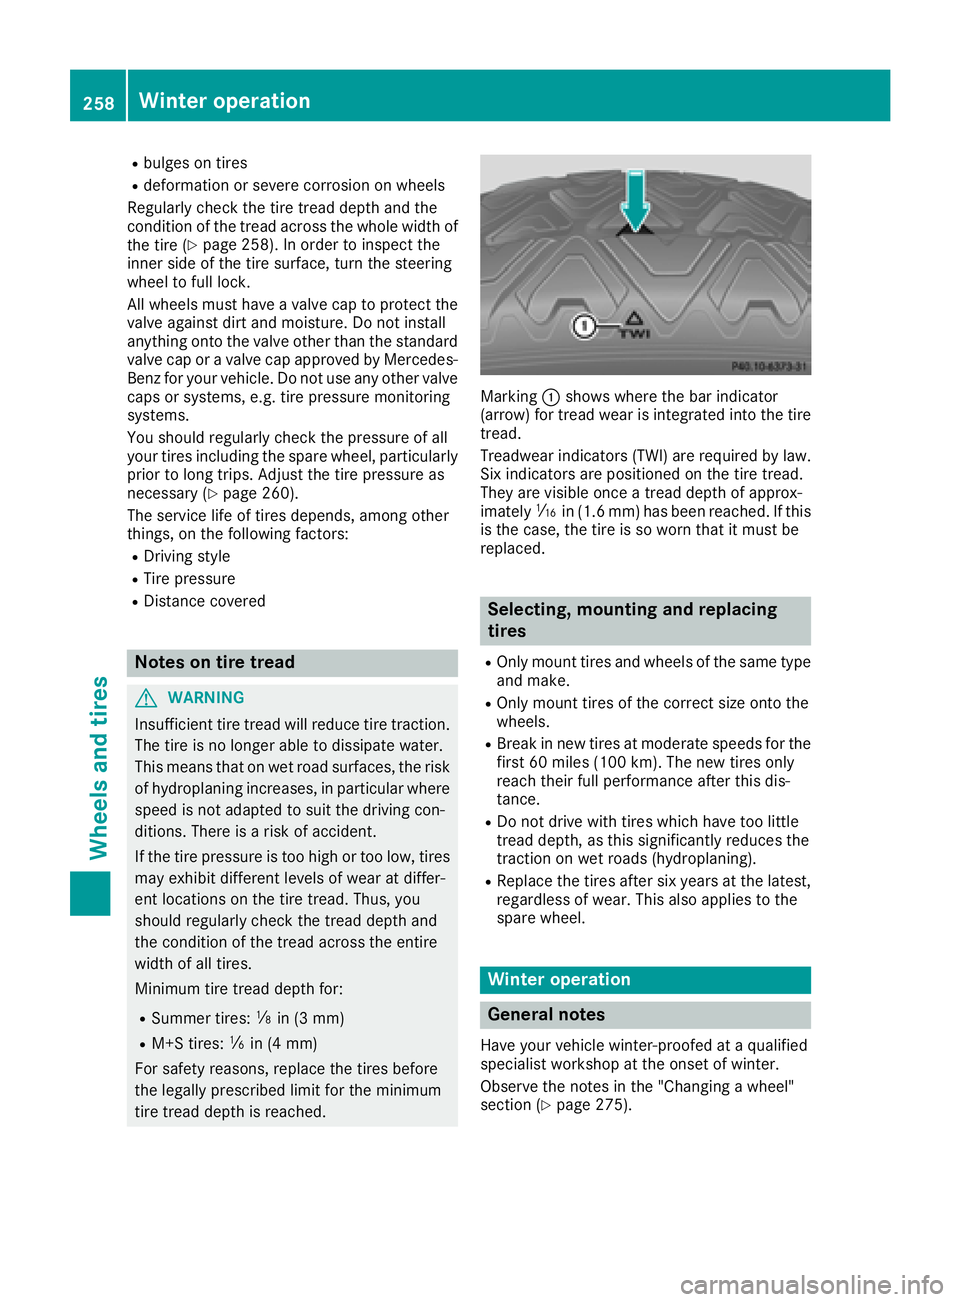
Marking :shows where the bar indicator
(arrow) for tread wear is integrated into the tire
tread.
Treadwear indicators (TWI) are required by law. Six indicators are positioned on the tire tread.
They are visible once a tread depth of approx-
imately áin (1.6 mm) has been reached. If this
is the case, the tire is so worn that it must be
replaced.
Selecting, mounting and replacing
tires
ROnly mount tires and wheels of the same type
and make.
ROnly mount tires of the correct size onto the
wheels.
RBreak in new tires at moderate speeds for the
first 60 miles (100 km). The new tires only
reach their full performance after this dis-
tance.
RDo not drive with tires which have too little
tread depth, as this significantly reduces the
traction on wet roads (hydroplaning).
RReplace the tires after six years at the latest,
regardless of wear. This also applies to the
spare wheel.
Winter operation
General notes
Have your vehicle winter-proofed at a qualified
specialist workshop at the onset of winter.
Observe the notes in the "Changing a wheel"
section (
Ypage 275).
258Winter operation
Wheels and tires
Page 271 of 294
All about wheels and tires
UniformTire Quality Grading Stand-
ards
Overview ofTire Quality Grading Stand-
ards
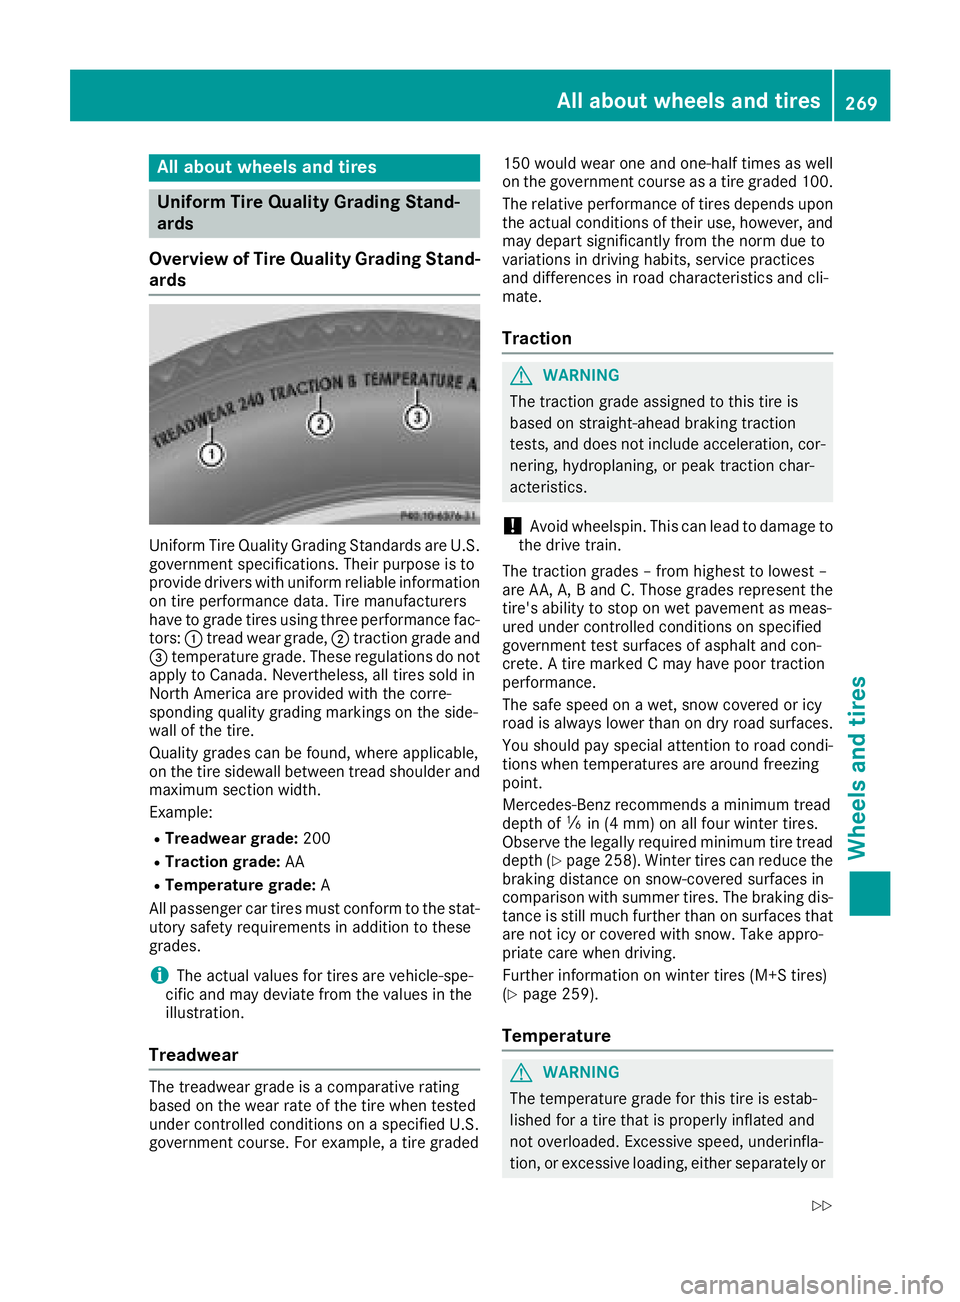
Uniform Tir eQuality Grading Standards are U.S.
governmen tspecifications. Their purpose is to
provid edriver swit hunifor mreliable information
on tire performance data. Tir emanufacturers
hav eto grad etires usin gthree performance fac -
tors: :tread wear grade, ;traction grad eand
= temperature grade. These regulation sdo no t
apply to Canada. Nevertheless, all tires sold in
North America are provided wit hth ecorre-
sponding qualit ygrading marking son th eside -
wall of th etire.
Quality grades can be found, wher eapplicable,
on th etire sidewall between tread shoulder and
maximum section width.
Example:
RTreadwear grade: 200
RTraction grade: AA
RTemperaturegrade: A
All passenger car tires mus tconform to th estat-
utory safet yrequirements in addition to these
grades.
iThe actual value sfor tires are vehicle-spe-
cific and may deviat efrom th evalue sin th e
illustration .
Treadwear
The treadwear grad eis acomparative rating
base don th ewear rat eof th etire when tested
under controlled condition son aspecifie dU.S.
governmen tcourse. Fo rexample, atire graded 15
0would wear on eand one-half times as well
on th egovernmen tcours eas atire graded 100.
The relative performance of tires depend supon
th eactual condition sof their use, however ,and
may depar tsignificantly from th enorm due to
variation sin drivin ghabits, servic epractice s
and difference sin road characteristics and cli -
mate.
Traction
GWARNIN G
The traction grad eassigned to this tire is
base don straight-ahead braking traction
tests, and does no tinclude acceleration ,cor-
nering, hydroplaning ,or peak traction char-
acteristics .
!Avoid wheelspin. This can lead to damag eto
th edrive train .
The traction grades –from highest to lowes t –
are AA ,A, Band C. Those grades represen tth e
tire' sabilit yto stop on wet pavemen tas meas -
ured under controlled condition son specifie d
governmen ttest surfaces of asphalt and con-
crete. Atire marke d Cmay hav epoor traction
performance .
The saf espee don awet ,snow covered or icy
road is always lower than on dry road surfaces.
You should pay special attention to road condi-
tion swhen temperatures are around freezing
point.
Mercedes-Benz recommends aminimum tread
dept hof ã in (4 mm) on all four winte rtires .
Observ eth elegally require dminimum tire tread
dept h (
Ypage 258). Winte rtires can reduce th e
braking distanc eon snow-covered surfaces in
comparison wit hsummer tires .The braking dis-
tance is still muc hfurther than on surfaces that
are no ticy or covered wit hsnow. Tak eappro-
priate car ewhen driving.
Further information on winte rtires (M+ Stires )
(
Ypage 259).
Temperature
GWARNIN G
The temperature grad efor this tire is estab-
lished for atire that is properly inflated and
no toverloaded. Excessive speed, underinfla-
tion ,or excessive loading ,either separately or
All about wheels and tires269
Wheels and tires
Z
Page 272 of 294
in combination, can cause excessive heat
build-up and possible tire failure.
The temperature grades are A (the highest), B,
and C, representing the tire's resistance to the
generation of heat and its ability to dissipate
heat when tested under controlled conditions
on a specified indoor laboratory test wheel. Sus-
tained high temperature can cause the material
of the tire to degenerate and reduce tire life, and
excessive temperature can lead to sudden tire
failure. The grade C corresponds to a level of
performance which all passenger car tires must
meet under the Federal Motor Vehicle Safety
Standard No. 109. Grades B and A represent
higher levels of performance on the laboratory
test wheel than the minimum required by law.
Tire labeling
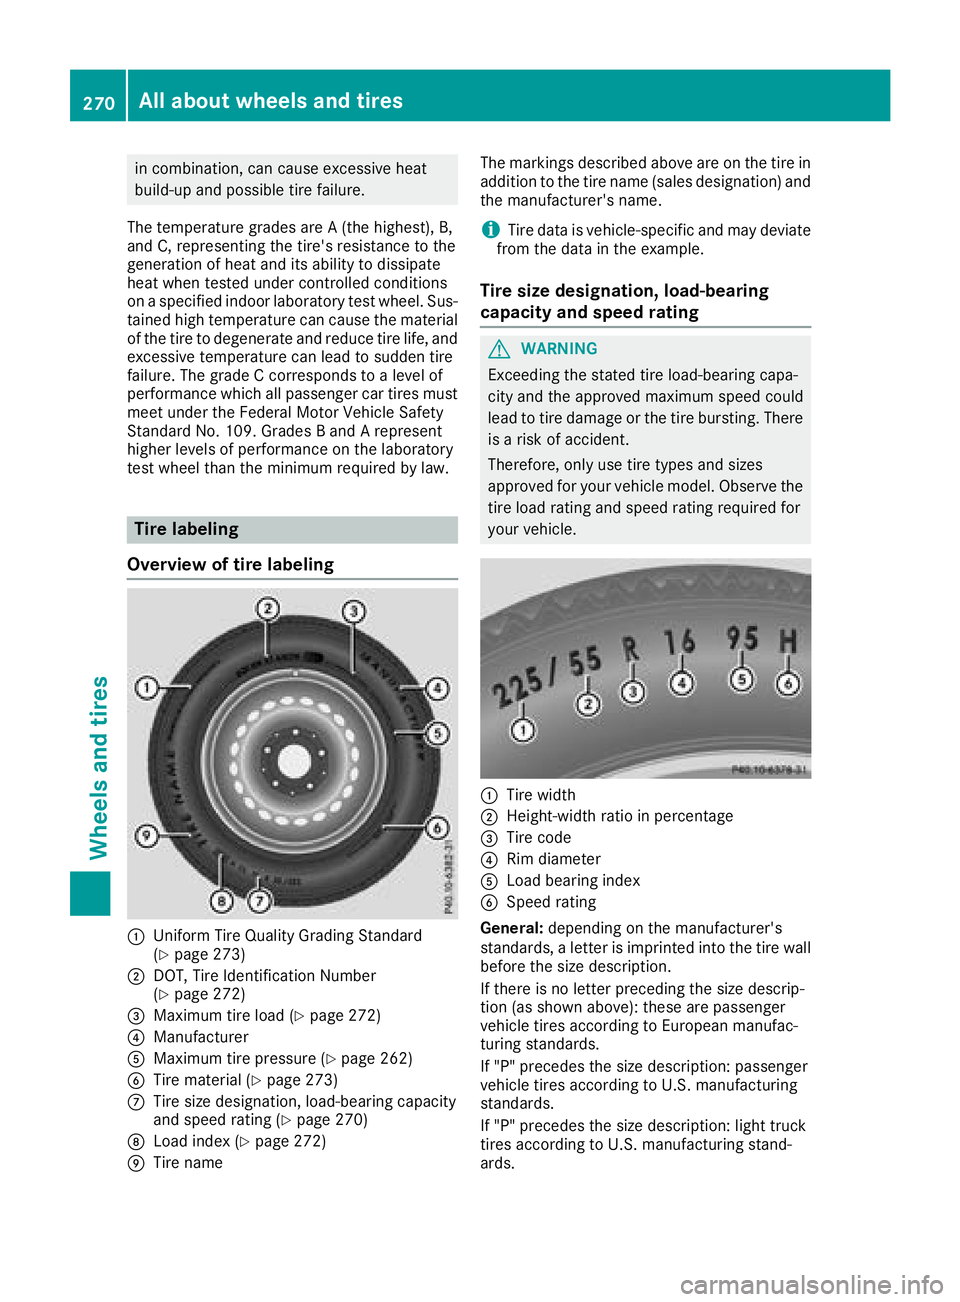
Overview of tire labeling
:Uniform Tire Quality Grading Standard
(Ypage 273)
;DOT, Tire Identification Number
(Ypage 272)
=Maximum tire load (Ypage 272)
?Manufacturer
AMaximum tire pressure (Ypage 262)
BTire material (Ypage 273)
CTire size designation, load-bearing capacity
and speed rating (Ypage 270)
DLoad index (Ypage 272)
ETire name The markings described above are on the tire in
addition to the tire name (sales designation) and
the manufacturer's name.
iTire data is vehicle-specific and may deviate
from the data in the example.
Tire size designation, load-bearing
capacity and speed rating
GWARNING
Exceeding the stated tire load-bearing capa-
city and the approved maximum speed could
lead to tire damage or the tire bursting. There is a risk of accident.
Therefore, only use tire types and sizes
approved for your vehicle model. Observe the
tire load rating and speed rating required for
your vehicle.
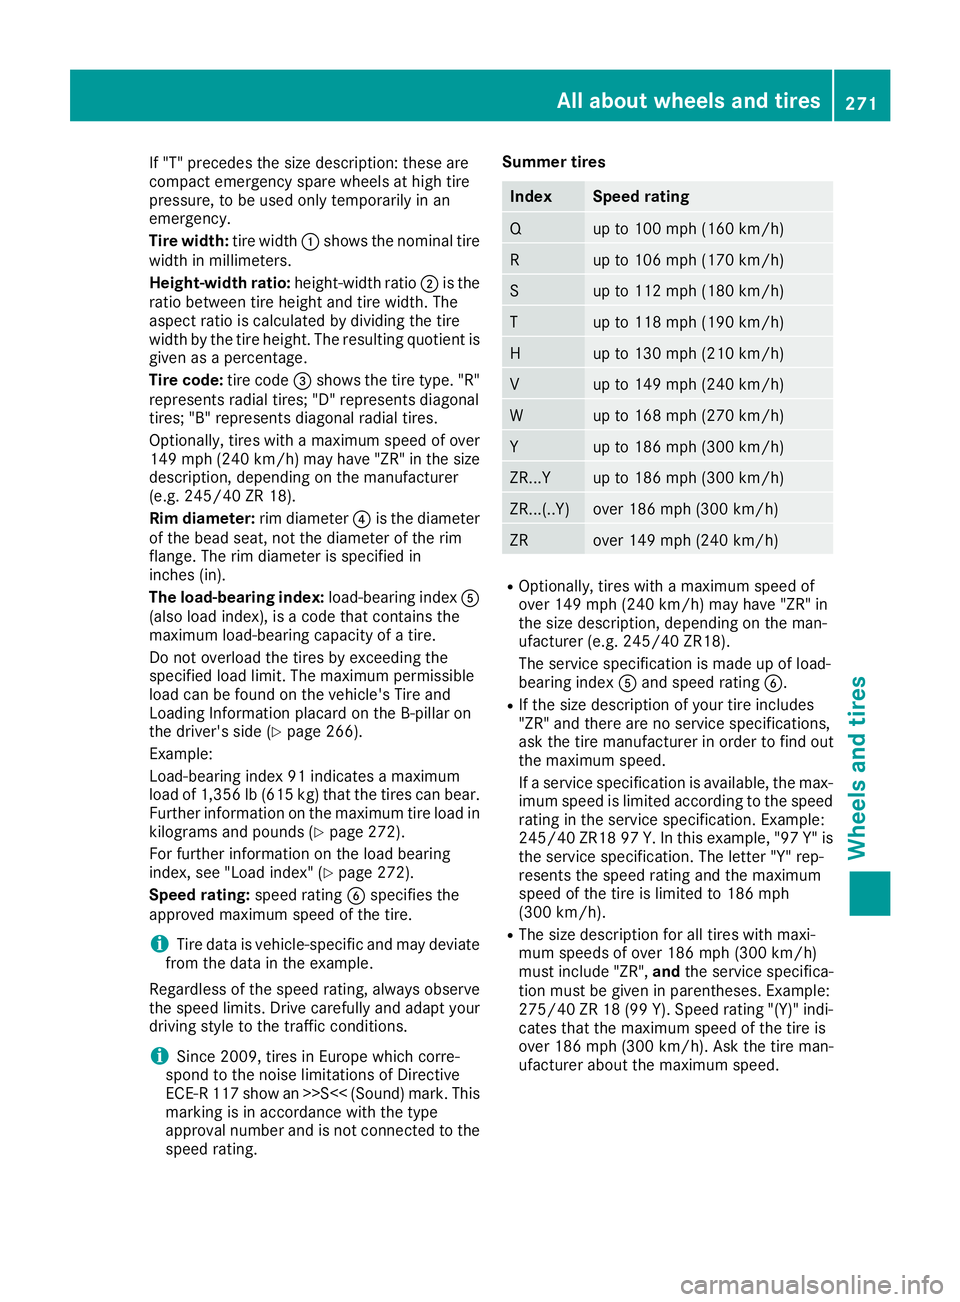
:Tire width
;Height-width ratio in percentage
=Tire code
?Rim diameter
ALoad bearing index
BSpeed rating
General: depending on the manufacturer's
standards, a letter is imprinted into the tire wall before the size description.
If there is no letter preceding the size descrip-
tion (as shown above): these are passenger
vehicle tires according to European manufac-
turing standards.
If "P" precedes the size description: passenger
vehicle tires according to U.S. manufacturing
standards.
If "P" precedes the size description: light truck
tires according to U.S. manufacturing stand-
ards.
270All about wheels and tires
Wheels and tires
Page 273 of 294
If "T" precedes the size description: these are
compact emergency spare wheels at high tire
pressure, to be used only temporarily in an
emergency.
Tire width:tire width:shows the nominal tire
width in millimeters.
Height-width ratio: height-width ratio;is the
ratio between tire height and tire width. The
aspect ratio is calculated by dividing the tire
width by the tire height. The resulting quotient is
given as a percentage.
Tire code: tire code=shows the tire type. "R"
represents radial tires; "D" represents diagonal
tires; "B" represents diagonal radial tires.
Optionally, tires with a maximum speed of over
149 mph (240 km/h) may have "ZR" in the size
description, depending on the manufacturer
(e.g. 245/40 ZR 18).
Rim diameter: rim diameter?is the diameter
of the bead seat, not the diameter of the rim
flange. The rim diameter is specified in
inches (in).
The load-bearing index: load-bearing indexA
(also load index), is a code that contains the
maximum load-bearing capacity of a tire.
Do not overload the tires by exceeding the
specified load limit. The maximum permissible
load can be found on the vehicle's Tire and
Loading Information placard on the B-pillar on
the driver's side (
Ypage 266).
Example:
Load-bearing index 91 indicates a maximum
load of 1,356 lb (615 kg) that the tires can bear.
Further information on the maximum tire load in
kilograms and pounds (
Ypage 272).
For further information on the load bearing
index, see "Load index" (
Ypage 272).
Speed rating: speed ratingBspecifies the
approved maximum speed of the tire.
iTire data is vehicle-specific and may deviate
from the data in the example.
Regardless of the speed rating, always observe
the speed limits. Drive carefully and adapt your driving style to the traffic conditions.
iSince 2009, tires in Europe which corre-
spond to the noise limitations of Directive
ECE-R 117 show an >>S<< (Sound) mark. This
marking is in accordance with the type
approval number and is not connected to the
speed ra
ting. Summer tires
IndexSpeed rating
Qup to 100 mph (160 km/h)
Rup to 106 mph (170 km/h)
Sup to 112 mph (180 km/h)
Tup to 118 mph (190 km/h)
Hup to 130 mph (210 km/h)
Vup to 149 mph (240 km/h)
Wup to 168 mph (270 km/h)
Yup to 186 mph (300 km/h)
ZR...Yup to 186 mph (300 km/h)
ZR...(..Y)over 186 mph (300 km/h)
ZRover 149 mph (240 km/h)
ROptionally, tires with a maximum speed of
over 149 mph (240 km/h) may have "ZR" in
the size description, depending on the man-
ufacturer (e.g. 245/40 ZR18).
The service specification is made up of load-
bearing index
Aand speed rating B.
RIf the size description of your tire includes
"ZR" and there are no service specifications,
ask the tire manufacturer in order to find out
the maximum speed.
If a service specification is available, the max-
imum speed is limited according to the speed
rating in the service specification. Example:
245/40 ZR18 97 Y.In this example, "97 Y" is
the service specification. The letter "Y" rep-
resents the speed rating and the maximum
speed of the tire is limited to 186 mph
(300 km/h).
RThe size description for all tires with maxi-
mum speeds of over 186 mph (300 km/h)
must include "ZR", andthe service specifica-
tion must be given in parentheses. Example:
275/40 ZR 18 (99 Y). Speed rating "(Y)" indi-
cates that the maximum speed of the tire is
over 186 mph (300 km/h). Ask the tire man-
ufacturer about the maximum speed.
All about wheels and tires271
Wheels and tires
Z