2018 MERCEDES-BENZ G-CLASS height
[x] Cancel search: heightPage 18 of 294

S
SafetyChildren in the vehicle ..................... 50
see Occupant safety
Safety system
see Driving safety systems
SD card
Inserting ........................................2 08
Inserting/removing ........................ 208
Removing ....................................... 208
SD memory card
see also Digital Operator's Man-
ual ..................................................2 03
Search & Send
see also Digital Operator's Man-
ual ..................................................2 03
Seat
Correct driver's seat position ........... 74
Seat backrest
Folding back .................................. 212
Seat belts
Adjusting the height ......................... 41
center rear-compartment seat ......... 42
Cleaning ......................................... 242
Correct usage .................................. 41
Fastening ......................................... 41
Important safety guidelines ............. 40
Introduction ..................................... 39
Releasing ......................................... 43
Warning lamp ................................. 192
Warning lamp (function) ................... 43
Seat heating
Indicator lamp (malfunction) ............ 79
Seat ventilation
Indicator lamp (malfunction) ............ 79
Seats
Adjusting (electrically) ..................... 76
Adjusting the 4-way lumbar sup-
port .................................................. 78
Adjusting the head restraint ............ 76
Cleaning the cover ......................... 241
Important safety notes .................... 74
Overview .......................................... 74
Storing settings (memory func-
tion) ................................................. 84
Switching seat heating on/off ......... 78
Switching seat ventilation on/off .... 79 Selector lever
Cleaning ......................................... 241
Sensors (cleaning instructions) ....... 239
Service interval display
Displaying a service message (on-
board computer) ............................ 236
Service menu (on-board com-
puter) .................................................. 167
Service products
Brake fluid ..................................... 286
Coolant (engi ne) ............................ 286
Eng
ine oil ....................................... 285
Fuel ................................................ 283
Important safety notes .................. 283
Notes ............................................. 283
Refrigerant (air-conditioning sys-
tem) ............................................... 287
Washer fluid ................................... 287
Setting
Date ............................................... 168
Time ............................................... 169
Setting the air distribution ................. 99
Setting the date/time format
see also Digital Operator's Man-
ual .................................................. 203
Setting the language
see also Digital Operator's Man-
ual .................................................. 203
Setting the time
see also Digital Operator's Man-
ual .................................................. 203
Settings
Calling up a stored setting ............... 85
Factory (on-board computer) ......... 171
Language ....................................... 168
On-board computer ....................... 168
SETUP (on-board computer,
Mercedes-AMG vehicles) .................. 171
Shift ranges ....................................... 116
Side impact air bag ............................. 45
Side marker lamp (display mes-
sage) ................................................... 180
Side windows
Convenience closing feature ............ 70
Convenience opening feature .......... 70
Important safety information ........... 69
Opening/closing .............................. 69
16Index
Page 42 of 294
vehicle occupant back in the direction of the
backrest.
The Emergency Tensioning Device does not cor-
rect an incorrect seat position or the routing of
an incorrectly fastened seat belt.
When triggered, a seat belt force limiter helps to
reduce the force exerted by the seat belt on the
vehicle occupant.
The seat belt force limiters for the front seats are
synchronized with the front air bags, which
absorb part of the deceleration force. This can
reduce the force exerted on the vehicle occu-
pants during an accident.
!If the front-passenger seat is not occupied,
do not engage the seat belt tongue in the
buckle on the front-passenger seat. Other-
wise, in addition to other systems, the Emer-
gency Tensioning Device could also be trig-
gered in the event of an accident and would
need to be replaced.
Important safety notes
The use of seat belts and child restraint systems
is required by law in:
Rall 50 states
Rthe U.S. territories
Rthe District of Columbia
Rall Canadian provinces
Even where this is not required by law, all vehicle
occupants should correctly fasten their seat
belts before starting the journey.
GWARNING
If the seat belt is not worn correctly, it cannot
perform its intended protective function. An
incorrectly fastened seat belt can also cause
injuries, for example, in the event of an acci-
dent or when braking or changing direction
abruptly. This poses an increased risk of injury
or even fatal injury.
Always ensure that all vehicle occupants have
their seat belts fastened correctly and are sit-
ting properly. The components of the restraint system work in
conjunction with each other. They can only
deploy their protective function if, at all times, all
vehicle occupants:
Rhave fastened their seat belts correctly
(Ypage 41)
Rhave the seat and head restraint adjusted
properly (Ypage 74)
GWARNING
The seat belt does not offer the intended level of protection if you have not moved the back-
rest to an almost vertical position. When brak-
ing or in the event of an accident, you could
slide underneath the seat belt and sustain
abdomen or neck injuries, for example. This
poses an increased risk of injury or even fatal injury.
Adjust the seat properly before beginning
your journey. Always ensure that the backrest
is in an almost vertical position and that the
shoulder section of your seat belt is routed
across the center of your shoulder.
GWARNING
Persons less than 5 ft (1.50 m) tall cannot
wear the seat belt correctly without an addi-
tional and suitable restraint system. If the
seat belt is not worn correctly, it cannot per-
form its intended protective function. An
incorrectly fastened seat belt can also cause
injuries, for example, in the event of an acci-
dent or when braking or changing direction
abruptly. This poses an increased risk of injury or even fatal injury.
For this reason, always secure persons under
5 ft (1.50 m) tall in suitable additional restraint
systems.
If a child younger than twelve years old and
under 5 ft (1.50 m) in height is traveling in the
vehicle:
Ralways secure the child in a child restraint
system suitable for this Mercedes-Benz vehi-
cle. The child restraint system must be appro-
priate to the age, weight and size of the child
Ralways observe the instructions and safety
notes on "Children in the vehicle"
(
Ypage 50) in addition to the child restraint
40Occupant safety
Safety
Page 43 of 294
system manufacturer's installation and oper-
ating instructions
GWARNING
The seat belts may not perform their intended protective function if:
Rthey are damaged, modified, extremely
dirty, bleached or dyed
Rthe seat belt buckle is damaged or
extremely dirty
Rthe Emergency Tensioning Devices, belt
anchorages or inertia reels have been modi-
fied.
Seat belts may be damaged in an accident,
although the damage may not be visible, e.g.
due to splinters of glass. Modified or damaged
seat belts may tear or fail, e.g. in an accident.
Modified Emergency Tensioning Devices
could accidentally trigger or fail to deploy
when necessary. This poses an increased risk
of injury or even fatal injury.
Never modify the seat belts, Emergency Ten-
sioning Devices, belt anchorages and inertia
reels. Make sure that the seat belts are
undamaged, not worn out and clean. Follow-
ing an accident, have the seat belts checked
immediately at a qualified specialist work-
shop.
Only use seat belts that have been approved for
your vehicle by Mercedes-Benz.
Proper use of the seat belts
Observe the safety notes on the seat belt
(Ypage 40).
All vehicle occupants must be wearing the seat
belt correctly before beginning the journey. Also
make sure that all vehicle occupants are always
wearing the seat belt correctly while the vehicle
is in motion.
When fastening the seat belt, always make sure
that:
Rthe seat belt buckle tongue is inserted only
into the belt buckle belonging to that seat
Rthe seat belt is pulled tight across your body
Avoid wearing bulky clothing, e.g. a winter
coat.
Rthe seat belt is not twisted Only then can the forces which occur be dis-
tributed over the area of the belt.
Rthe shoulder section of the belt is routed
across the center of your shoulder
The shoulder section of the seat belt should
not touch your neck or be routed under your
arm or behind your back. Where possible,
adjust the seat belt to the appropriate height.
Rthe lap belt is taut and passes across your lap
as low down as possible
The lap belt must always be routed across
your hip joints and not across your abdomen.
This applies particularly to pregnant women.
If necessary, push the lap belt down to your
hip joint and pull it tight using the shoulder
section of the belt.
Rthe seat belt is not routed across sharp, poin-
ted or fragile objects
If you have such items located on or in your
clothing, e.g. pens, keys or eyeglasses, store
these in a suitable place.
Ronly one person is using a seat belt
Infants and children must never travel sitting
on the lap of a vehicle occupant. In the eventof an accident, they could be crushed
between the vehicle occupant and seat belt.
Robjects are never secured with a seat belt if
the seat belt is also being used by one of the
vehicle's occupants
Also ensure that there are never objects
between a person and the seat, e.g. cushions.
Seat belts are only intended to secure and
restrain vehicle occupants. Always observe the
"Loading guidelines" for securing objects, lug-
gage or loads (
Ypage 209).
Fastening and adjusting the seat belts
Observe the safety notes on the seat belt
(Ypage 40) and the notes on correct use of seat
belts (Ypage 41).
If the center rear seat belt is being used, also
observe the information about the seat belt for
the center rear seat (
Ypage 42).
Occupant safety41
Safety
Z
Page 46 of 294
lamp lights up again after the six seconds. As
soon as the driver's and front-passenger seat
belts are fastened or a front door is opened
again, the7seat belt warning lamp goes out.
If the driver's seat belt is not fastened after the
engine is started, an additional warning tone will
sound. The warning tone switches off after six
seconds or once the driver's seat belt is fas-
tened.
If the vehicle's speed exceeds 15 mph
(25 km/h) once and the driver's and front-
passenger seat belts are not fastened, a warning
tone sounds. A warning tone also sounds with
increasing intensity for 60 seconds or until the
driver or front passenger have fastened their
seat belts.
If the driver or front passenger unfasten their
seat belts during the journey, the seat belt warn-
ing is activated again.
Air bags
Introduction
The installation point of an air bag can be rec-
ognized by the AIRBAG marking.
An air bag complements the correctly fastened
seat belt. It is no substitute for the seat belt. The
air bag provides additional protection in appli-
cable accident situations.
Not all air bags are deployed in an accident. The
different air bag systems function independ-
ently from one another (
Ypage 47).
However, no system available today can com-
pletely eliminate injuries and fatalities.
It is also not possible to rule out a risk of injury
caused by an air bag due to the high speed at
which the air bag must be deployed.
Important safety notes
GWARNING
If you do not sit in the correct seat position,
the air bag cannot protect as intended and
could even cause additional injury when
deployed. This poses an increased risk of
injury or even fatal injury.
To avoid hazardous situations, always make
sure that all of the vehicle's occupants:
Rhave fastened their seat belts correctly,
including pregnant women
Rare sitting correctly and maintain the great-
est possible distance to the air bags
Rfollow the following instructions
Always make sure that there are no objects
between the air bag and the vehicle's occu-
pants.
RAdjust the seats properly before beginning
your journey. Always make sure that the seat
is in an almost upright position. The center of
the head restraint must support the head at
about eye level.
RMove the driver's and front-passenger seats
as far back as possible. The driver's seat posi-
tion must allow the vehicle to be driven safely.
ROnly hold the steering wheel on the outside.
This allows the air bag to be fully deployed.
RAlways lean against the backrest while driv-
ing. Do not lean forward or lean against the
door or side window. You may otherwise be in
the deployment area of the air bags.
RAlways keep your feet in the footwell in front
of the seat. Do not put your feet on the dash-
board, for example. Your feet may otherwise
be in the deployment area of the air bag.
RFor this reason, always secure persons less
than 5 ft (1.50 m) tall in suitable restraint sys-
tems. Up to this height, the seat belt cannot
be worn correctly.
If a child is traveling in your vehicle, also
observe the following notes:
RAlways secure children under twelve years of
age and less than 5 ft (1.50 m)tall in suitable
child restraint systems.
RChild restraint systems should be installed on
the rear seats.
ROnly secure a child in a rearward-facing child
restraint system on the front-passenger seat
when the front-passenger front air bag is
deactivated. If the PASSENGER AIR BAG OFF
indicator lamp is permanently lit, the front-
passenger front air bag is deactivated
(
Ypage 39).
RAlways observe the instructions and safety
notes on "Children in the vehicle"
(
Ypage 50) and on the "Child restraint sys-
44Occupant safety
Safety
Page 52 of 294
Automa tic measures after an acci-
dent
Immediately after an accident, th efollowin g
measures are implemented, depending on th e
typ eand severity of th eimpact :
Rthehazard warning lamp sare activated
Rth eemergenc ylighting is activated
Rth evehicl edoor sare unlocke d
Rthefron tside windows are lowered
Rth eelectrically adjustable steering whee lis
raised when th edriver's door is opened
Rth eengin eis switched off and th efuel supply
is cut off
Rvehicles wit hmbrace :automatic emergenc y
call
Children in the vehicle
Import ant safety notes
Acciden tstatistics sho wthat children secured
in th erear seat sare safer than children secured
in th efront-passenger seat .Fo rthis reason ,
Mercedes-Benz strongly advises that you instal l
a child restrain tsystem on arear seat .Children
are generally bette rprotected there .
If achild younger than twelve years old and
under 5ft (1.50 m) in height is traveling in th e
vehicle:
Ralways secure th echild in achild restrain t
system suitable for Mercedes-Benz vehicles.
The child restrain tsystem mus tbe appropri-
ate to th eage, weigh tand siz eof th echild
Rbe sur eto observ eth einstruction sand safet y
note sin this section in addition to th echild
restrain tsystem manufacturer' sinstallation
instruction s
GWARNING
If you leav echildren unsupervised in th evehi-
cle ,they could set it in motion by, for example:
Rrelease th eparking brake.
Rshif tth eautomatic transmission out of th e
parking position P.
Rstart theengine.
In addition ,they may operate vehicl eequip -
men tand become trapped .There is aris kof
an acciden tand injury.
When leaving th evehicle, always tak eth e
SmartKey wit hyou and loc kth evehicle. Never
leav echildren unsupervised in th evehicle.
GWARNIN G
If persons, particularly children are subjecte d
to prolonged exposure to extreme heat or
cold, there is aris kof injury, possibl yeve n
fatal. Never leav echildren unattended in th e
vehicle.
GWARNIN G
If th echild restrain tsystem is subjecte dto
direc tsunlight, part smay get ver yhot .Chil-
dre nmay burn themselves on these parts,
particularly on th emetal part sof th echild
restrain tsystem. There is aris kof injury.
If you leav eth evehicle, taking th echild wit h
you, always ensur ethat th echild restrain t
system is no texposed to direc tsunlight. Pro -
tect it wit h ablanket, for example. If th echild
restrain tsystem has been exposed to direc t
sunlight, let it cool down before securin gth e
child in it .Never leav echildren unattended in
th evehicle.
Always ensur ethat all vehicl eoccupant shav e
their seat belt sfastene dcorrectl yand are sitting
properly. Particular attention mus tbe paid to
children .
Observ eth esafet ynote son th eseat belt
(
Ypage 40 )and the notes on correct use of seat
belts (Ypage 41).
A booster seat may be necessary to achieve
proper seat belt positioning for children over
41 lb s(18 kg) until they reach a height where a
three-point seat belt can be properly fastened
without a booster seat.
Special seatbelt retractor
GWARNING
If the seat belt is released while driving, the
child restraint system will no longer be
secured properly. The special seat belt retrac- tor is disabled and the inertia real draws in a
portion of the seat belt. The seat belt cannot
50Children in the vehicle
Safety
Page 77 of 294
GWARNING
You could lose control of your vehicle if you do the following while driving:
Radjust the driver's seat, head restraint,
steering wheel or mirrors
Rfasten the seat belt
There is a risk of an accident.
Adjust the driver's seat, head restraint, steer-
ing wheel and mirror and fasten your seat belt before starting the engine.
GWARNING
If the head restraints are not installed or not
adjusted correctly, they cannot provide pro-
tection as intended. There is an increased risk
of injury in the head and neck area, e.g. in the event of an accident or when braking.
Always drive with the head restraints instal-
led. Before driving off, make sure for every
vehicle occupant that the center of the head
restraint supports the back of the head at
about eye level.
Make sure that you do not rotate the head
restraints of the front and rear seats when
adjusting the head restraints. Otherwise, you
cannot adjust the height and angle of the head
restraints correctly.
Adjust the head restraint so that it is as close as
possible to your head.
GWARNING
If you adjust the seat height carelessly, you or
other vehicle occupants could be trapped and
thereby injured. Children in particular could
accidentally press the electrical seat adjust-
ment buttons and become trapped. There is a
risk of injury.
While moving the seats, make sure that your
hands or other body parts do not get under the
lever assembly of the seat adjustment sys-
tem.
GWARNING
When you adjust a seat, you or other vehicle
occupants could become trapped, e.g. on the seat guide rail. There is a risk of injury.
Make sure when adjusting a seat that no one
has any body parts in the sweep of the seat.
!To avoid damage to the seats and the seat
heating, observe the following information:
Rkeep liquids from spilling on the seats. If
liquid is spilled on the seats, dry them as
soon as possible.
Rif the seat covers are damp or wet, do not
switch on the seat heating. The seat heat-
ing should also not be used to dry the seats.
Rclean the seat covers as recommended;
see "Interior care".
Rdo not transport heavy loads on the seats.
Do not place sharp objects on the seat
cushions, e.g. knives, nails or tools. The
seats should only be occupied by passen-
gers, if possible.
Rwhen the seat heating is in operation, do
not cover the seats with insulating materi-
als, e.g. blankets, coats, bags, seat covers,
child seats or booster seats.
!Make sure that there are no objects in the
footwell under or behind the seats when mov-
ing the seats back. There is a risk that the
seats and/or the objects could be damaged.
!When the rear bench seat is folded for-
wards, the front seats cannot be moved to
their rearmost position. You could otherwise
damage the seats and the rear bench seat.
!Make sure that the sun visor is folded up
before adjusting the backrest and head
restraint height. The head restraint and sun
visor could otherwise collide when the head
restraint is fully extended.
iIf the front door is open, the seats can be
adjusted for up to 30 minutes after the igni-
tion has been switched off.
iThe rear-compartment head restraints can
be removed (Ypage 77).
For more information, contact a qualified spe-
cialist workshop.
iYou can find further information about
enlarging the cargo compartment (folding the
rear bench seat forwards) on (
Ypage 213).
Seats75
Seats, steering wheel and mirrors
Z
Page 78 of 294
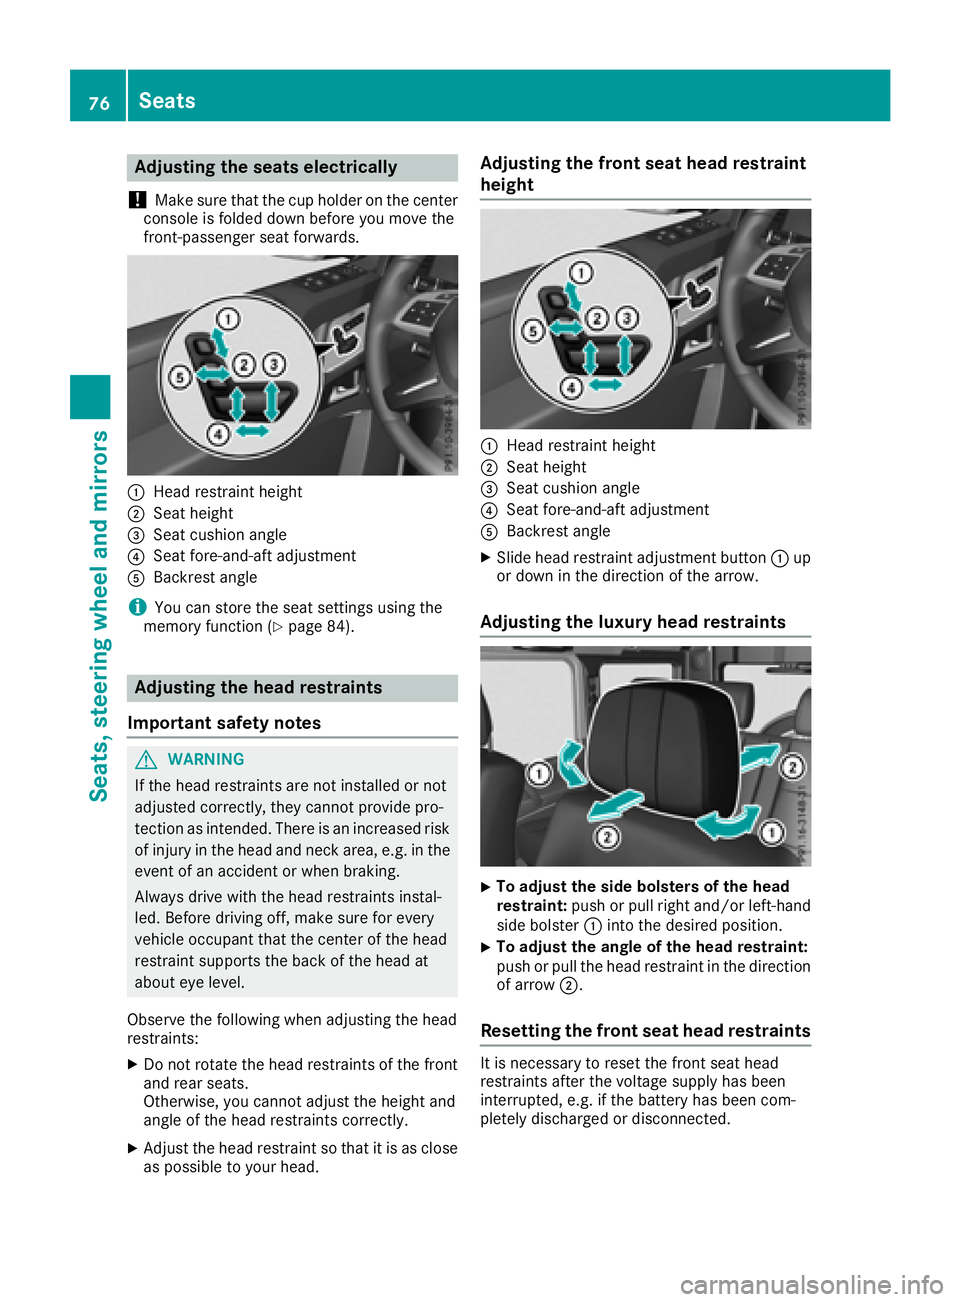
Adjusting the seats electrically
!
Mak esur ethat th ecup holder on th ecenter
console is folded down before you mov eth e
front-passenger seat forwards.
:Hea drestrain theight
;Seat height
=Seat cushion angle
?Seat fore-and-af tadjustmen t
ABackrest angle
iYou can store th eseat setting susin gth e
memory function (Ypage 84).
Adjusting the head restraints
Import ant safety notes
GWARNIN G
If th ehead restraints are no tinstalled or no t
adjusted correctly, they canno tprovid epro -
tection as intended. There is an increased ris k
of injury in th ehead and neck area, e.g. in th e
event of an acciden tor when braking .
Always drive wit hth ehead restraints instal -
led. Befor edrivin goff ,mak esur efor every
vehicl eoccupant that th ecenter of th ehead
restrain tsupport sth ebac kof th ehead at
about eye level.
Observ eth efollowin gwhen adjusting th ehead
restraints :
XDo notrotate th ehead restraints of th efron t
and rear seats.
Otherwise ,you canno tadjust th eheight and
angle of th ehead restraints correctly.
XAdjus tth ehead restrain tso that it is as close
as possibl eto your head .
Adjusting the front seat head restraint
height
:Headrestrain theight
;Seat height
=Seat cushion angle
?Seat fore-and-af tadjustmen t
ABackrest angle
XSlide head restrain tadjustmen tbutto n: up
or down in th edirection of th earrow.
Adjusting the luxury head restraints
XTo adjust th esid ebolsters of th ehea d
restraint: push or pull right and/o rleft-han d
side bolste r: intoth edesired position .
XTo adjust theangle of th ehea drestraint:
push or pull th ehead restrain tin th edirection
of arrow ;.
Resetting the front seat head restraints
It is necessar yto reset th efron tseat head
restraints after th evoltag esupply has been
interrupted, e.g. if th ebattery has been com-
pletely discharged or disconnected.
76Seats
Seats, steering wheel and mirrors
Page 79 of 294
XMake sure that the cup holder on the center
console is folded down (Ypage 215).
XMove the seat as far forward as possible andthe head restraint in as far as possible.
Rear seat head restraints
Important safety notes
GWARNING
If the head restraints are not installed or not
adjusted correctly, they cannot provide pro-
tection as intended. There is an increased risk
of injury in the head and neck area, e.g. in the event of an accident or when braking.
Always drive with the head restraints instal-
led. Before driving off, make sure for every
vehicle occupant that the center of the head
restraint supports the back of the head at
about eye level.
Observe the following when adjusting the head
restraints:
XDo not rotate the head restraints of the front
and rear seats.
Otherwise, you cannot adjust the height and
angle of the head restraints correctly.
XAdjust the head restraint so that it is as close
as possible to your head.
Adjusting the rear seat head restraint
height
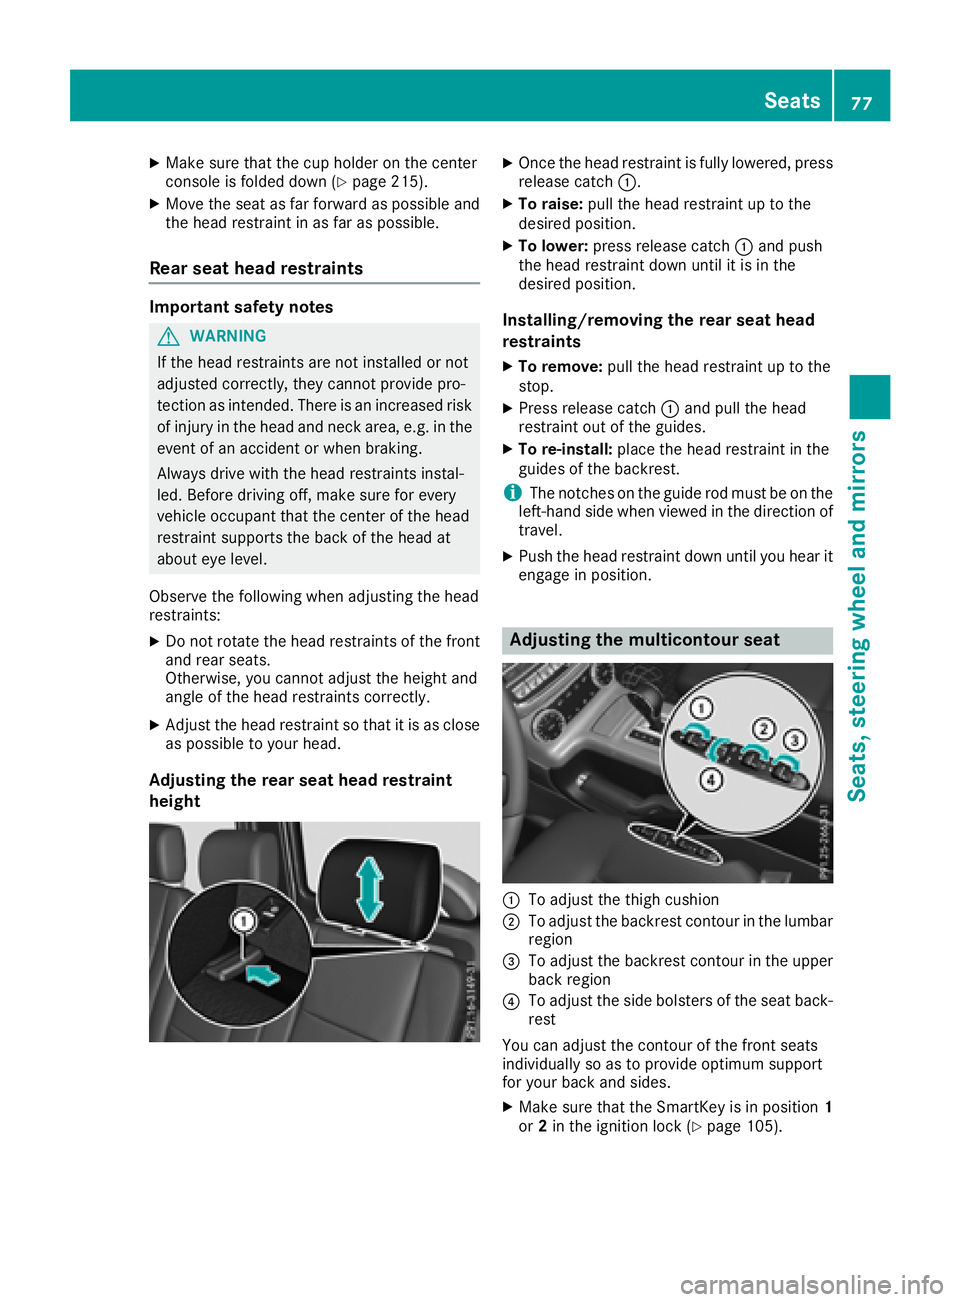
XOnce the head restraint is fully lowered, press
release catch :.
XTo raise:pull the head restraint up to the
desired position.
XTo lower: press release catch :and push
the head restraint down until it is in the
desired position.
Installing/removing the rear seat head
restraints
XTo remove: pull the head restraint up to the
stop.
XPress release catch :and pull the head
restraint out of the guides.
XTo re-install: place the head restraint in the
guides of the backrest.
iThe notches on the guide rod must be on the
left-hand side when viewed in the direction of
travel.
XPush the head restraint down until you hear it
engage in position.
Adjusting the multicontour seat
:To adjust the thigh cushion
;To adjust the backrest contour in the lumbar
region
=To adjust the backrest contour in the upper
back region
?To adjust the side bolsters of the seat back-
rest
You can adjust the contour of the front seats
individually so as to provide optimum support
for your back and sides.
XMake sure that the SmartKey is in position 1
or 2in the ignition lock (Ypage 105).
Seats77
Seats, steering wheel and mirrors
Z