2018 MERCEDES-BENZ G-CLASS sensor
[x] Cancel search: sensorPage 188 of 294

Display messagesPossible causes/consequences andMSolutions
DISTRONIC PLUS
Currently Unavaila‐ble See Operator' sManual
DISTRONICis deactivated and temporarily inoperative. Possibl ecau-
ses are:
RThe DISTRONI CPLU Scover in th eradiato rtrim is dirty
RFunction is impaire ddue to heav yrain or snow.
RThe sensor sin th ebumpers are dirty.
RThe radar sensor system is temporarily inoperative, e.g. due to
electromagneti cradiation emitted by nearby TV or radi ostation sor
other source sof electromagneti cradiation .
RThe system is outside th eoperating temperature range.
RThe transfer cas eis in th eLOW RANGE transmission position .
RThe vehicleis on an uphil lor adownhill slop eof mor ethan
22 ‑25 %
RThe on-boar dvoltag eis to olow.
A warning tone also sounds.
If th edisplay message does no tdisappear :
XPull overand stop th evehicl esafely as soo nas possible, payin g
attention to roa dand traffic conditions.
XApply th eparking brake.
XClean th eDISTRONI CPLU Scover in th eradiato rtrim and th e
bumper (Ypage 239).
XRestart th eengine.
If th esystem detects that th esensor sare full yoperational, th edisplay
message disappears.
DISTRONI CPLU Sis operational again .
DISTRONIC PLUS
Inoperative
DISTRONICPLU Sis malfunctioning
BA S(anti-lock braking system) may also hav efailed.
A warning tone also sounds.
XVisit aqualified specialist workshop .
DISTRONIC PLUS
Suspended
You havedepressed th eaccelerato rpedal .DISTRONI CPLU Sis no
longer controllin gth espeed of th evehicle.
XRemove your foo tfrom th eaccelerato rpedal .
DISTRONIC PLU S
- - -mph
An activation condition for DISTRONI CPLU Sis no tfulfilled .
XCheckth eactivation condition sfor DISTRONI CPLU S (Ypage 134).
Cruise Contro l
- - -mph
Acondition for activating cruise control has no tbeen fulfilled .
You hav etried to store aspeed belo w20 mph (30 km/ h), for example.
XIf conditions permit, drive faster than 20 mph (30 km/ h)and store
the speed.
XCheck the activation conditions for cruise control (Ypage 133).
186Display messages
On-board computer and displays
Page 189 of 294

Tires
Display messagesPossible causes/consequences andMSolutions
Tire pressure willbe displayed afterdriving a fewminutes
The tire pressure monitor is measuring the tire pressure.
XDrive on.
The tire pressures appear in the multifunction display after you have
been driving for a few minutes.
TirePress.MonitorInoperativeThe tire pressure monitor is faulty.
XVisit a qualified specialist workshop.
Tire Pressure Moni‐tor Inoperative NoWheel Sensors
The wheels mounted do not have a suitable tire pressure sensor. The
tire pressure monitor is deactivated.
XMount wheels with suitable tire pressure sensors.
The tire pressure monitor is activated automatically after driving for
a few minutes.
Check TiresThe tire pressure in one or more tires has dropped significantly. The
wheel position is shown in the multifunction display.
A warning tone also sounds.
GWARNING
Tire pressures that are too low pose the following hazards:
Rthey may burst, especially as the load and vehicle speed increase.
Rthey may wear excessively and/or unevenly, which may greatly
impair tire traction.
Rthe driving characteristics, as well as steering and braking, may be
greatly impaired
There is a risk of an accident.
XStop the vehicle without making any sudden steering or braking
maneuvers. Pay attention to the traffic conditions as you do so.
XSecure the vehicle against rolling away (Ypage 122).
XIf there is a flat tire, inspect the tires (Ypage 246).
XCheck the tire pressure (Ypage 263).
XIf necessary, correct the tire pressure.
Displa y messages187
On-board computer and displays
Z
Page 190 of 294

Display messagesPossible causes/consequences andMSolutions
WarningTir eMal ‐functionThe tire pressur ein on eor mor etires has dropped suddenly. The whee l
position is shown in th emultifunction display.
A warning tone also sounds.
GWARNIN G
Drivin gwit h a flat tire poses aris kof th efollowin ghazards :
Raflat tire affects th eabilit yto steer or brak eth evehicl e
Ryou could lose control of th evehicl e
Rcontinued drivin gwit h a flat tire will caus eexcessive heat build-up
and possibl y afire
There is aris kof an accident.
XStop th evehicl ewithout making any sudden steering or braking
maneuvers .Pay attention to th etraffic condition sas you do so.
XSecur eth evehicl eagainst rollin gaway (Ypage 122).
XIf there is aflat tire, inspec tth etires (Ypage 246).
PleaseCorrec tTirePressureThe tire pressur eis to olow in at least on eof th etires ,or th etire
pressur edifference between th ewheels is to ogreat.
XChec kth etire pressures at th enext opportunity (Ypage 263).
XIf necessary, correc tth etire pressure.
XRestart th etire pressur emonitor (Ypage 265).
TirePress .Sen ‐sor(s) Missin gThere is no signal from th etire pressur esensor of on eor several
wheels. The pressur eof th eaffecte dtire does no tappear in th emul-
tifunction display.
XHav eth efault ytire pressur esensor replace dat aqualified special -
ist workshop .
TirePress.Monito rCurrently Unavaila‐ble
Becausethere is interferenc efrom astron gsource of radi owaves, no
signals from th etire pressur esensor sare detected. The tire pressur e
monitor is temporarily malfunctioning .
XDrive on.
The tire pressur emonitor restarts automatically as soo nas th e
problem has been resolved.
188Display messages
On-board computer and displays
Page 201 of 294

Engine
Warning/
indicator
lampNSignal type
Possible causes/consequences and M
Solutions
;NThe yellow Check Engine warning lamp lights up while the engine is running.
There may be a malfunction, for example:
Rin the engine management
Rin the fuel injection system
Rin the exhaust system
Rin the ignition system
Rin the fuel system
The emission limit values may be exceeded and the engine may be in emergency
mode.
XVisit a qualified specialist workshop immediately.
In some states, you must immediately visit a qualified specialist workshop as soon as the yellow Check Engine warning lamp lights up. This is due to the legal require-
ments in effect in these states. If in doubt, check whether such legal regulations
apply in the state in which you are currently driving.
8N The yellow reserve fuel warning lamp lights up while the engine is running.
The fuel level has dropped into the reserve range.
XRefuel at the nearest gas station.
8N The yellow reserve fuel warning lamp flashes while the vehicle is in motion.
In addition, the ;Check Engine warning lamp may light up.
The fuel filler cap is not closed correctly or the fuel system is leaking.
XCheck that the fuel filler cap is correctly closed.
XIf the fuel filler cap is not correctly closed: close the fuel filler cap.
XIf the fuel filler cap is closed:visit a qualified specialist workshop.
?NThe red coolant warning lamp lights up while the engine is running and the
coolant temperature gauge is at the start of the scale.
The temperature sensor for the coolant temperature gauge is malfunctioning.
The coolant temperature is no longer being monitored. There is a risk of engine
damage if the coolant temperature is too high.
XPull over and stop the vehicle safely and switch off the engine, paying attention
to road and traffic conditions. Do not continue driving under any circumstances.
XSecure the vehicle against rolling away (Ypage 122).
XConsult a qualified specialist workshop.
Warning and indicator lamps in the instrument cluster199
On-board computer and displays
Z
Page 241 of 294

!Do not park your vehicle for a long period of
time directly after cleaning, particularly after
cleaning the wheel rim with wheel cleaner.
Wheel cleaner can lead to the increased cor-
rosion of the brake discs and pads. Therefore,
drive for a few minutes after cleaning. By
heating up the brakes, the brake discs and
pads dry. The vehicle can then be parked for a
long period of time.
Cleaning the windows
GWARNING
You could become trapped by the windshield wipers if they start moving while cleaning the
windshield or wiper blades. There is a risk of
injury.
Always switch off the windshield wipers and
the ignition before cleaning the windshield or
wiper blades.
!Do not use dry cloths, abrasive products,
solvents or cleaning agents containing sol-
vents to clean the inside of the windows. Do
not touch the insides of the windows with
hard objects, e.g. an ice scraper or ring. There
is otherwise a risk of damaging the windows.
!Clean the water drainage channels of the
windshield and the rear window at regular
intervals. Deposits such as leaves, petals and pollen may under certain circumstances pre-
vent water from draining away. This can lead
to corrosion damage and damage to elec-
tronic components.
XClean the inside and outside of the windows
with a damp cloth and a cleaning product that
is recommended and approved by Mercedes-
Benz.
Cleaning wiper blades
GWARNING
You could become trapped by the windshield wipers if they start moving while cleaning the
windshield or wiper blades. There is a risk of
injury.
Always switch off the windshield wipers and
the ignition before cleaning the windshield or
wiper blades.
!Do not pull the wiper blade. Otherwise, the
wiper blade could be damaged.
!Do not clean wiper blades too often and do
not rub them too hard. Otherwise, the graph-
ite coating could be damaged. This could
cause wiper noise.
!Hold the wiper arm securely when folding
back. The windshield could be damaged if the
wiper arm smacks against it suddenly.
XFold the windshield wiper arms away from the
windshield.
XCarefully clean the wiper blades with a damp
cloth.
XFold the windshield wiper arms back again
before switching on the ignition.
Cleaning the exterior lighting
!Only use cleaning agents or cleaning cloths
which are suitable for plastic light lenses.
Unsuitable cleaning agents or cleaning cloths
could scratch or damage the plastic light len- ses.
XClean the plastic lenses of the exterior light-
ing using a wet sponge and a mild cleaning
agent, e.g. Mercedes-Benz car shampoo or
cleaning cloths.
Cleaning the mirror turn signals
!Only use cleaning agents or cleaning cloths
that are suitable for plastic lenses. Unsuitable
cleaning agents or cleaning cloths could
scratch or damage the plastic lenses of the
mirror turn signals.
XClean the plastic lenses of the mirror turn sig-
nals in the exterior mirror housing using a wet
sponge and mild cleaning agent, e.g.
Mercedes-Benz car shampoo or cleaning
cloths.
Cleaning the sensors
!If you clean the sensors with a power
washer, make sure that you keep a distance
of at least 11.8 in (30 cm) between the vehicle
and the power washer nozzle. Information
about the correct distance is available from
the equipment manufacturer.
Care239
Maintenance and care
Z
Page 242 of 294

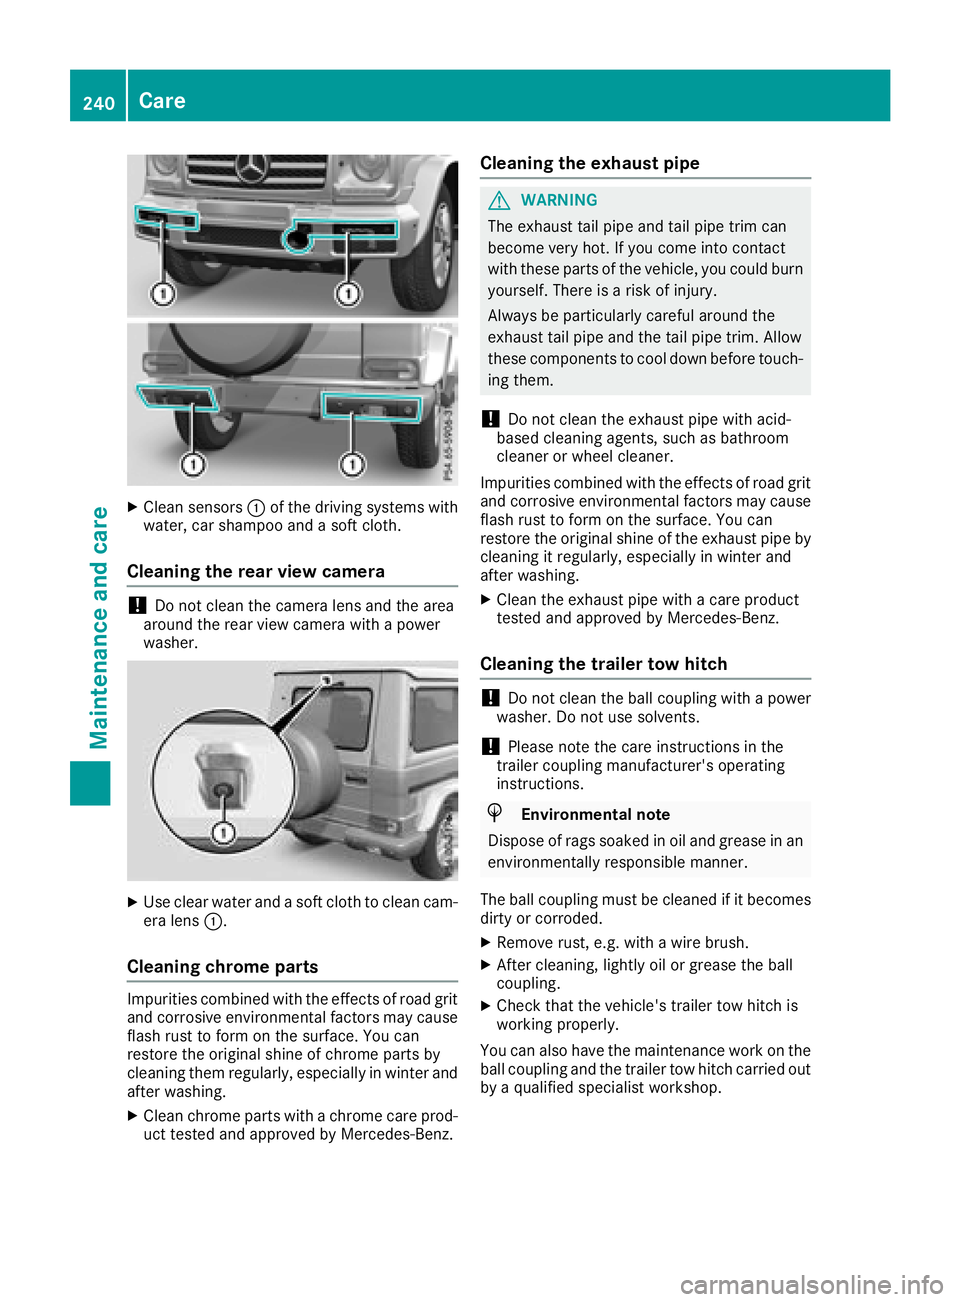
XClean sensors:of the driving systems with
water, car shampoo and a soft cloth.
Cleaning the rear view camera
!Do not clean the camera lens and the area
around the rear view camera with a power
washer.
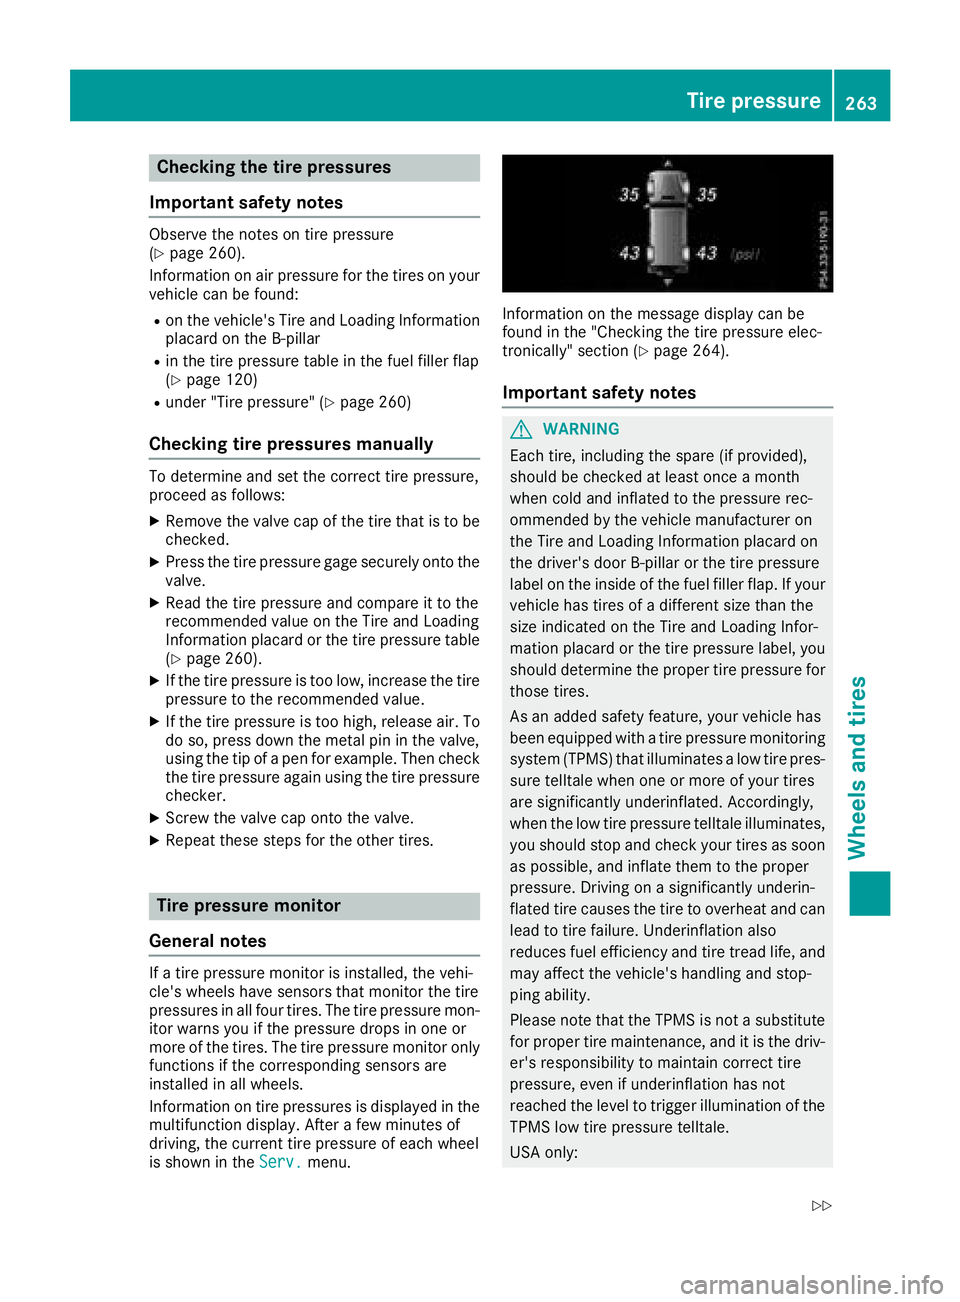
XUse clear water and a soft cloth to clean cam- era lens :.
Cleaning chrome parts
Impurities co mbinedwit h the effects of road grit
and corrosive environmental factors may cause flash rust to form on the surface. You can
restore the original shine of chrome parts by
cleaning them regularly, especially in winter and
after washing.
XClean chrome parts with a chrome care pro d-
uct tested and approved byMercedes-Benz.
Cleaning the exhaust pipe
GWARNING
The exhaust tail pipeand tail pipetrim can
become very hot. Ifyou come into contact
wit h these parts of the vehicle, you could burn
yourself. There isa risk of injury.
Always be particularly careful around the
exhaust tail pipeand the tail pipetrim. Allow
these components to cool downbefore touch-
ing them.
!Do not clean the exhaust pipe with acid-
based cleaning agents, such as bathroom
cleaner or wheel cleaner.
Impurities co mbined with the effects of road grit
and corrosive environmental factors may cause
flash rust to form on the surface. You can
restore the original shine of the exhaust pipeby
cleaning it regularly, especially in winter and
after washing.
XClean the exhaust pipe with a care product
tested and approved byMercedes-Benz.
Cleaning the trailer tow hitch
!Do not clean the ball coupling with a power
washer. Do not use solvents.
!Please note the care instructions in the
trailer coupling manufacturer's operating
instructions.
HEnvironm entalnote
Dispose of rags soaked in oil and grease in an
environmentally responsible manner.
The ball coupling must becleaned if it becomes
dirt y or corroded.
XRemove rust, e.g. with a wire brush.
XAfter cleaning, lightly oil or grease the ball
coupling.
XCheck that the vehicle's trailer tow hitch is
working properly.
You can also have the maintenance work on the
ball coupling and the trailer tow hitch carried out
by a qualified specialist workshop.
240Care
Maintenance and care
Page 265 of 294

Checking the tire pressures
Important safety notes
Observe the notes on tire pressure
(Ypage 260).
Information on air pressure for the tires on your
vehicle can be found:
Ron the vehicle's Tire and Loading Information
placard on the B-pillar
Rin the tire pressure table in the fuel filler flap
(Ypage 120)
Runder "Tire pressure" (Ypage 260)
Checking tire pressures manually
To determine and set the correct tire pressure,
proceed as follows:
XRemove the valve cap of the tire that is to be
checked.
XPress the tire pressure gage securely onto the
valve.
XRead the tire pressure and compare it to the
recommended value on the Tire and Loading
Information placard or the tire pressure table
(
Ypage 260).
XIf the tire pressure is too low, increase the tire
pressure to the recommended value.
XIf the tire pressure is too high, release air. To
do so, press down the metal pin in the valve,
using the tip of a pen for example. Then check
the tire pressure again using the tire pressure
checker.
XScrew the valve cap onto the valve.
XRepeat these steps for the other tires.
Tire pressure monitor
General notes
If a tire pressure monitor is installed, the vehi-
cle's wheels have sensors that monitor the tire
pressures in all four tires. The tire pressure mon-
itor warns you if the pressure drops in one or
more of the tires. The tire pressure monitor only
functions if the corresponding sensors are
installed in all wheels.
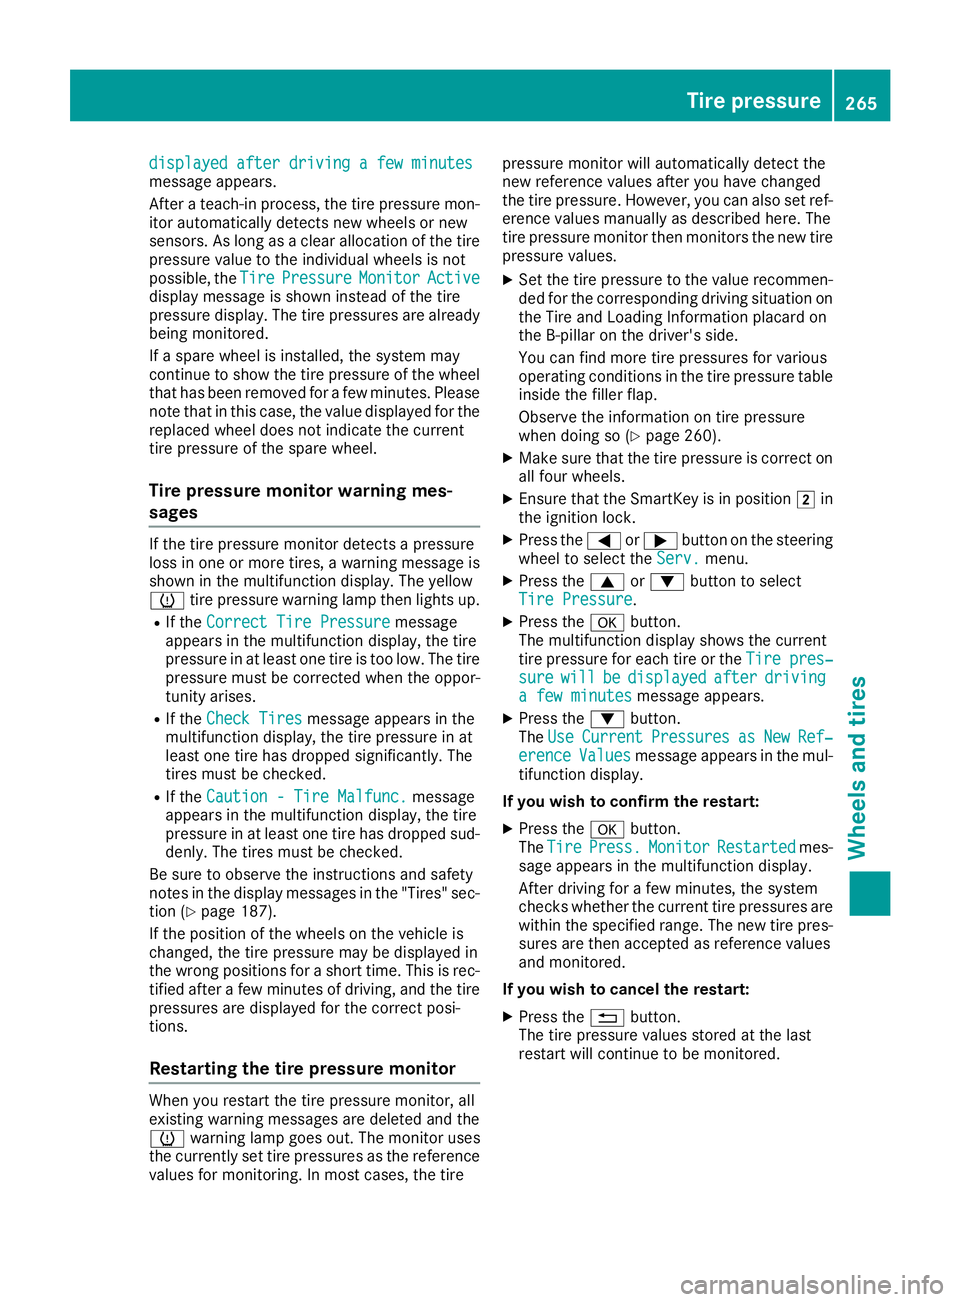
Information on tire pressures is displayed in the
multifunction display. After a few minutes of
driving, the current tire pressure of each wheel
is shown in the Serv.
menu.
Information on the message display can be
found in the "Checking the tire pressure elec-
tronically" section (
Ypage 264).
Important safety notes
GWARNING
Each tire, including the spare (if provided),
should be checked at least once a month
when cold and inflated to the pressure rec-
ommended by the vehicle manufacturer on
the Tire and Loading Information placard on
the driver's door B-pillar or the tire pressure
label on the inside of the fuel filler flap. If your
vehicle has tires of a different size than the
size indicated on the Tire and Loading Infor-
mation placard or the tire pressure label, you
should determine the proper tire pressure for
those tires.
As an added safety feature, your vehicle has
been equipped with a tire pressure monitoring
system (TPMS) that illuminates a low tire pres-
sure telltale when one or more of your tires
are significantly underinflated. Accordingly,
when the low tire pressure telltale illuminates,
you should stop and check your tires as soon
as possible, and inflate them to the proper
pressure. Driving on a significantly underin-
flated tire causes the tire to overheat and can lead to tire failure. Underinflation also
reduces fuel efficiency and tire tread life, and
may affect the vehicle's handling and stop-
ping ability.
Please note that the TPMS is not a substitute
for proper tire maintenance, and it is the driv-
er's responsibility to maintain correct tire
pressure, even if unde rinf
lation has not
reached the level to trigger illumination of the
TPMS low tire pressure telltale.
USA only:
Tire pressure263
Wheels and tires
Z
Page 267 of 294

displayed after driving a few minutesmessage appears.
After a teach-in process, the tire pressure mon-
itor automatically detects new wheels or new
sensors. As long as a clear allocation of the tire
pressure value to the individual wheels is not
possible, theTire
PressureMonitorActivedisplay message is shown instead of the tire
pressure display. The tire pressures are already
being monitored.
If a spare wheel is installed, the system may
continue to show the tire pressure of the wheel
that has been removed for a few minutes. Please
note that in this case, the value displayed for the
replaced wheel does not indicate the current
tire pressure of the spare wheel.
Tire pressure monitor warning mes-
sages
If the tire pressure monitor detects a pressure
loss in one or more tires, a warning message is
shown in the multifunction display. The yellow
htire pressure warning lamp then lights up.
RIf the Correct Tire Pressuremessage
appears in the multifunction display, the tire
pressure in at least one tire is too low. The tire
pressure must be corrected when the oppor-
tunity arises.
RIf the Check Tiresmessage appears in the
multifunction display, the tire pressure in at
least one tire has dropped significantly. The
tires must be checked.
RIf the Caution - Tire Malfunc.message
appears in the multifunction display, the tire
pressure in at least one tire has dropped sud-
denly. The tires must be checked.
Be sure to observe the instructions and safety
notes in the display messages in the "Tires" sec-
tion (
Ypage 187).
If the position of the wheels on the vehicle is
changed, the tire pressure may be displayed in
the wrong positions for a short time. This is rec- tified after a few minutes of driving, and the tire
pressures are displayed for the correct posi-
tions.
Restarting the tire pressure monitor
When you restart the tire pressure monitor, all
existing warning messages are deleted and the
h warning lamp goes out. The monitor uses
the currently set tire pressures as the reference
values for monitoring. In most cases, the tire pressure monitor will automatically detect the
new reference values after you have changed
the tire pressure. However, you can also set ref-
erence values manually as described here. The
tire pressure monitor then monitors the new tire
pressure values.
XSet the tire pressure to the value recommen-ded for the corresponding driving situation on
the Tire and Loading Information placard on
the B-pillar on the driver's side.
You can find more tire pressures for various
operating conditions in the tire pressure table
inside the filler flap.
Observe the information on tire pressure
when doing so (
Ypage 260).
XMake sure that the tire pressure is correct on
all four wheels.
XEnsure that the SmartKey is in position 2in
the ignition lock.
XPress the =or; button on the steering
wheel to select the Serv.menu.
XPress the9or: button to select
Tire Pressure.
XPress the abutton.
The multifunction display shows the current
tire pressure for each tire or the Tire pres‐
surewillbedisplayedafterdrivinga few minutesmessage appears.
XPress the:button.
The UseCurrentPressuresasNewRef‐erenceValuesmessage appears in the mul-
tifunction display.
If you wish to confirm the restart:
XPress the abutton.
The TirePress.MonitorRestartedmes-
sage appears in the multifunction display.
After driving for a few minutes, the system
checks whether the current tire pressures are within the specified range. The new tire pres-
sures are then accepted as reference values
and monitored.
If you wish to cancel the restart:
XPress the %button.
The tire pressure values stored at the last
restart will continue to be monitored.
Tire pressure265
Wheels and tires
Z