2018 MERCEDES-BENZ G-CLASS belt
[x] Cancel search: beltPage 57 of 294

PASSENGER AIR BAG OFF indicator lamp:
shows you whether the front-passenger front air
bag is deactivated.
XTurn the SmartKey to position 1or2 in the
ignition lock.
The system carries out self-diagnostics.
The PASSENGER AIR BAG OFF indicator lamp
must light up for approximately six seconds.
If, after the system self-test, the
PASSENGER AIR BAG OFF indicator lamp:
Ris lit: the front-passenger front air bag is
deactivated. It will then not be deployed in the event of an accident.
Ris not lit , the sensor system did not detect a
child restraint system with transponder for
the BabySmart™ air bag deactivation system.
If, in the event of an accident, all deployment
criteria are met, the front-passenger front air
bag is deployed.
Child restraint system on the front-
passenger seat
General notes
Accident statistics show that children secured
in the rear seats are safer than children secured
in the front-passenger seat. For this reason,
Mercedes-Benz strongly advises that you install
the child restraint system on a rear seat.
If it is absolutely necessary to install a child
restraint system on the front-passenger seat,
always observe the information on the "Baby-
Smart™ air bag deactivation system"
(
Ypage 53). You can thus avoid the risks that could arise as
a result of:
Ra child restraint system that is not detected
by the BabySmart™ air bag deactivation sys-
tem sensor system
Rthe unintentional deactivation of the front-
passenger front air bag
Rthe unsuitable positioning of the child
restraint system, e.g. too close to the dash-
board
Rearward-facing child restraint system
If it is absolutely necessary to install a rearward-
facing child restraint system on the front-
passenger seat, always make sure that the
front-passenger front air bag is deactivated.
Only if the PASSENGER AIR BAG OFF indicator
lamp is permanently lit (
Ypage 39) is the front-
passenger front air bag deactivated.
Always observe the child restraint system man-
ufacturer's installation and operating instruc-
tions.
Forward-facing child restraint system
If it is absolutely necessary to install a forward-
facing child restraint system on the front-
passenger seat, always move the front-
passenger seat as far back as possible. The
entire base of the child restraint system must
always rest on the seat cushion of the front-
passenger seat. The backrest of the child
restraint system must lie as flat as possible
against the backrest of the front-passenger
seat. The child restraint system must not touch
the roof or be subjected to a load by the head
restraint. Adjust the angle of the seat backrest
and the head restraint position accordingly.
Always make sure that the shoulder belt strap is
correctly routed from the vehicle belt sash guide
to the shoulder belt guide on the child restraint system. The shoulder belt strap must be routed
forward and down from the vehicle belt sash
guide. If necessary, adjust the belt sash guide
and the front-passenger seat accordingly.
Always observe the child restraint system man-
ufacturer's installation and operating instruc-
tions.
Children in the vehicle55
Safety
Z
Page 76 of 294
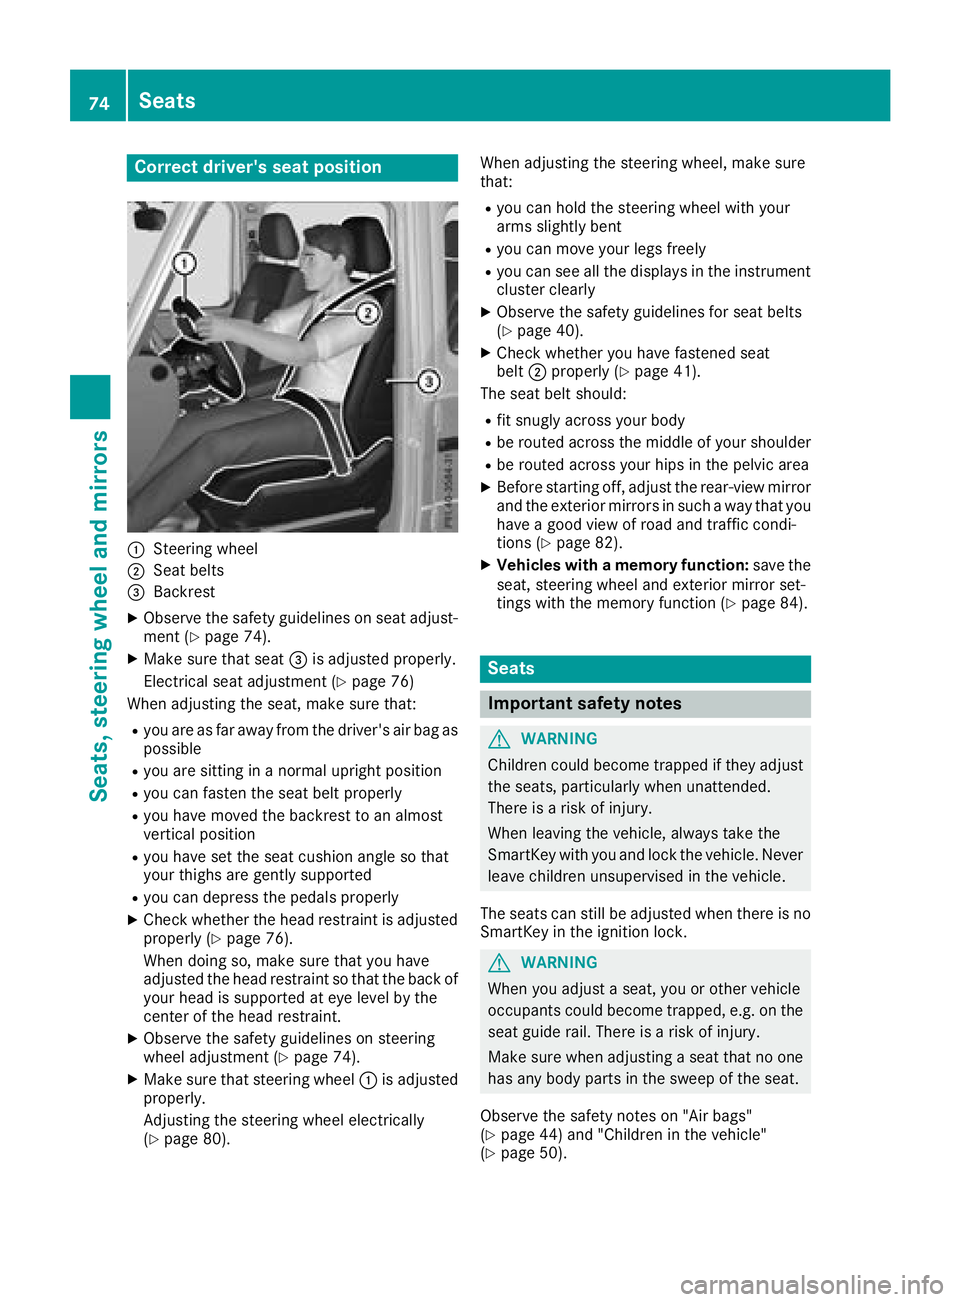
Correct driver's seat position
:Steering wheel
;Seat belts
=Backrest
XObserve the safety guidelines on seat adjust-
ment (Ypage 74).
XMake sure that seat=is adjusted properly.
Electrical seat adjustment (
Ypage 76)
When adjusting the seat, make sure that:
Ryou are as far away from the driver's air bag as
possible
Ryou are sitting in a normal upright position
Ryou can fasten the seat belt properly
Ryou have moved the backrest to an almost
vertical position
Ryou have set the seat cushion angle so that
your thighs are gently supported
Ryou can depress the pedals properly
XCheck whether the head restraint is adjusted
properly (Ypage 76).
When doing so, make sure that you have
adjusted the head restraint so that the back of
your head is supported at eye level by the
center of the head restraint.
XObserve the safety guidelines on steering
wheel adjustment (Ypage 74).
XMake sure that steering wheel :is adjusted
properly.
Adjusting the steering wheel electrically
(
Ypage 80). When adjusting the steering wheel, make sure
that:
Ryou can hold the steering wheel with your
arms slightly bent
Ryou can move your legs freely
Ryou can see all the displays in the instrument
cluster clearly
XObserve the safety guidelines for seat belts
(Ypage 40).
XCheck whether you hav
e fastened seat
belt ;properly (Ypage 41).
The seat belt should:
Rfit snugly across your body
Rbe routed across the middle of your shoulder
Rbe routed across your hips in the pelvic area
XBefore starting off, adjust the rear-view mirror
and the exterior mirrors in such a way that you
have a good view of road and traffic condi-
tions (
Ypage 82).
XVehicles with a memory function: save the
seat, steering wheel and exterior mirror set-
tings with the memory function (
Ypage 84).
Seats
Important safety notes
GWARNING
Children could become trapped if they adjust
the seats, particularly when unattended.
There is a risk of injury.
When leaving the vehicle, always take the
SmartKey with you and lock the vehicle. Never
leave children unsupervised in the vehicle.
The seats can still be adjusted when there is no
SmartKey in the ignition lock.
GWARNING
When you adjust a seat, you or other vehicle
occupants could become trapped, e.g. on the seat guide rail. There is a risk of injury.
Make sure when adjusting a seat that no one
has any body parts in the sweep of the seat.
Observe the safety notes on "Air bags"
(
Ypage 44) and "Children in the vehicle"
(Ypage 50).
74Seats
Seats, steering wheel and mirrors
Page 77 of 294
GWARNING
You could lose control of your vehicle if you do the following while driving:
Radjust the driver's seat, head restraint,
steering wheel or mirrors
Rfasten the seat belt
There is a risk of an accident.
Adjust the driver's seat, head restraint, steer-
ing wheel and mirror and fasten your seat belt before starting the engine.
GWARNING
If the head restraints are not installed or not
adjusted correctly, they cannot provide pro-
tection as intended. There is an increased risk
of injury in the head and neck area, e.g. in the event of an accident or when braking.
Always drive with the head restraints instal-
led. Before driving off, make sure for every
vehicle occupant that the center of the head
restraint supports the back of the head at
about eye level.
Make sure that you do not rotate the head
restraints of the front and rear seats when
adjusting the head restraints. Otherwise, you
cannot adjust the height and angle of the head
restraints correctly.
Adjust the head restraint so that it is as close as
possible to your head.
GWARNING
If you adjust the seat height carelessly, you or
other vehicle occupants could be trapped and
thereby injured. Children in particular could
accidentally press the electrical seat adjust-
ment buttons and become trapped. There is a
risk of injury.
While moving the seats, make sure that your
hands or other body parts do not get under the
lever assembly of the seat adjustment sys-
tem.
GWARNING
When you adjust a seat, you or other vehicle
occupants could become trapped, e.g. on the seat guide rail. There is a risk of injury.
Make sure when adjusting a seat that no one
has any body parts in the sweep of the seat.
!To avoid damage to the seats and the seat
heating, observe the following information:
Rkeep liquids from spilling on the seats. If
liquid is spilled on the seats, dry them as
soon as possible.
Rif the seat covers are damp or wet, do not
switch on the seat heating. The seat heat-
ing should also not be used to dry the seats.
Rclean the seat covers as recommended;
see "Interior care".
Rdo not transport heavy loads on the seats.
Do not place sharp objects on the seat
cushions, e.g. knives, nails or tools. The
seats should only be occupied by passen-
gers, if possible.
Rwhen the seat heating is in operation, do
not cover the seats with insulating materi-
als, e.g. blankets, coats, bags, seat covers,
child seats or booster seats.
!Make sure that there are no objects in the
footwell under or behind the seats when mov-
ing the seats back. There is a risk that the
seats and/or the objects could be damaged.
!When the rear bench seat is folded for-
wards, the front seats cannot be moved to
their rearmost position. You could otherwise
damage the seats and the rear bench seat.
!Make sure that the sun visor is folded up
before adjusting the backrest and head
restraint height. The head restraint and sun
visor could otherwise collide when the head
restraint is fully extended.
iIf the front door is open, the seats can be
adjusted for up to 30 minutes after the igni-
tion has been switched off.
iThe rear-compartment head restraints can
be removed (Ypage 77).
For more information, contact a qualified spe-
cialist workshop.
iYou can find further information about
enlarging the cargo compartment (folding the
rear bench seat forwards) on (
Ypage 213).
Seats75
Seats, steering wheel and mirrors
Z
Page 81 of 294
iThe system automatically switches from
level 3to level 2after approximately eight
minutes.
The system automatically switches down
from level 2to level 1after approximately ten
minutes.
The system automatically switches off
approximately 35 minutes after it is set to
level 1.
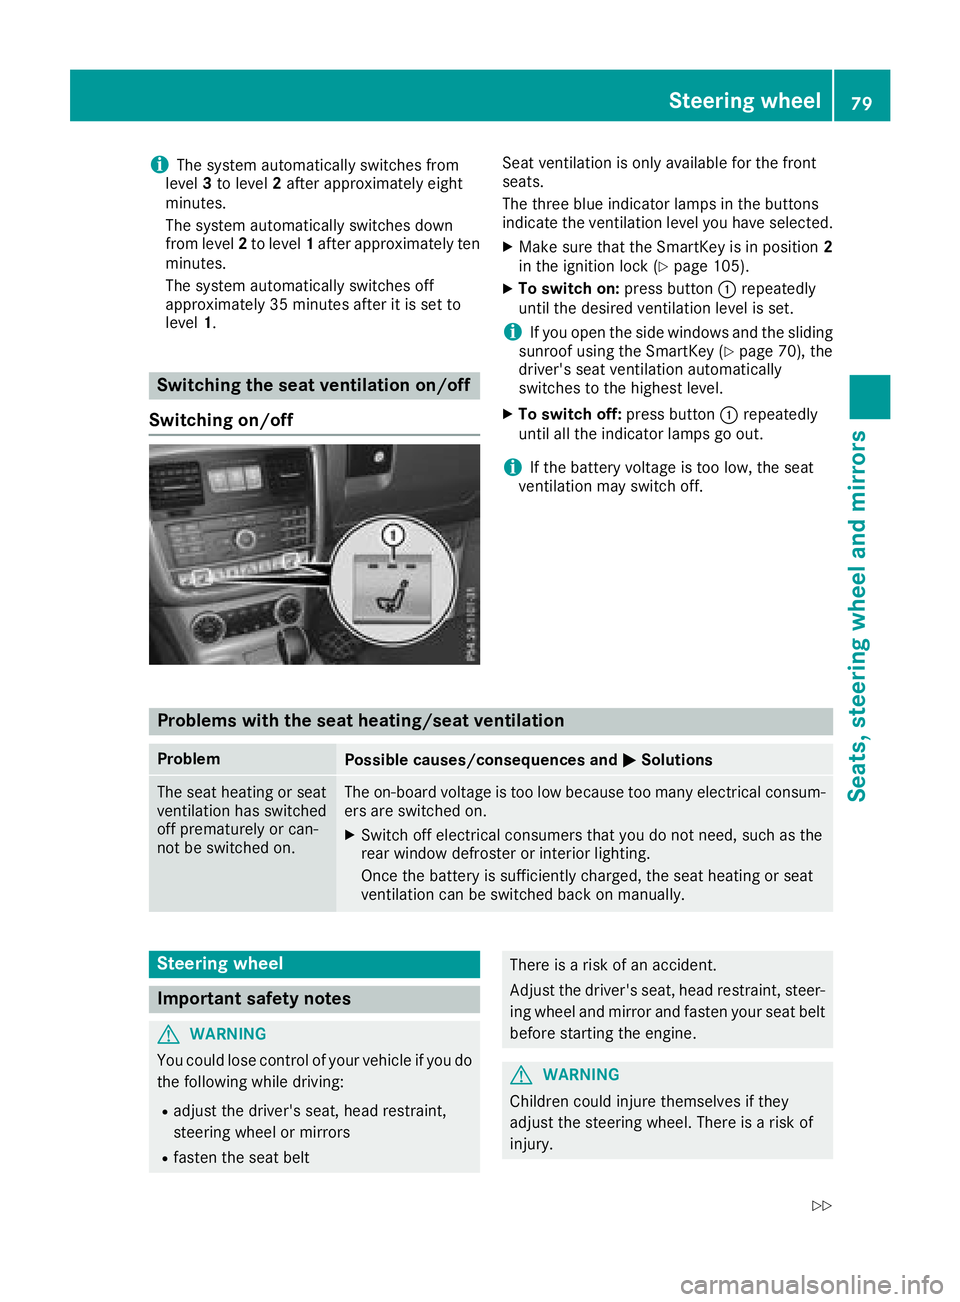
Switching the seat ventilation on/off
Switching on/off
Seat ventilation is only available for the front
seats.
The three blue indicator lamps in the buttons
indicate the ventilation level you have selected.
XMake sure that the SmartKey is in position 2
in the ignition lock (Ypage 105).
XTo switch on: press button:repeatedly
until the desired ventilation level is set.
iIf you open the side windows and the sliding
sunroof using the SmartKey (Ypage 70), the
driver's seat ventilation automatically
switches to the highest level.
XTo switch off: press button:repeatedly
until all the indicator lamps go out.
iIf the battery voltage is too low, the seat
ventilation may switch off.
Problems with the seat heating/seat ventilation
ProblemPossible causes/consequences and MSolutions
The seat heating or seat
ventilation has switched
off prematurely or can-
not be switched on.The on-board voltage is too low because too many electrical consum-
ers are switched on.
XSwitch off electrical consumers that you do not need, such as the
rear window defroster or interior lighting.
Once the battery is sufficiently charged, the seat heating or seat
ventilation can be switched back on manually.
Steering wheel
Important safety notes
GWARNING
You could lose control of your vehicle if you do the following while driving:
Radjust the driver's seat, head restraint,
steering wheel or mirrors
Rfasten the seat belt
There is a risk of an accident.
Adjust the driver's seat, head restraint, steer-ing wheel and mirror and fasten your seat belt
before starting the engine.
GWARNING
Children could injure themselves if they
adjust the steering wheel. There is a risk of
injury.
Steering wheel79
Seats, steering wheel and mirrors
Z
Page 110 of 294

Deactivating/activating theECO start/
stop function
XTo activate :press butto n:.
Indicator lamp ;on butto n: and th eè
EC Osymbol in th emultifunction display go
out .
Selecting drive program Sor Min Mercedes -
AM Gvehicles automatically deactivates th e
EC Ostart/sto pfunction .
XTo activate :press butto n:.
Indicator lamp ;lights up.
Mercedes-AMG vehicles :if drive program S
or Mis active ,th eautomatic transmissio n
switches to drive program C.
If all condition sfo rautomatic engin eswitch -
of f (
Ypage 108) are fulfilled, th eè sym-
bol is shown in green in th emultifunction dis -
play.
If th econdition sfo rautomatic engin eswitch -
of fare no tall fulfille d (
Ypage 108), th eè
EC Osymbol is lit yellow. If this is th ecase, th e
EC Ostart/sto pfunction is no tavailable .
iIf indicator lamp ;is off, th eEC Ostart /
stop function has bee ndeactivated manually
or as th eresult of amalfunction .The engin e
will then no tbe switched of fautomatically
when th evehicle stops .
Automatic engin eswitch-off
If th evehicle is brake dto astandstill wit hth e
transmissio nin h ori ,th eEC Ostart/sto p
function switches of fth eengin eautomatically. The EC
Ostart/sto pfunction is operational and
th eè ECOsymbol is shown in green in th e
multifunction display, if:
Rth eindicator lamp in th eè ECObutto nis
lit green
Rth etransfe rcas eis in th eHIG HRANGE on-
road position
Rth evehicle is stationary
Rth eoutsid etemperature and th eatmospheri c
air pressure is within th erange that is suitable
fo rth esyste m
Rtheengin eis at normal operatin gtemperature
Rth eset temperature fo rth evehicle interio r
has bee nreached
Rth ebattery is sufficientl ycharged
Rth esyste mdetects that th ewindshield is no t
fogge dup when th eair-conditionin gsystem is
switched on
Rth ehoo dis close d
Rthedriver's doo ris close dand th edriver's
seat belt is fastene d
If th econdition sfo rautomatic engin eswitch-off
are no tall fulfilled, th eè ECOsymbol is
shown in yellow.
iIf you shift th etransmissio nfrom Rto D, the
EC Ostart/sto pfunction is avai lable again
once th eè ECOsymbol reappears in
green in th emultifunction display.
iThe engin ecan be automatically switched
of fan unlimite dnumber of times .
iYou can still activat eth eHOLD function
when th evehicle is stationary, eve nif th e
engin ehas bee nswitched of fautomatically. It
is then no tnecessary to continue applyin gth e
brake sdurin gth eautomatic stop phase.
Whe nyou depress th eaccelerator pedal, th e
engin estart sautomatically and th ebraking
effect of th eHOLD function is deactivated.
Depress th eaccelerator peda lcarefully, as
th eengin emus tbe started first .
iDuringautomatic engin eswitch-off ,th ecli-
mat econtro lsystem only operates at a
reduce dcapacity. If you require full climat e
contro lcapacity, th eEC Ostart/sto pfunction
can be deactivated by pressing th eEC Obut -
to n (
Ypage 108).
108Driving
Driving and parking
Page 111 of 294
Automa tic engine start
The engin estart sautomatically if:
RIn general :
-you switch off th eECO start/sto pfunction
by pressing th eECO butto n
-you release th ebrakes when in transmis -
sion position hori, when th eHOLD
function is inactive
RBy th edriver :
-you release th ebrakes when in transmis -
sion position hori
-you depress th eaccelerato rpedal
-you engage revers egear k
-you mov eth etransmission out of position
j
-you switch to drive program Sor M
(Mercedes-AM Gvehicles)
-you unfasten your seat belt or open th e
driver's door
RBy th esystem:
-th evehicl estart sto rol l
-thebrak esystem require sthis
-th etemperature in th evehicl einterior devi-
ate sfrom th eset range
-th esystem detects moisture on th ewind-
shield when th eair-conditioning system is
switched on
-th econdition of charge of th ebattery is to o
low
iShifting th etransmission to position j
does no tstart th eengine.
Driving109
Driving and parking
Z
Page 138 of 294
Do not use DISTRONIC PLUS:
Rin road and traffic conditions that do not allow
you to maintain a constant speed, e.g. in
heavy traffic or on winding roads
Ron slippery road surfaces. Braking or accel-
erating can cause the drive wheels to lose
traction and the vehicle could then skid
Rwhen there is poor visibility, e.g. due to fog,
heavy rain or snow
DISTRONIC PLUS may not detect narrow vehi-
cles driving in front, e.g. motorcycles, or vehi-
cles driving on a different line.
In particular, the detection of obstacles can be
impaired if:
Rthere is dirt on the sensors or anything else
covering the sensors
Rthere is snow or heavy rain
Rthere is interference by other radar sources
Rthere are strong radar reflections, for exam-
ple, in parking garages
If DISTRONIC PLUS no longer detects a vehicle
in front, DISTRONIC PLUS may unexpectedly
accelerate the vehicle to the stored speed.
This speed may:
Rbe too high if you are driving in a filter lane or an exit lane
Rbe so high in the right lane that you pass vehi-cles driving on the left (left-hand drive coun-
tries)
Rbe so high in the left lane that you pass vehi-
cles driving on the right (right-hand drive
countries)
If there is a change of drivers, advise the new
driver of the speed stored.
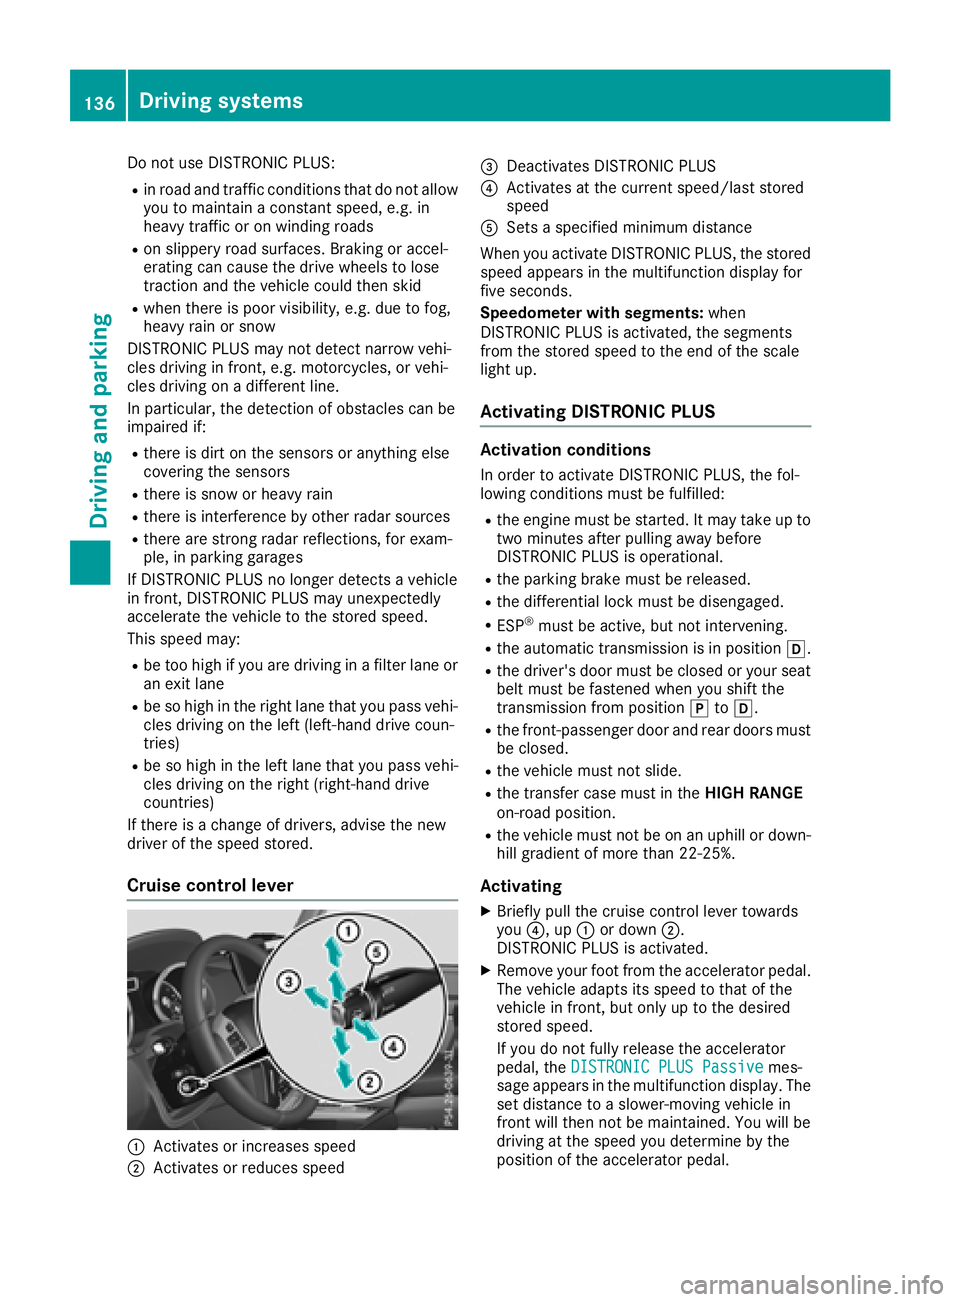
Cruise control lever
:Activates or increases speed
;Activates or reduces speed
=Deactivates DISTRONIC PLUS
?Activates at the current speed/last stored
speed
ASets a specified minimum distance
When you activate DISTRONIC PLUS, the stored
speed appears in the multifunction display for
five seconds.
Speedometer with segments: when
DISTRONIC PLUS is activated, the segments
from the stored speed to the end of the scale
light up.
Activating DISTRONIC PLUS
Activation conditions
In order to activate DISTRONIC PLUS, the fol-
lowing conditions must be fulfilled:
Rthe engine must be started. It may take up to
two minutes after pulling away before
DISTRONIC PLUS is operational.
Rthe parking brake must be released.
Rthe differential lock must be disengaged.
RESP®must be active, but not intervening.
Rthe automatic transmission is in position h.
Rthe driver's door must be closed or your seat
belt must be fastened when you shift the
transmission from positionjtoh.
Rthe front-passenger door and rear doors must
be closed.
Rthe vehicle must not slide.
Rthe transfer case must in the HIGH RANGE
on-road position.
Rthe vehicle must not be on an uphill or down-
hill gradient of more than 22‑25%.
Activating
XBriefly pull the cruise control lever towards
you ?, up :or down ;.
DISTRONIC PLUS is activated.
XRemove your foot from the accelerator pedal.
The vehicle adapts its speed to that of the
vehicle in front, but only up to the desired
stored speed.
If you do not fully release the accelerator
pedal, the DISTRONIC PLUS Passive
mes-
sage appears in the multifunction display. The set distance to a slower-moving vehicle in
front will then not be maintained. You will be
driving at the speed you determine by the
position of the accelerator pedal.
136Driving system s
Driving an d parking
Page 140 of 294

Rthe battery is disconnected.
Rthe accelerator pedal has been depressed,
e.g. by a vehicle occupant.
There is a risk of an accident.
If you wish to exit the vehicle, always turn off
DISTRONIC PLUS and secure the vehicle
against rolling away.
For further information on deactivating
DISTRONIC PLUS (
Ypage 139).
If DISTRONIC PLUS detects that the vehicle in
front is stopping, it brakes your vehicle until it is
stationary.
Once your vehicle is stationary, it remains sta-
tionary and you do not need to depress the
brake.
Depending on the specified minimum distance,
your vehicle will come to a standstill at a suffi-
cient distance behind the vehicle in front. The
specified minimum distance is set using the
control on the cruise control lever.
The automatic transmission shifts automatically
to transmission position jif DISTRONIC PLUS
is activated and:
Rthe driver's seat belt is not fastened and the
driver's door is open.
Rthe engine is switched off, unless it is auto-
matically switched off by the ECO start/stop
function.
On steep uphill or downhill inclines, or if there is
a malfunction, the automatic transmission may
also automatically be shifted to pos
ition
j.
Setting a speed
XPush the cruise control lever upwards :for a
higher speed or down ;for a lower speed.
XTo adjust the set speed in 1 mph incre-
ments (1 km/h increments):briefly push
the cruise control lever up :or down ;to
the pressure point.
Every time the cruise control lever is pressed
up : or down ;, the last speed stored is
increased or reduced.
XTo adjust the set speed in 5 mph incre-
ments (10 km/h increments): briefly push
the cruise control lever up :or down ;
beyond the pressure point.
Every time the cruise control lever is pressed
up : or down ;, the last speed stored is
increased or reduced. If you accelerate to overtake, DISTRONIC PLUS
adjusts the vehicle's speed back to the last
speed stored after you have finished overtaking.
Setting a specified minimum distance
You can set the specified minimum distance for
DISTRONIC PLUS by varying the time span
between one and two seconds. With this func-
tion, you can set the minimum distance that
DISTRONIC PLUS keeps to the vehicle in front,
dependent on vehicle speed. You can see this
distance in the multifunction display
(
Ypage 167).
Make sure that you maintain the minimum dis-
tance to the vehicle in front as required by law.
Adjust the distance to the vehicle in front if nec-
essary.
XTo increase: turn control;in direction =.
DISTRONIC PLUS then maintains a greater
distance between your vehicle and the vehicle
in front.
XTo decrease: turn control;in direction :.
DISTRONIC PLUS then maintains a shorter
distance between your vehicle and the vehicle
in front.
138Driving systems
Driving an d parking