Page 225 of 294

The system has not been able to initiate an MB
Info call, if:
Rthe indicator lamp in theïInfo call button
is flashing continuously.
Rno voice connection to the Mercedes-Benz
Customer Assistance Center was estab-
lished.
This can occur if the relevant mobile phone net-
work is not available, for example.
The Call Failed
message appears in the mul-
tifunction display.
XTo end a call: press the~button on the
multifunction steering wheel.
or
XPress the corresponding multimedia system
button for ending a phone call.
Call priority
When service calls are active, e.g. Roadside
Assistance or Info calls, an emergency call can
still be initiated. In this case, an emergency call
will take priority and override all other active
calls.
The indicator lamp of the respective button
flashes until the call is ended.
An emergency call can only be terminated by the
Mercedes-Benz Customer Assistance Center.
All other calls can be ended by pressing:
Rthe ~ button on the multifunction steering
wheel
Rthe corresponding button in the multimedia
system to end the voice call
When a call is initiated, the audio system is
muted.
The mobile phone is no longer connected to the multimedia system.
However, if you want to use your mobile phone,
do so only when the vehicle is stationary and in
a safe location.
Downloading destinations
Downloading destinations
Downloading destinations gives you access to a
database with over 15 million points of interest
(POIs). These can be downloaded on the navi-
gation system in your vehicle. If you know the
destination, the address can be downloaded.
Alternatively, you can obtain the location of Points of Interest (POIs)/important destinations
in the vicinity.
Furthermore, you can download routes with up
to four way points.
You are prompted to confirm route guidance to
the address entered.
XSelect Yesby turning 3or sliding 1
the controller and confirm with 7.
The system calculates the route and subse-
quently starts the route guidance with the
address entered.
If you select No
the address can be stored in
the address book.
The destination download function is available
if:
Rthe vehicle is equipped with a navigation sys-
tem.
Rthe relevant mobile phone network is availa-
ble and data transfer is possible.
Route Assistance
This service is part of the mbrace PLUS Package
and cannot be purchased separately.
You can use the Route Assistance function even
if the vehicle is not equipped with a navigation
system.
Within the framework of this service, you receive
a professional and reliable form of navigation
support without having to leave your vehicle.
The customer service representative finds a
suitable route depending on your vehicle's cur-
rent position and the desired destination. You
will then be guided live through the current route
section.
Search and Send
General notes
To use "Search & Send", your vehicle must be
equipped with mbrace and a navigation system.
Additionally, an mbrace service subscription
must be completed.
"Search & Send" is a destination entry service. A
destination address which is found on Google
Maps
®can be transferred via mbrace directly to
your vehicle's navigation system.
Features223
Stowage and features
Z
Page 226 of 294

Specifying and sending the destination
address
XGo to the website http://maps.google.com
and enter a destination address into the entry
field.
XTo send the destination address to the e-
mail address of your mbrace account:
click on the corresponding button on the web-
site.
Example:
If you select 'Send to vehicle' and then
'Mercedes-Benz', the destination address will
be sent to your vehicle.
XWhen the "Send" dialog window appears:
Enter the e-mail address you specified when
setting up your mbrace account into the cor-
responding field.
XClick "Send".
Information on specific commands such as
"Address entry" or "Send" can be found on the
website.
Calling up a transmitted destination
address
XTurn the SmartKey to position 2in the ignition
lock (Ypage 105).
The transmitted destination address is loaded
into the vehicle's navigation system.
A display message appears, asking whether
navigation should be started.
XSelect Yesby turning 3or sliding 1
the controller and confirm with 7.
The system calculates the route and subse-
quently starts the route guidance with the
address entered.
If you select No
the address can be stored in
the address book.
If you have sent more than one destination
address, each individual destination must be
confirmed separately.
Destination addresses are loaded in the same
order as the order in which they were sent.
If you own multiple Mercedes-Benz vehicles with
mbrace and activated mbrace accounts:
If multiple vehicles are registered under the
same e-mail address, the destination will be
sent to all the vehicles.
Vehicle remote opening
You can use the vehicle remote opening if you
have unintentionally locked your vehicle and a
replacement SmartKey is not available.
The vehicle can be opened by the Mercedes-
Benz Customer Assistance Center.
The vehicle can be immediately opened
remotely within four days of the ignition being
turned off. After this time, the remote unlocking
may be delayed by 15 to 60 minutes. After
30 days, the vehicle can no longer be opened
remotely.
The vehicle remote unlocking feature is availa-
ble if the relevant mobile phone network is avail-
able and a data connection is possible.
XContact the following service hotlines:
Mercedes-Benz Customer Assistance Center
at 1-800-FOR-MERCedes (1-800-367-6372)
or 1-866-990-9007
You will be asked for your password.
XReturn to your vehicle at the time agreed upon
with the Mercedes-Benz Customer Assis-
tance Center.
Alternatively, the vehicle can be opened via:
Rthe Internet, under the "Owners Online" sec-
tion
Rtelephone applications (e.g. for iPhone®,
Android™)
To do this, you will need your identification num-
ber and password.
Vehicle remote closing
The vehicle remote closing feature can be used
when you have forgotten to lock the vehicle and you are no longer nearby.
The vehicle can then be locked by the Mercedes-
Benz Customer Assistance Center.
The vehicle can be immediately remotely locked
within four days of the ignition being turned off.
After this time, remote closing may be delayed
by 15 to 60 minutes. After 30 days the vehicle
can no longer be locked remotely.
The vehicle remote closing feature is available if
the relevant mobile phone network is available
and a data connection is possible.
XContact the following service hotlines:
224Features
Stowage and features
Page 227 of 294

or 1-866-990-9007
You will be asked for your password.
The next time you are inside the vehicle and you
switch on the ig")
Mercedes-Benz Customer Assistance Center
at 1-800-FOR-MERCedes (1-800-367-6372)
or 1-866-990-9007
You will be asked for your password.
The next time you are inside the vehicle and you
switch on the ignition, the Doors Locked
Remotelymessage appears in the multifunction
display.
Alternatively, the vehicle can be locked via:
Rthe Internet, under the "Owners Online" sec-
tion
Rtelephone applications (e.g. for iPhone®,
Android™)
To do this, you will need your identification num-
ber and password.
Stolen vehicle recovery service
If your vehicle has been stolen:
XNotify the police.
The police will issue a numbered incident
report.
XThis number will be forwarded to the
Mercedes-Benz Customer Assistance Center
together with your PIN.
The Mercedes-Benz Customer Assistance
Center then tries to locate the system. The
Mercedes-Benz Customer Assistance Center
contacts you and the local law enforcement
agency if the vehicle is located.
However, only the law enforcement agency is
informed of the location of the vehicle.
If the anti-theft alarm system is activated for
longer than 30 seconds, the Mercedes-Benz
Customer Assistance Center is automatically
notified.
Vehicle Health Check
With the Vehicle Health Check, the Customer
Assistance Center can provide improved sup-
port for problems with your vehicle. During an
existing call, vehicle data is transferred to the
Customer Assistance Center.
The customer service representative can use
the received data to decide what kind of assis-
tance is required. You are then, for example,
guided to the nearest Mercedes-Benz Service
Center or a recovery vehicle is called.
If vehicle data need to be transferred during an
Info call or a Roadside Assistance call, this is
initiated by the Customer Assistance Center. You will see the
Roadside Assistance Con‐
nectedmessage in the display. If the Vehicle
Health Check can be started, the RequestforVehicle Diagnostics Received Startvehicle diagnostics?message appears in
the display.
XPress the Yesbutton to confirm the message.
XIf theVehicle Diagnostics PleaseStart Ignitionmessage appears: turn the
SmartKey to position 2in the ignition lock
(
Ypage 105).
XIf the Please follow the instructionsreceivedbyphoneandmoveyourvehi‐cle to a safe position.message
appears: please follow the instructions
received by phone and move your vehicle to a
safe position.
The message in the display disappears.
The vehicle operating state check begins. You
will see the Vehicle Diagnostics Active
message.
If you select Cancel
, the Vehicle Health
Check is canceled completely.
When the check is complete, the Sending
vehicle diagnostics data. (Voice con‐nection may be interrupted duringdatatransfer)message appears. The vehicle
data can now be sent.
XPress the OKbutton to confirm the message.
The voice connection with the Customer
Assistance Center is terminated.
You will see the Vehicle Diagnostics:
Transferring Data...message.
The vehicle data is sent to the Customer
Assistance Center.
Depending on what the customer service rep-
resentative agreed with you, the voice connec-
tion is re-established after the transfer is com-
plete. If necessary, you will be contacted at a
later time by another means, e.g. by e-mail or
phone.
Another function of the Vehicle Health Check is
the transfer of service data to the Customer
Assistance Center. If a service is due, the display
shows a message to this effect together with
information about any special offers at your
workshop.
This information can also be called up under
"Owners Online" at http://www.mbusa.com.
Information on the data stored in the vehicle
(
Ypage 28).
Features225
Stowage and features
Z
Page 228 of 294
.
Downloading routes
Downloading routes allows you to transfer and
save predefined routes in the navigation sys-
tem.
A route can be prepared and sent by e")
Information on Roadside Assistance
(Ypage 25).
Downloading routes
Downloading routes allows you to transfer and
save predefined routes in the navigation sys-
tem.
A route can be prepared and sent by either a
customer service representative or under "Own-
ers Online" at http://www.mbusa.com.
Each route can include up to four way points.
Once a route has been received by the naviga-
tion system, you will see theDo
youwanttostart route guidance? DestinationReceived destination has been savedin "Previous destinations".message on
the multimedia system display.
The route is saved.
XTo start route guidance: selectYes.
An overview of the route is shown in the dis-
play.
If you select No
, the saved route can be called
up later in the navigation menu.
XSelect Start.
Route guidance starts.
Downloaded and saved routes can be called up
again.
Speed alert
You can define the upper speed limit, which
must not be exceeded by the vehicle.
If this selected speed is exceeded by the vehicle,
a message will be sent to the Customer Assis-
tance Center. The Customer Assistance Center
then forwards this information to you.
You can select the way in which you receive this
information beforehand. Possible options
include text message, e-mail or an automated
call.
The data you receive contains the following
information:
Rthe location where the speed limit was excee-
ded
Rthe time at which the speed limit was excee-
ded
Rthe selected speed limit which was exceeded
Geo fencing
Geo fencing allows you to select areas which the
vehicle should not enter or leave. You will be
informed if the vehicle crosses the boundaries
of the selected areas. You can select the way in
which you receive this information beforehand.
Possible options include text message, e-mail or an automated call.
The area can be determined as either a circle or
a polygon with a maximum of ten corners. You
can specify up to ten areas simultaneously. Dif-
ferent settings are possible for each area.
These settings can be called up under "Owners
Online" at http://www.mbusa.com.
Alternatively, you can trigger an Info call and
notify the customer service representative that
you wish to activate geo-fencing.
Currently inactive areas can be activated by text
message.
Triggering the vehicle alarm
With this function, you can trigger the vehicle's
panic alarm via text message. An alarm sounds
and the exterior lighting flashes. Depending on
the setting, the panic alarm lasts five or ten sec-onds. Afterwards, the alarm switches off.
Brush guard (USA only)
If the brush guard has to be removed, contact a
qualified specialist workshop.
Garage door opener
General notes
You can use the HomeLink®garage door opener
integrated into the rear-view mirror to operate
up to three different gate/garage door opener
systems.
Certain garage door drives are incompatible
with the integrated garage door opener. If you
have difficulty programing the integrated garage
door opener, contact a Mercedes-Benz Service
Center.
226Features
Stowage and features
Page 229 of 294

Alternatively, you can call the following tele-
phone assistance services:
RUSA:Mercedes-Benz Customer Assistance
Center at 1-800-FOR-MERCedes
RCanada: Customer Service at
1-800-387-0100
RHomeLink®hotline 1-800-355-3515 (free of
charge)
More information on HomeLink
®and/or com-
patible products is also available online at
http://www.homelink.com.
Notes on the declaration of conformity
(
Ypage 26).
USA: FCC ID: CB2HMIHL4
Canada: IC: 279B-HMIHL4
USA only:
This device complies with Part 15 of the FCC
Rules. Operation is subject to the following two
conditions:
1. This device may not cause harmful interfer-
ence, and
2. this device must accept any interference
received, including interference that may cause
undesired operation.
Any unauthorized modification to this device
could void the user's authority to operate the
equipment.
Canada only:
This device complies with RSS-210 of Industry
Canada. Operation is subject to the following
two conditions:
1. This device may not cause harmful interfer-
ence, and
2. this device must accept any interference
received, including interference that may cause
undesired operation.
Any unauthorized modification to this device
could void the user's authority to operate the
equipment.
Important safety notes
GWARNING
When you operate or program the garage door
with the integrated garage door opener, per-
sons in the range of movement of the garage
door can become trapped or struck by the
garage door. There is a risk of injury.
When using the integrated garage door
opener, always make sure that nobody is
within the range of movement of the garage
door.
GWARNING
Combustion engines emit poisonous exhaust
gases such as carbon monoxide. Inhaling
these exhaust gases leads to poisoning. There
is a risk of fatal injury. Therefore never leave
the engine running in enclosed spaces with-
out sufficient ventilation.
Only operate the following garage doors using
the garage door opener:
Rgarage doors with a safety stop and reversing
function
Rgarage doors which conform to the current
U.S. safety standards
When programming a garage door opener, park
the vehicle outside the garage. Do not run the
engine while programming.
Programming
Programming
Pay attention to the "Important safety notes"
(Ypage 227).
Garage door remote control Ais not included
with the integrated garage door opener.
XDelete the memory of the integrated remote
control (Ypage 229) before programming it
for the first time.
XTurn the SmartKey to position 2in the igni-
tion lock (Ypage 105).
XSelect one of buttons ;to? to use to con-
trol the garage door drive.
Features227
Stowag ean d features
Z
Page 230 of 294

XTo start programming mode:press and
hold one of buttons ;to? on the integrated
garage door opener.
The garage door opener is now in program-
ming mode. After a short time, indicator
lamp :will start flashing. It flashes approx-
imately once per second.
Indicator lamp :flashes immediately the
first time that the transmitter button is pro-
grammed. If this transmitter button has
already been programmed, indicator lamp :
will only start flashing at a rate of once a sec-
ond after 20 seconds have elapsed.
XContinue to hold the transmitter button.
XTo program the remote control: point
transmitter button Bof remote control A
towards the transmitter buttons on the rear-
view mirror at a distance of 2 to 12 in (5 to
30 cm).
XKeep transmitter button Bon remote control
A pressed until indicator lamp :starts to
flash rapidly.
When indicator lamp :flashes rapidly: pro-
gramming is finished.
XRelease transmitter buttons ;,=or? on
the integrated remote control and transmitter
button Bon remote control A.
If indicator lamp :does not flash rapidly and
goes out after approximately 20 second s:
repeat the programming process for the cor-
responding button on the rear-view mirror.
When doing so, vary the distance between
remote control Aand the rear-view mi
rror.
The required distance between remote con-
trol Aand the integrated garage door opener
depends on the garage door drive system.
Several attempts might be necessary. You
should test every position for at least
20 seconds before trying another position.
If the garage door system works with a rolling
code, you must synchronize the remote control
integrated in the rear-view mirror with the
garage door system receiver after program-
ming.
You can find further information on this in the
operating instructions of the garage door sys-
tem.
Synchronizing the rolling code
Pay attention to the "Important safety notes"
(Ypage 227).
If the garage door system uses a rolling code,
you will also have to synchronize the garage door system with the integrated garage door
opener in the rear-view mirror. To do this you will
need to use the programming button on the door
drive control panel. The programming button
may be located in different places depending on
the manufacturer. It is usually located on the
door drive unit on the garage ceiling.
Familiarize yourself with the garage door drive
operating instructions, e.g. under "Program-
ming additional remote controls", before carry-
ing out the following steps.
Your vehicle must be within reach of the garage
door or gate opener drive. Make sure that nei-
ther your vehicle nor any persons/objects are
present within the sweep of the door or gate.
Observe the safety notes when performing the
rolling code synchronization (
Ypage 227).
XTurn the SmartKey to position
2in the igni-
tion lock (Ypage 105).
XGet out of the vehicle.
XPress the programming button on the door
drive unit.
You now have 30 seconds to initiate the next
step.
XGet into the vehicle.
XPress previously programmed button ;,=
or ? on the integrated garage door opener
repeatedly until the door closes.
The rolling code synchronization i
s then com-
plete.
Notes on programming the remote con-
trol
Canadian radio frequency laws require a "break"
(or interruption) of the transmission signals
after broadcasting for a few seconds. Therefore,
these signals may not last long enough for the
integrated remote control to recognize the sig-
nal during programming. Comparable with
Canadian law, American garage door openers
also have a built-in "interruption".
Proceed as follows:
Rif you live in Canada.
Rif you have difficulties programming the
garage door opener (regardless of where you
live) when following the programming steps.
XPress and hold one of buttons ;to? on the
integrated garage door opener until the inte-
grated remote control is successfully set up.
XSimultaneously press transmitter button B
on remote control Aand hold for two sec-
228Features
Stowage and features
Page 231 of 294

onds. Then let go for 2 seconds, press again
and hold for 2 seconds.
XRepeat this sequence on transmitter button
Bon remote control Auntil the frequency
signal is established.
XIf the setup procedure is successful, indicator
lamp :flashes once slowly and goes out
after a few seconds.
If indicator lamp :does not flash slowly and
then go out: repeat the programming process
for the corresponding button on the rear-view
mirror. When doing so, vary the distance
between remote control Aand the rear-view
mirror.
The required distance between remote con-
trol Aand the integrated garage door opener
depends on the garage door drive system.
Several attempts might be necessary. You
should test every position for at least
20 seconds before trying another position.
The required distance between remote control
A and the integrated garage door opener
depends on the garage door drive system. Sev-
eral attempts might be necessary. You should
test every position for at least 25 seconds
before trying another position.
Problems when programming
If you have problems when programming the
integrated remote control, please note the fol-
lowing:
RCheck the transmitter frequency used by
garage door drive remote control Aand
whether it is supported. The transmitter fre-
quency can usually be found on the back of
remote control Afor the garage door drive.
The integrated remote control is compatible
with devices that have units which operate in
the frequency range of 280 to 390 MHz.
RReplace the batteries in remote control A.
This increases the probability of remote con-
trol Asending a strong and precise signal to
the integrated remote control on the rear-
view mirror.
RWhen programming, hold remote control A
at varying distances and angles from the
transmitter button that you are programming.
Try various angles at a distance between 2and
12 inches (5to 30 cm) or at the same angle
but at varying distances.
RIf a further remote control Ais available for
the same garage door drive, repeat the same
programming steps with this remote control A. Before performing these steps, make sure
that new batteries have been installed in
garage door drive remote control A.
RNote that some remote controls only transmit
for a limited amount of time (the indicator
lamp on the remote control goes out). Press
button Bon remote control Aagain before
transmission ends.
RAlign the antenna cable of the garage door
opener unit. This can improve signal trans-
mission.
Opening/closing the garage door
Once programmed, the integrated remote con-
trol will assume the function of the garage door
system's remote control. Please also read the
operating instructions for the garage door sys-
tem.
XTurn the SmartKey to position in the ignition
lock 2(Ypage 105).
XPress one of buttons ;to? on the integra-
ted remote control in the rear-view mirror that
is programmed to operate the garage door.
Garage door system with fixed code: indicator
lamp :lights up continuously.
Garage door system with rolling code: indica-
tor lamp :flashes briefly and then lights up
for approximately two seconds. This is repea-
ted for up to 20 seconds.
The transmitter will transmit a signal for as
long as the transmitter button is being
pressed. The transmission will be halted after a maximum of 20 seconds and indicator
lamp :will flash. Press the transmitter but-
ton again if necessary.
XPress button ;,=or? again if necessary.
Clearing the memory
Make sure that you clear the memory of the
integrated garage door opener before selling the
vehicle.
XTurn the SmartKey to position 2
(Ypage 105) in the ignition lock.
XPress and hold transmitter buttons ;and ?
for approximately 20 seconds until indicator
lamp :flashes rapidly.
The memory of the integrated garage door
opener in the rear-view mirror is cleared.
Features229
Stowage and features
Z
Page 232 of 294

Engine compartment
Hood
Important safety notes
GWARNING
If the hood is unlatched, it may open up when the vehicle is in motion and block your view.
There is a risk of an accident.
Never unlatch the hood while driving. Before
every trip, ensure that the hood is locked.
GWARNING
When opening and closing the hood, it may
suddenly fall into the closed position. There is a risk of injury to persons within range of
movement of the hood.
Open and close the hood only when no one is
within its range of movement.
GWARNING
Opening the hood when the engine is over-
heated or when there is a fire in the engine
compartment could expose you to hot gases
or other service products. There is a risk of
injury.
Let an overheated engine cool down before
opening the hood. If there is a fire in the
engine compartment, keep the hood closed
and contact the fire department.
GWARNING
The ignition system and the fuel injection sys-
tem work under high voltage. If you touch
components which are under voltage, you
could get an electric shock. There is a risk of
injury.
Never touch components of the ignition sys-
tem or fuel injection system when the ignition
is switched on.
GWARNING
The engine compartment contains moving
components. Certain components, such as
the radiator fan, may continue to run or start
again suddenly when the ignition is off. There is a risk of injury.
If you need to do any work inside the engine
compartment:
Rswitch off the ignition
Rnever reach into the area where there is a
risk of danger from moving components,
such as the fan rotation area
Rremove jewelry and watches
Rkeep items of clothing and hair, for exam-
ple, away from moving parts
Do not touch the following when the ignition is
switched on:
Rignition coils
Rspark plug connectors
Rtest socket
Opening the hood
GWARNING
Certain components in the engine compart-
ment, such as the engine, radiator and parts
of the exhaust system, can become very hot.
Working in the engine compartment poses a
risk of injury.
Where possible, let the engine cool down and touch only the components described in the
following.
GWARNING
When the hood is open and the windshield
wipers are set in motion, you can be injured by
the wiper linkage. There is a risk of injury.
Always switch off the windshield wipers and
the ignition before opening the hood.
!Make sure that the windshield wipers are
not folded away from the windshield. You
could otherwise damage the windshield wip-
ers or the hood.
230Engine compartment
Maintenance and care
 1
1 2
2 3
3 4
4 5
5 6
6 7
7 8
8 9
9 10
10 11
11 12
12 13
13 14
14 15
15 16
16 17
17 18
18 19
19 20
20 21
21 22
22 23
23 24
24 25
25 26
26 27
27 28
28 29
29 30
30 31
31 32
32 33
33 34
34 35
35 36
36 37
37 38
38 39
39 40
40 41
41 42
42 43
43 44
44 45
45 46
46 47
47 48
48 49
49 50
50 51
51 52
52 53
53 54
54 55
55 56
56 57
57 58
58 59
59 60
60 61
61 62
62 63
63 64
64 65
65 66
66 67
67 68
68 69
69 70
70 71
71 72
72 73
73 74
74 75
75 76
76 77
77 78
78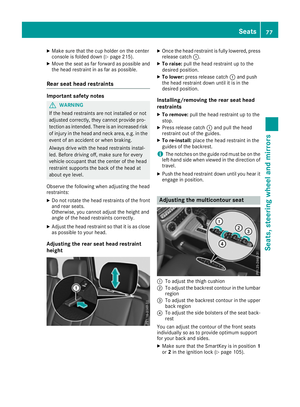 79
79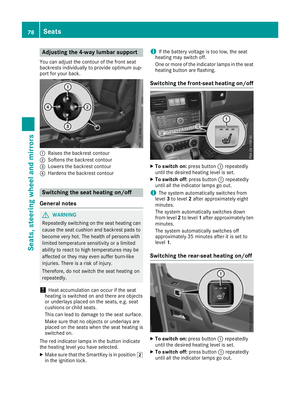 80
80 81
81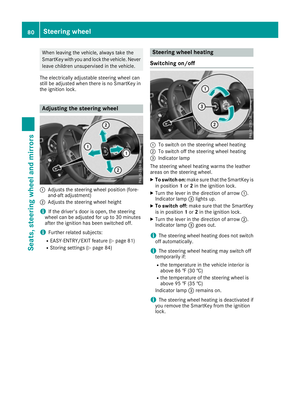 82
82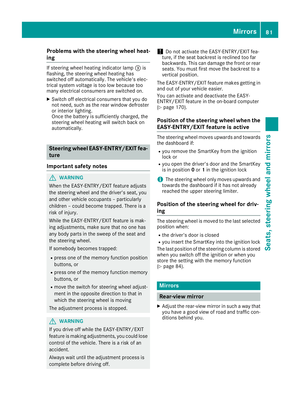 83
83 84
84 85
85 86
86 87
87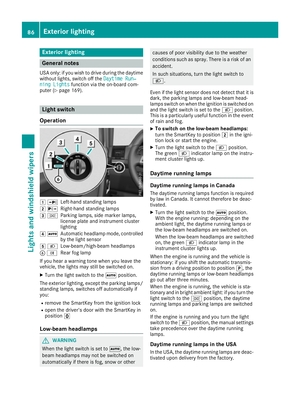 88
88 89
89 90
90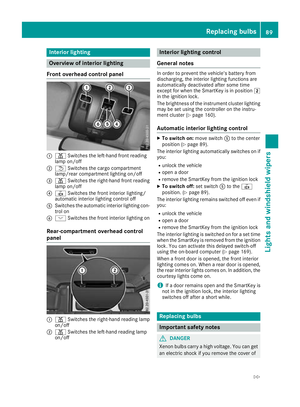 91
91 92
92 93
93 94
94 95
95 96
96 97
97 98
98 99
99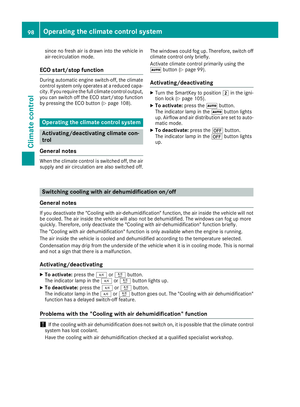 100
100 101
101 102
102 103
103 104
104 105
105 106
106 107
107 108
108 109
109 110
110 111
111 112
112 113
113 114
114 115
115 116
116 117
117 118
118 119
119 120
120 121
121 122
122 123
123 124
124 125
125 126
126 127
127 128
128 129
129 130
130 131
131 132
132 133
133 134
134 135
135 136
136 137
137 138
138 139
139 140
140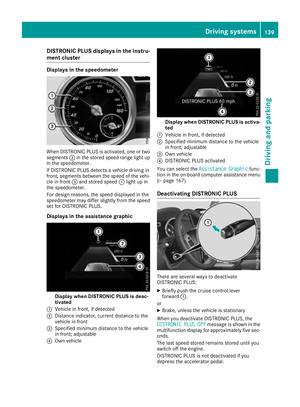 141
141 142
142 143
143 144
144 145
145 146
146 147
147 148
148 149
149 150
150 151
151 152
152 153
153 154
154 155
155 156
156 157
157 158
158 159
159 160
160 161
161 162
162 163
163 164
164 165
165 166
166 167
167 168
168 169
169 170
170 171
171 172
172 173
173 174
174 175
175 176
176 177
177 178
178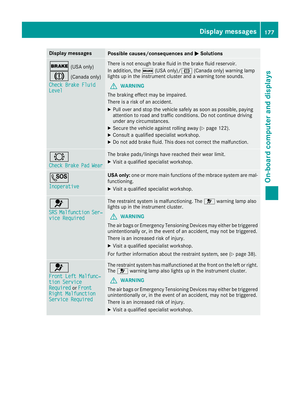 179
179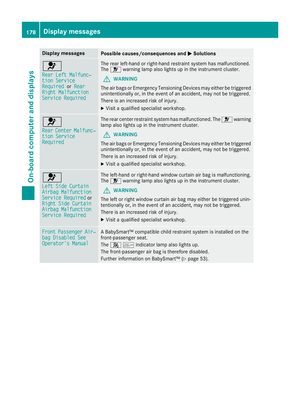 180
180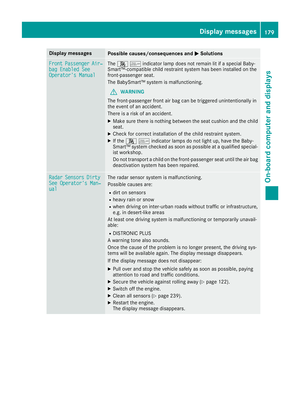 181
181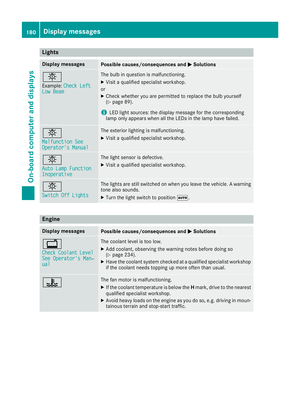 182
182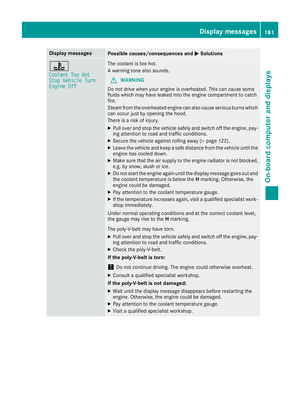 183
183 184
184 185
185 186
186 187
187 188
188 189
189 190
190 191
191 192
192 193
193 194
194 195
195 196
196 197
197 198
198 199
199 200
200 201
201 202
202 203
203 204
204 205
205 206
206 207
207 208
208 209
209 210
210 211
211 212
212 213
213 214
214 215
215 216
216 217
217 218
218 219
219 220
220 221
221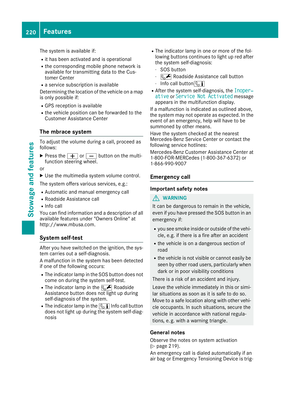 222
222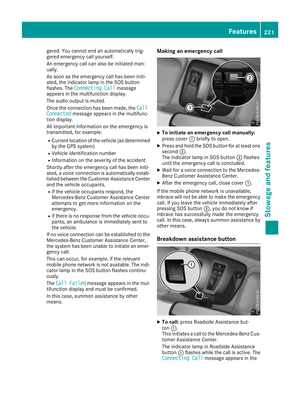 223
223 224
224 225
225 226
226 227
227 228
228 229
229 230
230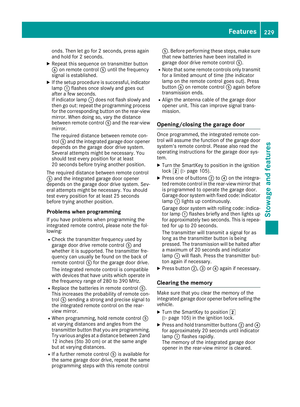 231
231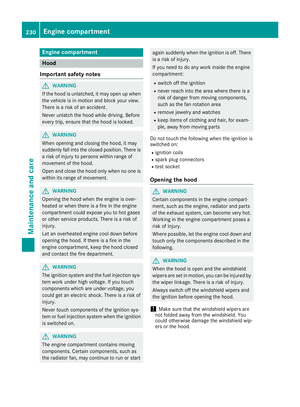 232
232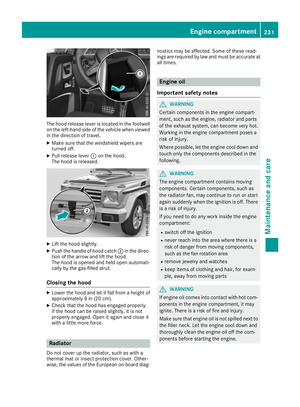 233
233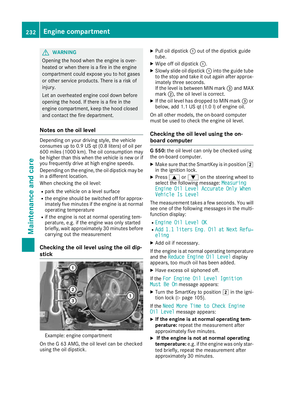 234
234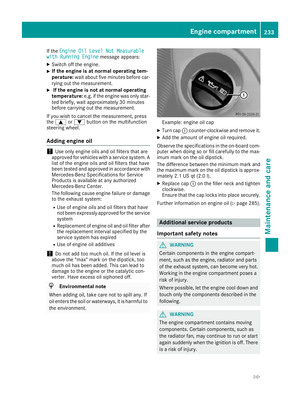 235
235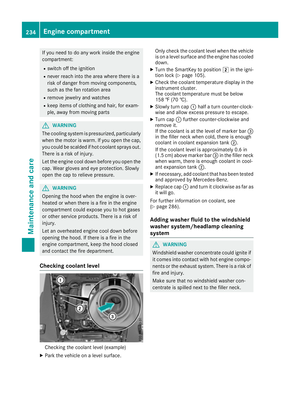 236
236 237
237 238
238 239
239 240
240 241
241 242
242 243
243 244
244 245
245 246
246 247
247 248
248 249
249 250
250 251
251 252
252 253
253 254
254 255
255 256
256 257
257 258
258 259
259 260
260 261
261 262
262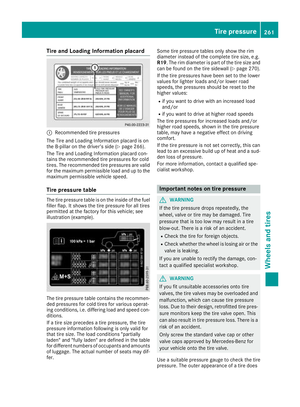 263
263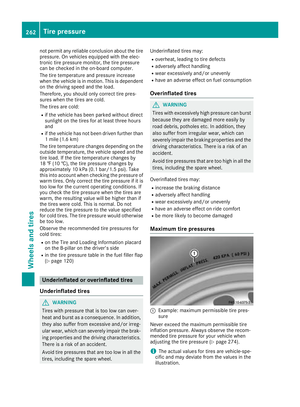 264
264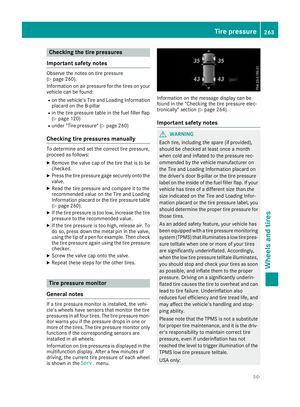 265
265 266
266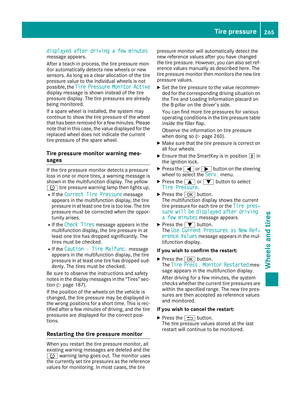 267
267 268
268 269
269 270
270 271
271 272
272 273
273 274
274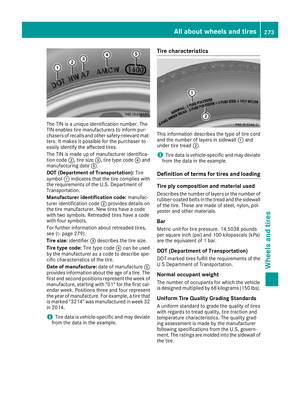 275
275 276
276 277
277 278
278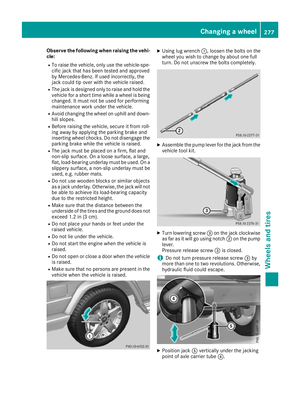 279
279 280
280 281
281 282
282 283
283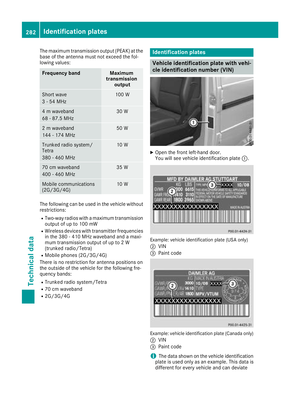 284
284 285
285 286
286 287
287 288
288 289
289 290
290 291
291 292
292 293
293