2018 MERCEDES-BENZ G-CLASS tow bar
[x] Cancel search: tow barPage 159 of 294
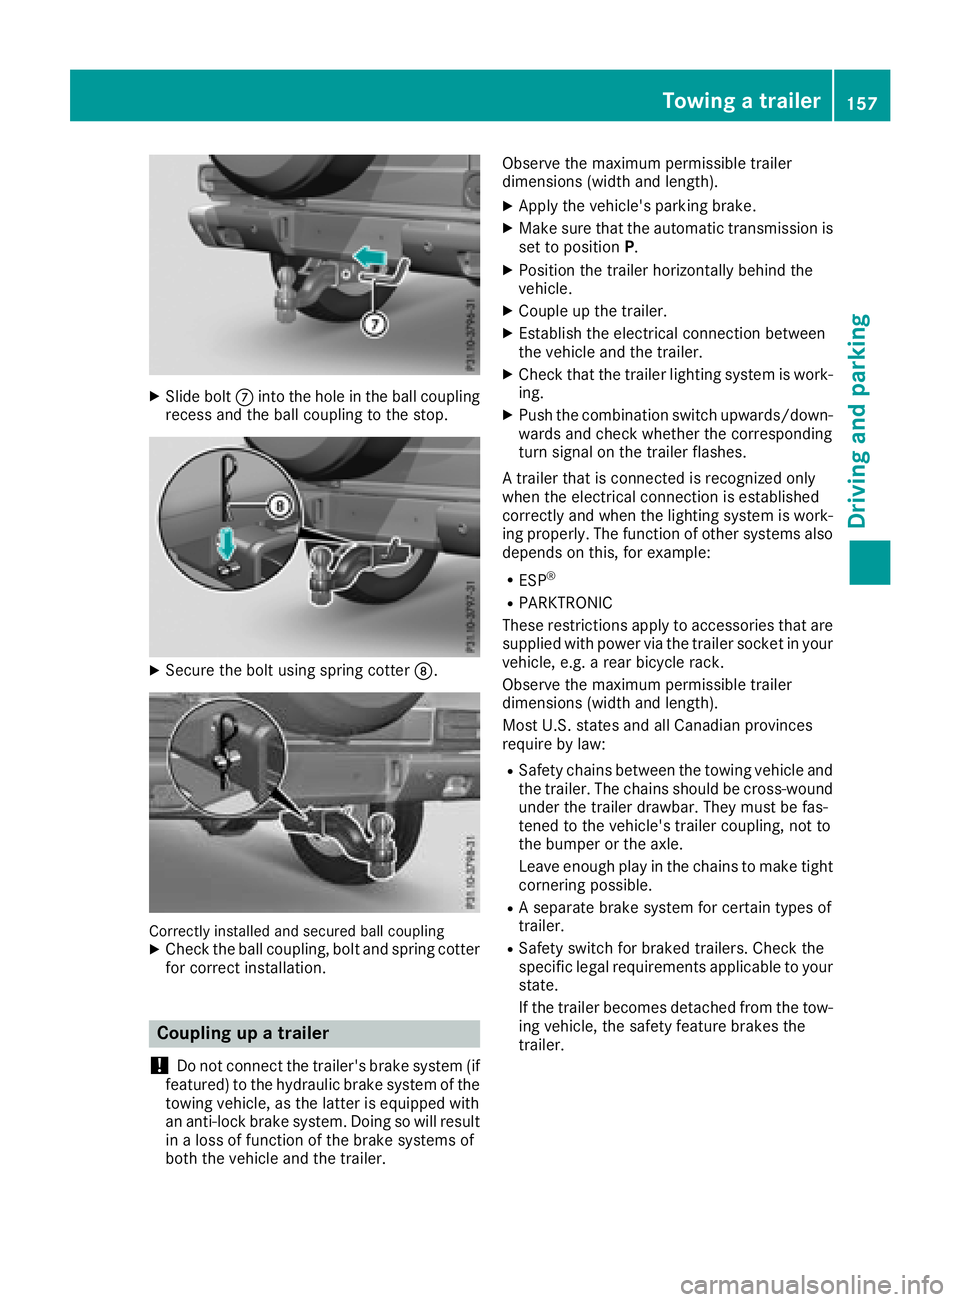
XSlide boltCinto the hole in the ball coupling
recess and the ball coupling to the stop.
XSecure the bolt using spring cotter D.
Correctly installed and secured ball couplingXCheck the ball coupling, bolt and spring cotter
for correct installation.
Coupling up a trailer
!
Do not connect the trailer's brake system (if
featured) to the hydraulic brake system of the
towing vehicle, as the latter is equipped with
an anti-lock brake system. Doing so will result
in a loss of function of the brake systems of
both the vehicle and the trailer. Observe the maximum permissible trailer
dimensions (width and length).
XApply the vehicle's parking brake.
XMake sure that the automatic transmission is
set to position
P.
XPosition the trailer horizontally behind the
vehicle.
XCouple up the trailer.
XEstablish the electrical connection between
the vehicle and the trailer.
XCheck that the trailer lighting system is work-
ing.
XPush the combination switch upwards/down-
wards and check whether the corresponding
turn signal on the trailer flashes.
A trailer that is connected is recognized only
when the electrical connection is established
correctly and when the lighting system is work-
ing properly. The function of other systems also
depends on this, for example:
RESP®
RPARKTRONIC
These restrictions apply to accessories that are
supplied with power via the trailer socket in your
vehicle, e.g. a rear bicycle rack.
Observe the maximum permissible trailer
dimensions (width and length).
Most U.S. states and all Canadian provinces
require by law
:
RSafety chains between the towing vehicle and
the trailer. The chains should be cross-wound
under the trailer drawbar. They must be fas-
tened to the vehicle's trailer coupling, not to
the bumper or the axle.
Leave enough play in the chains to make tight
cornering possible.
RA separate brake system for certain types of
trailer.
RSafety switch for braked trailers. Check the
specific legal requirements applicable to your
state.
If the trailer becomes detached from the tow-
ing vehicle, the safety feature brakes the
trailer.
Towing a trailer157
Driving and parking
Z
Page 160 of 294

Towing a trailer
There are several legal requirements for towing
a trailer, e.g. the maximum permissible speed.
Make sure that your car/trailer combination
complies with the local regulations:
Rin your place of residence
Rat your destination
The police and local authorities can provide reli- able information.
In order to accumulate driving experience and
accustom yourself to the new handling charac-
teristics, practice the following at a location
where there is no traffic:
RCornering
RStopping
RBacking up
Before driving, check the following:
RTrailer tow hitch
RSafety switch for braked trailers
RSafety chains
RElectrical connections
RLighting system
RWheels and tires
RLoad-securing measures
Adjust the exterior mirrors to provide an unob-
structed view of the rear section of the trailer.
Trailers with electronically controlled
brakes: pull away carefully in the vehicle/trailer
combination, brake manually using the brake
controller and check whether the brakes func-
tion correctly.
Check the load securing measures on a regular
basis.
When towing a trailer, your vehicle's handling
characteristics will be different in comparison
with when driving without a tra
iler.
The vehicle/trailer combination:
Ris heavier
Ris restricted in its acceleration and gradient-
climbing capability
Rhas an increased braking distance
Ris affected more by strong crosswinds
Rdemands more sensitive steering
Rhas a larger turning radius
Avoid sudden steering movements.
Avoid braking abruptly. If possible, brake gently
at first to allow the trailer to run on. Then,
increase the braking force rapidly. When overtaking, pay particular attention to the
extended length of your vehicle/trailer combi-
nation.
Due to the length of the vehicle/trailer combi-
nation, you require additional road space when
overtaking before you can change back to the
original lane.
If the automatic transmission repeatedly shifts
between gears on uphill or downhill gradients,
shift to a lower gear.
Driving in a lower gear and at a reduced speed
decreases the risk of engine damage.
Avoid constant braking. Otherwise, the vehicle
brakes and possibly also the trailer brakes may
overheat.
When driving downhill, shift to a lower gear to
utilize the engine's braking effect.
If the coolant temperature increases dramati-
cally while the air-conditioni ng s
ystem is
switched on, switch off the air-conditioning sys- tem.
Coolant heat can also be dissipated by opening
the windows and switching the ventilation
blower and the interior temperature to the high-
est level.
Decoupling a trailer
GWARNING
If you uncouple a trailer with the overrun
brake engaged, you could trap your hand
between the vehicle and the trailer drawbar.
There is a risk of injury.
Do not uncouple a trailer if the overrun brake
is engaged.
!Do not disconnect a trailer with an engaged
overrun brake. Otherwise, your vehicle could
be damaged by the rebounding of the overrun
brake.
XApply the parking brake.
XMake sure that the automatic transmission is
set to position P.
XSecure the vehicle and trailer against rolling
away.
XClose all doors, including the rear door.
XRemove the trailer cable.
XRemove the safety chains, if there are any.
XUncouple the trailer.
158Towing a trailer
Driving an d parking
Page 161 of 294
Permissible trailer and drawbar loads
Weight specifications
The gross trailer weight is calculated as the
weight of the trailer plus the weight of the load
and the trailer's equipment.
You will find permissible trailer loads under
"Technical data" (
Ypage 291).
Loading a trailer
RWhen loading the trailer, make sure that nei-
ther the permissible gross trailer weight nor
the permissible gross vehicle weight are
exceeded. The permissible gross vehicle
weight is indicated on the identification plate on the B-pillar on the driver's side of the vehi-
cle.
You can find the maximum permissible values
on the type plates of your vehicle and the
trailer. When calculating how much weight
the vehicle and trailer may carry, pay atten-
tion to the respective lowest values.
RThe trailer drawbar load on the ball coupling
must be added to the rear axle load to avoid
exceeding the permissible gross axle weight.
The permissible gross vehicle weight is indi-
cated on the identification plate on the B-pil-
lar on the driver's side of the vehicle.
Mercedes-Benz recommends a trailer load
where the trailer drawbar noseweight accounts
for 8% to 15% of the permissible gross trailer
weight.
Additional accessories, passengers and load
reduce the permissible trailer load and nose-
weight that your vehicle can tow.
Checking the vehicle and trailer weight
RHave the towing vehicle, including the driver,
passengers and load, and completely loaded
trailer weighed on a suitable weighing
machine. This will allow you to ensure that the
weights of the towing vehicle and trailer com-
ply with the maximum permissible values.
RCheck the gross axle weight rating of the front
and rear axles, the gross weight of the trailer
and trailer drawbar load.
Trailer power supply
!
You can connect accessories with a maxi-
mum power consumption of 180 W to the
permanent power supply.
You must not charge a trailer battery using the
power supply.
The trailer socket of your vehicle is equipped at
the factory with a permanent power supply.
The permanent power supply is supplied via
trailer socket pin 9.
A qualified specialist workshop can provide
more information about installing the trailer
electrics.
Trailer with 7-pin connector
General notes
Trailers with 7-pin connector: you can make a
connection to the 13-pin connector on the ball
coupling using an adapter plug or, if necessary,
an adapter cable. Both can be obtained in a
qualified specialist workshop.
Installing the adapter
!Make sure that there is enough slack in the
cable for cornering so that the cable cannot
become detached.
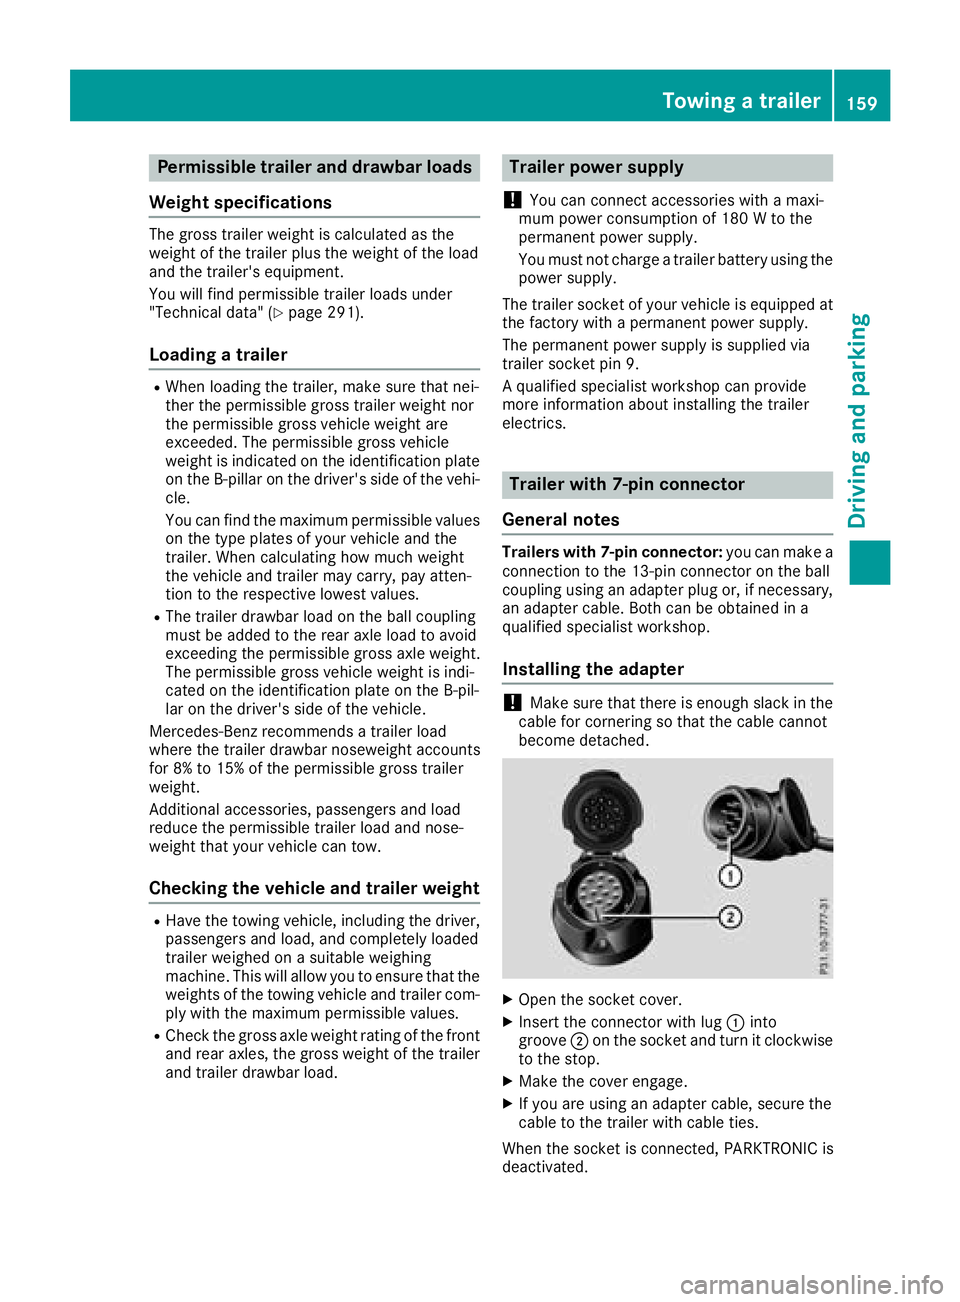
XOpen the socket cover.
XInsert the connector with lug :into
groove ;on the socket and turn it clockwise
to the stop.
XMake the cover engage.
XIf you are using an adapter cable, secure the
cable to the trailer with cable ties.
When the socket is connected, PARKTRONIC is
deactivated.
Towing a trailer159
Driving and parking
Z
Page 253 of 294
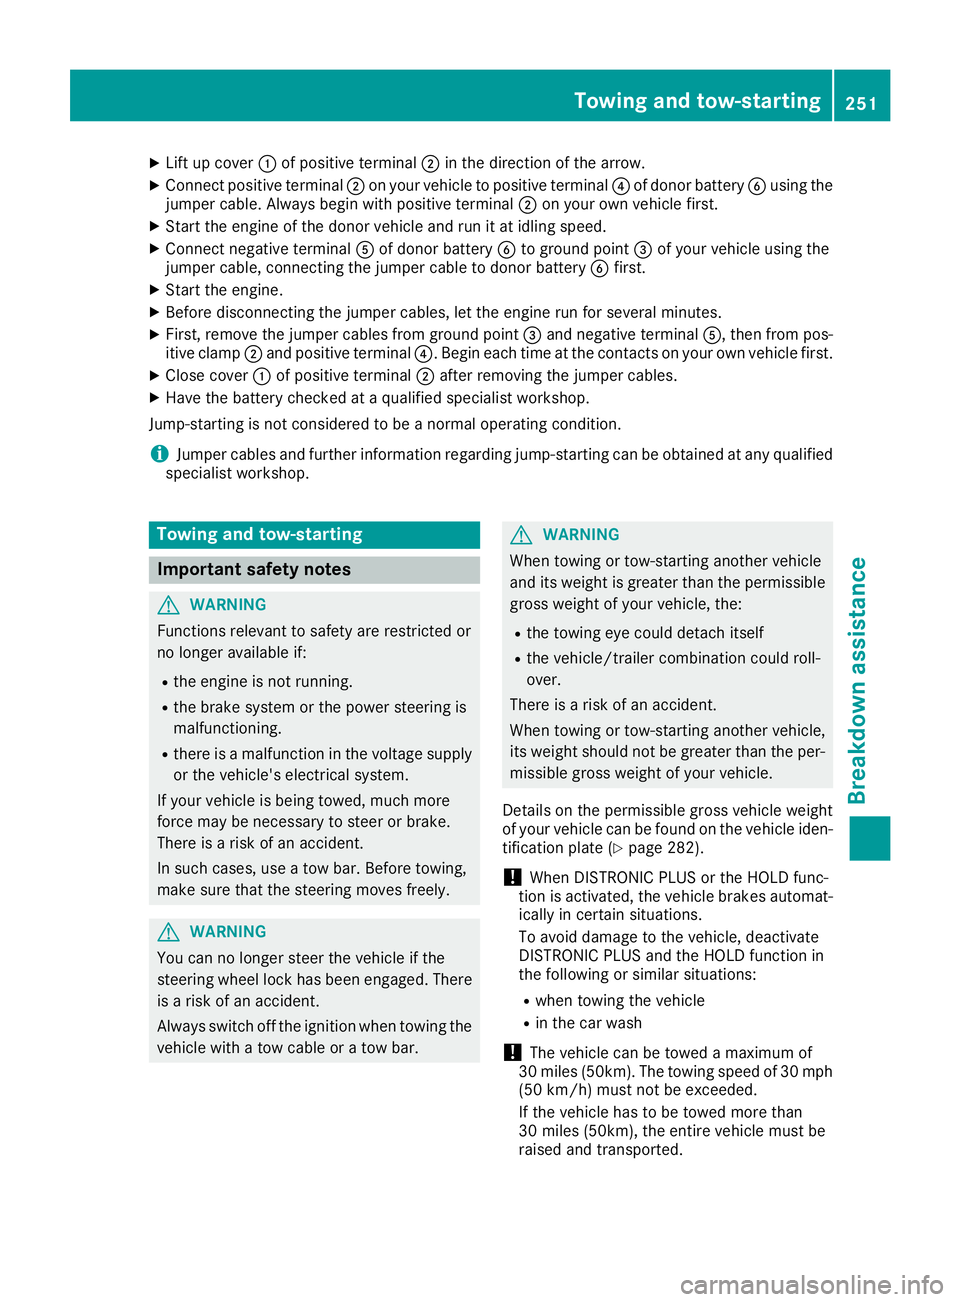
XLift up cover:of positive terminal ;in the direction of the arrow.
XConnect positive terminal ;on your vehicle to positive terminal ?of donor battery Busing the
jumper cable. Always begin with positive terminal ;on your own vehicle first.
XStart the engine of the donor vehicle and run it at idling speed.
XConnect negative terminal Aof donor battery Bto ground point =of your vehicle using the
jumper cable, connecting the jumper cable to donor battery Bfirst.
XStart the engine.
XBefore disconnecting the jumper cables, let the engine run for several minutes.
XFirst, remove the jumper cables from ground point =and negative terminal A, then from pos-
itive clamp ;and positive terminal ?. Begin each time at the contacts on your own vehicle first.
XClose cover:of positive terminal ;after removing the jumper cables.
XHave the battery checked at a qualified specialist workshop.
Jump-starting is not considered to be a normal operating condition.
iJumper cables and further information regarding jump-starting can be obtained at any qualified
specialist workshop.
Towing and tow-starting
Important safety notes
GWARNING
Functions relevant to safety are restricted or
no longer available if:
Rthe engine is not running.
Rthe brake system or the power steering is
malfunctioning.
Rthere is a malfunction in the voltage supply or the vehicle's electrical system.
If your vehicle is being towed, much more
force may be necessary to steer or brake.
There is a risk of an accident.
In such cases, use a tow bar. Before towing,
make sure that the steering moves freely.
GWARNING
You can no longer steer the vehicle if the
steering wheel lock has been engaged. There
is a risk of an accident.
Always switch off the ignition when towing the
vehicle with a tow cable or a tow bar.
GWARNING
When towing or tow-starting another vehicle
and its weight is greater than the permissible
gross weight of your vehicle, the:
Rthe towing eye could detach itself
Rthe vehicle/trailer combination could roll-
over.
There is a risk of an accident.
When towing or tow-starting another vehicle,
its weight should not be greater than the per- missible gross weight of your vehicle.
Details on the permissible gross vehicle weight
of your vehicle can be found on the vehicle iden-
tification plate (
Ypage 282).
!When DISTRONIC PLUS or the HOLD func-
tion is activated, the vehicle brakes automat-
ically in certain situations.
To avoid damage to the vehicle, deactivate
DISTRONIC PLUS and the HOLD function in
the following or similar situations:
Rwhen towing the vehicle
Rin the car wash
!The vehicle can be towed a maximum of
30 miles (50km). The towing speed of 30 mph (50 km/h) must not be exceeded.
If the vehicle has to be towed more than
30 miles (50km), the entire vehicle must be
raised and transported.
Towing and tow-starting251
Breakdown assistance
Z
Page 254 of 294
!Only secure the tow cable or tow bar to the
towing eyes. You could otherwise damage the
vehicle.
!Do not tow with sling-type equipment. This
could damage the vehicle.
!Do not use the towing eye for recovery. This
could damage the vehicle. If in doubt, have
the vehicle recovered using a crane.
!When towing, pull away slowly and
smoothly. If the tractive power is too high, the
vehicles could be damaged.
!Your vehicles is equipped with an automatic
transmission. Therefore, you must not have
the vehicle tow-started. The transmission
may otherwise be damaged.
It is better to have the vehicle transported than
to have it towed away.
If the transfer case can be shifted into the Neu-
tral position, you can tow away the vehicle.
If the transfer case cannot be shifted into the
Neutral position, you can tow away the vehicle
with one axle raised. Please bear the following in
mind:
Rremove the propeller shaft between the trans-
fer case and the rolling axle
Rturn the SmartKey to position 1in the igni-
tion lock
The battery must be connected and charged.
Otherwise, you:
Rcannot turn the SmartKey to position 2in
the ignition lock
Rcannot shift the automatic transmission to
position i
Disarm the automatic locking feature before the vehicle is towed (
Ypage 67). You could other-
wise be locked out when pushing or towing the
vehicle.
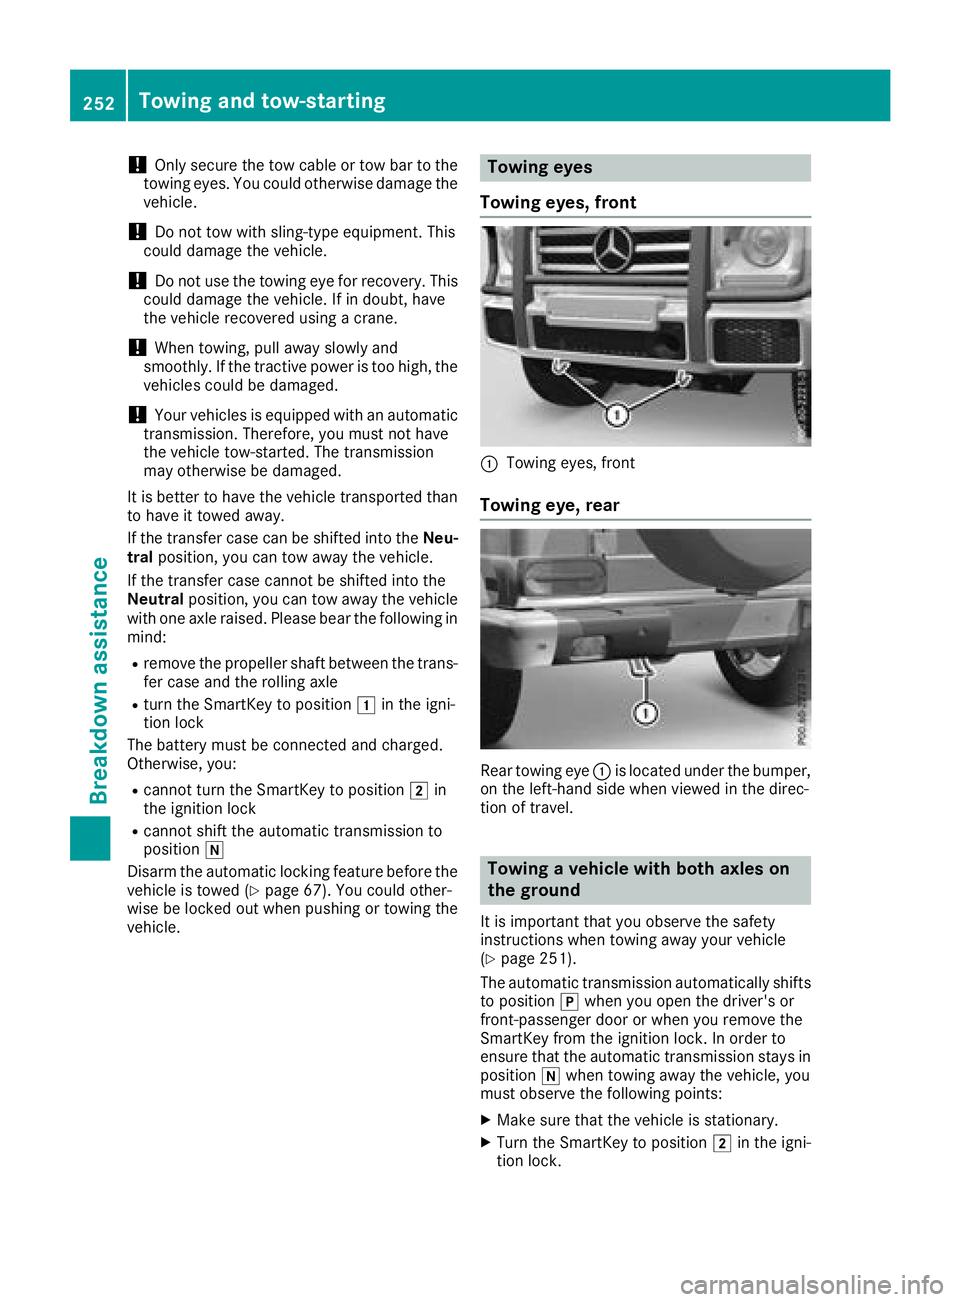
Towing eyes
Towing eyes, front
:Towing eyes, front
Towing eye, rear
Rear towing eye :is located under the bumper,
on the left-hand side when viewed in the direc-
tion of travel.
Towing a vehicle with both axles on
the ground
It is important that you observe the safety
instructions when towing away your vehicle
(
Ypage 251).
The automatic transmission automatically shifts
to position jwhen you open the driver's or
front-passenger door or when you remove the
SmartKey from the ignition lock. In order to
ensure that the automatic transmission stays in
position iwhen towing away the vehicle, you
must observe the following points:
XMake sure that the vehicle is stationary.
XTurn the SmartKey to position 2in the igni-
tion lock.
252Towing and tow-starting
Breakdown assistance
Page 277 of 294
PSI (pounds per square inch)
A standard unit of measure for tire pressure.
Aspect ratio
Relationship between tire height and tire width
in percent.
Tire pressure
This is pressure inside the tire applying an out-
ward force to each square inch of the tire's sur-
face. The tire pressure is specified in pounds per
square inch (psi), in kilopascals (kPa) or in bar.
The tire pressure should only be corrected when
the tires are cold.
Cold tire pressure
The tires are cold:
Rif the vehicle has been parked with the tires
out of direct sunlight for at least three hours
and
Rif the vehicle has not been driven further than
1 mile (1.6 km)
Tread
The part of the tire that comes into contact with
the road.
Bead
The tire bead ensures that the tire sits securely
on the wheel. There are several steel wires in the
bead to prevent the tire from coming loose fromthe wheel rim.
Sidewall
The part of the tire between the tread and the
bead.
Weight of optional extras
The combined weight of those optional extras
that weigh more than the replaced standard
parts and more than 2.3 kg (5 lbs). These
optional extras, such as high-performance
brakes, level control, a roof rack or a high-per-
formance battery, are not included in the curb
weight and the weight of the accessories.
TIN (Tire Identification Number)
This is a unique identifier which can be used by
a tire manufacturer to identify tires, for example
for a product recall, and thus identify the pur-
chasers. The TIN is made up of the manufactur-
er's identity code, tire size, tire type code and
the manufacturing date.
Load bearing index
The load bearing index (also load index) is a code
that contains the maximum load bearing capa-
city of a tire.
Traction
Traction is the result of friction between the tires
and the road surface.
TWR (Tongue Weight Rating)
The TWR specifies the maximum permissible
weight that the ball coupling of the trailer tow
hitch can support.
Treadwear indicators
Narrow bars (tread wear bars) that are distrib-
uted over the tire tread. If the tire tread is level
with the bars, the wear limit of áin (1.6 mm)
has been reached.
Occupant distribution
The distribution of occupants in a vehicle at their
designated seating positions.
Total load limit
Nominal load and luggage load plus 68 kg
(150 lbs) multiplied by the number of seats in
the vehicle.
Changing a wheel
Flat tire
You can find information on what to do in the
event of a flat tire in the "Breakdown assistance"
section (
Ypage 246).
Rotating the wheels
GWARNING
Interchanging the front and rear wheels may
severely impair the driving characteristics if
the wheels or tires have different dimensions. The wheel brakes or suspension components
may also be damaged. There is a risk of acci-
dent.
Rotate front and rear wheels only if the wheels and tires are of the same dimensions.
Changing a wheel275
Wheels and tires
Z
Page 293 of 294

which corresponds to an approach/departure
angle of 45°.
Accelerate carefully and make sure that the
wheels do not spin when driving on steep ter-
rain.
iIf the load on the front axle is reduced when
pulling away on a steep uphill slope, the front
wheels have a tendency to spin. 4ETS detects
this and brakes the wheels accordingly. The
rear wheel torque is increased, making it eas-
ier to drive off.
For further information about the maximum gra-
dient climbing ability, see (
Ypage 132).
Trailer tow hitch
Permissible trailer load, braked (at a
minimum gradient-climbing capabil-
ity of 12% from a standstill)
Missing values were not available at time of
going to print.
Model
Mercedes-AMG
G 65
All other models7716 lbs (3500 kg)
Maximum drawbar noseweight
!
Use a drawbar noseweight as close as pos-
sible to the maximum permissible nose-
weight. Do not use a noseweight of less than
50 kg, otherwise the trailer may come loose.
Note that the payload and the rear axle load
are reduced by the actual payload.
The drawbar load reduces the permissible over-
all load and rear axle load.
The drawbar load acts from above onto the ball
head on the trailer tow hitch.
The drawbar noseweight is not included in the
trailer load. Missing values were not available at time of
going to print.
ModelPermissible nose-
weight
Mercedes-AMG
G 65
All other models308.6 lbs (140kg )
The actual noseweight may not be higher than
the value which is given. The value can be found
on the trailer tow hitch or trailer identification
plates. The lowest weight applies.
The maximum permissible trailer drawbar nose-
weight is the maximum weight with which the
trailer drawbar can be loaded. The permissible
trailer drawbar noseweight is the limit for
Mercedes-Benz-approved trailer couplings.
Ball position
Ball position of the ball coupling
When choosing a ball coupling, the dimensions
stated in the illustration must not be exceeded.
Gross rear axle weight rating when
towing a trailer
Missing values were not available at time of
going to print.
ModelGross axle weight rating
Mercedes-AMG
G 65
All other models4189 lbs (1900 kg)
Trailer tow hitch291
Technical data
Z