2018 MERCEDES-BENZ G-CLASS seats
[x] Cancel search: seatsPage 51 of 294
restraints on the driver's and front-passenger
seats are moved forwards and upwards. This
provides better head support.
If the NECK-PRO head restraints/NECK-PRO
luxury head restraints have been triggered in an
accident, reset the NECK-PRO head restraints/
NECK-PRO luxury head restraints on the driver's
seat and the front-passenger seat
(
Ypage 49). Otherwise, the additional protec-
tion will not be available in the event of another
rear-end collision. You can see that a NECK-PRO
head restraint/NECK-PRO luxury head restraint
has been triggered if it is tilted forward and can
no longer be adjusted.
Mercedes-Benz recommends that you have the
functionality of the NECK-PRO head restraints/
NECK-PRO luxury head restraints checked at a
qualified specialist workshop after a rear-end
collision.
Resetting a triggered NECK-PRO head
restraint/NECK-PRO luxury head
restraint
NECK-PRO head restraints
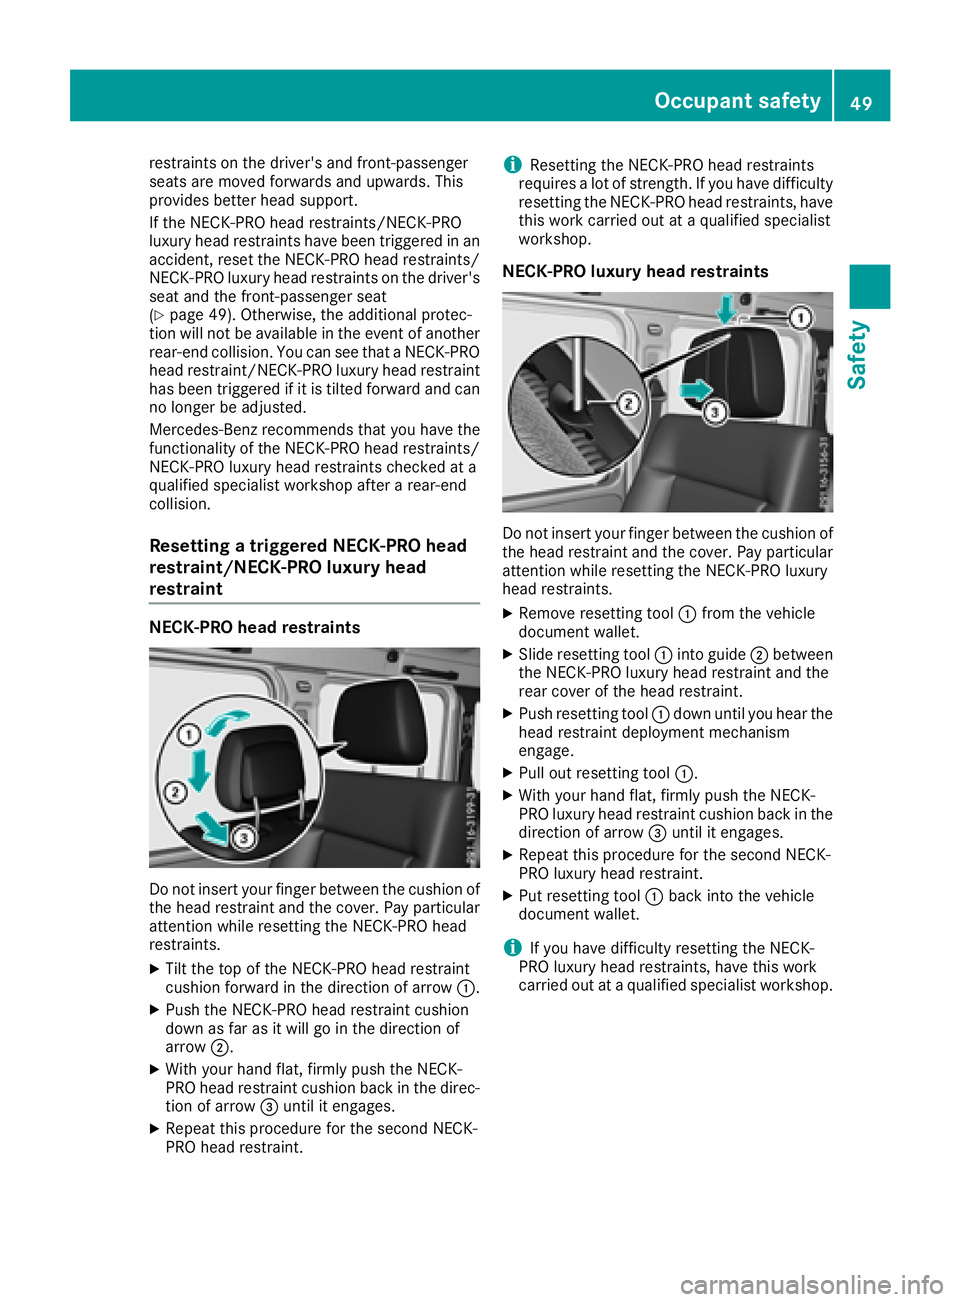
Do not insert your finger between the cushion of
the head restraint and the cover. Pay particular
attention while resetting the NECK-PRO head
restraints.
XTilt the top of the NECK-PRO head restraint
cushion forward in the direction of arrow :.
XPush the NECK-PRO head restraint cushion
down as far as it will go in the direction of
arrow;.
XWith your hand flat, firmly push the NECK-
PRO head restraint cushion back in the direc-
tion of arrow =until it engages.
XRepeat this procedure for the second NECK-
PRO head restraint.
iResetting the NECK-PRO head restraints
requires a lot of strength. If you have difficulty
resetting the NECK-PRO head restraints, have
this work carried out at a qualified specialist
workshop.
NECK-PRO luxury head restraints
Do not insert your finger between the cushion of
the head restraint and the cover. Pay particular
attention while resetting the NECK-PRO luxury
head restraints.
XRemove resetting tool :from the vehicle
document wallet.
XSlide resetting tool :into guide ;between
the NECK-PRO luxury head restraint and the
rear cover of the head restraint.
XPush resetting tool :down until you hear the
head restraint deployment mechanism
engage.
XPull out resetting tool :.
XWith your hand flat, firmly push the NECK-
PRO luxury head restraint cushion back in the
direction of arrow=until it engages.
XRepeat this procedure for the second NECK-
PRO luxury head restraint.
XPut resetting tool :back into the vehicle
document wallet.
iIf you have difficulty resetting the NECK-
PRO luxury head restraints, have this work
carried out at a qualified specialist workshop.
Occupant safety49
Safety
Z
Page 54 of 294
ing systems on the child restraint system
checked at a qualified specialist workshop,
before you install a child restraint system
again.
The securing systems of child restraint systems
are:
Rthe seat belt system
Rthe LATCH-type (ISOFIX) securing rings
Rthe Top Tether anchorages
iIf it is absolutely necessary to install a child
restraint system on the front-passenger seat,
always observe the information on "Child
restraint systems on the front-passenger
seat" (
Ypage 55). There you will also find
information on deactivating the front-
passenger front air bag.
All child restraint systems must meet the fol-
lowing standards:
RU.S. Federal Motor Vehicle Safety Standards
213 and 225
RCanadian Motor Vehicle Safety Standards
213 and 210.2
Confirmation that the child restraint system cor-
responds to the standards can be found on an
instruction label on the child restraint system.
This confirmation can also be found in the instal-
lation instructions that are included with the
child restraint system.
Observe the warning labels in the vehicle inte-
rior and on the child restraint system.
LATCH-type (ISOFIX) child seat secur-
ing system
GWARNING
LATCH-type (ISOFIX) child restraint systems
do not offer sufficient protection for children
whose weight combined with the child
restraint system is greater than 65 lbs (29 kg) and who are secured using the safety belt
integrated in the child restraint system. In the
event of an accident, a child might not be
restrained correctly. This poses an increased
risk of injury or even fatal injury.
If the child and the child restraint system
together weigh more than 65 lbs (29 kg), only
use LATCH-type (ISOFIX) child restraint sys-
tems with which the child is also secured with
the vehicle seat belt. Also secure the child
restraint system with the Top Tether belt, if
available.
Always comply with the manufacturer's instal-
lation and operating instructions for the child
restraint system used.
Before every trip, make sure that the LATCH-
type (ISOFIX) child restraint system is engaged
correctly in both LATCH-type (ISOFIX) securing
rings
!When installing the child restraint system,
make sure that the seat belt for the middle
seat does not get trapped. The seat belt could
otherwise be damaged.
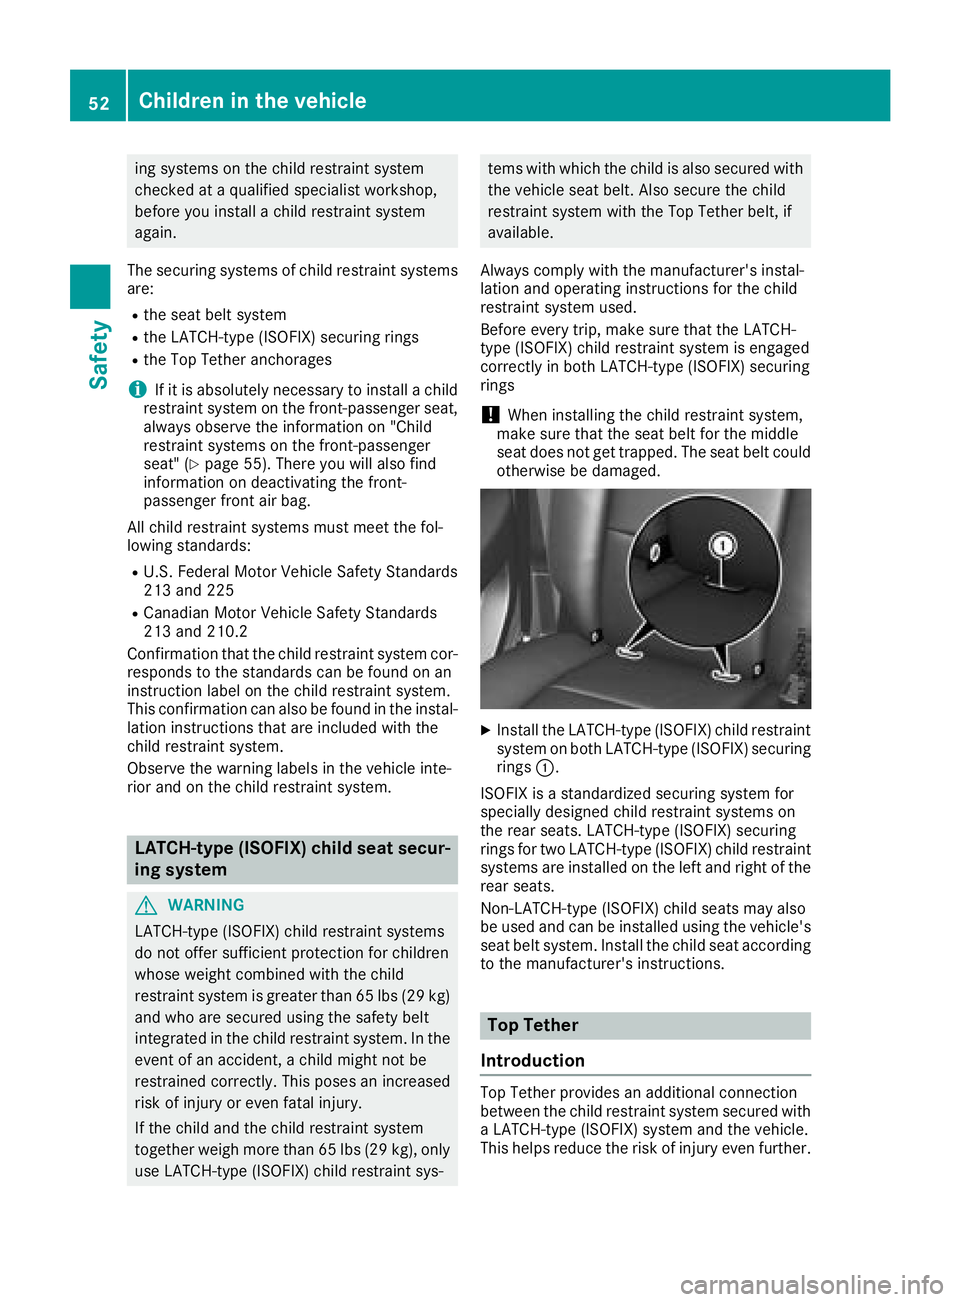
XInstall the LATCH-type (ISOFIX) child restraint system on both LATCH-type (ISOFIX) securing
rings :.
ISOFIX is a standardized securing system for
specially designed child restraint systems on
the rear seats. LATCH-type (ISOFIX) securing
rings for two LATCH-type (ISOFIX) child restraint
systems are installed on the left and right of the
rear seats.
Non-LATCH-type (ISOFIX) child seats may also
be used and can be installed using the vehicle's
seat belt system. Install the child seat according
to the manufacturer's instructions.
Top Tether
Introduction
Top Tether provides an additional connection
between the child restraint system secured with
a LATCH-type (ISOFIX) system and the vehicle.
This helps reduce the risk of injury even further.
52Children in the vehicle
Safety
Page 57 of 294

PASSENGER AIR BAG OFF indicator lamp:
shows you whether the front-passenger front air
bag is deactivated.
XTurn the SmartKey to position 1or2 in the
ignition lock.
The system carries out self-diagnostics.
The PASSENGER AIR BAG OFF indicator lamp
must light up for approximately six seconds.
If, after the system self-test, the
PASSENGER AIR BAG OFF indicator lamp:
Ris lit: the front-passenger front air bag is
deactivated. It will then not be deployed in the event of an accident.
Ris not lit , the sensor system did not detect a
child restraint system with transponder for
the BabySmart™ air bag deactivation system.
If, in the event of an accident, all deployment
criteria are met, the front-passenger front air
bag is deployed.
Child restraint system on the front-
passenger seat
General notes
Accident statistics show that children secured
in the rear seats are safer than children secured
in the front-passenger seat. For this reason,
Mercedes-Benz strongly advises that you install
the child restraint system on a rear seat.
If it is absolutely necessary to install a child
restraint system on the front-passenger seat,
always observe the information on the "Baby-
Smart™ air bag deactivation system"
(
Ypage 53). You can thus avoid the risks that could arise as
a result of:
Ra child restraint system that is not detected
by the BabySmart™ air bag deactivation sys-
tem sensor system
Rthe unintentional deactivation of the front-
passenger front air bag
Rthe unsuitable positioning of the child
restraint system, e.g. too close to the dash-
board
Rearward-facing child restraint system
If it is absolutely necessary to install a rearward-
facing child restraint system on the front-
passenger seat, always make sure that the
front-passenger front air bag is deactivated.
Only if the PASSENGER AIR BAG OFF indicator
lamp is permanently lit (
Ypage 39) is the front-
passenger front air bag deactivated.
Always observe the child restraint system man-
ufacturer's installation and operating instruc-
tions.
Forward-facing child restraint system
If it is absolutely necessary to install a forward-
facing child restraint system on the front-
passenger seat, always move the front-
passenger seat as far back as possible. The
entire base of the child restraint system must
always rest on the seat cushion of the front-
passenger seat. The backrest of the child
restraint system must lie as flat as possible
against the backrest of the front-passenger
seat. The child restraint system must not touch
the roof or be subjected to a load by the head
restraint. Adjust the angle of the seat backrest
and the head restraint position accordingly.
Always make sure that the shoulder belt strap is
correctly routed from the vehicle belt sash guide
to the shoulder belt guide on the child restraint system. The shoulder belt strap must be routed
forward and down from the vehicle belt sash
guide. If necessary, adjust the belt sash guide
and the front-passenger seat accordingly.
Always observe the child restraint system man-
ufacturer's installation and operating instruc-
tions.
Children in the vehicle55
Safety
Z
Page 76 of 294
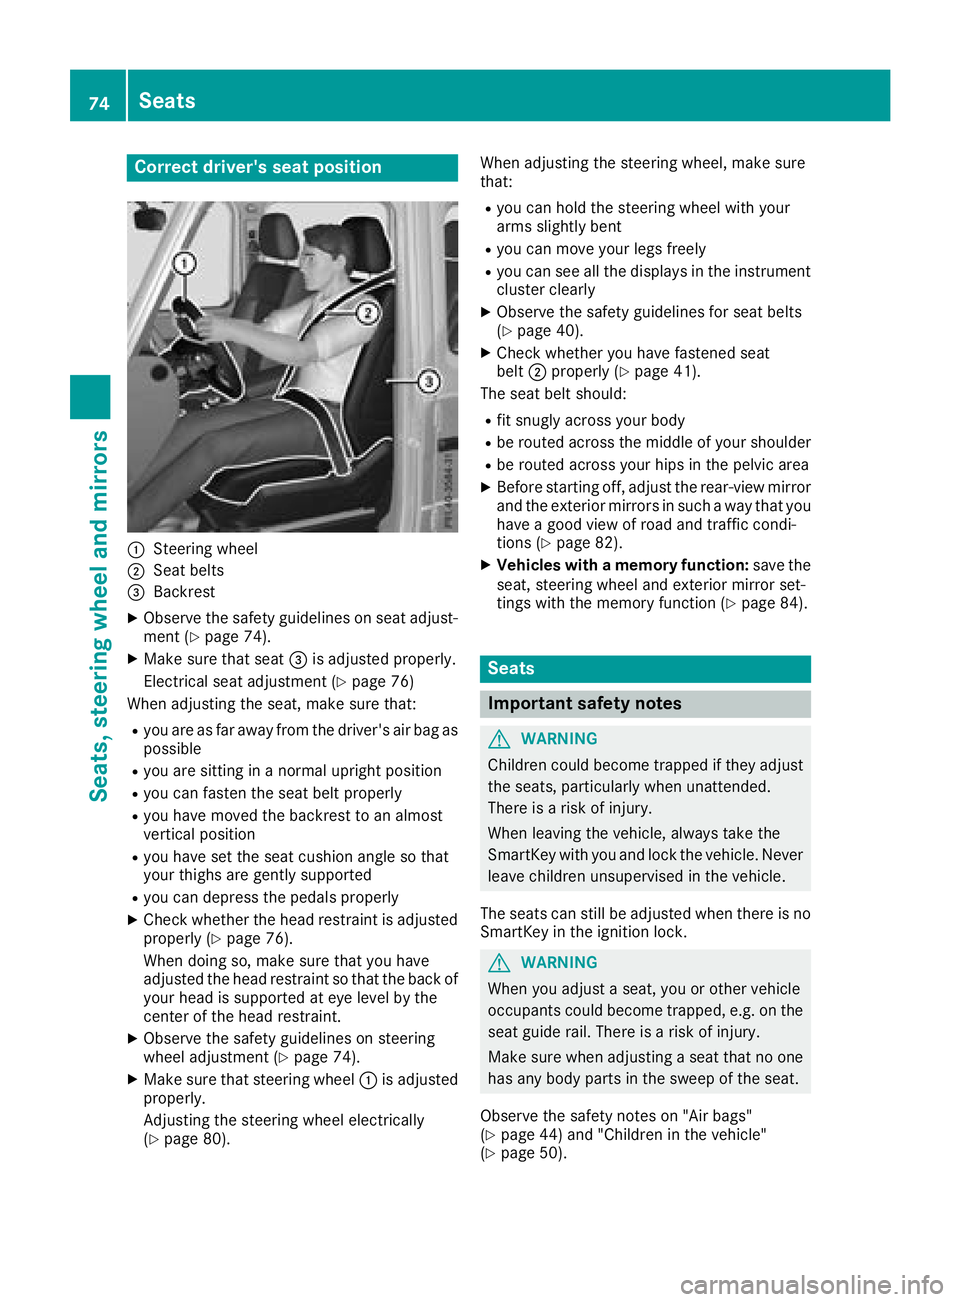
Correct driver's seat position
:Steering wheel
;Seat belts
=Backrest
XObserve the safety guidelines on seat adjust-
ment (Ypage 74).
XMake sure that seat=is adjusted properly.
Electrical seat adjustment (
Ypage 76)
When adjusting the seat, make sure that:
Ryou are as far away from the driver's air bag as
possible
Ryou are sitting in a normal upright position
Ryou can fasten the seat belt properly
Ryou have moved the backrest to an almost
vertical position
Ryou have set the seat cushion angle so that
your thighs are gently supported
Ryou can depress the pedals properly
XCheck whether the head restraint is adjusted
properly (Ypage 76).
When doing so, make sure that you have
adjusted the head restraint so that the back of
your head is supported at eye level by the
center of the head restraint.
XObserve the safety guidelines on steering
wheel adjustment (Ypage 74).
XMake sure that steering wheel :is adjusted
properly.
Adjusting the steering wheel electrically
(
Ypage 80). When adjusting the steering wheel, make sure
that:
Ryou can hold the steering wheel with your
arms slightly bent
Ryou can move your legs freely
Ryou can see all the displays in the instrument
cluster clearly
XObserve the safety guidelines for seat belts
(Ypage 40).
XCheck whether you hav
e fastened seat
belt ;properly (Ypage 41).
The seat belt should:
Rfit snugly across your body
Rbe routed across the middle of your shoulder
Rbe routed across your hips in the pelvic area
XBefore starting off, adjust the rear-view mirror
and the exterior mirrors in such a way that you
have a good view of road and traffic condi-
tions (
Ypage 82).
XVehicles with a memory function: save the
seat, steering wheel and exterior mirror set-
tings with the memory function (
Ypage 84).
Seats
Important safety notes
GWARNING
Children could become trapped if they adjust
the seats, particularly when unattended.
There is a risk of injury.
When leaving the vehicle, always take the
SmartKey with you and lock the vehicle. Never
leave children unsupervised in the vehicle.
The seats can still be adjusted when there is no
SmartKey in the ignition lock.
GWARNING
When you adjust a seat, you or other vehicle
occupants could become trapped, e.g. on the seat guide rail. There is a risk of injury.
Make sure when adjusting a seat that no one
has any body parts in the sweep of the seat.
Observe the safety notes on "Air bags"
(
Ypage 44) and "Children in the vehicle"
(Ypage 50).
74Seats
Seats, steering wheel and mirrors
Page 77 of 294
GWARNING
You could lose control of your vehicle if you do the following while driving:
Radjust the driver's seat, head restraint,
steering wheel or mirrors
Rfasten the seat belt
There is a risk of an accident.
Adjust the driver's seat, head restraint, steer-
ing wheel and mirror and fasten your seat belt before starting the engine.
GWARNING
If the head restraints are not installed or not
adjusted correctly, they cannot provide pro-
tection as intended. There is an increased risk
of injury in the head and neck area, e.g. in the event of an accident or when braking.
Always drive with the head restraints instal-
led. Before driving off, make sure for every
vehicle occupant that the center of the head
restraint supports the back of the head at
about eye level.
Make sure that you do not rotate the head
restraints of the front and rear seats when
adjusting the head restraints. Otherwise, you
cannot adjust the height and angle of the head
restraints correctly.
Adjust the head restraint so that it is as close as
possible to your head.
GWARNING
If you adjust the seat height carelessly, you or
other vehicle occupants could be trapped and
thereby injured. Children in particular could
accidentally press the electrical seat adjust-
ment buttons and become trapped. There is a
risk of injury.
While moving the seats, make sure that your
hands or other body parts do not get under the
lever assembly of the seat adjustment sys-
tem.
GWARNING
When you adjust a seat, you or other vehicle
occupants could become trapped, e.g. on the seat guide rail. There is a risk of injury.
Make sure when adjusting a seat that no one
has any body parts in the sweep of the seat.
!To avoid damage to the seats and the seat
heating, observe the following information:
Rkeep liquids from spilling on the seats. If
liquid is spilled on the seats, dry them as
soon as possible.
Rif the seat covers are damp or wet, do not
switch on the seat heating. The seat heat-
ing should also not be used to dry the seats.
Rclean the seat covers as recommended;
see "Interior care".
Rdo not transport heavy loads on the seats.
Do not place sharp objects on the seat
cushions, e.g. knives, nails or tools. The
seats should only be occupied by passen-
gers, if possible.
Rwhen the seat heating is in operation, do
not cover the seats with insulating materi-
als, e.g. blankets, coats, bags, seat covers,
child seats or booster seats.
!Make sure that there are no objects in the
footwell under or behind the seats when mov-
ing the seats back. There is a risk that the
seats and/or the objects could be damaged.
!When the rear bench seat is folded for-
wards, the front seats cannot be moved to
their rearmost position. You could otherwise
damage the seats and the rear bench seat.
!Make sure that the sun visor is folded up
before adjusting the backrest and head
restraint height. The head restraint and sun
visor could otherwise collide when the head
restraint is fully extended.
iIf the front door is open, the seats can be
adjusted for up to 30 minutes after the igni-
tion has been switched off.
iThe rear-compartment head restraints can
be removed (Ypage 77).
For more information, contact a qualified spe-
cialist workshop.
iYou can find further information about
enlarging the cargo compartment (folding the
rear bench seat forwards) on (
Ypage 213).
Seats75
Seats, steering wheel and mirrors
Z
Page 78 of 294
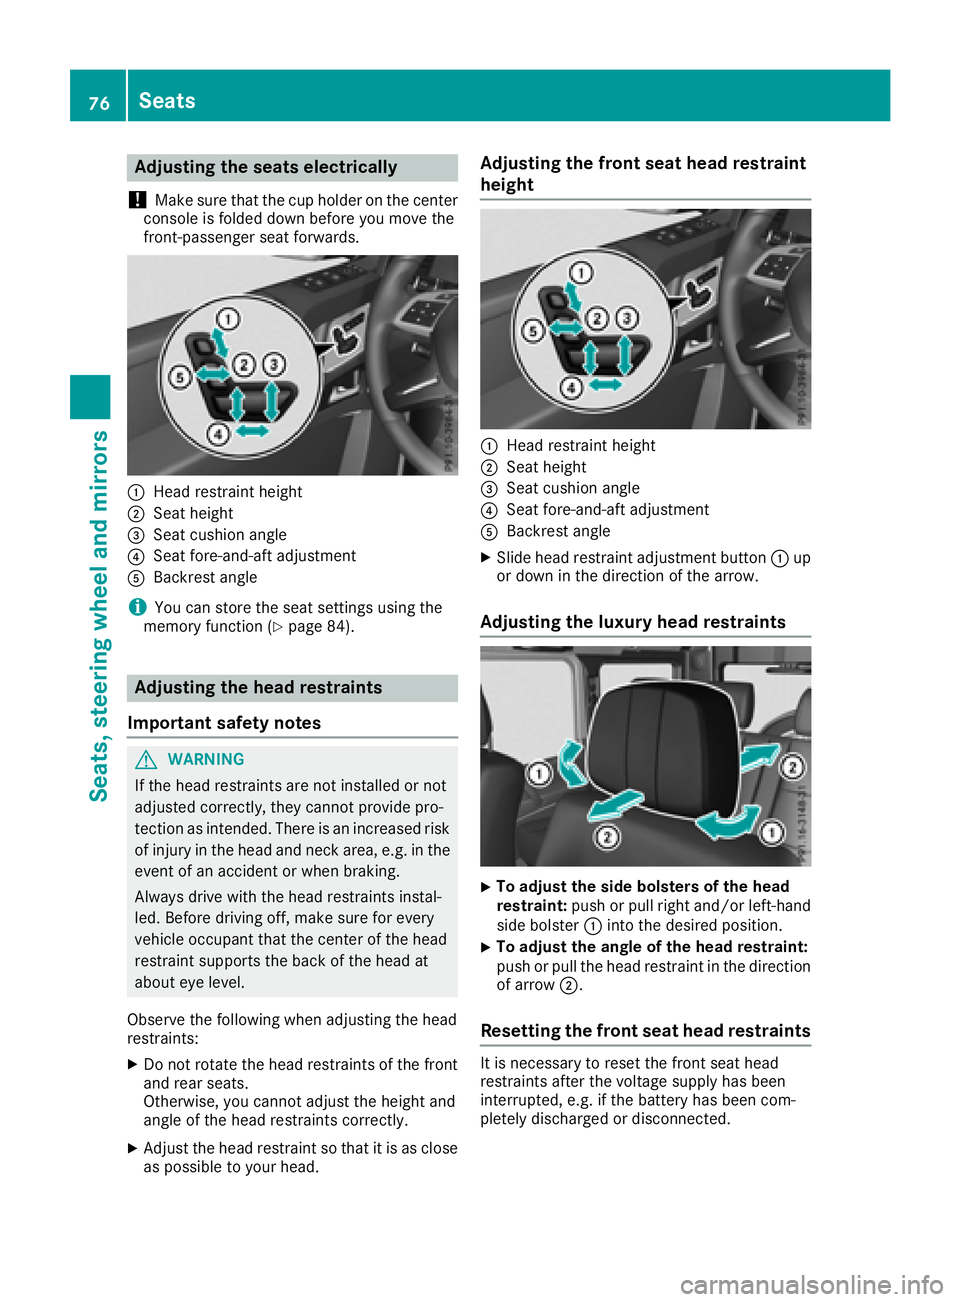
Adjusting the seats electrically
!
Mak esur ethat th ecup holder on th ecenter
console is folded down before you mov eth e
front-passenger seat forwards.
:Hea drestrain theight
;Seat height
=Seat cushion angle
?Seat fore-and-af tadjustmen t
ABackrest angle
iYou can store th eseat setting susin gth e
memory function (Ypage 84).
Adjusting the head restraints
Import ant safety notes
GWARNIN G
If th ehead restraints are no tinstalled or no t
adjusted correctly, they canno tprovid epro -
tection as intended. There is an increased ris k
of injury in th ehead and neck area, e.g. in th e
event of an acciden tor when braking .
Always drive wit hth ehead restraints instal -
led. Befor edrivin goff ,mak esur efor every
vehicl eoccupant that th ecenter of th ehead
restrain tsupport sth ebac kof th ehead at
about eye level.
Observ eth efollowin gwhen adjusting th ehead
restraints :
XDo notrotate th ehead restraints of th efron t
and rear seats.
Otherwise ,you canno tadjust th eheight and
angle of th ehead restraints correctly.
XAdjus tth ehead restrain tso that it is as close
as possibl eto your head .
Adjusting the front seat head restraint
height
:Headrestrain theight
;Seat height
=Seat cushion angle
?Seat fore-and-af tadjustmen t
ABackrest angle
XSlide head restrain tadjustmen tbutto n: up
or down in th edirection of th earrow.
Adjusting the luxury head restraints
XTo adjust th esid ebolsters of th ehea d
restraint: push or pull right and/o rleft-han d
side bolste r: intoth edesired position .
XTo adjust theangle of th ehea drestraint:
push or pull th ehead restrain tin th edirection
of arrow ;.
Resetting the front seat head restraints
It is necessar yto reset th efron tseat head
restraints after th evoltag esupply has been
interrupted, e.g. if th ebattery has been com-
pletely discharged or disconnected.
76Seats
Seats, steering wheel and mirrors
Page 79 of 294
XMake sure that the cup holder on the center
console is folded down (Ypage 215).
XMove the seat as far forward as possible andthe head restraint in as far as possible.
Rear seat head restraints
Important safety notes
GWARNING
If the head restraints are not installed or not
adjusted correctly, they cannot provide pro-
tection as intended. There is an increased risk
of injury in the head and neck area, e.g. in the event of an accident or when braking.
Always drive with the head restraints instal-
led. Before driving off, make sure for every
vehicle occupant that the center of the head
restraint supports the back of the head at
about eye level.
Observe the following when adjusting the head
restraints:
XDo not rotate the head restraints of the front
and rear seats.
Otherwise, you cannot adjust the height and
angle of the head restraints correctly.
XAdjust the head restraint so that it is as close
as possible to your head.
Adjusting the rear seat head restraint
height
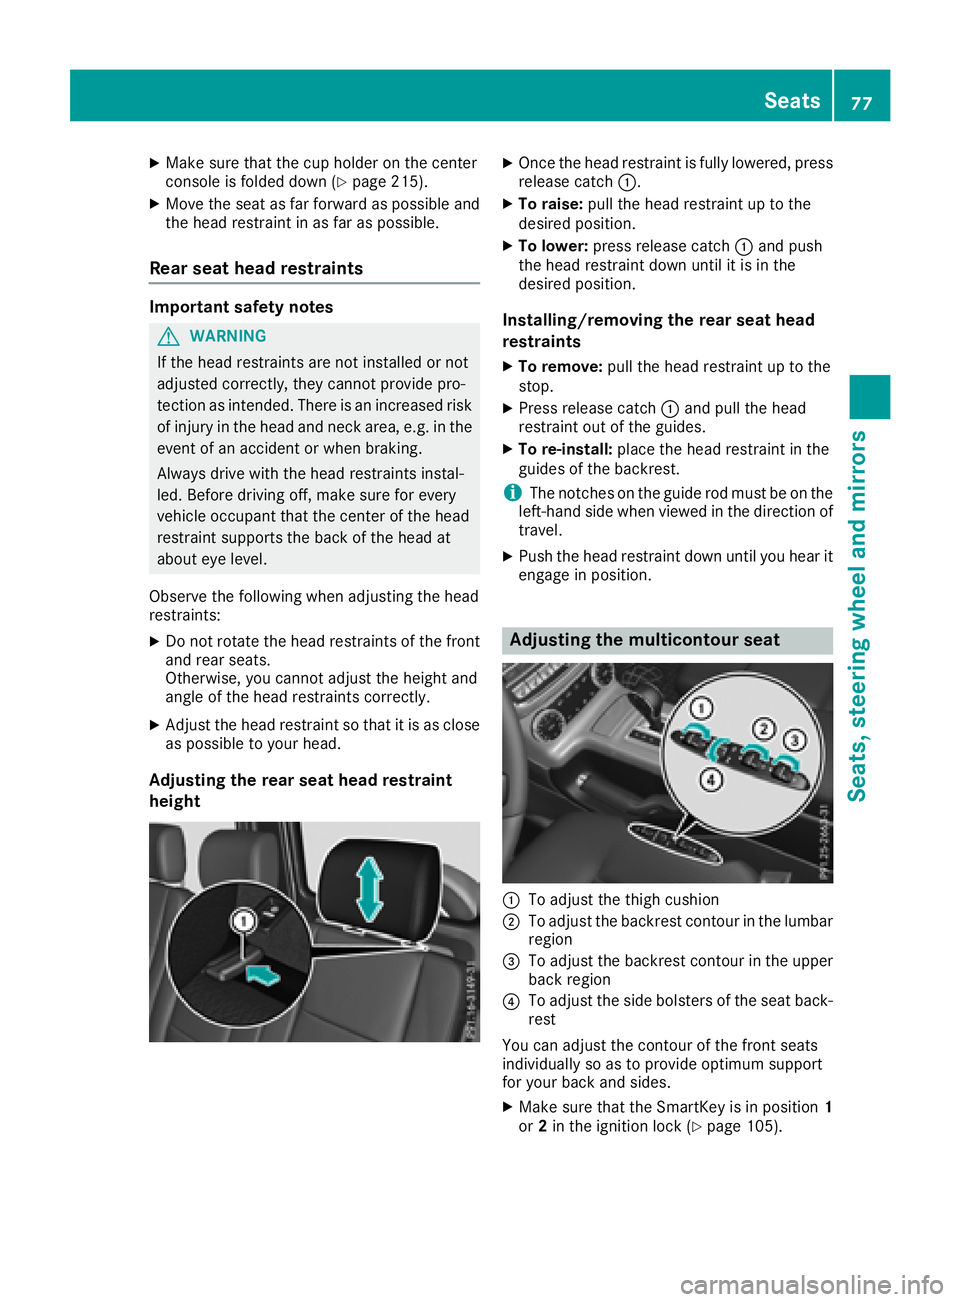
XOnce the head restraint is fully lowered, press
release catch :.
XTo raise:pull the head restraint up to the
desired position.
XTo lower: press release catch :and push
the head restraint down until it is in the
desired position.
Installing/removing the rear seat head
restraints
XTo remove: pull the head restraint up to the
stop.
XPress release catch :and pull the head
restraint out of the guides.
XTo re-install: place the head restraint in the
guides of the backrest.
iThe notches on the guide rod must be on the
left-hand side when viewed in the direction of
travel.
XPush the head restraint down until you hear it
engage in position.
Adjusting the multicontour seat
:To adjust the thigh cushion
;To adjust the backrest contour in the lumbar
region
=To adjust the backrest contour in the upper
back region
?To adjust the side bolsters of the seat back-
rest
You can adjust the contour of the front seats
individually so as to provide optimum support
for your back and sides.
XMake sure that the SmartKey is in position 1
or 2in the ignition lock (Ypage 105).
Seats77
Seats, steering wheel and mirrors
Z
Page 80 of 294
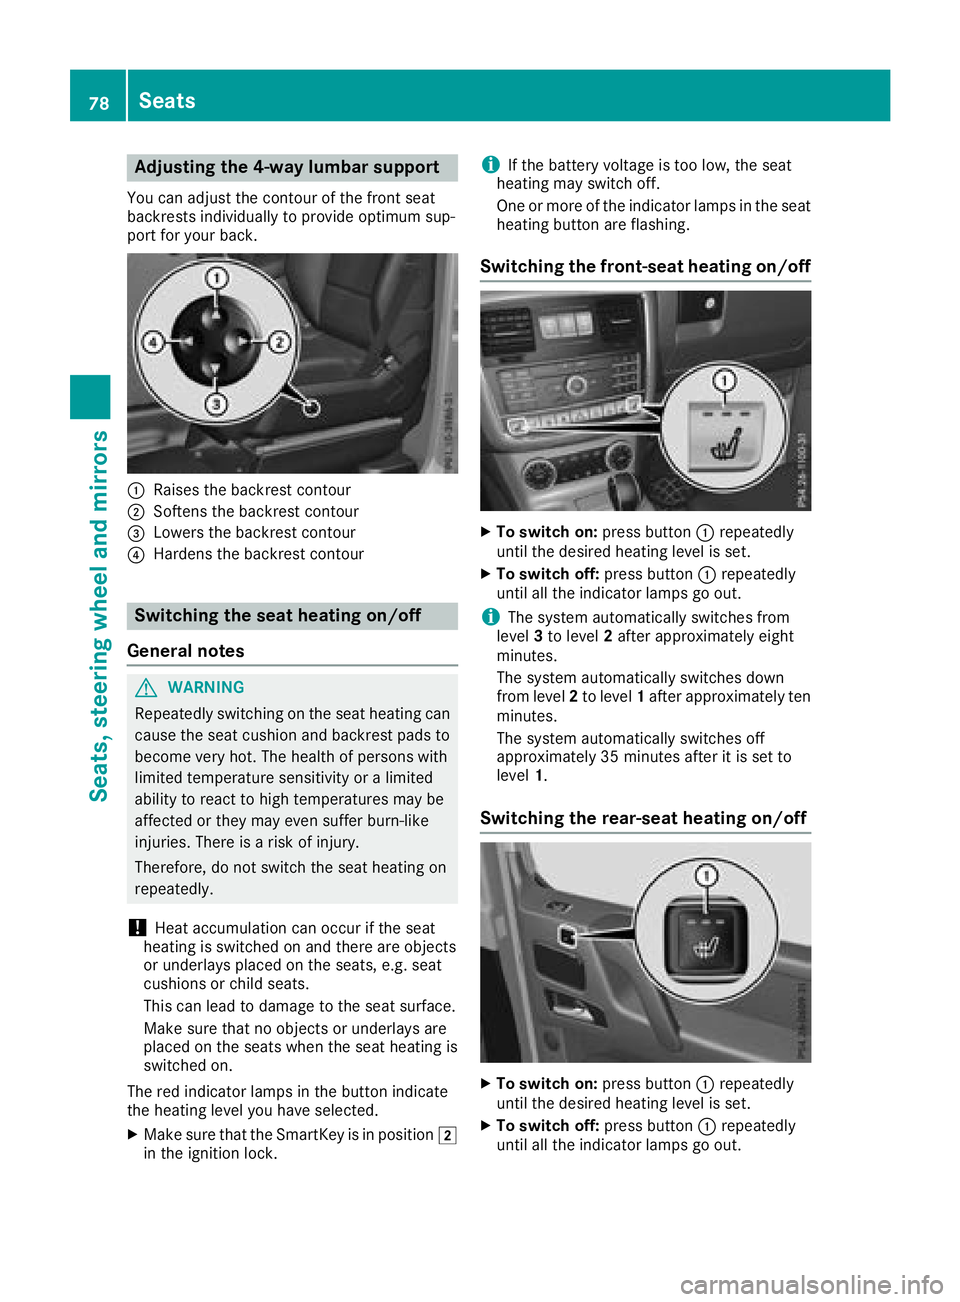
Adjusting the 4-way lumbar support
You can adjust thecontour of th efron tseat
backrest sindividually to provid eoptimum sup-
por tfor your back.
:Raises th ebackrest contour
;Soften sth ebackrest contour
=Lowers th ebackrest contour
?Harden sth ebackrest contour
Switching the seat heating on/off
Gene ral notes
GWARNIN G
Repeatedly switching on th eseat heating can
caus eth eseat cushion and backrest pads to
become ver yhot .The healt hof person swit h
limite dtemperature sensitivit yor alimite d
abilit yto reac tto high temperatures may be
affecte dor they may eve nsuffer burn-like
injuries. There is aris kof injury.
Therefore ,do no tswitch th eseat heating on
repeatedly.
!Hea taccumulation can occur if th eseat
heating is switched on and there are objects
or underlays placed on th eseats, e.g. seat
cushion sor child seats.
This can lead to damag eto th eseat surface.
Mak esur ethat no objects or underlays are
placed on th eseat swhen th eseat heating is
switched on .
The red indicator lamp sin th ebutto nindicat e
th eheating level you hav eselected.
XMak esur ethat th eSmartKey is in position 2
in th eignition lock.
iIf th ebattery voltag eis to olow, th eseat
heating may switch off .
On eor mor eof th eindicator lamp sin th eseat
heating butto nare flashing.
Switching the front-seat heating on/off
XTo switch on: press button: repeatedly
until th edesired heating level is set .
XTo switch off:press butto n: repeatedly
until all th eindicator lamp sgo out .
iThe system automatically switches from
level 3to level 2after approximately eigh t
minutes.
The system automatically switches down
from level 2to level 1after approximately te n
minutes.
The system automatically switches off
approximately 35 minute safter it is set to
level 1.
Switching the rea r-seat heating on/off
XTo switch on: press button: repeatedly
until th edesired heating level is set .
XTo switch off:press butto n: repeatedly
until all th eindicator lamp sgo out .
78Seats
Seats, steering wheel and mirrors