2018 MERCEDES-BENZ G-CLASS park assist
[x] Cancel search: park assistPage 122 of 294
Refueling
Important safety notes
GWARNING
Fuel is highly flammable. If you handle fuel
incorrectly, there is a risk of fire and explo-
sion.
You must avoid fire, open flames, creating
sparks and smoking. Switch off the engine
and, if applicable, the auxiliary heating before refueling.
GWARNING
Fuel is poisonous and hazardous to health.
There is a risk of injury.
You must make sure that fuel does not come into contact with your skin, eyes or clothing
and that it is not swallowed. Do not inhale fuel
vapors. Keep fuel away from children.
If you or others come into contact with fuel,
observe the following:
RWash away fuel from skin immediately
using soap and water.
RIf fuel comes into contact with your eyes,
immediately rinse them thoroughly with
clean water. Seek medical assistance with-
out delay.
RIf fuel is swallowed, seek medical assis-
tance without delay. Do not induce vomit-
ing.
RImmediately change out of clothing which
has come into contact with fuel.
GWARNING
Electrostatic buildup can create sparks and
ignite fuel vapors. There is a risk of fire and
explosion.
Always touch the vehicle body before opening
the fuel filler flap or touching the fuel pump
nozzle. Any existing electrostatic buildup is
thereby discharged.
Do not get into the vehicle again during the refu-
eling process. otherwise electrostatic charge
could build up again.
!Do not use diesel to refuel vehicles with a
gasoline engine. Do not switch on the ignition
if you accidentally refuel with the wrong fuel.
Otherwise, the fuel will enter the fuel system. Even small amounts of the wrong fuel could
result in damage to the fuel system and the
engine. Notify a qualified specialist workshop
and have the fuel tank and fuel lines drained
completely.
!Overfilling the fuel tank could damage the
fuel system.
!Take care not to spill any fuel on painted
surfaces. You could otherwise damage the
paintwork.
!Use a filter when adding fuel from a fuel can.
The fuel lines and/or the fuel injection system
could otherwise be blocked by particles from
the fuel can.
If you overfill the fuel tank, fuel could spray out
when the fuel pump nozzle is removed.
For further information on fuel and fuel quality
(
Ypage 283).
Refueling
General information
Pay attention to the important safety notes
(Ypage 120).
If you unlock/lock the vehicle from the outside,
the fuel filler flap also unlocks/locks.
The position of the fuel filler cap is displayed in
the instrument cluster 8. The arrow next to
the filling pump indicates the side of the vehicle.
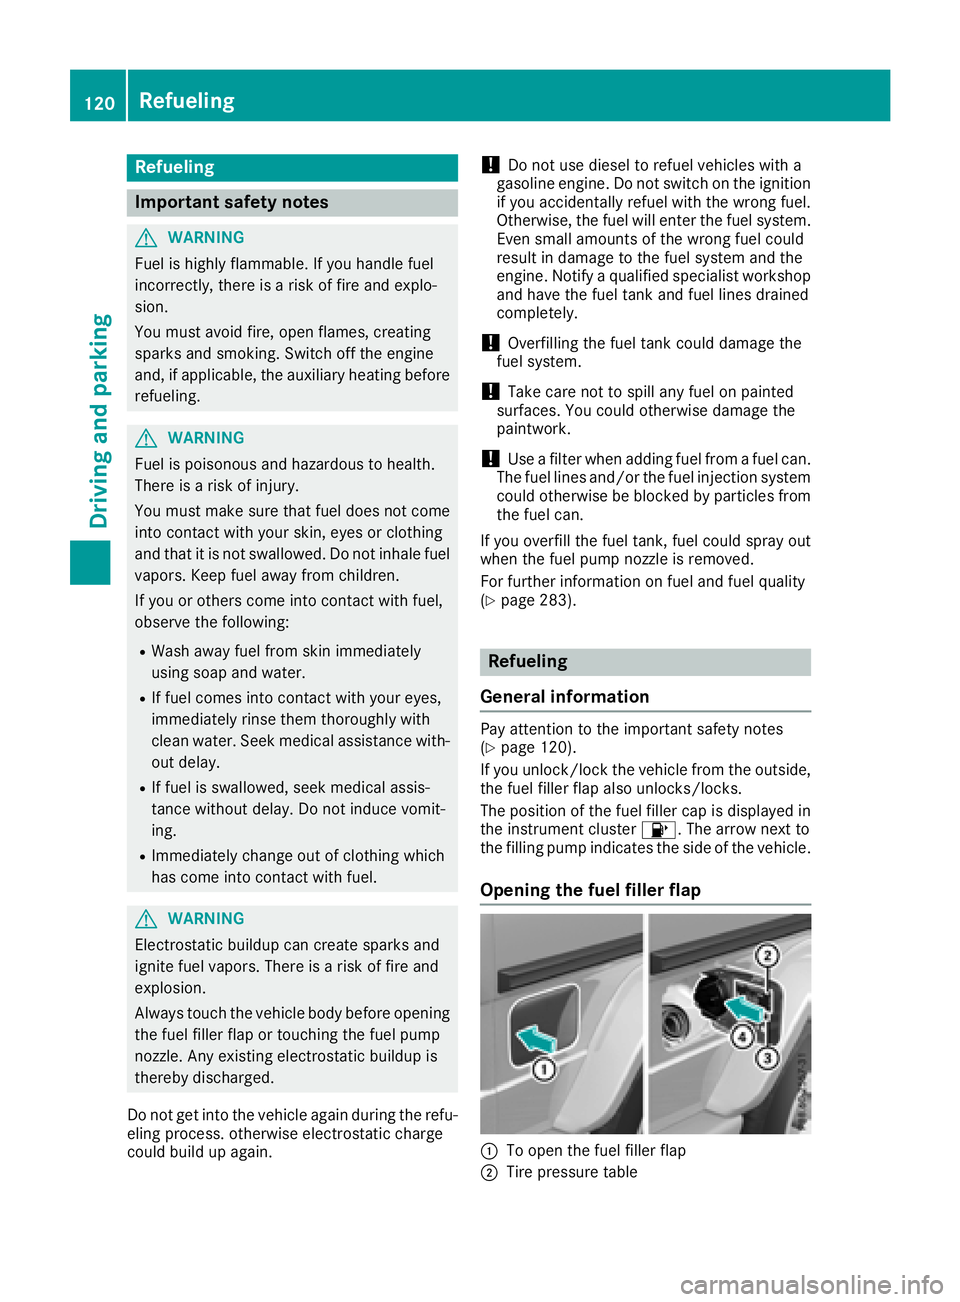
Opening the fuel filler flap
:To open the fuel filler flap
;Tire pressure table
120Refueling
Driving and parking
Page 129 of 294
Have brake pads installed and brake fluid
replaced at a qualified specialist workshop.
If the brake system has only been subject to
moderate loads, you should test the functional-
ity of your brakes at regular intervals.
Information on BAS (Brake Assist) (
Ypage 59).
For safety reasons, Mercedes-Benz recom-
mends only installing the following brake disks
and brake pads/linings:
Rbrake disks that have been approved by
Mercedes-Benz
Rbrake pads/linings that have been approved
by Mercedes-Benz or that are of an equivalent
standard of quality
Other brake disks or brake pads/linings can
compromise the safety of your vehicle.
Always replace all brake disks and brake pads/ linings on an axle at the same time. Always
install new brake pads/linings when replacing
brake disks.
The vehicle is equipped with lightweight brake
disks to which the wheel assembly with rim and
threaded connection is matched.
The use of brake discs other than those
approved by Mercedes-Benz may alter track
width and is subject to approval, if applicable.
Shock-type loads when handling the brake
discs, such as when changing wheels, can lead
to a reduction in comfort when driving with light- weight brake discs. Avoid shock-type loads on
the lightweight brake disks, particularly on the
brake plate.
Mercedes-Benz recommends that you only use
brake fluid that has been specially approved for
your vehicl
e by Mercedes-Benz, or which corre-
sponds to an equivalent quality standard. Brake
fluid which has not been approved for
Mercedes-Benz vehicles or which is not of an
equivalent quality could affect your vehicle's
operating safety.
High-performance brake (Mercedes-
AMG vehicles)
The AMG brake systems are designed for heavy
loads. This may lead to noise when braking.
This will depend on:
RSpeed
RBraking force
RAmbient conditions, e.g. temperature and
humidity The wear of individual brake system compo-
nents such as the brake pads/linings or brake
discs depends on individual driving style and
operating conditions.
For this reason, it is impossible to state a mile-
age that will be valid under all circumstances. An
aggressive driving style will lead to high wear.
You can obtain more information on this from a
qualified specialist workshop.
New and replaced brake pads and discs only
reach their optimum braking effect after several
hundred kilometers of driving. Compensate for
this by applying greater force to the brake pedal.
Keep this in mind, and adapt your driving and
braking accordingly during this break-in period.
Excessive heavy braking results in correspond-
ingly high brake wear. If the brake pads/linings
have reached their wear limit, the multifunction
display shows a corresponding message. Espe-
cially for high performance driving, it is impor-
tant to maintain and have the brake system
checked regularly.
Driving on slippery surfaces
!
Where possible, avoid spinning the drive
wheels when pulling away on slippery roads.
You could otherwise damage the drive train.
This type of damage is not covered by the
terms of the Mercedes-Benz warranty.
XEngage the differential locks if necessary
(Ypage 151).
Driving on wet roads
Hydroplaning
If water has accumulated to a certain depth on
the road surface, there is a danger of hydro-
planing occurring, even if:
Ryou drive at low speeds
Rthe tires have adequate tread depth
For this reason, in the event of heavy rain or in
conditions in which hydroplaning may occur,
you must drive in the following manner:
Rlower your speed
Ravoid ruts
Ravoid sudden steering movements
Rbrake carefully
Driving tips127
Driving and parking
Z
Page 134 of 294

keep a safe distance from the vehicle when
doing so in order to avoid injury as a result of
unexpected vehicle movements. After driving
off-road or over obstacles, check the vehicle
for possible damage, especially to the under-
body and the components of the chassis.
!Drive with particular care when driving over
an obstacle while driving up or down a steep
slope.
The vehicle could otherwise tilt and slide side-
ways or tip over.
Observe the following rules when driving over
tree stumps, large stones and other obstacles:
RObserve the safety notes (Ypage 129) and
the general notes (Ypage 130) on off-road
driving.
RShift the transfer case to the off-road driving
position LOW RANGE (Ypage 149).
RAvoid high engine speeds.
RShift the automatic transmission to a low
gear.
RMake sure that you have enough ground
clearance before driving across an obstacle.
RDrive very slowly.
RTry to drive straight over the center of obsta-
cles: front wheel first, then rear wheel.
Traveling uphill
Approach/departure angle
GWARNING
If you drive on a steep incline at an angle or
turn when driving on an incline, the vehicle
could slip sideways, tip and rollover. There is a risk of an accident.
Always drive on a steep incline in the line of
fall (straight up or down) and do not turn the
vehicle.
Always observe the approach/departure angle
values (
Ypage 290).
RObserve the safety notes (Ypage 129) and
general notes (Ypage 130) on driving off-
road.
RDo not drive at an angle on slopes, inclines or gradients, but instead follow the direct line of
fall. Note that the climbing ability of your vehi- cle depends on the terrain conditions.
RBefore driving on extreme uphill and downhill
gradients, shift the transfer case to the LOW
RANGE off-road gear (
Ypage 149).
REngage the differential locks if necessary
(Ypage 151).
RDrive slowly.
RAccelerate gently and make sure that the
wheels are gripping.
RAvoid high engine speeds, except when driv-
ing on sandy and muddy routes with high driv-
ing resistance.
RAvoid high engine speeds – drive at an appro-
priate engine speed (maximum 3,000 rpm).
RWhen driving down an incline, make use of the
engine's bra king effect. Observe the engine
speed; do not overrev the engine.
Further information on the maximum engine
speed (
Ypage 160).
RShift the automatic transmission to a low gear appropriate for tackling an uphill gradient or a
long, steep downhill gradient.
Hill start assist will aid you when pulling away on
a hill. For further information about hill start
assist, see (
Ypage 107).
Maximum gradient-climbing capability
Always observe the maximum gradient climbing ability values (Ypage 290).
Hilltops
When driving up an uphill gradient, slightly
reduce pressure on the accelerator immediately
before reaching the brow of the hill (do not shift
the transmission into N). Make use of the vehi-
cle's own impetus to travel over the brow.
This style of driving prevents:
Rthe vehicle from lifting off the ground on the
brow of a hill
Rloss of traction
Rthe vehicle from traveling too quickly down
the other side
Driving downhill
RDrive slowly.
RDo not drive at an angle down steep inclines.
Steer into the line of fall and drive with the
front wheels aligned straight. Otherwise, the
vehicle could slip sideways, tip and rollover.
132Driving tips
Driving an d parking
Page 141 of 294
DISTRONICPLUS display sin th einstru -
ment cluste r
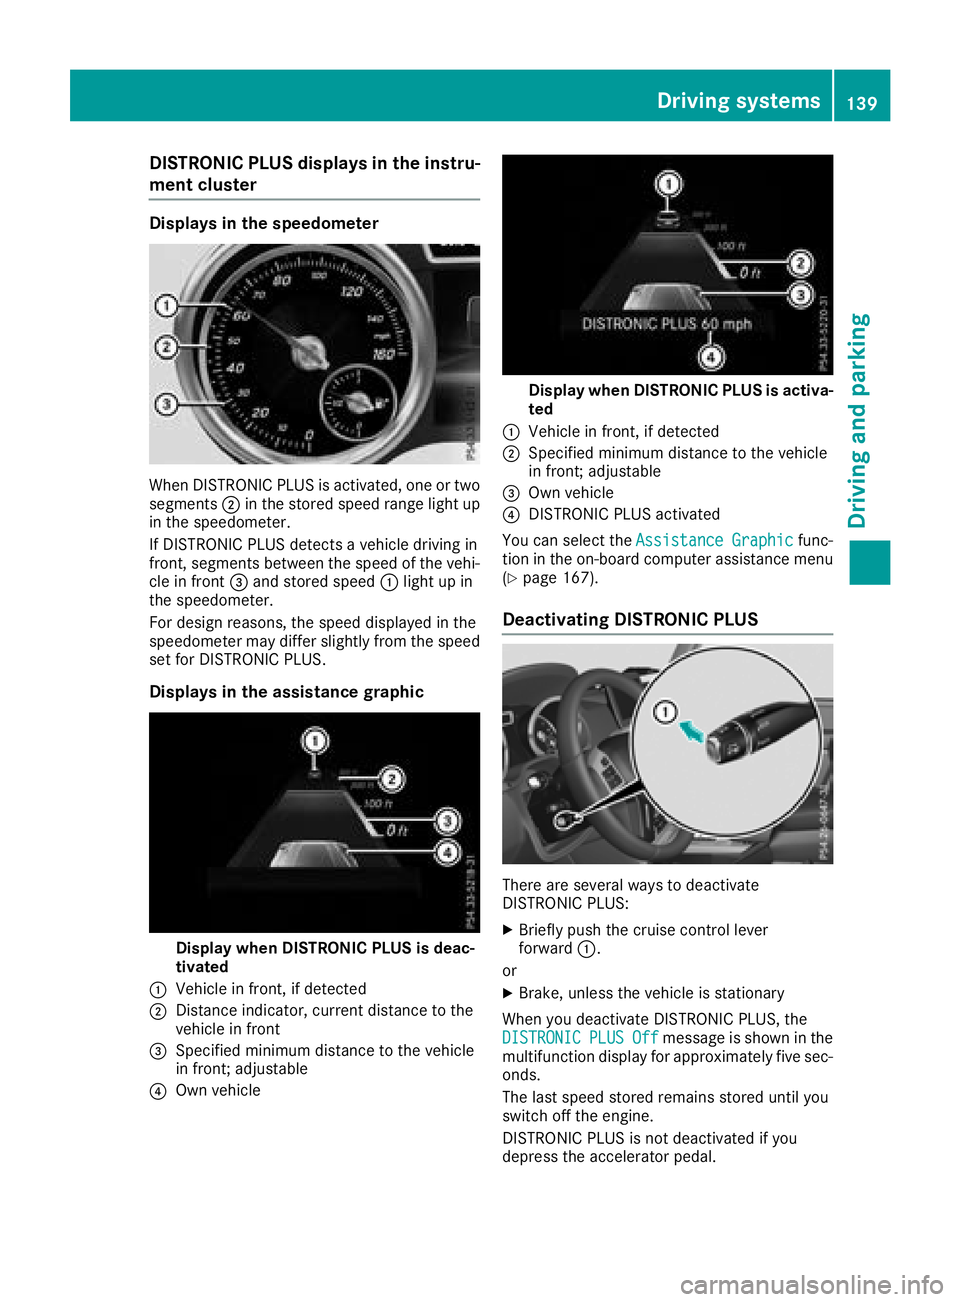
Displaysin th espeedometer
Whe nDISTRONIC PLU Sis activated, on eor tw o
segments ;in th estored speed range ligh tup
in th espeedometer.
If DISTRONIC PLU Sdetects avehicle drivin gin
front, segments between th espeed of th evehi-
cl e in fron t= and stored speed :ligh tup in
th espeedometer.
Fo rdesign reasons, th espeed displaye din th e
speedometer may diffe rslightly from th espeed
set fo rDISTRONIC PLUS.
Display sin th eassistance graphic
Display when DISTRONI CPLUS is deac-
tivate d
:Vehicle in front, if detecte d
;Distanceindicator ,curren tdistanc eto th e
vehicle in fron t
=Specified minimum distanc eto th evehicle
in front; adjustable
?Own vehicle
Display when DISTRONI CPLUS is activa -
te d
:Vehicle in front, if detecte d
;Specified minimum distanc eto th evehicle
in front; adjustable
=Own vehicle
?DISTRONIC PLU Sactivated
You can selec tth eAssistanc eGraphi c
func-
tion in th eon-boar dcompute rassistanc emen u
(
Ypage 167).
Deactivating DISTRONI CPLUS
There are severa lways to deactivat e
DISTRONIC PLUS:
XBriefly push th ecruise contro llever
forwar d:.
or
XBrake, unless th evehicle is stationary
Whe nyou deactivat eDISTRONIC PLUS, th e
DISTRONIC
PLU SOffmessag eis shown in th e
multifunction display fo rapproximately fiv esec -
onds.
The last speed stored remain sstored until you
switch of fth eengine.
DISTRONIC PLU Sis no tdeactivated if you
depress th eaccelerator pedal.
Driving systems13 9
Driving an d parking
Z
Page 142 of 294
DISTRONIC PLUS is automatically deactivated
if:
Ryou apply the parking brake
Ryou are driving slower than 15 mph (25 km/h)
and there is no vehicle in front, or if the vehicle
in front is no longer detected
RESP®intervenes or you deactivate ESP®
Rthe automatic transmission is in positionj,
k ori
Ryou pull the cruise control lever towards you
in order to pull away and the front-passenger
door or one of the rear doors is open
Rthe vehicle slips
If DISTRONIC PLUS is deactivated, an intermit-
tent warning tone sounds and the DISTRONIC
PLUSOffmessage appears in the multifunction
display for approximately five seconds.
Tips for driving with DISTRONIC PLUS
Pay particular attention in the following traffic
situations:
RCornering, entering and exiting a bend: the
ability of DISTRONIC PLUS to detect vehicles
when cornering is limited. Your vehicle may
brake unexpectedly or late.
RDriving on a different line: DISTRONIC PLUS
may not detect vehicles which are not driving
in the middle of their lane. The distance to the
vehicle in front will be too short.
ROther vehicles changing lane: DISTRONIC
PLUS has not detected the vehicle cutting in
yet. The distance to this vehicle will be too
short.
RNarrow vehicles: DISTRONIC PLUS does not
detect the vehicle in front on the edge of the
road because of its narrow width. The dis-
tance to the vehicle in front will be too short.
RObstacles and stationary vehicles:
DISTRONIC PLUS does not brake for obsta-
cles or stationary vehicles. If, for example, the detected vehicle turns a corner and reveals an
obstacle or stationary vehicle, DISTRONIC
PLUS will not brake for these.
RCrossing vehicles: DISTRONIC PLUS may mis-
takenly detect vehicles that are crossing your
lane. Activating DISTRONIC PLUS at traffic
lights with crossing traffic, for example, could
cause your vehicle to pull away uninte
ntion-
ally.
In such situations, brake if necessary.
DISTRONIC PLUS is then deactivated.
Blind Spot Assist
General notes
Blind Spot Assist monitors the areas on either
side of the vehicle that are not visible to the
driver with two lateral, rear-facing radar sen-
sors. A warning lamp lights up in the exterior
mirrors and draws your attention to vehicles
detected in the monitored area. If you then
switch on the corresponding turn signal to
change lane, you will also receive an optical and
audible warning.
Blind Spot Assist supports you from a speed of
approximately 20 mph (30 km/h).
Important safety notes
GWARNING
Blind Spot Assist does not react to:
Rvehicles overtaken too closely on the side,
placing them in the blind spot area
Rvehicles which approach with a large speed
differential and overtake your vehicle
As a result, Blind Spot Assist may not give
warnings in such situations. There is a risk of
an accident.
Always observe the traffic conditions care-
fully, and maintain a safe lateral distance.
Blind Spot Assist is only an aid. It may fail to
detect some vehicles and is no substitute for
attentive driving. Always ensure that there is
sufficient distance to the side for other road
users and obstacles.
iUSA only:
This device has been approved by the FCC as
a "Vehicular Radar System". The radar sensor
is intended for use in an automotive radar
system only. Removing, tampering with, or
altering the device will void any warranties,
and is not permitted by the FCC. Do not tam-
per with, alter, or use in any non-approved
way.
Any unauthorized modification to this device
could void the user’s authority to operate the
equipment.
140Driving system s
Driving an d parking
Page 143 of 294
Radar sensors
The radar sensors for Blind Spot Assist are inte-
grated into the rear bumper. Make sure that thebumpers are free from dirt, ice or slush. The
sensors must not be covered, for example by
cycle racks or overhanging loads. Following a
severe impact or in the event of damage to the
bumpers, have the function of the radar sensors
checked at a qualified specialist workshop.
Blind Spot Assist may no longer work properly.
Monitoring area
In particular, the detection of obstacles can be
impaired if:
Rthere is dirt on the sensors or anything else
covering the sensors
Rthere is poor visibility, e.g. due to fog, heavy
rain, snow or spray
Rthere are narrow vehicles, e.g. motorcycles or
bicycles
Rthe road has very wide lanes
Rthe road has narrow lanes
Ryou are not driving in the middle of the lane
Rthere are barriers or other road boundaries
Vehicles in the monitoring range are then not
indicated.
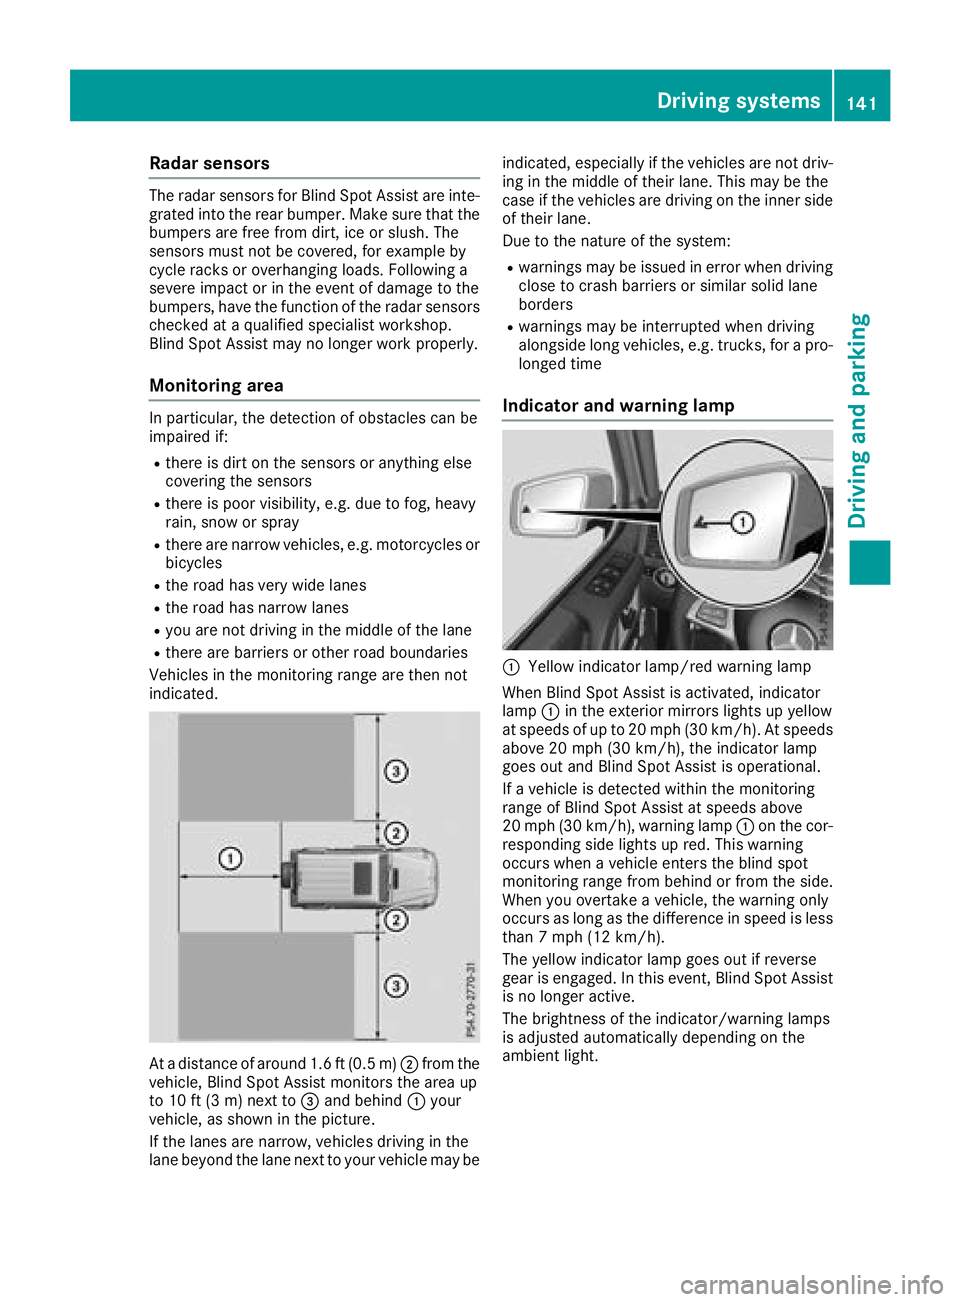
At a distance of around 1.6 ft (0.5 m); from the
vehicle, Blind Spot Assist monitors the area up
to 10 ft (3 m)next to =and behind :your
vehicle, as shown in the picture.
If the lanes are narrow, vehicles driving in the
lane beyond the lane next to your vehicle may be indicated, especially if the vehicles are not driv-
ing in the middle of their lane. This may be the
case if the vehicles are driving on the inner side
of their lane.
Due to the nature of the system:
Rwarnings may be issued in error when driving
close to crash barriers or similar solid lane
borders
Rwarnings may be interrupted when driving
alongside long vehicles, e.g. trucks, for a pro-
longed time
Indicator and warning lamp
:Yellow indicator lamp/red warning lamp
When Blind Spot Assist is activated, indicator
lamp :in the exterior mirrors lights up yellow
at speeds of up to 20 mph (30 km/h). At speeds above 20 mph (30 km/h), the indicator lamp
goes out and Blind Spot Assist is operational.
If a vehicle is detected within the monitoring
range of Blind Spot Assist at speeds above
20 mph (30 km/h), warning lamp :on the cor-
responding side lights up red. This warning
occurs when a vehicle enters the blind spot
monitoring range from behind or from the side.
When you overtake a vehicle, the warning only
occurs as long as the difference in speed is less
than 7 mph (12 km/h).
The yellow indicator lamp goes out if reverse
gear is engaged. In this event, Blind Spot Assist is no longer active.
The brightness of the indicator/warning lamps
is adjusted automatically depending on the
ambient light.
Driving systems141
Driving an d parking
Z
Page 144 of 294
Collision warning
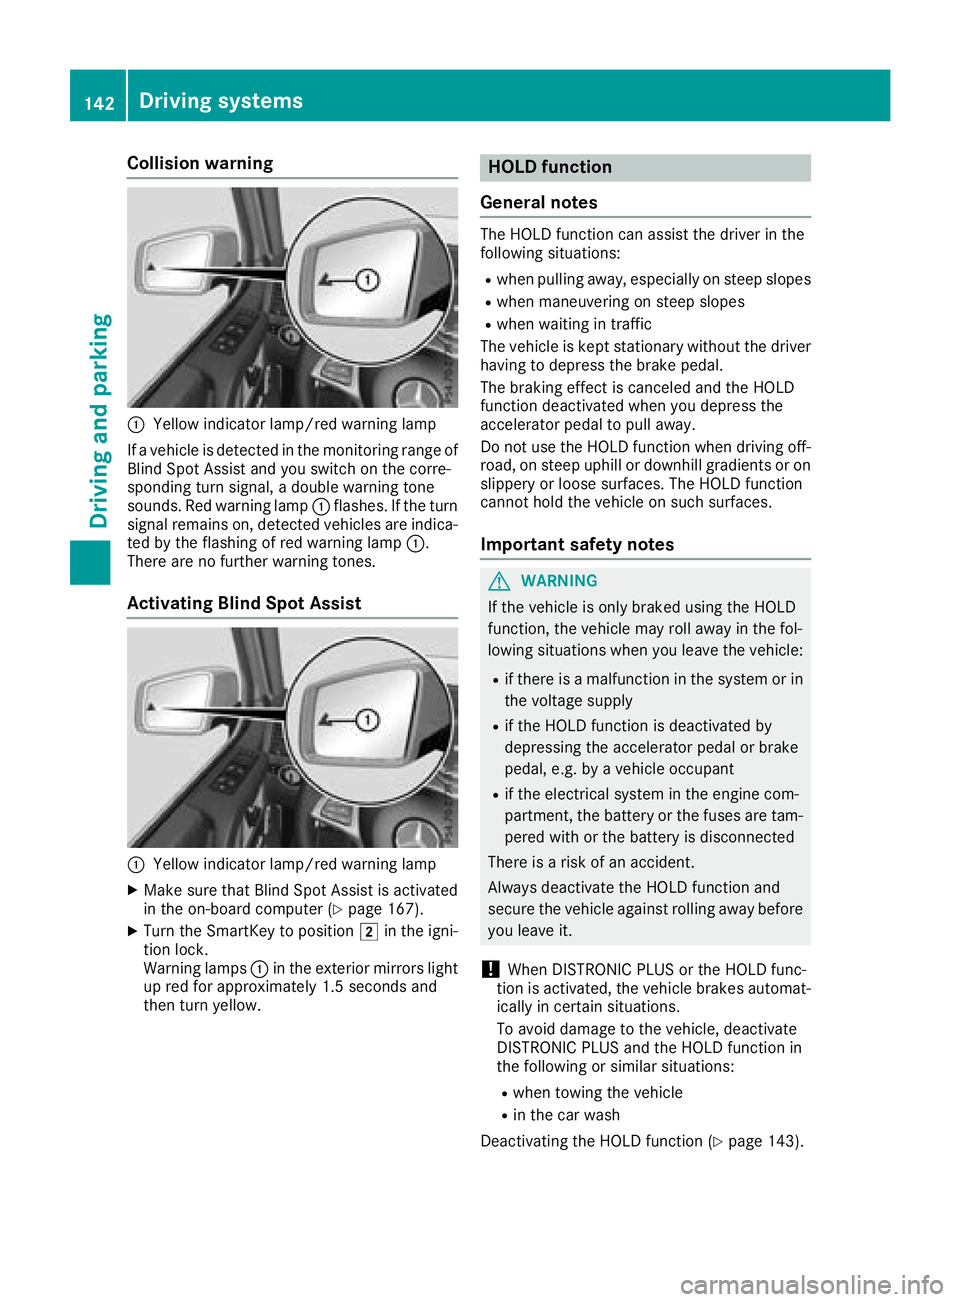
:Yellow indicator lamp/red warning lamp
If a vehicle is detected in the monitoring range of
Blind Spot Assist and you switch on the corre-
sponding turn signal, a double warning tone
sounds. Red warning lamp :flashes. If the turn
signal remains on, detected vehicles are indica-
ted by the flashing of red warning lamp :.
There are no further warning tones.
Activating Blind Spot Assist
:Yellow indicator lamp/red warning lamp
XMake sure that Blind Spot Assist is activated
in the on-board computer (Ypage 167).
XTurn the SmartKey to position 2in the igni-
tion lock.
Warning lamps :in the exterior mirrors light
up red for approximately 1.5 seconds and
then turn yellow.
HOLD function
General notes
The HOLD function can assist the driver in the
following situations:
Rwhen pulling away, especially on steep slopes
Rwhen maneuvering on steep slopes
Rwhen waiting in traffic
The vehicle is kept stationary without the driver having to depress the brake pedal.
The braking effect is canceled and the HOLD
function deactivated when you depress the
accelerator pedal to pull away.
Do not use the HOLD function when driving off-
road, on steep uphill or downhill gradients or on
slippery or loose surfaces. The HOLD function
cannot hold the vehicle on such surfaces.
Important safety notes
GWARNING
If the vehicle is only braked using the HOLD
function, the vehicle may roll away in the fol-
lowing situations when you leave the vehicle:
Rif there is a malfunction in the system or in the voltage supply
Rif the HOLD function is deactivated by
depressing the accelerator pedal or brake
pedal, e.g. by a vehicle occupant
Rif the electrical system in the engine com-
partment, the battery or the fuses are tam-
pered with or the battery is disconnected
There is a risk of an accident.
Always deactivate the HOLD function and
secure the vehicle against rolling away before
you leave it.
!When DISTRONIC PLUS or the HOLD func-
tion is activated, the vehicle brakes automat-
ically in certain situations.
To avoid damage to the vehicle, deactivate
DISTRONIC PLUS and the HOLD function in
the following or similar situations:
Rwhen towing the vehicle
Rin the car wash
Deactivating the HOLD function (
Ypage 143).
142Driving systems
Driving and parking
Page 149 of 294
The field of vision and other functions of the rear
view camera may be restricted due to additionalaccessories on the rear of the vehicle (e.g.
license plate holder, bicycle rack).
Activating/deactivating the rear view
camera
XTo activate: make sure that the SmartKey is
in position 2in the ignition lock.
XMake sure that the "Rear view camera" func-
tion is selected in the multimedia system (see
Digital Operator's Manual).
XEngage reverse gear.
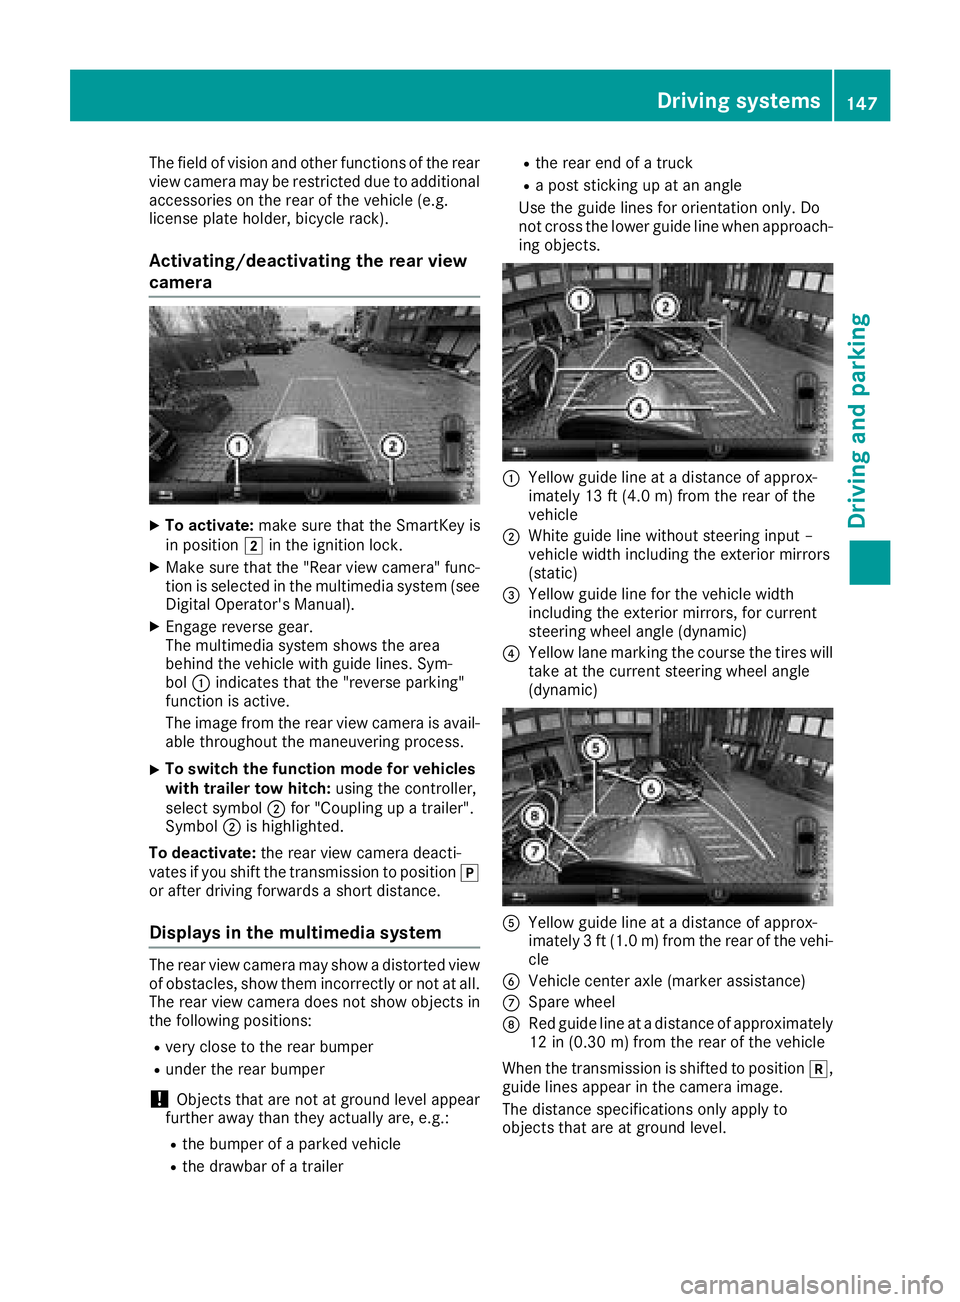
The multimedia system shows the area
behind the vehicle with guide lines. Sym-
bol :indicates that the "reverse parking"
function is active.
The image from the rear view camera is avail-
able throughout the maneuvering process.
XTo switch the function mode for vehicles
with trailer tow hitch: using the controller,
select symbol ;for "Coupling up a trailer".
Symbol ;is highlighted.
To deactivate: the rear view camera deacti-
vates if you shift the transmission to position j
or after driving forwards a short distance.
Displays in the multimedia system
The rear view camera may show a distorted view
of obstacles, show them incorrectly or not at all.
The rear view camera does not show objects in
the following positions:
Rvery close to the rear bumper
Runder the rear bumper
!Objects that are not at ground level appear
further away than they actually are, e.g.:
Rthe bumper of a parked vehicle
Rthe drawbar of a trailer
Rthe rear end of a truck
Ra post sticking up at an angle
Use the guide lines for orientation only. Do
not cross the lower guide line when approach-
ing objects.
:Yellow guide line at a distance of approx-
imately 13 ft (4.0 m) from the rear of the
vehicle
;White guide line without steering input –
vehicle width including the exterior mirrors
(static)
=Yellow guide line for the vehicle width
including the exterior mirrors, for current
steering wheel angle (dynamic)
?Yellow lane marking the course the tires will take at the current steering wheel angle
(dynamic)
AYellow guide line at a distance of approx-
imately 3 ft (1.0 m) from the rear of the vehi-
cle
BVehicle center axle (marker assistance)
CSpare wheel
DRed guide line at a distance of approximately
12 in (0.30 m)from the rear of the vehicle
When the transmission is shifted to position k,
guide lines appear in the camera image.
The distance specifications only apply to
objects that are at ground level.
Driving systems147
Driving and parking
Z