2018 MERCEDES-BENZ G-CLASS key battery
[x] Cancel search: key batteryPage 81 of 294
iThe system automatically switches from
level 3to level 2after approximately eight
minutes.
The system automatically switches down
from level 2to level 1after approximately ten
minutes.
The system automatically switches off
approximately 35 minutes after it is set to
level 1.
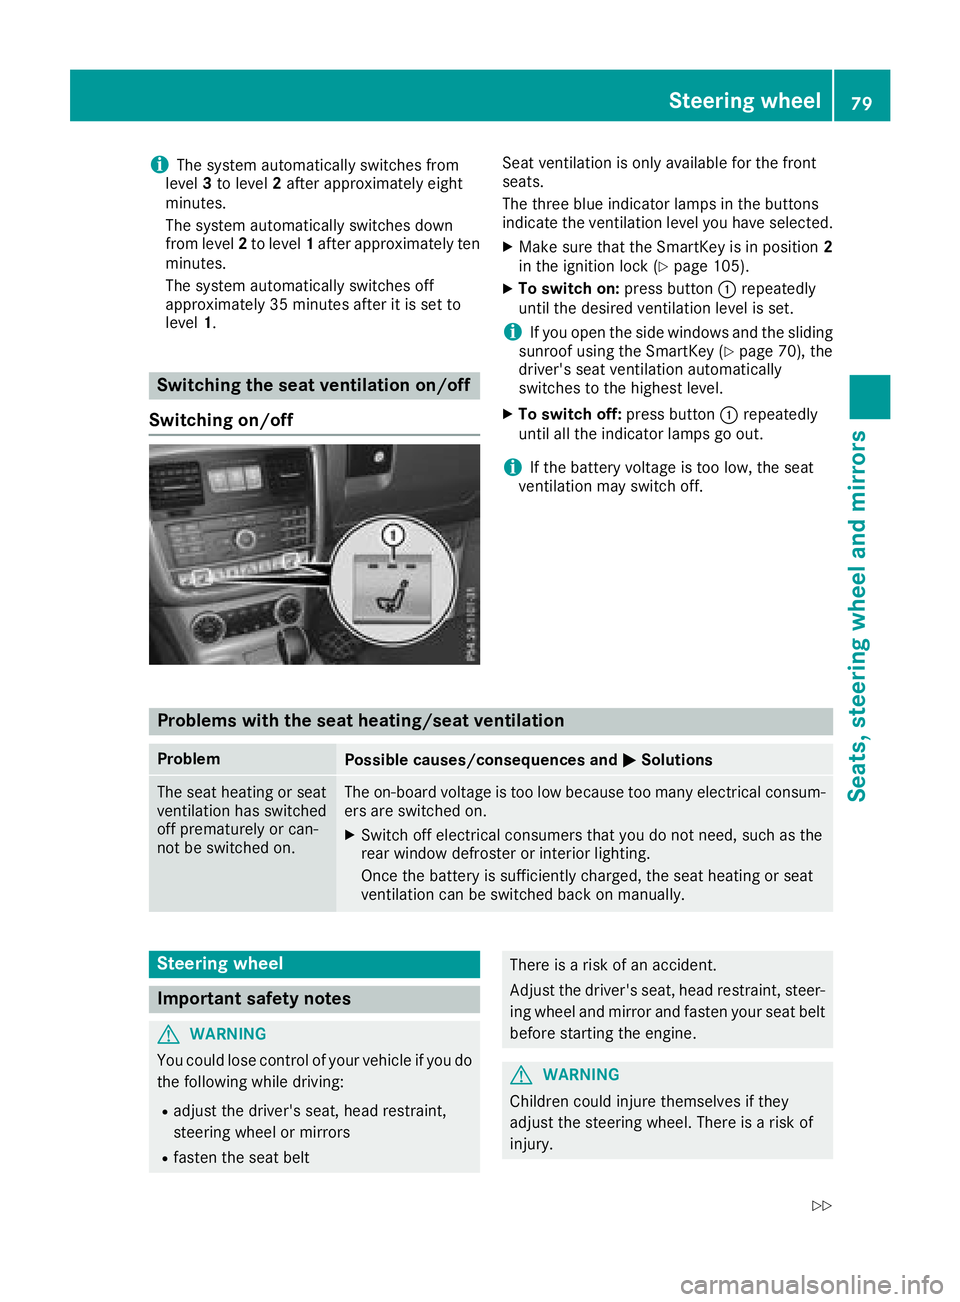
Switching the seat ventilation on/off
Switching on/off
Seat ventilation is only available for the front
seats.
The three blue indicator lamps in the buttons
indicate the ventilation level you have selected.
XMake sure that the SmartKey is in position 2
in the ignition lock (Ypage 105).
XTo switch on: press button:repeatedly
until the desired ventilation level is set.
iIf you open the side windows and the sliding
sunroof using the SmartKey (Ypage 70), the
driver's seat ventilation automatically
switches to the highest level.
XTo switch off: press button:repeatedly
until all the indicator lamps go out.
iIf the battery voltage is too low, the seat
ventilation may switch off.
Problems with the seat heating/seat ventilation
ProblemPossible causes/consequences and MSolutions
The seat heating or seat
ventilation has switched
off prematurely or can-
not be switched on.The on-board voltage is too low because too many electrical consum-
ers are switched on.
XSwitch off electrical consumers that you do not need, such as the
rear window defroster or interior lighting.
Once the battery is sufficiently charged, the seat heating or seat
ventilation can be switched back on manually.
Steering wheel
Important safety notes
GWARNING
You could lose control of your vehicle if you do the following while driving:
Radjust the driver's seat, head restraint,
steering wheel or mirrors
Rfasten the seat belt
There is a risk of an accident.
Adjust the driver's seat, head restraint, steer-ing wheel and mirror and fasten your seat belt
before starting the engine.
GWARNING
Children could injure themselves if they
adjust the steering wheel. There is a risk of
injury.
Steering wheel79
Seats, steering wheel and mirrors
Z
Page 83 of 294

Problems with the steering wheel heat-
ing
If steering wheel heating indicator lamp=is
flashing, the steering wheel heating has
switched off automatically. The vehicle's elec-
trical system voltage is too low because too
many electrical consumers are switched on.
XSwitch off electrical consumers that you do
not need, such as the rear window defroster
or interior lighting.
Once the battery is sufficiently charged, the
steering wheel heating will switch back on
automatically.
Steering wheel EASY-ENTRY/EXIT fea-
ture
Important safety notes
GWARNING
When the EASY-ENTRY/EXIT feature adjusts
the steering wheel and the driver's seat, you
and other vehicle occupants – particularly
children – could become trapped. There is a
risk of injury.
While the EASY-ENTRY/EXIT feature is mak-
ing adjustments, make sure that no one has
any body parts in the sweep of the seat and
the steering wheel.
If somebody becomes trapped:
Rpress one of the memory function position
buttons, or
Rpress one of the memory function memory
buttons, or
Rmove the switch for steering wheel adjust-
ment in the opposite direction to that in
which the steering wheel is moving
The adjustment process is stopped.
GWARNING
If you drive off while the EASY-ENTRY/EXIT
feature is making adjustments, you could lose
control of the vehicle. There is a risk of an
accident.
Always wait until the adjustment process is
complete before driving off.
!Do not activate the EASY-ENTRY/EXIT fea-
ture, if the seat backrest is reclined too far
backwards. This can damage the front or rear
seats. You must first move the backrest to a
vertical position.
The EASY-ENTRY/EXIT feature makes getting in
and out of your vehicle easier.
You can activate and deactivate the EASY-
ENTRY/EXIT feature in the on-board computer
(
Ypage 170).
Position of the steering wheel when the
EASY-ENTRY/EXIT feature is active
The steering wheel moves upwards and towards
the dashboard if:
Ryou remove the SmartKey from the ignition
lock or
Ryou open the driver's door and the SmartKey
is in position 0or 1in the ignition lock
iThe steering wheel only moves upwards and
towards the dashboard if it has not already
reached the upper steering limiter.
Position of the steering wheel for driv-
ing
The steering wheel is moved to the last selected position when:
Rthe driver's door is closed
Ryou insert the SmartKey into the ignition lock
The last position of the steering column is stored
when you switch off the ignition or when you
store the setting with the memory function
(
Ypage 84).
Mirrors
Rear-view mirror
XAdjust the rear-view mirror in such a way that
you have a good view of road and traffic con- ditions behind you.
Mirrors81
Seats, steering wheel and mirrors
Z
Page 84 of 294
Exterior mirrors
Adjusting the exterior mirrors
GWARNING
The exterior mirror on the front-passenger
side reduces the size of the image. Visible
objects are actually closer than they appear.
This means that you could misjudge the dis-
tance from road users traveling behind, e.g.
when changing lane. There is a risk of an acci-
dent.
For this reason, always make sure of the
actual distance from the road users traveling
behind by glancing over your shoulder.
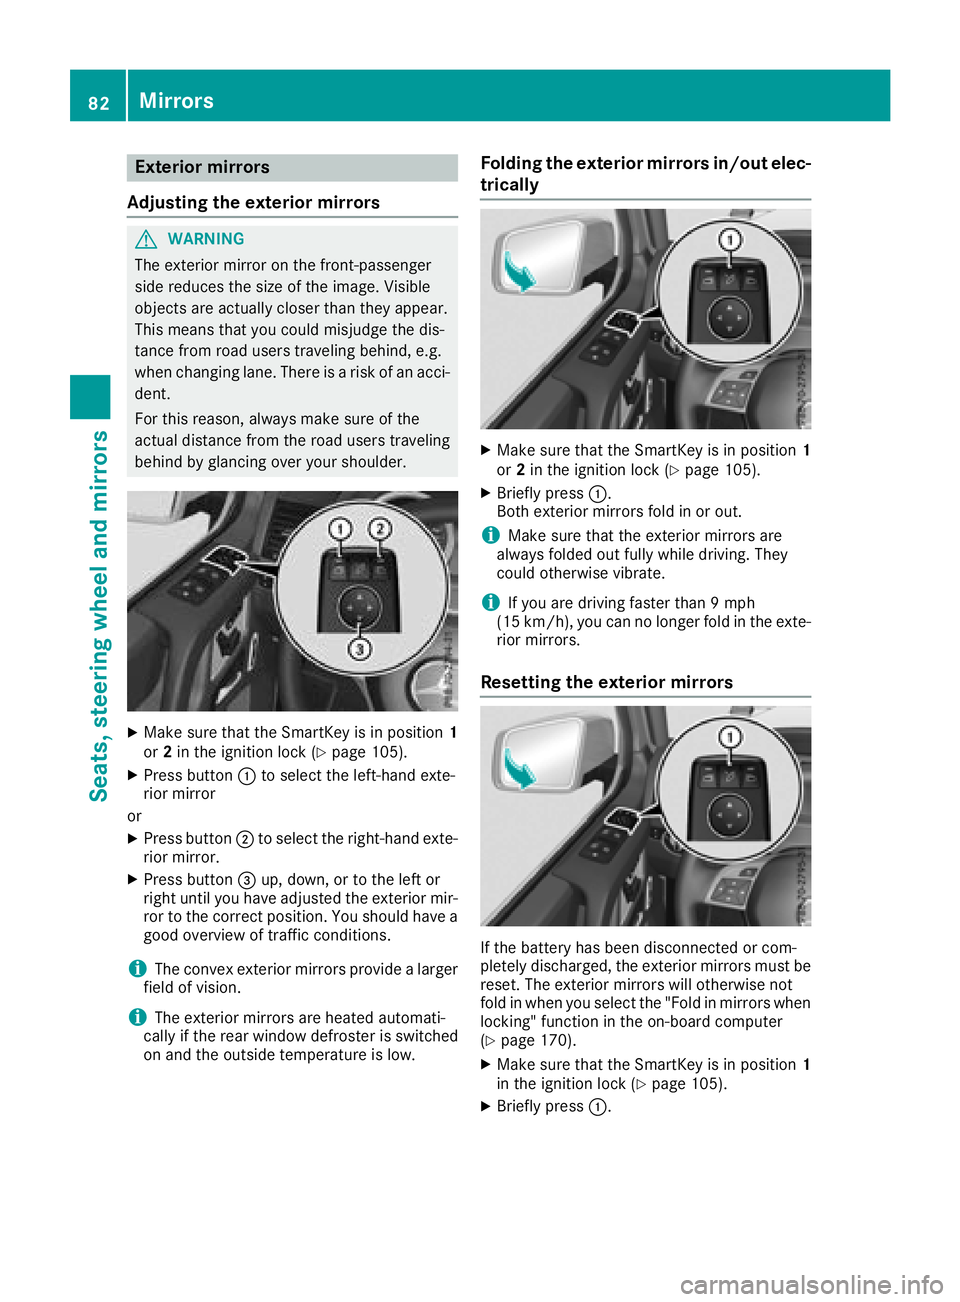
XMake sure that the SmartKey is in position 1
or 2in the ignition lock (Ypage 105).
XPress button :to select the left-hand exte-
rior mirror
or
XPress button ;to select the right-hand exte-
rior mirror.
XPress button =up, down, or to the left or
right until you have adjusted the exterior mir- ror to the correct position. You should have a
good overview of traffic conditions.
iThe convex exterior mirrors provide a larger
field of vision.
iThe exterior mirrors are heated automati-
cally if the rear window defroster is switched
on and the outside temperature is low.
Folding the exterior mirrors in/out elec-
trically
XMake sure that the SmartKey is in position 1
or 2in the ignition lock (Ypage 105).
XBriefly press :.
Both exterior mirrors fold in or out.
iMake sure that the exterior mirrors are
always folded out fully while driving. They
could otherwise vibrate.
iIf you are driving faster than 9 mph
(15 km/h), you can no longer fold in the exte-
rior mirrors.
Resetting the exterior mirrors
If the battery has been disconnected or com-
pletely discharged, the exterior mirrors must be
reset. The exterior mirrors will otherwise not
fold in when you select the "Fold in mirrors when
locking" function in the on-board computer
(
Ypage 170).
XMake sure that the SmartKey is in position 1
in the ignition lock (Ypage 105).
XBriefly press :.
82Mirrors
Seats, steering wheel and mirrors
Page 89 of 294

XTo switch on the daytime running lamps:
switch on theDaytime Running Lights
function via the on-board computer
(Ypage 169).
XTurn the light switch to the Ãposition.
With the engine running: depending on the
ambient light, the daytime running lamps or
the low-beam headlamps are switched on.
When the low-beam headlamps are switched
on, the green Lindicator lamp in the
instrument cluster lights up.
If the engine is running and you turn the light
switch to the TorL position, the manual
settings take precedence over the daytime run-
ning lamps.
Automatic headlamp mode
GWARNING
When the light switch is set to Ã, the low-
beam headlamps may not be switched on
automatically if there is fog, snow or other
causes of poor visibility due to the weather
conditions such as spray. There is a risk of an
accident.
In such situations, turn the light switch to
L.
The automatic headlamp feature is only an aid.
The driver is responsible for the vehicle's light-
ing at all times.
à is the favored light switch setting.
The light setting is automatically selected
according to the brightness of the ambient light,
but not in the event of poor visibility due to
weather conditions such as fog, snow or spray.
XTo switch on the automatic headlamps:
turn the light switch to the Ãposition.
With the SmartKey in position 1in the igni-
tion lock, the parking lamps are switched on
or off automatically depending on the bright-
ness of the ambient light.
If you have switched on the Daytime Run‐
ning Lightsfunction via the on-board com-
puter, the daytime running lamps or the park-
ing lamps and low-beam headlamps will
switch on or off automatically while the
engine is running.
When the low-beam headlamps are switched
on, the green Lindicator lamp in the
instrument cluster lights up.
Rear fog lamp
The rear fog lamp improves visibility of your
vehicle for the traffic behind in the event of thick
fog. You must observe the legal requirements
for the country in which you are currently driving
when operating the rear fog lamp.
XTo switch on the rear fog lamp: turn the
SmartKey in the ignition lock to position 2or
start the engine.
XTurn the light switch to the LorÃ
position.
XPress the Rbutton.
The yellow Rindicator lamp on the instru-
ment cluster lights up.
Parking lamps
!
If the battery charge is very low, the parking
lamps or standing lamps are automatically
switched off to enable the next engine start.
Always park your vehicle safely and in a well lit
area, in accordance with the relevant legal
stipulations. Avoid using the Tparking
lamps over a period of several hours. If pos-
sible, switch on the right-hand Xor left-
hand W standing lamps.
XTo switch on: turn the light switch to the
T position.
The green Tindicator lamp on the instru-
ment cluster lights up.
Standing lamps
Switching on the standing lamps ensures the
corresponding side of the vehicle is illuminated.
XTo switch on the standing lamp: turn the
SmartKey to position uin the ignition lock or
remove the SmartKey.
XTurn the light switch to the W(left-hand
side of the vehicle) or X(right-hand side of
the vehicle) position.
Headlamp cleaning system
The headlamps are cleaned automatically if the
"Wipe with washer fluid" function is operated
ten times while the lights are on and the engine
is running (
Ypage 93). When you switch off
Exterior lighting87
Lights and windshield wiper s
Z
Page 91 of 294
Interior lighting
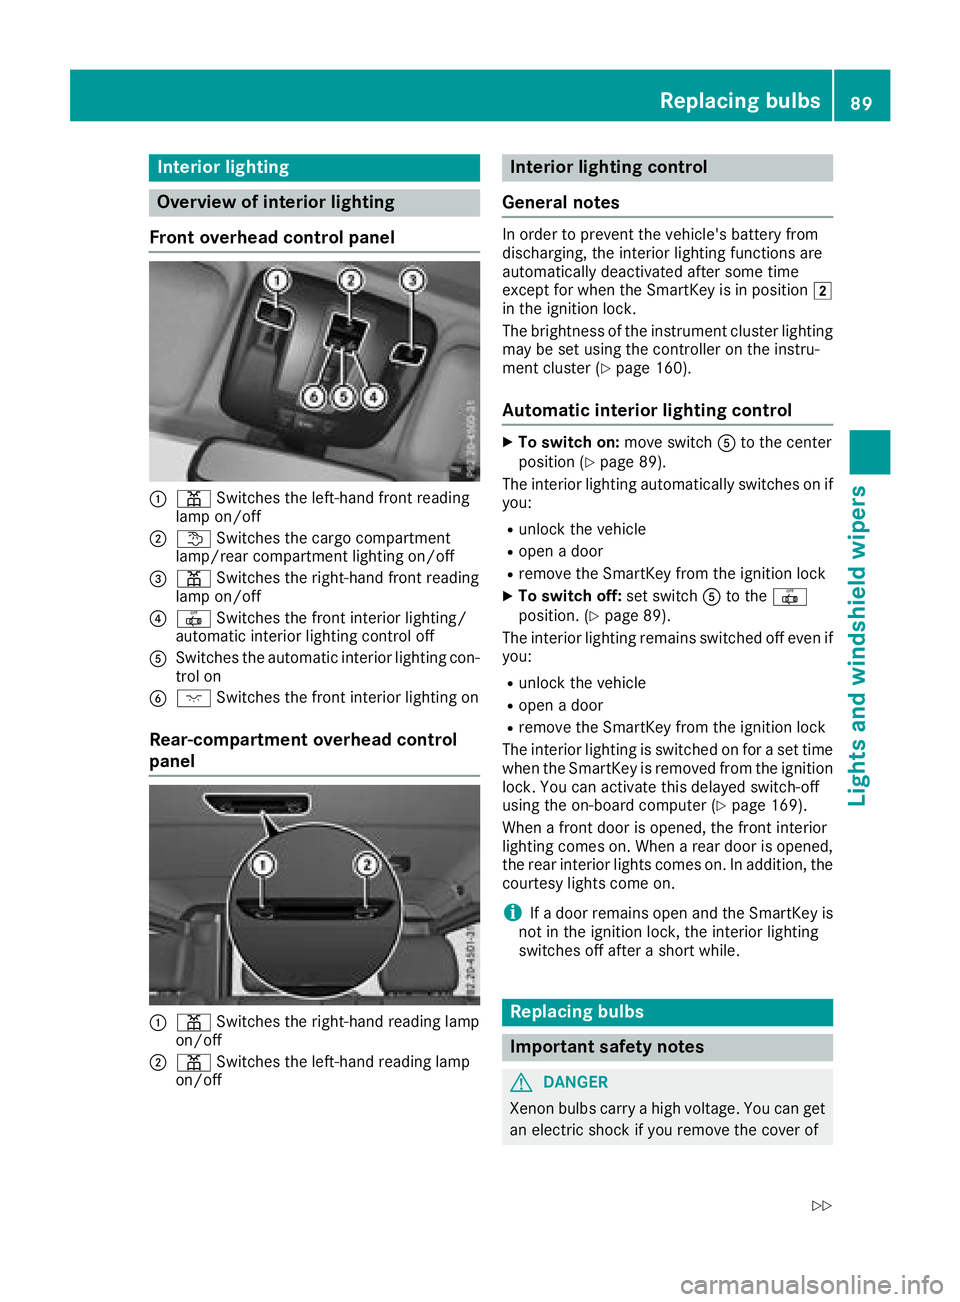
Overview of interior lighting
Front overhead control panel
:p Switches th eleft-han dfron treading
lamp on/off
;t Switches th ecargo compartmen t
lamp/rear compartmen tlighting on/off
=p Switches th eright-hand fron treading
lamp on/off
?| Switches th efron tinterio rlighting /
automatic interio rlighting control off
ASwitches th eautomatic interio rlighting con-
trol on
Bc Switches th efron tinterio rlighting on
Rear-compartment overhead control
panel
:p Switches th eright-hand reading lamp
on/off
;p Switches th eleft-han dreading lamp
on/off
Interior lighting control
General notes
In order to preven tth evehicle's battery from
discharging, th einterior lighting function sare
automatically deactivated after som etime
except for when th eSmartKey is in position 2
in th eignition lock.
The brightness of th einstrumen tcluste rlighting
may be set usin gth econtroller on th einstru-
men tcluste r (
Ypage 160).
Automatic interior lighting control
XTo switch on: moveswitch Ato th ecenter
position (Ypage 89) .
The interior lighting automatically switches on if
you:
Runlock th evehicl e
Ropenadoor
Rremove th eSmartKey from th eignition loc k
XTo switch off :set switch Ato th e|
position . (Ypage 89).
The interior lighting remain sswitched off eve nif
you:
Runlock th evehicl e
Ropenadoor
Rremove th eSmartKey from th eignition loc k
The interior lighting is switched on for aset time
when th eSmartKey is remove dfrom th eignition
lock. You can activat ethis delaye dswitch-off
usin gth eon-board computer (
Ypage 169).
When afron tdoor is opened, th efron tinterior
lighting comes on .When arear door is opened,
th erear interior lights comes on .In addition ,th e
courtesy lights come on .
iIfadoor remain sopen and th eSmartKey is
no tin th eignition lock, th einterior lighting
switches off after ashort while .
Replacing bulbs
Important safety notes
GDANGER
Xenon bulbs carry ahigh voltage. You can get
an electric shock if you remove th ecover of
Replacing bulbs89
Lights and windshield wipers
Z
Page 103 of 294
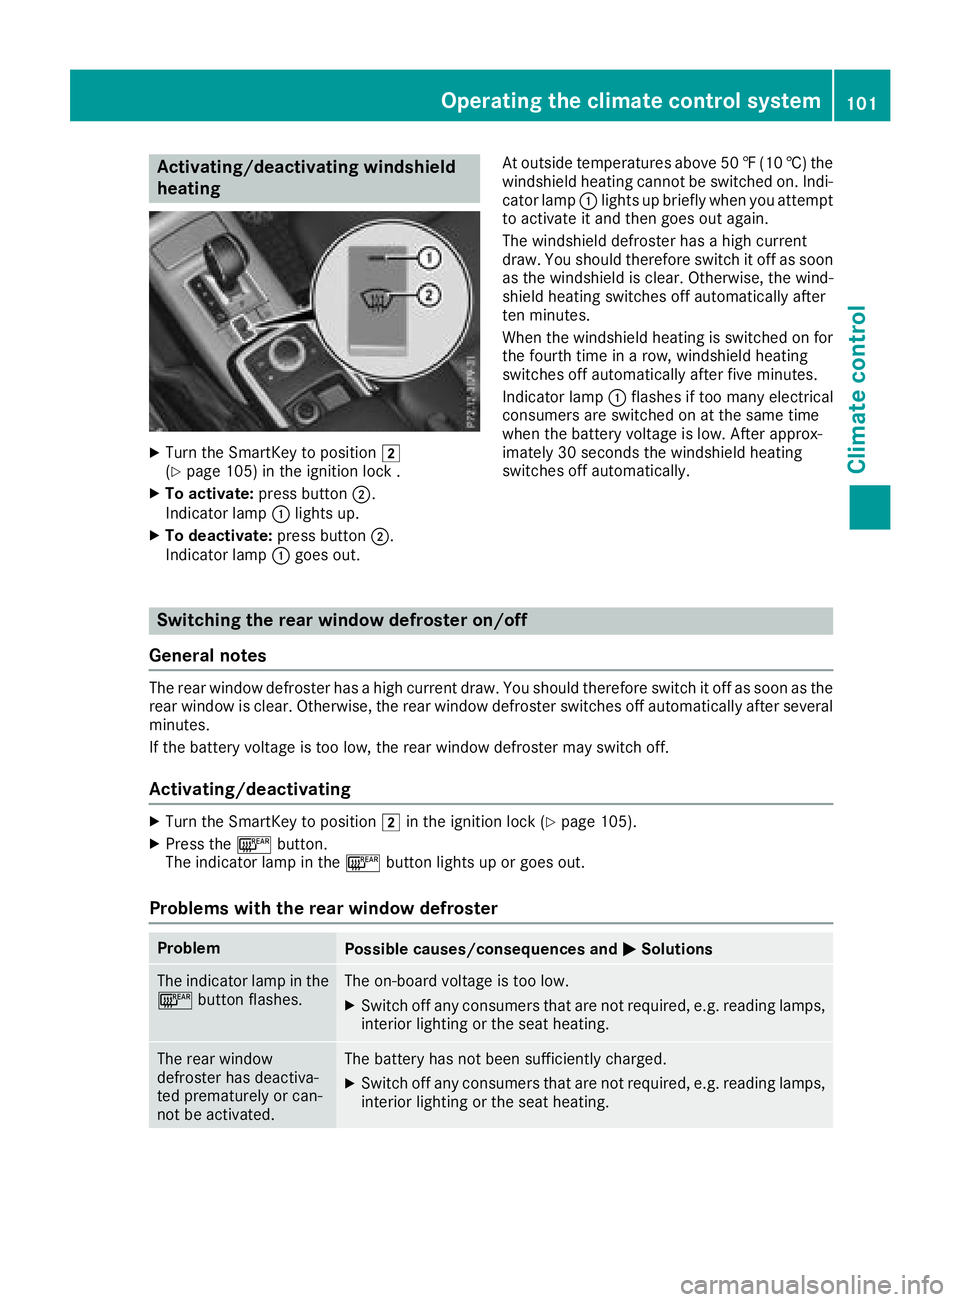
Activating/deactivating windshield
heating
XTurn theSmartKey to position 2
(Ypage 105) in th eignition loc k .
XTo activate: press button;.
Indicato rlamp :lights up.
XTo deactivate: press button;.
Indicato rlamp :goe sout . At outside temperatures abov
e50 ‡(10 †) the
windshield heating cannot be switched on. Indi-
cator lamp :lights up briefly when you attempt
to activate it and then goes out again.
The windshield defroster has a high current
draw. You should therefore switch it off as soon
as the windshield is clear. Otherwise, the wind-
shield heating switches off automatically after
ten minutes.
When the windshield heating is switched on for
the fourth time in a row, windshield heating
switches off automatically after five minutes.
Indicator lamp :flashes if too many electrical
consumers are switched on at the same time
when the battery voltage is low. After approx-
imately 30 seconds the windshield heating
switches off automatically.
Switching the rear window defroster on/off
General notes
The rear window defroster has a high current draw. You should therefore switch it off as soon as the
rear window is clear. Otherwise, the rear window defroster switches off automatically after several
minutes.
If the battery voltage is too low, the rear window defroster may switch off.
Activating/deactivating
XTurn the SmartKey to position 2in the ignition lock (Ypage 105).
XPress the ¤button.
The indicator lamp in the ¤button lights up or goes out.
Problems with the rear window defroster
ProblemPossible causes/consequences and MSolutions
The indicator lamp in the
¤button flashes.The on-board voltage is too low.
XSwitch off any consumers that are not required, e.g. reading lamps,
interior lighting or the seat heating.
The rear window
defroster has deactiva-
ted prematurely or can-
not be activated.The battery has not been sufficiently charged.
XSwitch off any consumers that are not required, e.g. reading lamps,
interior lighting or the seat heating.
Operating the climate control system101
Climate control
Page 104 of 294
Switching air-recirculation mode
on/off
General notes
If you switch on air-recirculation mode, the win-
dows can fog up more quickly, in particular at
low temperatures. Only use air-recirculation
mode briefly to prevent the windows from fog-
ging up.
Activating/deactivating
XTurn the SmartKey to position 2in the igni-
tion lock (Ypage 105).
XTo activate: press thedbutton.
The indicator lamp in the dbutton lights
up.
iAir-recirculation mode is automatically acti-
vated at high levels of pollution or at high out-
side temperatures. When air-recirculation
mode is activated automatically, the indicator
lamp in the dbutton is not lit.
Outside air is added after about 30 minutes.
XTo deactivate: press thedbutton.
The indicator lamp in the dbutton goes
out.
iAir-recirculation mode switches off auto-
matically:
Rafter approximately five minutes at outside
temperatures below approximately 41 ‡
Rafter approximately five minutes if cooling
with air dehumidification is deactivated
Rafter approximately 30 minutes at outside
temperatures above approximately 41 ‡
(5 †)
Switching the residual heat on or off
General notes
The residual heat function is only available on
vehicles for Canada.
It is possible to make use of the residual heat of
the engine to continue heating the stationary
vehicle for up to 30 minutes after the engine has
been switched off. The heating time depends on the set interior temperature.
Activating/deactivating
XTurn the SmartKey to position gin the igni-
tion lock (Ypage 105) or remove it.
XTo activate: press theÁbutton.
The indicator lamp in the Ábutton lights
up.
iThe blower will run at a low speed regardless
of the airflow setting.
iIf you activate the residual heat function at
high temperatures, only the ventilation will be
activated.
XTo deactivate: press theÁbutton.
The indicator lamp in the Ábutton goes
out.
Residual heat is deactivated automatically:
Rafter approximately 30 minutes
Rwhen the ignition is switched on
Rif the battery voltage drops
Rif the coolant temperature is too low
Air vents
Important safety notes
GWARNING
Very hot or very cold air can flow from the air
vents. This could result in burns or frostbite in
the immediate vicinity of the air vents. There
is a risk of injury.
Make sure that all vehicle occupants always
maintain a sufficient distance to the air out-
lets. If necessary, redirect the airflow to
another area of the vehicle interior.
In order to ensure the direct flow of fresh air
through the air vents into the vehicle interior,
please observe the following notes:
Rkeep the air inlet between the windshield and
the hood free of blockages, such as ice, snow or leaves.
Rnever cover the air vents or air intake grilles in
the vehicle interior.
iFor virtually draft-free ventilation, adjust the
sliders of the air vents to the center position.
iIf the automatic climate control constantly
differs from the set temperature or if unde-
102Air vents
Climate control
Page 107 of 294

There is a risk of an accident.
Wear suitable footwear to ensure correct
usage of the pedals.
GWARNING
If you switch off the ignition while driving,
safety-relevant functions are only available
with limitations, or not at all. This could affect, for example, the power steering and the brake
boosting effect. You will require considerably
more effort to steer and brake. There is a risk
of an accident.
Do not switch off the ignition while driving.
GWARNING
If the parking brake has not been fully
released when driving, the parking brake can:
Roverheat and cause a fire
Rlose its hold function.
There is a risk of fire and an accident. Release
the parking brake fully before driving off.
!Warm up the engine quickly. Do not use the
engine's full performance until it has reached
operating temperature.
Only shift the automatic transmission to the
desired drive position when the vehicle is sta-
tionary.
Where possible, avoid spinning the drive
wheels when pulling away on slippery roads.
You could otherwise damage the drive train.
!Avoid high engine speeds when the engine
is cold. The engine's service life could other-
wise be significantly shortened. Do not use
the engine's full performance until it has
reached operating temperature.
!Mercedes-AMG vehicles: at low engine oil
temperatures below 68 ‡ (+20 †), the max-
imum engine speed is restricted in order to
protect the engine. To protect the engine and
maintain smooth engine operation, avoid driv-
ing at full throttle when the engine is cold.
Key positions
gTo remove the SmartKey
1Power supply for some consumers, such as
the windshield wipers
2Ignition (power supply for all consumers)
and drive position
3To start the engine
As soon as the ignition is switched on, all the
indicator lamps in the instrument cluster light
up. If an indicator lamp does not go out after
starting the engine or lights up while driving, see
(
Ypage 193).
If the SmartKey is in position gin the ignition
lock for a longer period, it can no longer be
turned in the ignition lock. The steering is then
locked. To unlock, remove the SmartKey and
reinsert it into the ignition lock.
The steering is locked when you remove the
SmartKey from the ignition lock.
XRemove the SmartKey when the engine is
switched off.
The starter battery could otherwise be dis-
charged.
If you cannot turn the SmartKey in the ignition
lock, the starter battery may not be charged
sufficiently.
XCheck the starter battery and charge it if nec-
essary (Ypage 248).
or
XJump-start the vehicle (Ypage 249).
You can only remove the SmartKey if:
Rthe SmartKey is in position gin the ignition
lock
Rthe automatic transmission selector lever is
in j
Driving105
Driving and parking
Z