2018 MERCEDES-BENZ G-CLASS alarm
[x] Cancel search: alarmPage 70 of 294

XTo deactivate:press and hold button :for
approximately five seconds until a tone
sounds.
XTo activate: press and hold button ;for
approximately five seconds until a tone
sounds.
If you press one of the two buttons and do not
hear a tone, the relevant setting has already
been selected.
The vehicle is locked automatically when the
ignition is switched on and the wheels are turn-
ing.
You could therefore be locked out if:
Rthe vehicle is being pushed.
Rthe vehicle is being towed.
Rthe vehicle is being tested on a dynamometer.
You can also switch the automatic locking func-
tion on and off using the on-board computer
(
Ypage 170).
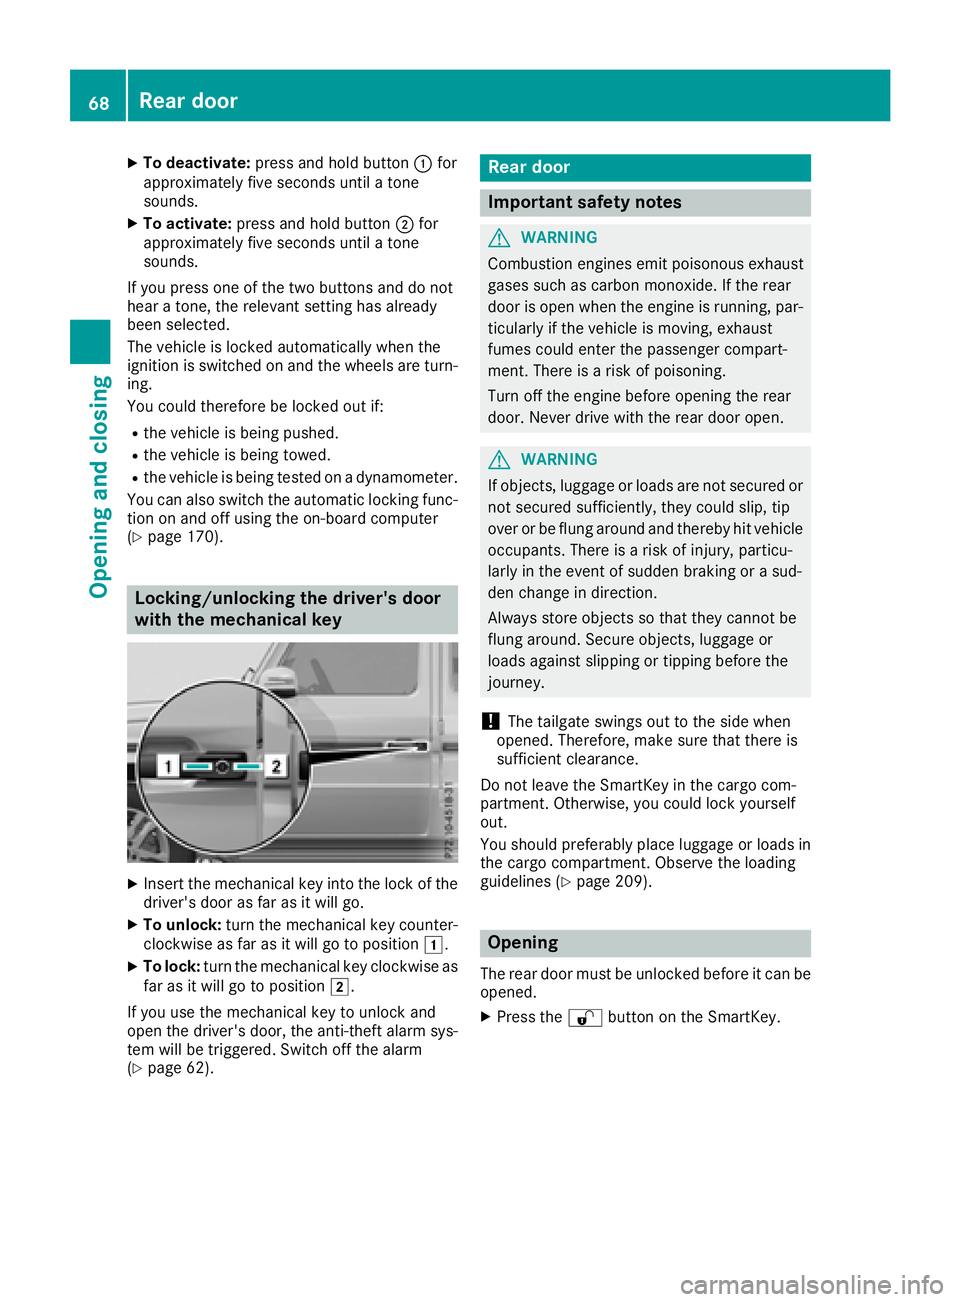
Locking/unlocking the driver's door
with the mechanical key
XInsert the mechanical key into the lock of the driver's door as far as it will go.
XTo unlock: turn the mechanical key counter-
clockwise as far as it will go to position 1.
XTo lock:turn the mechanical key clockwise as
far as it will go to position 2.
If you use the mechanical key to unlock and
open the driver's door, the anti-theft alarm sys-
tem will be triggered. Switch off the alarm
(
Ypage 62).
Rear door
Important safety notes
GWARNING
Combustion engines emit poisonous exhaust
gases such as carbon monoxide. If the rear
door is open when the engine is running, par-
ticularly if the vehicle is moving, exhaust
fumes could enter the passenger compart-
ment. There is a risk of poisoning.
Turn off the engine before opening the rear
door. Never drive with the rear door open.
GWARNING
If objects, luggage or loads are not secured or
not secured sufficiently, they could slip, tip
over or be flung around and thereby hit vehicle
occupants. There is a risk of injury, particu-
larly in the event of sudden braking or a sud-
den change in direction.
Always store objects so that they cannot be
flung around. Secure objects, luggage or
loads against slipping or tipping before the
journey.
!The tailgate swings out to the side when
opened. Therefore, make sure that there is
sufficient clearance.
Do not leave the SmartKey in the cargo com-
partment. Otherwise, you could lock yourself
out.
You should preferably place luggage or loads in
the cargo compartment. Observe the loading
guidelines (
Ypage 209).
Opening
The rear door must be unlocked before it can be opened.
XPress the %button on the SmartKey.
68Rear door
Opening and closing
Page 227 of 294

Mercedes-Benz Customer Assistance Center
at 1-800-FOR-MERCedes (1-800-367-6372)
or 1-866-990-9007
You will be asked for your password.
The next time you are inside the vehicle and you
switch on the ignition, the Doors Locked
Remotelymessage appears in the multifunction
display.
Alternatively, the vehicle can be locked via:
Rthe Internet, under the "Owners Online" sec-
tion
Rtelephone applications (e.g. for iPhone®,
Android™)
To do this, you will need your identification num-
ber and password.
Stolen vehicle recovery service
If your vehicle has been stolen:
XNotify the police.
The police will issue a numbered incident
report.
XThis number will be forwarded to the
Mercedes-Benz Customer Assistance Center
together with your PIN.
The Mercedes-Benz Customer Assistance
Center then tries to locate the system. The
Mercedes-Benz Customer Assistance Center
contacts you and the local law enforcement
agency if the vehicle is located.
However, only the law enforcement agency is
informed of the location of the vehicle.
If the anti-theft alarm system is activated for
longer than 30 seconds, the Mercedes-Benz
Customer Assistance Center is automatically
notified.
Vehicle Health Check
With the Vehicle Health Check, the Customer
Assistance Center can provide improved sup-
port for problems with your vehicle. During an
existing call, vehicle data is transferred to the
Customer Assistance Center.
The customer service representative can use
the received data to decide what kind of assis-
tance is required. You are then, for example,
guided to the nearest Mercedes-Benz Service
Center or a recovery vehicle is called.
If vehicle data need to be transferred during an
Info call or a Roadside Assistance call, this is
initiated by the Customer Assistance Center. You will see the
Roadside Assistance Con‐
nectedmessage in the display. If the Vehicle
Health Check can be started, the RequestforVehicle Diagnostics Received Startvehicle diagnostics?message appears in
the display.
XPress the Yesbutton to confirm the message.
XIf theVehicle Diagnostics PleaseStart Ignitionmessage appears: turn the
SmartKey to position 2in the ignition lock
(
Ypage 105).
XIf the Please follow the instructionsreceivedbyphoneandmoveyourvehi‐cle to a safe position.message
appears: please follow the instructions
received by phone and move your vehicle to a
safe position.
The message in the display disappears.
The vehicle operating state check begins. You
will see the Vehicle Diagnostics Active
message.
If you select Cancel
, the Vehicle Health
Check is canceled completely.
When the check is complete, the Sending
vehicle diagnostics data. (Voice con‐nection may be interrupted duringdatatransfer)message appears. The vehicle
data can now be sent.
XPress the OKbutton to confirm the message.
The voice connection with the Customer
Assistance Center is terminated.
You will see the Vehicle Diagnostics:
Transferring Data...message.
The vehicle data is sent to the Customer
Assistance Center.
Depending on what the customer service rep-
resentative agreed with you, the voice connec-
tion is re-established after the transfer is com-
plete. If necessary, you will be contacted at a
later time by another means, e.g. by e-mail or
phone.
Another function of the Vehicle Health Check is
the transfer of service data to the Customer
Assistance Center. If a service is due, the display
shows a message to this effect together with
information about any special offers at your
workshop.
This information can also be called up under
"Owners Online" at http://www.mbusa.com.
Information on the data stored in the vehicle
(
Ypage 28).
Features225
Stowage and features
Z
Page 228 of 294

Information on Roadside Assistance
(Ypage 25).
Downloading routes
Downloading routes allows you to transfer and
save predefined routes in the navigation sys-
tem.
A route can be prepared and sent by either a
customer service representative or under "Own-
ers Online" at http://www.mbusa.com.
Each route can include up to four way points.
Once a route has been received by the naviga-
tion system, you will see theDo
youwanttostart route guidance? DestinationReceived destination has been savedin "Previous destinations".message on
the multimedia system display.
The route is saved.
XTo start route guidance: selectYes.
An overview of the route is shown in the dis-
play.
If you select No
, the saved route can be called
up later in the navigation menu.
XSelect Start.
Route guidance starts.
Downloaded and saved routes can be called up
again.
Speed alert
You can define the upper speed limit, which
must not be exceeded by the vehicle.
If this selected speed is exceeded by the vehicle,
a message will be sent to the Customer Assis-
tance Center. The Customer Assistance Center
then forwards this information to you.
You can select the way in which you receive this
information beforehand. Possible options
include text message, e-mail or an automated
call.
The data you receive contains the following
information:
Rthe location where the speed limit was excee-
ded
Rthe time at which the speed limit was excee-
ded
Rthe selected speed limit which was exceeded
Geo fencing
Geo fencing allows you to select areas which the
vehicle should not enter or leave. You will be
informed if the vehicle crosses the boundaries
of the selected areas. You can select the way in
which you receive this information beforehand.
Possible options include text message, e-mail or an automated call.
The area can be determined as either a circle or
a polygon with a maximum of ten corners. You
can specify up to ten areas simultaneously. Dif-
ferent settings are possible for each area.
These settings can be called up under "Owners
Online" at http://www.mbusa.com.
Alternatively, you can trigger an Info call and
notify the customer service representative that
you wish to activate geo-fencing.
Currently inactive areas can be activated by text
message.
Triggering the vehicle alarm
With this function, you can trigger the vehicle's
panic alarm via text message. An alarm sounds
and the exterior lighting flashes. Depending on
the setting, the panic alarm lasts five or ten sec-onds. Afterwards, the alarm switches off.
Brush guard (USA only)
If the brush guard has to be removed, contact a
qualified specialist workshop.
Garage door opener
General notes
You can use the HomeLink®garage door opener
integrated into the rear-view mirror to operate
up to three different gate/garage door opener
systems.
Certain garage door drives are incompatible
with the integrated garage door opener. If you
have difficulty programing the integrated garage
door opener, contact a Mercedes-Benz Service
Center.
226Features
Stowage and features