2018 MERCEDES-BENZ E-CLASS COUPE engine
[x] Cancel search: enginePage 340 of 486

Installingtheto wing eye
#Press the mark on co ver1 inwa rds and
re mo ve.
#Scr ew intheto wing eyeclockwise tothe
st op.
% Make sure that co ver1 engages in the
bumper when youre mo vetheto wing eye. *
NO
TEDama gedue toincor rect use of
th eto wing eye
When a towing eye is used toreco ver a vehi‐
cle, theve hicle may be damaged in the proc‐
ess.
#Only use theto wing eyeto to waw ay or
to w start theve hicle.
To w starting theve hicle (eme rgency engine
st art)
Ve hicles with automatic transmission
* NO
TEDama getothe automatic trans‐
mission due to towstarting
The automatic transmission may be damaged
in the process of tow starting vehicles with
automatic transmission.
#Ve hicles with automatic transmission
must not be tow star ted.
#Ve hicles with automatic transmission must
not be tow star ted.
Electrical fuses
Note s on electrical fuses
&
WARNING Risk of accident and injury
due to ov erloaded lines
If yo u manipulate or bridge a faulty fuse or if
yo ure place it with a fuse with a higher
amperage, the electric line could be overloa‐
ded.
This could result in a fire .
#Alw aysre place faulty fuses with speci‐
fi ed new fuses conta iningthe cor rect
amperage.
* NO
TEDama gecaused byincor rect fuses
Incor rect fuses may cause damage toelectri‐
cal components or sy stems.
#Only use Mercedes-Benz appr oved
fuses with the cor rect fuse rating.
Blown fuses must bereplaced with fuses of the
same rating, which you can recognize bythe
338
Breakdown assis tance
Page 341 of 486

color and fuserating. The fuse ratings are li sted
in the fuse assignment diagram.
Fu se assignment diag ram: onthe fuse box in
th e trunk (
→page 341).
* NO
TEDama geor malfunctions caused
by moisture
Moisture may cause dama getothe electrical
sy stem or cause it tomalfunction.
#When the fuse box is open, make sure
th at no moisture can enter the fuse
box.
#When closing the fuse box, make sure
th at the seal of the lid is positioned cor‐
re ctly on the fuse box.
If a newly inser ted fuse also blo ws, ha vethe
cause traced and rectified at a qualified special‐
ist workshop.
Ensure thefo llowing before replacing a fuse:
RThe vehicle is secured against rolling away.
RAll electrical consumers are switched off.
RThe ignition is switched off. The electrical fuses are located in
various fuse
bo xes:
RFu se box in the engine compartment on the
driver's side (→page 339)
RFu se box on the driver's side of the cockpit
(→page 340)
RFu se box in the front-passen gerfo ot we ll
(→page 340)
RFu se box in the trunk on theright-hand side
of theve hicle, when vie wed in the direction
of tr avel (
→page 341)
Fuse box in the engine compa rtment
Prerequisites
Observ eth e no tes on electrical fuses
(
→page 338).
Ha ve thefo llowing readily available:
RA dry clo th
RA screwdriver Opening
&
WARNING Risk of injury from usingthe
windshield wipers while the engine hood
is open
When the engine hood is open and the wind‐
shield wipers are set in motion, you can be
trapped bythe wiper linkage.
#Alw ays switch off the windshield wipers
and ignition before opening the engine
hood.
Breakdown assis tance 339
Page 368 of 486
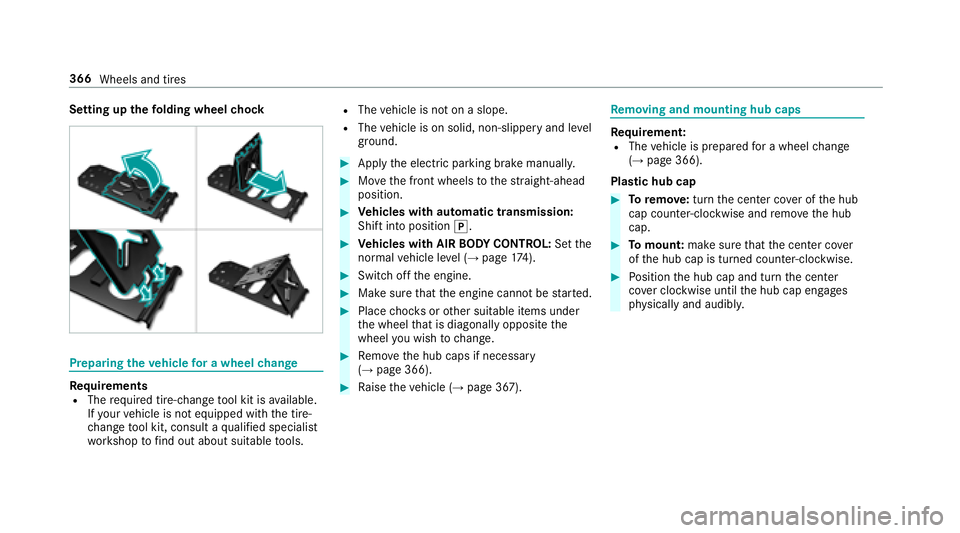
Setting upthefo lding wheel chock
Prepa ring theve hicle for a wheel change
Re quirementsRThe requ ired tire-change tool kit is available.
If yo ur vehicle is not equipped with the tire-
ch ange tool kit, consult a qualified specialist
wo rkshop tofind out about suitable tools.
RThe vehicle is not on a slope.
RThe vehicle is on solid, non-slippery and le vel
ground .
#Applythe electric parking brake manually.
#Mo vethe front wheels tothest ra ight-ahead
position.
#Ve hicles with automatic transmission:
Shift into position j.
#Vehicles with AIR BODY CONT ROL:Set the
normal vehicle le vel (→page 174).
#Switch off the engine.
#Make sure that the engine cannot bestar ted.
#Place choc ks orother suitable items under
th e wheel that is diagonally opposite the
wheel you wish tochange.
#Re mo vethe hub caps if necessary
(→page 366).
#Ra ise theve hicle (→page 367).
Re moving and mounting hub caps
Requirement:RThe vehicle is prepared for a wheel change
(→page 366).
Plast ic hub cap
#Toremo ve:turn the center co ver of the hub
cap counter-clockwise and remo vethe hub
cap.
#To mount: makesurethat the center co ver
of the hub cap is turned counter-clockwise.
#Po sition the hub cap and turn the center
co ver clockwise until the hub cap engages
ph ysically and audibly.
366
Wheels and tires
Page 369 of 486
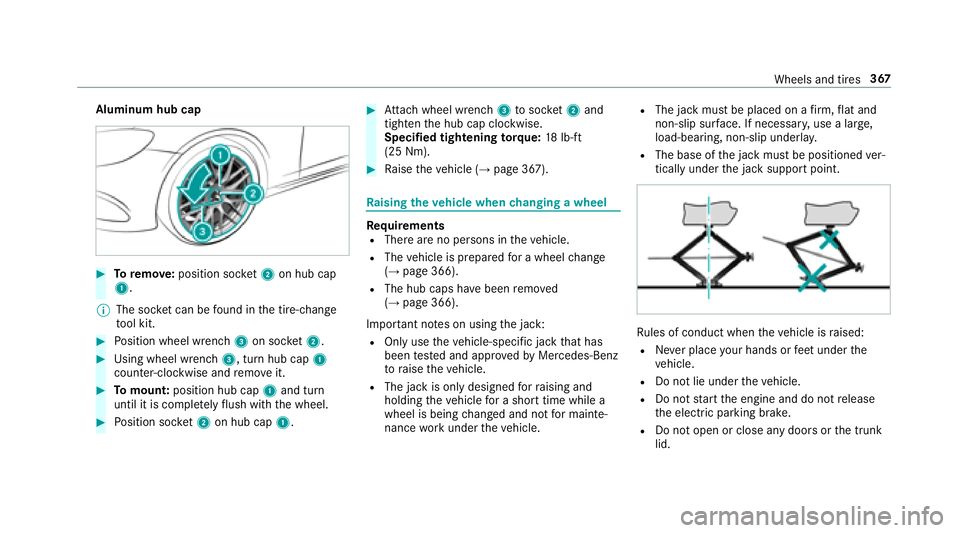
Aluminum hub cap
#Toremo ve:position soc ket2 on hub cap
1.
% The soc ket can be found inthe tire-change
to ol kit.
#Po sition wheel wrench 3on soc ket2.
#Using wheel wrench 3, turn hub cap1
counter-clo ckwise and remo veit.
#To mount: position hub cap 1and turn
until it is compl etely flush withth e wheel.
#Po sition soc ket2 on hub cap 1.
#Attach wheel wrench 3tosoc ket2 and
tighten the hub cap clockwise.
Specified tightening torq ue: 18lb-ft
(25 Nm).
#Ra ise theve hicle (→page 367).
Ra ising theve hicle when changing a wheel
Re quirementsRThere are no persons in theve hicle.
RThe vehicle is prepared for a wheel change
(→page 366).
RThe hub caps ha vebeen remo ved
(→page 366).
Impor tant no tes on using the jack:
ROnly use theve hicle-specific jack that has
been tested and appr ovedby Mercedes-Benz
to raise theve hicle.
RThe jack is only designed forra ising and
holding theve hicle for a short time while a
wheel is being changed and not for mainte‐
nance workunder theve hicle.
RThe jack must be placed on a firm ,fl at and
non-slip sur face. If necessar y,use a lar ge,
load-bearing, non-slip underla y.
RThe base ofthe jack must be positioned ver‐
tically under the jack support point.
Ru les of conduct when theve hicle is raised:
RNe ver place your hands or feet under the
ve hicle.
RDo not lie under theve hicle.
RDo not start the engine and do not release
th e electric parking brake.
RDo not open or close any doors or the trunk
lid.
Wheels and tires 367
Page 376 of 486
Thefollowing can be used in theve hicle without
re strictions:
RRF transmitter wi tha maximum transmission
output of up to100 mW
RRF transmitters with transmitter frequencies
inthe 380 - 410 MHz frequency band and a
maximum transmission output of up to2 W
(trunked radio sy stem/T etra )
RMobile phones (2G/3G/4G)
There are no restrictions when positioning the
antenna on the outside of theve hicle forth efo l‐
lowing frequency bands:
RTr unked radio sy stem/T etra
R70 cm band
R2G/3G/4G
Ve hicle identification plate, VIN and engine
number
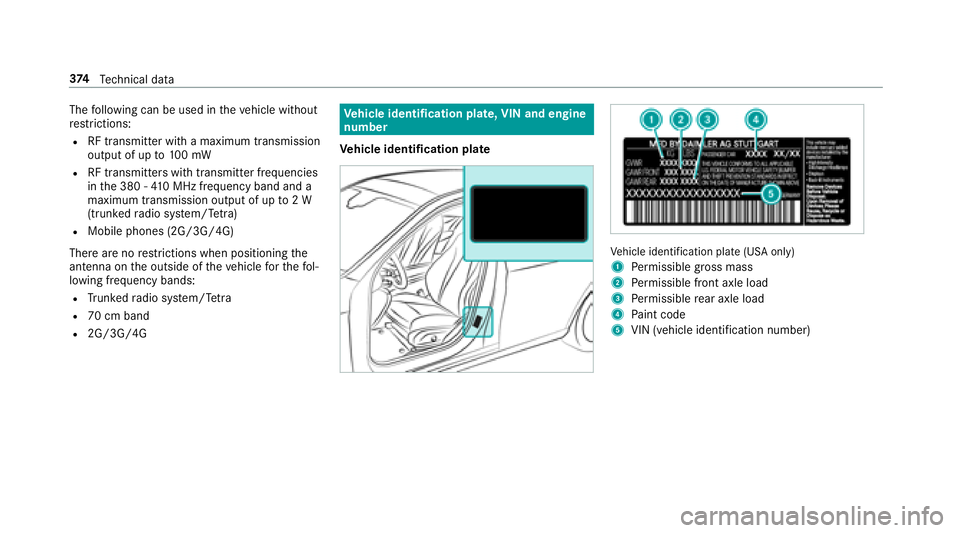
Ve hicle identification plate
Vehicle identification plate (USA only)
1
Pe rm issible grossmass
2Pe rm issible front axle load
3Perm issible rear axle load
4Pa int code
5VIN (vehicle identification number)
37 4
Tech nical da ta
Page 377 of 486
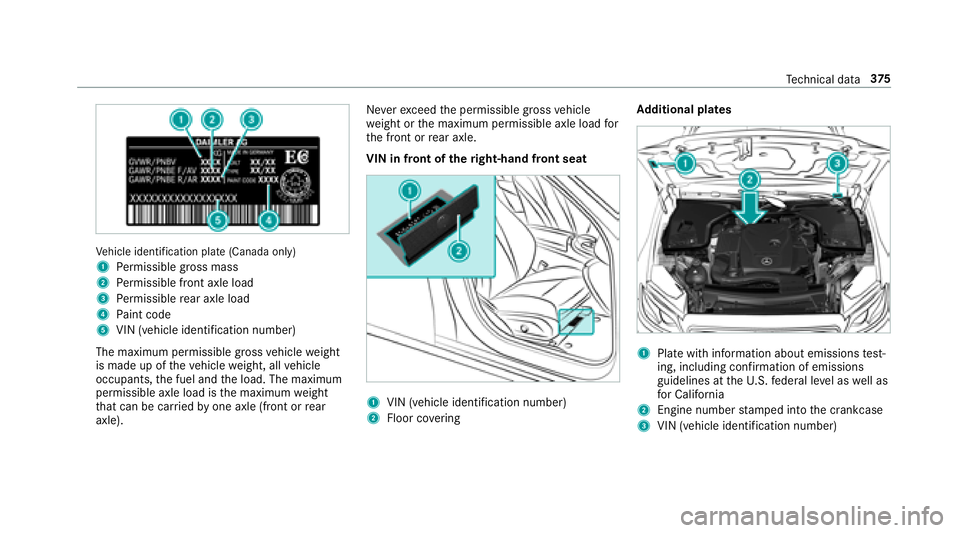
Vehicle identification plate (Canada only)
1
Pe rm issible grossmass
2Pe rm issible front axle load
3Perm issible rear axle load
4Pa int code
5VIN (vehicle identification number)
The maximum permissible gross vehicle weight
is made up of theve hicle weight, all vehicle
occupants, the fuel and the load. The maximum
permissible axle load is the maximum weight
th at can be car ried byone axle (front or rear
axle). Ne
verexc eed the permissible gross vehicle
we ight or the maximum permissible axle load for
th e front or rear axle.
VIN in front of theright-hand front seat
1VIN (vehicle identification number)
2Floor co vering Ad
ditional plates
1Pla tewith information about emissions test‐
ing, including con firm ation of emissions
guidelines at theU. S. federal le vel as well as
fo r California
2Engine number stamped into the crankcase
3VIN (vehicle identification number)
Te ch nical da ta37
5
Page 378 of 486
Operatingfluids
Note s on operating fluids
&
WARNING Risk of injury from operating
fl uids harmful to your health
Operating fluids maybe pois onous and harm‐
ful to yo ur health.
#Obser vethete xt on the original con‐
ta iners when using, storing or disposing
of operating fluids.
#Alw aysst ore operating fluids sealed in
th eir original conta iners.
#Alwayske ep children away from operat‐
ing fluids.
+ENV IRONMEN TALNO TEEnvironmental
pollution caused byenvironmen tally ir re‐
sponsible disposal
#Dispose of operating fluids in an envi‐
ro nmentally responsible manner.
Operating fluids include thefo llowing:
RFu els
RLubricants
RCoolant
RBrake fluid
RWi ndshield washer fluid
RClimate cont rol sy stem refrigerant
Only use products recommended byMercedes-
Benz. Damage caused byusing vehicle products
which ha venot been recommended is not cov‐
ered bythe Mercedes-Benz guarantee, warranty
or goodwill gestures.
Yo u can identify operating fluids appr ovedby
Mercedes-Benz bythefo llowing insc ript ion on
th e conta iners:
RMB-Freigabe (e.g. MB-Fr eigabe 229.51)
RMB-Approval (e.g. MB-App rova l 229.51) Fu
rther information on appr oved operating flu‐
ids:
Rin the Mercedes-Benz Specifications for
operating fluids at http://be vo.mercedes-
benz.com (byen tering the designation)
Rat a qualified specialist workshop
&
WARNING Risk offire and explosion
caused byfuel
Fu els are highly inflammable.
#You must avoidfire , open flames, creat‐
ing spar ksand smoking.
#Before refueling, switch off the engine
and, if ins talled in your vehicle, thest a‐
tionary heater.
& WARNING Risk of injury from fuel
Fu els are poisonous and harmful to your
health
#Do not swallow fuel or let it come into
contact with skin, eyes or clo thing.
#Do not inhale fuel vapors.
37 6
Tech nical da ta
Page 379 of 486
#Keep children away from fuel.
If yo u or other people come into contact with
fuel, obser vethefo llowing:
#Immediately rinse fuel off your skin wit h
soap and water.
#If fuel comes into contact with your
ey es, immediately rinse them thor‐
oughly with clean water.Seek medical
attention immediately.
#If yo u sw allow fuel, seek medical atten‐
tion immediatel y.Do not induce vomit‐
ing.
#Change immediately out of clo thing that
has come into con tact wi thfuel.
Fuel
Note s on fuel grades forve hicles with a gas‐
oline engine
Obser vethe no tes on operating fluids
(
→page 376). *
NO
TEDama gecaused bythe wrong fuel
Even small amounts of the wrong fuel could
re sult in damage tothe fuel sy stem, the
engine and the emission control sy stem.
#Only refuel with lo w-sulfur premium
grade fuel.
This fuel may contain up to10 %ethanol.
Yo ur vehicle is suitable for use with E10 fuel.
Do not refuel using:
RDiesel
RE15, E85, E100
RGasoline containing me thanol (M15, M30,
M85, M100)
RGasoline with additives con taining me tal
If yo u accidenta llyrefuel with the wrong fuel:
#Do not switch the ignition on.
#Consult a qualified specialist workshop.
Ifth eav ailable fuel is not suf ficiently low in sul‐
fur, this can produce unpleasant odors. Only
refuel with fuel that has at least the octane
number specified in the information table in the
fuel filler flap (
→page 140). This may reduce
engine output and increase fuel consum ption.
If yo uwa nt maximum engine output: only
re fuel with unleaded premium grade gasoline
with at least 91AKI/95 RON.
Ne verre fuel using gasoline with a lo werRO N.
* NO
TEPremature wear caused byunlea‐
ded regular gasoline
Unleaded regular gasoline can cause the
engine towe ar more quickly and impair lon‐
ge vity and per form ance.
If unleaded premium grade gasoline is
una vailable and you ha vetorefuel using
unleaded regular gasoline:
#Only fill th e fuel tank tohalf full with
unleaded regular gasoline and refill as
soon as possible with unleaded pre‐
mium grade gasoline.
#Do not drive at the maximum speed.
Te ch nical da ta37
7