2018 MERCEDES-BENZ CLA light
[x] Cancel search: lightPage 266 of 326
X
Use as uitabl et ouch-up stick, e.g. MB Touch-
Up Stick ,tor epair slight damage to the paint-
work quickly and provisionally.
Matt ef inish care
! Never polish the vehicle or the light alloy
wheels. Polishing causes the finish to shine.
! The following may cause the paint to
become shiny and thus reduce the matte
effect: R
strong rubbing of the paintwork with
unsuitabl em aterialsR
frequent use of automatic car washes R
washing the vehicle in direct sunlight
! Never use paint cleaner, buffing or polishing
products, or gloss preserver, e.g. wax, for the
purpose of paintwork care. These products
are only suitabl ef or high-gloss surfaces. Their
use on vehicles with matte paintwork leads to
considerable surface damage or, more spe-
cifically ,tos hiny, spotted areas.
Alway sh ave paintwork repairs carried out at a
qualified specialist workshop.
! Do not use wash programs with ah ot wax
treatment under any circumstances.
Observe these notes if your vehicle has ac lear
matte finish. This will help you to avoid damage
to the paintwork due to incorrect treatment.
These notes also apply to light alloy wheels with
ac lear matte finish.
The vehicle should ideally be washed by hand
using as oft sponge, car shampoo and plenty of
water.
Use only insect remover and car shampoo from
the range of approved Mercedes-Benz care
products.
Cleaning the vehicl ep arts
Cleaning the wheels
G WARNING
The water jet from ac ircular jet nozzle (dirt
blasters) can cause invisible exterior damage
to the tires or chassis components. Compo-
nent sd amage dint his way may fail unexpect-
edly .T here is ar isk of an accident. Do not use power washers with circular jet
nozzles to clean the vehicle. Have damaged
tires or chassis component sr eplaced imme-
diately.
! Do not use acidic wheel cleaning products
to remove brake dust. This could damage
wheel bolts and brake components.
! Do not park your vehicle for al ong period of
time directly after cleaning, particularl ya fter
cleaning the wheel rim with wheel cleaner.
Wheel cleaner can lead to the increased cor-
rosion of the brake discs and pads. Therefore,
drive for af ew minutes after cleaning. By
heating up the brakes, the brake discs and
pads dry. The vehicle can then be parked for a
long period of time.
Cleaning the windows
G WARNING
You could become trapped by the windshield
wipers if they start moving while cleaning the
windshiel dorw iper blades. There is ar isk of
injury.
Alway ss witch off the windshiel dw ipers and
the ignition before cleaning the windshiel do r
wiper blades.
! Only fold the windshiel dw ipers awa yf rom
the windshiel dw hen vertical. Otherwise, you
will damage the hood.
! Do not use dry cloths, abrasive products,
solvents or cleaning agents containing sol-
vents to clean the inside of the windows. Do
not touch the insides of the windows with
hard objects, e.g. an ice scraper or ring. There
is otherwise ar isk of damaging the windows.
! Clea nt he water drainage channels of the
windshiel da nd the rear window at regular
intervals. Deposits such as leaves, petals and
pollen may under certain circumstances pre-
vent water from draining away. This can lead
to corrosion damage and damage to elec-
tronic components. X
Clea nt he inside and outside of the windows
with ad amp cloth and ac leaning product that
is recommended and approved by Mercedes-
Benz.264
Care
Maintenance and care
Page 267 of 326
Cleaning wiper blades
G WARNING
You coul db ecome trapped by th ew indshield
wiper sift he ys ta rt moving while cleanin gt he
windshield or wiper blades .T her eisar is ko f
injury.
Always switch off th ew indshield wiper sa nd
th ei gnition before cleanin gt he windshield or
wiper blades.
! Only fold th ew indshield wiper sa way from
th ew indshield when vertical. Otherwise, you
will damag et he hood.
! Do no tp ull th ew iper blade. Otherwise, the
wiper blade coul dbed amaged.
! Do no tc lean wiper blades to oo ften and do
no tr ub them to oh ard .O th erwise, th eg raph-
ite coatin gc oul dbed amaged. This could
caus ew iper noise.
! Hol dt he wiper arm securely when folding
back .T he windshield coul dbed amaged if the
wiper arm smacks against it suddenly. X
Fol dt he windshield wiper arm sa way from the
windshield. X
Carefully clean th ew iper blades wit had amp
cloth. X
Fol dt he windshield wiper arm sb ack again
before switching on th ei gnition.
Cleaning th ee xterior lighting
! Only use cleanin ga gents or cleanin gc loths
whic ha re suitable for plastic light lenses.
Unsuitable cleanin ga gents or cleanin gc loths
coul ds cr atch or damag et he plastic light len-
ses. X
Clean th ep lastic lenses of th ee xteri or lights
wit haw et sponge and am ild cleanin ga gent,
e.g .M ercedes-Ben zc ar shampoo or cleaning
cloths.
Cleaning th em irror turn signals
! Only use cleanin ga gents or cleanin gc loths
that are suitable for plastic lenses .U ns uitable
cleanin ga gents or cleanin gc loth sc ould
scratch or damag et he plastic lenses of the
mirror tur ns ignals. X
Clean th ep lastic lenses of th em irror tur ns ig-
nals in th ee xteri or mirror housing usin gaw et
sponge and mild cleanin ga gent, e.g.
Mercedes-Ben zc ar shampoo or cleaning
cloths.
Cleaning th es ensors
! If you clean th es ensor sw it hap ower
washer, mak es ure that you keep ad istance
of at least 11.8 in (30 cm )b etween the vehicl e
and th ep ower washer nozzle. Information
about th ec orrec td istanc eisa vailabl ef ro m
th ee quipment manufacturer.
X
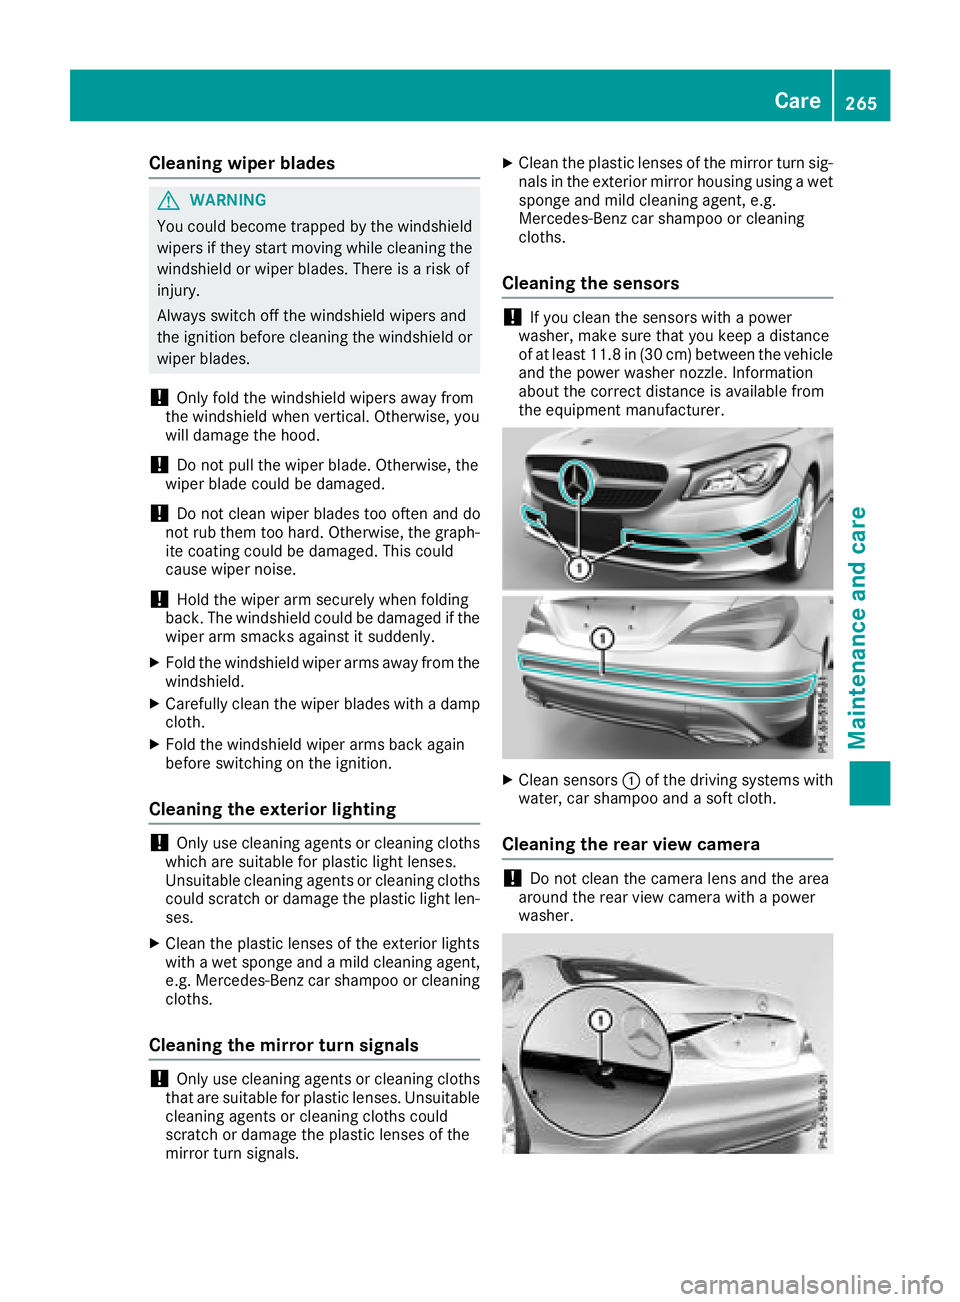
Clean sensors �C of th ed riving systems with
water, car shampoo and as of tc loth.
Cleaning th er ea rv iew camera
! Do no tc lean th ec amera len sa nd th ea rea
aroun dt he rear view camera with ap ower
washer. Care 265
Maintenance and care Z
Page 270 of 326
! Do not clean the seat belts using chemical
cleaning agents. Do not dry the seat belts by
heating at temperatures above 176 ‡( 80 †)
or in direct sunlight. X
Use clean, lukewarm water and soa ps olution.
Cleaning the headliner and carpets X
Headliner: if it is very dirty ,u se as oft brus ho r
dry shampoo. X
Carpets: use the carpe ta nd textile cleaning
agents recommended and approved by
Mercedes-Benz.268
Care
Maintenanc ea nd care
Page 278 of 326
Battery (vehicle)
Important safety notes Specia lt ool sa nd expert knowledg ea re required
when working on the battery ,e .g .r emova la nd
installation. Yo us houl dt herefore have al lw or k
involving the battery carrie do ut at aq uali fied
specialist workshop.
G WARNING
Wor kc arrie do ut incorrectly on the battery
can lead ,f or example, to as hort circui ta nd
thu sd amag et he vehicl ee le ctronics .T hi sc an
lead to functio nr estrictions applying to
safety-relevant systems, e.g the lighting sys-
tem, the ABS (anti-lock braking system )ort he
ESP ®
(Electronic Stability Program). The oper-
ating safety of your vehicl em ay be restricted.
Yo uc ould lose contro loft he vehicle, for
example: R
when braking R
in the event of abrupt steering maneuvers
and/or when the vehicle's speed is not
adapted to the roa dc onditions
There is ar is kofana ccident.
In the event of as hort circui tora similar inci-
dent, contact aq uali fied specialist workshop
immediately. Do not drive any further .Y ou
shoul dh av ea ll work involving the battery car-
rie do ut at aq uali fied specialist workshop.
For further informatio na bout ABS and ESP ®
,
see ( Y
page 61 )a nd ( Y
page 64).
G WARNING
Electrostati cb uild -u pc an lead to the creation
of sparks, which could ignite the highl ye xplo-
sive gases of ab at tery .T here is ar is kofa n
explosion.
Before handling the battery ,t ouch the vehicle
body to remove any existing electrostatic
build-up.
The highl yf lammabl eg as mixture form sw he n
charging the battery as well as when jump-start-
ing. Alway sm ak es ur et ha tn either yo un or the bat-
tery is electrostaticall yc harged. Ab uild -u po f
electrostatic charge can be caused ,f or exam-
ple: R
by wearing clothing made from synthetic
fibers R
du etof rictio nb et ween clothing and seatsR
if yo up us horp ul lt he battery across the car-
pe toro the rs yn theti cm at erialsR
if yo ur ub the battery with ac loth
G WARNING
During the charging process ,ab at tery produ-
ces hydrogen gas. If as hort circui to ccurs or
sparks are created ,t he hydrogen ga sc an
ignite .T here is ar is kofane xplosion.R
Make sure tha tt he positive terminal of a
connected battery does not come into con-
tact with vehicl ep ar ts.R
Never place meta lo bj ects or tool sonab at -
tery. R
It is important tha ty ou observe the descri-
be do rder of the battery terminal sw he n
connecting and disconnecting ab at tery.R
Whe nj ump-starting ,m ak es ur et ha tt he
battery pole sw it hi de ntical polarity are
connected. R
It is particularly important to observe the
describe do rder when connecting and dis-
connecting the jumper cables. R
Never connect or disconnect the battery
terminal sw hile the engine is running.
G WARNING
Battery aci disc austic .T here is ar is kofi njury.
Avoi dc ontact with skin, eyes or clothing. Do
not inhal ea ny battery gases .Don ot lean over
the battery .K ee pc hildren away from batter-
ies. Wash away battery aci di mmediatel yw it h
plenty of clean water and see km edica la tten-
tion.
H Environmental note
Batterie sc ontain dangerous
substances. It is against the
la wtod is pose of them with276
Battery (vehicle)
Breakdo wn assis tance
Page 281 of 326
G WARNING
During charging and jump-starting, explosive gase sc an escap ef rom the battery .T here is ar isk
of an explosion.
Particularl ya voi df ire, open flames, creating sparks and smoking. Ensure there is sufficient ven-
tilation while charging and jump-starting. Do not lea no ver ab attery.
G WARNING
During the charging process ,ab attery produces hydrogen gas. If as hort circui to ccurs or sparks
are created ,t he hydrogen gas can ignite. There is ar isk of an explosion.R
Make sure that the positive terminal of ac onnected battery does not come into contact with
vehicl ep arts.R
Never place metal objects or tools on ab attery.R
It is important that you observe the described order of the battery terminal sw hen connecting
and disconnecting ab attery.R
When jump-starting, make sure that the battery pole sw ith identical polarity are connected.R
It is particularl yi mportant to observe the described order when connecting and disconnecting
the jumper cables. R
Never connect or disconnect the battery terminal sw hile the engine is running.
G WARNING
Ad ischarged battery can freeze at temperatures below freezing point. When jump-starting the
vehicl eorc harging the battery ,g ase sc an escap ef rom the battery .T here is ar isk of an explosion.
Allow the frozen battery to thaw out before charging it or jump-starting.
! Avoid repeated and lengthy starting attempts. Otherwise, the catalytic converter coul db e
damaged by the non-combusted fuel.
If the indicator/warning lamp sdon ot light up in the instrument cluster at low temperatures, it is very
likel yt hat the discharged battery has frozen. In this case you may neither jump-start the vehicl en or
charge the battery .L et the battery thaw first. The service life of at hawed-out battery may be shorter.
The starting characteristics can be impaired ,p articularl yatl ow temperatures. Have the thawed-out
battery checked at aq ualified specialist workshop.
Do not start the vehicl eu sing ar api dc harging device. If you rv ehicle's battery is discharged, the
engine can be jump-started from another vehicl eorf rom as econd battery using jumper cables.
Observe the following points: R
The battery is not accessible in all vehicles. If the other vehicle's battery is not accessible ,j ump-
start the vehicl eu sing as econd battery or aj ump-starting device.R
You may only jump-start the vehicl ew hen the engine and exhaust system are cold.R
Do not start the engine if the battery is frozen. Let the battery thaw first. R
Only jump-start from batterie sw ith a12Vv oltag er ating.R
Only use jumper cables that are not damaged and have as ufficient cross-section and insulated
terminal clamps. R
Make sure that the two vehicles do not touch. Jump-starting 279
Breakdown assistance Z
Page 282 of 326
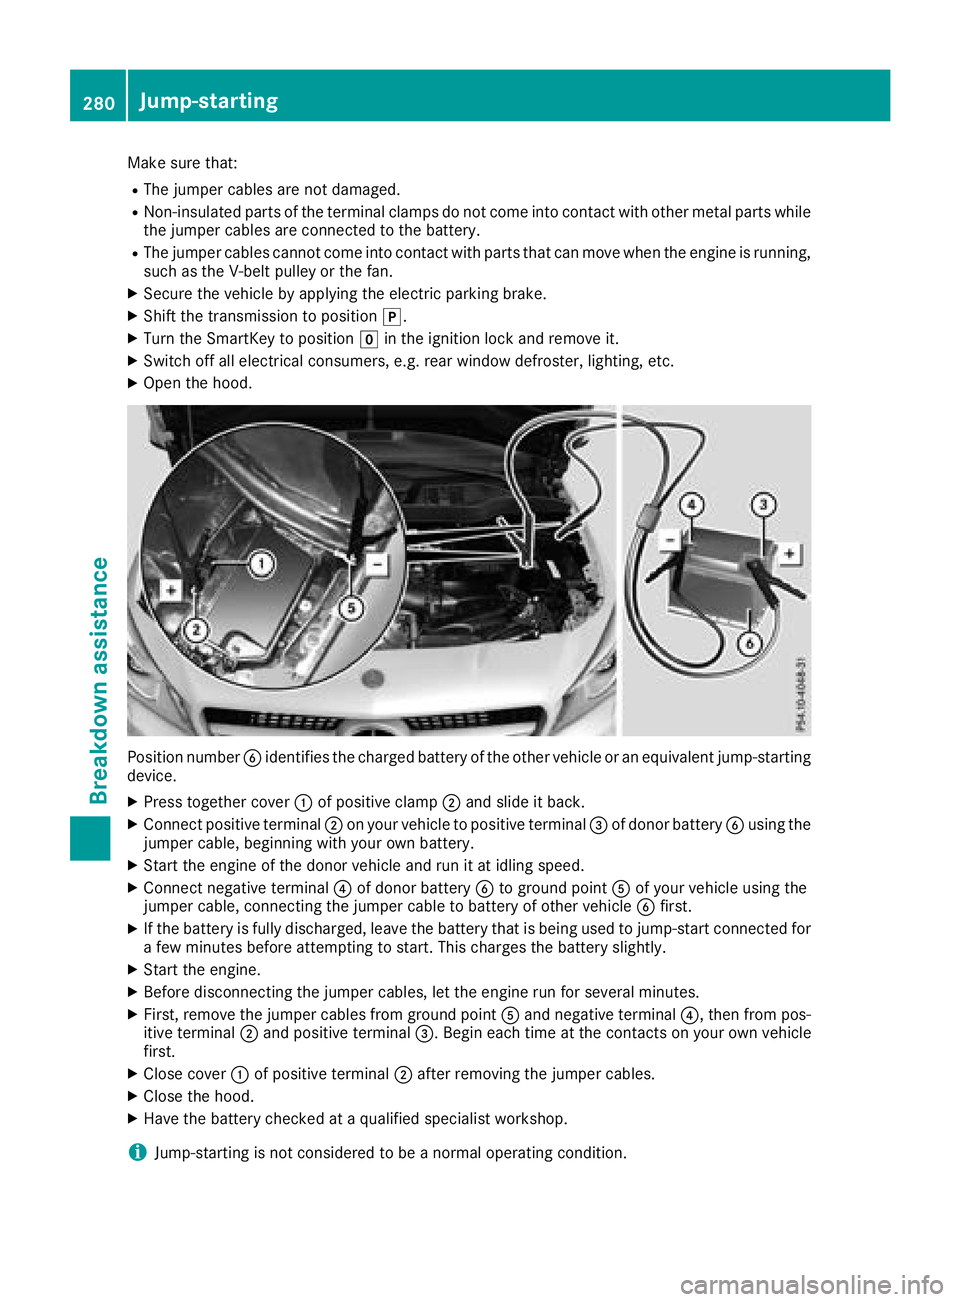
Make sure that: R
The jumper cables are not damaged. R
Non-insulated parts of the terminal clamps do not come into contact with other metal parts while
the jumper cables are connected to the battery. R
The jumper cables cannot come into contact with parts that can move when the engine is running,
such as the V-belt pulle yort he fan.X
Secure the vehicle by applying the electric parking brake. X
Shift the transmission to position �] .X
Turn the SmartKey to position �Z in the ignition lock and remove it.X
Switch off all electrical consumers, e.g. rear window defroster, lighting, etc. X
Open the hood.
Position number �
Page 294 of 326
If the tire pressures have been set to the lower
values for lighter load sa nd/or lowe rr oad
speeds, the pressures shoul dber eset to the
higher values: R
if you want to drive with an increased load
and/or R
if you want to drive at higher speeds
i The tire pressures for increased load sa nd/
or higher road speeds, shown in the tire pres-
sure table, may have an egative effect on driv-
ing comfort.
If the tire pressure is not set correctly, this can
lea dtoane xcessive build up of heat and as ud-
den loss of pressure.
For more information, contact aq ualifie ds pe-
cialist workshop.
Important notes on tire pressure
G WARNING
If the tire pressure drops repeatedly ,t he
wheel ,v alve or tire may be damaged. Tire
pressure that is too low may resul tina tire
blow-out. There is ar isk of an accident.R
Check the tire for foreign objects. R
Check whether the wheel is losing air or the
valve is leaking.
If you are unabl etor ectify the damage, con-
tact aq ualifie ds pecialist workshop.
G WARNING
If you fit unsuitable accessorie so nto tire
valves ,t he tire valves may be overloaded and
malfunction, which can cause tire pressure
loss. Due to their design, retrofitted tire pres-
sure monitors keep the tire valve open. This
can also resul tint ire pressure loss. There is a
risk of an accident.
Only screw the standard valve cap or other
valve caps approved by Mercedes-Benz for
you rv ehicle onto the tire valve.
Use as uitable pressure gauge to check the tire
pressure. The outer appearance of at ire does
not permit any reliable conclusion abou tt he tire
pressure. On vehicle se quipped with the elec-
tronic tire pressure monitor, the tire pressure
can be checked in the on-board computer. The tire temperature and pressure increase
when the vehicle is in motion. This is dependent
on the driving speed and the load.
Therefore, you shoul do nly correct tire pres-
sures when the tires are cold.
The tires are cold: R
if the vehicle has been parked with the tires
out of direct sunlight for at least three hours
and R
if the vehicle has been driven less than 1m ile
(1.6 km)
The tire temperature changes depending on the
outsid et emperature ,t he vehicle speed and the
tire load .Ift he tire temperature changes by
18 ‡( 10 †), the tire pressure changes by
approximately 10 kPa (0.1 bar/1.5 psi) .T ake
this into account when checking the pressure of
warm tires. Only correct the tire pressure if it is
too low for the current operating conditions. If
you check the tire pressure when the tires are
warm, the resulting valu ew il lbeh ighe rt han if
the tires were cold. This is normal. Do not
reduce the tire pressure to the valu es pecified
for cold tires. The tire pressure would otherwise
be too low.
Observe the recommended tire pressures for
cold tires: R
on the Tire and Loading Information placard
on the B-pilla ront he driver's sideR
in the tire pressure table in the fuel fille rf lap
( Y
page 139)
Underinflated or overinflated tires
Underinflated tires
G WARNING
Tires with pressure that is too low can over-
heat and burst as ac onsequence. In addition,
they also suffer from excessive and/or irreg-
ula rw ear, which can severel yi mpair the brak-
ing propertie sa nd the driving characteristics.
There is ar isk of an accident.
Avoid tire pressures that are too low in all the
tires, including the spare wheel.
Underinflated tires may: R
overheat, leading to tire defects R
adversely affect handling292
Tire pressure
Wheel sa nd tires
Page 297 of 326
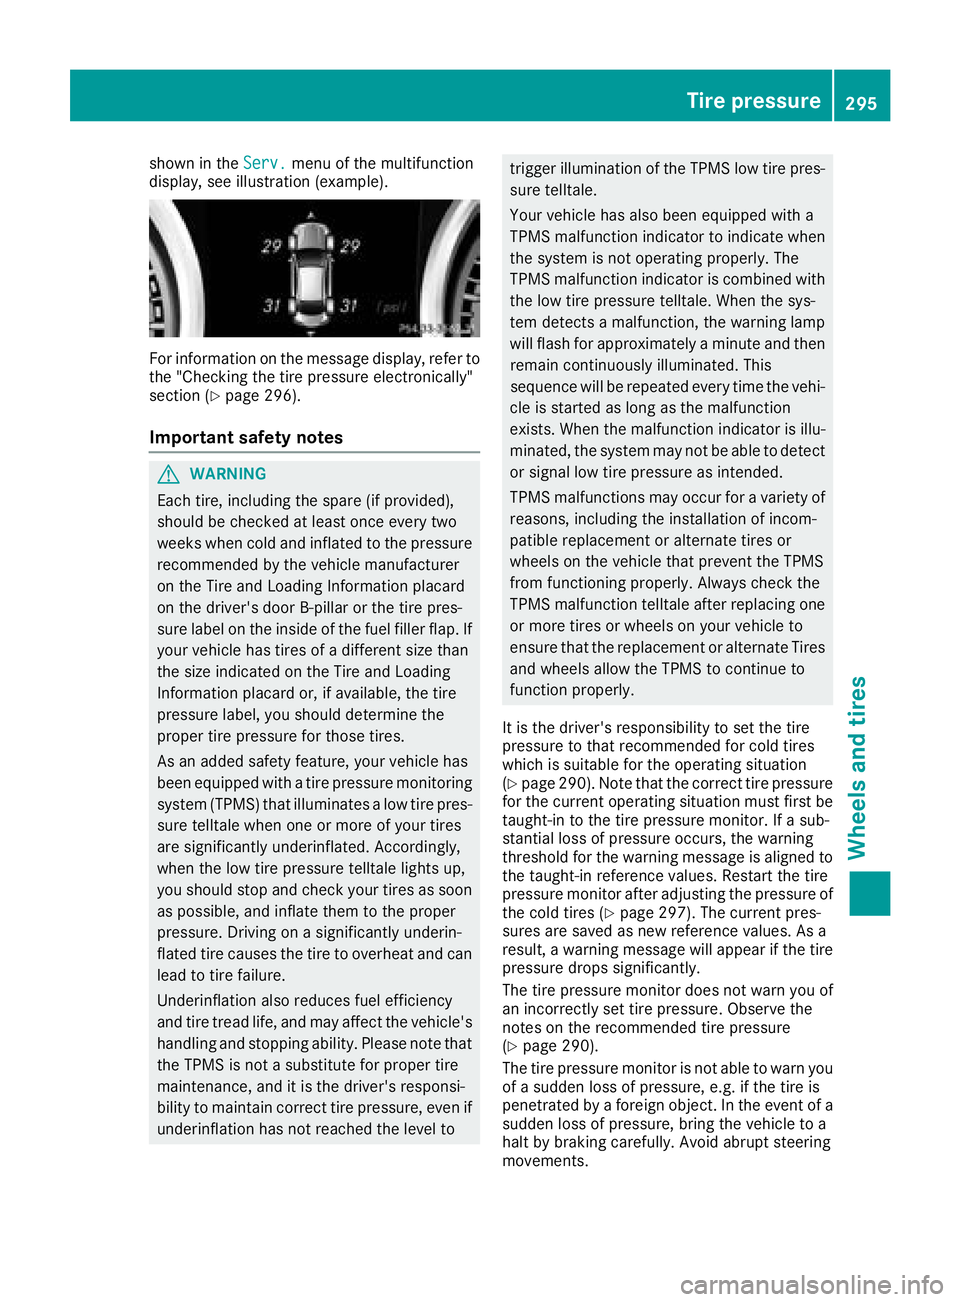
shown in the Serv. menu of the multifunction
display, see illustration (example).
For information on the message display, refer to
the "Checking the tire pressure electronically"
section ( Y
page 296).
Important safety notes
G WARNING
Each tire, including the spare (if provided),
should be checked at least once every two
weeks when cold and inflated to the pressure
recommended by the vehicle manufacturer
on the Tire and Loading Information placard
on the driver's door B-pillar or the tire pres-
sure label on the inside of the fuel filler flap. If
your vehicle has tires of ad ifferent size than
the size indicated on the Tire and Loading
Information placard or, if available, the tire
pressure label ,y ou should determine the
proper tire pressure for those tires.
As an added safety feature, your vehicle has
been equipped with at ire pressure monitoring
system (TPMS) that illuminates al ow tire pres-
sure telltale when one or more of your tires
are significantly underinflated. Accordingly,
when the low tire pressure telltale lights up,
you should stop and check your tires as soon
as possible ,a nd inflate them to the proper
pressure. Driving on as ignificantly underin-
flated tire causes the tire to overheat and can
lead to tire failure.
Underinflation also reduces fuel efficiency
and tire tread life, and may affect the vehicle's
handling and stopping ability. Please note that
the TPMS is not as ubstitute for proper tire
maintenance, and it is the driver's responsi-
bility to maintain correct tire pressure, even if
underinflation has not reached the level to trigger illumination of the TPMS low tire pres-
sure telltale.
Your vehicle has also been equipped with a
TPMS malfunction indicator to indicate when
the system is not operating properly. The
TPMS malfunction indicator is combined with
the low tire pressure telltale. When the sys-
tem detects am alfunction, the warning lamp
will flash for approximately am inute and then
remain continuously illuminated. This
sequence will be repeated every time the vehi-
cle is started as long as the malfunction
exists. When the malfunction indicator is illu-
minated, the system may not be able to detect
or signal low tire pressure as intended.
TPMS malfunctions may occur for av ariety of
reasons, including the installation of incom-
patible replacement or alternate tires or
wheels on the vehicle that prevent the TPMS
from functionin gp roperly. Always check the
TPMS malfunction telltale after replacing one
or more tires or wheels on your vehicle to
ensure that the replacement or alternate Tires
and wheels allow the TPMS to continue to
function properly.
It is the driver's responsibility to set the tire
pressure to that recommended for cold tires
which is suitable for the operating situation
( Y
page 290). Note that the correct tire pressure
for the current operating situation must first be
taught-in to the tire pressure monitor. If as ub-
stantial loss of pressure occurs, the warning
threshold for the warning message is aligned to
the taught-in reference values. Restart the tire
pressure monitor after adjusting the pressure of
the cold tires ( Y
page 297). The current pres-
sures are saved as new reference values. As a
result, aw arning message will appea rift he tire
pressure drops significantly.
The tire pressure monitor does not warn you of
an incorrectly set tire pressure. Observe the
notes on the recommended tire pressure
( Y
page 290).
The tire pressure monitor is not able to warn you
of as udden loss of pressure, e.g. if the tire is
penetrated by af oreign object. In the event of a
sudden loss of pressure, bring the vehicle to a
halt by braking carefully .A void abrupt steering
movements. Tire pressure 295
Wheels and tires Z