2018 MERCEDES-BENZ CLA COUPE brake
[x] Cancel search: brakePage 70 of 326

You should therefore adapt your drivingstyle
to the differenth andlingcharacteristics. Have
the brakes ystemchecked at aqualified spe-
cialist workshop.
Please observet he information on warnin gand
indicator lamps (
Ypage 220)
(
Ypage 220) as well as on display messages
(Ypage 194).
ADAPTIVE BRAKE
ADAPTIVE BRAKE enhances braking safetya nd
offers increased braking comfort.Ina ddition to
the braking function ,ADA PTIVE BRAKE also has
the HOLDf unction (
Ypage 157) and hill start
assist (Ypage 125).
STEER CONTROL
Genera linformation
STEER CONTROL helps you by transmitting a
noticeable steeringf orcetothe steeringw heel
in the direction required for vehicle stabilization.
This steeringa ssistanceisprovided in particular
if:
Rboth right wheels or both left wheels are on a
wet or slippery road surfacew hen you brake
Rthe vehicle begins to skid
Important safetynotes
iObserve the "Importan tsafetyn otes" sec-
tion (Ypage 61).
No steeringa ssistanceisprovided from STEER
CONTROL, if:
RESP®is malfunctioning
Rthe steeringism alfunctioning
If ESP®is malfunctioning, you will be assisted
further by the electrical power steering.
Protection against theft
Immobilizer
The immobilizer prevent syour vehicle from
being started without the correctS martKey.
XTo activatewith theSmartKey: remove the
SmartKey from the ignition lock.
XTo activatew ith KEYLESS-GO start-func-
tion or KEYLESS-GO: switchthe ignition off
and open the driver's door.
XTo deactivate: switchont he ignition.
When leaving the vehicle, always tak ethe
SmartKey with you and lock the vehicle. Anyone
can star tthe engin eifavalid SmartKey has been
left inside the vehicle.
iThe immobilizer is always deactivate dwhen
you star tthe engine.
In the eventt hat the engin ecannot be started
(yet the vehicle's battery is charged), the sys-
tem is not operational. Contact an authorized
Mercedes-Ben zCenter or call
1-800-FOR-MERCedes (in the USA )or
1-800-387-0100( in Canada).
ATA (anti-theft alarms ystem)
XTo arm:lock the vehicle with the SmartKe yor
KEYLESS-GO.
Indicator lamp :flashes. The alarm system
is armed after approximately 15 seconds.
XTo disarm: unlock the vehicle with the Smart-
Key or KEYLESS-GO.
or
XInsert the SmartKe yintot he ignition lock.
Av isual and audible alarm is triggered if the
alarm system is armed and you open:
Rad oor
Rthe vehicle with the mechanical key
Rthe trun klid
Rthe hood
68Protection against theft
Safety
Page 72 of 326

SmartKey
Important safety notes
GWARNING
If children are left unsupervised in the vehicle,
they could:
Ropen the doors, thus endangering other
people or road users.
Rget out and disrupt traffic.
Roperate the vehicle's equipment.
Additionally, children could set the vehicle in
motion if, for example, they:
Rrelease the parking brake.
Rshifting the automatic transmission out of
park position P
RStart the engine.
There is arisk of an accident and injury.
When leaving the vehicle, always take the
SmartKey with you and lock the vehicle. Never
leave children or animals unattended in the
vehicle. Always keep the SmartKey out of
reach of children.
GWARNING
If you attach heavy or large object stothe
SmartKey, the SmartKey could be uninten-
tionally turned in the ignition lock. This could
cause the engine to be switched off. There is a risk of an accident.
Do not attach any heavy or large object stothe
SmartKey. Remove any bulky key rings before
insertingt he SmartKey into the ignition lock.
!Keep the SmartKey away from stron gmag-
netic fields. Otherwise, the remote control
function could be affected.
Strong magnetic fields can occur in the vicin-
ity of powerful electrical installations.
Do not keep the SmartKey:
Rwith electronic devices, e.g. amobile phone
or another SmartKey.
Rwith metallic objects, e.g. coins or metal foil.
Rinside metallic objects, e.g. ametal case
Vehicles with KEYLESS-GO startf unction:do
not keep the SmartKey in the trunk.O therwise,the SmartKey may not be detected, e.g. when
startin
gthe engine using the Start/Stop button.
SmartKey functions
:& To lock the vehicle
;FTo open the trunk lid
=%To unlock the vehicle
If you do not open the vehicle within approx-
imately 40 seconds of unlocking:
Rthe vehicle is locked again.
Ranti-theft protection is reactivated.
XTo lock: press the &button.
The SmartKey centrally locks/unlocks:
Rthe doors
Rthe trunk lid
Rthe fuel filler flap
The turn signals flash once when unlocking and
three times when locking.
When the locator lighting is activated via the
multimedia system, it lights up when it is dark
after the vehicle is unlocked with the remote
control (see the separate operating instruc-
tions).
You can also set an audible signal to confirm
that the vehicle has been locked. The audible
signal can be activated and deactivated using
the on-board computer (
Ypage 187).
XTo open the trunk lid automatically: press
and hold the Fbutton until the trunk lid
opens (
Ypage 79).
70SmartKey
Opening and closing
Page 78 of 326
Doors
Important safet ynotes
GWARNING
If children are lef tunsupervised in th evehicle,
they could:
Rope nthe doors ,thu se ndangerin gother
people or road users.
Rget out and disrup ttraffic .
Roperat ethe vehicle' sequipment.
Additionally, children could set th evehicle in
motion if, fo rexample, they:
Rrelease th eparking brake .
Rshiftingthe automatic transmissio nout of
par kposition P
RStart th eengine.
There is ariskofana ccidentand injury.
Whe nleavin gthe vehicle, always take th e
SmartKey wit hyou and loc kthe vehicle. Never
leav echildren or animals unattended in th e
vehicle. Always keep th eSmartKey out of
reach of children .
You should preferably plac eluggage or load sin
th ec argo compartment. Observ ethe loadin g
guidelines (
Ypage 237).
Unlockingand opening doors from
th ei nside
!
The sid ewindows will no topen/close if th e
battery is discharged or if th esidew indows
hav eicedu p. It will then no tbepossible to
close th edoor. Do no tattemp ttoforce the
doo rclosed. You could otherwise damage th e
doo rort hesidew indow.
Whe nad ooriso pened, th esidew indow on that
sid eo pens slightly. Whe nthe doo risc losed, th e
sid ew indow close sagain .
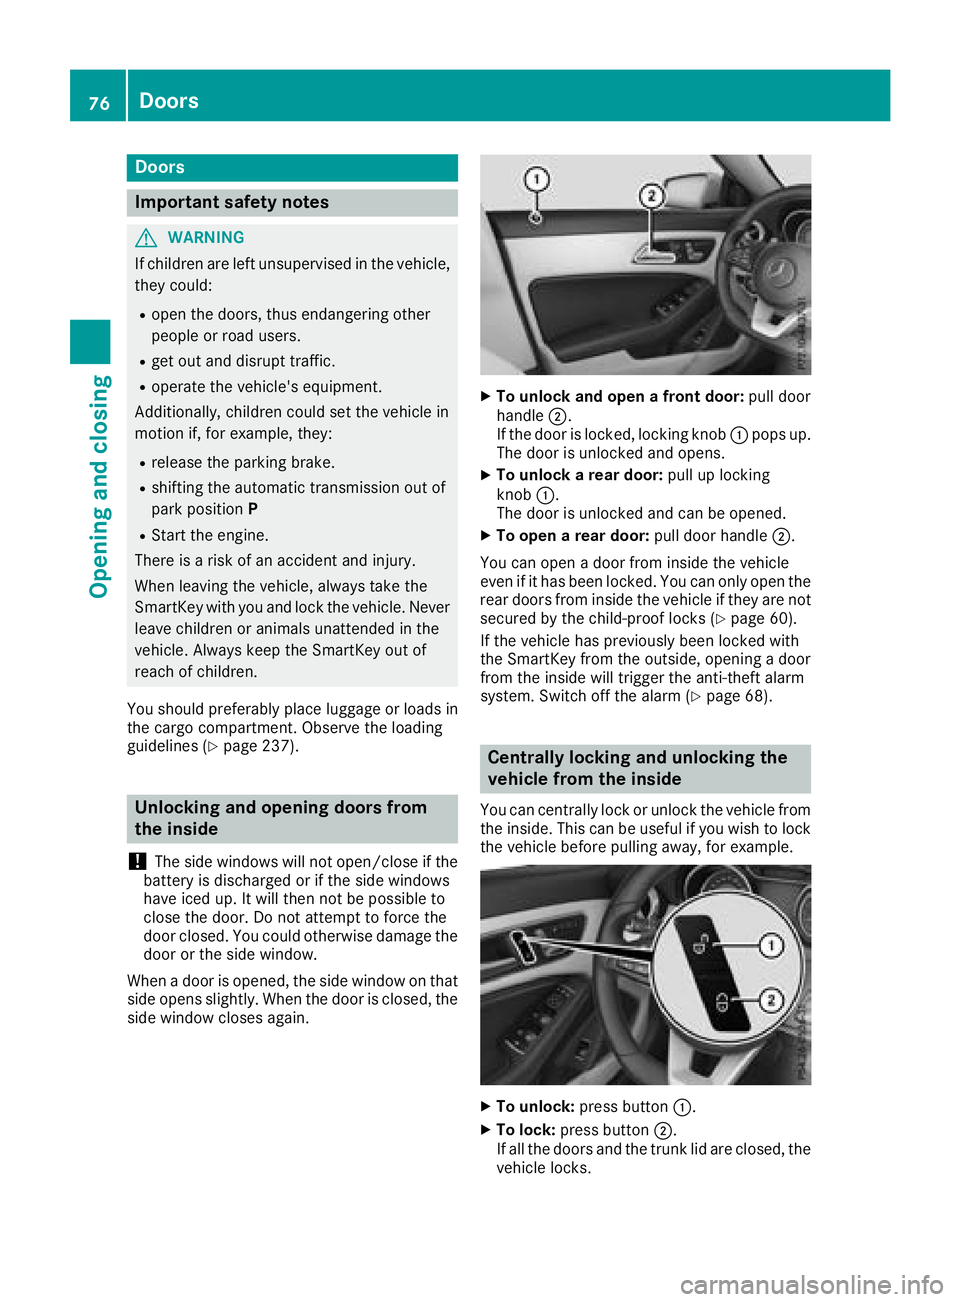
XTo unlock an dopenaf ront door: pull door
handle ;.
If th edoorisl ocked, locking knob :pop sup.
The doo risunlocke dand opens .
XTo unlock areard oor: pull up locking
knob :.
The doo risunlocke dand can be opened.
XTo ope nareard oor: pull doo rhandle ;.
You can ope nadoorfromi nsidet he vehicle
eve nifith as bee nlocked. You can only ope nthe
rea rdoors from insid ethe vehicle if they are no t
secure dbythechild-proof locks (
Ypage 60).
If th evehicle has previously bee nlocke dwith
th eS martKey from th eoutside, opening adoor
from th einsidew ill trigger th eanti-thef talarm
system. Switc hoffthea larm(
Ypage 68).
Centrally locking an dunlocking th e
vehicle from th einside
You can centrall yloc koru nlockthe vehicle from
th ei ns ide. Thi scan be useful if you wish to loc k
th ev ehicle befor epulling away, fo rexample.
XTo unlock :press butto n:.
XTo lock :press butto n;.
If all th edoors and th etrunk lid are closed, th e
vehicle locks .
76Doors
Opening andclosing
Page 103 of 326
take precedence overthe daytime running
lamps.
US Ao nly:
The daytime running lamps improve the visibility
of your vehicl eduringt he day. To do this, the
daytime running lamps functio nmustb e
switched on using the on-board computer
(
Ypage 187).
If the engine is running and yo uturnt he light
switch to the TorL position, the manual
setting stake precedence ove rthe daytime run-
ning lamps.
Low-beam headlamps
Even if the light sensord oesn ot detect thatiti s
dark, the parking lamps and low-bea mhead-
lamps switch on when the ignition is switched on
and the light switch is settot heL position.
Thi sisa particularly usefu lfun ctio nint he event
of rain and fog.
XTo switc honthe low-beam headlamps:
tur nthe SmartKeytop osition 2in the igni-
tio nlockors tart the engine.
XTurn the light switch to L.
The green Lindicator lamp in the instru-
ment clusterl ights up.
Rea rfog lamp
The rea rfog lamp improves visibility of your
vehicl efor the trafficb ehindint he event of thick
fog .Pleas etake note of the country-specific
regulations for the us eofrearfog lamps.
XTo switc honthe rear fogl amp:turnthe
SmartKeyint he ignition lock to position 2or
s
tart the engine.
XTurn the light switch to LorÃ.
XPress the Rbutton.
The yellow Rindicator lamp in the instru-
ment clusterl ights up.
XTo switc hoffthe rear fogl amp:press the
R button.
The yellow Rindicator lamp in the instru-
ment clusterg oeso ut.
iWhen the rea rfog lamp is switched on, the
cente rbrake lamp in the tai llam pswitches off
du etoal egalrequirement.
Parkin glamps
!If the battery charge is ver ylow ,the parking
lamps or standing lamps ar eautomatically
switched off to enabl ethe next engine start.
Alway sparky ourvehicl esafelya nd in awelllit area
,ina ccordance with the relevant legal
stipulations. Avoidu sing the Tparking
lamps ove raperiodofs everal hours. If pos-
sible, switch on the right-hand Xor left-
hand W standing lamps.
XTo switc hon:tur nthe light switch to T.
Th eg reen T indicator lamp in the instru-
ment clusterl ights up.
Standin glamps
Switching on the standing lamps ensures the
corresponding side of the vehicl eisillumin ated.
XTo switc honthe standin glamps: the
SmartKeyisn ot in the ignition lock or it is in
position gin the ignition lock.
XTurn the light switch to W(left-hand side of
the vehicle) or X(right-hand side of the
vehicle).
Combination switch
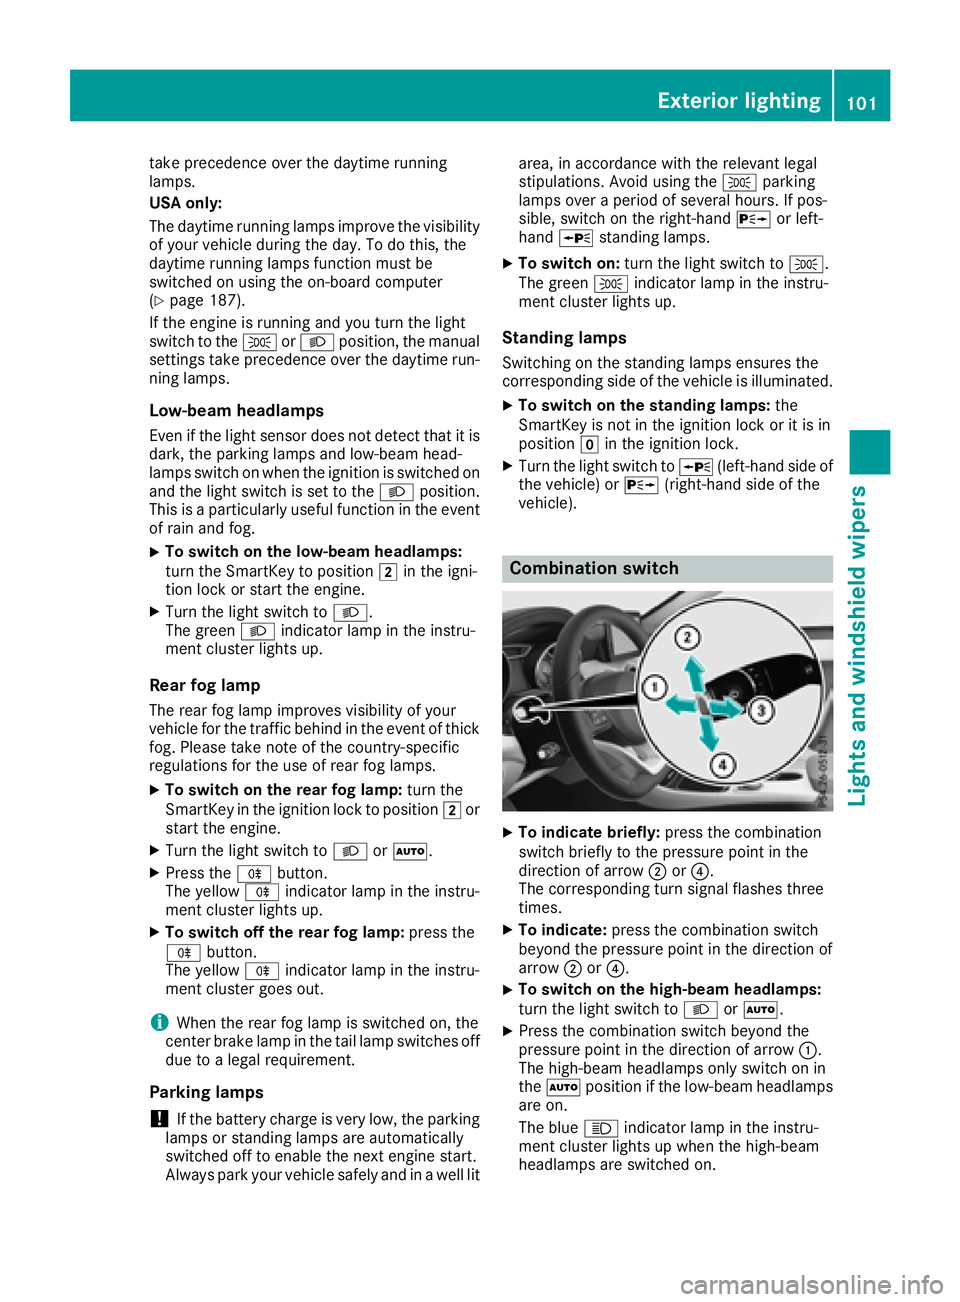
XTo indicate briefly: press the combination
switch briefl ytothe pressure point in the
directio nofarrow ;or?.
Th ec orresponding tur nsigna lflashe sthree
times.
XTo indicate: press the combinatio nswitch
beyond the pressure point in the directio nof
arrow ;or?.
XTo switc honthe high-beam headlamps:
tur nthe light switch to LorÃ.
XPress the combinatio nswitch beyond the
pressure point in the directio nofarrow :.
Th eh igh-beam headlamps onl yswitch on in
the à positio nifthe low-bea mheadlam ps
ar eo n.
Th eb lue K indicator lamp in the instru-
ment clusterl ights up when the high-beam
headlamps ar eswitched on.
Exterior lighting101
Lights and windshield wiper s
Z
Page 107 of 326
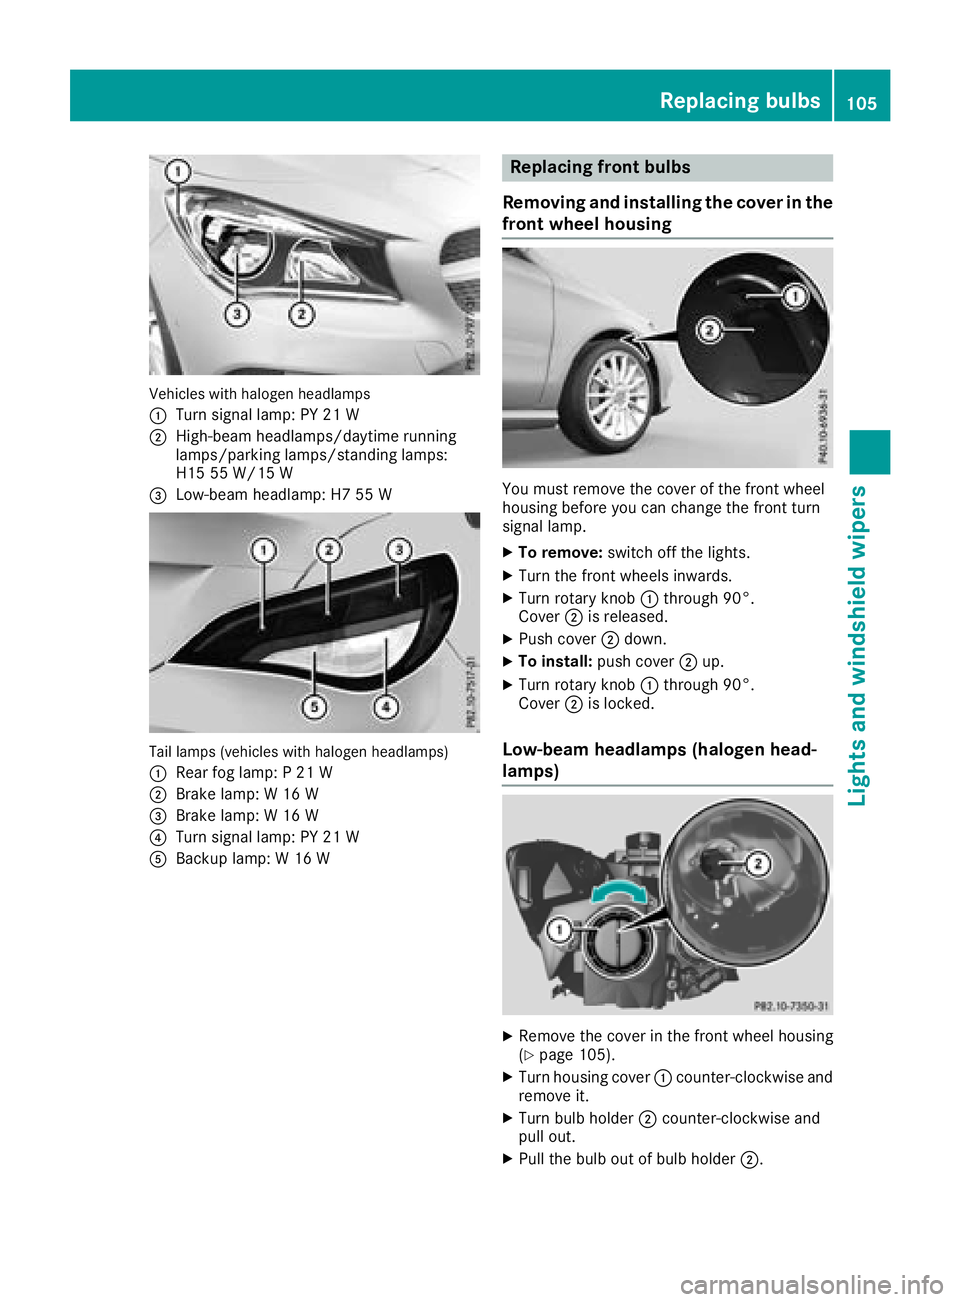
Vehicles with halogenheadlamps
:
Turn signal lamp: PY 21 W
;High-beam headlamps/daytime running
lamps/parking lamps/standing lamps:
H15 55 W/15 W
=Low-beam headlamp: H7 55 W
Tail lamps (vehicles with halogenh eadlamps)
:
Rearf og lamp: P21W
;Brake lamp: W16W
=Brake lamp:W16W
?Turn signal lamp: PY 21 W
ABackup lamp: W16W
Replacing front bulbs
Removing and installingt he coverinthe
front wheelh ousing
You must remove the cover of the front wheel
housing before you can change the front turn
signal lamp.
XTo remove:switch off the lights.
XTurn the front wheelsi nwards.
XTurn rotary knob:through 90°.
Cover ;is released.
XPush cover ;down.
XTo install: push cover ;up.
XTurn rotary knob :through 90°.
Cover ;is locked.
Low-beam headlamps (halogenh ead-
lamps)
XRemove the cover in the front wheel housing
(Ypage 105).
XTurn housing cover :counter-clockwise and
remove it.
XTurn bulb holder ;counter-clockwise and
pull out.
XPull the bulb out of bulb holder ;.
Replacing bulbs105
Lights and windshieldwipers
Z
Page 109 of 326

XPress retainingclips :at the same time in
the direction of the arrows.
XCarefully remove the bulb holder together
with the connected plug and the bulbs.
Bulb holder
;
Brake lamp
=Brake lamp
?Rear fog lamp
ABackup lamp
BTurn signals
XBrake lamp and backup lamp: remove the
corresponding bulb from the bulb holder.
XInsert the new bulb into the bulb holder.
XRear fog lamp and turns ignal:press the
bulb gently into the bulb holder, turn it coun-
ter-clockwise and remove it from the bulb
holder.
XInsert the new bulb into the bulb holder and
turn it clockwise.
XReinsert the bulb holder and engage on
retainin gclips :.
XClose the side trim panel (Ypage 106).
Windshield wipers
Switching the windshield wipers
on/off
!
Do not operate the windshield wipers when
the windshield is dry, as this could damage
the wiper blades. Moreover, dust that has col-
lected on the windshield can scratch the glass
if wiping takes place when the windshield is
dry.
If it is necessary to switch on the windshield
wipers in dry weather conditions, alwaysu se
washer fluid when operating the windshield
wipers.
!If the windshield wipers leave smears on the
windshield after the vehicle has been washed
in an automatic car wash, wax or other resi-
dues may be the reason for this. Clean the
windshield using washer fluid after washing
the vehicle in an automatic car wash.
Combination switch
1
$ Windshield wiper off
2ÄIntermittent wipe, low (rain sensor set
to low sensitivity)
3Å Intermittent wipe, high (rain sensor
set to high sensitivity)
4° Continuous wipe, slow
5¯Continuous wipe, fast
BíSingle wipe/î Wipes the wind-
shield using washer fluid
XSwitc hont he ignition.
XTurn the combination switch to the corre-
sponding position.
!Vehicles with arain sensor: if the windshield
becomes dirty in dry weather conditions, the
windshield wipers may be activated inadver-
tently. This could then damage the windshield
wiper blades or scratch the windshield.
For this reason, you should alwayss witch off
the windshield wipers in dry weather.
Vehicles with arain sensor: in the ÄorÅ
position, the appropriate wiping frequency is
automatically set accordingtot he intensity of
the rain. In the Åposition, the rain sensor is
more sensitive than in the Äposition, caus-
ing the windshield wiper to wipe more fre-
quently.
If the wiper blades are worn, the windshield will
no longer be wiped properly. This could prevent
you from observing the traffic conditions.
Windshield wipers107
Lights and windshield wipers
Z
Page 123 of 326
Notesonb reaking-in anew vehicle
Important safety notes
Thes ensors ystemofs omedriving and driving
safety systems adjusts automaticall ywhile a
certai ndistance is being driven after the vehicle
ha sb eend elivere dorafter repairs. Full system
effectiveness is not reachedu ntilthe end of this
teach-inp rocedure.
New and replaced brake pads and discs only
reach their optimum braking effect after several hundred kilometers of driving. Compensate for
thi sb yapplyin ggreate rforce to the brake pedal.
The first 1000 miles (150 0km)
Them orey ou look after the engine when it is
new ,the mor esatisfied yo uwillbew ithi ts per-
formance in the future.
RYo us houl dtherefore drive at varying vehicle
and engine speeds for the first 1000 miles
(1500 km).
RAvoi dheavy loads, e.g .driving at full throttle,
during thi speriod.
RChang egearing oodt ime, befor ethe tach-
ometer needl eisÔ of the wa ytothe red area
of the tachometer.
RDo not manuall yshift to alower gear to brake
the vehicle.
RTry to avoi ddepressing the accelerator pedal
beyond the point of resistanc e(kickdown).
RIdeally ,for the first 1000 mile s(1500 km),
driv einp rogram E.
Addition al breaking-in note sfor Mercedes-AMG
vehicles:
RDo no tdrivef aster than 85 mph (14 0km/ h)
for th efirst 1,000 miles (1,500 km).
ROnly allow th eengine to reac hamaximum
engine speedof4 ,500 rpm briefly.
RChange gear in good time.
Afte r1,000 miles (1,500 km), you can increase
th ee ngine speedg radually and brin gthe vehicle
to full speed.
You shoulda lso observethese note sonbreak-
ing-in if th eengine or part softhedriv etrain on
your vehicle have been replaced.
Always observ ethe maximum permissible
speed.
Driving
Important safety notes
GWARNING
Object sinthedriver'sf ootwell can restrict the
pedal travel or obstruc tadepressedp edal.
The operatin gand road safety of th evehicle is
jeopardized. Thereisar isk of an accident.
Makes ure that all object sinthevehicle are
stowed correctly, and that they canno tenter
th ed river'sf ootwell. Install th efloormats
securely and as specified in orde rtoensure
sufficient clearance for th epedals.Don otuse
loosef loormats and do no tplace floormats on
to pofo neanother.
GWARNING
Unsuitable footwear can hinder correc tusage
of th epedals,e .g.:
Rshoesw ith thick soles
Rshoeswith high heels
Rslippers
Thereisar isk of an accident.
Wear suitable footwear to ensure correct
usage of th epedals.
GWARNING
If you switch off th eignition while driving,
safety-relevan tfunctionsa re only available
with limitations ,ornotat all. This coul daffect,
for example, th epower steering and th ebrake
boostin geffect .You will require considerably
moree ffort to steer and brake. Thereisar isk
of an accident.
Do no tswitch off th eignition while driving.
GWARNING
If th eparking brak ehas no tbeen fully
released when driving ,the parking brak ecan:
Roverheat and caus eafire
Rlose its hold function.
Thereisar isk of fireand an accident. Release
th ep arking brak efully before driving off.
Driving121
Driving and parking
Z
Page 124 of 326
!Do not warm up the engine with the vehicle
stationary. Drive off immediately.A void high
engine speeds and driving at full throttle until
the engine has reached its operating temper- ature.
Only shift the automatic transmission to the
desired drive position when the vehicle is sta-
tionary.
Where possible,a void spinning the drive
wheels when pulling awayons lippery roads.
You could otherwise damage the drive train.
!Mercedes-AMG vehicles: avoid full-load
operation and engine speeds greater than
5000 rpm when the engine is cold. This helps
to protect the engine and avoids uncomfort-
able driving.
Key positions
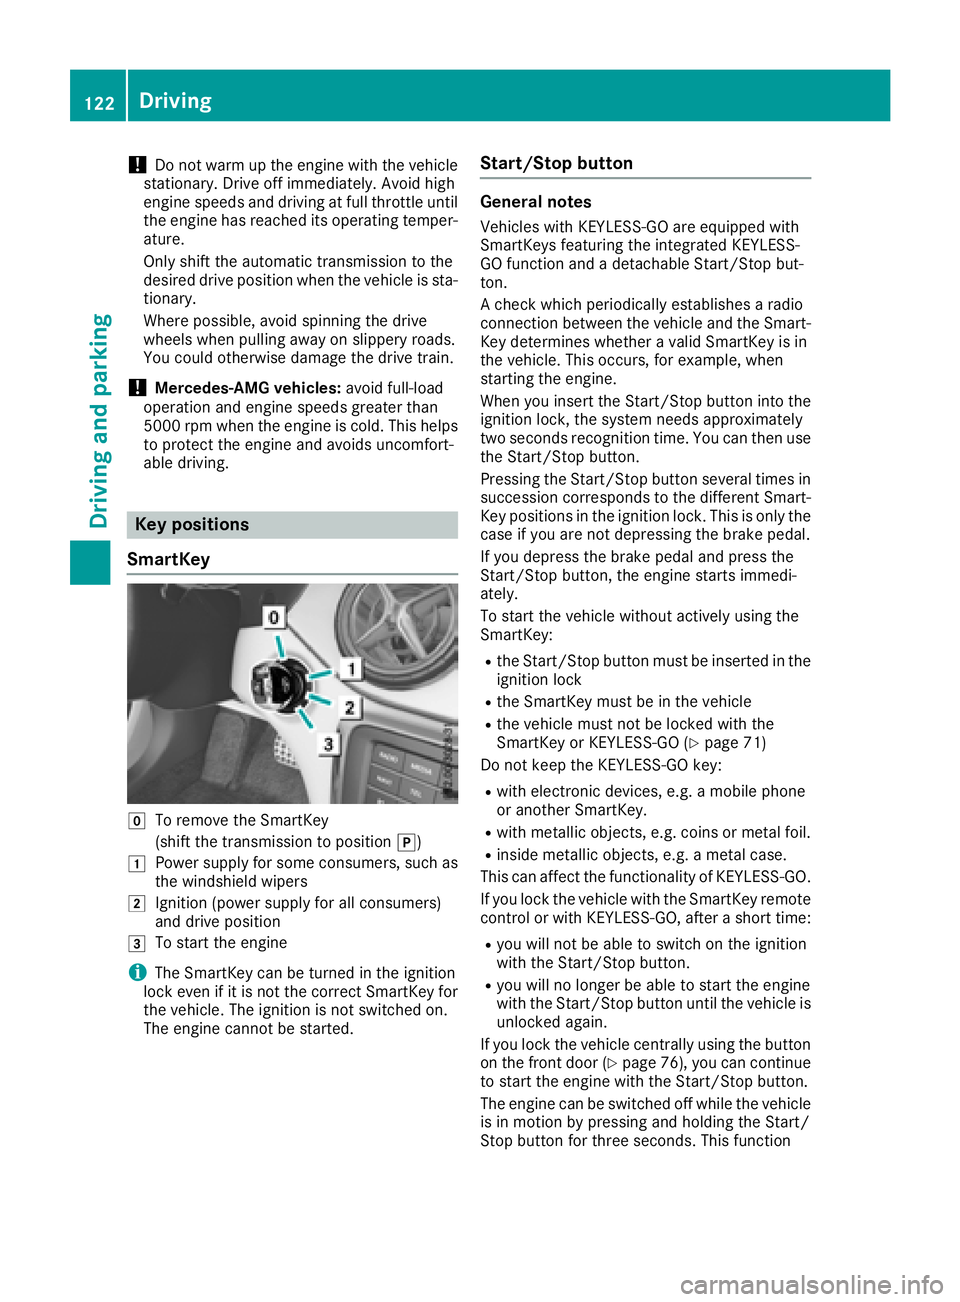
SmartKey
gTo remove the SmartKey
(shift the transmission to position j)
1Power supplyfor some consumers, such as
the windshieldw ipers
2Ignition (power supplyf or all consumers)
and drive position
3To start the engine
iThe SmartKey can be turned in the ignition
lock even if it is not the correct SmartKey for
the vehicle. The ignition is not switched on.
The engine cannot be started.
Start/Stop button
General notes
Vehicles with KEYLESS-GO are equipped with
SmartKeys featuring the integrated KEYLESS-
GO function and adetachable Start/Stop but-
ton.
Ac heck which periodically establishes aradio
connection between the vehicle and the Smart-
Key determines whether avalid SmartKey is in
the vehicle. This occurs, for example, when
starting the engine.
When you insert the Start/Stop button into the
ignition lock, the system needs approximately
two seconds recognition time. You can then use
the Start/Stop button.
Pressing the Start/Stop button several times in
succession corresponds to the different Smart-
Key positions in the ignition lock. This is only the
case if you are not depressing the brake pedal.
If you depress the brake pedal and press the
Start/Stop button, the engine starts immedi-
ately.
To start the vehicle without actively using the
SmartKey:
Rthe Start/Stop button must be inserted in the
ignition lock
Rthe SmartKey must be in the vehicle
Rthe vehicle must not be locked with the
SmartKey or KEYLESS-GO (Ypage 71)
Do not keep the KEYLESS-GO key:
Rwith electronic devices, e.g. amobile phone
or another SmartKey.
Rwith metallic objects, e.g. coins or metal foil.
Rinside metallic objects, e.g. ametal case.
This can affect the functionality of KEYLESS-GO.
If you lock the vehicle with the SmartKey remote
control or with KEYLESS-GO, after ashort time:
Ryou will not be able to switch on the ignition
with the Start/Stop button.
Ryou will no longer be able to start the engine
with the Start/Stop button until the vehicle is
unlocked again.
If you lock the vehicle centrally using the button
on the front door (
Ypage 76), you can continue
to start the engine with the Start/Stop button.
The engine can be switched off while the vehicle
is in motion by pressing and holding the Start/
Stop button for three seconds. This function
122Driving
Driving and parking