2018 MERCEDES-BENZ CLA COUPE oil
[x] Cancel search: oilPage 268 of 326
XMake sure that the vehicle is atastandstill
and the SmartKey is in key position 2in the
ignition lock.
XOpen the camera cover for cleaning via the
multimedia system (see the separate operat-
ing instructions).
XTo clean the rear view camera: use clear
water and asoft cloth to clean camera
lens :.
Cleaningt he exhaust pipes
GWARNING
The exhaust tail pipe and tail pipe trim can
become very hot. If you come into contact
with these parts of the vehicle, you could burn
yourself. There is arisk of injury.
Always be particularly careful around the
exhaust tail pipe and the tail pipe trim. Allow
these components to cool down before touch-
ing them.
!Do not clean the exhaust pipe with acid-
based cleaning agents, such as bathroom
cleaner or wheel cleaner.
!Mercedes-AMG vehicles with black exhaust
pipes: the black-chrome tailpipe finishers
should not be polished with achrome polish.
They will otherwise lose their black sheen. For
optimal care, the faceplates should be rubbed with alightly oiled cloth after every car wash.
Commercially available engine and care oils
are suitable for this.
For heavier soiling, you can apply afine paint-
work polish with amicrofiber cloth. Remove
the excess polish residue after polishing.
Impurities combined with the effectsofr oad grit
and corrosive environmental factors may cause
flash rust to form on the surface. You can
restore the original shine of the exhaust pipe by
cleaning it regularly,e specially in winter and
after washing.
XClean the exhaust pipe with acare product
tested and approved by Mercedes-Benz.
Interior care
Cleaningt he display
!For cleaning, do not use any of the following:
Ralcohol-based thinner or gasoline
Rabrasive cleaning agents
Rcommercially-availableh ousehold cleaning
agents
These may damage the display surface. Do
not put pressure on the display surface when cleaning. This could lead to irreparable dam-
age to the display.
XBefore cleaning the display,m ake sure that it
is switched off and has cooled down.
XClean the display surface using acommer-
cially available microfiber cloth and TFT/LCD
display cleaner.
XDry the display surface using adry microfiber
cloth.
Cleaningt he plastic trim
GWARNING
Care products and cleaning agents containing solvents cause surfaces in the cockpit to
become porous. As aresult, plastic parts may
come loose in the event of air bag deploy-
ment. There is arisk of injury.
Do not use any care products and cleaning
agents to clean the cockpit.
!Never attach the following to plastic surfa-
ces:
Rstickers
Rfilms
Rperfume oil container or similar
You could otherwise damage the plastic.
!Do not allow cosmetics, insect repellent or
sunscreen to come into contact with the plas-
tic trim. This maintains the high-quality look of
the surfaces.
XWipe the plastic trim with adamp, lint-free
cloth, e.g. amicrofiber cloth.
XHeavy soiling: use care and cleaning prod-
ucts recommended and approved by
Mercedes-Benz.
The surface may change color temporarily.
Wait until the surface is dry again.
266Care
Maintenance and care
Page 269 of 326
Cleaning thesteering wheel and gear or
selector lever
XThoroughlyw ipe withadamp cloth or use
leather car eagents that have been recom-
mended and approved by Mercedes-Benz.
Cleaning genuine wood and trim ele-
ments
!Do no tuse solvent-based cleanin gagents
suchast ar remover, wheel cleaners, polishes
or waxes. Thereiso therwise ariskofd amag-
ing th esurface.
!Do no tuse chrom epolishont rimp ieces.
The trim pieces have achrom elook but are
mostly made of anodized aluminum and can
lose their shineifc hrom epolishisu sed. Use
ad amp, lint-free cloth instead when cleaning
th et rimp ieces.
If th echrome-plated trim pieces are very
dirty, you can use achrom epolish. If you are
unsure as to whether th etrimp ieces are
chrome-plated or not, consult an authorized
Mercedes-Ben zCenter.
XWipe th ewoodent rima nd trim pieces witha
damp, lint-free cloth ,e.g.am icrofiber cloth.
XHeavy soiling: use careand cleanin gprod-
uct srecommended and approved by
Mercedes-Benz.
Cleaning th eseat covers
General notes
!Do no tuse am icrofiber cloth to clean covers
made out of real leather,a rtificial leather or
DINAMICA.Ifu sed often,these can damage
th ec over.
Notet hatregular car eisessential to ensure that
th ea ppearanc eand comfor tofthecovers is
retaine dovertime.
Genuine leather seat covers
!To retain th enatural appearanc eofthe
leather,o bservethe followingc leaning
instructions:
RClean genuine leather covers carefull ywith
ad amp cloth and then wipe th ecovers
down withad ry cloth.
RMakesure that th eleather does not
become soaked. It may otherwise become
roug hand cracked.
ROnly use leather car eagents that have
been tested and approved by Mercedes-
Benz. You can obtain these from aqualified
specialist workshop.
Leather is anatural product.
It exhibitsn atural surface characteristics, for
example:
Rdifferences in th etextur e
Rmarks caused by growth and injury
Rslightn uances of color
Thesea re characteristic sofleather and not
material defects.
Seat coversofo ther materials
!Observethe followingw hen cleaning:
Rclean artificial leather covers withac loth
moistene dwithas olution containing 1%
detergent( e.g. dish washingl iquid).
Rclean cloth covers witham icrofiber cloth
moistene dwithas olution containing 1%
detergent( e.g. dish washingl iquid). Rub
c
arefull yand always wipe entir eseat sec-
tions to avoid leaving visible lines. Leave
th es eat to dry afterwards. Cleaning results
dependont hetype of dirt and how longi t
has been there.
Rclean DINAMICA covers withad amp cloth.
Makes ure that you wipe entir eseat sec-
tions to avoid leaving visible lines.
Cleaning th eseat belts
GWARNING
Seat beltsc an become severely weakened if
bleached or dyed. This coul dcaus ethe seat
beltstot earorf ail, for instance, in th eevent of
an accident. This posesani ncreased riskof
injury or fatal injury.
Never bleachord ye theseat belts.
Care267
Maintenance and care
Z
Page 271 of 326
Where willIfind...?
Reflective safety jacket
Removing/replacing the reflective
safety jacket
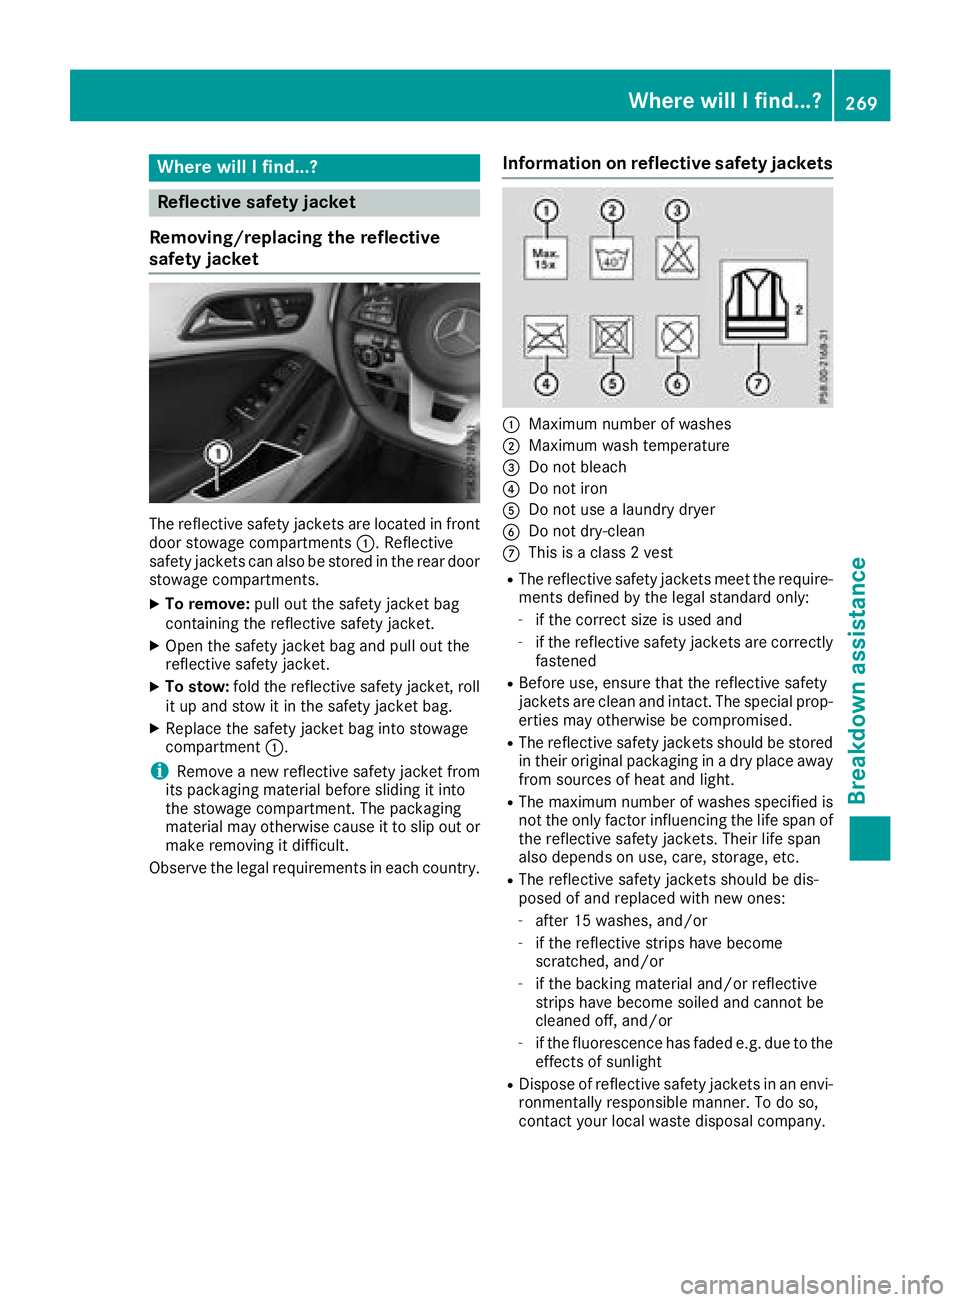
The reflective safety jackets are located in front
door stowage compartments :.Reflective
safety jackets can als obestored in the rear door
stowage compartments.
XTo remove: pullout the safety jacket bag
containing the reflective safety jacket.
XOpen the safety jacket bag and pul lout the
reflective safety jacket.
XTo stow: fold the reflective safety jacket, roll
it up and stow it in the safety jacket bag.
XReplace the safety jacket bag into stowage
compartment :.
iRemoveanew reflective safety jacket from
its packaging material before sliding it into
the stowage compartment. The packaging
material may otherwise caus eittoslipout or
make removing it difficult.
Observe the legalr equirements in each country.
Information on reflective safety jackets
:Maximum numberofwashes
;Maximum wash temperature
=Do not bleach
?Do not iron
ADo not use alaundry dryer
BDo not dry-clean
CThis is aclass2v est
RThe reflective safety jackets meet the require-
ments defined by the legals tandard only:
-if the correct size is usedand
-if the reflective safety jackets are correctly
fastened
RBefore use ,ensure that the reflective safety
jackets are cleana nd intact. The special prop-
erties may otherwise be compromised.
RThe reflective safety jackets should be stored
in their original packaging in adry place away
from sources of heata nd light.
RThe maximumnumbe rofwashes specified is
not the only factor influencing the life spano f
the reflective safety jackets. Theirl ife span
als od epends on use ,care, storage ,etc.
RThe reflective safety jackets should be dis-
posedofa nd replaced with new ones:
-after 15 washes, and/or
-if the reflective strips have become
scratched,and/or
-if the backing material and/or reflective
strips have become soiled and cannot be
cleaned off, and/or
-if the fluorescence has fade de.g. due to the
effects of sunlight
RDisposeofr eflective safety jackets in an envi-
ronmentall yresponsiblem anner. To do so,
contact you rlocalw aste disposal company.
Where will Ifind...?269
Breakdown assistance
Page 276 of 326
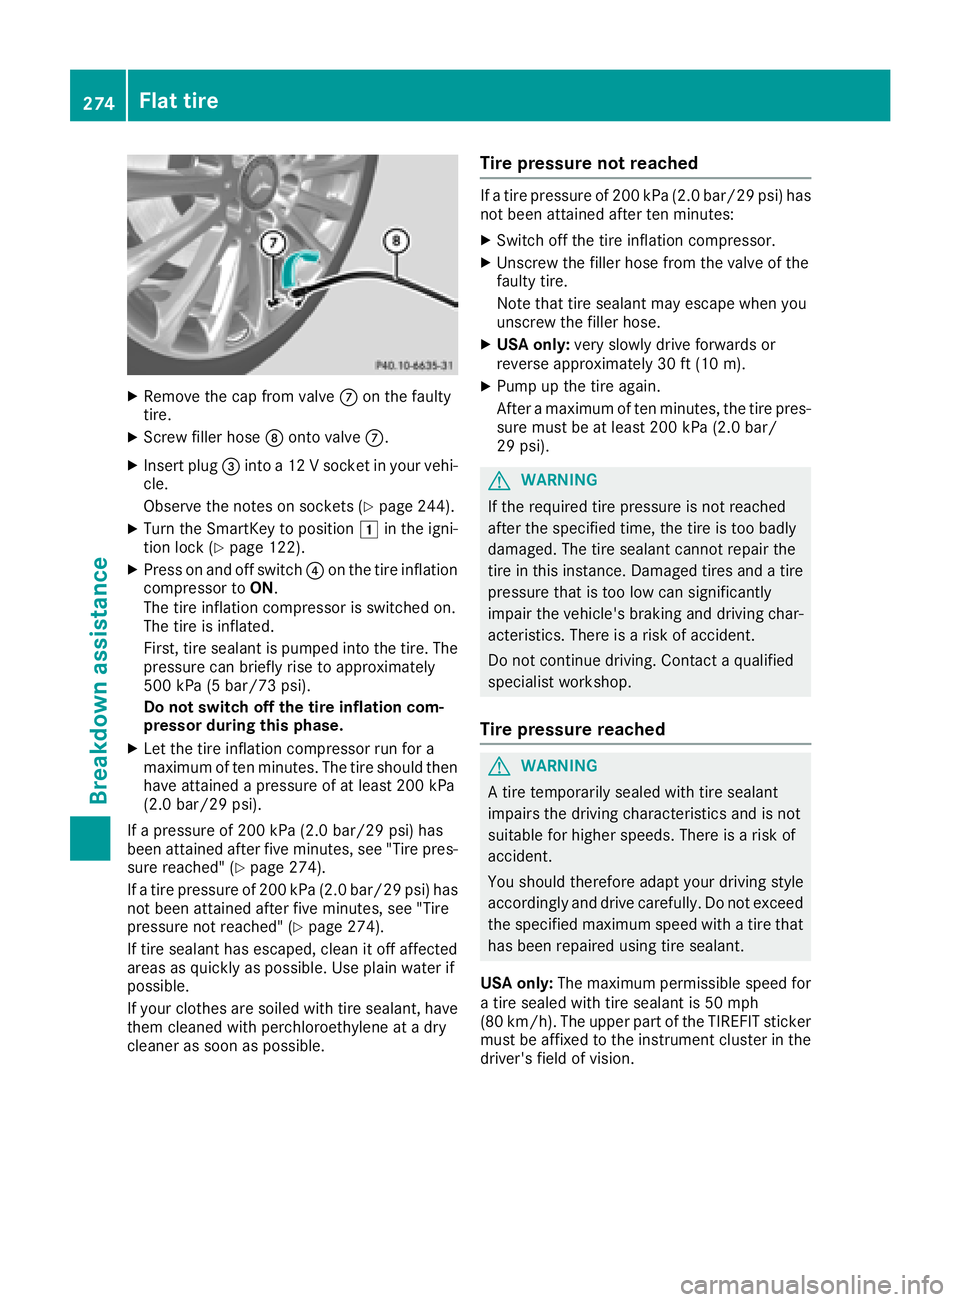
XRemove thecap from valv eC on th efault y
tire.
XScrew filler hos eD onto valv eC.
XInser tplug =intoa12Vs ocketinyour vehi-
cle .
Observ ethe note sons ockets (
Ypage 244).
XTurn theSmartKey to position 1in th eigni-
tion loc k(Ypage 122).
XPress on and off switch ?on th etirei nflation
compressor to ON.
The tire inflation compressor is switched on .
The tire is inflated.
First ,tires ealan tispumped int othe tire. The
pressur ecan briefly ris etoapproximately
50 0k Pa(5 bar/73 psi) .
Do not switch off th etirei nflation com -
pressor during this phase .
XLet thetirei nflation compressor run for a
maximum of te nminutes. The tire should then
hav eattained apressur eofatl east 200kPa
(2.0 ba r/29 psi) .
If ap ressur eof200 kP a(2.0 ba r/29 psi) ha s
been at tained after fiv eminutes, see" Tire pres-
sure reached" (
Ypage 274).
If at ire pressure of 200 kPa (2.0 bar/29 psi) has
not been attaine dafter fiv eminutes, see" Tire
pressure not reached" (
Ypage 274).
If tire sealant hase scaped ,clean it off affected
area sasq uickl yasp ossible. Use plai nwater if
possible.
If your clothesa resoile dwitht ire seala
nt, have
themc leanedwithp erchloroethylene at adry
cleane rassoona spossible.
Tire pressure no treached
Ifat ire pressure of 200 kPa (2.0 bar/29p si)h as
not been attaine dafter ten minutes:
XSwitch off the tire inflatio ncompressor.
XUnscrew the fille rhosef romt he valve of the
faulty tire.
Note thatt ire sealant maye scap ew heny ou
unscrew the fille rhose.
XUS Ao nly: veryslowl ydrive forwards or
revers eapproximately 30 ft (10 m).
XPump up the tire again.
After amaximum of ten minutes, the tire pres-
sure must be at leas t200 kPa (2.0 ba r/
29 psi) .
GWARNING
If the required tire pressure is not reached
afte rthe specified time ,the tire is too badly
damaged. The tire sealant cannot repai rthe
tire in this instance. Damaged tire sand atire
pressure that is too low can significantly
impai rthe vehicle's braking and driving char-
acteristics. There is ariskofa ccident.
Do not continu edriving .Contact aquali fied
specialist workshop.
Tire pressure reached
GWARNING
At ire temporaril yseale dwitht ire sealant
impairs the driving characteristics and is not
suitablef or higher speeds .There is arisko f
accident.
You shoul dtherefore adap tyou rd riving style
accordingly and drive carefully .Donot exceed
the specified maximum speed with atire that
hasb eenr epaired using tire sealant.
USA only: The maximum permissible speed for
at ire seale dwitht ire sealant is 50 mph
(80 km/h). The upper part of the TIREFIT sticker
mus tbea ffixed to the instrument cluster in the
driver'sf ield of vision.
274Flat tire
Breakdown assistance
Page 308 of 326
Uniform TireQualityG rading Standards
Aunifor mstandard to grade the quality of tires
with regards to tread quality, tire traction and
temperature characteristics. The quality grad-
ing assessmentism ade by the manufacturer
following specification sfrom the U.S .govern-
ment .The ratings are molded int othe sidewall of
the tire.
Recommended tir epressures
The recommended tire pressure applies to the
tires mounted at the factory.
The Tire and Loading Information placard con-
tains the recommended tire pressures for cold
tires on afully loaded vehicle and for the maxi-
mum permissible vehicle speed.
The tire pressure table contains the recommen-
ded pressures for cold tires for various operat-
ing conditions, i.e. differingl oad and speed con-
ditions.
Increased vehicle weight due to optional
equipment
The combined weight of all standard and
optional equipment available for the vehicle,
regardless of whether it is actually installed on
the vehicle or not.
Rim
This is the part of the wheel on which the tire is
mounted.
GAWR (Gross Axle Weight Rating)
The GAWR is the maximum gross axle weight
rating. The actual load on an axle must never
exceed the gross axle weight rating. The gross
axle weight ratin gcan be found on the vehicle
identification plate on the B-pillar on the driver's
side.
Speed rating
The speed ratin gispart of the tire identification.
It specifies the speed range for which the tire is
approved.
GVW (Gross Vehicle Weight)
The gross vehicle weight includes the weight of
the vehicle includin gfuel, tools, the spare wheel,
accessories installed, occupants, luggage and
the drawbar noseweight ,ifapplicable. The gross
vehicle weight must not exceed the gross vehi-
cle weight ratin gGVWR as specified on the vehi-
cle identification plate on the B-pillar on the
driver'ss ide.
GVWR(Gross Vehicle Weight Rating)
The GVWR is the maximum permissible gross
weight of afully loaded vehicle (the weight of the
vehicle includin gall accessories, occupants,
fuel, luggage and the drawbar n
oseweight
,if
applicable). The gross vehicle weight ratin gis
specified on the vehicle identification plate on
the B-pillar on the driver'ss ide.
Maximum loaded vehicle weight
The maximum weight is the sum of:
Rthe curb weight of the vehicle
Rthe weight of the accessories
Rthe load limit
Rthe weight of the factory installed optional
equipment
Kilopascal (kPa)
Metric unit for tire pressure. 6.9 kPa corre-
sponds to1psi. Another unit for tire pressure is
bar. 100 kilopascals (kPa) are the equivalent of
1b ar.
Load index
In addition to the load-bearin gindex ,the load
index may also be imprinted on the sidewall of
the tire. This specifies the load-bearin gcapacity
more precisely.
Curb weight
The weight of avehicle with standard equipment
includin gthe maximum capacityoff uel, oil and
coolant .Italso includes the air-conditionin gsys-
tem and optional equipment if these are instal-
led in the vehicle, but does not include passen-
gers or luggage.
Maximum load rating
The maximum tire load is the maximum permis-
sible weight in kilogram sorlbs for which atire is
approved.
Maximum permissible tir epressure
Maximum permissible tire pressure for one tire.
Maximum load on one tire
Maximum load on one tire. This is calculated by
dividing the maximum axle load of one axle by
two.
306All about wheels and tires
Wheels and tires
Page 310 of 326

Tire-mounting tools should not be used near
the valve. This could damage the electronic
components.
Only have tires changed ataqualified spe-
cialist workshop.
Observe the instructions and safety notes in the
"Changing awheel" section (
Ypage 307).
The wear pattern sonthe front and rear tires
differ, depending on the operating conditions.
Rotate the wheels before aclear wear pattern
has formed on the tires. Frontt ires typically
wear more on the shoulders and the rear tires in
the center.
On vehicles that have the same size front and
rear wheels, you can rotat ethe wheels accord-
ing to the intervals in the tire manufacturer's
warranty book in your vehicle documents. If no
warranty book is available, the tires should be
rotated every 3,000 to 6,000 miles (5,000 to
10,000k m).D ependin gontire wear, this may
be required earlier. Do not change the direction
of wheel rotation.
Clean the contact surfaces of the wheel and the brake disc thoroughly every time awheel is rota-
ted. Check the tire pressure and, if necessary,
restart the tire pressure loss warning system
(Canada only) or the tire pressure monitor (USA
only).
Direction of rotation
Tires with aspecified direction of rotation have
additional benefits ,e.g. if there is arisk of hydro-
planing. These advantages can only be gained if
the tires are installed corresponding to the
direction of rotation.
An arrow on the sidewall of the tire indicates its
correctd irection of rotation.
Storing wheels
Storewheels that are not being used in acool,
dry and preferably dark place. Protectt he tires
from oil, grease, gasoline and diesel.
Mounting awheel
Preparing the vehicle
XStop the vehicle on solid, non-slippery and
level ground.
XApply the electric parking brake manually.
XBring the front wheels into the straight-ahead position.
XShift the transmission to position j.
XSwitch off the engine.
XVehicles without KEYLESS-GO:remove the
SmartKey from the ignition lock.
XVehicles with KEYLESS-GO start-function
or KEYLESS-GO: open the driver's door.
The vehicle electronics are now in position
u.T his is the same as “key removed”.
XVehicles with KEYLESS-GO start-function
or KEYLESS-GO: remove the Start/Stop but-
ton from the ignition lock (
Ypage 122).
XMake sure that the engine cannot be started
via your smartphon e(Ypage 83).
XIf included in the vehicle equipment, remove
the tire-change tool kit from the vehicle.
XSafeguard the vehicle against rolling away
(Ypage 141).
iApart from certain country-specific varia-
tions, the vehicles are not equipped with a
tire-change tool kit. Some tools for changing a
wheel are specific to the vehicle. For more
information on which tools are required to
perform awheel change on your vehicle, con-
sult aqualified specialist workshop.
Necessary tire-changing tools can include, for
example:
RJack
RWheel chock
RLug wrench
308Changing awheel
Wheels and tires
Page 312 of 326

XUsing lug wrench:,loosen the bolts on the
wheel you wish to change by abouto ne full
turn. Do not unscrew the bolts completely.
Jacking points
The jacking points are located just behind the
front wheel housings and just in front of the rear
wheel housings (arrows).
Mercedes-AMG vehicles and vehicles with
AMG Line: to protect the vehicle body, the vehi-
cle has covers installed next to the jacking
points on the outer sills.
Covers, front (example: vehicles with AMG Line)
XMercedes-AMG vehicles and vehicles
with AMG Line: fold cover;upwards.
XTake ratchet wrench Aout of the vehicle tool
kit and place it on the hexagon nut of jack ?
so that the letters AUFare visible.
XPosition jack ?at jacking point =.
XMake sure the foot of the jack is directly
beneath the jacking point.
XTurn ratchet wrench Auntil jack ?sits
completely on jacking point =and the base
of the jack lies evenly on the ground.
XTurn ratchet wrench Auntil the tire is raised
am aximum of 1.2 in (3 cm )from the ground.
Removing awheel
!Do not place wheel bolts in sand or on adirty
surface. The bolt and wheel hub threads could
otherwise be damagedw hen you screw them
in.
XUnscrew the wheel bolts.
XRemove the wheel.
Mounting anew wheel
GWARNING
Oiled or greased wheel bolts or damaged
wheel bolts/hub threads can cause the wheel
310Changing awheel
Wheels and tires
Page 313 of 326
bolts to come loose. Asaresult, you could
lose awheel while driving .There is arisk of
accident.
Never oil or grease wheel bolts. In the event of
damage to the threads, contact aqualified
specialist workshop immediately. Have the
damaged wheel bolts or hub threads
replaced/renewed. Do not continue driving.
GWARNING
If you tighten the wheel bolts or wheel nuts
when the vehicle is raised, the jack could tip
over. There is arisk of injury.
Only tighten the wheel bolts or wheel nuts
when the vehicle is on the ground.
Always pay attention to the instructions and
safety notes in the "Changing awheel" section
(
Ypage 307).
Only use wheel bolts that have been designed
for the wheel and the vehicle. For safety rea-
sons, Mercedes-Benz recommends that you
only use wheel bolts which have been approved for Mercedes-Benz vehicles and the respective
wheel.
!To preventd amage to the paintwork, hold
the wheel securely against the wheel hub
while screwingint he first wheel bolt.
XClean the wheel and wheel hub contact sur-
faces.
XPlace the new wheel on the wheel hub and
push it on.
XTighten the wheel bolts until they are finger-
tight.
Lowering the vehicle
GWARNING
The wheels could work loose if the wheel nuts and bolts are not tightened to the specified
tightenin gtorque. There is arisk of accident.
Have the tightenin gtorque immediately
checked at aqualified specialist workshop
after awheel is changed.
XPlace the ratchet wrenc hontot he hexagon
nut of the jack so that the letters ABare visi-
ble.
XTurn the ratchet wrenc huntil the vehicle is
onc eagain standing firmly on the ground.
XPlace the jack to one side.
XTighten the wheel bolts evenly in acrosswise
pattern in the sequence indicated (: toA).
The specified tightenin gtorque is 96 lb-ft
(130 Nm) .
XTurn the jack back to its initial position.
XStow the jack and the rest of the vehicle tools
in the vehicle again.
XMercedes-AMG vehicles and vehicles
with AMG Line: use the cover of the outer sill.
XCheck the tire pressure of the newly mounted
wheel and adjust it if necessary.
Observe the recommended tire pressure
(
Ypage 290).
Canadao nly:as long as you are driving with the
emergency spare wheel mounted, the tire pres-
sure loss warning system cannot function relia-
bly. Only restart the tire pressure loss warning
system when the defective wheel has been
replaced with anew wheel.
Vehicles with tir epressure monitor (USA
only): all mounted wheels must be equipped
with functioning sensors.
Changing awheel311
Wheels and tires
Z