2018 MERCEDES-BENZ CLA COUPE towing
[x] Cancel search: towingPage 159 of 326
HOLD function
General notes
The HOLD function can assist the driverint he
following situations:
Rwhen pulling away, especially on steep slopes
Rwhen maneuvering on steep slopes
Rwhen waiting in traffic
The vehicleisk ept stationary without the driver
having to depress the brake pedal.
The braking effect is cancele dand the HOLD
function deactivated when you depress the
accelerator pedaltop ulla way.
Important safety notes
GWARNING
When leaving the vehicle, it can still roll away despite being braked by the HOLD function if:
Rthere is amalfunction in the system or in
the voltag esupply.
Rthe HOLD function has been deactivated by
pressing the accelerator pedalort he brake
pedal, e.g. by avehicleo ccupant.
Rthe electrical system in the engine com-
partment, the battery or the fuse shave
been tampere dwith.
Rthe battery is disconnected
There is arisk of an accident.
If you wis htoexit the vehicle, alway sturn off
the HOLD function and secure the vehicle
against rolling away.
!When Distance Pilot DISTRONIC or the
HOLD function is activated, the vehicle
brakes automatically in certain situations.
To avoi ddamage to the vehicle, deactivate
Distance Pilot DISTRONIC and the HOLD
function in the following or similar situations:
Rwhen towing the vehicle
Rin the car wash
Deactivating the HOLD function (
Ypage1 57).
Activation conditions
You can activate the HOLD function if:
Rthe vehicleiss tationary
Rthe engine is running or if it has been auto-
matically switched off by the ECO start/stop
function
Rthe driver's door is closed or you rseat belti s
fastened
Rthe electric parking brake is released
RDistance Pilot DISTRONIC is deactivated
Rthe transmission is in position h,kori
on vehicles with automatic transmission
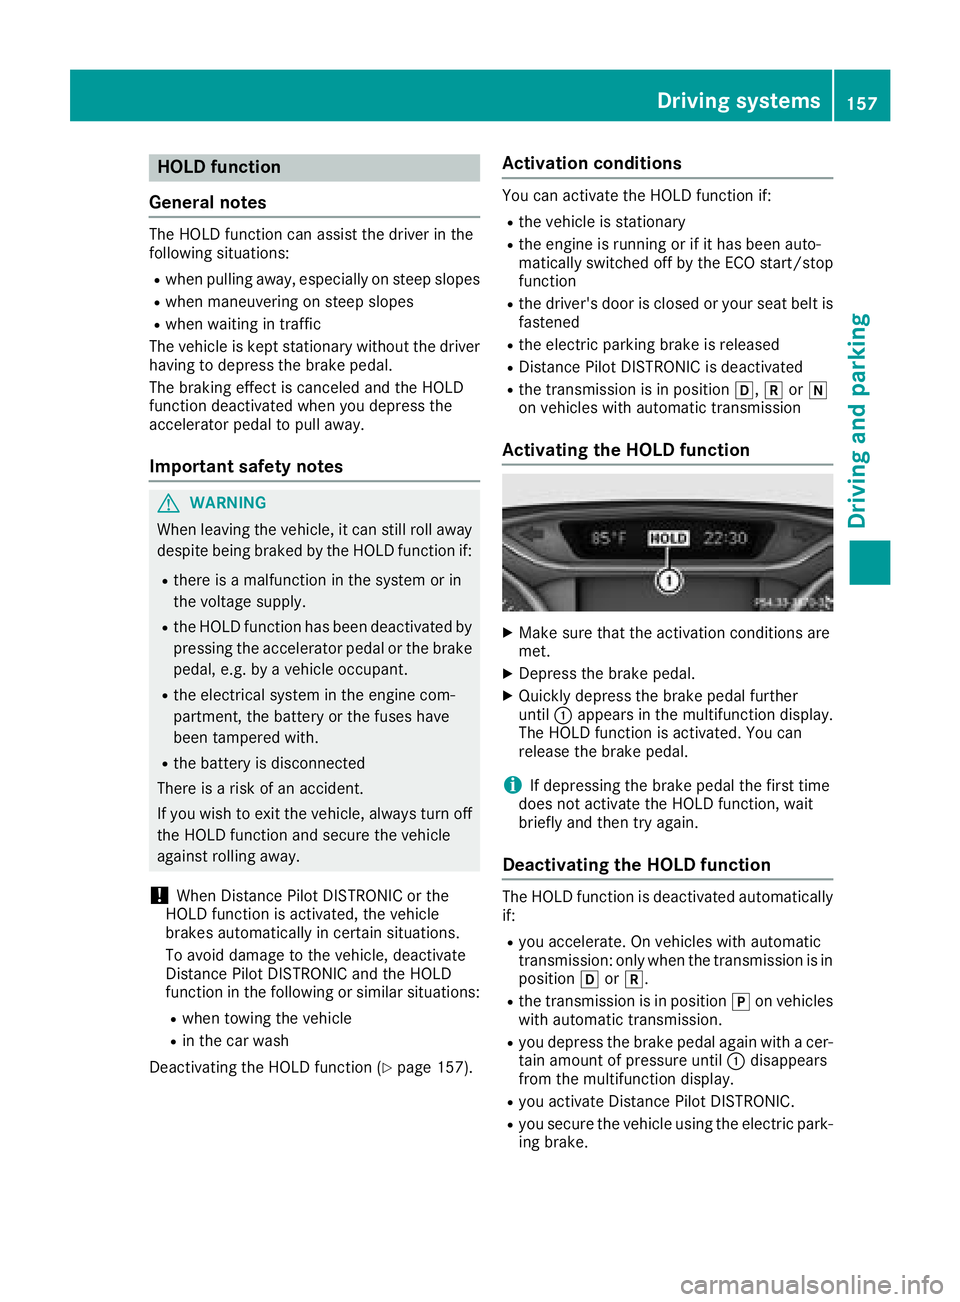
Activating the HOLD function
XMake sure that the activation conditions are
met.
XDepress the brake pedal.
XQuickly depress the brake pedalf urther
until :appears in the multifunction display.
The HOLD function is activated. You can
release the brake pedal.
iIf depressing the brake pedalt he first time
does not activate the HOLD function, wait
briefly and then try again.
Deactivatin gthe HOLD function
The HOLD function is deactivated automatically
if:
Ryou accelerate. On vehicles with automatic
transmission: only when the transmission is in
position hork.
Rthe transmission is in position jon vehicles
with automatic transmission.
Ryou depress the brake pedala gain withacer-
tain amount of pressure until :disappears
from the multifunction display.
Ryou activate Distance Pilot DISTRONIC.
Ryou secure the vehicleu sing the electric park-
ing brake.
Driving systems157
Driving and parking
Z
Page 162 of 326

Sport mode
The firmer settingofthe suspension tuning in
Sport mode ensures even better contact with
the road. Select this mode when employing a
sporty driving style, e.g. on winding country
roads.
XPress button :.
Indicator lamp ;lights up. You have selected
Sport mode.
The AMG Suspension System SPORT
mes-
sage appears in the multifunction display.
Comfort mode
In Comfort mode, the driving characteristics of
your vehicle are more comfortable. Select this
mode if you favor amore comfortable driving
style, but also when driving fast on straight
roads, e.g. highways.
XPress button :again so that indicator
lamp ;goes out.
You have selected Comfortmode.
The AMG
SuspensionSystemCOMFORTmes-
sage appears in the multifunction display.
4MATIC
!
Never tow the vehicle with one axle raised.
This may damage the differential. Damage of
this sort is not covered by the Mercedes-Benz
Limited Warranty. All wheels must remain
either on the ground or be fully raised.
Observe the instructions for towing the vehi-
cle with all wheels in full contact with the
ground.
4MATIC, together with ESP
®,i mproves the trac-
tion of your vehicle whenever adrive wheel
spins due to insufficient grip. If you fail to adapt your driving style, 4MATIC can
neither reduce the risk of accident nor override
the laws of physics. 4MATIC cannot take
account of road, weather and traffic conditions.
4MATIC is only an aid. You are responsible for
the distance to the vehicle in front,f or vehicle
speed, for braking in good time and for staying in
your lane.
If ad rive wheel spins due to insufficient grip:
ROnly depress the accelerator pedal as far as
necessary when pulling away.
RAccelerate less when driving.
iIn wintry driving conditions, the maximum
effect of 4MATIC can only be achieved if you
use winter tires (M+S tires), with snow chains
if necessary.
DYNAMIC BODY CONTROL
General notes
DYNAMICB ODY CONTROL offers improved
driving comfort and continuously controls the
calibration of the dampers. The
damping characteristics adapt to the current
operating and driving situation.
The damping is tuned individually to each wheel
and depends on:
Ryour driving style, e.g. sporty
Rthe road surface conditions
Rthe drive program selected
The drive program can be set using the
DYNAMICS ELECT button (
Ypage 128).
Selecting Comfort mode
In theComfort drive program, the driving char-
acteristic sofyour vehicle are more comforta-
ble. Therefore, select this drive program if you
prefer amore comfortable driving style. Also
select the Comfortdrive program when driving
fast on straight roads, e.g. on straight stretches of highway.
XPress DYNAMICS ELECT button (Ypage 128)
as many times as necessary until the Com-
fort drive program is selected.
160Driving systems
Driving and parking
Page 249 of 326
XTo endacall:press the ~button on the
multifunctio nsteering wheel.
or
XPress the corresponding multimedia system
button for ending aphone call.
XAfter the emergency call, close cover :.
If the mobil ephone network is unavailable,
mbrace will not be able to make the emergency
call. If yo uleave the vehicl eimmediatelya fter
pressing SOS button ;,youdo not know if
mbrace hass uccessfull ymade th eemergency
call. In thisc ase, always summon assistance by
othe rmeans.
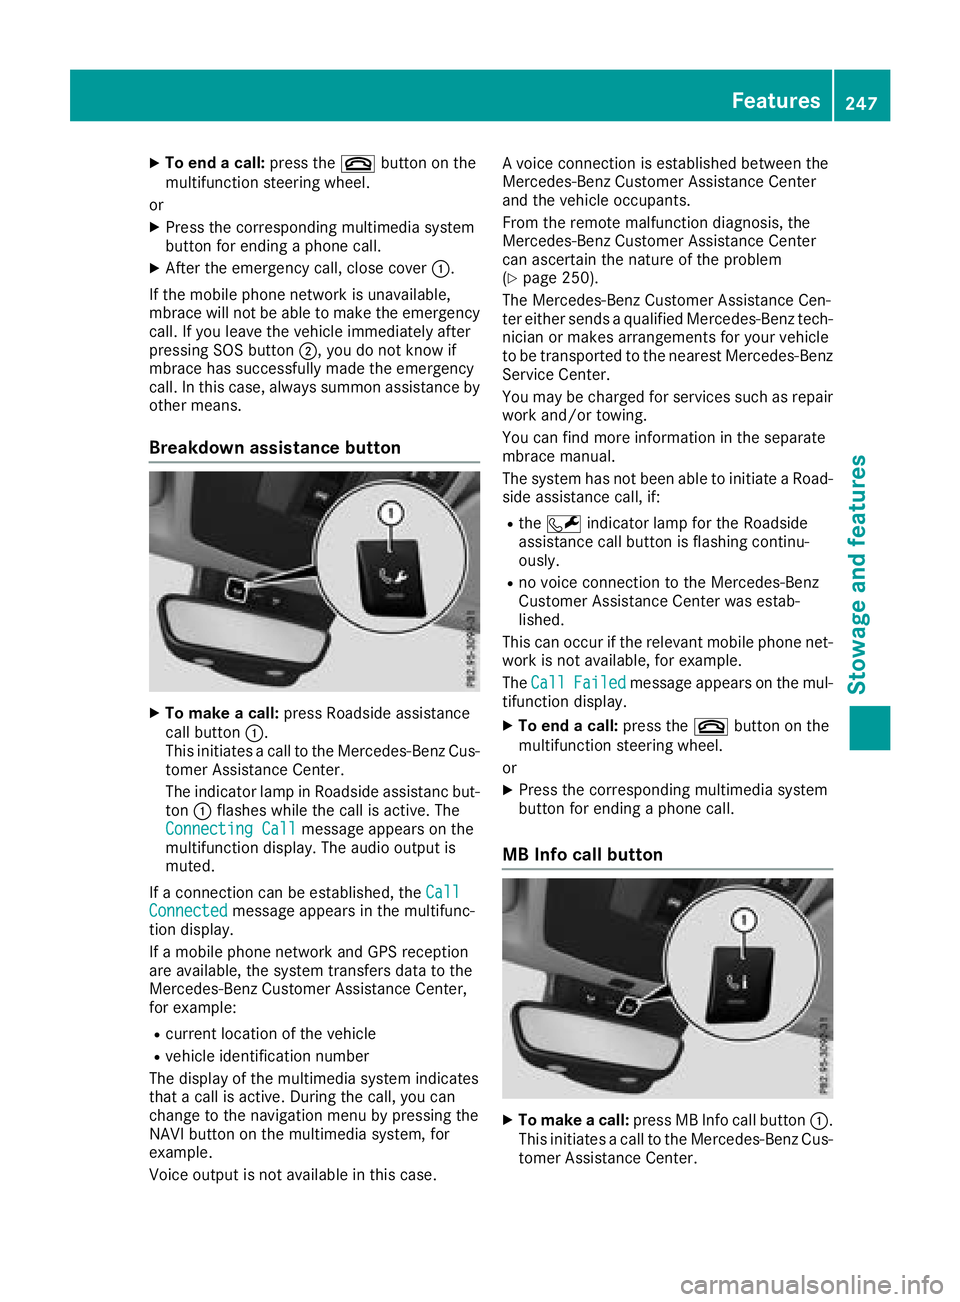
Breakdow nassistanc ebutton
XTo make acall: press Roadside assistance
cal lbutton :.
Thi sinitiates acalltot he Mercedes-Benz Cus-
tomerA ssistance Center.
The indicator lamp in Roadside assistanc but-
ton :flashesw hilethe cal lisactive. The
ConnectingC all
message appears on the
multifunctio ndisplay .The audi ooutputi s
muted.
If ac onnectio ncan be established ,the Call
Connectedmessage appears in the multifunc-
tio nd isplay.
If am obilephone network and GP Sreception
are available ,the system transfers data to the
Mercedes-Benz Customer Assistance Center,
for example:
Rcurrent location of the vehicle
Rvehicl eide ntificatio nnumber
The display of the multimedia system indicates
thatac allisa ctive. During the call, yo ucan
change to the navigatio nmenu by pressing the
NAVI button on the multimedia system,f or
example.
Voice outputi snot available in thisc ase.Av
oice connectio nise stablished between the
Mercedes-Benz Customer Assistance Center
and the vehicl eoccupants.
From the remote malfunctio ndiagn osis, the
Mercedes-Benz Customer Assistance Center
can ascertain the nature of the problem
(
Ypage 250).
The Mercedes-Benz Customer Assistance Cen-
ter either send saqualified Mercedes-Benz tech-
nician or makes arrangements for your vehicle
to be transported to the nearestM ercedes-Benz
Service Center.
Yo um aybe chargedf or servicessuchasr epair
work and/or towing.
Yo uc an find more informatio ninthe separate
mbrace manual.
The system hasn ot been able to initiate aRoad-
side assistance call, if:
Rthe F indicator lamp for the Roadside
assistance cal lbutton is flashing continu-
ously.
Rno voice connectio ntothe Mercedes-Benz
Customer Assistance Center wa sestab-
lished.
Thi scan occurift he relevant mobil ephone net-
work is not available ,for example.
The Call
Failedmessage appears on the mul-
tifunctio ndisplay.
XTo en dacall:press the ~button on the
multifunctio nsteering wheel.
or
XPress the corresponding multimedia system
button for ending aphone call.
MB Info cal lbutton
XTo make acall: press MB Info cal lbutton :.
Thi sinitiates acalltot he Mercedes-Benz Cus-
tomerA ssistance Center.
Features247
Stowag eand featur es
Z
Page 264 of 326
quently. Under arduous operatingconditions,
the tires must be checked more often. Further
information can be obtained at aqualified spe-
cialist workshop, e.g. an authorized Mercedes-
BenzC enter.
Driving abroad
An extensive Mercedes-Benz Service network is
also available in other countries. You can obtain
further information from any authorized
Mercedes-Benz Center.
Care
General notes
HEnvironmental note
Dispose of empty packagin gand cleaning
cloths in an environmentally responsible man-
ner.
!For cleanin gyour vehicle, do not use any of
the following:
Rdry, rough or hard cloths
Rabrasive cleanin gagents
Rsolvents
Rcleanin gagent scontainin gsolvents
Do not scrub.
Do not touch the surfaces or protective films
with hard objects, e.g. aring or ice scraper.
You could otherwise scratch or damage the
surfaces and protective film.
!Do not park your vehicle for along period of
time directly after cleaning, particularly after
cleanin gthe wheel rim with wheel cleaner.
Wheel cleaner can lead to the increased cor-
rosion of the brake discs and pads. Therefore,
drive for afew minutes after cleaning. By
heating up the brakes, the brake discs and
pads dry. The vehicle can then be parked for a
long period of time.
Regular care of your vehicle is acondition for
retaining the quality in the long term.
Use care productsa nd cleaningagent srecom-
mended and approved by Mercedes-Benz.
Washing the vehicle and cleaning the
paintwork
Automatic car wash
GWARNING
Braking efficiency is reduced after washing
the vehicle. There is arisk of an accident.
After the vehicle has been washed, brake
carefully while paying attention to the traffic
condition suntil full brakin gpower is restored.
!When Distance Pilot DISTRONIC or the
HOLD function is activated, the vehicle
brakes automatically in certain situations.
To avoid damage to the vehicle, deactivate
Distance Pilot DISTRONIC and the HOLD
function in the following or similar situations:
Rwhen towing the vehicle
Rin the car wash
!Never clean your vehicle in aTouchless
Automatic Car Wash as these use special
cleanin gagents. These cleanin gagent scan
damage the paintwor korplastic parts.
!Make sure that the automatic transmission
is in position Nwhen washing your vehicle in
at ow-through car wash. The vehicle could be
damaged if the transmission is in another
position.
!Make sure that:
Rthe side windows and the sliding sunroof
are fully closed.
Rthe blower is switched off.
Rthe windshield wiper switch is at position 0.
The vehicle may otherwise be damaged.
You can wash the vehicle in an automatic car
wash from the very start.
If the vehicle is very dirty, pre-wash it before
cleanin gitinana utomatic car wash.
After using an automatic car wash, wipe off wax
from the windshield and the wiper blades. This
will prevents mears and reduce wiping noises
caused by residue on the windshield.
Washing by hand
In some countries, washing by hand is only
allowed at specially equipped washing bays.
Observe the legal requirements in each country.
262Care
Maintenance and care
Page 273 of 326
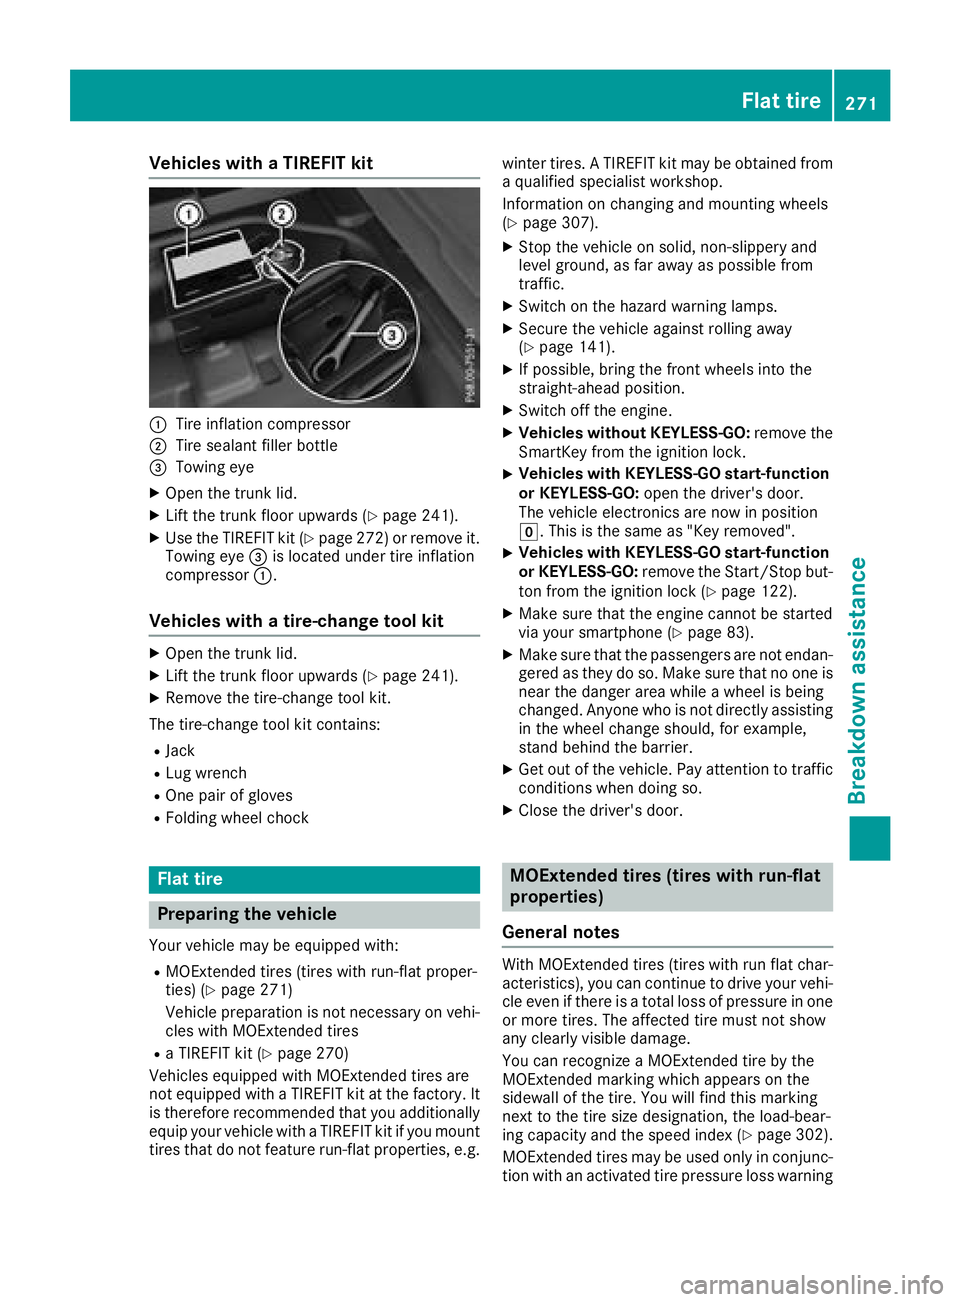
Vehicles withaTIREFI Tkit
:Tire inflation compressor
;Tire sealant fille rbottle
=Towing eye
XOpe nthe trunk lid.
XLiftthe trunk floor upwards (Ypage 241).
XUse the TIREFIT kit (Ypage 272 )orremove it.
Towing eye =is located under tire inflation
compressor :.
Vehicles with atire-chang etool kit
XOpen the trunk lid.
XLift the trunk floor upwards (Ypag e241).
XRemove the tire-change tool kit.
The tire-change tool kit contains:
RJack
RLug wrench
ROne pai rofgloves
RFolding wheelc hock
Flat tire
Preparing the vehicle
Yourvehiclem ay be equipped with:
RMOExtended tires (tires with run-flat proper-
ties) (Ypage271)
Vehiclep reparation is not necessary on vehi-
cles with MOExtended tires
RaT IREFIT kit (Ypag e270)
Vehicles equipped with MOExtended tires are
not equipped with aTIREFIT kit at the factory. It
is therefore recommended that you additionally
equip you rvehiclew ithaTIREFIT kit if you mount
tires that do not feature run-flat properties, e.g. winter tires.
ATIREFIT kit may be obtained from
aq ualified specialist workshop.
Information on changing and mounting wheels
(
Ypag e307).
XStop the vehicleons olid, non-slippery and
level ground ,asfar awa yaspossible from
traffic.
XSwitch on the hazard warning lamps.
XSecure the vehiclea gainst rolling away
(Ypag e141).
XIf possible, bring the front wheels into the
straight-ahead position.
XSwitch off the engine.
XVehicles without KEYLESS-GO: remove the
SmartKey from the ignitio nlock.
XVehicles with KEYLESS-GO start-function
or KEYLESS-GO: open the driver'sd oor.
The vehiclee lectronics are now in position
g.T his is the same as "Key removed".
XVehicles with KEYLESS-GO start-function
or KEYLESS-GO: remove the Start/Stop but-
ton from the ignitio nlock (
Ypag e122).
XMake sure that the engine cannot be started
via you rsmartphone (Ypag e83).
XMake sure that the passengers are not endan-
gered as they do so. Make sure that no one is
near the dange rarea while awhee lisb eing
changed .Anyone who is not directly assisting
in the wheelc hange should, for example,
stand behind the barrier.
XGet out of the vehicle. Pay attention to traffic
conditions when doing so.
XClose the driver'sd oor.
MOExtended tires (tires with run-flat
properties)
General notes
With MOExtended tires (tires with run flat char-
acteristics) ,you can continue to drive you rvehi-
cle even if there is atotal loss of pressure in one
or more tires. The affected tire must not show
any clearly visible damage.
You can recognize aMOExtended tire by the
MOExtended marking which appears on the
sidewal lofthe tire. You wil lfind this marking
next to the tire size designation, the load-bear-
ing capacity and the speedi ndex (
Ypage302).
MOExtended tires may be used only in conjunc-
tion with an activated tire pressure loss warning
Flat tire271
Breakdown assistance
Page 283 of 326
iJumper cablesand further informatio nregardingj ump-startin gcan be obtaine datany qualified
specialist workshop.
Towing and tow-starting
Important safety notes
GWARNING
Functionsr elevanttos afety are restricted or
no longer available if:
Rth ee ngine is no trunning.
Rtheb rakes ystem or th epower steering is
malfunctioning.
Rthere is amalfunctio ninthevoltage supply
or th evehicle's electrical system.
If your vehicle is beingt owed, muchm ore
force may be necessaryt osteer or brake.
Thereisar isk of an accident.
In such cases, use atow bar. Before towing,
makes ure that th esteering moves freely.
GWARNING
You can no longer steer th evehicle if the
steering wheel lockh as been engaged. There
is ar isk of an accident.
Always switch off th eignitio nwhen towing the
vehicle with atow cable or atow bar.
GWARNING
When towing or tow-startin ganother vehicle
and its weight is greater than th epermissible
gross weight of your vehicle ,the :
Rthet ow ing eye could detach itself
Rthev ehicle/trailer combinatio ncould roll-
over.
Thereisar isk of an accident.
When towing or tow-startin ganother vehicle,
its weight shouldn otbe greater than th eper-
missible gross weight of your vehicle.
Details on th epermissible gross vehicle weight
of your vehicle can be foun donthevehicle iden-
tification plate(
Ypage 314).
!When Activ eBrake Assist,D istance Pilot
DISTRONIC or th eHOLDfunction is activated, th
ev ehicle brakes automatically in certain
situations.
To avoid damage to th evehicle ,deactivate
these systems in th efollowing or similar sit-
uations:
Rwhen towing th evehicle
Rin th ecar wash
!Makes ure that th eelectric parking brak eis
released. If th eelectric parking brakeisf aulty,
visitaq ualifiedspecialist workshop.
!Only secure th etow rope or to wbar at the
towing eyes. Otherwise, th evehicle coul dbe
damaged.
!Do no tuse th etow ing eyes for recoveryp ur-
posesast hisc oul dd amage th evehicle .Ifin
doubt,r ecover th evehicle with acrane.
!When towing ,pull away slowly and
smoothly. If th etractive power is to ohigh,t he
vehicle scoul dbed amaged.
!The vehicle can be towed amaximum of
30 miles (50km ). The towing speed of 30 mph
(50km/h) must no tbeexceeded.
If th evehicle has to be towed moret han
30 miles (50km), th efront axle must be raised
or th eentire vehicle raiseda nd transported.
!Do nottow with sling-type equipment .This
coul ddamage th evehicle.
!When towing vehicle swith KEYLESS-GO,
use th ekey instead of th eStart/Sto pbutton.
Otherwise, th eautomatic transmission may
shifttop ositionPwhen th edriver' sorf ront-
passenger door are opened, whichc ouldlead
to damage to th etransmission.
!Vehicles with automatic transmission must
no tbes tarted by tow-starting. This coul doth-
erwis edamage th etransmission.
It is bette rtohave th evehicle transported than
to have it towed away.
If th evehicle can no longer be driven because of
an accidentorb reakdown,you have thefollow-
ing options:
RTransportin gthe vehicle.
Towing and tow-starting281
Breakdown assistance
Z
Page 284 of 326
Asarule, yous houl dhavet he vehicl etrans-
ported.
RTowing the vehicl ewithat ow ropeort ow bar.
Onlyt ow the vehicl einexceptionalc ases.
The battery must be connected and charged.
Otherwise, you:
Rcanno tturn the SmartKeytop osition2in
the ignition lock.
Rcanno trelease the electri cparking brake.
Rcanno tshift the transmission to position i.
The functio nofthe electri cparking brake and
the parking lock is dependent on the on-board
voltage.
If the on-board voltag eislowor if ther eisasys-
tem malfunction:
Rthe electri cparking brake mayn ot be applied
in certain circumstances ,or
Rit maynol ongerbep ossibl etos hift the trans-
mission to position j
Switch off non-essentia lconsumers, e.g .the
radio.
Disar mthe automatic locking feature before the
vehicl eistowed (
Ypage 187). Yo ucould other-
wise be locked outw henp ushing or towing the
vehicle.
Installing/removin gthe towin geye
Installing the towin geye
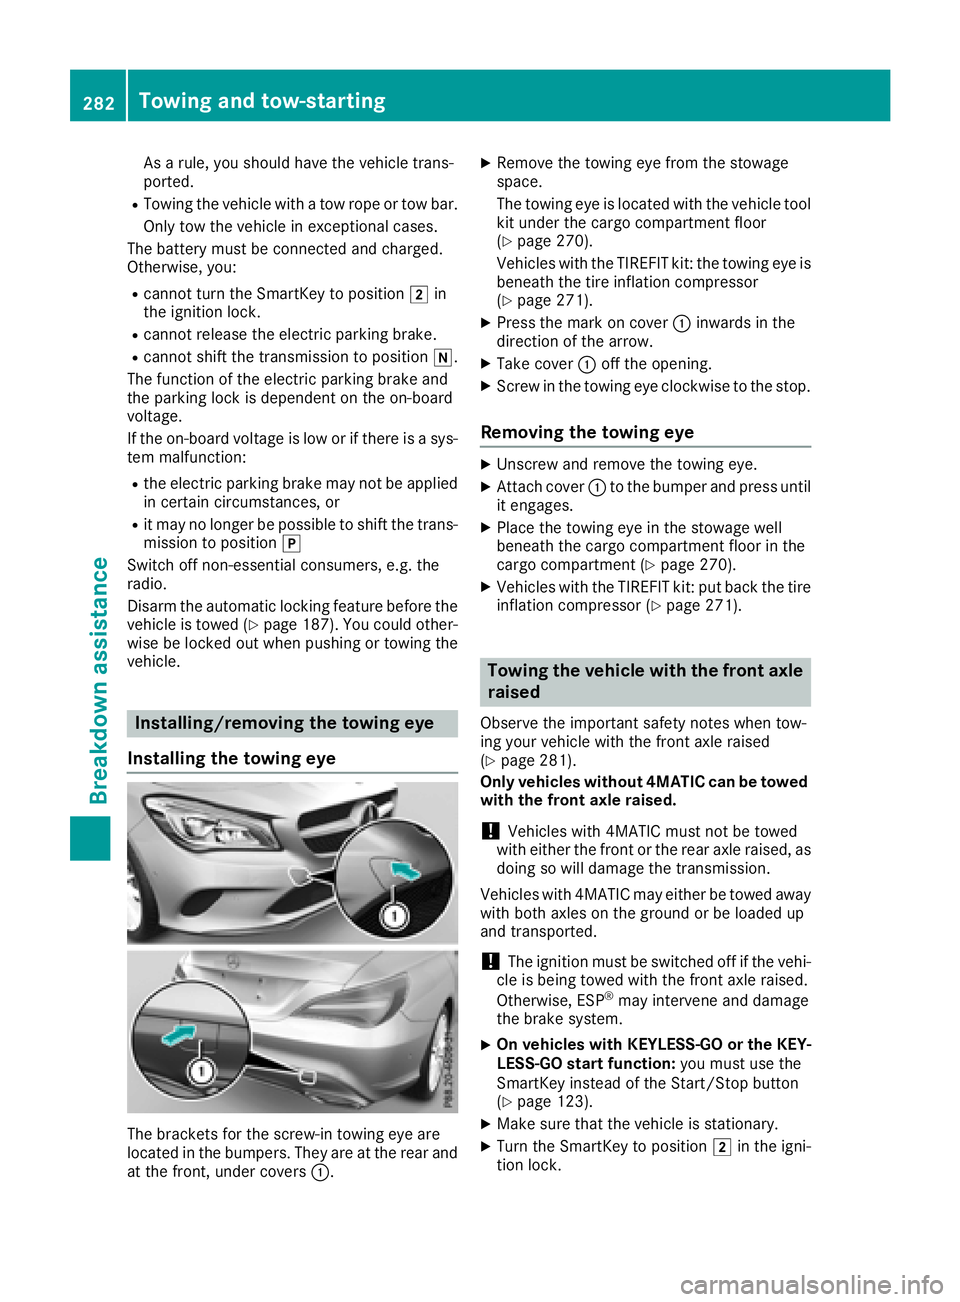
The brackets for the screw-i ntowing ey eare
locate dinthe bumpers. The yareat the rea rand
at the front, under covers :.
XRemove the towing eyefrom the stowage
space.
The towing ey eislocate dw itht he vehicl etool
kit under the cargo compartment floor
(
Ypage 270).
Vehicles with the TIREFIT kit: the towing ey eis
beneath the tire inflation compressor
(
Ypage 271).
XPress the mark on cover :inwards in the
direction of the arrow.
XTake cover :off the opening.
XScrew in the towing ey eclockwise to the stop.
Removing the towin geye
XUnscrew and remove the towing eye.
XAttach cover :to the bumpe rand press until
it engages.
XPlace the towing ey einthe stowag ewell
beneath the cargo compartment floor in the
cargo compartment (
Ypage 270).
XVehicles with the TIREFIT kit: pu tbackt he tire
inflation compressor (Ypage 271).
Towin gthe vehicle with the fron taxle
raised
Observ ethe important safety notes when tow-
ing your vehicl ewitht he front axl eraised
(
Ypage 281).
Only vehicle swithou t4MATIC can be towed
with the fron taxler aised.
!Vehicles with 4MATIC must not be towed
with either the front or the rea raxler aised, as
doing so will damage the transmission.
Vehicles with 4MATIC maye ither be towed away
with both axles on the ground or be loaded up
and transported.
!The ignition must be switched off if the vehi-
cle is being towed with the front axl eraised.
Otherwise, ESP
®mayi ntervene and damage
the brake system.
XOn vehicle swithK EYLESS -GO or the KEY-
LESS-GO start function: youm ustu se the
SmartKeyi nsteadofthe Start/Stop button
(
Ypage 123).
XMake sure thatt he vehicleisstationary.
XTurn the SmartKeytop osition 2in the igni-
tio nlock.
282Towin gand tow-starting
Breakdo wn assis tance
Page 285 of 326
XWhen the vehicle is stationary, depress the
brake pedal and keep it depressed.
XShift the automatic transmission to position
j.
XRelease the brake pedal.
XRelease the electric parking brake.
XSwitchoff the automatic locking
(Ypage 187).
XSwitc hont he hazard warning lamps
(Ypage 102).
XTurn the SmartKey in the ignition lock to posi-
tion gand leave the SmartKey in the ignition
lock.
Towing avehicle with both axles on
the ground
It is importan tthat you observe the safety
instruction swhen towing away your vehicle
(
Ypage 281).
XOn vehicles with KEYLESS-GO or the KEY-
LESS-GO star tfunction: you must use the
SmartKey instead of the Start/Stop button
(
Ypage 123).
The automatic transmission automatically shifts
to position jwhen you open the driver's or
front-passenger door or when you remove the
SmartKey from the ignition lock. In order to
ensure that the automatic transmission stays in
position iwhen towing away the vehicle, you
must observe the following points:
XMake sure that the vehicle is stationary.
XTurn the SmartKey to position 2in the igni-
tion lock.
XDepress and hold the brake pedal.
XShift the automatic transmission to position
i.
XLeave the SmartKey in position 2in the igni-
tion lock.
XRelease the brake pedal.
XRelease the electric parking brake.
XSwitc hont he hazard warning lamps
(Ypage 102).
iIn order to signal achange of direction when
towing the vehicle with the hazard warning
lamps switched on, use the combination
switch as usual. In this case, only the indicator
lamps for the direction of travel flash. After resetting the combination switch, the hazard
warning lamp start
sflashing again.
Transporting the vehicle
4MATIC vehicles or vehicles with auto-
matic transmission
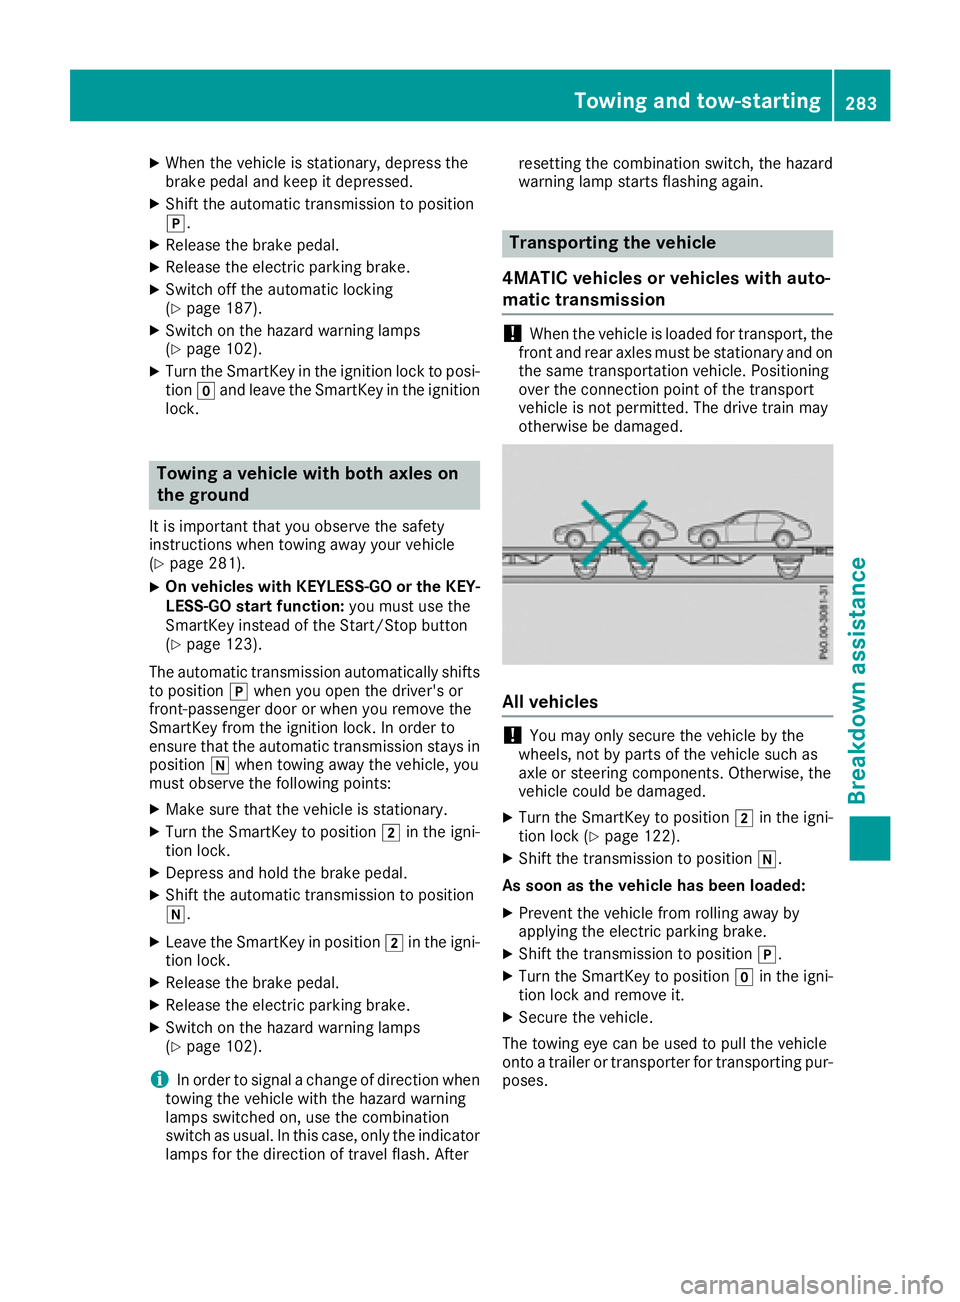
!When the vehicle is loaded for transport, the
fronta nd rear axles must be stationary and on
the same transportation vehicle. Positioning
over the connection point of the transport
vehicle is not permitted. The drive train may
otherwise be damaged.
All vehicles
!You may only secure the vehicle by the
wheels, not by parts of the vehicle such as
axle or steerin gcomponents. Otherwise, the
vehicle could be damaged.
XTurn the SmartKey to position 2in the igni-
tion lock (Ypage 122).
XShift the transmission to position i.
As soon as the vehicle has been loaded:
XPreventt he vehicle from rolling away by
applying the electric parking brake.
XShift the transmission to position j.
XTurn the SmartKey to positiongin the igni-
tion lock and remove it.
XSecure the vehicle.
The towing eye can be used to pull the vehicle
ont oat railer or transporter for transportin gpur-
poses.
Towing and tow-starting283
Breakdown assistance
Z