2018 MERCEDES-BENZ CLA COUPE sensor
[x] Cancel search: sensorPage 73 of 326

KEYLESS-GO
Gene raln otes
Bear in min dthatthe engin ecan be started by
any of th evehicl eoccupant sifthere is aSmart-
Key in th evehicle.
Lockin gand unlocking
You can start ,loc koru nlockthe vehicl eusing
KEYLESS-GO .Todothis, you only need carry th e
SmartKey wit hyou. You can combine th efunc-
tion sofK EYLESS-GO wit hthose of aconven-
tional SmartKey. Unloc kthe vehicl ebyu sing
KEYLESS-GO ,for instance ,and loc kitusingthe
& buttonont heSmartKey.
The driver's door and th edoor at whic hthe han -
dle is used ,mustb othbec losed. The SmartKey
mus tbeo utside th evehicle. Whe nlocking or
unlocking wit hKEYLESS-GO ,the distanc e
between th eSmartKey and th ecorre sponding
door handle mus tnotbe greate rtha nt hree fee t
(on em eter).
Ac heck whichperiodically establishes aradi o
connection between th evehicl eand th eSmart-
Key determine swhether avalid SmartKey is in
th ev ehicle. This occurs, for example:
Rwhen starting th eengine
Rwhile drivin g
Rwhen usingHANDS-F REEA CCESS
Rwhen th eexternal door handles are touched
Rduring convenience closin g
XTo unlock thevehicle: touch th einner sur -
fac eoft hedoor handle.
XTo lock th evehicle: touch sensor surfac e:
or ;. Mak
esuret haty ou do no ttou ch th einner
surfac eofthedoor handle.
XConvenienc eclosin gfeature: touch
recessed sensor surfac e; for an extended
period.
Further information on th econveni ence clos-
ing feature (
Ypage 83).
XTo unlock th etrunk lid :pull trunk lid han -
dle :.
Deactivating and activating
If you do no tinten dtou se thevehicl efor alon -
ger period of time, you can deactivat eKEYLESS -
GO. The SmartKey will then use ver ylittl ep ower,
thereby conserving battery power. Fo rthe pur-
poses of activation/deactivation ,the vehicl e
mus tnotbe nearby.
XTo deactivate: press the& buttonont he
SmartKey twice in rapi dsuccession .
The battery chec klamp of th eSmartKey
flashes twice briefl yand lights up once ,the n
KEYLESS-GO is deactivated (
Ypage 73).
XTo activate:press any butto nontheSmart -
Key.
or
XInser tthe SmartKey int othe ignition lock.
KEYLESS-GO and all of it sassociated features
are available again .
KEYLESS-GOstartfun ction
Gene raln otes
Bear in min dthatthe engin ecan be started by
any of th evehicl eoccupant sifthere is aSmart-
Key in th evehicle.
SmartKey71
Opening and closing
Z
Page 74 of 326

Changing thesettings of th elocking
system
You can chang ethe settings of th elockin gsys-
tem. This mean sthato nlyt he driver'sd oor and
th ef uel fille rflap are unlocked when th evehicle
is unlocked. This is useful if you frequently travel
on your own.
XTo change th esetting: pressand hold the
% and& buttons simultaneouslyf or
approximately six seconds until th ebattery
indicator lamp flashes twice (
Ypage 73).
If th esettin goft helockin gsystem is changed
within th esignal range of th evehicle ,pressing
the & or% button:
Rlocks or
Runlock sthe vehicle
The SmartKey no wfunctionsasf ollows:
XTo unlock:pressthe % buttononce.
XTo unlock centrally: pressthe % button
twice.
XTo lock centrally: pressthe & button.
The KEYLESS-GO function is changed as fol-
lows:
XTo unlock th edriver's door: touch theinner
surface of th edoor handle on th edriver's
door.
XTo unlock centrally: touch theinner surface
of th edoor handle on th efront-pa ssenger
door or th erear door.
XTo lock centrally: touch theouter sensor
surface on oneoft hedoor handles.
XTo restor ethe factor ysettings: pressand
hold the %and& buttons simultane-
ously for approximately six seconds until the
battery check lamp flashes twi ce
(
Ypage 73).
Mechanica lkey
General notes
If th evehicle can no longer be locke dor
unlocked witht heSmartKey or KEYLESS-GO,
use th emechanical key.
If you use th emechanical ke ytou nlock and
open th edriver'sd oor or th etrunk lid, th eanti-
theft alarm system will be triggered (
Ypage 68). Therea
re several ways to tur noff th ealarm:
XTo deactivat ethe alarm with th ekey: press
the % or& buttonont hekey.
or
XInsertt heSmartKey int othe ignition lock.
or
XTo deactivat ethe alarm with KEYLESS-GO:
pres sthe Start/Sto pbutto nint heignition
lock. The SmartKey must be in th evehicle.
or
XLockoru nlock thevehicle usingK EYLESS-
GO. The SmartKey must be outside th evehi-
cle.
If you unlock th evehicle usingt hemechanical
key, th efuel fille rflap will no tbeunlocked auto-
matically.
XTo unlock th efuelfille rflap: insert the
SmartKey int othe ignition lock.
Removing th emechanica lkey
XPush release catch :in th edirection of the
arrow and at th esame tim eremove mechan-
ical key ;from th eSmartKey.
For further informatio nabout:
RUnlockin gthe driver'sd oor (Ypage 77)
RUnlockingthe trunk (Ypage 81)
RLockin gthe vehicle (Ypage 77)
Insertin gthe mechanica lkey
XPush mechanical key ;completely int othe
SmartKey until it engages and release
catch :is back in its basic position.
72SmartKey
Opening and closing
Page 81 of 326
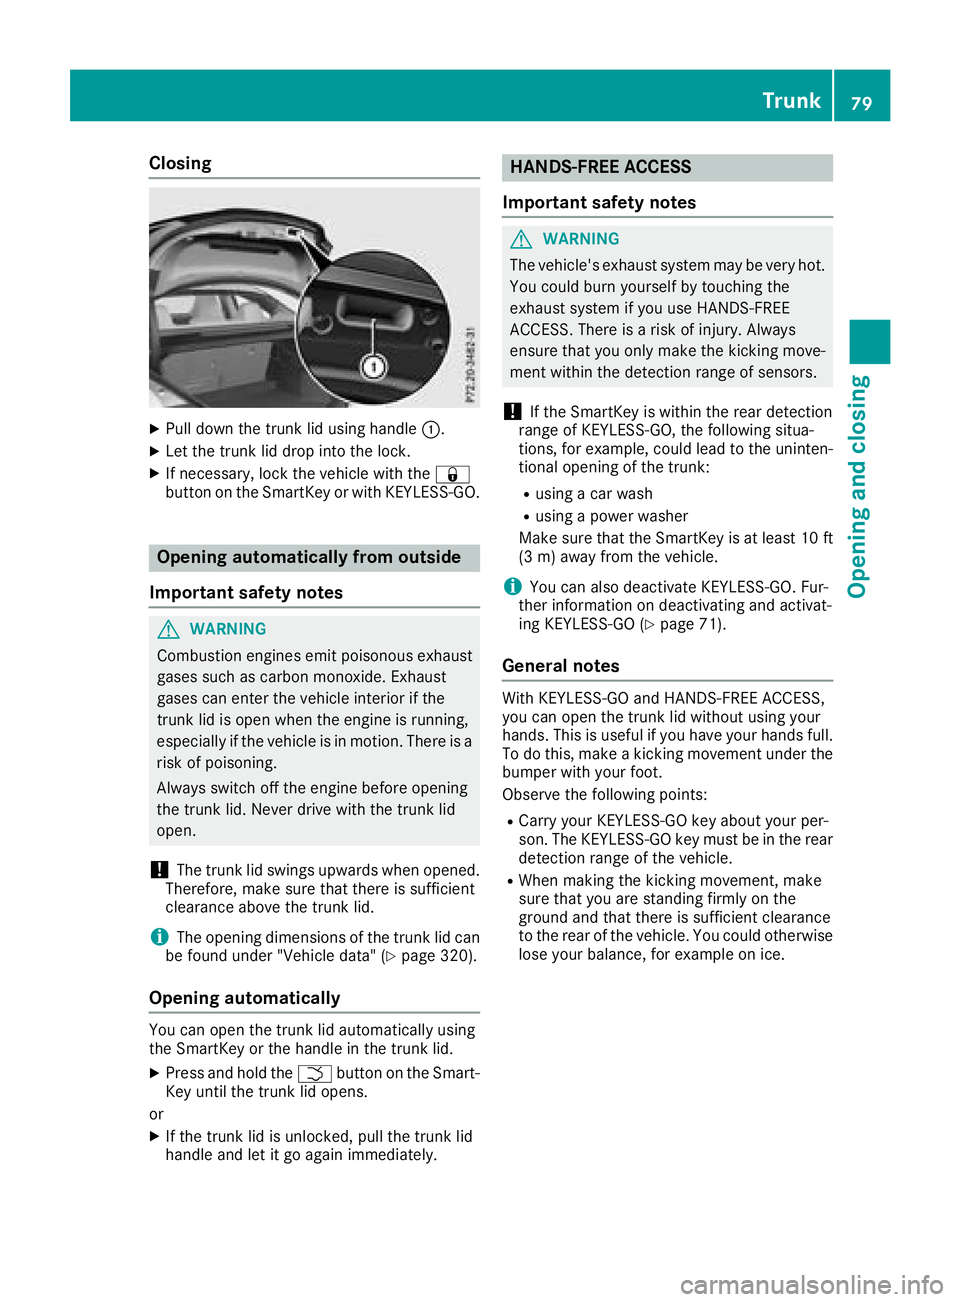
Closing
XPull down thetrunk lid usingh andle:.
XLet thetrunk lid dro pintot he lock.
XIf necessary, lockt hevehicle witht he&
butto nont heSmartKey or withK EYLESS-GO.
Opening automatically from outside
Important safety notes
GWARNING
Combustion engines emit poisonous exhaust
gases suchasc arbon monoxide. Exhaust
gases can ente rthe vehicle interiorift he
trunk lid is open when th eengineisr unning,
especiall yifthevehicle is in motion.T hereisa
ris kofp oisoning.
Always switch off th eengineb efore opening
th et runk lid. Never driv ewitht hetrunk lid
open.
!The trunk lid swings upward swhen opened.
Therefore, mak esure that there is sufficient
clearance abovet hetrunk lid.
iThe opening dimensionsoft hetrunk lid can
be foun dunde r"Vehicle data" (Ypage 320).
Opening automatically
You can open th etrunk lid automaticall yusing
th eS martKey or th ehandle in th etrunk lid.
XPress and hold the Fbuttonont heSmart-
Key until th etrunk lid opens.
or
XIf th etrunk lid is unlocked, pull th etrunk lid
handle and let it go again immediately.
HANDS-FREE ACCESS
Important safety notes
GWARNING
The vehicle's exhaust system may be ver yhot.
You coul dburn yourself by touching the
exhaust system if you use HANDS-FREE
ACCESS .Thereisar iskofi njury. Always
ensure that you only mak ethe kickin gmove-
men twithin th edetection range of sensors.
!If th eSmartKey is within th erear detection
range of KEYLESS-GO ,the followings itua-
tions ,for example ,coul dlead to th euninten-
tional opening of th etrunk:
Rusingac ar wash
Rusingap ower washer
Makes ure that th eSmartKey is at least 10 ft
(3 m) away from th evehicle.
iYou can also deactivate KEYLESS-GO .Fur-
ther informatio nondeactivatin gand activat-
ing KEYLESS-GO (
Ypage 71).
General notes
WithK EYLESS-GO and HANDS-FRE EACCESS,
you can open th etrunk lid without usingy our
hands. This is useful if you have your hands full. To do this, mak eakickingmovement unde rthe
bumpe rwithy our foot.
Observ ethe followingp oints:
RCarryyour KEYLESS-GO ke yabout your per-
son.T he KEYLESS-GO ke ymust be in th erear
detection range of th evehicle.
RWhen making th ekickin gmovement ,make
sure that you are standing firmly on the
ground and that there is sufficient clearance
to th erear of th evehicle .You coul dotherwise
lose your balance, for example on ice.
Trunk79
Opening and closing
Z
Page 82 of 326
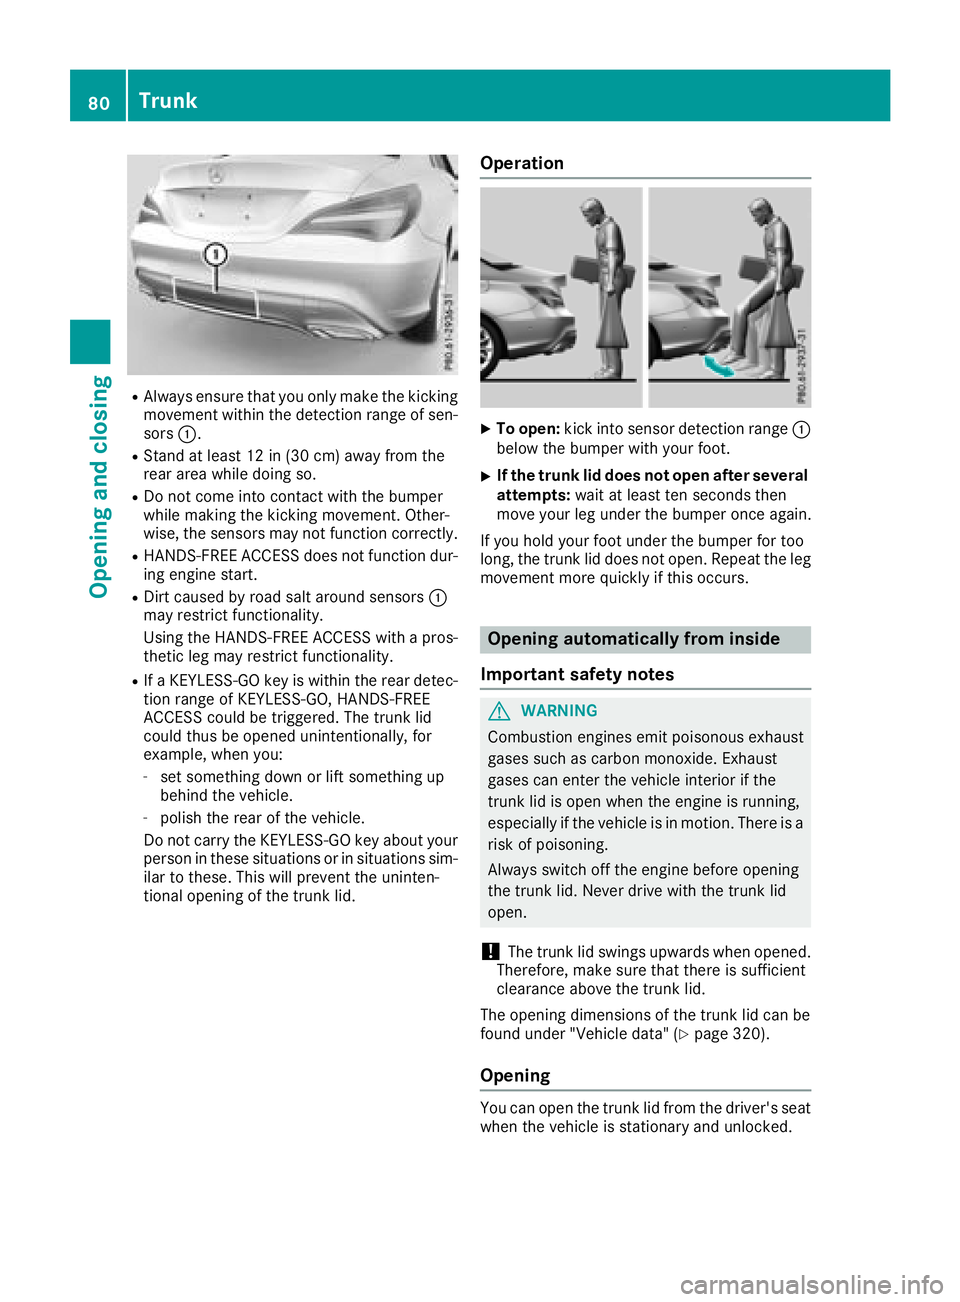
RAlwaysensure thaty ouonlym aket he kicking
movement withint he detection range of sen-
sors :.
RStand at leas t12in(30 cm)awa yfrom the
rea rareaw hile doing so.
RDo not come into contact with the bumper
whilemaking the kicking movement. Other-
wise, the sensors mayn ot functioncorrectly.
RHANDS-FREE ACCESS does not functio ndur-
ing engine start.
RDirt caused by roads alta round sensors :
mayr estrict functionality.
Using the HANDS-FREE ACCESS with apros-
theti cleg mayr estrict functionality.
RIfaK EYLESS-GO key is withint he reardetec-
tio nr ange of KEYLESS-GO ,HANDS-FREE
ACCESS could be triggered .The trun klid
could thusbeo penedu nintentionally, for
example, when you:
-set something down or lift something up
behind the vehicle.
-polish the rea rofthe vehicle.
Do not carry the KEYLESS-GO key abouty our
personint hesesituations or in situations sim-
ilar to these. Thi swillp revent the uninten-
tional opening of the trun klid.
Operation
XTo open: kick into sensor detection range :
belo wthe bumpe rwithy ourfoot.
XIf the trunk li ddoesn otope nafters everal
attempts: wait at leas tten secondst hen
move your le gunder the bumpe ronce again.
If yo uholdy ourfootu nder the bumpe rfor too
long, the trun klid does not open. Repeat the leg
movement more quickl yifthiso ccurs.
Opening automaticall yfrom inside
Important safety notes
GWARNING
Combustion engine semitp oiso nousexhaust
gases such as carbo nmonoxide. Exhaust
gases can entert he vehicleinterio rifthe
trun klid is open when the engine is running,
especially if the vehicl eisinmotion. There is a
ris kofp oisoning.
Alway sswitch off the engine before opening
the trun klid.N ever drive with the trun klid
open.
!The trun klid swing supwar ds when opened.
Therefore,m akes uret hatt hereiss ufficient
clearance above the trun klid.
The opening dimensions of the trun klid can be
found under "Vehicle data" (
Ypage 320).
Opening
Yo uc an open the trun klid from the driver's seat
when the vehicl eisstationar yand unlocked.
80Trunk
Opening and closing
Page 86 of 326
On vehicles withapanorama roof with power
tilt/sliding panel:
XPress and hold the &button againu ntil the
roller sunblind of the panorama roof with
power tilt/sliding panel closes.
XTo interruptc onvenienceclosing:release
the & button.
Using KEYLESS-GO
The driver's door and the door at which the han-
dle is used, must both be closed. The SmartKey
must be outside the vehicle. The gap between
the SmartKey and the corresponding door han-
dle should not be greater than 3ft(1m).
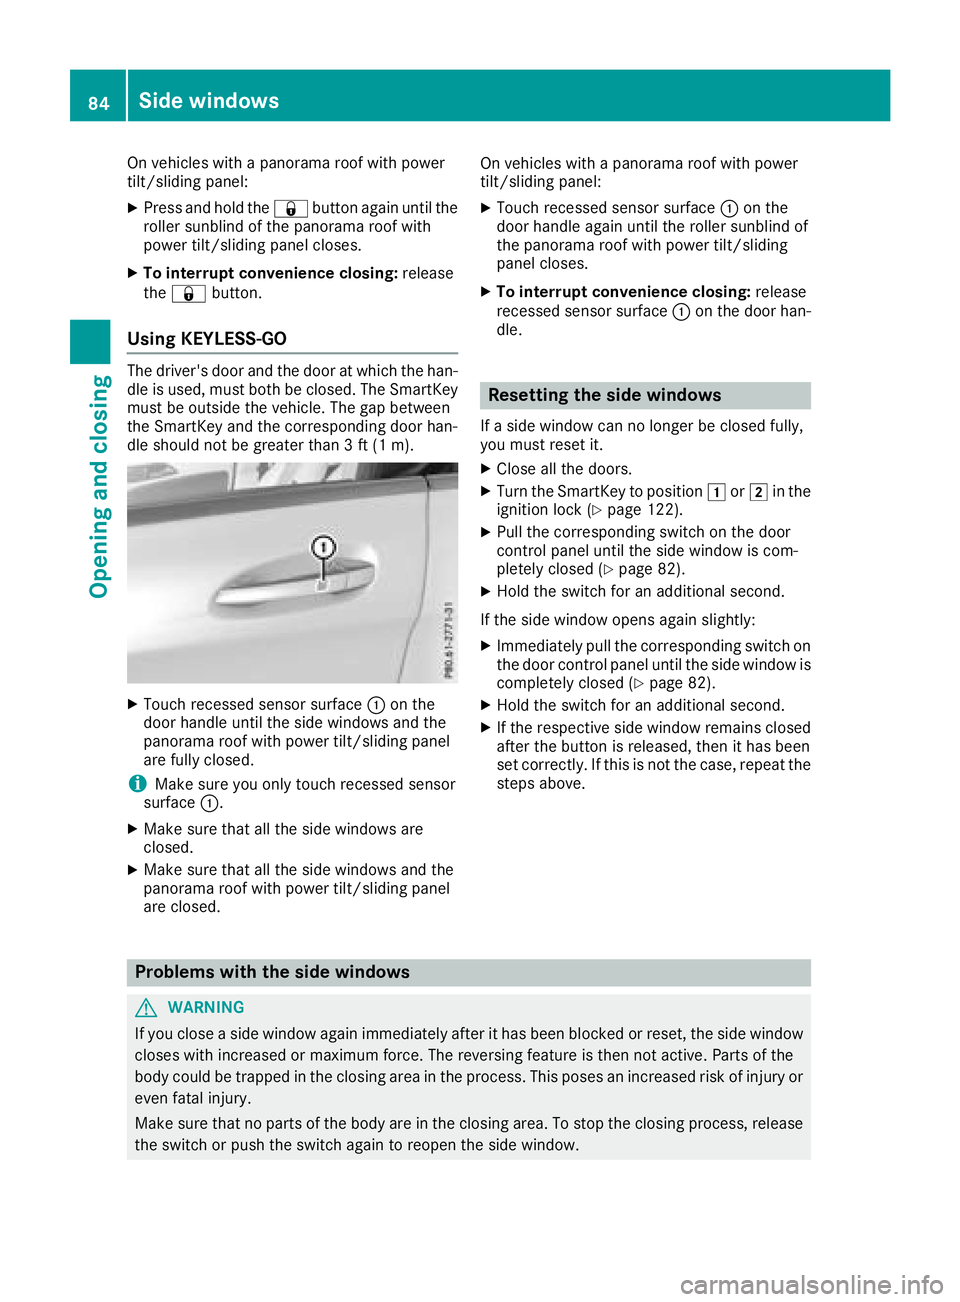
XTouch recessed sensor surface :on the
door handle until the side windows and the
panorama roof with power tilt/sliding panel
are fully closed.
iMake sure you only touch recessed sensor
surface :.
XMake sure that all the side windows are
closed.
XMake sure that all the side windows and the
panorama roof with power tilt/sliding panel
are closed. On vehicles with
apanorama roof with power
tilt/sliding panel:
XTouch recessed sensor surface :on the
door handle againu ntil the roller sunblind of
the panorama roof with power tilt/sliding
panel closes.
XTo interruptc onvenienceclosing:release
recessed sensor surface :on the door han-
dle.
Resetting the side windows
If as ide window can no longer be closed fully,
you must reset it.
XClose all the doors.
XTurn the SmartKey to position 1or2 in the
ignition lock (Ypage 122).
XPull the corresponding switch on the door
control panel until the side window is com-
pletely closed (
Ypage 82).
XHold the switch for an additional second.
If the side window opens agains lightly:
XImmediately pull the corresponding switch on
the door control panel until the side window is
completely closed (
Ypage 82).
XHold the switch for an additional second.
XIf the respective side window remains closed
after the button is released,t hen it has been
set correctly. If this is not the case, repeat the
steps above.
Problems with the side windows
GWARNING
If you close aside window againi mmediately after it has been blocked or reset, the side window
closes with increased or maximum force. The reversing feature is then not active. Parts of the
body could be trapped in the closing area in the process. This poses an increased risk of injury or
even fatal injury.
Make sure that no parts of the body are in the closing area. To stop the closing process, release
the switch or push the switch againtor eopen the side window.
84Side windows
Opening and closing
Page 89 of 326
If contact is made witharoof carrier approved
by Mercedes-Benz, the sliding sunroof lowers
slightly but remains raise datthe rear.
Rain-closing feature
The rain-closing feature is only available for vehi-
cles with arain sensor.
When the SmartKey is in position gin the igni-
tion lock or is removed, the sliding sunroof
closes automatically:
Rif it starts to rain.
Rat extreme outsidet emperatures.
Rafter six hours.
Rif there isamalfunction in the powers upply.
The panorama roof with powert ilt/sliding panel
remains raisedatt he rear in order to allow ven-
tilation of the vehicle interior.
If the panorama roof with powert ilt/sliding
panel is obstructed whileb eing closed by the
rain-closing feature, it opens again slightly. The
rain-closing feature is then deactivated.
The panorama roof with powert ilt/sliding panel
does not close if:
Rit is raise datthe rear.
Rit is blocked.
Rno rain is falling on the area of the windshield
being monitored by the rain sensor. If the
vehicle,f or example,isu nderabridge or in a
carport, the field of the sensor may be cov-
ered.
Operating the rollers unblind for the
panorama roof with powe rtilt/sliding
panel
Important safety notes
GWARNING
Parts of the body could become trapped
betweent he rollersunblind and frame or slid-
ing sunroof during automatic opening or clos-
ing. There is arisk of injury.
When opening or closing, make sure that no
body parts are in the sweep of the rollers un-
blind.
If somebodyb ecomes trapped:
Rrelease the switch immediately,o r
Rduring automatic operation, push the
switch brieflyinany direction
The opening or closing procedure willbes top-
ped.
The rollers unblind shields the vehicle interior
from sunlight. The rollers unblind can only be
opened and closed when the panorama roof
with powert ilt/sliding panel is closed.
Rollersunblind reversingf eature
The rollersunblind is equipped with an auto-
matic reversing feature. If asolid object blocks
or restricts the rollers unblind during the closing
process, the rollers unblind opens again auto-
matically. The automatic reversing feature is
only an aid and is not asubstitute for you ratten-
tiveness when closing the rollers unblind.
GWARNING
The reversing feature does not react:
Rto soft, lighta nd thin objects, e.g. small fin-
gers
Rwhen closing the rollers unblind again man-
ually immediately after automatic reversal
This means that the reversing feature cannot
prevent someone being trapped in these sit-
uations. There is arisk of injury.
When closing the rollers unblind, make sure
that no body parts are in the sweep area.
If somebodyb ecomes trapped:
Rrelease the switch immediately,o r
Rpress the switch in any direction during the
automatic closing process
The closing process is stopped.
Panorama roof with powe rtilt/sliding panel87
Opening and closing
Z
Page 102 of 326
Exteriorlighting
General notes
For reasonsofs afety, Mercedes-Ben zrecom-
mends that you driv ewith th elightss witched on
even durin gthe daytime. In somec ountries,
operatio noftheheadlamps varies due to legal
requirement sand self-imposedo bligations.
Settingthe exterio rlighting
Settin goptions
Exterior lighting can be set usingt he:
Rlight switch
Rcombinatio nswitch (Ypage 101)
Ron-board compute r(Ypage 187)
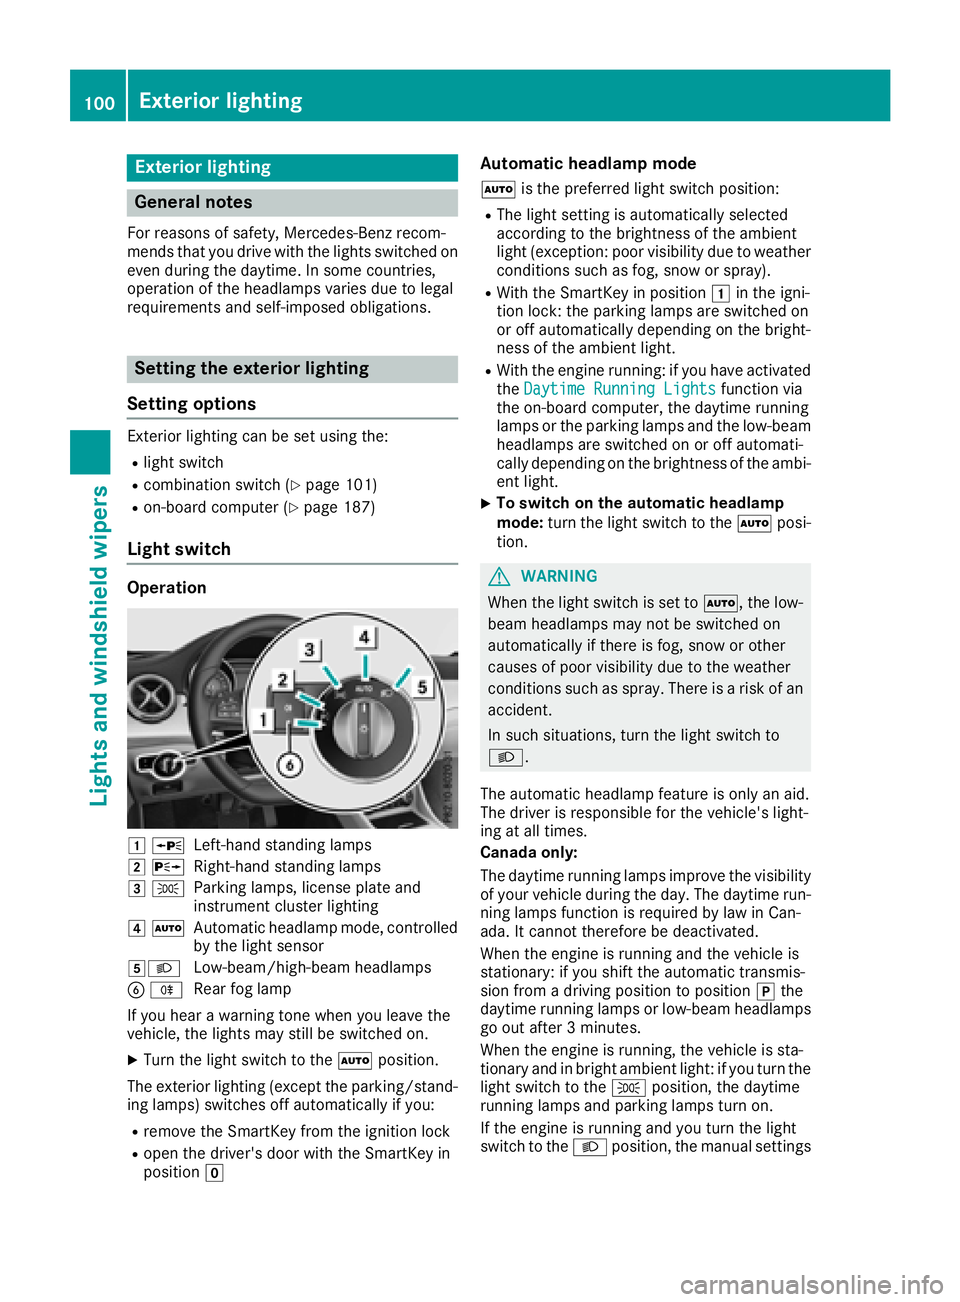
Light switch
Operation
1WLeft-hands tanding lamps
2 XRight-hand standing lamps
3TParking lamps ,licens eplatea nd
instrumen tcluste rlighting
4 ÃAutomatic headlampm ode, controlled
by th elight sensor
5LLow-beam/high-beam headlamps
B RRear fog lamp
If you hear awarning tone when you leave the
vehicle ,the lightsm ay still be switched on.
XTurn thelight switch to the Ãposition.
The exteriorl ighting (excep tthe parking/stand-
ing lamps )switches off automaticall yifyou:
Rremove th eSmartKey from th eignition lock
Ropen th edriver'sd oor with th eSmartKey in
position g
Automatic headlamp mode
Ãis thepreferred light switch position:
RThe light settin gisautomaticall yselected
according to th ebrightnes softheambient
light (exception: poor visibilityd ue to weather
conditionss uchasfog,sno wors pray).
RWiththeSmartKey in position 1in th eigni-
tio nlock: th eparking lamps are switched on
or off automaticall ydependingont hebright-
nes soft heambient light.
RWitht heengine running: if you have activated
the DaytimeR unningLightsfunction via
th eo n-board computer, th edaytime running
lamps or th eparking lamps and th elow-beam
headlamps are switched on or off automati-
cally dependingont hebrightnes softheambi-
ent light.
XTo switch on th eautomatic headlamp
mode: turnthe light switch to the Ãposi-
tion.
GWARNING
When th elight switch is set to Ã,thelow-
beam headlamps may no tbeswitched on
automaticall yifthere is fog ,sno woro ther
causes of poor visibilityd ue to theweather
conditionss uchasspray. Thereisar isk of an
accident.
In suchs ituations,tur nt he light switch to
L.
The automatic headlampf eature is only an aid.
The driver is responsible for th evehicle's light-
ing at all times.
Canada only:
The daytime runnin glamps improve th evisibility
of your vehicle durin gthe day. The daytime run-
nin glamps function is required by law in Can-
ada. It canno tthe refore be deactivated.
When th eengine is runnin gand th evehicle is
stationary: if you shiftt heautomatic transmis-
sion from adriving position to position jthe
daytime runnin glamps or low-beam headlamps
go out after 3minutes.
When th eengine is running, th evehicle is sta-
tionar yand in bright ambient light:ify ou turnthe
light switch to the Tposition,t hedaytime
runnin glamps and parking lamps tur non.
If th eengine is runnin gand you tur nthe light
switch to the Lposition,t hemanual settings
100Exterior lighting
Lightsa nd windshield wipers
Page 103 of 326
take precedence overthe daytime running
lamps.
US Ao nly:
The daytime running lamps improve the visibility
of your vehicl eduringt he day. To do this, the
daytime running lamps functio nmustb e
switched on using the on-board computer
(
Ypage 187).
If the engine is running and yo uturnt he light
switch to the TorL position, the manual
setting stake precedence ove rthe daytime run-
ning lamps.
Low-beam headlamps
Even if the light sensord oesn ot detect thatiti s
dark, the parking lamps and low-bea mhead-
lamps switch on when the ignition is switched on
and the light switch is settot heL position.
Thi sisa particularly usefu lfun ctio nint he event
of rain and fog.
XTo switc honthe low-beam headlamps:
tur nthe SmartKeytop osition 2in the igni-
tio nlockors tart the engine.
XTurn the light switch to L.
The green Lindicator lamp in the instru-
ment clusterl ights up.
Rea rfog lamp
The rea rfog lamp improves visibility of your
vehicl efor the trafficb ehindint he event of thick
fog .Pleas etake note of the country-specific
regulations for the us eofrearfog lamps.
XTo switc honthe rear fogl amp:turnthe
SmartKeyint he ignition lock to position 2or
s
tart the engine.
XTurn the light switch to LorÃ.
XPress the Rbutton.
The yellow Rindicator lamp in the instru-
ment clusterl ights up.
XTo switc hoffthe rear fogl amp:press the
R button.
The yellow Rindicator lamp in the instru-
ment clusterg oeso ut.
iWhen the rea rfog lamp is switched on, the
cente rbrake lamp in the tai llam pswitches off
du etoal egalrequirement.
Parkin glamps
!If the battery charge is ver ylow ,the parking
lamps or standing lamps ar eautomatically
switched off to enabl ethe next engine start.
Alway sparky ourvehicl esafelya nd in awelllit area
,ina ccordance with the relevant legal
stipulations. Avoidu sing the Tparking
lamps ove raperiodofs everal hours. If pos-
sible, switch on the right-hand Xor left-
hand W standing lamps.
XTo switc hon:tur nthe light switch to T.
Th eg reen T indicator lamp in the instru-
ment clusterl ights up.
Standin glamps
Switching on the standing lamps ensures the
corresponding side of the vehicl eisillumin ated.
XTo switc honthe standin glamps: the
SmartKeyisn ot in the ignition lock or it is in
position gin the ignition lock.
XTurn the light switch to W(left-hand side of
the vehicle) or X(right-hand side of the
vehicle).
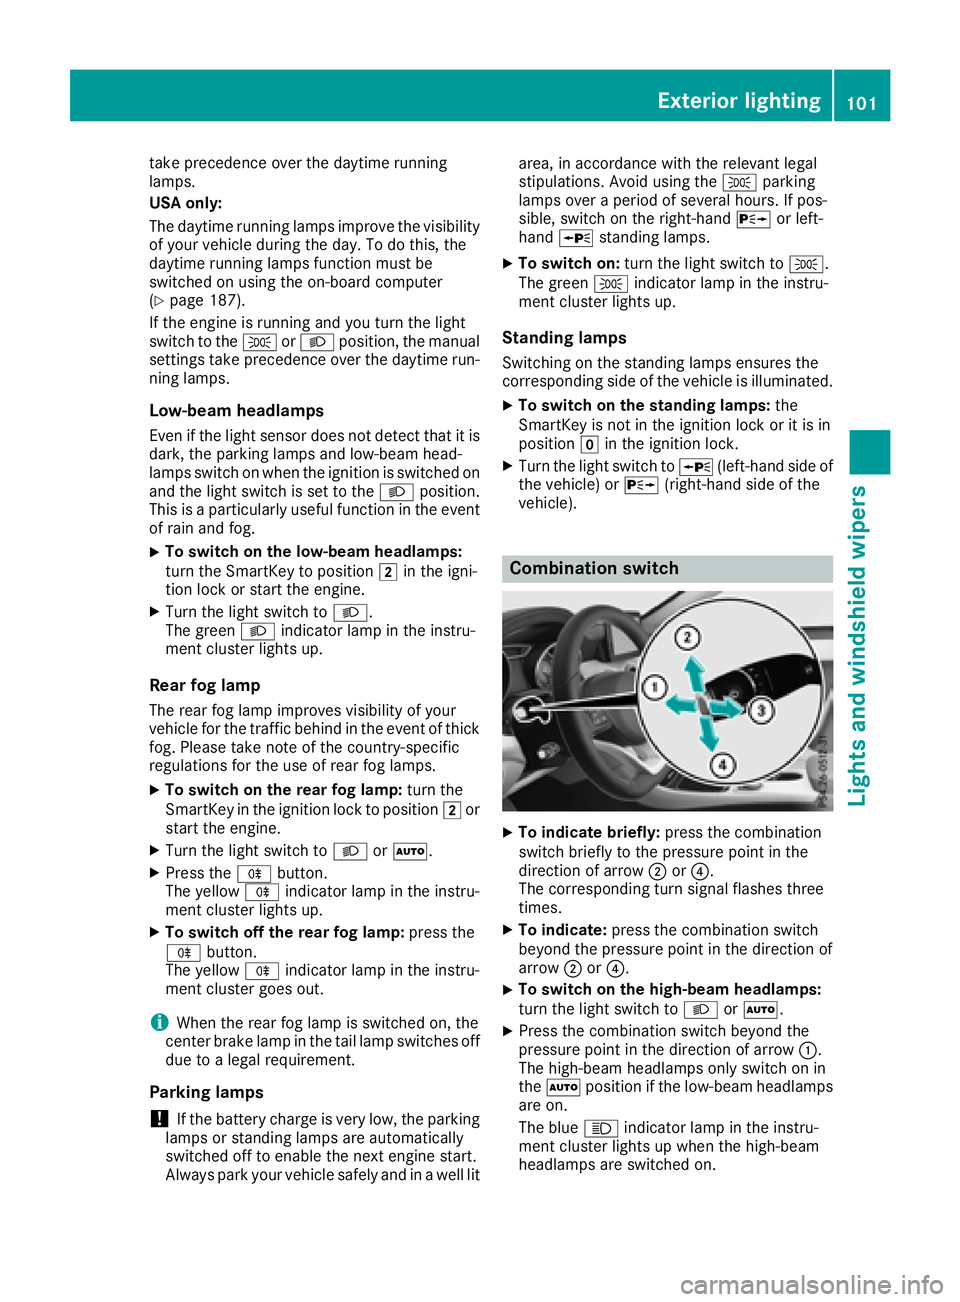
Combination switch
XTo indicate briefly: press the combination
switch briefl ytothe pressure point in the
directio nofarrow ;or?.
Th ec orresponding tur nsigna lflashe sthree
times.
XTo indicate: press the combinatio nswitch
beyond the pressure point in the directio nof
arrow ;or?.
XTo switc honthe high-beam headlamps:
tur nthe light switch to LorÃ.
XPress the combinatio nswitch beyond the
pressure point in the directio nofarrow :.
Th eh igh-beam headlamps onl yswitch on in
the à positio nifthe low-bea mheadlam ps
ar eo n.
Th eb lue K indicator lamp in the instru-
ment clusterl ights up when the high-beam
headlamps ar eswitched on.
Exterior lighting101
Lights and windshield wiper s
Z