2018 MERCEDES-BENZ CLA COUPE key battery
[x] Cancel search: key batteryPage 78 of 326
Doors
Important safet ynotes
GWARNING
If children are lef tunsupervised in th evehicle,
they could:
Rope nthe doors ,thu se ndangerin gother
people or road users.
Rget out and disrup ttraffic .
Roperat ethe vehicle' sequipment.
Additionally, children could set th evehicle in
motion if, fo rexample, they:
Rrelease th eparking brake .
Rshiftingthe automatic transmissio nout of
par kposition P
RStart th eengine.
There is ariskofana ccidentand injury.
Whe nleavin gthe vehicle, always take th e
SmartKey wit hyou and loc kthe vehicle. Never
leav echildren or animals unattended in th e
vehicle. Always keep th eSmartKey out of
reach of children .
You should preferably plac eluggage or load sin
th ec argo compartment. Observ ethe loadin g
guidelines (
Ypage 237).
Unlockingand opening doors from
th ei nside
!
The sid ewindows will no topen/close if th e
battery is discharged or if th esidew indows
hav eicedu p. It will then no tbepossible to
close th edoor. Do no tattemp ttoforce the
doo rclosed. You could otherwise damage th e
doo rort hesidew indow.
Whe nad ooriso pened, th esidew indow on that
sid eo pens slightly. Whe nthe doo risc losed, th e
sid ew indow close sagain .
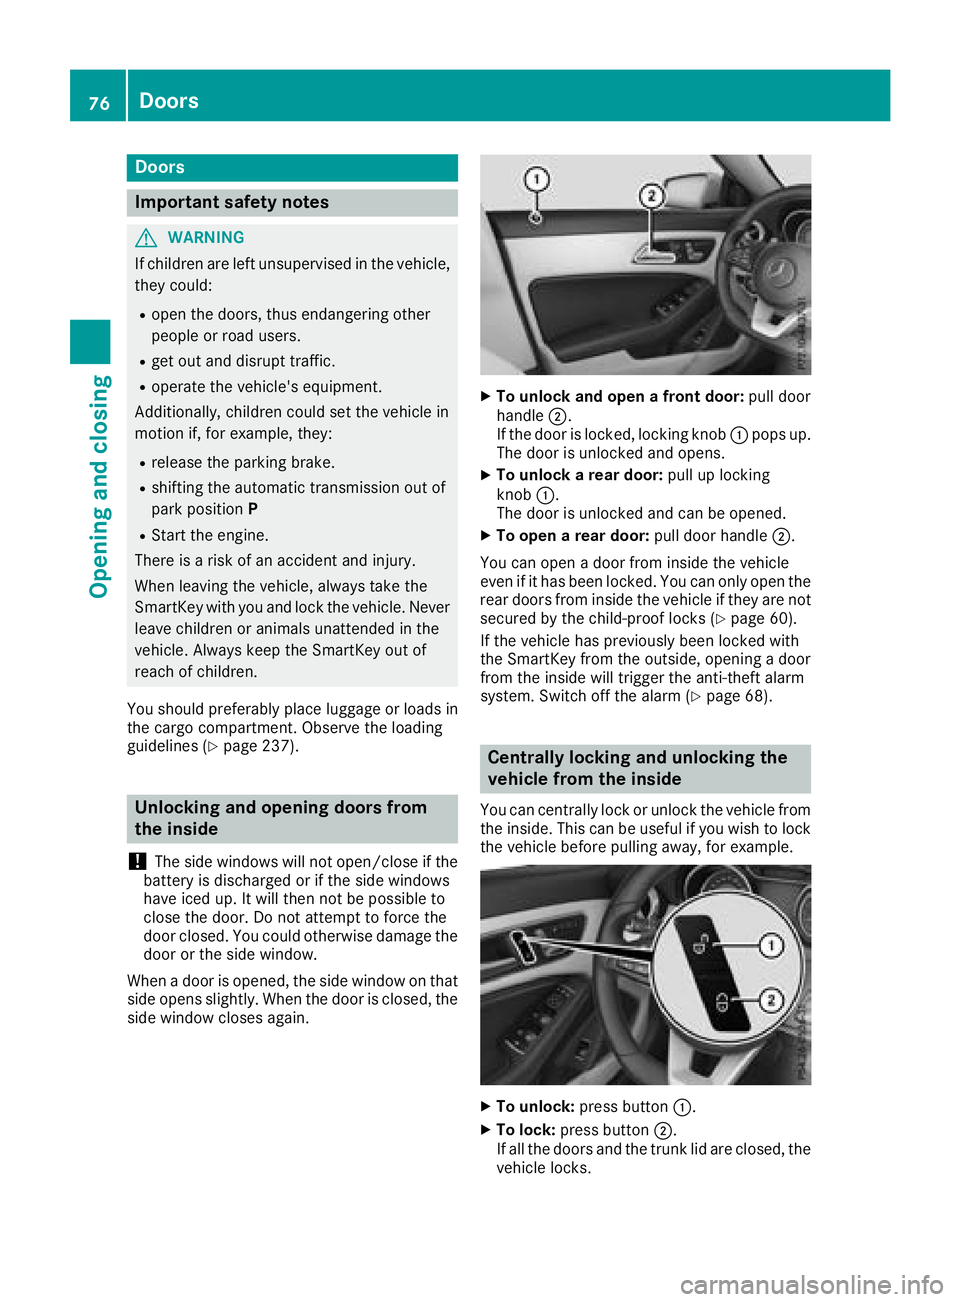
XTo unlock an dopenaf ront door: pull door
handle ;.
If th edoorisl ocked, locking knob :pop sup.
The doo risunlocke dand opens .
XTo unlock areard oor: pull up locking
knob :.
The doo risunlocke dand can be opened.
XTo ope nareard oor: pull doo rhandle ;.
You can ope nadoorfromi nsidet he vehicle
eve nifith as bee nlocked. You can only ope nthe
rea rdoors from insid ethe vehicle if they are no t
secure dbythechild-proof locks (
Ypage 60).
If th evehicle has previously bee nlocke dwith
th eS martKey from th eoutside, opening adoor
from th einsidew ill trigger th eanti-thef talarm
system. Switc hoffthea larm(
Ypage 68).
Centrally locking an dunlocking th e
vehicle from th einside
You can centrall yloc koru nlockthe vehicle from
th ei ns ide. Thi scan be useful if you wish to loc k
th ev ehicle befor epulling away, fo rexample.
XTo unlock :press butto n:.
XTo lock :press butto n;.
If all th edoors and th etrunk lid are closed, th e
vehicle locks .
76Doors
Opening andclosing
Page 83 of 326
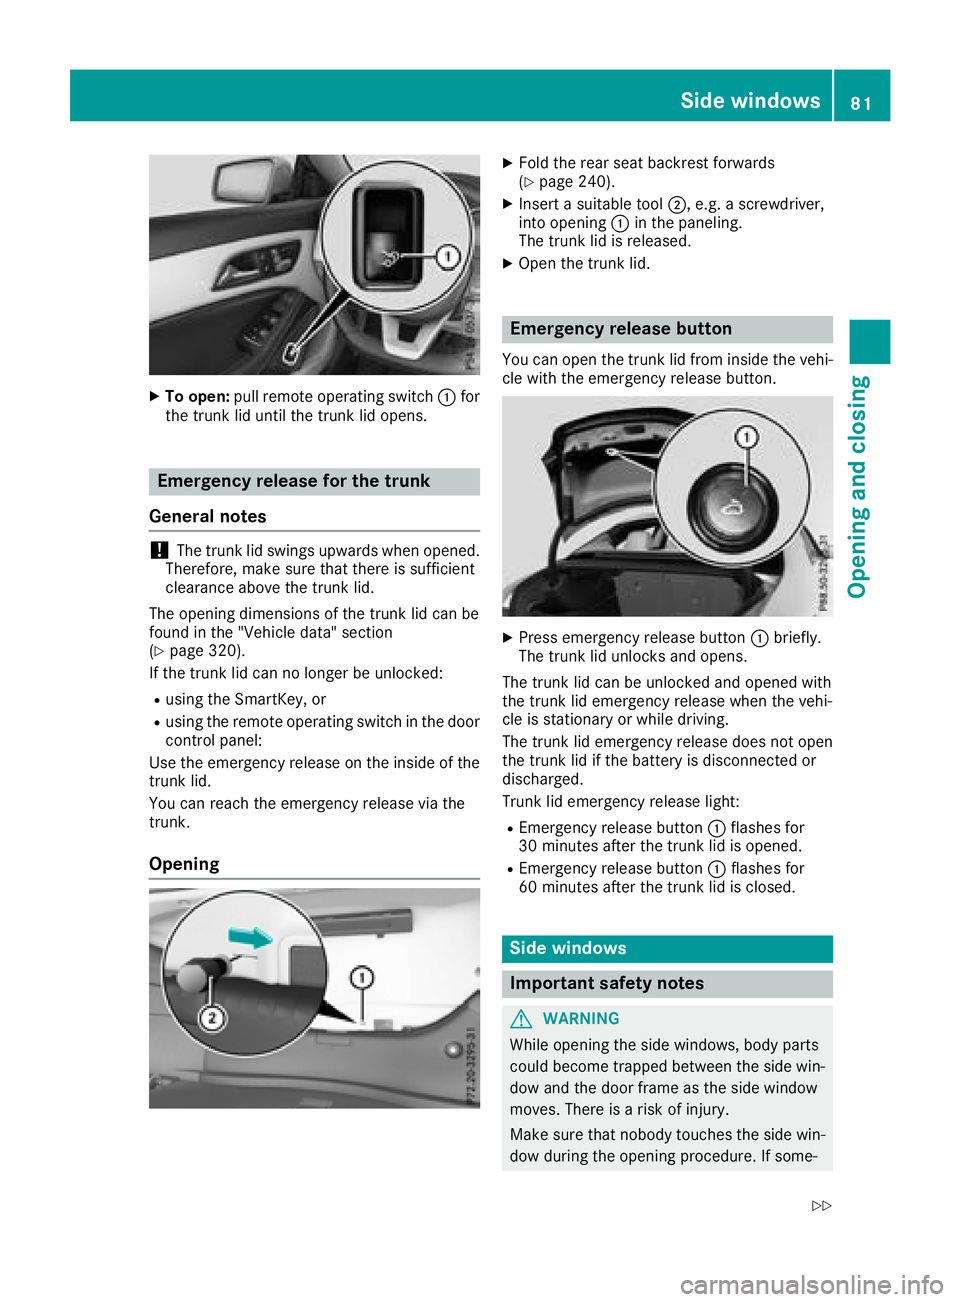
XTo open:pull remote operating switch :for
the trunk li duntilthe trunk li dopens.
Emergencyr eleasefor the trunk
General notes
!The trunk li dswing su pwar ds when opened.
Therefore, make sure thatt hereiss ufficient
clearance above the trunk lid.
The opening dimensions of the trunk li dcan be
found in the "Vehicle data" section
(
Ypage 320).
If the trunk li dcan no longer be unlocked:
Rusing the SmartKey ,or
Rusing the remote operating switch in the door
controlp anel:
Use the emergency release on the insid eofthe
trunk lid.
Yo uc an reach the emergency release via the
trunk.
Opening
XFoldt he rears eatb ackres tforwards
(Ypage 240).
XInsert asuitabl etool ;,e .g.as crewdriver,
into opening :in the paneling.
The trunk li disreleased.
XOpenthe trunk lid.
Emergencyr eleasebutton
Youc an open the trunk li dfrom insid ethe vehi-
cle with the emergency release button.
XPress emergency release button :briefly.
The trunk li dunlocks and opens.
The trunk li dcan be unlockeda nd openedwith
the trunk li demergency release when the vehi-
cle is stationary or whil edriving.
The trunk li demergency release does not open
the trunk li difthe battery is disconnected or
discharged.
Trunk li demergency release light:
REmergency release button :flashesf or
30 minutes afte rthe trunk li disopened.
REmergency release button :flashesf or
60 minutes afte rthe trunk li disclosed.
Side windows
Important safety notes
GWARNING
While opening the side windows ,bod yp arts
could become trappe dbetween the side win-
do wa nd the door frame as the side window
moves. There is ariskofi njury.
Make sure thatn obodytouchest he side win-
do wd uring the opening procedure. If some-
Side windows81
Opening and closing
Z
Page 96 of 326
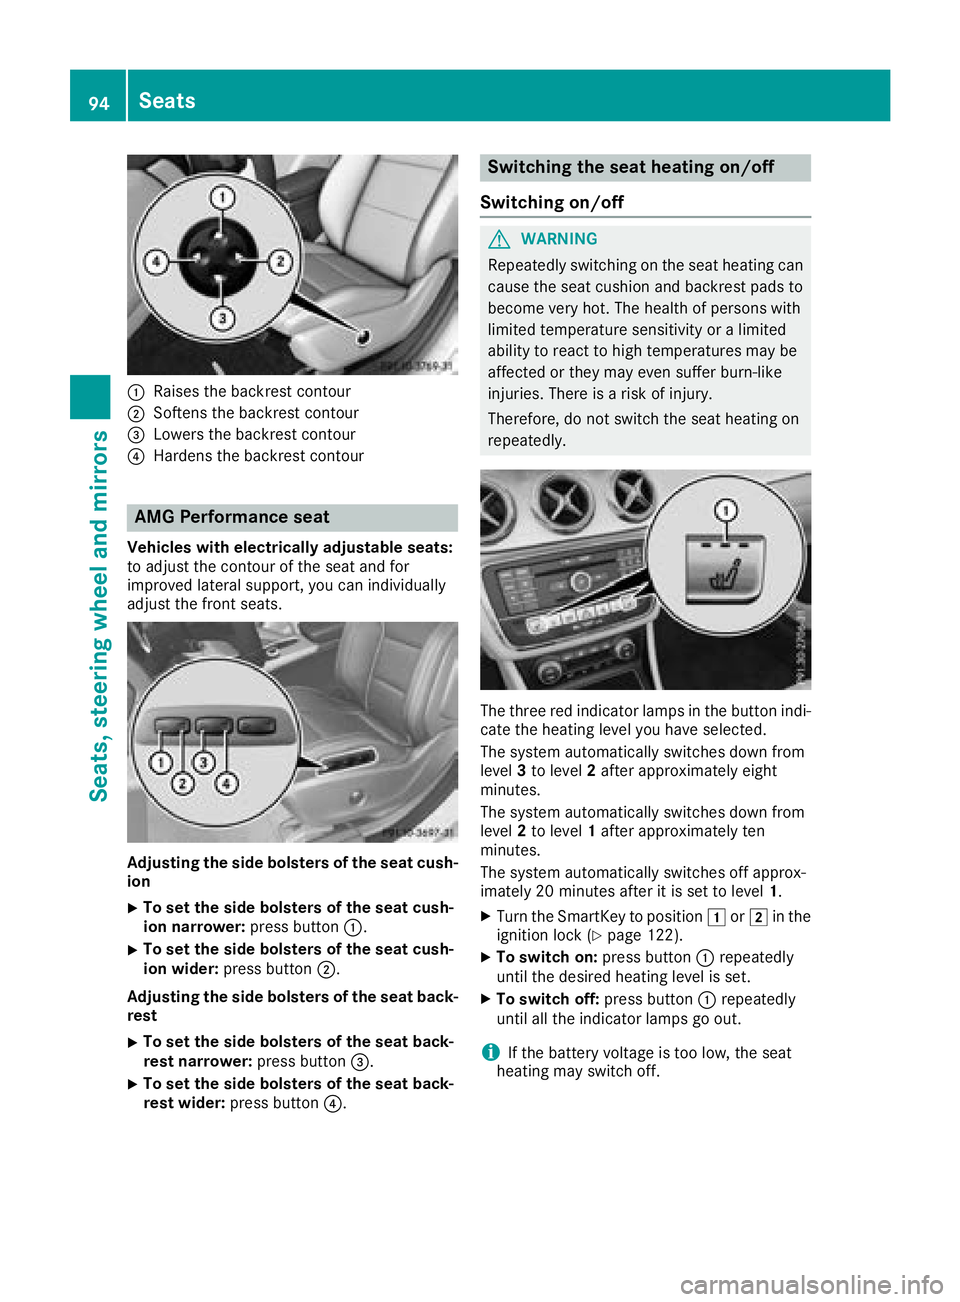
:Raises thebackrest contour
;Soften sthe backrest contour
=Lowers th ebackrest contour
?Harden sthe backrest contour
AMG Performance seat
Vehicles with electricall yadjusta bles eats :
to adjust th econtou roftheseat and for
improve dlateral support ,you can individually
adjust th efront seats.
Adjusting th esideb olsters of th eseatc ush -
ion
XTo set th esideb olsters of th eseatc ush -
ion narrower: press button:.
XTo set th esideb olsters of th eseatc ush -
ion wider: press butto n;.
Adjusting th esideb olsters of th eseatb ack -
res t
XTo set th esideb olsters of th eseatb ack -
res tnarrower: press butto n=.
XTo set th esideb olsters of th eseatb ack -
res twider: press butto n?.
Switchin gthe seath eating on/off
Switchin gon/off
GWARNIN G
Repeatedly switching on th eseat heating can
caus ethe seat cushion and backrest pads to
become ver yhot.T he healt hofpersonswith
limite dtem perature sensitivit yoralimited
abilit ytor eac ttoh igh temperatures may be
affecte dortheym ay eve nsuffer burn-like
injuries. There is ariskofi njury.
Therefore ,donotswitch th eseat heating on
repeatedly.
The three red indicator lamp sinthebutto nindi-
cat ethe heating level you hav eselected.
The system automatically switches down from
level 3to level 2after approximately eigh t
minutes.
The system automatically switches down from
level 2to level 1after approximately te n
minutes.
The system automatically switches off approx -
imately 20 minute safter it is set to level 1.
XTurn theSma rtKey to position 1or2 in th e
ignition loc k(Ypage 122).
XTo switch on: press button: repeatedly
until th edesired heating level is set .
XTo switch off:press butto n: repeatedly
until all th eindicator lamp sgoout.
iIf th ebattery voltag eistoolow, th eseat
heating may switch off .
94Seats
Seats,steering wheel and mirrors
Page 97 of 326
Problems with the seat heating
ProblemPossible causes/consequences andMSolutions
The seat heating has
switched off prematurely
or cannot be switched
on.The on-board voltage is too low because too many electrical consum-
ers are switched on.
XSwitch off electrical consumers that you do not need, such as the
rear window defroster or interior lighting.
Once the battery is sufficiently charged, the seat heating will switch
back on automatically.
Steering wheel
Important safety notes
GWARNING
You could lose control of your vehicle if you do the following while driving:
Radjust the driver's seat, head restraint,
steering wheel or mirrors
Rfasten the seat belt
There is arisk of an accident.
Adjust the driver's seat, head restraint,s teer-
ing wheel and mirror and fasten your seat belt before startin gthe engine.
GWARNING
Children could injure themselves if they
adjust the steering wheel. There is arisk of
injury.
When leaving the vehicle, always take the
SmartKey with you and lock the vehicle. Never
leave children unsupervised in the vehicle.
Adjusting the steering wheel
GWARNING
If the steering wheel is unlocked while the
vehicle is in motion, it could change position
unexpectedly. This could cause you to lose
control of the vehicle. There is arisk of an
accident.
Before startin goff, make sure the steering
wheel is locked. Never unlock the steering
wheel while the vehicle is in motion.
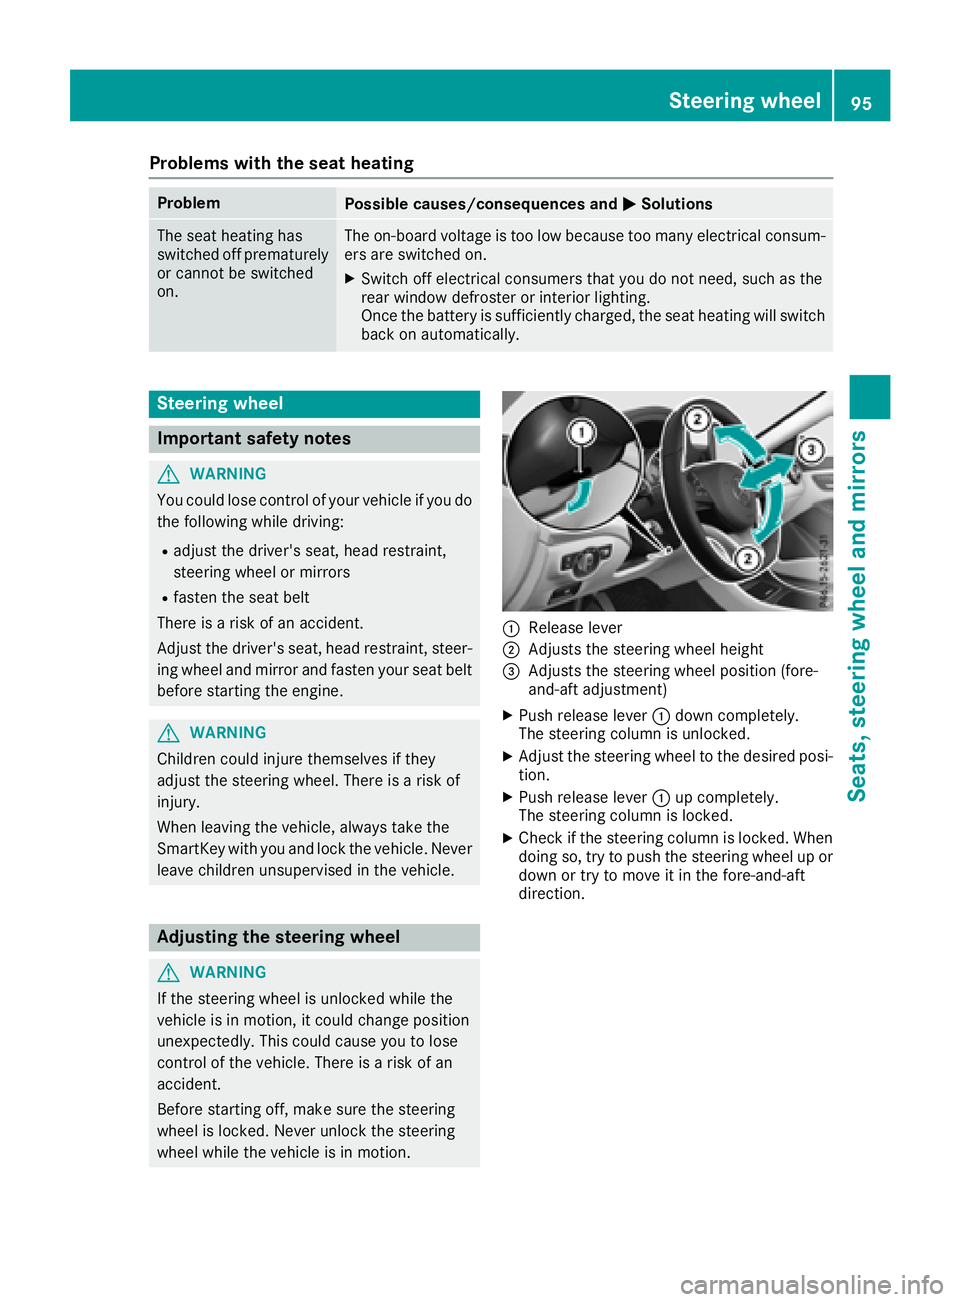
:Release lever
;Adjustst he steering wheel height
=Adjuststhe steering wheel position (fore-
and-aft adjustment)
XPush release lever :down completely.
The steering column is unlocked.
XAdjust the steering wheel to the desired posi-
tion.
XPush release lever :up completely.
The steering column is locked.
XCheck if the steering column is locked. When
doing so, try to push the steering wheel up or down or try to move it in the fore-and-aft
direction.
Steering wheel95
Seats, steering wheela nd mirrors
Z
Page 99 of 326
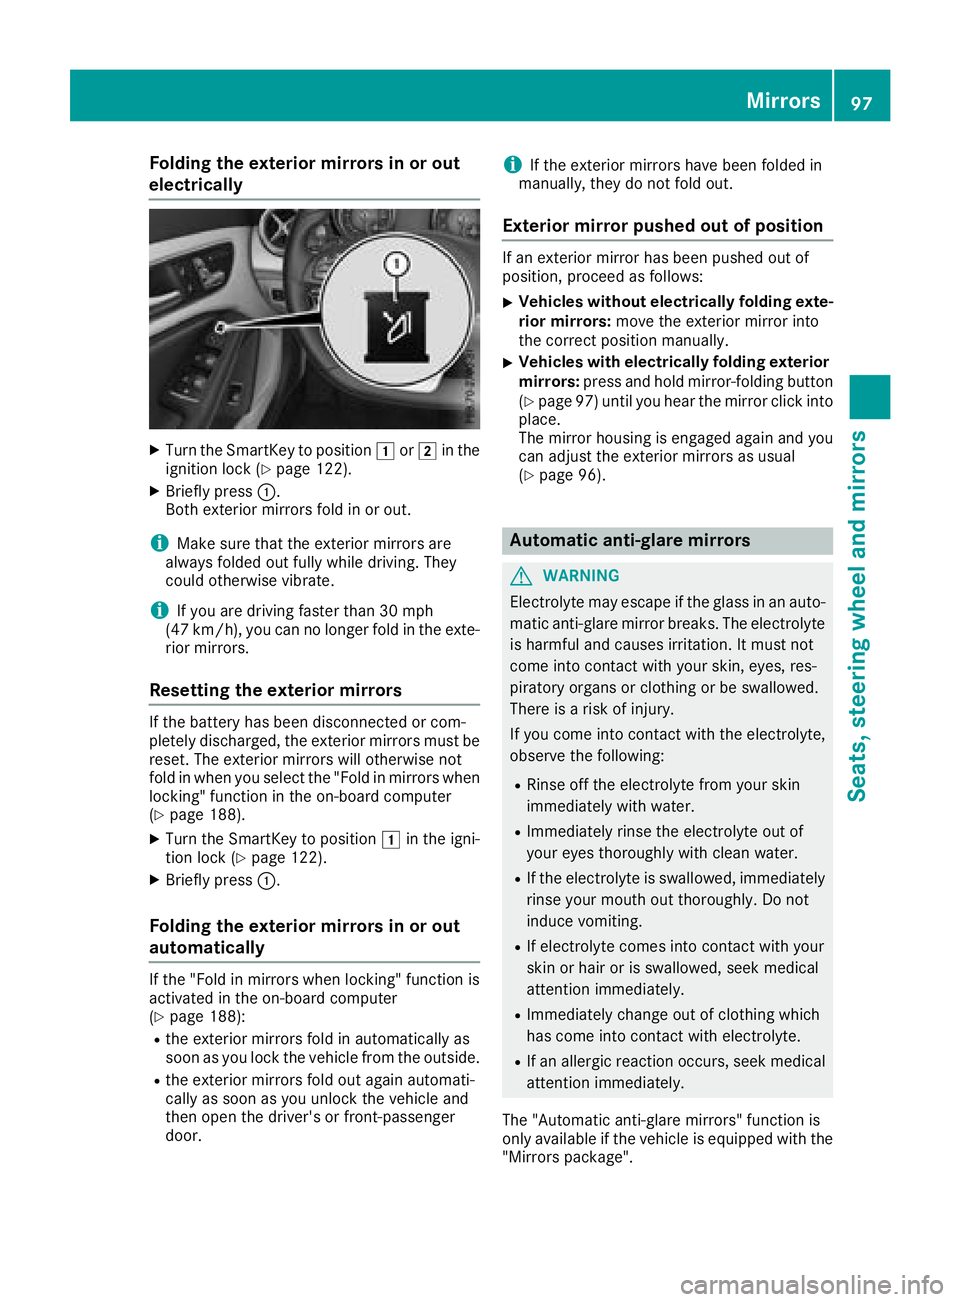
Folding theexterior mirrors in or out
electrically
XTurn th eSma rtKey to position 1or2 in th e
ignition loc k(Ypage 122).
XBriefly press :.
Both exterio rmirror sfoldinoro ut.
iMak esure that th eexter iorm irror sare
always folded out fully while driving .They
could otherwise vibrate .
iIf you are driving fastertha n30m ph
(47 km/h), you can no longer fol dintheexte -
rio rm irrors.
Resetting th eexterior mirrors
If th ebattery has been disconnected or com-
pletely discharged, th eexter iorm irror smust be
reset .The exterio rmirror swill otherwise no t
fol dinw hen you select th e"Fold in mirror swhen
locking" function in th eon-bo ard computer
(
Ypage 188).
XTurn th eSmartKey to position 1in th eigni-
tion loc k(Ypage 122).
XBriefly press :.
Folding theexterior mirrors in or out
automatically
If th e"Fold in mirror swhen locking" function is
activated in th eon-bo ard computer
(
Ypage 188):
Rth ee xter iorm irror sfoldina utomatically as
soo nasy ou loc kthe vehicl efromt heoutside .
Rthee xter iorm irror sfoldo ut again automati-
call yass oonasy ou unlock th evehicl eand
then open th edriver' sorf ront-pa ssenger
door .
iIf theexter iorm irror shave been folded in
manually, they do no tfoldo ut.
Exterior mirror pushed out of position
If an exterio rmirror has been pushed out of
position ,procee dasfollows :
XVehicles without electricall yfolding exte-
rior mirrors :mov ethe exterio rmirror int o
th ec orre ct position manually.
XVehicles with electricall yfolding exterior
mirrors :press and hold mirror-foldin gbutto n
(
Ypage 97 )until yo uhearthe mirror click into
place.
The mirror housing is engaged agai nand you
can adjus tthe exterio rmirrors as usual
(
Ypage 96).
Automati canti-glare mirrors
GWARNING
Electrolyte maye scape if the glassinanauto-
matic anti-glare mirror breaks .The electrolyte
is harmfula nd causes irritation. It must not
come into contact with your skin, eyes, res-
piratory organs or clothing or be swallowed.
There is ariskofi njury.
If yo ucome into contact with the electrolyte,
observe the following:
RRinse off the electrolyte from your skin
immediatelyw ithw ater.
RImmediately rins ethe electrolyte outo f
your eyes thoroughl ywithc lean water.
RIf the electrolyte is swallowed, immediately
rins eyourm outh outt horoughly. Do not
induce vomiting.
RIf electrolyte comesi nto contact with your
skinorh airoriss wallowed, seekm edical
attentio nimmediately.
RImmediately change outofc lothing which
hasc ome into contact with electrolyte.
RIf an allergicr eactionoccurs, see kmedical
attentio nimmediately.
The "Automatic anti-glare mirrors"f unctionis
onlya vailable if the vehicl eisequippe dwitht he
"Mirrors package".
Mirrors97
Seats, steering wheel andmirrors
Z
Page 103 of 326
take precedence overthe daytime running
lamps.
US Ao nly:
The daytime running lamps improve the visibility
of your vehicl eduringt he day. To do this, the
daytime running lamps functio nmustb e
switched on using the on-board computer
(
Ypage 187).
If the engine is running and yo uturnt he light
switch to the TorL position, the manual
setting stake precedence ove rthe daytime run-
ning lamps.
Low-beam headlamps
Even if the light sensord oesn ot detect thatiti s
dark, the parking lamps and low-bea mhead-
lamps switch on when the ignition is switched on
and the light switch is settot heL position.
Thi sisa particularly usefu lfun ctio nint he event
of rain and fog.
XTo switc honthe low-beam headlamps:
tur nthe SmartKeytop osition 2in the igni-
tio nlockors tart the engine.
XTurn the light switch to L.
The green Lindicator lamp in the instru-
ment clusterl ights up.
Rea rfog lamp
The rea rfog lamp improves visibility of your
vehicl efor the trafficb ehindint he event of thick
fog .Pleas etake note of the country-specific
regulations for the us eofrearfog lamps.
XTo switc honthe rear fogl amp:turnthe
SmartKeyint he ignition lock to position 2or
s
tart the engine.
XTurn the light switch to LorÃ.
XPress the Rbutton.
The yellow Rindicator lamp in the instru-
ment clusterl ights up.
XTo switc hoffthe rear fogl amp:press the
R button.
The yellow Rindicator lamp in the instru-
ment clusterg oeso ut.
iWhen the rea rfog lamp is switched on, the
cente rbrake lamp in the tai llam pswitches off
du etoal egalrequirement.
Parkin glamps
!If the battery charge is ver ylow ,the parking
lamps or standing lamps ar eautomatically
switched off to enabl ethe next engine start.
Alway sparky ourvehicl esafelya nd in awelllit area
,ina ccordance with the relevant legal
stipulations. Avoidu sing the Tparking
lamps ove raperiodofs everal hours. If pos-
sible, switch on the right-hand Xor left-
hand W standing lamps.
XTo switc hon:tur nthe light switch to T.
Th eg reen T indicator lamp in the instru-
ment clusterl ights up.
Standin glamps
Switching on the standing lamps ensures the
corresponding side of the vehicl eisillumin ated.
XTo switc honthe standin glamps: the
SmartKeyisn ot in the ignition lock or it is in
position gin the ignition lock.
XTurn the light switch to W(left-hand side of
the vehicle) or X(right-hand side of the
vehicle).
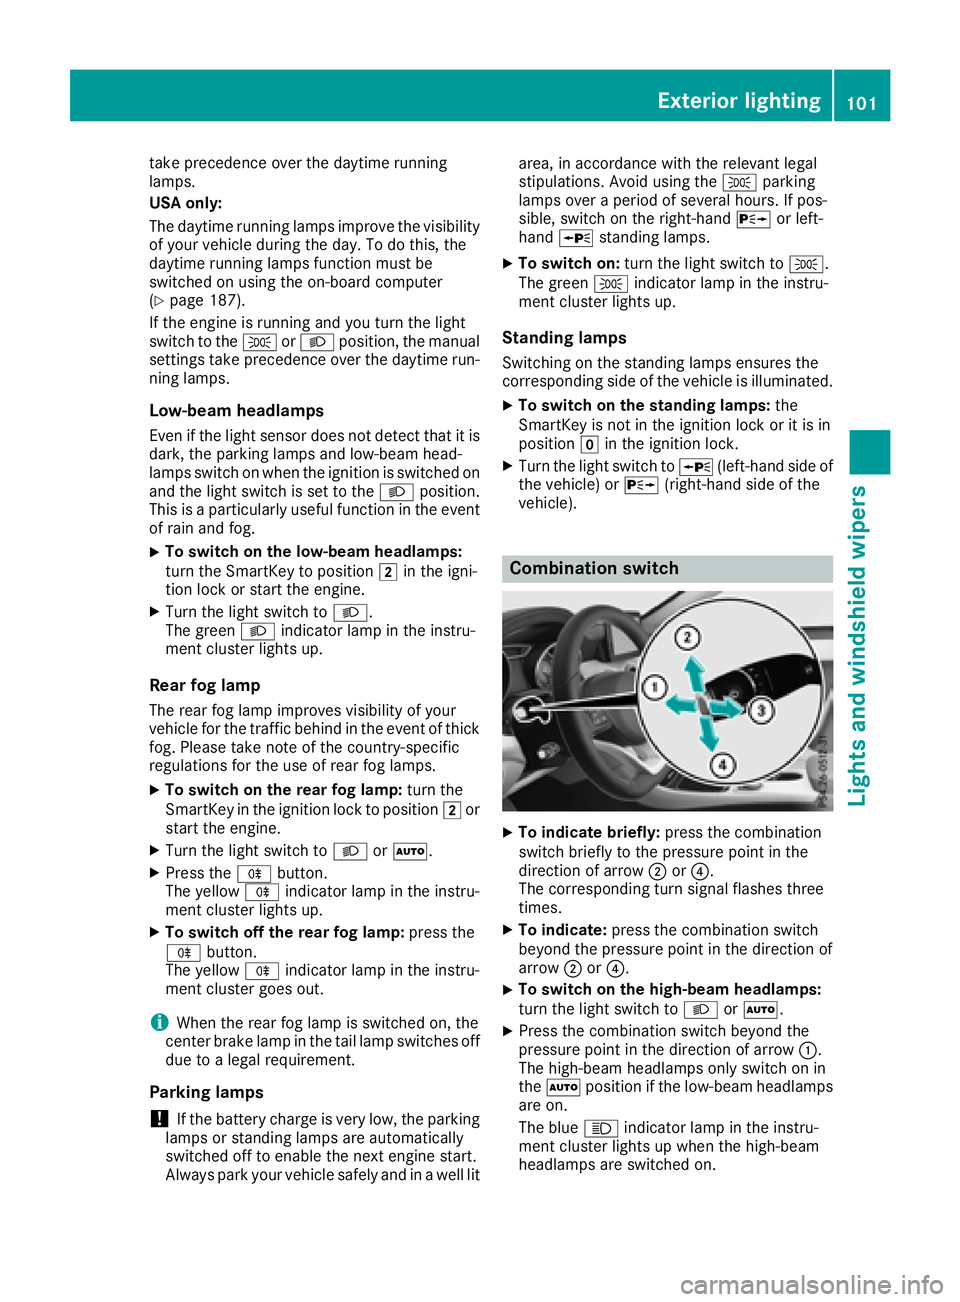
Combination switch
XTo indicate briefly: press the combination
switch briefl ytothe pressure point in the
directio nofarrow ;or?.
Th ec orresponding tur nsigna lflashe sthree
times.
XTo indicate: press the combinatio nswitch
beyond the pressure point in the directio nof
arrow ;or?.
XTo switc honthe high-beam headlamps:
tur nthe light switch to LorÃ.
XPress the combinatio nswitch beyond the
pressure point in the directio nofarrow :.
Th eh igh-beam headlamps onl yswitch on in
the à positio nifthe low-bea mheadlam ps
ar eo n.
Th eb lue K indicator lamp in the instru-
ment clusterl ights up when the high-beam
headlamps ar eswitched on.
Exterior lighting101
Lights and windshield wiper s
Z
Page 106 of 326
Interior lighting control
General notes
In order to preven tthe vehicle's battery from
discharging ,the interio rlighting function sare
automatically deactivated after som etime
except when th eSmartKey is in position 2in
th ei gnition lock.
The color and brightness for th eambien tlighting
may be set via th emultimedia system; see th e
separat eoperating instructions.
Automati cinterior lighting control
XTo switch on: set theswitch to center posi-
tion B.
XTo switch off :set th eswitch to th e|
position .
The interio rlighting automatically switches on if
you:
Runlock th evehicl e
Ropen adoor
Rremove th eSmartKey from th eignition loc k
The interio rligh tisa ctivated for ashort while
when th eSma rtKey is remove dfromt heignition
lock. This delaye dswitch-off can be adjusted via
th em ultimedia system; see th eseparat eoper -
ating instructions.
Replacin gbulbs
Important safety notes
GWARNIN G
Bulbs, lamp sand connectors can get ver yhot
when operating .Ifyou chang eabulb, you
could burn yourself on these components.
Ther eisar iskofi njury.
Allow these component stocooldown before
changing abulb.
Do no tuse ab ulb if it has been dropped or if it s
glass tub ehas been scratched.
The bulb may explod eif:
Ryou touch it
Rit is hot
Ryou dro pit
Ryou scratch it Use bulbs only in closed lamp
sthath aveb een
designed for this purpose .Onlyi nstal lspar e
bulbs of th esam etypea nd th especifie dvolt-
age.
Mark sont heglass tub ereduce th eservic elife
of th ebulbs .Don ottouch th eglass tub ewith
your bare hands. If necessary, clean th eglass
tub ew hen cold wit halcohol or spirit and rub it
off wit halint-free cloth .
Protect bulbs from moisture during operation .
Do no tallow bulbs to come int ocontac twith
liquids.
Replac eonlyt he bulbs listed (
Ypage 104).
Hav ethe bulbs that you canno tchang ey ourself
replace dataq ualified specialist workshop.
If you require assistanc ereplacing bulbs ,con -
sult aqualified specialist workshop.
If th enew bulb still does no tligh tup, consult a
qualified specialist workshop.
Headlamps and lights are an important aspect of
vehicl esafety. You must therefor emakes ure
that these function correc tl
y
ata ll times .Have
th eh eadlamp setting checke dregularly.
Vehicles with LED headlamps: thef ront and
rear lamp clusters of your vehicl eare equipped
wit hL ED bulbs .Don otreplace th ebulbs your-
self .Contac taqualified specialist workshop
wit hthe necessar yspecialist knowledge and
tools to carry out th eworkr equired.
Overview of bul btypes
You can replace th efollowin gbulbs .The bulb
typ ecan be foun dinthelegend .
104Replacingb ulbs
Lightsand windshield wipers
Page 121 of 326
If the battery voltage is too low, the rear window
defroster may switch off.Activating/deactivating
XTurn the SmartKey to position2in the igni-
tion lock (Ypage 122).
XPress the ¤button.
The indicator lamp in the ¤button lights
up or goes out.
Problems with the rear window defroster
ProblemPossible causes/consequences and MSolutions
The rear window
defroster has deactiva-
ted prematurely or can-
not be activated.The battery has not been sufficiently charged.
XSwitch off any consumers that are not required, e.g. reading lamps,
interior lighting or the seat heating.
When the battery is sufficiently charged, the rear window defroster
can be activated again.
Switching air-recirculationmode
on/off
General notes
You can deactivate the flow of fresh air if
unpleasant odors are entering the vehicle from
outside. The air already inside the vehicle will
then be recirculated.
If you switch on air-recirculation mode, the win-
dows can fog up more quickly, in particular at
low temperatures. Only use air-recirculation
mode brieflytop revent the windowsf rom fog-
ging up.
The operation of air-recirculation mode is the
same for all control panels.
Activating/deactivating
XTurn the SmartKey to position 2in the igni-
tion lock (Ypage 122).
XTo activate: press theebutton.
The indicator lamp in the ebutton lights
up.
Air-recirculation mode switches on automati-
cally:
Rat high outsidet emperatures
Rat high levelsofp ollution
When air-recirculation mode is activated auto-
matically, the indicator lamp in the ebutton
is not lit. Outside air is addeda fter about
30 minutes.
XTo deactivate: press theebutton.
The indicator lamp in the ebutton goes
out.
iAir-recirculation mode deactivates auto-
matically:
Rafter approximately five minutes at outside
temperature sbelowa pproximately 45 ‡
(7 †)
Rafter approximately five minutes if the
"Cooling with air dehumidification" func-
tion is deactivated
Rafter approximately 30 minutes at outside
temperature sabove approximately 45 ‡
(7 †) if the "Cooling with dehumidification"
function is activated
Switching the residual heat on or off
General notes
The residual heat function is only available in
vehiclesf or Canada with dual-zone automatic
climate control.
It is possible to make use of the residual heat of
the engine to continue heating the vehicle for
approximately 30 minutes after the engine has
been switched off. The heating time depends on
the set interior temperature.
iThe blower willr un atalow speed regardless
of the airflow setting.
Operating the climatec ontrol systems119
Climate control