2018 MERCEDES-BENZ AMG GT ROADSTER ESP
[x] Cancel search: ESPPage 99 of 294

The daytime running lamps improve the visibility
of your vehicle during the day. Here, theDay‐
time Running Lightsfunction must be
switched on via the on-board computer
(
Ypage 169).
If the engine is running and you turn the light
switch to the TorL position, the manual
settings take precedence over the daytime run-
ning lamps.
Low-beam headlamps
GWARNING
When the light switch is set to Ã, the low-
beam headlamps may not be switched on
automatically if there is fog, snow or other
causes of poor visibility due to the weather
conditions such as spray. There is a risk of an
accident.
In such situations, turn the light switch to
L.
When the ignition is switched on and the light
switch is in the Lposition, the parking lamps
and low-beam headlamps are switched on even
if the light sensor does not sense dark condi-
tions. This is a particularly useful function in the
event of rain and fog.
XTo switch on the low-beam headlamps:
select key position 2with the Start/Stop
button or start the engine.
XTurn the light switch to the Lposition.
The green Lindicator lamp in the instru-
ment cluster lights up.
Rear fog lamp
The rear fog lamp improves visibility of your
vehicle for the traffic behind in the event of thick
fog. You must observe the legal requirements
for the country in which you are currently driving when operating the rear fog lamp.
XTo switch on the rear fog lamp: select key
position 2with the Start/Stop button or
start the engine.
XTurn the light switch to the LorÃ
position.
XPress the Rbutton.
The yellow Rindicator lamp in the instru-
ment cluster lights up.
XTo switch off the rear fog lamp: press the
R button.
The yellow Rindicator lamp in the instru-
ment cluster goes out.
Parking lamps
!If the battery charge is very low, the parking
lamps or standing lamps are automatically
switched off to enable the next engine start.
Always park your vehicle safely and in a well lit
area, in accordance with the relevant legal
stipulations. Avoid using the Tparking
lamps over a period of several hours. If pos-
sible, switch on the right-hand Xor left-
hand W standing lamps.
XTo switch on the parking lamps: turn the
light switch to the Tposition.
The green Tindicator lamp in the instru-
ment cluster lights up.
Standing lamps
Switching on the standing lamps ensures the
correspondin g side of the vehicle is illuminated.
XTo switch on the standing lamps: switch off
the engine with the Start/Stop button.
XTurn the light switch to the Wposition (left-
hand side of the vehicle) or Xposition
(right-hand side of the vehicle).
Combination switch
:High-beam headlamps
;Turn signal, right
=High-beam flasher
?Turn signal, left
Exterior lighting97
Lights and windshield wipers
Z
Page 100 of 294

XTo indicate briefly:press the combination
switch briefly to the pressure point in the
direction of arrow ;or?.
The corresponding turn signal flashes three
times.
XTo indicate: press the combination switch
beyond the pressure point in the direction of
arrow ;or?.
XTo switch on the high-beam headlamps:
select key position 2with the Start/Stop
button or start the engine.
XTurn the light switch to the LorÃ
position.
XPress the combination switch beyond the
pressure point in the direction of arrow :.
In the Ãposition, the high-beam head-
lamps are only switched on when it is dark and
the engine is running.
The K indicator lamp in the instrument
cluster lights up when the high-beam head-
lamps are switched on.
XTo switch off the high-beam headlamps:
move the combination switch back to its nor-
mal position.
The K indicator lamp in the instrument
cluster goes out.
Vehicles with Adaptive Highbeam Assist: when
Adaptive Highbeam Assist is active, it controls
switching on/off of the high-beam headlamps
(
Ypage 98).
XTo switch on the high-beam flasher: pull
the combination switch in the direction of
arrow =.
Hazard warning lamps
XTo switch on the hazard warning lamps:
press button :.
All turn signals flash. If you now switch on a
turn signal using the combination switch, only
the turn signal lamp on the corresponding
side of the vehicle will flash.
XTo switch off the hazard warning lamps:
press button :.
The hazard warning lamps automatically switch
on if:
Ran air bag is deployed or
Rthe vehicle decelerates rapidly from a speed
of above 45 mph (70 km/h) and comes to a
standstill
The hazard warning lamps switch off automati-
cally if the vehicle reaches a speed of above
6 mph (10 km/h) again after a full brake appli-
cation.
iThe hazard warning lamps still operate if the
ignition is switched off.
Adaptive Highbeam Assist
General notes
You can use this function to set the headlamps
to change between low beam and high beam
automatically. The system recognizes vehicles
with their lights on, either approaching from the
opposite direction or traveling in front of your
vehicle, and consequently switches the head-
lamps from high beam to low beam.
The system automatically adapts the low-beam
headlamp range depending on the distance to
the other vehicle. Once the system no longer
detects any other vehicles, it reactivates the
high-beam headlamps.
The system's optical sensor is located behind
the windshield near the overhead control panel.
Important safety notes
GWARNING
Adaptive Highbeam Assist does not recognize
road users:
Rwho have no lights, e.g. pedestrians
Rwho have poor lighting, e.g. cyclists
Rwhose lighting is blocked, e.g. by a barrier
98Exterior lighting
Lights and windshield wiper s
Page 101 of 294

On very rare occasions, Adaptive Highbeam
Assist may fail to recognize other road users
that have lights, or may recognize them too
late. In this, or in similar situations, the auto-
matic high-beam headlamps will not be deac-tivated or will be activated regardless. There is
a risk of an accident.
Always carefully observe the traffic conditions
and switch off the high-beam headlamps in
good time.
Adaptive Highbeam Assist cannot take into
account road, weather or traffic conditions.
Adaptive Highbeam Assist is only an aid. You are
responsible for adjusting the vehicle's lighting
to the prevailing light, visibility and traffic con-
ditions.
In particular, the detection of obstacles can be
restricted if there is:
Rpoor visibility, e.g. due to fog, heavy rain or
snow
Rdirt on the sensors or the sensors are
obscured
Switching Adaptive Highbeam Assist
on/off
XTo switch on: turn the light switch to the
à position.
XPress the combination switch beyond the
pressure point in the direction of arrow :.
The _ indicator lamp in the multifunction
display lights up when it is dark and the light
sensor activates the low-beam headlamps.
If you are driving at speeds above approx-
imately 16 mph (25 km/h):
The headlamp range is set automatically
depending on the distance between the vehi-
cle and other road users.
If you are driving at speeds above approx-
imately 19 mph (30 km/h) and no other road
users have been detected:
The high-beam headlamps are switched on
automatically. The Kindicator lamp in the
instrument cluster also lights up.
If you are driving at speeds below approx-
imately 16 mph (25 km/h) or other road users have been detected or the roads are ade-
quately lit:
The high-beam headlamps are switched off
automatically. The Kindicator lamp in the instrument cluster goes out. The
_indi-
cator lamp in the multifunction display
remains lit.
XTo switch off: move the combination switch
back to its normal position or move the light
switch to another position.
The _ indicator lamp in the instrument
cluster goes out.
Headlamps fogged up on the inside
Certain climatic and physical conditions may
cause moisture to form in the headlamp. This
moisture does not affect the functionality of the
headlamp.
Interior lighting
Overview
:| Switches the automatic interior light-
ing control on or off
;p Switches the right-hand reading lamp
on/off
=c Activates/deactivates interior lighting
?p Switches the left-hand reading lamp
on/off
Interior lighting control
General notes
In order to avoid the vehicle battery discharging,
the interior light functions are deactivated after
some time, except for when the Start/Stop but-
ton is in key position 2.
Interior lighting99
Lights and windshield wipers
Z
Page 102 of 294
Automa tic interi orlighting control
XTo switch on or off :press th e| button.
When th eautomatic interior lighting control is
activated, th ebutto nis flus hwit hth eover-
head control panel.
The interior lighting automatically switches on if
you:
Runloc kth evehicl e
Ropenadoor
Rswitch off th eengin ewit hth eStart/Sto pbut -
to n
The interior lighting is activated for ashort time
when th eengin eis switched off wit hth eStart /
Stop button. This delaye dswitch-off can be
adjusted via th emultimedia system (see Digital
Operator' sManual).
Replacing bulbs
The fron tand rear ligh tclusters of your vehicl e
are equipped wit hLE Dligh tbulbs .Do no t
replace th ebulbs yourself .Contac t aqualified
specialis tworkshop whic hhas th enecessar y
specialis tknowledge and tools to carry out th e
wor krequired.
Lamps are an important aspect of vehicl esafety.
You mus ttherefor emak esur ethat these func-
tion correctl yat all times .Hav eth eheadlamp
setting checke dregularly.
Windshield wipers
Switching the windshield wipers
on/off
!
Do no toperate th ewindshield wiper swhen
th ewindshield is dry, as this could damag e
th ewiper blades. Moreover, dust that has col-
lecte don th ewindshield can scratch th eglas s
if wipin gtakes plac ewhen th ewindshield is
dry.
If it is necessar yto switch on th ewindshield
wiper sin dry weather conditions, always use
washer fluid when operating th ewindshield
wipers.
!If th ewindshield wiper sleav esmears on th e
windshield after th evehicl ehas been washed
in an automatic car wash ,wax or other resi-
dues may be th ereason for this. Clean th ewindshield usin
gwasher fluid after washing
th evehicl ein an automatic car wash .
!Intermittent wipingwit hrain sensor :due to
optical influence sand th ewindshield becom-
ing dirty in dry weather conditions, th ewind-
shield wiper smay be activated inadvertently.
This could then damag eth ewindshield wiper
blade sor scratch th ewindshield.
Fo rthis reason ,you should always switch off
th ewindshield wiper sin dry weather .
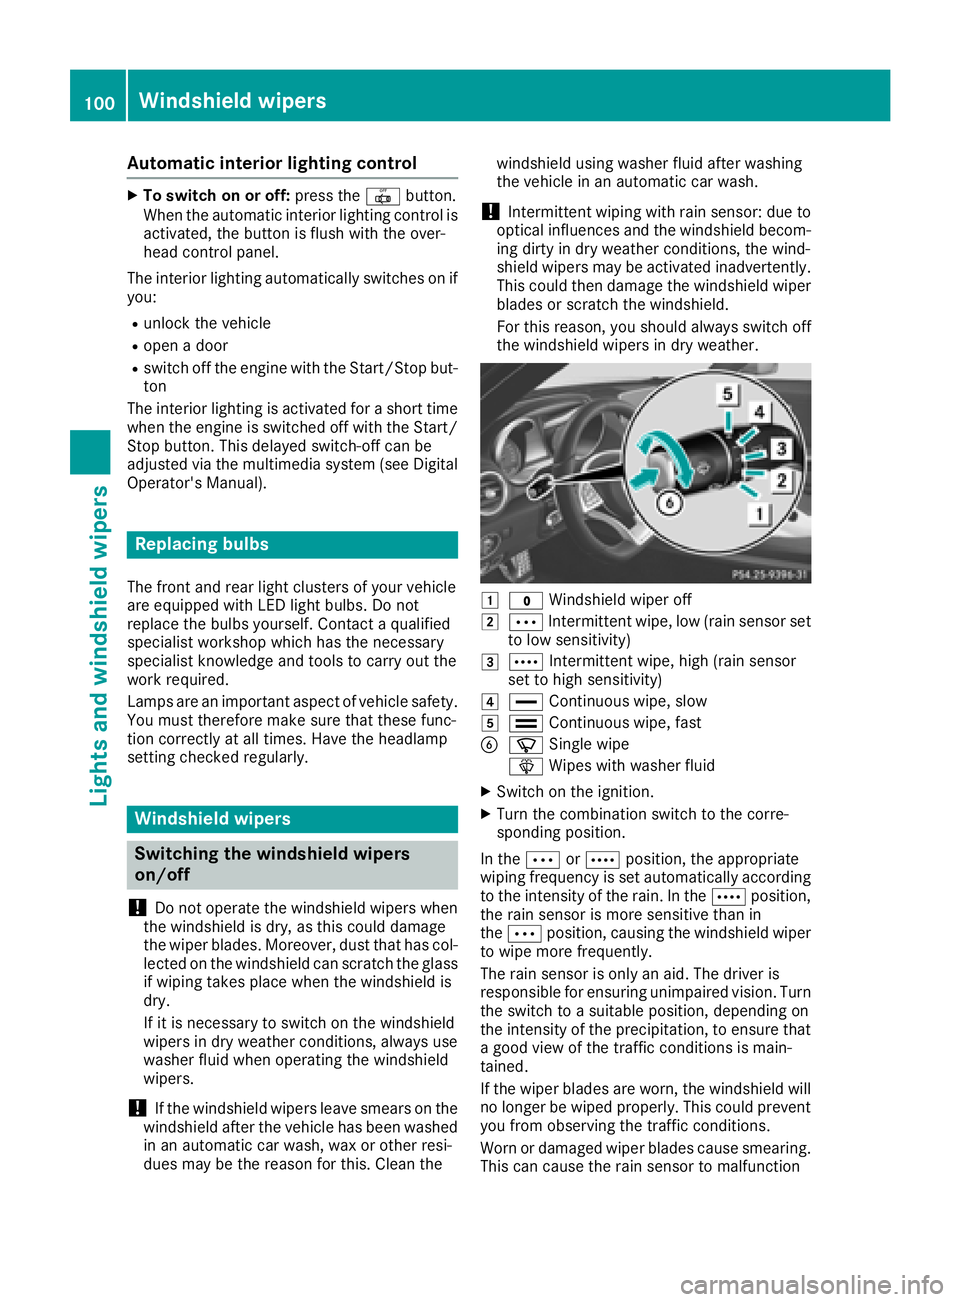
1$Windshield wiper off
2ÄIntermittent wipe, low (rai nsensor set
to low sensitivity)
3Å Intermittent wipe, high (rai nsensor
set to high sensitivity)
4° Continuous wipe, slow
5¯Continuous wipe, fas t
BíSingle wipe
î Wipeswit hwasher fluid
XSwitc hon th eignition .
XTurn thecombination switch to th ecorre-
sponding position .
In th eÄ orÅ position ,th eappropriat e
wipin gfrequency is set automatically according
to th eintensit yof th erain .In th eÅ position ,
th erain sensor is mor esensitive than in
th eÄ position ,causing th ewindshield wiper
to wipe mor efrequently.
The rain sensor is only an aid. The driver is
responsibl efor ensuring unimpaired vision .Turn
th eswitch to asuitable position ,depending on
th eintensit yof th eprecipitation ,to ensur ethat
a goo dvie wof th etraffic condition sis main -
tained.
If th ewiper blade sare worn, th ewindshield will
no longer be wiped properly. This could preven t
you from observing th etraffic conditions.
Wor nor damaged wiper blade scaus esmearing.
This can caus eth erain sensor to malfunction
100Windshield wipers
Lights and windshield wipers
Page 111 of 294
Notes on breaking-in a new vehicle
Important safety notes
The sensor system of some driving and driving
safety systems adjusts automatically while a
certain distance is being driven after the vehiclehas been delivered or after repairs. Full system
effectiveness is not reached until the end of this
teach-in procedure.
New and replaced brake pads and discs only
reach their optimum braking effect after several hundred kilometers of driving. Compensate for
this by applying greater force to the brake pedal.
The first 1,000 miles (1,500 km)
The more you look after the engine when it is
new, the more satisfied you will be with its per-
formance in the future.
RYou should therefore drive at varying vehicle
and engine speeds for the first 1,000 miles
(1,500 km).
RIdeally, for the first 1,000 miles (1,500 km),
drive in program C.
RDo not drive faster than 85 mph (140 km/h)
for the first 1,000 miles (1,500 km).
ROnly briefly allow the engine to reach a max-
imum engine speed of 4,500 rpm briefly.
RAvoid heavy loads, e.g. driving at full throttle,
during this period.
RDo not exceed Ôof the maximum permitted
engine speed for each gear.
RShift up into manual mode Mand temporary
manual drive program in good time.
RDo not carry out a RACE START.
RDo not manually shift to a lower gear to brake
the vehicle.
RTry to avoid depressing the accelerator pedal
beyond the pressure point (kickdown).
After 1,000 mile s(1,500 km), you can increase
the engine speed gradually and accelerate the
vehicle to full speed.
You should also observe these notes on break-
ing in if the engine or parts of the drive train on
your vehicle have been replaced.
Always observe the respective maximu m per-
missibl
e speed.
Driving
Important safety notes
GWARNING
Objects in the driver's footwell can restrict the pedal travel or obstruct a depressed pedal.
The operating and road safety of the vehicle is
jeopardized. There is a risk of an accident.
Make sure that all objects in the vehicle are
stowed correctly, and that they cannot enter
the driver's footwell. Install the floormats
securely and as specified in order to ensure
sufficient clearance for the pedals. Do not use
loose floormats and do not place floormats on
top of one another.
GWARNING
Unsuitable footwear can hinder correct usage of the pedals, e.g.:
Rshoes with thick soles
Rshoes with high heels
Rslippers
There is a risk of an accident.
Wear suitable footwear to ensure correct
usage of the pedals.
GWARNING
If you switch off the ignition while driving,
safety-relevant functions are only available
with limitations, or not at all. This could affect, for example, the power steering and the brake
boosting effect. You will require considerably
more effort to steer and brake. There is a risk
of an accident.
Do not switch off the ignition while driving.
GWARNING
If the parking brake has not been fully
released when driving, the parking brake can:
Roverheat and cause a fire
Rlose its hold function.
There is a risk of fire and an accident. Release
the parking brake fully before driving off.
Driving109
Driving and parking
Z
Page 112 of 294
!Do not warm up the engine while stationary.
Pull away immediately. Avoid high engine
speeds and full throttle until the engine has
reached its operating temperature.
In vehicles with automatic transmission,
engage positions P and R only when the vehi-
cle is stationary.
Where possible, avoid spinning the drive
wheels when pulling away on slippery roads.
You could otherwise damage the drive train.
!During a cold start with low engine oil tem-
peratures (below 32 ‡) (0 †), the maximum
engine speed is restricted in order to protect
the engine. To protect the engine and main-
tain smooth engine operation, avoid driving at
full throttle when the engine is cold.
Key positions
Start/Stop button
General notes
All vehicles are equipped with a Start/Stop but-
ton.
The Start/Stop button is located in the center
console and is illuminated when the vehicle is
unlocked.
The SmartKey must be in the vehicle.
Pressing the Start/Stop button several times in
succession corresponds to the different Smart-
Key positions in the ignition lock. This is only the
case if you are not depressing the brake pedal.
If you depress the brake pedal and press the
Start/Stop button, the engine starts immedi-
ately.
A check which periodically establishes a radio
connection between the vehicle and the Smart-
Key determines whether a valid SmartKey is in
the vehicle. This occurs, for example, when
starting the engine.
If there is a SmartKey in the ignition lock, this
takes precedence over the KEYLESS-GO start
function.
To start the vehicle without actively using the
SmartKey:
Rthe SmartKey must be in the vehicle
Rthe vehicle must not be locked with the
SmartKey or KEYLESS-GO (Ypage 67) Do not keep the SmartKey:
Rwith electronic devices, e.g. a mobile phone
or another SmartKey
Rwith metallic objects, e.g. coins or metal foil
Rinside metallic objects, e.g. a metal case
This can affect the functionality of the Smart-
Key.
If you lock the vehicle with the SmartKey remote control or with KEYLESS-GO, after a short time:
Ryou will not be able to switch on the ignition
with the Start/Stop button
Ryou will no longer be able to start the engine
with the Start/Stop button until the vehicle is
unlocked again
If you lock the vehicle centrally using the button
on the driver's door (
Ypage 72), you can con-
tinue to start the engine with the Start/Stop
button.
The engine can be switched off while the vehicle
is in motion by pressing and holding the Start/
Stop button for three seconds. This function
operates independently of the ECO start/stop
automatic engine switch-off function.
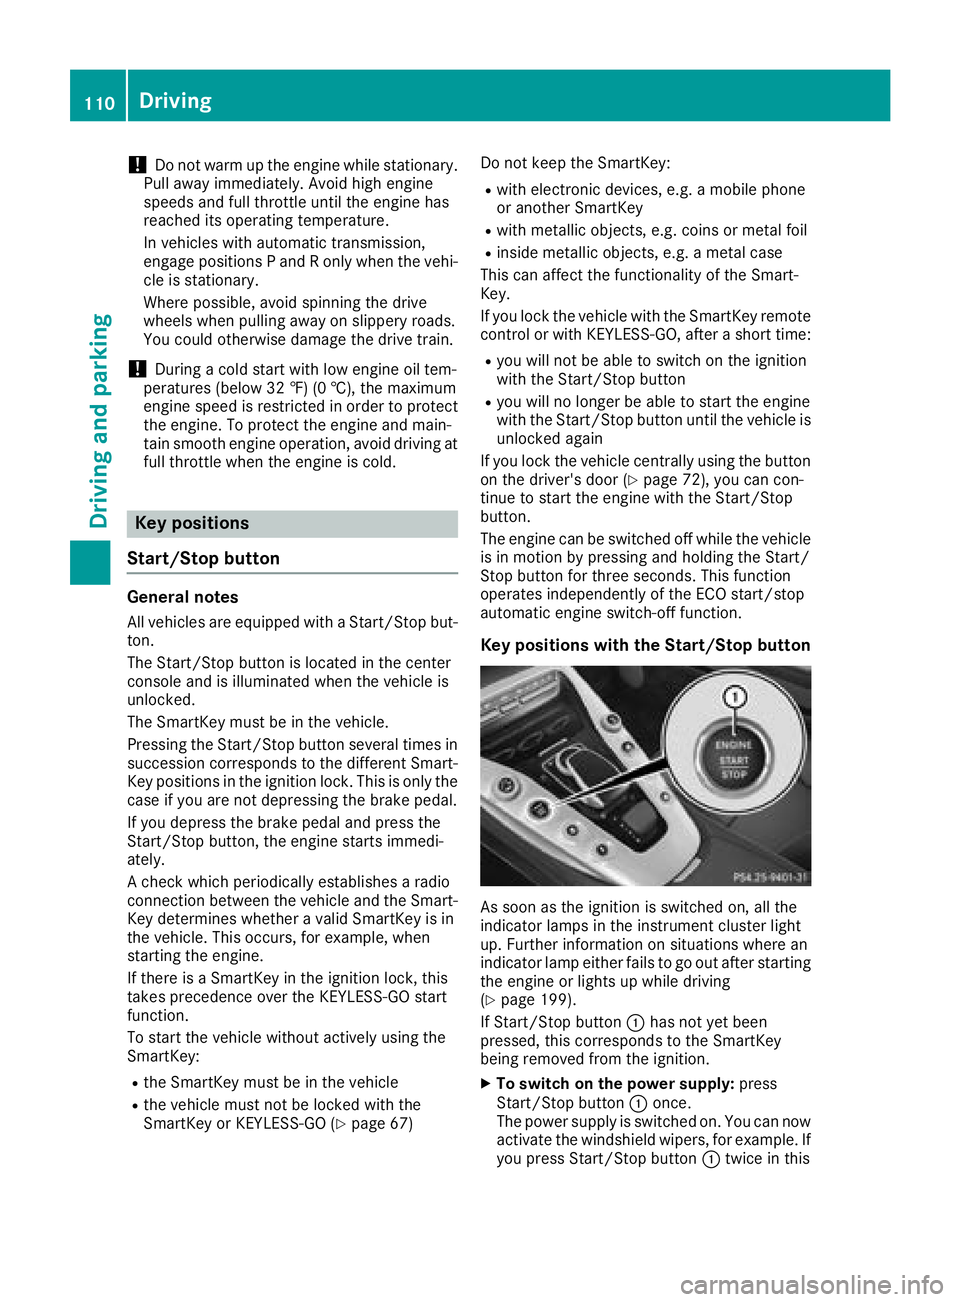
Key positions with the Start/Stop button
As soon as the ignition is switched on, all the
indicator lamps in the instrument cluster light
up. Further information on situations where an
indicator lamp either fails to go out after starting
the engine or lights up while driving
(
Ypage 199).
If Start/Stop button :has not yet been
pressed, this corresponds to the SmartKey
being removed from the ignition.
XTo switch on the power supply: press
Start/Stop button :once.
The power supply is switched on. You can now
activate the windshield wipers, for example. If you press Start/Stop button :twice in this
110Driving
Driving and parking
Page 115 of 294
GWARNING
After a short time, hill start assist will no lon-
ger brake your vehicle and it could roll away.
There is a risk of an accident and injury.
Therefore, quickly move your foot from the
brake pedal to the accelerator pedal. Never
leave the vehicle when it is held by hill start
assist.
Hill start assist is not active if:
Ryou are pulling away on a level road or on a
downhill gradient
Rthe transmission is in position i
Rthe electric parking brake is applied
RESP®is malfunctioning
Rear axle steering
General notes
Depending on the speed, rear axle steering
adapts the track of the rear axle to the position
of the front wheels. Together with the steering
angle of the front wheels, this results in greater
mobility and stability than on vehicles without
rear axle steering.
Rear axle steering has the following character-
istics:
Rreduced steering effort and turning circle,
resulting in reduced parking effort.
Rimproved driving stability, e.g. on curves.
Rthe vehicle has more direct steering. Control
of the vehicle is thereby increased.
ECO start/stop function
Introduction
The ECO start/stop function switches the
engine off automatically if the vehicle is stopped
under certain conditions.
The engine starts automatically when the driver
wants to pull away again. The ECO start/stop
function thereby helps you to reduce the fuel
consumption and emissions of your vehicle.
Important safety notes
GWARNING
If the engine is switched off automatically and
you exit the vehicle, the engine is restarted
automatically. The vehicle may begin moving.
There is a risk of accident and injury.
If you wish to exit the vehicle, always turn off
the ignition and secure the vehicle against
rolling away.
General notes
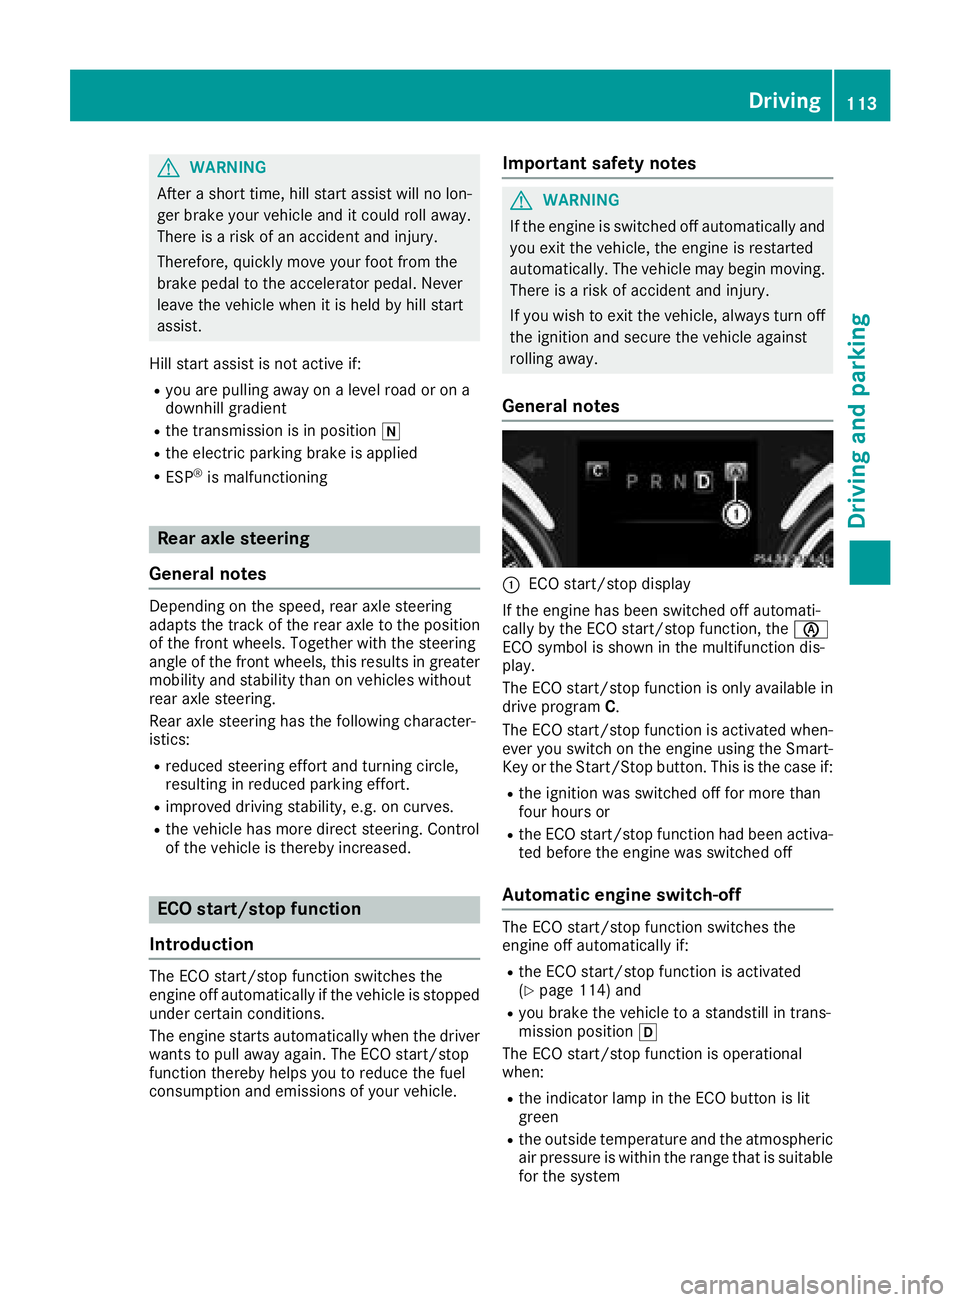
:ECO start/stop display
If the engine has been switched off automati-
cally by the ECO start/stop function, the è
ECO symbol is shown in the multifunction dis-
play.
The ECO start/stop function is only available in drive program C.
The ECO start/stop function is activated when-
ever you switch on the engine using the Smart-
Key or the Start/Stop button. This is the case if:
Rthe ignition was switched off for more than
four hours or
Rthe ECO start/stop function had been activa-
ted before the engine was switched off
Automatic engine switch-off
The ECO start/stop function switches the
engine off automatically if:
Rthe ECO start/stop function is activated
(Ypage 114) and
Ryou brake the vehicle to a standstill in trans-
mission position h
The ECO start/stop function is operational
when:
Rthe indicator lamp in the ECO button is lit
green
Rthe outside temperature and the atmospheric
air pressure is within the range that is suitable
for the system
Driving113
Driving and parking
Z
Page 117 of 294
Setting the volume:
XPress button:.
If you select the loudest setting, indicator
lamp ;lights up. You can also adjust the position of the exhaust
flap using the:RDYNAMIC SELECT controller (Ypage 116)
RMultimedia system
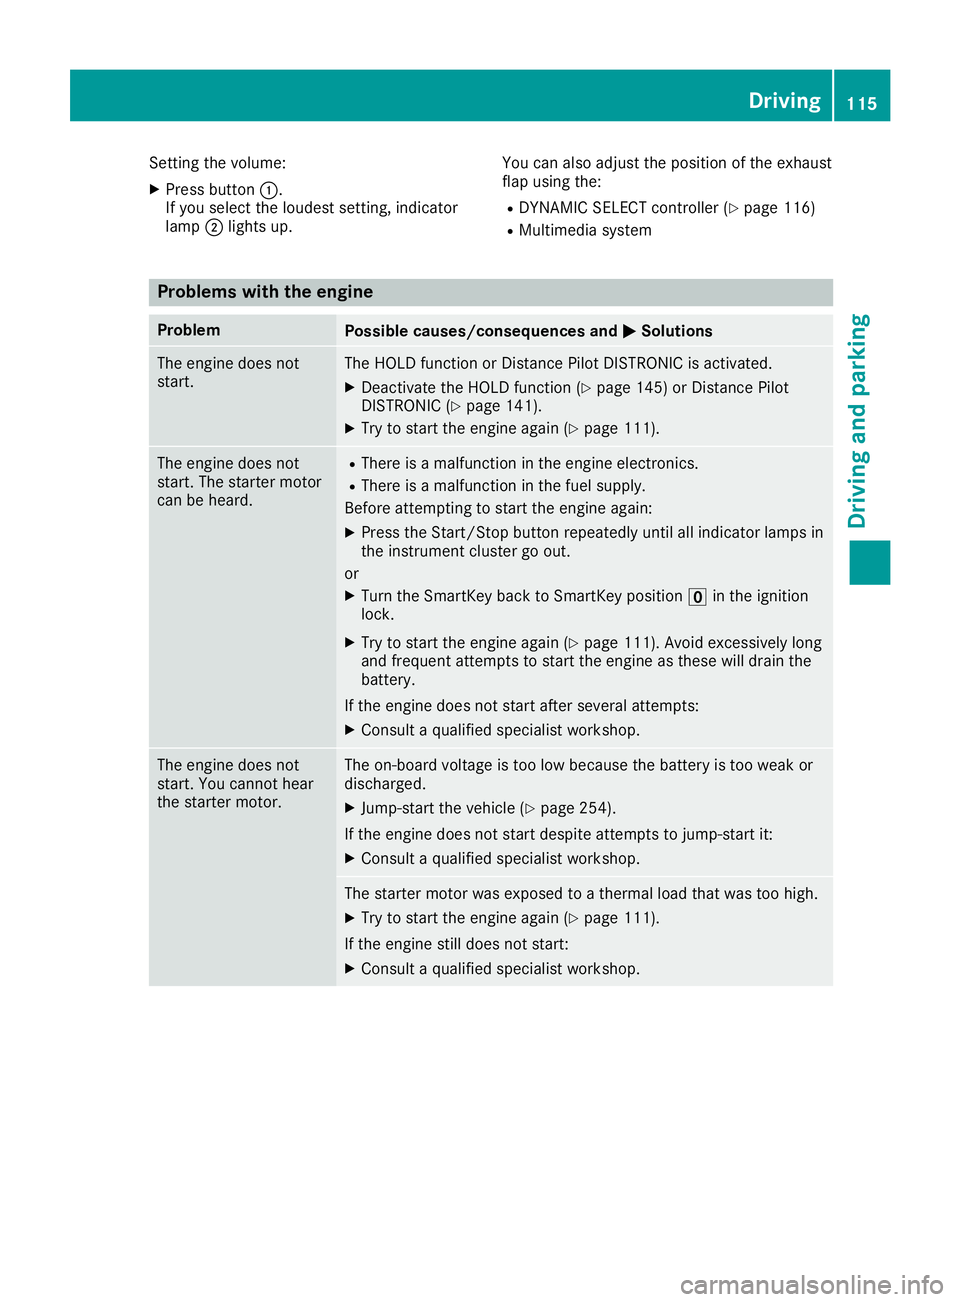
Problems with the engine
ProblemPossible causes/consequences and
MSolutions
The engine does not
start.The HOLD function or Distance Pilot DISTRONIC is activated.
XDeactivate the HOLD function (Ypage 145) or Distance Pilot
DISTRONIC (Ypage 141).
XTry to start the engine again (Ypage 111).
The engine does not
start. The starter motor
can be heard.RThere is a malfunction in the engine electronics.
RThere is a malfunction in the fuel supply.
Before attempting to start the engine again:
XPress the Start/Stop button repeatedly until all indicator lamps in
the instrument cluster go out.
or
XTurn the SmartKey back to SmartKey position uin the ignition
lock.
XTry to start the engine again (Ypage 111). Avoid excessively long
and frequent attempts to start the engine as these will drain the
battery.
If the engine does not start after several attempts:
XConsult a qualified specialist workshop.
The engine does not
start. You cannot hear
the starter motor.The on-board voltage is too low because the battery is too weak or
discharged.
XJump-start the vehicle (Ypage 254).
If the engine does not start despite attempts to jump-start it:
XConsult a qualified specialist workshop.
The starter motor was exposed to a thermal load that was too high.
XTry to start the engine again (Ypage 111).
If the engine still does not start:
XConsult a qualified specialist workshop.
Driving115
Driving and parking
Z