2018 MERCEDES-BENZ AMG GT ROADSTER ESP
[x] Cancel search: ESPPage 75 of 294
The vehicle is locked automatically when the
ignition is switched on and the wheels are turn-
ing.
You could therefore be locked out if:
Rthe vehicle is being pushed
Rthe vehicle is being towed
Rthe vehicle is on a roller dynamometer
iYou can activate and deactivate the auto-
matic locking mechanism via the multimedia
system (see the Digital Operator's Manual).
Unlocking/locking the driver's door
using the mechanical key
To completely lock the vehicle using the
mechanical key:
Rbegin by pressing the button for locking the
vehicle from the inside while the driver's door
is open
Rthen, proceed to lock the driver's door using
the mechanical key
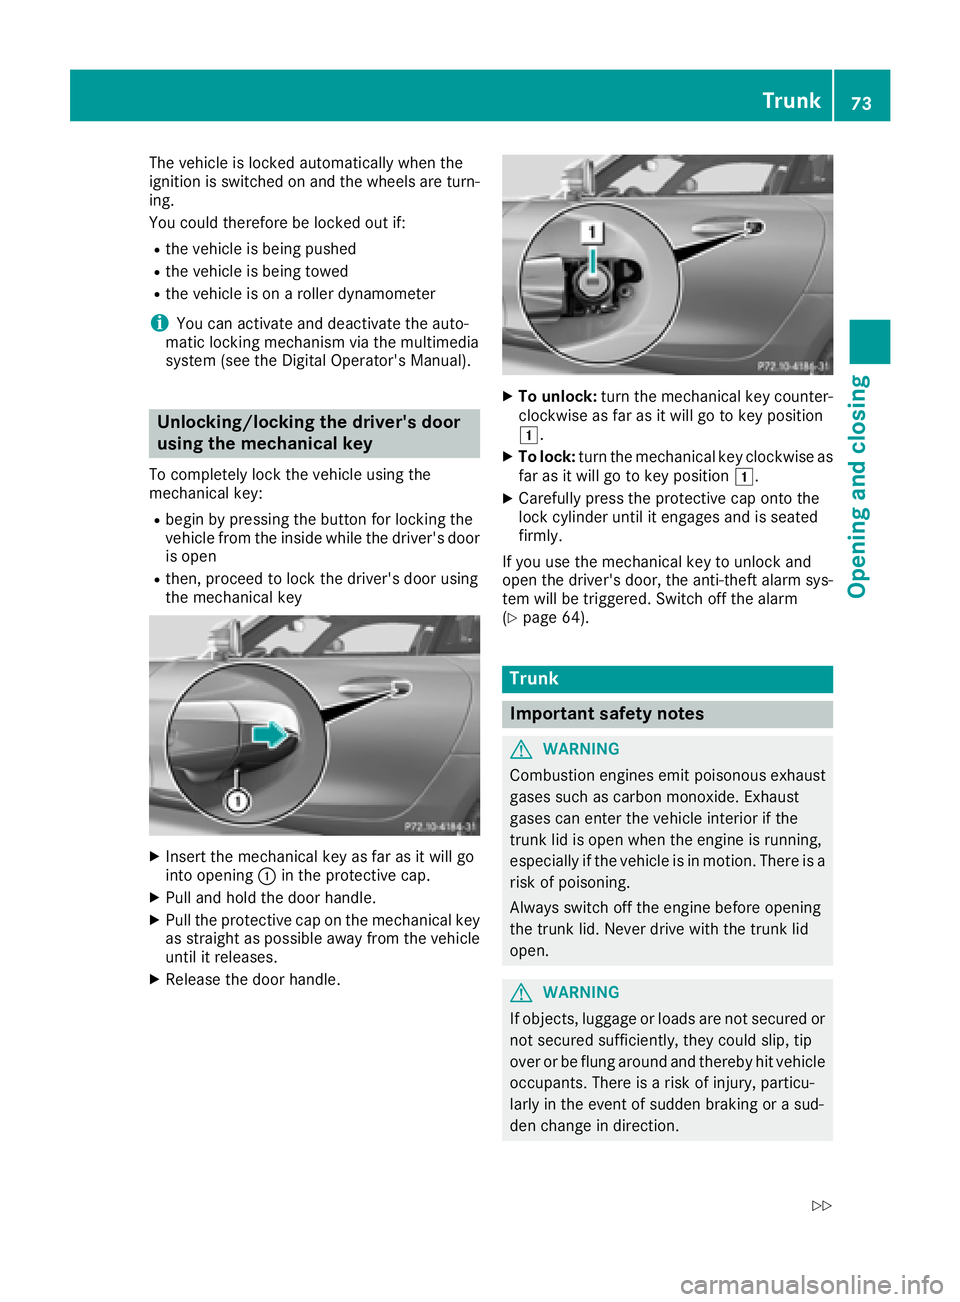
XInsert the mechanical key as far as it will go
into opening :in the protective cap.
XPull and hold the door handle.
XPull the protective cap on the mechanical key
as straight as possible away from the vehicle
until it releases.
XRelease the door handle.
XTo unlock: turn the mechanical key counter-
clockwise as far as it will go to key position
1.
XTo lock: turn the mechanical key clockwise as
far as it will go to key position 1.
XCarefully press the protective cap onto the
lock cylinder until it engages and is seated
firmly.
If you use the mechanical key to unlock and
open the driver's door, the anti-theft alarm sys-
tem will be triggered. Switch off the alarm
(
Ypage 64).
Trunk
Important safety notes
GWARNING
Combustion engines emit poisonous exhaust
gases such as carbon monoxide. Exhaust
gases can enter the vehicle interior if the
trunk lid is open when the engine is running,
especially if the vehicle is in motion. There is a
risk of poisoning.
Always switch off the engine before opening
the trunk lid. Never drive with the trunk lid
open.
GWARNING
If objects, luggage or loads are not secured or
not secured sufficiently, they could slip, tip
over or be flung around and thereby hit vehicle
occupants. There is a risk of injury, particu-
larly in the event of sudden braking or a sud-
den change in direction.
Trunk73
Opening and closing
Z
Page 77 of 294

Observe the following points:
RCarry your KEYLESS-GO key about your per-
son. The SmartKey must be at the rear of the
vehicle in the detection range of KEYLESS-
GO.
RWhen making the kicking movement, make
sure that you are standing firmly on the
ground and that there is sufficient clearance
to the rear of the vehicle. You could otherwise
lose your balance, for example on ice.
RAlways ensure that you only make the kicking
movement within the detection range of sen-
sors:.
RStand at least 12 in (30 cm) away from the
rear area while doing so.
RDo not come into contact with the bumper
while making the kicking movement. Other-
wise, the sensors may not function correctly.
RUnlocking the trunk via the sensor does not
function while the engine is being started.
RDirt caused by road salt or snow around sen-
sors :may restrict functionality.
Using the trunk unlocking function via the
sensor with a prosthetic leg may restrict func- tionality.
RIf a KEYLESS-GO SmartKey is within the rear
detection range of KEYLESS-GO, the sensors
could be triggered. As a result, the trunk lid
could be opened unintentionally under the
following conditions:
-if you set something down or lift something
behind the vehicle
-if you polish the rear of the vehicle
Do not carry the KEYLESS-GO key about your
person in these situations or in situations sim-
ilar to these. This will prevent the trunk lid
from being unlocked unintentionally.
Operation
XTo unlock: kick into sensor detection
range :below the bumper with your foot.
The trunk lid opens slightly.
XTo open: lift the trunk lid.
XIf the trunk lid does not unlock after sev-
eral attempts: wait at least ten seconds then
kick under the bumper once again.
If you hold your foot under the bumper for too
long, the trunk lid does not unlock. Repeat the
leg movement more quickly if this occurs.
Unlocking from inside the vehicle
GWARNING
Combustion engines emit poisonous exhaust
gases such as carbon monoxide. Exhaust
gases can enter the vehicle interior if the
trunk lid is open when the engine is running,
especially if the vehicle is in motion. There is a
risk of poisoning.
Always switch off the engine before opening
the trunk lid. Never drive with the trunk lid
open.
Trunk75
Opening and closing
Z
Page 79 of 294

GWARNING
While closing the side windows, body parts in
the closing area could become trapped. There is a risk of injury.
When closing make sure that no parts of the
body are in the closing area. If somebody
becomes trapped, release the switch or press
the switch to open the side window again.
GWARNING
If children operate the side windows they
could become trapped, particularly if they are left unsupervised. There is a risk of injury.
When leaving the vehicle, always take the
SmartKey with you and lock the vehicle. Never
leave children unsupervised in the vehicle.
Side window reversing feature
The side windows are equipped with an auto-
matic reversing feature. If a solid object blocks
or restricts a side window from traveling
upwards during the automatic closing process,
the side window opens again automatically. Dur-
ing the manual closing process, the side window only opens again automatically after the corre-
sponding switch is released. The automatic
reversing feature is only an aid and does not
relieve you of the responsibility of paying atten-
tion when closing a side window.
GWARNING
The reversing feature does not react:
Rto soft, light and thin objects, e.g. small fin-
gers
Rwhile resetting
This means that the reversing feature cannot
prevent someone being trapped in these sit-
uations. There is a risk of injury.
Make sure that no body parts are in close
proximity during the closing procedure. If
someone becomes trapped, press the switch
to open the side window again.
Opening and closing the side win-
dows
The switches for all side windows are located on
the driver's door. There is also a switch on the
front-passenger door for the corresponding side window.
The switch on the driver's door has priority.
:Left
;Right
XSwitch on the power supply or switch on the
ignition with the Start/Stop button.
XTo open manually: press and hold the cor-
responding switch.
XTo open fully: press the switch beyond the
point of resistance and release it.
Automatic operation is started.
XTo close manually: pull the corresponding
switch and hold it.
XTo close fully: pull the switch beyond the
point of resistance and release it.
Automatic operation is started.
XTo interrupt automatic operation: press/
pull the corresponding switch again.
If you press the switch beyond the point of
resistance and release, automatic operation is
started in the corresponding direction. You can
stop automatic operation by pressing/pulling
the switch again.
You can still operate the side windows when you
switch off the power supply or the ignition. This
function remains active for five minutes or until
you open a door.
Side windows77
Opening and closing
Z
Page 80 of 294

Convenience opening
General notes
You can ventilate the vehicle before you start
driving.
If the SmartKey is in close proximity to the vehi-
cle, the convenience opening function is availa-
ble.
To do so, open the side windows using the
SmartKey.
The "convenience opening" feature is also avail-
able when the vehicle is unlocked.
Convenience opening
XAfter unlocking the vehicle, press and hold
the % button on the SmartKey until the
side windows begin to open.
or
XWhen the vehicle is unlocked, press and hold
the % button until the side windows have
reached the desired position.
XTo interrupt convenience opening: release
the % button.
Convenience closing feature
Important safety notes
GWARNING
When using the convenience closing feature,
parts of the body could be trapped in the clos-
ing area when a side window is being closed.
There is a risk of injury.
Observe the complete closing procedure
when the convenience closing feature is oper-
ating. Make sure that no body parts are in
close proximity during the closing procedure.
When you lock the vehicle, you can close the
windows at the same time.
Using the SmartKey
XPress and hold the &button until the side
windows are fully closed.
XMake sure that all the side windows are
closed.
XTo interrupt convenience closing: release
the & button.
Using KEYLESS-GO
The driver's door and the door at which the han-
dle is used, must both be closed. The SmartKey
must be outside the vehicle. The gap between
the SmartKey and the corresponding door han-
dle should not be greater than 3 ft (1 m).
XTouch recessed sensor surface :on the
door handle until the side windows are fully
closed.
Make sure you only touch recessed sensor
surface :.
XMake sure that all the side windows are
closed.
XTo interrupt convenience closing: release
recessed sensor surface :on the door han-
dle.
Resetting the side windows
If a side window can no longer be closed fully,
you must reset it.
XClose all the doors.
XSwitch on the power supply or switch on the
ignition with the Start/Stop button.
XPull the corresponding switch on the door
control panel until the side window is com-
pletely closed (
Ypage 77).
XHold the switch for an additional second.
78Side windows
Opening and closing
Page 81 of 294
If the side window opens again slightly:
XImmediately pull the corresponding switch on
the door control panel until the side window is
completely closed (
Ypage 77).
XHold the switch for an additional second.
XIf the respective side window remains closed
after the button is released, then it has been
set correctly. If this is not the case, repeat the
steps above.
Problems with the side windows
GWARNING
If you close a side window again immediately after it has been blocked or reset, the side window
closes with increased or maximum force. The reversing feature is then not active. Parts of the
body could be trapped in the closing area in the process. This poses an increased risk of injury or
even fatal injury.
Make sure that no parts of the body are in the closing area. To stop the closing process, release
the switch or push the switch again to reopen the side window.
ProblemPossible causes/consequences and MSolutions
A side window cannot be
closed because it is
blocked by objects, e.g.
leaves in the window
guide.XRemove the objects.
XClose the side window.
A side window cannot be
closed and you cannot
see the cause.If a side window is obstructed during closing and reopens again
slightly:
XImmediately after the window blocks, pull the corresponding switch
again until the side window has closed.
The side window is closed with increased force.
If a side window is obstructed again during closing and reopens again slightly:
XImmediately after the window blocks, pull the corresponding switchagain until the side window has closed.
The side window is closed without the automatic reversing feature.
The side windows cannot
be opened or closed with
convenience opening.The SmartKey battery is discharged or nearly discharged.
XCheck the SmartKey battery (Ypage 69) and replace it if necessary
(Ypage 69).
If a side window will still not open or close due to a malfunction, consult a qualified specialist
workshop.
Side windows79
Opening and closing
Z
Page 93 of 294
When leaving the vehicle, always take the
SmartKey with you and lock the vehicle. Never
leave children unsupervised in the vehicle.
GWARNING
If you drive off while the EASY-ENTRY/EXIT
feature is making adjustments, you could lose
control of the vehicle. There is a risk of an
accident.
Always wait until the adjustment process is
complete before driving off.
The EASY-ENTRY/EXIT feature makes getting in
and out of your vehicle easier.
You can activate and deactivate the EASY-
ENTRY/EXIT feature using the multimedia sys-
tem (see the Digital Operator's Manual)
Position of the steering wheel when the
EASY-ENTRY/EXIT feature is active
The steering wheel swings up when you:
Rremove the SmartKey from the ignition lock
Ropen the driver's door with the Start/Stop
button in position 1
iThe steering wheel only moves up if it has
not already reached the upper stop.
Position of the steering wheel for driv-
ing
The steering wheel is moved to the previously
set position if you:
Rclose the driver's door and
Rpress the Start/Stop button once
When you close the driver's door with the igni-
tion switched on, the steering wheel is also
automatically moved to the previously set posi-
tion.
The last position of the steering wheel column is
stored after each manual setting or when you
store the setting with the memory function
(
Ypage 94).
Crash-responsive EASY-EXIT feature
If the crash-responsive EASY-EXIT feature is trig-
gered in an accident, the steering column will
move upwards in the following situations:
Rwhen you open the driver's door
Rwhen you remove the key
This makes it easier to exit the vehicle and res-
cue the occupants.
Mirrors
Rear-view mirror
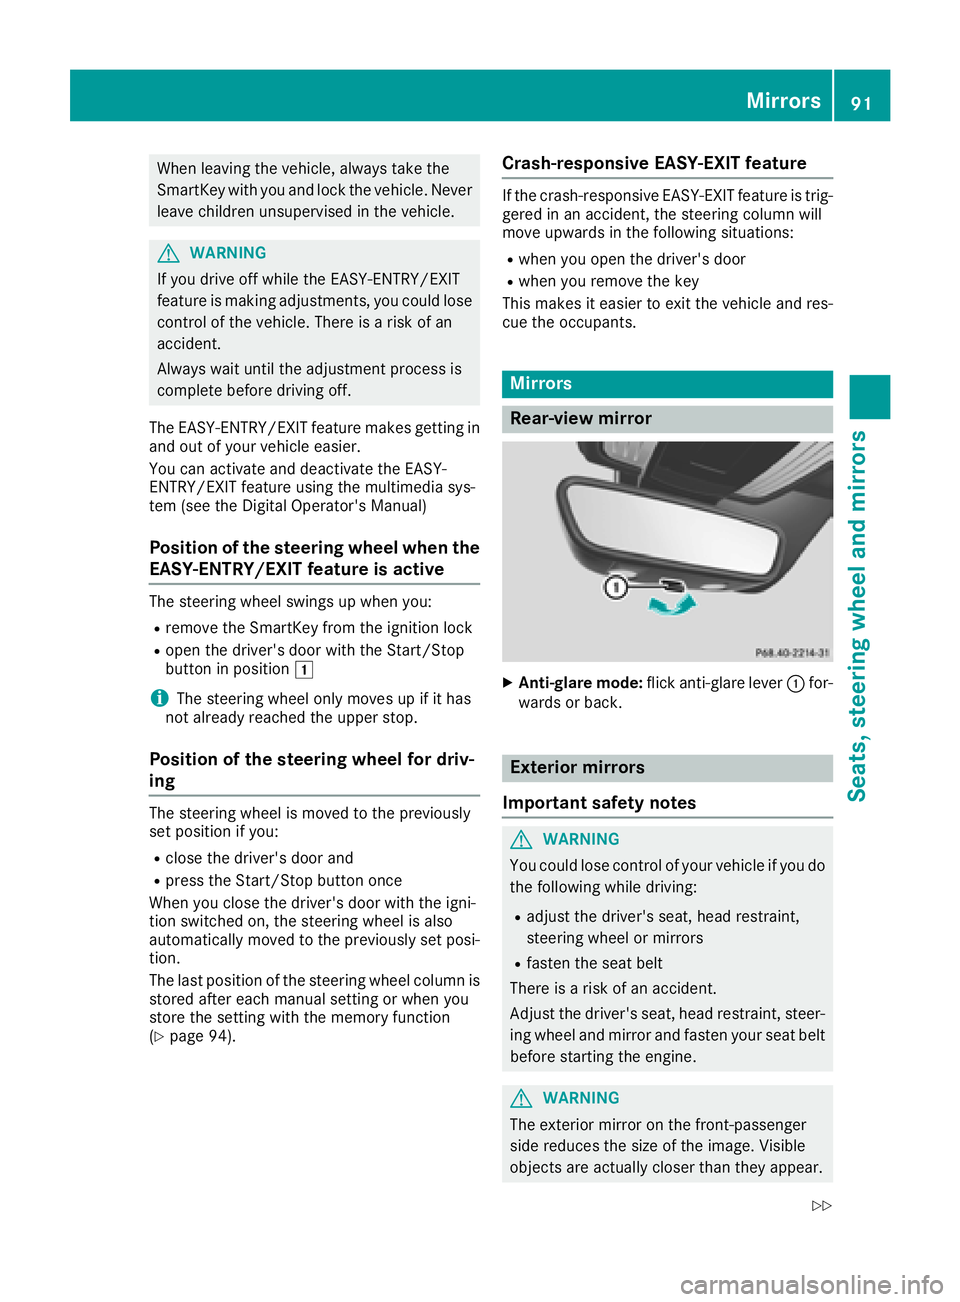
XAnti-glare mode: flick anti-glare lever :for-
wards or back.
Exterior mirrors
Important safety notes
GWARNING
You could lose control of your vehicle if you do the following while driving:
Radjust the driver's seat, head restraint,
steering wheel or mirrors
Rfasten the seat belt
There is a risk of an accident.
Adjust the driver's seat, head restraint, steer-
ing wheel and mirror and fasten your seat belt before starting the engine.
GWARNING
The exterior mirror on the front-passenger
side reduces the size of the image. Visible
objects are actually closer than they appear.
Mirrors91
Seats, steering wheel and mirrors
Z
Page 97 of 294
XOn the driver's side, adjust the steering wheel(Ypage 90) and the exterior mirrors
(Ypage 92).
XPress memory button Mand one of the stor-
age position buttons 1,2or 3within three
seconds.
The settings are stored in the selected preset
position. A tone sounds when the settings
have been completed.
Calling up a stored setting
XPress and hold the corresponding storage
position button 1,2or 3until:
RSeat
RSteering wheel
RExterior mirrors
are in the stored position.
iThe steering wheel and seat adjustment
procedure is interrupted as soon as you
release the storage position button. Exterior
mirror adjustment continues.
Memory function95
Seats, steering wheel and mirrors
Z
Page 98 of 294
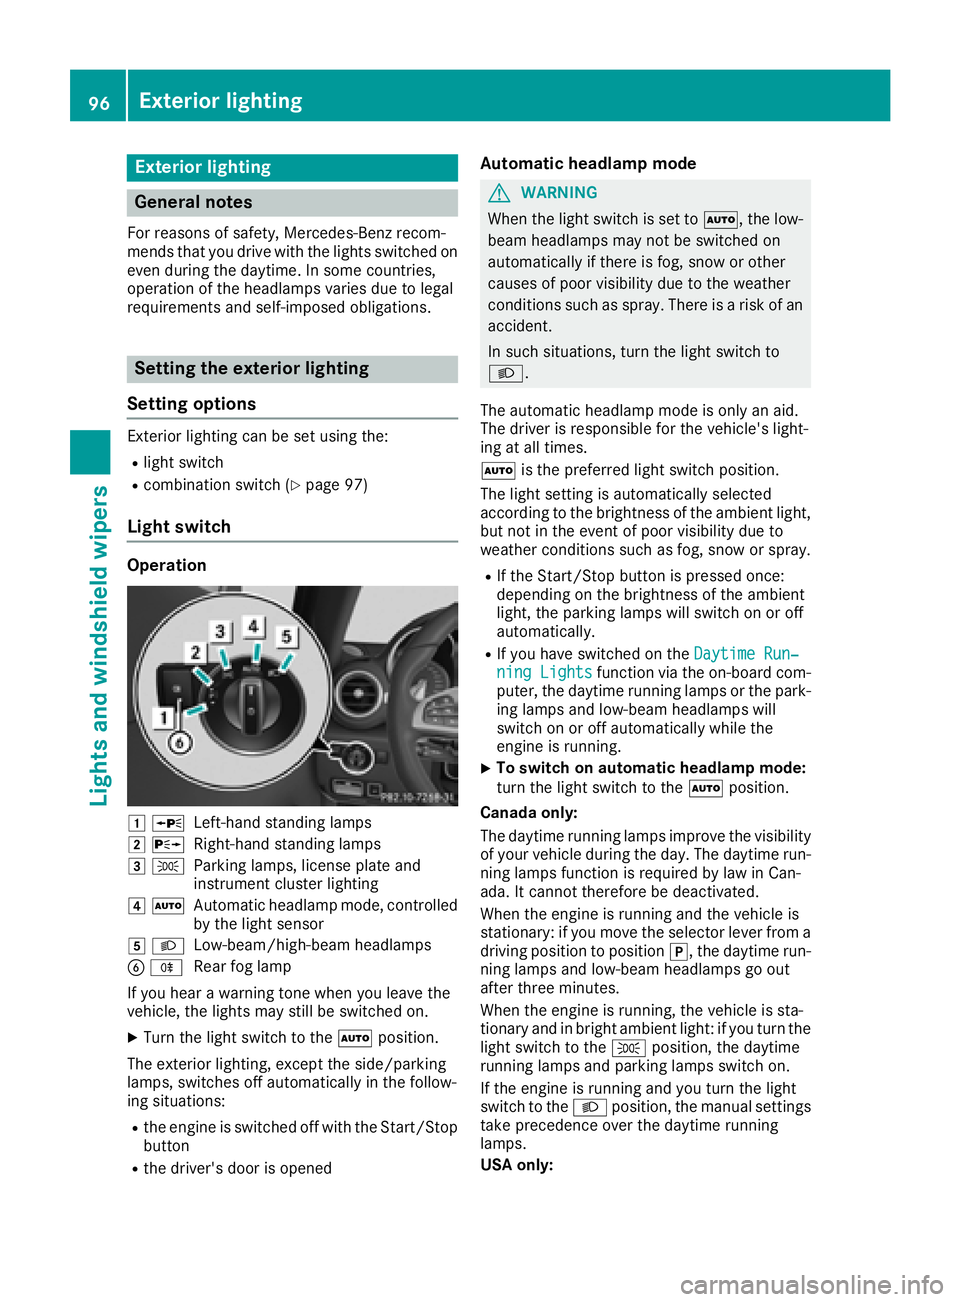
Exterior lighting
General notes
For reasons of safety, Mercedes-Benz recom-
mends that you drive with the lights switched on
even during the daytime. In some countries,
operation of the headlamps varies due to legal
requirements and self-imposed obligations.
Setting the exterior lighting
Setting options
Exterior lighting can be set using the:
Rlight switch
Rcombination switch (Ypage 97)
Light switch
Operation
1 WLeft-hand standing lamps
2XRight-hand standing lamps
3TParking lamps, license plate and
instrument cluster lighting
4ÃAutomatic headlamp mode, controlled
by the light sensor
5 LLow-beam/high-beam headlamps
BRRear fog lamp
If you hear a warning tone when you leave the
vehicle, the lights may still be switched on.
XTurn the light switch to the Ãposition.
The exterior lighting, except the side/parking
lamps, switches off automatically in the follow-
ing situations:
Rthe engine is switched off with the Start/Stop button
Rthe driver's door is opened
Automatic headlamp mode
GWARNING
When the light switch is set to Ã, the low-
beam headlamps may not be switched on
automatically if there is fog, snow or other
causes of poor visibility due to the weather
conditions such as spray. There is a risk of an
accident.
In such situations, turn the light switch to
L.
The automatic headlamp mode is only an aid.
The driver is responsible for the vehicle's light-
ing at all times.
à is the preferred light switch position.
The light setting is automatically selected
according to the brightness of the ambient light,
but not in the event of poor visibility due to
weather conditions such as fog, snow or spray.
RIf the Start/Stop button is pressed once:
depending on the brightness of the ambient
light, the parking lamps will switch on or off
automatically.
RIf you have switched on the Daytime Run‐ning Lightsfunction via the on-board com-
puter, the daytime running lamps or the park-
ing lamps and low-beam headlamps will
switch on or off automatically while the
engine is running.
XTo switch on automatic headlamp mode:
turn the light switch to the Ãposition.
Canada only:
The daytime running lamps improve the visibility of your vehicle during the day. The daytime run-
ning lamps function is required by law in Can-
ada. It cannot therefore be deactivated.
When the engine is running and the vehicle is
stationary: if you move the selector lever from a
driving position to position j, the daytime run-
ning lamps and low-beam headlamps go out
after three minutes.
When the engine is running, the vehicle is sta-
tionary and in bright ambient light: if you turn the
light switch to the Tposition, the daytime
running lamps and parking lamps switch on.
If the engine is running and you turn the light
switch to the Lposition, the manual settings
take precedence over the daytime running
lamps.
USA only:
96Exterior lighting
Lights and windshield wipers