2018 MERCEDES-BENZ AMG GT R-ROADSTER warning light
[x] Cancel search: warning lightPage 103 of 473
High beam
#
Toswitch on: turnthe light switch tothe
L orà position. #
Press the combination switch be yond the
point of resis tance in the direction of ar row
1 .
When the high beam is activated, the indica‐
to r lamp for low beam Lwill be deactiva‐
te d and replaced bythe indicator lamp for
high beam K. #
Toswitch off: movethe combination switch
back toits starting position.
Headla mpflasher #
Pull the combination switch in the direction
of ar row3.
Tu rn signal indicators #
Toindicate briefl y:press the combination
switch briefly tothe point of resis tance in the
direction of ar row2or4.
The cor responding turn signal indicator will
fl ash thre e times. #
Toindicate permanentl y:press the combi‐
nation switch be yond the point of resis tance
in the direction of ar row2or4. Ac
tivating/deactivating the hazard warning
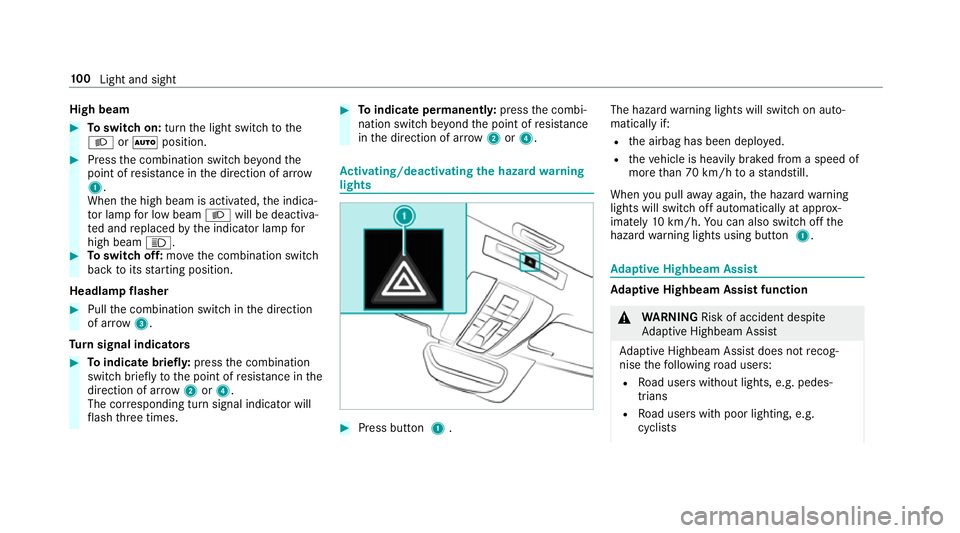
lights #
Press button 1. The hazard
warning lights will switch on auto‐
matically if:
R the airbag has been deplo yed.
R theve hicle is heavily braked from a speed of
more than 70 km/h toast andstill.
When you pull away again, the hazard warning
lights will switch off automatically at appr ox‐
imately 10km/h. You can also swit choff the
hazard warning lights using button 1. Ad
aptive Highbeam Assist Ad
aptive Highbeam Assist function &
WARNING Risk of accident despi te
Ad aptive Highbeam Assist
Ad aptive Highbeam Assist does not recog‐
nise thefo llowing road users:
R Road users without lights, e.g. pedes‐
trians
R Road users with poor lighting, e.g.
cyclists 100
Light and sight
Page 106 of 473
Setting
the interior lighting switch-off delay
time Multimedia sy
stem:
4 Vehicle 5
÷ Light settings
5 Interior light shut-off #
Set the switch-off delay time. Wi
ndscreen wipers and windscreen washer
sy stem Switching
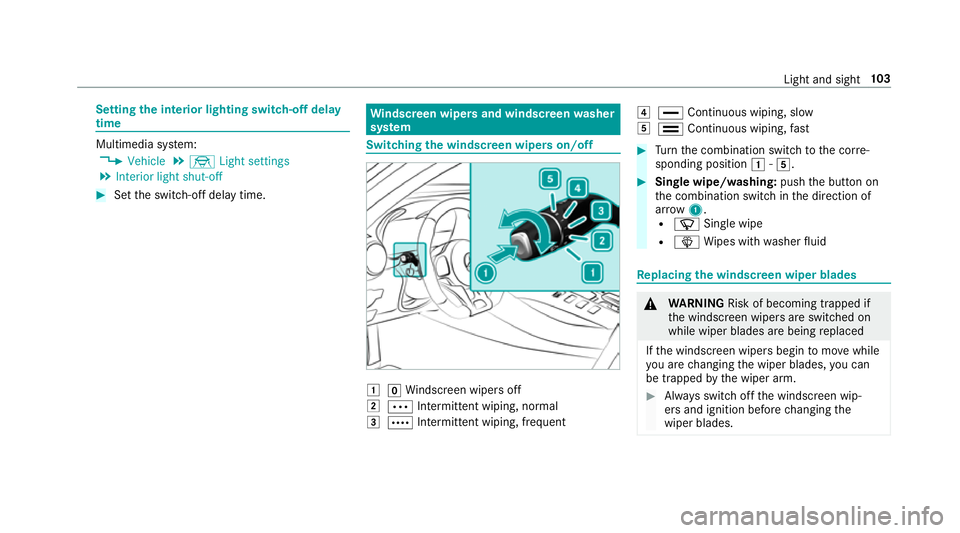
the windscreen wipers on/off 1
gWindsc reen wipers off
2 Ä Intermittent wiping, normal
3 Å Intermittent wiping, frequent 4
° Continuous wiping, slow
5 ¯ Continuous wiping, fast #
Turn the combination switch tothe cor re‐
sponding position 1-5. #
Single wipe/washing: pushthe button on
th e combination switch in the direction of
ar row 1.
R í Single wipe
R î Wipes with washer fluid Re
placing the windsc reen wiper blades &
WARNING Risk of becoming trapped if
th e windscreen wipers are switched on
while wiper blades are being replaced
If th e windscreen wipers begin tomo vewhile
yo u are changing the wiper blades, you can
be trapped bythe wiper arm. #
Alw ays switch off the windscreen wip‐
ers and ignition before changing the
wiper blades. Light and sight
103
Page 107 of 473
Moving
the wiper arms tothech ange posi‐
tion #
Switch the ignition on and switch off again
immediatel y. #
Within around 15seconds, press theî
button on the combination switch for appro x‐
ima tely thre e seconds (/ page103).
The wiper arms will mo veinto thech ange
position.
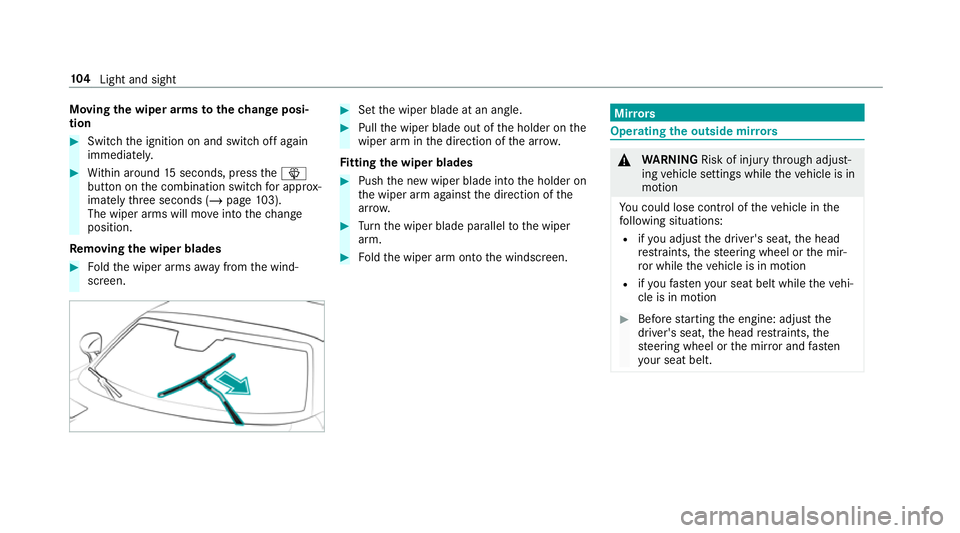
Re moving the wiper blades #
Foldthe wiper arms away from the wind‐
screen. #
Set the wiper blade at an angle. #
Pull the wiper blade out of the holder on the
wiper arm in the direction of the ar row.
Fi tting the wiper blades #
Push the new wiper blade into the holder on
th e wiper arm against the direction of the
ar row. #
Turn the wiper blade parallel tothe wiper
arm. #
Foldthe wiper arm onto the windscreen. Mir
rors Operating
the outside mir rors &
WARNING Risk of inju rythro ugh adjust‐
ing vehicle settings while theve hicle is in
motion
Yo u could lose cont rol of theve hicle in the
fo llowing situations:
R ifyo u adjust the driver's seat, the head
re stra ints, thesteering wheel or the mir‐
ro r while theve hicle is in motion
R ifyo ufast enyour seat belt while theve hi‐
cle is in motion #
Before starting the engine: adjust the
driver's seat, the head restra ints, the
st eering wheel or the mir ror and fasten
yo ur seat belt. 104
Light and sight
Page 108 of 473
&
WARNING Risk of accident due tomis‐
judgement of dis tances when using the
outside mir ror
The outside mir rors reflect objects on a
smaller scale. The objects in view are in fact
closer than they appear.
As a result, you may misjud gethe dis tance
between you and thero ad user driving
behind you, e.g. when changing lanes. #
Therefore, alw ays look over your shoul‐
der in order toensure that you are
aw are of the actual dis tance between
yo u and thero ad users driving behind
yo u. Fo
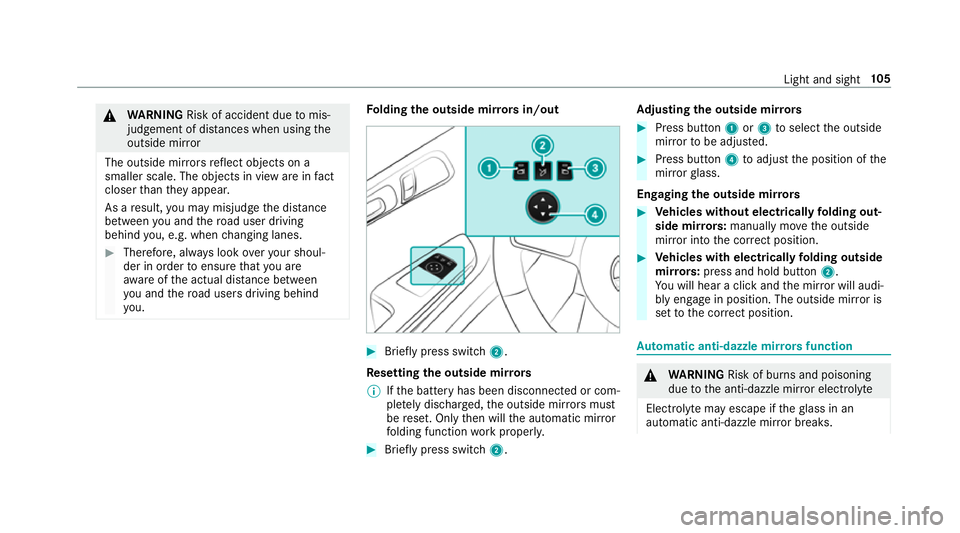
lding the outside mir rors in/out #
Brief lypress switch 2.
Re setting the outside mir rors
% Ifth e battery has been disconnected or com‐
ple tely discharged, the outside mir rors must
be reset. Only then will the automatic mir ror
fo lding function workproperly. #
Brief lypress switch 2. Ad
justing the outside mir rors #
Press button 1or3 toselect the outside
mir rorto be adjus ted. #
Press button 4toadjust the position of the
mir rorgl ass.
Engaging the outside mir rors #
Vehicles without electrical lyfolding out‐
side mir rors:manually mo vethe outside
mir ror into the cor rect position. #
Vehicles with electrical lyfolding outside
mir rors: press and hold button 2.
Yo u will hear a click and the mir ror will audi‐
bly engage in position. The outside mir ror is
set tothe cor rect position. Au
tomatic anti-dazzle mir rors function &
WARNING Risk of bu rns and poisoning
due tothe anti-dazzle mir ror electrolyte
Electrolyte may escape if theglass in an
automatic anti-dazzle mir ror breaks. Light and sight
105
Page 119 of 473
#
Do not shi ftdown on slippery road sur‐
fa ces toinc rease the engine braking
ef fect. &
DANG ER Risk of fata l injuries due topoi‐
sonous exhaust gases
If th eta ilpipe is bloc ked or suf ficient ventila‐
tion is not possible, poisonous exhaust gases
such as carbon monoxide may enter theve hi‐
cle. This is the case, forex ample, if theve hi‐
cle is stuck in sn ow. #
When the engine or thest ationary
heater are running, keep theta ilpipe
and the area around theve hicle clear of
sno w. #
Open a window on the side of theve hi‐
cle facing the wind toensure an ade‐
qu ate supply of fresh air. &
WARNING Risk of accident due tothe
brake sy stem overheating
If yo u lea veyour foot on the brake pedal
when driving, the brake sy stem may over‐
heat.
This increases the braking dis tance and the
brake sy stem may evenfa il. #
Never use the brake pedal as a foot re st. #
Do not depress the brake pedal and the
accelerator pedal at the same time
while driving. *
NO
TECausing wearto the brake linings
by permanently depressing the brake
pedal #
Do not permanently depress the brake
pedal while driving. #
Touse braking ef fect of the engine,
shift toa lo werge ar in good time. *
NO
TEDama getothe driv etra in and
engine when pulling away #
Do not warm upthe engine while the
ve hicle is stationar y.Pull away immedi‐
atel y. #
Avoid high engine speeds and driving at
full thro ttle until the engine has reached
its operating temp erature. *
NO
TEDama getothe catalytic con verter
due tonon-combu sted fuel The engine is not
running smo othly and is
misfiring.
Non-combus ted fuel may get into the cata‐
lytic con verter. #
Only depress the accelera tor pedal
slightl y. #
Have the cause rectified immediately at
a qu alified specialist workshop. 11 6
Driving and pa rking
Page 140 of 473
Sy
stem limitations
R ABS is active from speeds of appr ox.
8 km/h.
R ABS may be impai red or may not function if a
malfunction has occur red and theye l‐
low ! ABSwarning lamp lights up contin‐
uously in the instrument clus ter af terthe
engine is star ted. Fu
nction of BAS (Brake Assist Sy stem) &
WARNING Risk of an accident caused by
a malfunction in BAS (Brake Assi stSys‐
te m)
If BA S is malfunctioning, the braking dis tance
in an emergency braking situation is
increased. #
Dep ress the brake pedal with full force
in emer gency braking situations. ABS
pr eve nts the wheels from locking. BA
S suppo rts yo ur eme rgency braking situation
with additional brake forc e. If
yo u depress the brake pedal quickl y,BA S is
acti vated:
R BAS au tomatical lyboosts the brake pres‐
sure.
R BAS can sho rten the braking dis tance.
R ABS pr events the wheels from locking.
The brakes will function as usual once you
re lease the brake pedal. BAS is deactivated. Fu
nction of ESP ®
(Electronic Stability Pro‐
gr am) &
WARNING Risk of skidding if ESP ®
is
malfunctioning
If ESP ®
is malfunctioning, ESP ®
cannot car ry
out vehicle stabilisation. In addition, other
driving saf ety sy stems are switched off. #
Drive on carefull y. #
Have ESP ®
ch ecked at a qualified spe‐
cialist workshop. Yo
u can select between thefo llowing modes of
ESP ®
:
R ESP ®
on
R SPO RThandling mode on
R ESP ®
off
Characteristics when ESP ®
is activated
ESP ®
monitors and impr oves driving stability and
traction, particular lyin thefo llowing situations:
R When pulling away on wet or slippe rycar ria‐
ge wa ys.
R When braking.
R Instro ng sidewinds when you are driving
fast erthan 70 km/h.
ESP ®
can stabilise theve hicle byinter vening in
th efo llowing ways:
R One or more wheels are braked.
R The engine output is adap ted according to
th e situation.
ESP ®
is activated everytime the engine is star‐
te d, rega rdless of whe ther ESP ®
wa s in SPORT Driving and parking
137
Page 141 of 473
handling mode or
was deactivated before the
engine was switched off.
ESP ®
is inter vening if the ESP ®
÷ warning
lamp flashes in the instrument clus ter:
R Do not deacti vate ESP ®
.
R Only depress the accelera tor pedal as far as
is necessar y.
R Adapt your driving style to suit the cur rent
ro ad and weather conditions.
Cha racteristics of activated SPORT handling
mode &
WARNING Risk of skidding due toincor‐
re ct application of SPORT handling mode
When you activate SPORT handling mode,
th ere is an increased risk of skidding and
having an accident. #
Only activate SPORT handling mode in
the circums tances described as follo ws. Select SPORT handling mode when
theve hicle's
ow nov ersteering and under steering characteris‐ tics are desired,
forex ample when driving on
specially designated roads.
On lya high ly qualified and experienced driver
should drive in SPORT handling mode or with
ESP ®
deactivated.
If SPORT handling mode is activated and one or
more wheels start tospin, the÷ ESP®
wa rn‐
ing lamp in the instrument clus terflashes. ESP ®
th en only stabilises theve hicle toa limited
deg ree.
If SPORT handling mode is activated:
R ESP ®
only impr oves driving stability toa limi‐
te d deg ree.
R ETS/4ETS traction control is still active.
R The engine's torque is on lyrestricted to a
limited degree and the drive wheels can spin.
The spinning of the wheels results in a cut‐
ting action for better traction on loose sur fa‐
ces.
R ESP ®
continues toprov ide assis tance when
th e brakes are firm lyapplied. Cha
racteristics when ESP ®
is deactivated &
WARNING Risk of skidding if ESP ®
is
deactivated
If yo u deactivate ESP ®
, ESP ®
cannot car ry
out vehicle stabilisation. #
ESP ®
should on lybe deactivated in the
fo llowing situations. ESP
®
is deactivated if theå ESP®
OFF warn‐
ing lamp lights up continuously in the instrument
clus ter:
R Driving stability will no lon ger be impr oved.
R Crosswind Assist is no longer active.
R The drive wheels could spin.
R ETS/4ETS traction control is still active.
% Even when ESP ®
is deactivated, you are still
assis tedby ESP ®
when braking ha rd.
In thefo llowing situations, it may be better to
activate SPO RThandling mode or deactivate
ESP ®
:
R When using snow chains. 13 8
Driving and pa rking
Page 142 of 473
R
In deep sno w.
R On sand or gra vel.
% Spinning the wheels results in a cutting
action which pr ovides better grip.
% Activate ESP ®
as soon as the situations
described abo veno longer apply. ESP ®
will
ot herwise not be able tostabilise theve hicle
if th eve hicle starts toskid or a wheel starts
to spin.
If th e÷ ESP®
wa rning lamp lights up continu‐
ousl y,ESP ®
is not available due toa malfunction.
Obse rve any information which may be displa yed
in the instrument clus ter:
R Warning and indicator lamps (/ page416)
R Displ aymessa ges (/ page374)
ETS/4ETS (Electronic Traction Sy stem)
ETS/4E TStraction control is pa rtof ESP ®
.
ETS/4ETS can impr oveth eve hicle's traction by
inter vening in thefo llowing ways:
R The drive wheels are braked individually if
th ey spin. R
More drive torque is transferred tothe wheel
or wheels with traction. Ac
tivating/deactivating ESP ®
(Electronic Sta‐
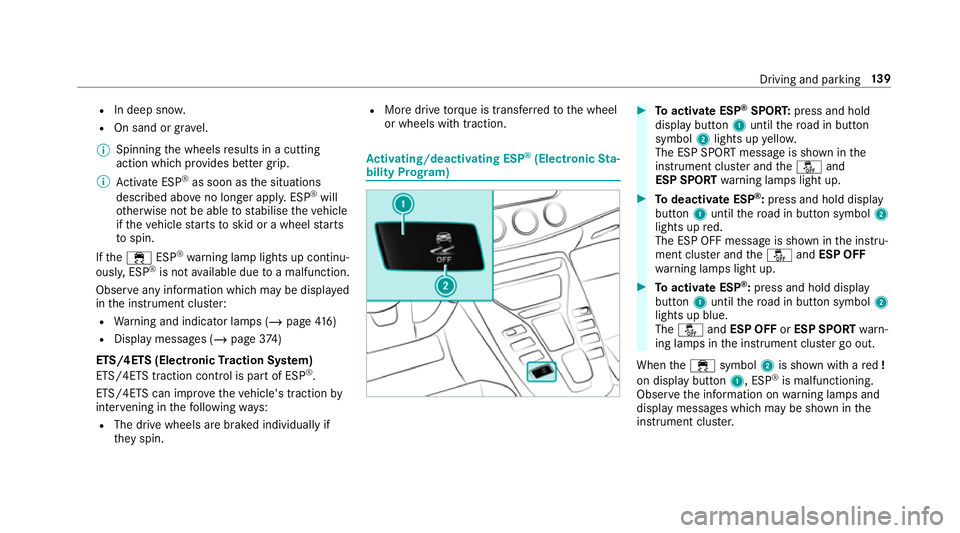
bility Prog ram) #
Toactivate ESP ®
SPORT: press and hold
display button 1until thero ad in button
symbol 2lights up yello w.
The ESP SPORT message is shown in the
instrument clus ter and theå and
ESP SPORT warning lamps light up. #
Todeactivate ESP ®
:press and hold displ ay
button 1until thero ad in button symbol 2
lights up red.
The ESP OFF message is shown in the instru‐
ment clus ter and theå andESP OFF
wa rning lamps light up. #
Toactivate ESP ®
:press and hold display
button 1until thero ad in button symbol 2
lights up blue.
The å andESP OFF orESP SPORT warn‐
ing lamps in the instrument clus ter go out.
When the÷ symbol 2is shown with a red!
on display button 1, ESP®
is malfunctioning.
Obser vethe information on warning lamps and
display messages which may be shown in the
instrument clus ter. Driving and pa
rking 13 9