2018 MERCEDES-BENZ AMG GT COUPE change time
[x] Cancel search: change timePage 271 of 465

Editing access data
Re
quirements:
R The mobile phone supports the Blue tooth®
DUN profile.
Multimedia sy stem:
4 System 5
ö Connectivity
5 Internet settings #
Highlight the mobile phone. #
Select ¥. #
Select Change configuration .#
For mobile phones with PAN and DUN:
select Configure settings using COMAND. #
Configure the Internet connection using pre‐
set or manual access data (/ page 266).
Cancelling Internet access permission for a
mobile phone
Multimedia sy stem:
4 System 5
ö Connectivity
5 Internet settings #
Highlight the mobile phone. #
Select ¥. #
Select Delete configuration. #
Select Yes.
Displaying mobile phone details
Multimedia sy stem:
4 System 5
ö Connectivity
5 Internet settings #
Highlight the mobile phone. #
Select ¥. #
Select Details.
Establishing an Internet connection
Multimedia sy stem:
4 Connect #
Forex ample, select zBrowser .
% The multimedia sy stem usually es tablishes
th e Internet connection automaticall y.Ifthe
multimedia sy stem is not connected tothe
Internet, the Internet connection is es tab‐
lished when an Internet application is used.
% The availability of web br ows ers is count ry-
dependent. Connection
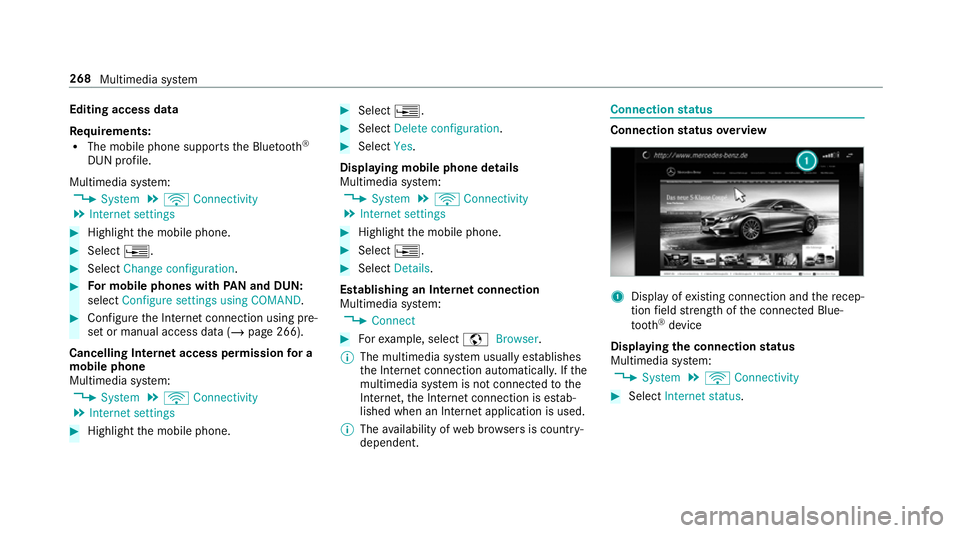
status Connection
status overview 1
Display of existing connection and there cep‐
tion field stre ngth of the connected Blue‐
tooth ®
device
Displaying the connection status
Multimedia sy stem:
4 System 5
ö Connectivity #
Select Internet status .268
Multimedia sy stem
Page 273 of 465

Multimedia sy
stem:
4 Connect 5
z Browser
5 z Enter URL #
Ente r aweb address.
% The function is count ry-dependent. #
Tofinish the entry and call up thewe b‐
site: select ¬.
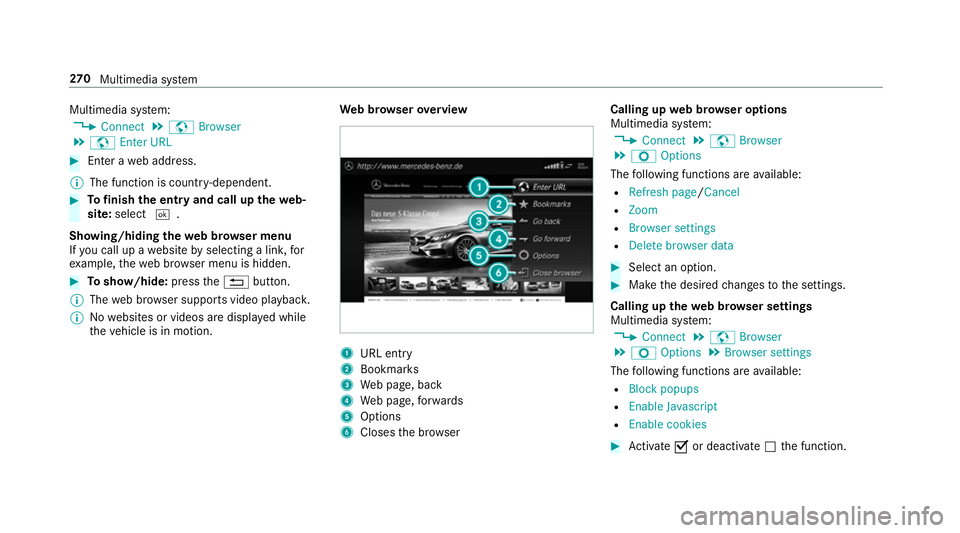
Showing/hiding thewe b br ows er menu
If yo u call up a website byselecting a link, for
ex ample, thewe b br ows er menu is hidden. #
Toshow/hide: pressthe% button.
% The web br ows er supports video playbac k.
% Nowebsites or videos are displa yed while
th eve hicle is in motion. We
b br owser overview 1
URL ent ry
2 Bookma rks
3 Web page, back
4 Web page, forw ards
5 Options
6 Closes the br ows er Calling up
web br owser options
Multimedia sy stem:
4 Connect 5
z Browser
5 Z Options
The following functions are available:
R Refresh page /Cancel
R Zoom
R Browser settings
R Delete browser data #
Select an option. #
Make the desired changes tothe settings.
Calling up thewe b br owser settings
Multimedia sy stem:
4 Connect 5
z Browser
5 Z Options 5
Browser settings
The following functions are available:
R Block popups
R Enable Javascript
R Enable cookies #
Activate Oor deacti vate ª the function. 270
Multimedia sy stem
Page 293 of 465

The
TVtuner enables reception of digital chan‐
nels according tothefo llowing standards:
R DVB-T
R DVB-T2
In some countries, thest andards may not be
av ailable, or may not be available in all areas.
A CI+ module (Common In terface Module),
which is not included in the scope of deliver y,is
used todecrypt HD prog rammes according to
th e CI+ standard. In some countries, an addi‐
tional smart card is required, which is inse rted
into the CI+ module (see the manufacturer's
operating manual).
The TVtuner is behind the front passenger seat
on theright, rear wheel ar ch. The CI+ module is
inse rted into theTV tune r.
* NO
TEDama getothe CI+ module and
Smart Card The CI+ module is designed
for use in the
home. The CI+ module can overheat and be
damaged bycontinuous exposure tohigh
outside temp eratures. #
Make sure that the CI+ module is not
subject tohigh temp eratures forex ten‐
ded pe riods of time.
If th e CI+ module is damaged, no
encryp tedch annels can be recei ved. The
TVtuner can recei veprogrammes in Dolby
Digital Plus. Manufactured under licence from Dolby Labora‐
to
ries. Dolb y,Dol byAudio and the double-D sym‐
bol are trademar ksof Dolby Laboratories.
The TVtuner au tomatically sets theTV standard.
TV reception is dependent on thefo llowing fac‐
to rs:
R Speed
R Characteristics of the selected TVchannel
TV reception may be influenced bythefo llowing
fa ctors:
R Electronic devices whi chare take n into the
ve hicle may impair TVreception.
R The conditions forre ception may change
whilst theve hicle is in motion.
Po or reception conditions can ha vethefo llowing
ef fect:
R The TVtuner switches toan alternative chan‐
nel with better reception whi chis digitally
broadcasting the same programme conte nt.
R The TVtuner mu testh e sound, freezes the
screen or hides it. The tsymbol appears
in the displa y. 290
Multimedia sy stem
Page 297 of 465

#
Press theD button on theto uchpad.
The media menu is called up. #
Navigate up or down.
The next or pr evious TVchannel is selec ted.
Displaying cur rent prog ramme in form ation
fo r the selected channel (EPG)
Multimedia sy stem:
4 Media 5
à Media sources 5
TV
5 Z Options #
Select Electronic Program Guide.
EPG displa ys thefo llowing information (if
av ailable):
R broadcast times
R names of the cur rent and upcoming pro‐
grammes #
Select programme information and confirm.
The de tails are displa yed. #
Toscroll: swipe up or down on theto uch‐
pad. #
Toexitth e detailed displa y:press the%
button. Fu
nction of thech annel fix setting
Channel fix is switched on
The channel is not changed. This is useful if, for
ex ample, you drive theve hicle thro ugh reception
re gions that ove rlap. It pr events frequent switch‐
ing ba ckand forth between channels.
The FIXindicator is displa yed af terth e name of
th eTV channel.
Channel fix is switched off
Depending on reception qualit y,theTV tuner
au tomatical lyswitches toan alternative channel
with the same programme conte nt but better
re ception. Using this function, the best possible
te levision picture can be found, rega rdless of the
re ception qualit y.
Ac tivating/deactivating channel fix
Multimedia sy stem:
4 Media 5
à Media sources 5
TV
5 Z Options #
Switch Channel fix onO or off ª. Channel list
overview The
TVtuner sho wsthe cur rent programme on
th e digital TVchannels or radio stations with
adequate reception in its ownch annel list.
The order of thech annel lists is alphabetical or
countr y-specific.
The TVtuner requ ires a short amount of time to
update the information.
The channel lists show thefo llowing information:
R recei vable channel names
R programme title
The information is shown under thefo llowing
conditions:
R it is broadcast bythe digital channel
R there ception conditions are adequate Favo
urites Overview of
TVprog rammes (f avourites)
Yo u can create a total of 40 digital TVchannel
fa vo urites. 294
Multimedia sy stem
Page 301 of 465

R
Balance and Fader
R Automatic volume adjustment
R Other sound settings #
Select a sound menu.
Ad justing treble, mid- range and bass set‐
tings
Multimedia sy stem:
4 Media 5
à Sound 5
Equaliser #
Select Treble, MidorBass. #
Change the settings.
Ac tivating/deactivating automatic volume
adjustment
Multimedia sy stem:
4 Media 5
à Sound
5 Automatic volume adjustment
Au tomatic volume adjustment compensates for
dif fering volumes when changing between audio
sources. #
Activate Oor deacti vate ª the function. Ad
justing the balance/ fader
Multimedia sy stem:
4 Media 5
à Sound
5 Balance and Fader #
Adjust the balance and fader. #
Toexitth e menu: pressthe% button. Burmes
ter®
sur round sound sy stem Information about
the Bu rmester ®
sur round
sound sy stem
The Burmes ter®
sur round sound sy stem has a
to ta l output of 640 W and is equipped with 14
speakers. It is available for all functions in the
ra dio and media modes.
Calling up the sound menu in the
Bu rm ester ®
sur round sound sy stem
Multimedia sy stem:
4 Media 5
à Sound
The following functions are available:
R Equaliser
R Balance and Fader R
Automatic volume adjustment
R Surround sound
R Sound focus
R Other sound settings #
Select a function.
Ad justing the treble, mid and bass settings
on the Burmes ter®
sur round sound sy stem
Multimedia sy stem:
4 Media 5
à Sound 5
Equaliser #
Select Treble, MidorBass. #
Set the desired values.
Ac tivating/deactivating volume adjustment
in the Bu rmester ®
sur round sound sy stem
Multimedia sy stem:
4 Media 5
à Sound
5 Automatic volume adjustment
Au tomatic volume adjustment compensates for
dif fering volumes when changing between audio
sources. #
Activate Oor deacti vate ª the function. 298
Multimedia sy stem
Page 323 of 465

Ty
res without run-flat characteristics: #
Do not drive on with a flat tyre. #
Chan getheflat tyre immediately with
an emer gency spa rewheel or spare
wheel. Alternativel y,consult a qualified
specialist workshop.
Ty res with run-flat characteristics: #
Obse rveth e information and warning
no tes on MOExtended tyres (run-flat
tyres). In
theeve nt of a flat tyre, thefo llowing options
are available depending on your vehicle's equip‐
ment:
R Vehicles with MOExtended tyres: it is pos‐
sible tocontinue the journey for a short
period of time. Make sure you obse rvethe
no tes on MOExtended tyres (run-flat tyres)
(/ page 320).
R Vehicles with a TIREFIT kit: you can repair
th e tyre so that it is possible tocontinue the
jou rney for a short period of time. Todo this,
use the TIREFIT kit (/ page 321). R
Vehicles with Mercedes me connect: you
can make a call for breakdown assi stance via
th eove rhead control panel in the case of a
breakdown (/ page 259).
R Allvehicles: change the wheel
(/ page 350). Note
s on MOExtended tyres (run-flat tyres) &
WARNING Risk of accident when driving
in emergency mode
When driving in emergency mode, the han‐
dling characteristics are impaired. e.g. when
cornering, when accelerating stronglyand
when braking. #
Do not exceed the permissible maxi‐
mum speed. #
Avoid any abrupt steering and driving
maneuvers as well as driving over
obs tacles (curbs, pot holes, off-road).
This applies, in pa rticular, toa loaded
ve hicle. #
Stop driving in the emer gency mode if
yo u notice:
R banging noise
R vehicle vibration
R smoke which smells like rubber
R continuous ESP ®
inter vention
R crac ksin tire side walls #
After driving in emergency mode ha ve
th erims checkedby aqu alified special‐
ist workshop with rega rd totheir fur ther
use. #
The defective tire must be replaced in
eve rycase. Wi
th MOExtended tyres (run-flat tyres), you can
continue todrive your vehicle even if there is a
tot al loss of pressure in one or more tyres. How‐
eve r,th e tyre af fected must not show any clearly
visible damage.
Yo u can recognise MOExtended tyres bythe
MOExtended marking which appears onthe side
wa ll of the tyre. 320
Breakdown assis tance
Page 345 of 465

ing condition (/
page 340). Observethe
no tes on tyre temp erature (/ page 339).
% The values displa yed in the multifunction dis‐
play may deviate from those of the tyre pres‐
sure gauge as they referto sea le vel.At high
altitudes, the tyre pressure values indicated
by a pressure gauge are higher than those
shown bythe on-board computer. In this
case, do not reduce the tyre pressure.
Make sure toobser vethefo llowing fur ther rela‐
te d subjec t:
R Notes on tyre pressure (/ page 339)
Rest arting the ty repressure moni toring sys‐
tem
Requ irements:
R The recommended tyre pressure is cor rectly
set forth ere spective operating status on
each of thefo ur wheels (/ page 339).
Re start the tyre pressure monitoring sy stem in
th efo llowing situations:
R The tyre pressure has changed. R
The wheels or tyres ha vebeen changed or
newly fitted.
On-boa rdcompu ter:
4 Service 5
Tyres #
Swipe down wards on Touch Control on the
left-hand side of thesteering wheel.
The Use current tyre pressures as new refer-
ence values? message is shown in the multi‐
function displa y. #
Tobegin restart, press Touch Control on the
left-hand side of thesteering wheel.
The Tyre press. monitor restarted message is
shown in the multifunction displa y.
Cur rent wa rning messages are dele ted and
th eye llow h warning lamp goes out.
Af teryo u ha vebeen driving for a few
minutes, the sy stem checks whe ther the cur‐
re nt tyre pressures are wi thin the specified
ra nge. The cur rent tyre pressures are then
accep ted as refere nce values and monitored.
Make sure toobser vethefo llowing fur ther rela‐
te d subjec t:
R Notes on tyre pressure (/ page 339)Ra
dio equipment appr oval of the ty repres‐
sure moni toring sy stem
Ra dio equipment appr oval numbers
Missing values werenot available at the time of
going topress. 342
Wheels and tyres
Page 354 of 465

R
The vehicle is not on a slope.
R The vehicle is on solid, non-slippery and le vel
ground. #
Apply the electric parking brake manually. #
Movethe front wheels tothest ra ight-ahead
position. #
Shift the transmission toposition j. #
Switch off the engine. #
Make sure that the engine cann otbe star ted. #
Place choc ks orother suitable items under
th e front and rear of the wheel that is diago‐
nally opposite the wheel you wish tochange. #
Remo vethe hub caps if necessary . #
Raise theve hicle (/ page 351). Fi
tting/ removing pla stic hub caps Re
moving #
Remo vesoc ket2 and wheel wrench 3
from theve hicle tool kit (/ page 350). #
Position soc ket2 on hub cap 1. #
Position wheel spanner 3on soc ket2. #
Using wheel spanner 3, turn hub cap1
anti-clo ckwise and remo veit.
Fi tting #
Before fitting, check hub cap 1and the
wheel area for dirt, and clean if necessar y. #
Position hub cap 1and turn until it is in the
ri ght position. #
Position soc ket2 on hub cap 1. #
Position wheel wrench 3on soc ket2 and
tighten hub cap 1.
Speci fied tigh tening torq ue: 25 Nm. Ra
ising theve hicle when changing a wheel Re
quirements:
R There are no persons in theve hicle.
R The vehicle has been prepared for a wheel
ch ange (/ page 350).
Important no tes on using the jack:
R Only use theve hicle-specific jack that has
been tested and appr oved byMercedes-Benz
to raise theve hicle.
R The jack is only designed forra ising and
holding theve hicle for a short time while a
wheel is being changed and not for mainte‐
nance workunder theve hicle. Wheels and tyres
351