2018 MERCEDES-BENZ AMG GT COUPE heater
[x] Cancel search: heaterPage 82 of 465

&
WARNING Risk of inju rydue tohead
re stra ints which are not fitted or are
adjus ted inco rrectly
If head restra ints are not fitted or are adjus‐
te d incor rectl y,they cannot pr ovide pr otec‐
tion as intended.
There is an increased risk of injury in the
head and neck area, e.g. in theeve nt of an
accident or when braking. #
Alw ays drive with the head restra ints
fi tted. #
Before driving off, ma kesure forev ery
ve hicle occupant that the cent reofthe
head restra int supports the back of the
head at about eye le vel. #
Toraise: pullthe head restra int up. #
Tolowe r:push the head restra int down. Switching
the seat heater on and off &
WARNING Risk of bu rns due torepeat‐
edly switching on the seat heater
Re peatedly switching on the seat heater can
cause the seat cushion and seat backrest
padding tobecome very hot.
The health of persons with limited temp era‐
ture sensitivity or a limited ability toreact to high
temp eratures may be af fected or they
may even su ffer burn-like injuries. #
Do not repeatedly switch on the seat
heater. To
protect against overheating, the seat heater
may be temp orarily deactivated af ter it is
switched on repeatedly.
* NO
TEDama getothe seats caused by
objects or documents when the seat
heater is switched on When
the seat heater is switched on, over‐
heating can occur due toobjects or docu‐
ments placed on the seats e.g. seat cushions
or child seats. This could cause damage to
th e seat sur face. #
Makesure that no objects or docu‐
ments are on the seats when the seat
heater is switched on. Re
quirements:
R the po wer supp lyis switched on Seats and
stowing 79
Page 83 of 465
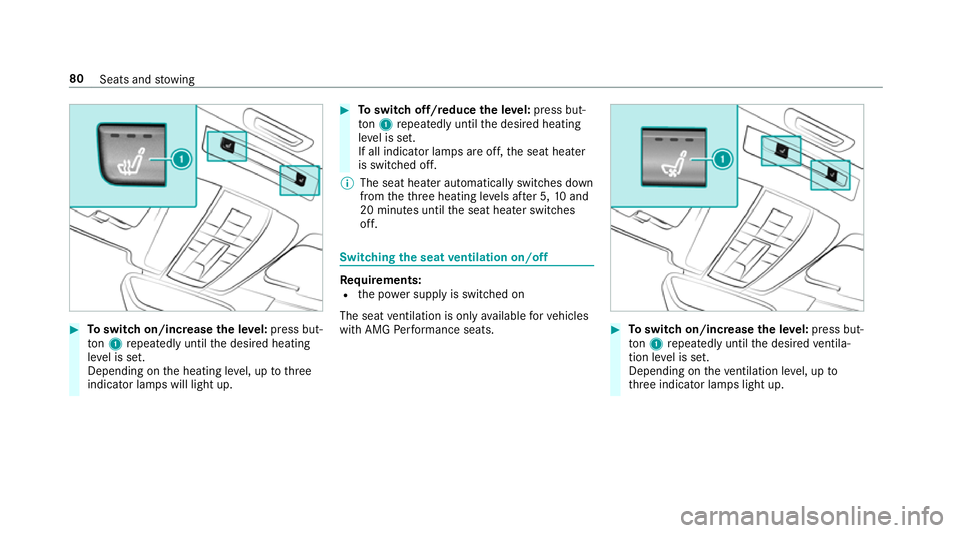
#
Toswitch on/increase the le vel:press but‐
to n1 repeatedly until the desired heating
le ve l is set.
Depending on the heating le vel, up tothree
indicator lamps will light up. #
Toswitch off/reduce the le vel:press but‐
to n1 repeatedly until the desired heating
le ve l is set.
If all indicator lamps are off, the seat heater
is switched off.
% The seat heater automatically switches down
from theth re e heating le vels af ter 5, 10and
20 minutes until the seat heater switches
off. Switching
the seat ventilation on/off Re
quirements:
R the po wer supp lyis switched on
The seat ventilation is only available forve hicles
with AMG Performance seats. #
Toswitch on/increase the le vel:press but‐
to n1 repeatedly until the desired ventila‐
tion le vel is set.
Depending on theve ntilation le vel, up to
th re e indicator lamps light up. 80
Seats and stowing
Page 107 of 465
Overview of climate control sy
stems Note
s on climate control An interior air
filter must alw ays be used so that
th e air conditioning sy stem, pollution le vel moni‐
to ring and the air filtering function workcor‐
re ctly. Ma kesure that thefilter is ins talled cor‐
re ctly and thefilter housing in the engine com‐
partment is closed cor rectly using the cap and
alw ays tightly sealed when in operation. Use fil‐
te rs recommended and appr ovedby Mercedes-
Benz. Alw ays ha veservice workcar ried out at a
qu alified specialist workshop. THERMOTRONIC control panel
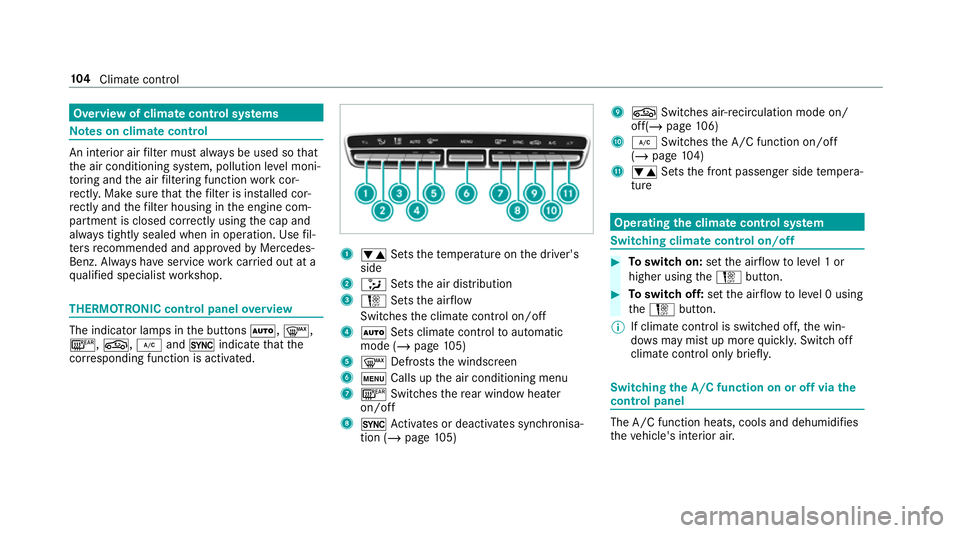
overview The indicator lamps in
the buttons Ã,¬,
¤, g,¿and0 indicate that the
cor responding function is activated. 1
w Setsthete mp erature on the driver's
side
2 _ Setsthe air distribution
3 H Setsthe air flow
Switches the climate control on/off
4 Ã Sets climate control toautomatic
mode (/ page105)
5 ¬ Defrosts the windscreen
6 t Calls up the air conditioning menu
7 ¤ Switches there ar wind owheater
on/off
8 0 Activates or deacti vates synchronisa‐
tion (/ page105) 9
g Switches ai r-re circulation mode on/
off(/ page 106)
A ¿ Switches the A/C function on/off
(/ page 104)
B w Setsthe front passenger side temp era‐
ture Operating
the clima tecont rol sy stem Switching clima
tecont rol on/off #
Toswitch on: setthe air flow toleve l 1 or
higher using theH button. #
Toswitch off: setthe air flow toleve l 0 using
th eH button.
% If climate control is switched off, the win‐
do ws may mist up more quickl y.Switch off
climate control only brie fly. Switching
the A/C function on or off via the
cont rol panel The A/C function heats, cools and dehumidifies
th
eve hicle's interior air. 104
Climate cont rol
Page 114 of 465
#
Do not shi ftdown on slippery road sur‐
fa ces toinc rease the engine braking
ef fect. &
DANG ER Risk of fata l injuries due topoi‐
sonous exhaust gases
If th eta ilpipe is bloc ked or suf ficient ventila‐
tion is not possible, poisonous exhaust gases
such as carbon monoxide may enter theve hi‐
cle. This is the case, forex ample, if theve hi‐
cle is stuck in sn ow. #
When the engine or thest ationary
heater are running, keep theta ilpipe
and the area around theve hicle clear of
sno w. #
Open a window on the side of theve hi‐
cle facing the wind toensure an ade‐
qu ate supply of fresh air. &
WARNING Risk of accident due tothe
brake sy stem overheating
If yo u lea veyour foot on the brake pedal
when driving, the brake sy stem may over‐
heat.
This increases the braking dis tance and the
brake sy stem may evenfa il. #
Never use the brake pedal as a foot re st. #
Do not depress the brake pedal and the
accelerator pedal at the same time
while driving. *
NO
TECausing wearto the brake linings
by permanently depressing the brake
pedal #
Do not permanently depress the brake
pedal while driving. #
Touse braking ef fect of the engine,
shift toa lo werge ar in good time. *
NO
TEDama getothe driv etra in and
engine when pulling away #
Do not warm upthe engine while the
ve hicle is stationar y.Pull away immedi‐
atel y. #
Avoid high engine speeds and driving at
full thro ttle until the engine has reached
its operating temp erature. *
NO
TEDama getothe catalytic con verter
due tonon-combu sted fuel The engine is not
running smo othly and is
misfiring.
Non-combus ted fuel may get into the cata‐
lytic con verter. #
Only depress the accelera tor pedal
slightl y. #
Have the cause rectified immediately at
a qu alified specialist workshop. Driving and parking
111
Page 123 of 465
#
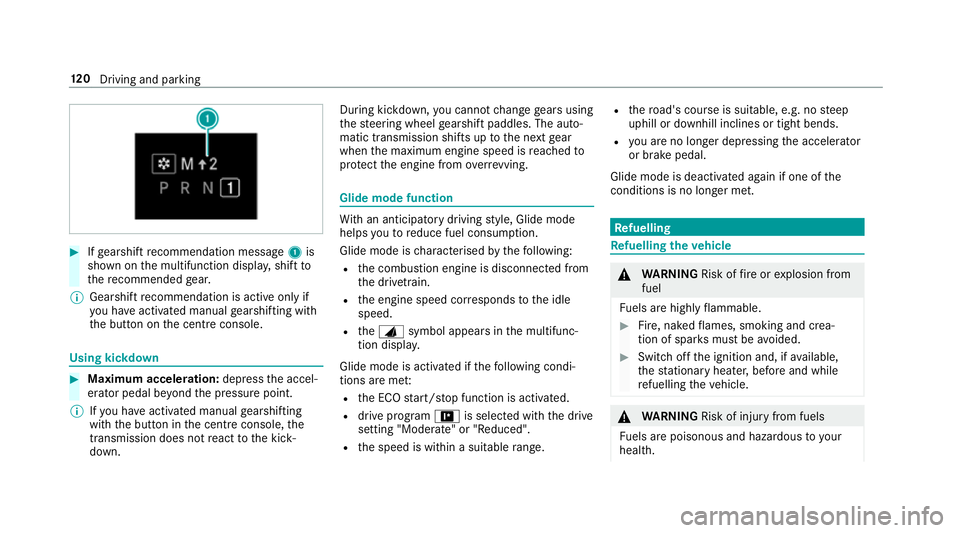
Ifge arshift recommendation message 1is
shown on the multifunction displa y,shift to
th ere commended gear.
% Gearshift recommendation is acti veonly if
yo u ha veactivated manual gearshifting with
th e button on the cent reconsole. Using kickdown
#
Maximum acceleration: depress the accel‐
erator pedal be yond the pressure point.
% Ifyo u ha veactivated manual gearshifting
with the button in the cent reconsole, the
transmission does not react tothe kick‐
down. During kickdown,
you cannot change gears using
th esteering wheel gearshift paddles. The auto‐
matic transmission shifts up tothe next gear
when the maximum engine speed is reached to
pr otect the engine from overrev ving. Glide mode function
Wi
th an anticipatory driving style, Glide mode
helps youto reduce fuel consum ption.
Glide mode is characterised bythefo llowing:
R the combustion engine is disconnected from
th e driv etra in.
R the engine speed cor responds tothe idle
speed.
R theJ symbol appears in the multifunc‐
tion displa y.
Glide mode is activated if thefo llowing condi‐
tions are me t:
R the ECO start/ stop function is activated.
R drive program =is selected with the drive
setting "Moderate" or "Reduced".
R the speed is within a suitable range. R
thero ad's course is suitable, e.g. no steep
uphill or downhill inclines or tight bends.
R you are no lon ger depressing the accelera tor
or brake pedal.
Glide mode is deactivated again if one of the
conditions is no longer met. Re
fuelling Re
fuelling theve hicle &
WARNING Risk offire or explosion from
fuel
Fu els are highly flammable. #
Fire, naked flames, smoking and crea‐
tion of spar ksmust be avoided. #
Swit choff the ignition and, if available,
th est ationary heater, before and while
re fuelling theve hicle. &
WARNING Risk of inju ryfrom fuels
Fu els are poisonous and hazardous to your
health. 12 0
Driving and pa rking
Page 333 of 465
#
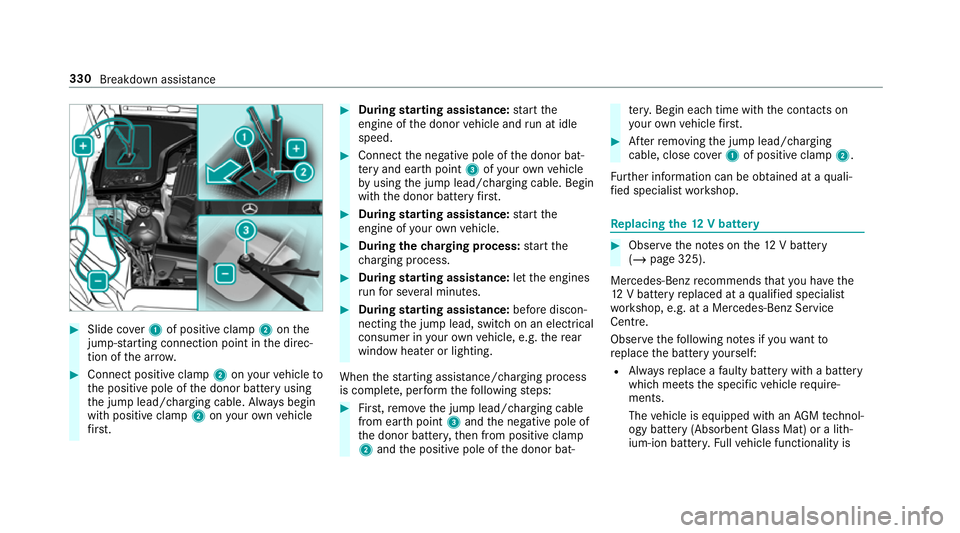
Slide co ver1 of positive clamp 2onthe
jump-s tarting connection point in the direc‐
tion of the ar row. #
Connect positive clamp 2onyour vehicle to
th e positive pole of the donor battery using
th e jump lead/charging cable. Alw ays begin
with positive clamp 2onyour ow nve hicle
fi rs t. #
During starting assi stance: start the
engine of the donor vehicle and run at idle
speed. #
Connect the negative pole of the donor bat‐
te ry and ear thpoint 3ofyour ow nve hicle
by using the jump lead/charging cable. Begin
with the donor battery firs t. #
During starting assi stance: start the
engine of your ow nve hicle. #
During thech arging process: start the
ch arging process. #
During starting assi stance: letthe engines
ru nfo r se veral minutes. #
During starting assi stance: before discon‐
necting the jump lead, switch on an electrical
consumer in your ow nve hicle, e.g. there ar
wind owheater or lighting.
When thest arting assis tance/charging process
is compl ete, per form thefo llowing steps: #
First,re mo vethe jump lead/charging cable
from ear thpoint 3and the negative pole of
th e donor batter y,then from positive clamp
2 and the positive pole of the donor bat‐ te
ry. Begin ea chtime wi th the conta cts on
yo ur ow nve hicle firs t. #
Afterre moving the jump lead/charging
cable, close co ver1 of positive clamp 2.
Fu rther information can be obtained at a quali‐
fi ed specialist workshop. Re
placing the 12V battery #
Obser vethe no tes on the12 V battery
(/ page 325).
Mercedes-Benz recommends that you ha vethe
12 V battery replaced at a qualified specialist
wo rkshop, e.g. at a Mercedes-Benz Service
Centre.
Obser vethefo llowing no tes if youwa ntto
re place the battery yourself:
R Alw aysre place a faulty bat tery with a battery
which meets the specific vehicle require‐
ments.
The vehicle is equipped with an AGMtech nol‐
ogy battery (Absorbent Glass Mat) or a li th‐
ium-ion batter y.Fu llve hicle functionality is 330
Breakdown assis tance
Page 364 of 465
Operating
fluids include thefo llowing:
R fuels
R lubricants
R coolant
R brake fluid
R windsc reen washer fluid
R climate cont rol sy stem refrigerant
Only use products app rove dby Mercedes-Benz.
Damage caused bythe use of products that ha ve
not been appr oved is not co veredby the
Mercedes-Benz warranty or goodwill gestures.
Yo u can identify operating fluids appr ovedby
Mercedes-Benz bythefo llowing insc ript ions on
th e conta iner:
R MB- Freigabe (e.g. MB-Fr eigabe 229.51 )
R MB-Appr oval (e.g. MB-App rova l 229.51)
Fu rther information on appr oved operating fluids
is available at thefo llowing locations:
R inthe Mercedes-Benz Specifications for
Operating Fluids byentering the designation
- at http://be vo.mercedes-benz.com -
inthe Mercedes-Benz BeVo App
R at a qualified specialist workshop &
WARNING Risk offire or explosion from
fuel
Fu els are highly flammable. #
Fire, naked flames, smoking and crea‐
tion of spar ksmust be avoided. #
Swit choff the ignition and, if available,
th est ationary heater, before and while
re fuelling theve hicle. &
WARNING Risk of inju ryfrom fuels
Fu els are poisonous and hazardous to your
health. #
Do not swallow fuel or let it come into
contact with skin, eyes or clo thing. #
Do not inhale fuel vapour. #
Keep children away from fuel. #
Keep doors and windo wsclosed du ring
th ere fuelling process. If
yo u or other people come into contact with
fuel, obser vethefo llowing: #
Immediately rinse fuel off your skin with
soap and water. #
If fuel comes into contact with your
ey es, immediately rinse them thor‐
oughly with clean water.Seek medical
attention immediately. #
Ifyo u swallow fuel, seek medical atten‐
tion immediatel y.Do not induce vomit‐
ing. #
Change immediately out of clo thing that
has come into con tact wi thfuel. Fu
el Information on fuel
grades forve hicles with
petrol engines
Obser vethe no tes on operating fluids
(/ page 360). Te
ch nical da ta361
Page 454 of 465
Ru
n-flat characteristics
MOExtended tyres ............................... 320
Ru nning-in no tes .....................................1 09S
Saf ety sy stems
see Driving saf ety sy stem
Saf etyve st ............................................... 318
Satellite map ...........................................2 38
SD card Inserting/removing .............................. 274
Seat .............................................................74
4-w aylumbar support ............................ 77
Ad justing (electrically) ........................... 77
Cor rect driver's seat position ................ 74
Operating the memory function ............ 83
Setting ................................................... 75
Setting options ...................................... 12
Seat belt ............................................... 29, 33
Ac tivating/deactivating seat belt
adjustment ............................................ 33
Ca re ..................................................... 316
Fa stening ............................................... 32 Pr
otection ..............................................29
Re duced pr otection ...............................30
Re leasing .............................................. .33
Seat belt adjustment (function) ............. 33
Wa rning lamp ........................................ 33
Seat belt adju stment
Ac tivating/deactivating ......................... 33
Fu nction ................................................ 33
Seat belt tensioners
Ac tivation .............................................. 28
Seat belt warning
see Seat belt
Seat co ver (Care) ..................................... 316
Seat heater Activating/deactivating ......................... 79
Seat ventilation
Ac tivating/deactivating ......................... 80
Second telephone ............................ 242, 24 3
Connecting .......................................... 24 2
Fe atures .............................................. 24 3
Selecting a gear
see Changing gears Selecting
the sound profile
Burmes ter®
high-end 3D sur round
sound sy stem ...................................... 300
Selector le ver
see E-SELECT selector le ver
Self-test Automatic front passenger front air‐
bag shutoff ............................................ 38
Sensors (Care) ........................................ .314
Service Menu (on-board computer) .................. 167
Service see ASS YST PLUS
Service centre see Qualified specialist workshop
Service inter val display
see AS SYST PLUS
Service station sear ch
St arting automatic sear ch................... 224
Setting a speed see Cruise control
Setting summer time ..............................19 9 Index
451