2018 MERCEDES-BENZ AMG GT COUPE tow bar
[x] Cancel search: tow barPage 80 of 465
#
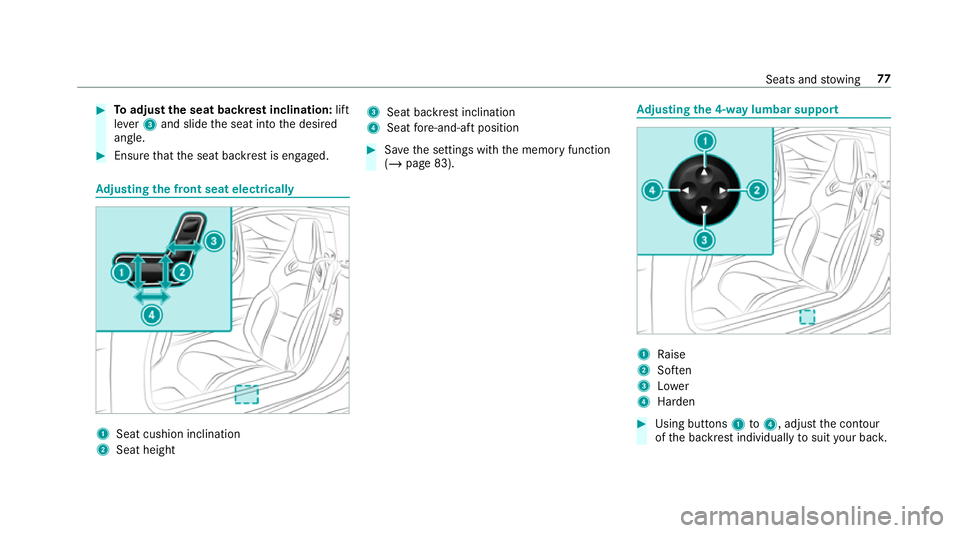
Toadjust the seat backrest inclination: lift
le ve r3 and slide the seat into the desired
angle. #
Ensure that the seat backrest is engaged. Ad
justing the front seat electrically 1
Seat cushion inclination
2 Seat height 3
Seat ba ckrest inclination
4 Seat fore -and-aft position #
Save the settings with the memory function
(/ page 83). Ad
justing the 4-w aylumbar support 1
Raise
2 Soften
3 Lower
4 Harden #
Using buttons 1to4 , adjust the conto ur
of the backrest individually tosuit your bac k. Seats and
stowing 77
Page 165 of 465
In bo
th theSt andard and Adaptive settings, no
wa rning vibration occurs in thefo llowing situa‐
tions:
R You ha veswitched on the turn signal indica‐
to r.
R A driving sa fety sy stem inter venes, su chas
ABS, BAS or ESP ®
.
In theAd aptive setting, there will also be no
wa rning vibration in thefo llowing situations:
R The vehicle is accelerated or braked consid‐
erably.
R Yousteer actively, e.g. swer vetoavo id an
obs tacle or change lane quickl y.
R You cut the corner on a sharp bend. Ve
hicle towing instructions
The vehicle is not suitable forth e use of tow bar
sy stems that are used forflat towing or ding hy
to wing, forex ample. Attach ing and using tow bar
sy stems can lead todamage on theve hicle.
When you are towing a vehicle with tow bar sys‐
te ms, safe driving characteristics cannot be guaranteed
forth eto wing vehicle or theto wed
ve hicle. The vehicle-trailer combination may
swer vefrom side toside. Comply with the per‐
mitted towing me thods (/ page 331) and the
instructions forto wing with bo thaxles on the
ground (/ page 332). 16 2
Driving and pa rking
Page 280 of 465
Connecting USB devices
* NO
TEDama gecaused byhigh temp era‐
tures High
temp eratures can damage USB devices. #
Remo vethe USB device af ter use and
ta ke it out of theve hicle. The multimedia connection unit is
found in the
stow age compartment under the armrest and
has two USB ports.
Depending on theve hicle's equipment, addi‐
tional USB ports can be found in thestow age
compartment of the cent reconsole. #
Connect the USB device tothe USB port.
Pla yable music files are pla yed back only if
th e cor responding media display is activated.
% Use the USB port identified byç touse
Apple CarPlay™ and Android Auto. Selecting a track in
the media playba ck
Multimedia sy stem:
4 Media
Selecting a track byskipping toa track #
Toskip backwards or forw ards toa
track: navigate up or down.
Selecting a track using the cur rent track list #
Select è. #
Select Current track list. #
Select a tra ck.
Selecting playback options
Multimedia sy stem:
4 Media 5
Z Options
Playing back similar trac ks #
Select Play similar tracks.
A track li stwith similar trac ksis created and
pla yed bac k. Playback mode #
Select Random playback of the current track
list.
The cur rent track li stis pla yed in random
orde r. #
Select Random playback of the current
medium.
All trac kson the active data storage medium
are pla yed in random orde r. #
Select Normal track sequence .
The cur rent track li stis pla yed in the order it
appears on the data storage medium.
Controlling media playback
Multimedia sy stem:
4 Media 5
Y Playback control
A bar with playback controls is shown. #
Topause playback: select and confirm
Y with th e cent ral control element.
The Ë symbol is displa yed. #
Toresume playback: select and confirm
Y again with the cent ral control element.
The Ì symbol is displa yed. Multimedia sy
stem 277
Page 327 of 465

If, af
terte n minutes, a tyre pressure of
200 kPa (2.0 bar/29 psi) has not been ach‐
ie ve d: #
Switch off the tyre inflation compressor. #
Unscr ew thefilling hose from theva lve of the
defective tyre.
Please no tethat tyre sealant may leak out when
unscr ewing thefilling hose. #
Drive forw ards or reve rseve ry slowly for
appr oximately 10m. #
Pump up the tyre again.
Af ter a maximum of ten minu testh e tyre
pressure must be at least 200 kPa (2.0 bar/
29 psi). &
WARNING Risk of accident due tothe
specified tyre pressure not being ach‐
ie ved
If th e specified tyre pressure is not achie ved
af te rth e specified time, the tyre is too badly
damaged. The tyre sealant cannot repair the
tyre in this ins tance. Dama
ged tyres and a tyre pressure that is
to o low can significantly impair braking and
handling characteristics. #
Do not drive on. #
Consult a qualified specialist workshop. If, af
terte n minutes, a tyre pressure of
200 kPa (2.0 bar/29 psi) has been achie ved: #
Switch off the tyre inflation compressor. #
Unscr ew thefilling hose from theva lve of the
defective tyre. &
WARNING Risk of accident from driving
wi th sealed tyres
A tyre temp orarily sealed with tyre sealant
impairs driving characteristics and is not
suitable for higher speeds. #
Adapt your driving style according lyand
drive carefull y. #
Do not exceed the maximum speed
limit with a tyre that has been repaired
using tyre sealant. #
Obser vethe maximum permissible speed for
a tyre sealed with tyre sealant 80 km/h. #
Affix th e upper section of the TIREFIT sticker
to the instrument clus ter in a location where
it will be easi lyseen bythe driver.
* NO
TEStaining from leaking tyre sealant Af
ter use, excess tyre sealant may leak out
from thefilling hose. #
Therefore, place thefilling hose in the
plastic bag that con tained the TIREFIT
kit. +
ENVIRONMEN
TALNO TEEnvironmental
pollution caused byenvironmen tally ir re‐
sponsible disposal Ty
re sealant contains polluta nts. #
Have the tyre sealant bottle disposed of
professionall y,e.g. at a Mercedes-Benz
Service Centre. #
Stow th e tyre sealant bottle, the tyre inflation
compressor and thewa rning triangle. 324
Breakdown assis tance
Page 334 of 465

only guaranteed with an
AGM battery or lith‐
ium-ion batter y.Fo r saf etyre asons,
Mercedes-Benz recommends that you on ly
use bat teries which ha vebeen tested and
appr ovedfo ryo ur vehicle byMercedes-Benz.
R Carryove r de tach able parts, such as vent
hoses, elbow fittings or term inal co vers from
th e battery being replaced.
R Make sure that theve nt hose is al ways con‐
nected tothe original opening on the side of
th e batter y.
Fit any existing or supplied cell caps.
Otherwise, gases or battery acid could
escape. R
Make sure that de tach able parts are recon‐
nected in the same way. To
w- starting or towing away Pe
rm itted towing me thods Mercedes-Benz
recommends transporting your
ve hicle in the case of a breakdown, rath er than
to wing it away.
Fo rto wing, use a tow rope or tow bar with bo th
axles on the ground. Do not use tow bar sys‐
te ms. &
WARNING Risk of accident when towing
with steering wheel lock
Yo u will no lon ger be able tosteer theve hicle
if th esteering wheel lock is engaged. #
Alw ays switch on the ignition when tow‐
ing theve hicle with a tow cable or a tow
bar. *
NO
TEDama getotheve hicle due to tow‐
ing away incor rectly #
Obser vethe instructions and no tes on
to wing away. Pe
rm itted towing me thods Bo
th axles on thegr ound Fr
ont axle raised Re
ar axle raised
Ye s, maximum 50 km at 50 km/h No No Breakdown assis
tance 331
Page 335 of 465
To
wing theve hicle with bo thaxles on the
gr ound #
Obser vethe no tes on the permitted towing
me thods (/ page 331). #
Make sure that the battery is connected and
ch arge d.
Obser vethefo llowing points when the battery is
dischar ged:
R the engine cann otbe star ted
R the electric parking brake cann otbe released
or applied
R vehicles with automatic transmission: the
automatic transmission cannot be shif tedto
position iorj.
% Vehicles with automatic transmission: if
th e automatic transmission cann otbe shif‐
te dto position i, orthe multifunction dis‐
play in the instrument clus ter does not show
anything, ha vetheve hicle transpor tedaw ay
( / page 333). A towing vehicle with lifting
equipment is requiredforve hicle transpor ta‐
tion. *
NO
TEDama gedue to to wing away at
exc essively high speeds or over long dis‐
ta nces The driv
etra in could be damaged when tow‐
ing at excessively high speeds or over long
dis tances. #
Atowing speed of 50 km/h must not
be exc eeded. #
Atowing dis tance of 50 km must not be
exc eeded. &
WARNING Risk of accident when towing
a ve hicle which is too heavy
If th eve hicle being tow- star ted or towed
aw ay is heavier than the permissible gross
mass, thefo llowing situations can occur:
R theto wing eye may become de tach ed.
R the car/t railer combination may swer ve
or eve nove rturn. #
If ano ther vehicle is tow- star ted or
to we daw ay, its weight must not exceed th
e permissible gross mass of your own
ve hicle. If a
vehicle must be tow star ted or towe daw ay,
its permissible gross mass must not exceed the
permissible gross mass of theto wing vehicle. #
Information on the permissible gross mass of
th eve hicle can be found on theve hicle iden‐
tification plate (/ page 359). #
Vehicles with automatic transmission: do
not open the driver's door or front passenger
door, otherwise the automatic transmission
automatically shifts toposition j. #
Fittheto wing eye (/ page 335). #
Fasten theto w bar.
* NO
TEDama gedue toincor rect connec‐
tion #
Only connect theto w rope or tow bar to
th eto wing eyes. #
Deactivate the automatic locking mechanism
(/ page 61). 332
Breakdown assis tance
Page 336 of 465
#
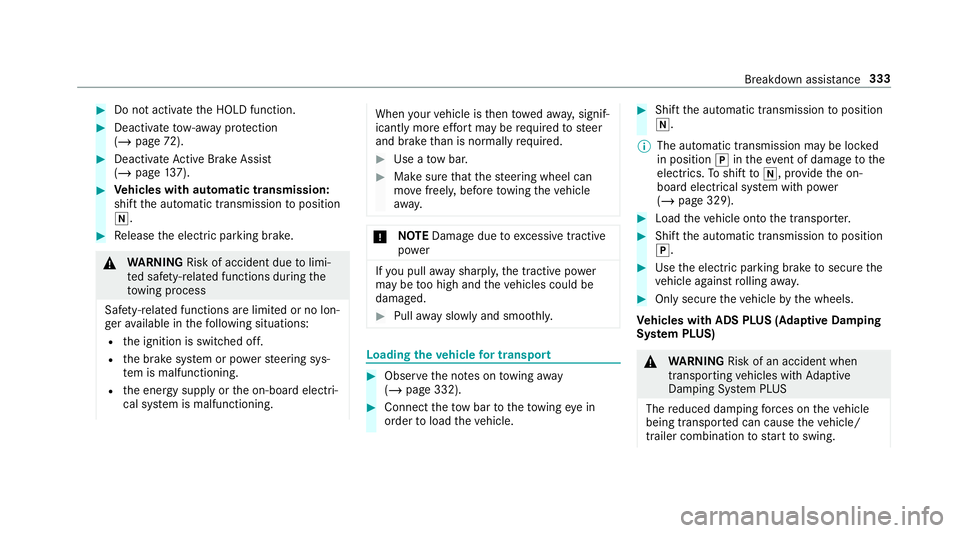
Do not acti vate the HOLD function. #
Deactivate tow- aw ay protection
(/ page 72). #
Deactivate Active Brake Assi st
( / page 137). #
Vehicles with automatic transmission:
shift the automatic transmission toposition
i. #
Release the electric parking brake. &
WARNING Risk of accident due tolimi‐
te d saf ety-re lated functions during the
to wing process
Saf ety-re lated functions are limited or no lon‐
ge rav ailable in thefo llowing situations:
R the ignition is switched off.
R the brake sy stem or po werst eering sys‐
te m is malfunctioning.
R the energy supply or the on-board electri‐
cal sy stem is malfunctioning. When
your vehicle is then towe daw ay, signif‐
icantly more ef fort may be requ ired tosteer
and brake than is no rmally requ ired. #
Use a tow bar. #
Make sure that thesteering wheel can
mo vefreely, before towing theve hicle
aw ay. *
NO
TEDama gedue toexcessive tracti ve
po wer If
yo u pull away sharpl y,the tractive po wer
may be too high and theve hicles could be
damaged. #
Pull away slowly and smoo thly. Loading the
vehicle for transport #
Obser vethe no tes on towing away
( / page 332). #
Connect theto w bar totheto wing eye in
order toload theve hicle. #
Shift the automatic transmission toposition
i.
% The automatic transmission may be loc ked
in position jintheeve nt of dama getothe
electrics. Toshift toi , pr ovide the on-
board electrical sy stem with po wer
( / page 329). #
Load theve hicle onto the transpor ter. #
Shift the automatic transmission toposition
j. #
Use the electric parking brake tosecure the
ve hicle against rolling away. #
Only secure theve hicle bythe wheels.
Ve hicles with ADS PLUS (Adaptive Damping
Sy stem PLUS) &
WARNING Risk of an accident when
transporting vehicles with Adaptive
Damping Sy stem PLUS
The reduced damping forc es on theve hicle
being transpor ted can cause theve hicle/
trailer combination tostart toswing. Breakdown assis
tance 333
Page 437 of 465
Selecting a POI ....................................
216
Selecting from the map ....................... 220
Selecting pr evious destinations .......... .216
De tecting inat tentiveness
see ATTENTION ASSIST
Diagnostics connection ............................21
Digital Owner's Manual .............................16
Digital speedome ter ................................ 171
Digital TV
see TV
Dinghy towing
see Tow- bar sy stem
Display Care ..................................................... 316
Display (multimedia sy stem)
Settings .............................................. .198
Display (on-board comp uter)
Displ ays on the multifunction display .. 167
Display content Setting the additional value range ....... 16 6
Display message .................................... .369
Calling up (on-boa rdcompu ter) ........... 369 No
tes .................................................. 369
Display messages ¯ - - - km/h ................................... 387
ç - - - km/h ................................... 386
È - - - km/h ................................... 387
#12 V battery See Owner's Man‐
ual ....................................................... 390
Ac tive Brake Assi stFunctions cur‐
re ntly limited See Owner's Manual ...... 382
Ac tive Brake Assi stFunctions limited
See Owner's Manual ........................... 380
Ac tive Dis tance Assi stavailable
again .................................................. .386
Ac tive Dis tance Assi stcur rently
una vailable See Owner's Manual .........386
Ac tive Dis tance Assi stinope rative ...... 386
Ad aptive Highbeam Assist Camera
view restricted See Owner's Manual ....411
Ad aptive Highbeam Assist cur rently
una vailable See Owner's Manual .........410 Ad
aptive Highbeam Assist inopera‐
tive ...................................................... .410
4 Add 1 litre engine oil when next
re fuelling ............................................. 394
Apply brake todeselect Park (P)
position ...............................................3 96
Apply brake toselect R ........................ 397
ÀAT TENTION ASSIST inoperative ... 385
ÀAT TENTION ASSIS T:Take a
break! .................................................. 384
bAu tomatic driving lights inoper‐
ative ..................................................... 41 0
Au xilia rybattery malfunction ...............397
Blind Spot Assi stcur rently una vaila‐
ble See Owner's Manual ...................... 388
Blind Spot Assist inope rative ............... 383
ÁChange key bat teries .................. 403
JCheck brake fluid le vel................ 375
Check brake pads See Owner's Man‐
ual ...................................................... .383 434
Index