2018 MERCEDES-BENZ AMG GT COUPE check oil
[x] Cancel search: check oilPage 7 of 294

Anti-skid chainssee Snow chains
Anti-theft ala rmsystem
see ATA (Anti-Theft Alarm system)
Asht ray.............................................. .217
Assistance display (on-board com-
puter) ..................................................1 62
Assistance menu (on-board com-
puter) ..................................................1 63
Assistance system
see Driving systems
ASSYST PLUS
Displaying a service message ........2 38
Hiding a service message .............. 237
Resetting the service interval dis-
play ................................................ 238
Service message ............................ 237
Special service requirements ......... 238
ATA (Anti-Theft Alarm system)
Activating/deactivating ................... 63
Function ...........................................6 3
Switching off the alarm .................... 63
ATTENTION ASSIST
Activating/deactivating ................. 163
Display message ............................ 183
Function/notes ............................. 148
Authorized Mercedes-Benz Center
see Qualified specialist workshop
Authorized workshop
see Qualified specialist workshop
AUTO lights
Display message ............................ 180
see Lights
Automatic car wash (care) ............... 239
Automatic engine start (ECO start/
stop function) .................................... 109
Automatic engine switch-off (ECO
start/stop function) .......................... 108
Automatic headlamp mode ................ 91
Automatic transmission
Accelerator pedal position ............. 115
Automatic drive program ............... 117
Changing gear ............................... 115
Display message ............................ 188
Double-clutch function .................. 115
Drive program display .................... 114
Driving tips .................................... 115 Emergency running mode
.............. 120
Eng
aging neutral ............................ 113
Engaging park position automati-
cally ............................................... 113
Engaging reverse gear ................... 113
Engaging the park position ............ 113
Gearshift recommendation ............ 118
Gliding mode ................................. 115
Important safety notes .................. 112
Kickdown ....................................... 115
Manual drive program .................... 117
Manual mode ................................. 118
Oil temperature (on-board com-
puter) ............................................. 165
Overview ........................................ 112
Problem (malfunction) ................... 120
Pulling away ................................... 107
Rocking the vehicle free ................ 115
Shift override ................................. 119
Starting the engine ........................ 107
Steering wheel paddle shifters ...... 116
Transmission position display ........ 114
Transmission positions .................. 114
Automatic transmission emer-
gency mode ....................................... 120
B
Back button ....................................... 205
BAS (Brake Assist System) ................. 58
Basic settings
see Settings
Battery (SmartKey)
Checking .......................................... 68
Important safety notes .................... 67
Replacing ......................................... 68
Battery (vehicle)
Charging ........................................ 251
Display message ............................ 182
Important safety notes .................. 250
Jump starting ................................. 251
Belt
see Seat belts
Belt warning ......................................... 43
Blind Spot Assist
Activating/deactivating (on-
board computer) ............................ 163
Display message ............................ 184
Index5
Page 12 of 294

Emergency Tensioning DevicesActivation ........................................ .51
Emergency unlocking
Tailgate ............................................ 75
Emissions control
Service and warranty information .... 25
Engine
Check Engine warning lamp .......... .199
Display message ............................ 181
ECO start/stop function ................ 108
Engine number ............................... 283
Irregular running ............................ 110
Jump-starting ................................. 251
Starting problems .......................... 110
Starting the engine with the
SmartKey ....................................... 107
Starting with the Start/Stop but-
ton ................................................. 107
Switching off .................................. 123
Tow-starting (vehicle) ..................... 256
Engine electronics
Notes ............................................. 282
Problem (malfunction) ................... 110
Engine oil
Adding ...........................................2 35
Additives ........................................ 286
Checking the oil level ..................... 233
Checking the oil level using the
dipstick .......................................... 233
Checking the oil level using the
on-board computer ........................ 234
Display message ............................ 182
Filling capacity ............................... 286
Notes about oil grades ................... 286
Notes on oil level/consumption .... 233
Temperature (on-board com-
puter) ............................................. 165
Engine oil additives
see Additives (engine oil)
Entering an address
see also Digital Operator's Man-
ual ..................................................2 04
ESC (Electronic Stability Control)
see ESP
®(Electronic Stability Program)
ESP®(Electronic Stability Pro-
gram)
AMG menu (on-board computer) ... 166
Characteristics ....... .......................... 61 Dea
ctivating/activating ................... 61
Deactivating/activating (button
in AMG vehicles) .............................. 62
Display message ............................ 170
Function/notes ................................ 61
General notes .................................. 61
Important safety information ........... 61
Warning lamp ................................. 196
ETS (Electronic Traction System) ....... 61
Exhaust check ................................... 126
Exhaust pipe (cleaning instruc-
tions) ..................................................2 42
Exterior lighting
Cleaning ......................................... 242
see Lights
Exterior mirror
Calling up a stored setting (mem-
ory function) ....................................9 0
Exterior mirrors
Adjusting ........................................ .87
Dipping (automatic) .........................8 8
Folding in/out (automatically) ......... 87
Folding in/out (electrically) ............. 87
Out of position (troubleshooting) ..... 88
Setting ............................................. 87
Storing settings (memory func-
tion) ................................................. 89
Storing the parking position ............. 88
F
Favorites
Overview ........................................ 207
Features ............................................. 216
Filler cap
see Refueling
Flat tire
Changing a wheel/mounting the
spare wheel ................................... 276
Preparing the vehicle ..................... 246
TIREFIT kit ...................................... 247
Floormats ........................................... 231
Frequencies
Mobile phone ................................. 282
Two-way radio ................................ 282
Front-passenger seat
see Seat
10Index
Page 19 of 294

Introduction .....................................40
Releasin g ......................................... 43
Warning lamp ................................. 193
Warning lamp (function) ................... 43
Seat function
see Seat
Seats
Adjusting (electrically) ..................... 82
Adjusting (manually) ........................ 81
Adjusting (Performance Seat) .......... 83
Adjusting lumbar support ................ 82
Adjusting the head restraint ............ 82
Calling up a stored setting (mem-
ory function) .................................... 90
Cleaning the cover ......................... 244
Important safety notes .................... 80
Seat heating problem ...................... 84
Seat ventilation problem .................. 84
Storing settings (memory func-
tion) ................................................. 89
Switching seat heating on/off ......... 83
Switching seat ventilation on/off .... 84
Selecting a gear
see Automatic transmission
Selector lever
Cleaning ......................................... 243
Positions ........................................ 112
Sensors (cleaning instructions) ....... 242
Service menu (on-board com-
puter) .................................................. 163
Service message
see ASSYST PLUS
Service products
Brake fluid ..................................... 286
Coolant (engine) ............................ 287
Engine oil ....................................... 286
Fuel ................................................ 283
Important safety notes .................. 283
Refrigerant (air-conditioning sys-
tem) ............................................... 288
Washer fluid ................................... 287
Setting the date/time format
see also Digital Operator's Man-
ual .................................................. 204
Setting the language
see also Digital Operator's Man-
ual .................................................. 204 Setting the time
see also Digital Operator's Man-
ual .................................................. 204
Settings
Factory (on-board computer) ......... 165
On-board computer ....................... 163
SETUP (on-board computer,
Mercedes-AMG vehicles) .................. 166
Side impact air bag ............................. 46
Si de marke
r lamp (display mes-
sage) ................................................... 180
Side windows
Cleaning ......................................... 241
Convenience closing feature ............ 77
Convenience opening feature .......... 76
Important safety information ........... 75
Opening/closing .............................. 76
Problem (malfunction) ..................... 78
Resetting ......................................... 77
Reversing feature ............................. 75
SIRIUS services
see also Digital Operator's Man-
ual .................................................. 204
SmartKey
Changing the battery ....................... 68
Changing the programming ............. 67
Checking the battery ....................... 68
Convenience closing feature ............ 77
Convenience opening feature .......... 76
Display message ............................ 192
Door central locking/unlocking ....... 65
Important safety notes .................... 65
KEYLESS-GO start function .............. 66
Loss ................................................. 69
Mechanical key ................................ 67
Overview .......................................... 65
Positions (ignition lock) ................. 106
Problem (malfunction) ..................... 69
Starting the engine ........................ 107
SMS
see also Digital Operator's Man-
ual .................................................. 204
Snow chains ...................................... 260
Sockets
General notes ................................ 218
Luggage compartment ................... 219
Sound
Switching on/off ........................... 205
Index17
Page 21 of 294

Vehicle data ................................... 288
Telephone
Accepting a call (multifunction
steering wheel) .............................. 162
Authorizing a mobile phone (con-
necting) .........................................2 11
Connecting a mobile phone
(device manager) ........................... 210
Display message ............................ 191
Introduction ................................... 161
Menu (on-board computer) ............ 161
Number from the phone book ........1 62
Redialing ........................................ 162
Rejecting/ending a call ................. 162
see also Digital Operator's Man-
ual ..................................................2 04
Temperature
Coolant (display in the instrument
cluster) .......................................... 154
Engine oil (on-board computer) ...... 165
Outside temperature ......................1 54
Setting (climate control) ................ 100
Transmission oil (on-board com-
puter) ............................................. 165
Timing (RACETIMER) ......................... 167
Tire pressure
Calling up (on-board computer) ..... 264
Checking manually ........................ 263
Display message ............................ 186
Maximum ....................................... 263
Not reached (TIREFIT) .................... 248
Notes ............................................. 262
Reached (TIREFIT) .......................... 249
Recommended ............................... 261
Tire pressure monitor
Checking the tire pressure elec-
tronically ........................................ 265
Function/notes .............................2 64
General notes ................................ 264
Important safety notes .................. 264
Restarting ...................................... 266
Warning lamp ................................. 202
Warning message .......................... 265
Tire-change tool kit ........................... 246
TIREFIT kit
Important safety notes .................. 247
Storage location ............................ 246
Tire pressure not reached .............. 248 Tire pressure reached .......
............. 249
Usi
ng ............................................. 247
Tires
Aspect ratio (definition) ................. 275
Average weight of the vehicle
occupants (definition) .................... 274
Bar (definition) ............................... 274
Changing a wheel .......................... 276
Characteristics .............................. 274
Checking ........................................ 259
Curb weight (definition) ................. 275
Definition of terms ......................... 274
Direction of rotation ......................2 76
Display message ............................ 186
Distribution of the vehicle occu-
pants (definition) ............................ 276
DOT (Department of Transporta-
tion) (definition) .............................2 74
DOT, Tire Identification Number
(TIN) ............................................... 273
GAWR (Gross Axle Weight Rating)
(definition) ..................................... 274
GVW (Gross Vehicle Weight) (def-
inition) ...........................................2 75
GVWR (Gross Vehicle Weight Rat-
ing) (definition) .............................. 275
Important safety notes .................. 258
Increased vehicle weight due to
optional equipment (definition) ...... 274
Information on driving .................... 258
Kilopascal (kPa) (definition) ........... 275
Labeling (overview) ........................ 271
Load bearing index (definition) ...... 276
Load index ..................................... 273
Load index (definition) ................... 275
Maximum load on a tire (defini-
tion) ............................................... 275
Maximum loaded vehicle weight
(definition) ..................................... 275
Maximum permissible tire pres-
sure (definition) ............................. 275
Maximum tire load ......................... 273
Maximum tire load (definition) ....... 275
Notes on sport tires ....................... 258
Optional equipment weight (defi-
nition) ............................................ 276
P
SI (pounds per square inch) (def-
inition) ........................................... 275
Index19
Page 107 of 294

!Do not warm up the engine while stationary.
Pull away immediately. Avoid high engine
speeds and full throttle until the engine has
reached its operating temperature.
In vehicles with automatic transmission,
engage positions P and R only when the vehi-
cle is stationary.
Where possible, avoid spinning the drive
wheels when pulling away on slippery roads.
You could otherwise damage the drive train.
!During a cold start with low engine oil tem-
peratures (below 32 ‡) (0 †), the maximum
engine speed is restricted in order to protect
the engine. To protect the engine and main-
tain smooth engine operation, avoid driving at
full throttle when the engine is cold.
Key positions
Start/Stop button
General notes
All vehicles are equipped with a Start/Stop but-
ton.
The Start/Stop button is located in the center
console and is illuminated when the vehicle is
unlocked.
The SmartKey must be in the vehicle.
Pressing the Start/Stop button several times in
succession corresponds to the different Smart-
Key positions in the ignition lock. This is only the
case if you are not depressing the brake pedal.
If you depress the brake pedal and press the
Start/Stop button, the engine starts immedi-
ately.
A check which periodically establishes a radio
connection between the vehicle and the Smart-
Key determines whether a valid SmartKey is in
the vehicle. This occurs, for example, when
starting the engine.
If there is a SmartKey in the ignition lock, this
takes precedence over the KEYLESS-GO start
function.
To start the vehicle without actively using the
SmartKey:
Rthe SmartKey must be in the vehicle
Rthe vehicle must not be locked with the
SmartKey or KEYLESS-GO (Ypage 66) Do not keep the SmartKey:
Rwith electronic devices, e.g. a mobile phone
or another SmartKey
Rwith metallic objects, e.g. coins or metal foil
Rinside metallic objects, e.g. a metal case
This can affect the functionality of the Smart-
Key.
If you lock the vehicle with the SmartKey remote control or with KEYLESS-GO, after a short time:
Ryou will not be able to switch on the ignition
with the Start/Stop button
Ryou will no longer be able to start the engine
with the Start/Stop button until the vehicle is
unlocked again
If you lock the vehicle centrally using the button
on the driver's door (
Ypage 71), you can con-
tinue to start the engine with the Start/Stop
button.
The engine can be switched off while the vehicle
is in motion by pressing and holding the Start/
Stop button for three seconds. This function
operates independently of the ECO start/stop
automatic engine switch-off function.
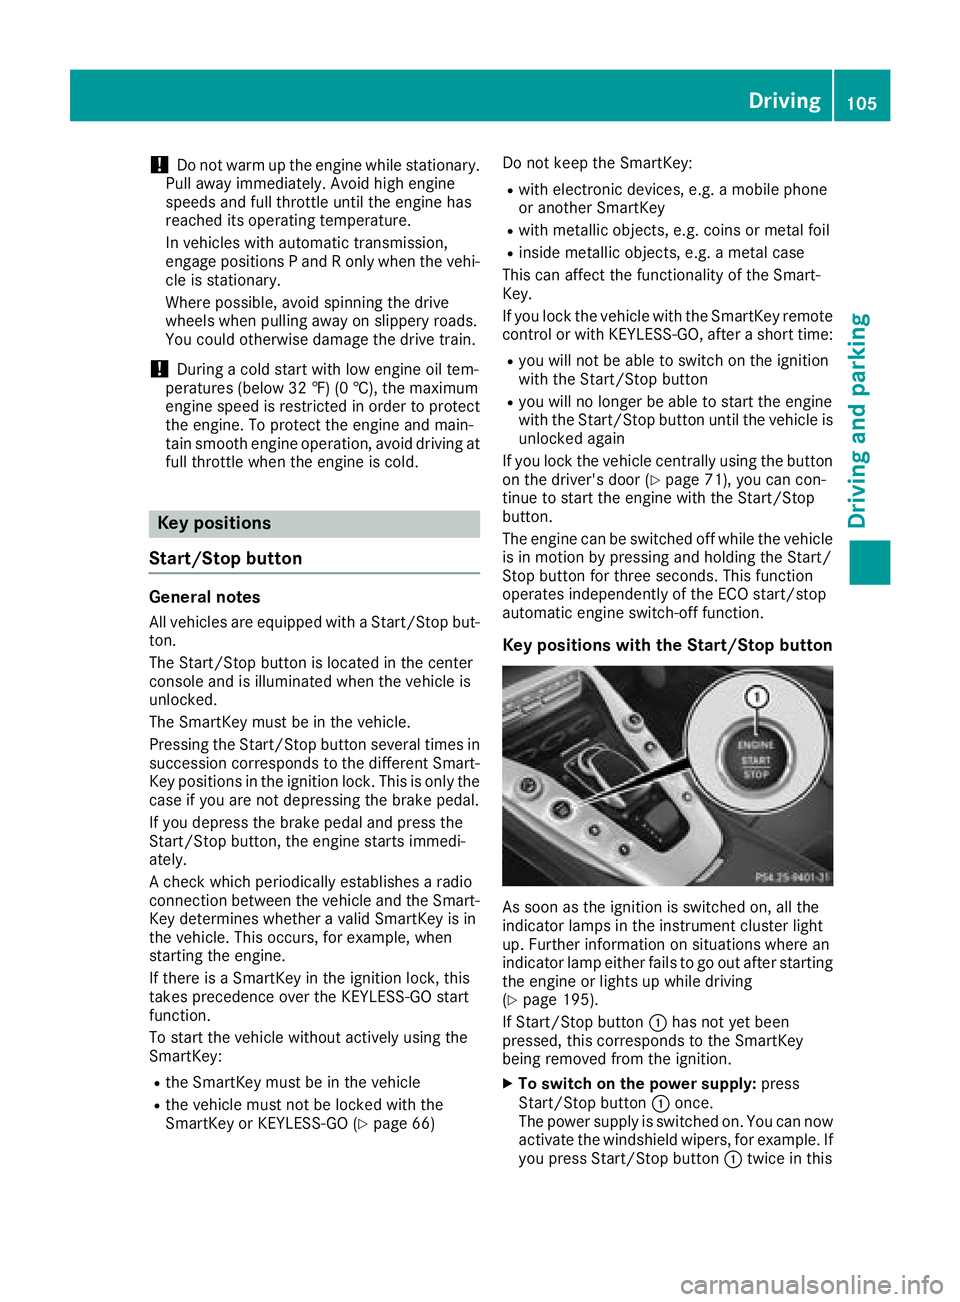
Key positions with the Start/Stop button
As soon as the ignition is switched on, all the
indicator lamps in the instrument cluster light
up. Further information on situations where an
indicator lamp either fails to go out after starting
the engine or lights up while driving
(
Ypage 195).
If Start/Stop button :has not yet been
pressed, this corresponds to the SmartKey
being removed from the ignition.
XTo switch on the power supply: press
Start/Stop button :once.
The power supply is switched on. You can now
activate the windshield wipers, for example. If you press Start/Stop button :twice in this
Driving105
Driving and parking
Z
Page 165 of 294

RDistance Pilot DISTRONIC (Ypage 131)
RDistance warning function of Active Brake
Assist (Ypage 58)
RBlind Spot Assist (Ypage 150)
RATTENTION ASSIST (Ypage 148)
RLane Keeping Assist (Ypage 152)
XPress:to display the ATTENTION ASSIST
assessment.
Service menu
Depending on the equipment installed in the
vehicle, you have the following options in the
Service
menu:
Rcalling up display messages in message mem- ory (Ypage 169)
Rchecking the tire pressure electronically
(Ypage 265).
Rcalling up the service due date (Ypage 238).
Rchecking the engine oil level using the on-
board computer (Ypage 234).
Settings menu
Introduction
Depending on the equipment installed in the
vehicle, you have the following options in the
Settings
menu:
Rchanging assistance settings (Ypage 163).
Rchanging the light settings (Ypage 164).
Rchanging the instrument cluster settings
(Ypage 164).
Rrestoring the factory settings (Ypage 165).
Assistance submenu
Activating/deactivating Active Brake
Assist
XPress òon the steering wheel to open the
menu list.
XPress :or9 on the steering wheel to
select the Settingsmenu.
XConfirm by pressing aon the steering
wheel.
XPress :or9 to select the DriveAs‐sistsubmenu.
XPressato confirm.
XSelect Brake Assistwith9 or:.
XPress ato confirm.
The current selection appears.
XTo activate/deactivate: press theabut-
ton again.
When Active Brake Assist is deactivated, the
æ symbol appears in the Assistance
Graphicmenu of the multifunction display.
Further information on Active Brake Assist
(
Ypage 58).
Activating/deactivating Blind Spot Assist
XPress òon the steering wheel to open the
menu list.
XPress :or9 on the steering wheel to
select the Settingsmenu.
XConfirm by pressing aon the steering
wheel.
XPress :or9 to select the DriveAs‐sistsubmenu.
XPressato confirm.
XPress :or9 to select Blind SpotAssist.
XPressato confirm.
The current selection appears.
XTo activate/deactivate: press theabut-
ton again.
When Blind Spot Assist is activated, gray
radar waves propagating backwards appear
next to the vehicle in the Assistance
Graphicmenu in the multifunction display.
For further information about Blind Spot Assist,
see (
Ypage 150).
Setting ATTENTION ASSIST
XPress òon the steering wheel to open the
menu list.
XPress :or9 on the steering wheel to
select the Settingsmenu.
XConfirm by pressing aon the steering
wheel.
XPress :or9 to select the DriveAs‐sistsubmenu.
XPressato confirm.
XSelect Attention Assistwith: or
9.
XPress ato confirm.
Menus and submenus163
On-board computer and displays
Z
Page 184 of 294

Display messagesPossible causes/consequences andMSolutions
#
See Operator'sMan ‐ual
The battery is no tbein gcharged.
A warning tone also sounds.
Possibl ecauses are:
Radefective alternato r
Ratorn poly-V-belt
Ramalfunction in th eelectronics
!Do no tcontinu edriving. The engin ecould otherwise overheat.
XPull ove rand stop th evehicl esafely and switch off th eengine, pay-
ing attention to roa dand traffic conditions.
XSecur eth evehicl eagainst rollin gaway (Ypage 122).
XConsult aqualified specialist workshop .
#
StopVehicl eSeeOperator' sManual
The battery is no longer bein gcharged and th econdition of charg eis
to olow.
A warning tone also sounds.
XPull ove rand stop th evehicl esafely and switch off th eengine, pay-
ing attention to roa dand traffic conditions.
XSecur eth evehicl eagainst rollin gaway (Ypage 122).
XObserv eth einstruction sin th e# See Operator' sManualdisplay message .
XConsultaqualified specialist workshop .
#
Start Engine SeeOperator'sManual
The engin eis off and th ebattery condition of charg eis to olow.
XSwitc hoff electrical consumer sthat you do no tneed, suc has th e
rear window defroste rand interior lighting .
XLeaveth eengin erunnin gfor afew minute sor drive alon gdistance.
The battery is bein gcharged.
4
Check Engine OilLevel (Ad d 1quart)
The engin eoil level has dropped to th eminimum level.
!Avoid lon gjourneys wit hto olittl eengin eoil. The engin ewill oth-
erwise be damaged.
XChec kth eoil level when next refueling, at th elatest (Ypage 233).
XIf necessary, add engin eoil (Ypage 235).
XHav eth eengin echecke dat aqualified specialist workshop if engin e
oil needs to be added mor eoften than usual.
Information on approve dengin eoils can be obtained from aqualified
specialist workshop or on th eInternet at http://bevo.mercedes -
benz.co m.
4
Engine Oil LevelLow Stop VehicleTurn Engine Off
The engine oil level is too low. There is a risk of engine damage.
XPull over and stop the vehicle safely and switch off the engine, pay-
ing attention to road and traffic conditions.
XSecure the vehicle against rolling away (Ypage 122).
XCheck the engine oil level (Ypage 233).
XIf necessary, add engine oil (Ypage 235).
182Display messages
On-board computer and displays
Page 185 of 294

Display messagesPossible causes/consequences andMSolutions
4
Engine Oil ReduceOil Level
You haveadded to omuc hengin eoil. The engin eor catalytic converter
may be damaged.
XSiphon off excess engin eoil until it is at th especified level. Observ e
th elegal requirements .
4
Engine Oil LevelCannot Be Measured
The measuringsystem is faulty.
XVisit aqualified specialist workshop .
8
FuelLevel Low
The fuel level has dropped int oth ereserv erange.
XRefue lat th eneares tgas station .
CThere is only aver ysmall amount of fuel in th efuel tank.
XRefue lat th eneares tgas station without fail .
8
Gas Cap Loose
The fuel filler cap is notclosed correctl yor th efuel system is leaking .
XCheckthat th efuel filler cap is correctl yclosed .
If th efuel filler cap is not correctl yclosed :
XCloseth efuel filler cap .
If th efuel filler cap is correctl yclosed :
XVisitaqualified specialist workshop .
Driving systems
Display messagesPossible causes/consequences and MSolutions
À
ATTENTION ASSIST:Take a Break!
Based on certain criteria, ATTENTION ASSIST has detecte dfatigue or
a lack of concentration on th epart of th edriver . Awarning tone also
sounds.
XIf necessary, tak e abreak.
During lon gjourneys, tak eregular breaks in goo dtime so you get
enough rest.
À
ATTENTION ASSISTInoperative
ATTENTION ASSIST is inoperative.
XVisit aqualified specialist workshop .
¨
Malfunction
There isamalfunction in th echassis. The vehicle's handlin gcharac -
teristics may be affected.
XVisit aqualified specialist workshop .
Display messages183
On-board computer and displays
Z