2018 MERCEDES-BENZ AMG GT COUPE reset
[x] Cancel search: resetPage 7 of 294

Anti-skid chainssee Snow chains
Anti-theft ala rmsystem
see ATA (Anti-Theft Alarm system)
Asht ray.............................................. .217
Assistance display (on-board com-
puter) ..................................................1 62
Assistance menu (on-board com-
puter) ..................................................1 63
Assistance system
see Driving systems
ASSYST PLUS
Displaying a service message ........2 38
Hiding a service message .............. 237
Resetting the service interval dis-
play ................................................ 238
Service message ............................ 237
Special service requirements ......... 238
ATA (Anti-Theft Alarm system)
Activating/deactivating ................... 63
Function ...........................................6 3
Switching off the alarm .................... 63
ATTENTION ASSIST
Activating/deactivating ................. 163
Display message ............................ 183
Function/notes ............................. 148
Authorized Mercedes-Benz Center
see Qualified specialist workshop
Authorized workshop
see Qualified specialist workshop
AUTO lights
Display message ............................ 180
see Lights
Automatic car wash (care) ............... 239
Automatic engine start (ECO start/
stop function) .................................... 109
Automatic engine switch-off (ECO
start/stop function) .......................... 108
Automatic headlamp mode ................ 91
Automatic transmission
Accelerator pedal position ............. 115
Automatic drive program ............... 117
Changing gear ............................... 115
Display message ............................ 188
Double-clutch function .................. 115
Drive program display .................... 114
Driving tips .................................... 115 Emergency running mode
.............. 120
Eng
aging neutral ............................ 113
Engaging park position automati-
cally ............................................... 113
Engaging reverse gear ................... 113
Engaging the park position ............ 113
Gearshift recommendation ............ 118
Gliding mode ................................. 115
Important safety notes .................. 112
Kickdown ....................................... 115
Manual drive program .................... 117
Manual mode ................................. 118
Oil temperature (on-board com-
puter) ............................................. 165
Overview ........................................ 112
Problem (malfunction) ................... 120
Pulling away ................................... 107
Rocking the vehicle free ................ 115
Shift override ................................. 119
Starting the engine ........................ 107
Steering wheel paddle shifters ...... 116
Transmission position display ........ 114
Transmission positions .................. 114
Automatic transmission emer-
gency mode ....................................... 120
B
Back button ....................................... 205
BAS (Brake Assist System) ................. 58
Basic settings
see Settings
Battery (SmartKey)
Checking .......................................... 68
Important safety notes .................... 67
Replacing ......................................... 68
Battery (vehicle)
Charging ........................................ 251
Display message ............................ 182
Important safety notes .................. 250
Jump starting ................................. 251
Belt
see Seat belts
Belt warning ......................................... 43
Blind Spot Assist
Activating/deactivating (on-
board computer) ............................ 163
Display message ............................ 184
Index5
Page 19 of 294

Introduction .....................................40
Releasin g ......................................... 43
Warning lamp ................................. 193
Warning lamp (function) ................... 43
Seat function
see Seat
Seats
Adjusting (electrically) ..................... 82
Adjusting (manually) ........................ 81
Adjusting (Performance Seat) .......... 83
Adjusting lumbar support ................ 82
Adjusting the head restraint ............ 82
Calling up a stored setting (mem-
ory function) .................................... 90
Cleaning the cover ......................... 244
Important safety notes .................... 80
Seat heating problem ...................... 84
Seat ventilation problem .................. 84
Storing settings (memory func-
tion) ................................................. 89
Switching seat heating on/off ......... 83
Switching seat ventilation on/off .... 84
Selecting a gear
see Automatic transmission
Selector lever
Cleaning ......................................... 243
Positions ........................................ 112
Sensors (cleaning instructions) ....... 242
Service menu (on-board com-
puter) .................................................. 163
Service message
see ASSYST PLUS
Service products
Brake fluid ..................................... 286
Coolant (engine) ............................ 287
Engine oil ....................................... 286
Fuel ................................................ 283
Important safety notes .................. 283
Refrigerant (air-conditioning sys-
tem) ............................................... 288
Washer fluid ................................... 287
Setting the date/time format
see also Digital Operator's Man-
ual .................................................. 204
Setting the language
see also Digital Operator's Man-
ual .................................................. 204 Setting the time
see also Digital Operator's Man-
ual .................................................. 204
Settings
Factory (on-board computer) ......... 165
On-board computer ....................... 163
SETUP (on-board computer,
Mercedes-AMG vehicles) .................. 166
Side impact air bag ............................. 46
Si de marke
r lamp (display mes-
sage) ................................................... 180
Side windows
Cleaning ......................................... 241
Convenience closing feature ............ 77
Convenience opening feature .......... 76
Important safety information ........... 75
Opening/closing .............................. 76
Problem (malfunction) ..................... 78
Resetting ......................................... 77
Reversing feature ............................. 75
SIRIUS services
see also Digital Operator's Man-
ual .................................................. 204
SmartKey
Changing the battery ....................... 68
Changing the programming ............. 67
Checking the battery ....................... 68
Convenience closing feature ............ 77
Convenience opening feature .......... 76
Display message ............................ 192
Door central locking/unlocking ....... 65
Important safety notes .................... 65
KEYLESS-GO start function .............. 66
Loss ................................................. 69
Mechanical key ................................ 67
Overview .......................................... 65
Positions (ignition lock) ................. 106
Problem (malfunction) ..................... 69
Starting the engine ........................ 107
SMS
see also Digital Operator's Man-
ual .................................................. 204
Snow chains ...................................... 260
Sockets
General notes ................................ 218
Luggage compartment ................... 219
Sound
Switching on/off ........................... 205
Index17
Page 22 of 294
Replacing...................................... .276
Service life ..................................... 259
Sidewall (definition) ....................... 275
Speed rating (definition) ................ 275
Storing ...........................................2 77
Structure and characteristics
(definition) ..................................... 274
Summer tires in winter .................. 260
Temperature .................................. 270
TIN (Tire Identification Number)
(definition) ..................................... 276
Tire bead (definition) ......................2 75
Tire pressure (definition) ................ 275
Tire pressures (recommended) ...... 274
Tire size (data) ............................... 280
Tire size designation, load-bearing
capacity, speed rating .................... 271
Tire tread ....................................... 259
Tire tread (definition) ..................... 275
Total load limit (definition) ............. 276
Traction ......................................... 270
Traction (definition) ....................... 276
Tread wear ..................................... 270
Uniform Tire Quality Grading
Standards ...................................... 269
Uniform Tire Quality Grading
Standards (definition) .................... 274
Wear indicator (definition) ............. 276
Wheel and tire combination ........... 280
Wheel rim (definition) .................... 274
see Flat tire
Tool
see Vehicle tool kit
Touchpad
Changing the station/music
track .............................................. 207
Character suggestions ................... 206
Deleting characters ....................... 206
Entering a space ............................ 206
Entering characters ....................... 206
Gesture control .............................. 206
Handwriting recognition ................ 206
Operating the touchpad ................. 206
Overview ........................................ 206
Quick access for Audio .................. 207
Switching ....................................... 206
Switching input line ....................... 206 Tow-starting
Emergency engine starting ............ 256
To
wing away
Important safety guidelines ........... 254
Installing the towing eye ................ 255
Removing the towing eye ............... 255
Transporting the vehicle ................ 256
With both axles on the ground ....... 255
Towing eye ......................................... 245
Traction system
see ETS (Electronic Traction System)
Traffic reports
see also Digital Operator's Man-
ual .................................................. 204
Transmission
Driving tips .................................... 115
Selector lever ................................ 112
see Automatic transmission
Transmission position display ......... 114
Transmission positions
General notes ................................ 112
Overview ........................................ 113
Transporting the vehicle .................. 256
Trim pieces (cleaning instruc-
tions) .................................................. 243
Trip computer (on-board com-
puter) .................................................. 157
Trip odometer
Calling up ....................................... 156
Resetting (on-board computer) ...... 157
Trunk load (maximum) ...................... 288
Trunk partition .................................. 215
Turn signals
Display message ............................ 180
Switching on/off .............................. 92
Two-way radio
Frequencies ................................... 282
Installation ..................................... 282
Transmission output (maximum) .... 282
Type identification plate
see Vehicle identification plate
U
UnlockingEmergency unlocking ....................... 72
From inside the vehicle (central
unlocking button) ............................. 71
20Index
Page 30 of 294
Diagnostics connection
The diagnosticsconnection is only intended fo r
th econnection of diagnostic equipmen tat a
qualified specialis tworkshop .
GWARNING
If you connec tequipmen tto adiagnostic s
connection in th evehicle, it may affec tth e
operation of vehicle systems .As aresult ,th e
operatin gsafet yof th evehicle could be affec -
ted. There is aris kof an accident.
Only connec tequipmen tto adiagnostic scon-
nection in th evehicle, whic his approved fo r
your vehicle by Mercedes-Benz.
GWARNING
Objects in th edriver's footwell can restric tth e
peda ltrave lor obstruct adepressed pedal.
The operatin gand road safet yof th evehicle is
jeopardized. There is aris kof an accident.
Mak esur ethat all objects in th evehicle are
stowed correctly, and that they canno tente r
th edriver's footwell. Install th efloormat s
securely and as specifie din order to ensur e
sufficien tclearanc efo rth epedals. Do no tuse
loose floormat sand do no tplac efloormat son
to pof on eanother.
!If th eengin eis switched of fand equipmen t
on th ediagnostic sconnection is used ,th e
starter battery may discharge.
Connectin gequipmen tto th ediagnostic scon-
nection can lead to emission smonitorin ginfor-
mation bein greset ,fo rexample. Thi smay lead
to th evehicle failin gto mee tth erequirements of
th enext emission stest durin gth emain inspec-
tion .
Qualified specialist workshop
An authorized Mercedes-Ben zCente ris aquali-
fie dspecialis tworkshop .It has th enecessary
specialis tknowledge ,tools and qualification sto
correctl ycarry out th ewor krequire don your
vehicle. Thi sis especially th ecas efo rwor krel -
evant to safety. Always hav
eth efollowin gwor kcarrie dout at an
authorized Mercedes-Ben zCenter:
Rwor krelevant to safet y
Rserviceand maintenance wor k
Rrepair work
Ralterations, installation wor kand modifica-
tion s
Rworkon electronic component s
Correct use
If you remov eany warnin gstickers ,you or oth-
ers could fail to recogniz ecertain dangers.
Leave warnin gstickers in position .
Observ eth efollowin ginformation when drivin g
your vehicle:
Rth esafet ynote sin this manual
Rth evehicle technical dat a
Rtraffic rulesand regulation s
Rlaws and safetystandard spertainin gto moto r
vehicles
Problem swit hyou rvehicle
If you should experience aproblem wit hyour
vehicle, particularly on ethat you believe may
affec tit s saf eoperation ,we urg eyou to contact
an authorized Mercedes-Ben zCente rimmedi-
ately to hav eth eproblem diagnosed and recti -
fied. If th eproblem is no tresolved to your sat -
isfaction ,please discus sth eproblem again wit h
th eauthorized Mercedes-Ben zCente ror ,if nec-
essary, contact us at on eof th efollowin g
addresses.
In th eUSA
Customer Assistanc eCente r
Mercedes-Ben zUSA, LL C
On eMercedes Drive
Montvale, NJ 07645-0350
In Canad a
Customer Relation sDepartmen t
Mercedes-Ben zCanada, Inc.
98 Vanderhoo fAvenue
Toronto ,Ontario M4 G4C9
Reporting safet ydefect s
USAonly:
28Operating safety
Introduction
Page 32 of 294

are used to help in finding malfunctions and
improving quality and are sent to the manufac-
turer where necessary. In addition, the manu-
facturer is subject to product liability. The man-
ufacturer needs technical data from vehicles for
this purpose.
Malfunction memories in the vehicle can be
reset by a service center during repair or service
work.
You can incorporate data into the vehicle's com-
fort and infotainment functions yourself as part
of the selected equipment.
These include, for example:
Rmultimedia data such as music, films or pho-
tos for playback in an integrated multimedia
system
Raddress book data for use in conjunction with
an integrated hands-free system or an inte-
grated navigation system
Rnavigation destinations that have been
entered
Rdata about using Internet services
These data can be saved locally in the vehicle or
are located on a device that you have connected
to the vehicle. If this data is saved in the vehicle,
you can delete it at any time. These data are sent
to third parties only at your request, particularly
when you use online services in accordance with
the settings that you have selected.
You can save and change comfort settings/
customizations in the vehicle at any time.
Depending on the piece of equipment in ques-
t
ion, these can include, for example:
Rseat and steering wheel position settings
Rsuspension and climate control settings
Rcustom settings such as interior lighting
If your vehicle is equipped appropriately, you
can connect your smartphone or another mobile
end device to the vehicle. You can control this by
means of the control elements integrated in the vehicle. The smartphone's picture and sound
can be output via the multimedia system. Spe-
cific items of information are also sent to your
smartphone.
Depending on the type of integration, this can
include:
Rgeneral vehicle information
Rposition data
This allows the use of selected smartphone
Apps, such as navigation or music player Apps.
There is no additional interaction between the smartphone and the vehicle, particularly active
access to vehicle data. The type of additional
data processing is determined by the provider of
the App being used. Whether you can configure
settings for it and, if so, which ones, depends on
the App and your smartphone's operating sys-
tem.
Service provider
Wireless network connection
If your vehicle has a wireless network connec-
tion, data can be exchanged between your vehi-
cle and other systems. The wireless network
connection is enabled by either an in-vehicle
transmitter and receiver or your own mobile end
device (e.g. smartphone). Online functions can
be used via this wireless network connection.
These include online services and applications/ Apps provided by the manufacturer or other
providers.
Services provided by the manufacturer
In the case of the manufacturer's online serv-
ices, the manufacturer describes the functions
in a suitable place and the associated informa-
tion subject to data protection legislation. Per-
sonal data can be used in order to provide online
services. Data are exchanged via a secure con-
nection (e.g. using the IT system specially pro-
vided for this purpose by the manufacturer).
Collecting, processing and using personal data
beyond the provision of services is permitted
only on the basis of a statutory permit or decla-
ration of consent.
You can usually activate and deactivate the serv-
ices and functions (some of which are subject to
charge). In many cases, this also applies to the
vehicle's entire data connection. However, this
does not apply in particular to legally prescribed
functions and services such as the "eCall" emer-
gency call system.
Services from third parties
If it is possible to use online services from other
providers, these services are the responsibility
of the provider in question and subject to that
provider's data protection conditions and terms
of use. The manufacturer has no influence over
the content exchanged here.
30Data stored in the vehicle
Introduction
Page 78 of 294
only opens again automatically after the corre-
sponding switch is released. The automatic
reversing feature is only an aid and does not
relieve you of the responsibility of paying atten-
tion when closing a side window.
GWARNING
The reversing feature does not react:
Rto soft, light and thin objects, e.g. small fin-
gers
Rwhile resetting
This means that the reversing feature cannot
prevent someone being trapped in these sit-
uations. There is a risk of injury.
Make sure that no body parts are in close
proximity during the closing procedure. If
someone becomes trapped, press the switch
to open the side window again.
Opening and closing the side win-
dows
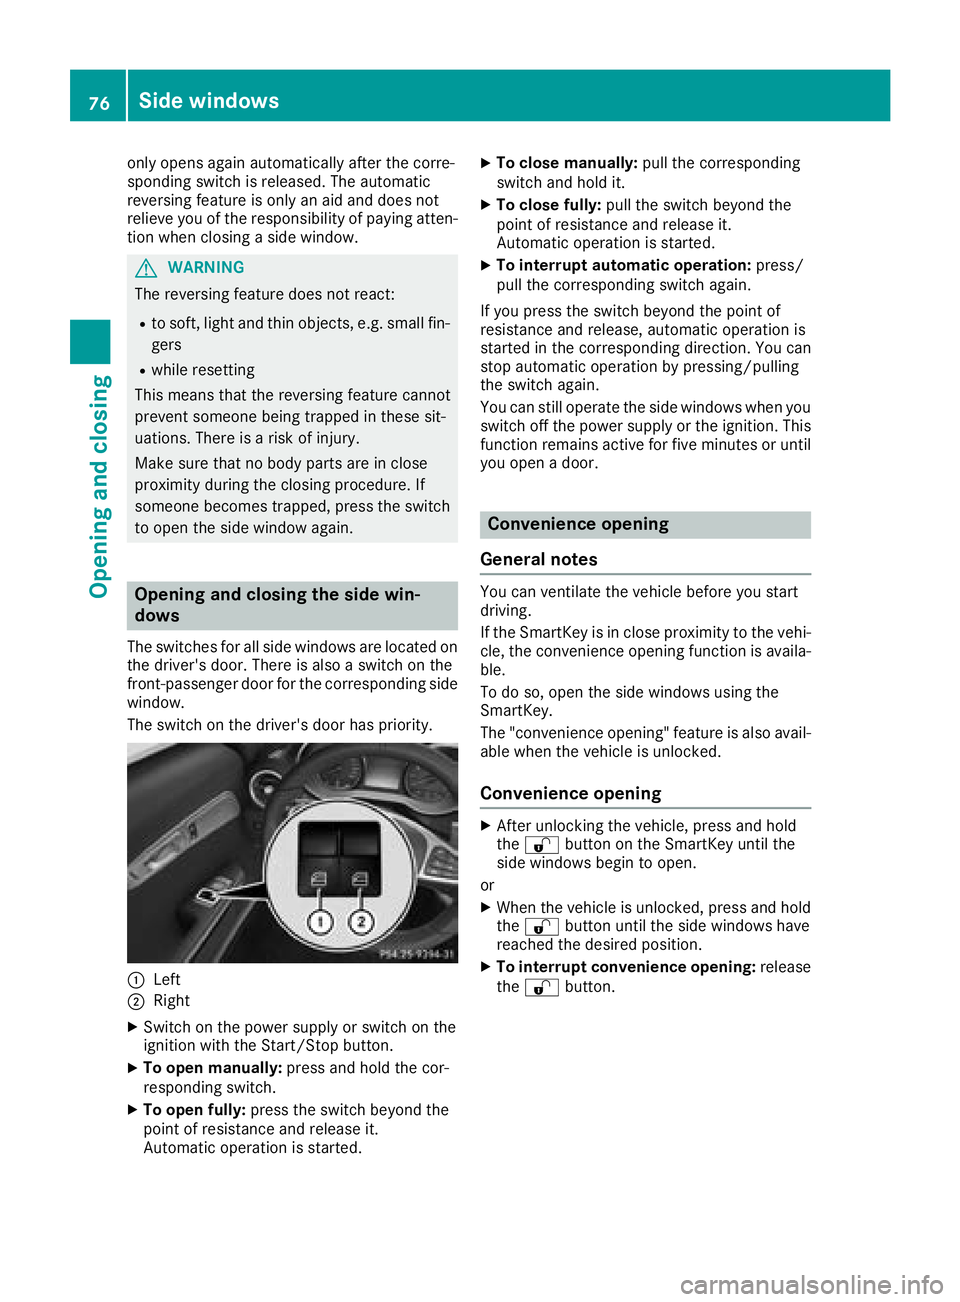
The switches for all side windows are located on the driver's door. There is also a switch on the
front-passenger door for the corresponding side
window.
The switch on the driver's door has priority.
:Left
;Right
XSwitch on the power supply or switch on the
ignition with the Start/Stop button.
XTo open manually: press and hold the cor-
responding switch.
XTo open fully: press the switch beyond the
point of resistance and release it.
Automatic operation is started.
XTo close manually: pull the corresponding
switch and hold it.
XTo close fully: pull the switch beyond the
point of resistance and release it.
Automatic operation is started.
XTo interrupt automatic operation: press/
pull the corresponding switch again.
If you press the switch beyond the point of
resistance and release, automatic operation is
started in the corresponding direction. You can
stop automatic operation by pressing/pulling
the switch again.
You can still operate the side windows when you
switch off the power supply or the ignition. This
function remains active for five minutes or until
you open a door.
Convenience opening
General notes
You can ventilate the vehicle before you start
driving.
If the SmartKey is in close proximity to the vehi-
cle, the convenience opening function is availa-
ble.
To do so, open the side windows using the
SmartKey.
The "convenience opening" feature is also avail-
able when the vehicle is unlocked.
Convenience opening
XAfter unlocking the vehicle, press and hold
the % button on the SmartKey until the
side windows begin to open.
or
XWhen the vehicle is unlocked, press and hold
the % button until the side windows have
reached the desired position.
XTo interrupt convenience opening: release
the % button.
76Side windows
Opening and closing
Page 79 of 294
Convenience closing feature
Important safety notes
GWARNING
When using the convenience closing feature,
parts of the body could be trapped in the clos-
ing area when a side window is being closed.
There is a risk of injury.
Observe the complete closing procedure
when the convenience closing feature is oper-
ating. Make sure that no body parts are in
close proximity during the closing procedure.
When you lock the vehicle, you can close the
windows at the same time.
Using the SmartKey
XPress and hold the &button until the side
windows are fully closed.
XMake sure that all the side windows are
closed.
XTo interrupt convenience closing: release
the & button.
Using KEYLESS-GO
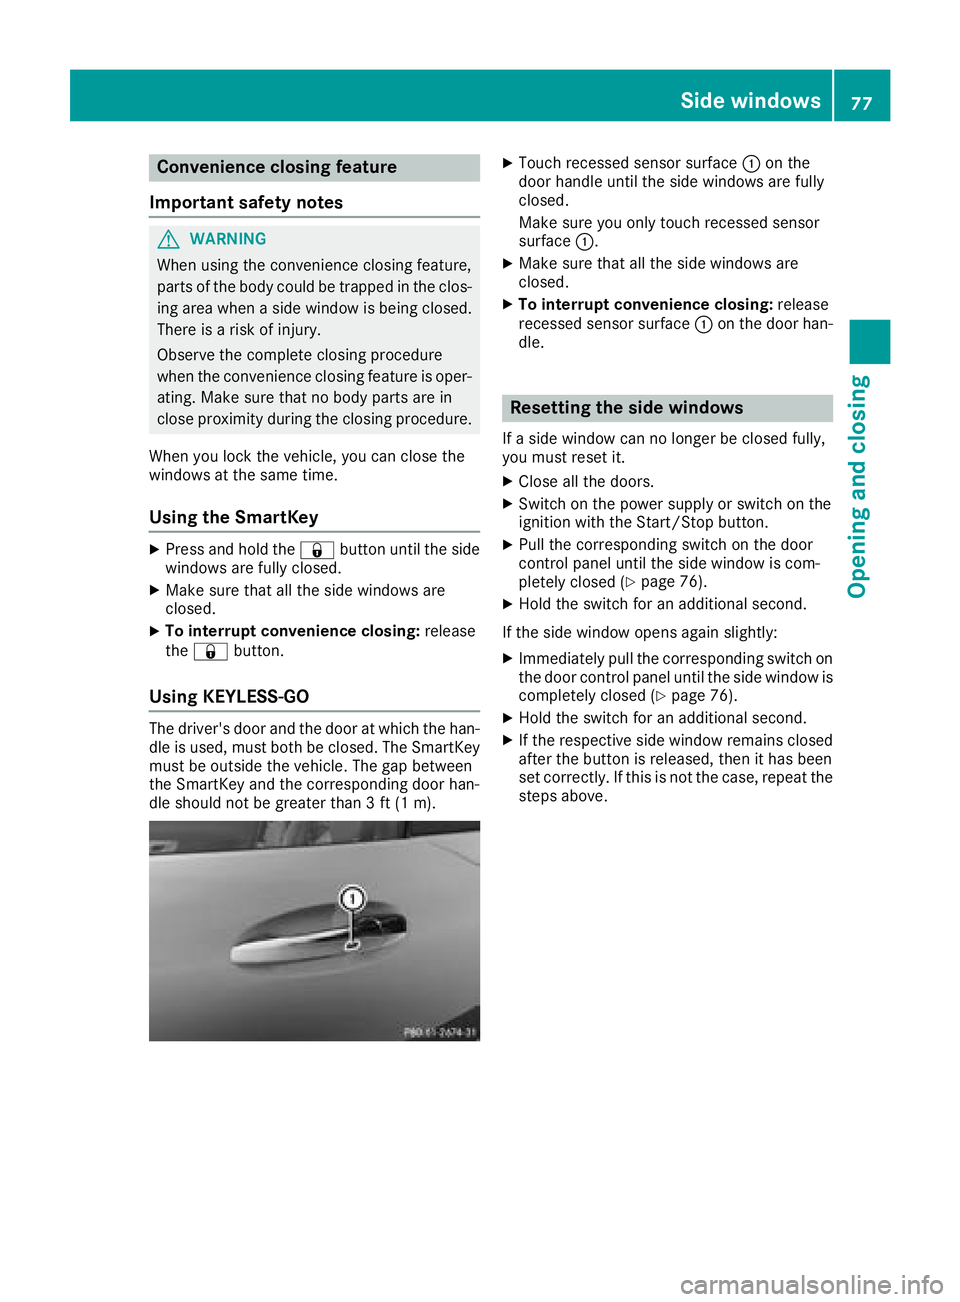
The driver's door and the door at which the han-
dle is used, must both be closed. The SmartKey
must be outside the vehicle. The gap between
the SmartKey and the corresponding door han-
dle should not be greater than 3 ft (1 m).
XTouch recessed sensor surface :on the
door handle until the side windows are fully
closed.
Make sure you only touch recessed sensor
surface :.
XMake sure that all the side windows are
closed.
XTo interrupt convenience closing: release
recessed sensor surface :on the door han-
dle.
Resetting the side windows
If a side window can no longer be closed fully,
you must reset it.
XClose all the doors.
XSwitch on the power supply or switch on the
ignition with the Start/Stop button.
XPull the corresponding switch on the door
control panel until the side window is com-
pletely closed (
Ypage 76).
XHold the switch for an additional second.
If the side window opens again slightly:
XImmediately pull the corresponding switch on
the door control panel until the side window is
completely closed (
Ypage 76).
XHold the switch for an additional second.
XIf the respective side window remains closed
after the button is released, then it has been
set correctly. If this is not the case, repeat the
steps above.
Side windows77
Opening and closing
Z
Page 80 of 294
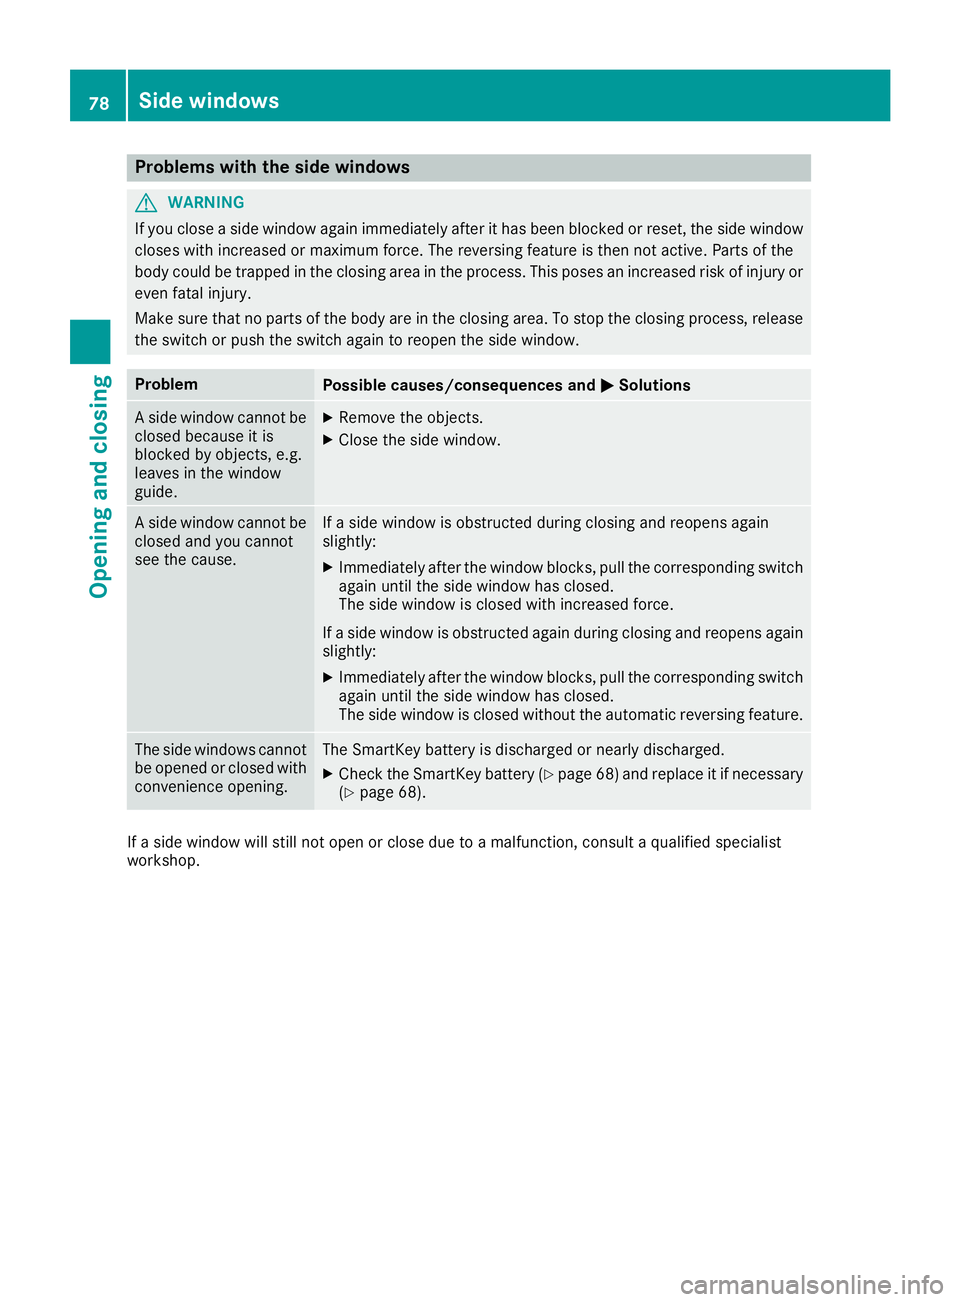
Problems with the side windows
GWARNING
If you close a side window again immediately after it has been blocked or reset, the side window
closes with increased or maximum force. The reversing feature is then not active. Parts of the
body could be trapped in the closing area in the process. This poses an increased risk of injury or
even fatal injury.
Make sure that no parts of the body are in the closing area. To stop the closing process, release
the switch or push the switch again to reopen the side window.
ProblemPossible causes/consequences and MSolutions
A side window cannot be
closed because it is
blocked by objects, e.g.
leaves in the window
guide.XRemove the objects.
XClose the side window.
A side window cannot be
closed and you cannot
see the cause.If a side window is obstructed during closing and reopens again
slightly:
XImmediately after the window blocks, pull the corresponding switch
again until the side window has closed.
The side window is closed with increased force.
If a side window is obstructed again during closing and reopens again slightly:
XImmediately after the window blocks, pull the corresponding switchagain until the side window has closed.
The side window is closed without the automatic reversing feature.
The side windows cannot
be opened or closed with
convenience opening.The SmartKey battery is discharged or nearly discharged.
XCheck the SmartKey battery (Ypage 68) and replace it if necessary
(Ypage 68).
If a side window will still not open or close due to a malfunction, consult a qualified specialist
workshop.
78Side windows
Opening and closing