2018 MERCEDES-BENZ AMG GT COUPE reset
[x] Cancel search: resetPage 89 of 294
This means that you could misjudge the dis-
tance from road users traveling behind, e.g.
when changing lane. There is a risk of an acci-
dent.
For this reason, always make sure of the
actual distance from the road users traveling
behind by glancing over your shoulder.
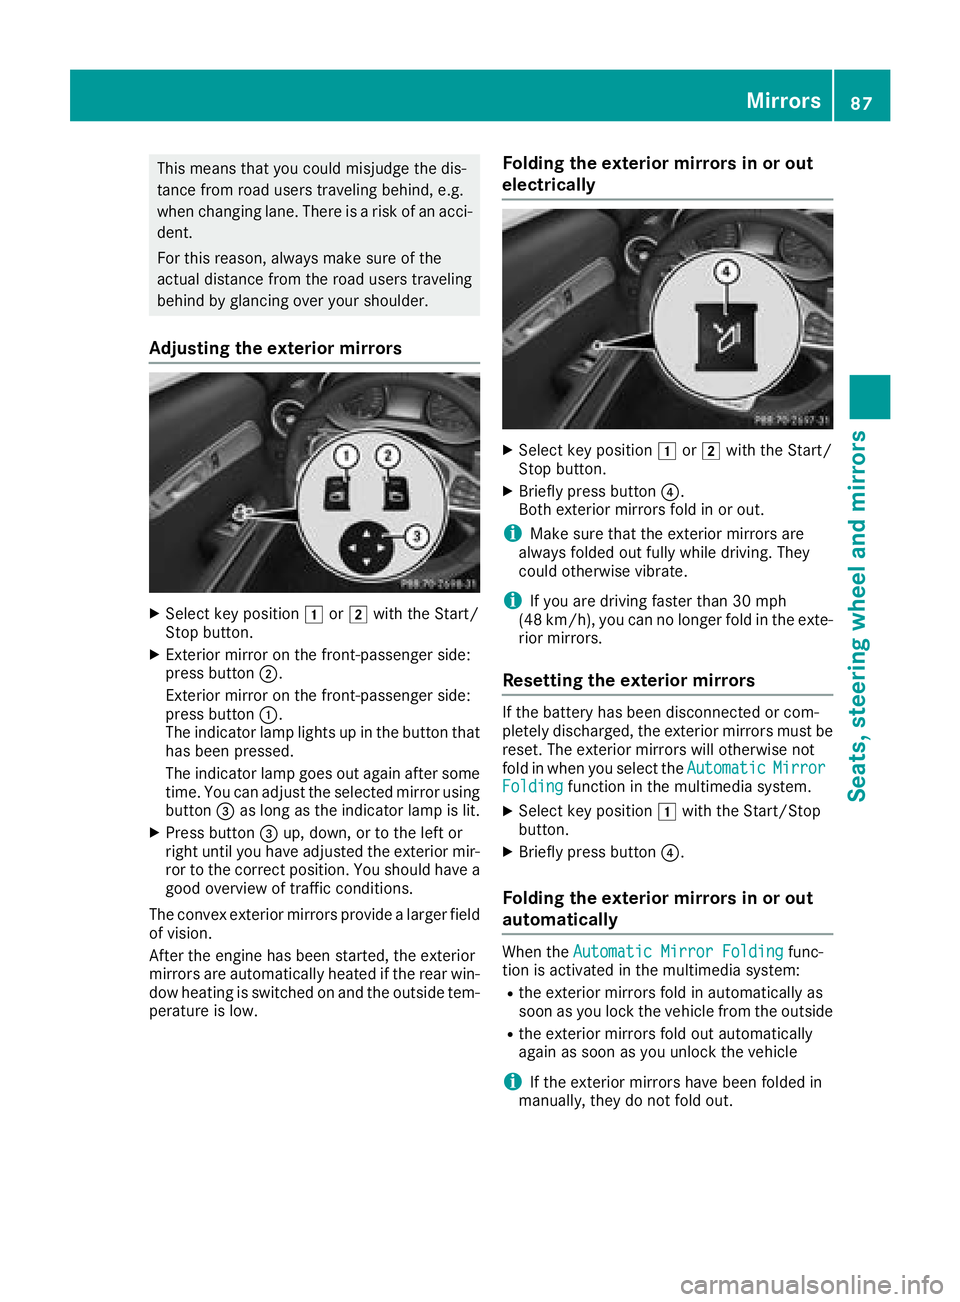
Adjusting the exterior mirrors
XSelect key position1or2 with the Start/
Stop button.
XExterior mirror on the front-passenger side:
press button ;.
Exterior mirror on the front-passenger side:
press button :.
The indicator lamp lights up in the button that
has been pressed.
The indicator lamp goes out again after some
time. You can adjust the selected mirror using
button =as long as the indicator lamp is lit.
XPress button =up, down, or to the left or
right until you have adjusted the exterior mir-
ror to the correct position. You should have a
good overview of traffic conditions.
The convex exterior mirrors provide a larger field of vision.
After the engine has been started, the exterior
mirrors are automatically heated if the rear win-
dow heating is switched on and the outside tem-
perature is low.
Folding the exterior mirrors in or out
electrically
XSelect key position 1or2 with the Start/
Stop button.
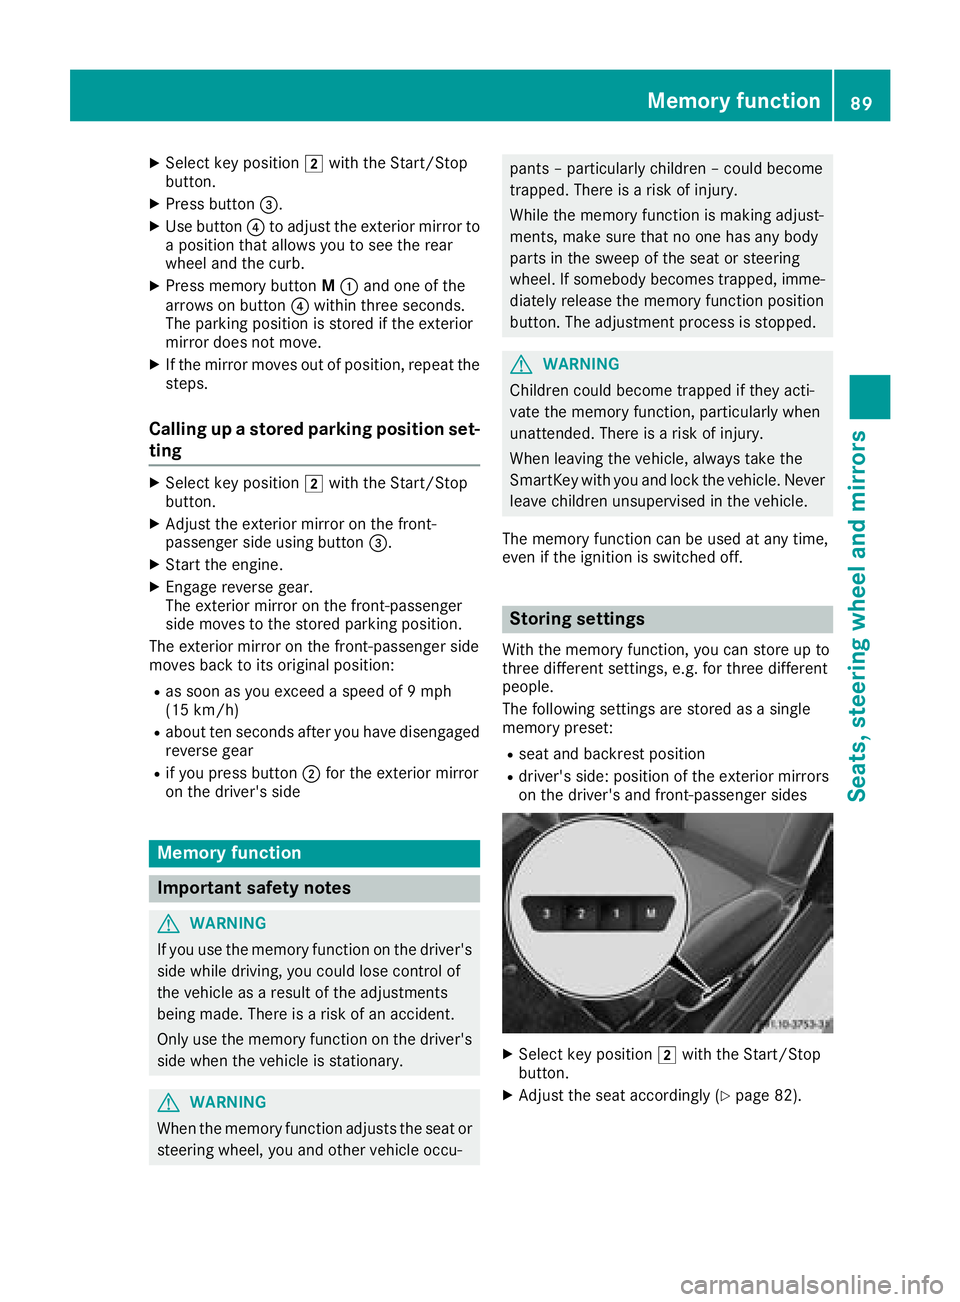
XBriefly press button ?.
Both exterior mirrors fold in or out.
iMake sure that the exterior mirrors are
always folded out fully while driving. They
could otherwise vibrate.
iIf you are driving faster than 30 mph
(48 km/h), you can no longer fold in the exte-
rior mirrors.
Resetting the exterior mirrors
If the battery has been disconnected or com-
pletely discharged, the exterior mirrors must be
reset. The exterior mirrors will otherwise not
fold in when you select the Automatic
MirrorFoldingfunction in the multimedia system.
XSelect key position1with the Start/Stop
button.
XBriefly press button ?.
Folding the exterior mirrors in or out
automatically
When theAutomatic Mirror Foldingfunc-
tion is activated in the multimedia system:
Rthe exterior mirrors fold in automatically as
soon as you lock the vehicle from the outside
Rthe exterior mirrors fold out automatically
again as soon as you unlock the vehicle
iIf the exterior mirrors have been folded in
manually, they do not fold out.
Mirrors87
Seats, steering wheel and mirrors
Z
Page 91 of 294
XSelect key position2with the Start/Stop
button.
XPress button =.
XUse button?to adjust the exterior mirror to
a position that allows you to see the rear
wheel and the curb.
XPress memory button M: and one of the
arrows on button ?within three seconds.
The parking position is stored if the exterior
mirror does not move.
XIf the mirror moves out of position, repeat the
steps.
Calling up a stored parking position set-
ting
XSelect key position 2with the Start/Stop
button.
XAdjust the exterior mirror on the front-
passenger side using button =.
XStart the engine.
XEngage reverse gear.
The exterior mirror on the front-passenger
side moves to the stored parking position.
The exterior mirror on the front-passenger side
moves back to its original position:
Ras soon as you exceed a speed of 9 mph
(15 km/h)
Rabout ten seconds after you have disengaged
reverse gear
Rif you press button ;for the exterior mirror
on the driver's side
Memory function
Important safety notes
GWARNING
If you use the memory function on the driver's side while driving, you could lose control of
the vehicle as a result of the adjustments
being made. There is a risk of an accident.
Only use the memory function on the driver's
side when the vehicle is stationary.
GWARNING
When the memory function adjusts the seat or steering wheel, you and other vehicle occu-
pants – particularly children – could become
trapped. There is a risk of injury.
While the memory function is making adjust-
ments, make sure that no one has any body
parts in the sweep of the seat or steering
wheel. If somebody becomes trapped, imme-diately release the memory function position
button. The adjustment process is stopped.
GWARNING
Children could become trapped if they acti-
vate the memory function, particularly when
unattended. There is a risk of injury.
When leaving the vehicle, always take the
SmartKey with you and lock the vehicle. Never
leave children unsupervised in the vehicle.
The memory function can be used at any time,
even if the ignition is switched off.
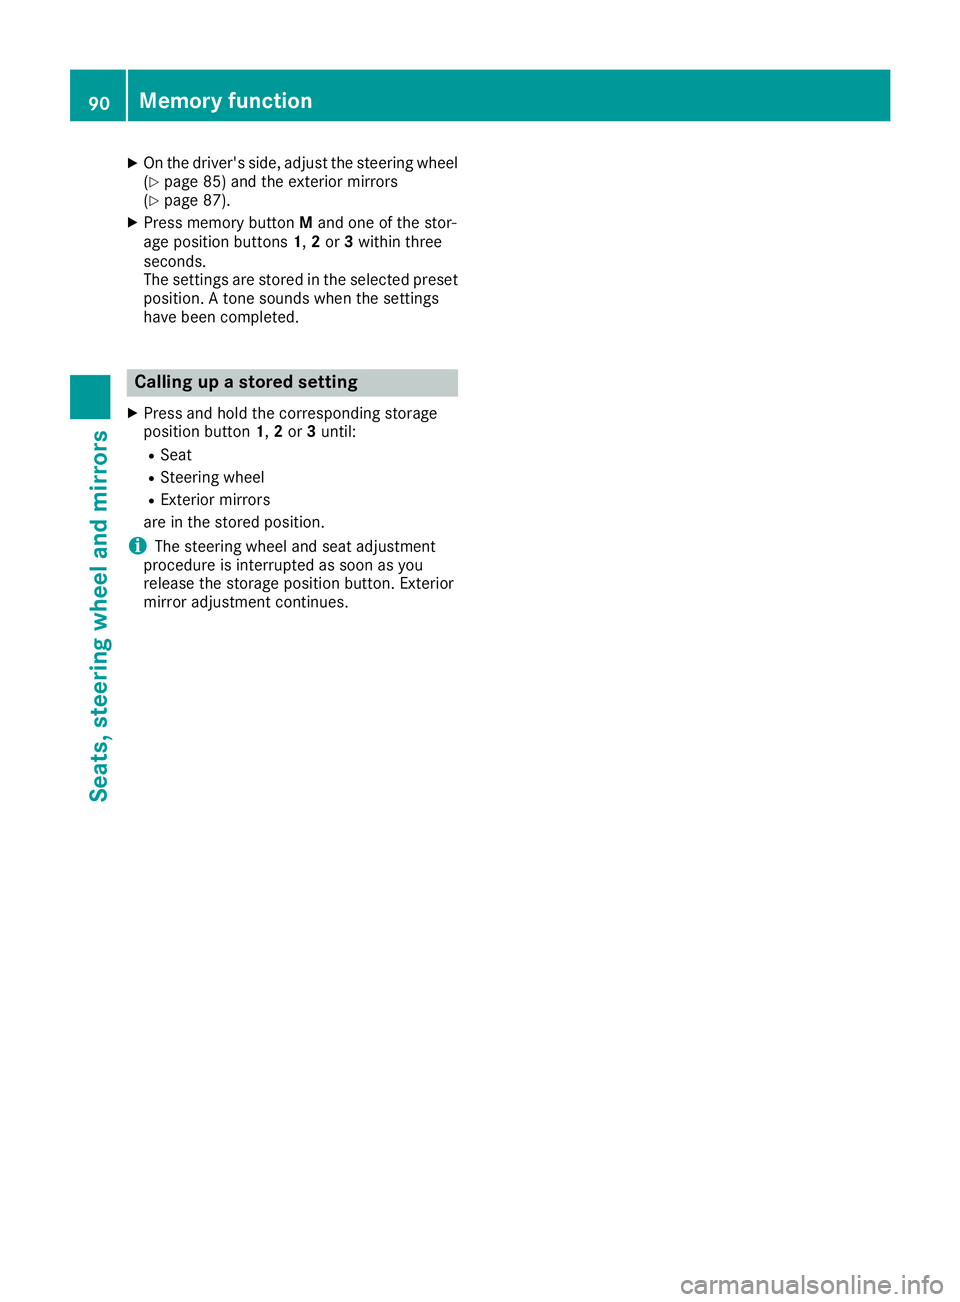
Storing settings
With the memory function, you can store up to
three different settings, e.g. for three different
people.
The following settings are stored as a single
memory preset:
Rseat and backrest position
Rdriver's side: position of the exterior mirrors
on the driver's and front-passenger sides
XSelect key position 2with the Start/Stop
button.
XAdjust the seat accordingly (Ypage 82).
Memory function89
Seats, steering wheel and mirrors
Z
Page 92 of 294
XOn the driver's side, adjust the steering wheel(Ypage 85) and the exterior mirrors
(Ypage 87).
XPress memory button Mand one of the stor-
age position buttons 1,2or 3within three
seconds.
The settings are stored in the selected preset
position. A tone sounds when the settings
have been completed.
Calling up a stored setting
XPress and hold the corresponding storage
position button 1,2or 3until:
RSeat
RSteering wheel
RExterior mirrors
are in the stored position.
iThe steering wheel and seat adjustment
procedure is interrupted as soon as you
release the storage position button. Exterior
mirror adjustment continues.
90Memory function
Seats, steering wheel and mirrors
Page 159 of 294
Calling up the range
XPress theòbutton on the steering wheel
to open the menu list.
XPress :or9 on the steering wheel to
select the Tripmenu.
XPress:or9 to select the approximate
Range.
The approximate range that can be covered
depends on the fuel level and your current
driving style. If there is only a small amount of
fuel left in the fuel tank, a vehicle being refu-
eled C appears instead of approximate
range.
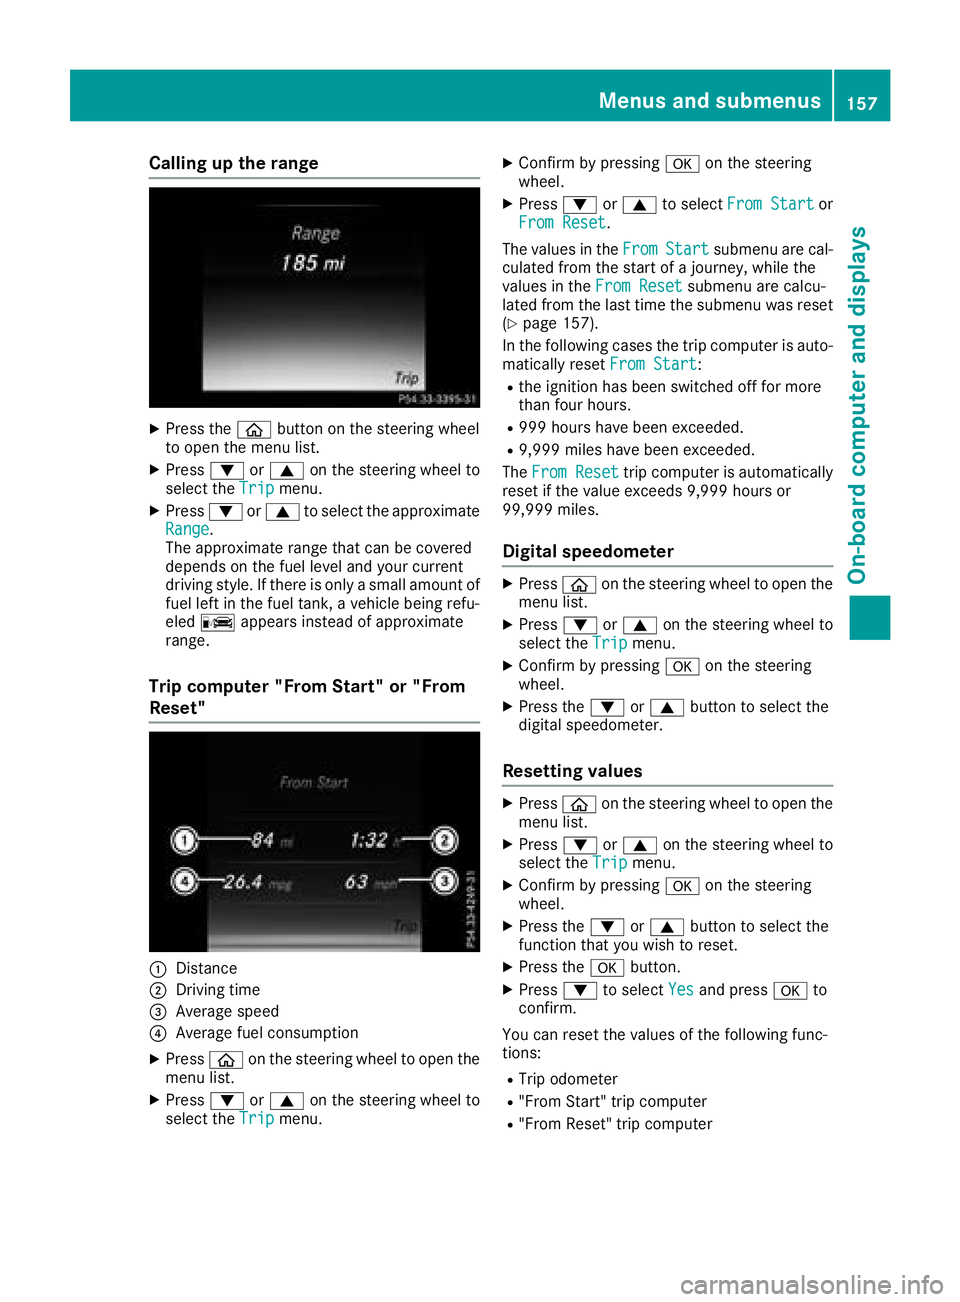
Trip computer "From Start" or "From
Reset"
:Distance
;Driving time
=Average speed
?Average fuel consumption
XPress òon the steering wheel to open the
menu list.
XPress :or9 on the steering wheel to
select the Tripmenu.
XConfirm by pressing aon the steering
wheel.
XPress :or9 to select From Startor
From Reset.
The values in the From
Startsubmenu are cal-
culated from the start of a journey, while the
values in the From Reset
submenu are calcu-
lated from the last time the submenu was reset
(
Ypage 157).
In the following cases the trip computer is auto- matically reset From Start
:
Rthe ignition has been switched off for more
than four hours.
R999 hours have been exceeded.
R9,999 miles have been exceeded.
The From Reset
trip computer is automatically
reset if the value exceeds 9,999 hours or
99,999 miles.
Digital speedometer
XPress òon the steering wheel to open the
menu list.
XPress :or9 on the steering wheel to
select the Tripmenu.
XConfirm by pressing aon the steering
wheel.
XPress the :or9 button to select the
digital speedometer.
Resetting values
XPress òon the steering wheel to open the
menu list.
XPress :or9 on the steering wheel to
select the Tripmenu.
XConfirm by pressing aon the steering
wheel.
XPress the :or9 button to select the
function that you wish to reset.
XPress the abutton.
XPress :to select Yesand press ato
confirm.
You can reset the values of the following func-
tions:
RTrip odometer
R"From Start" trip computer
R"From Reset" trip computer
Menus and submenus157
On-board computer and displays
Z
Page 161 of 294
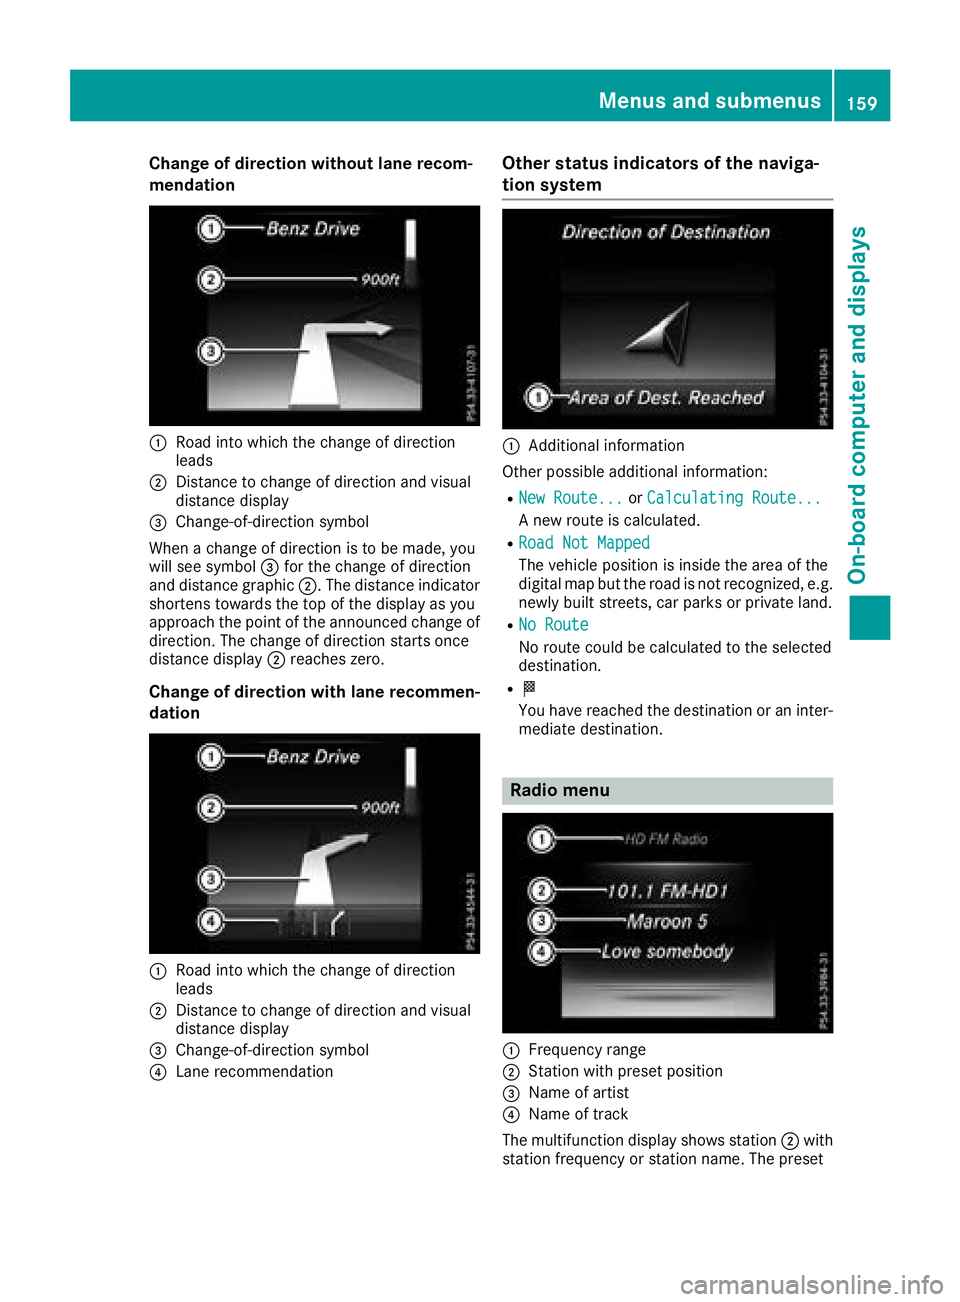
Change of direction without lane recom-
mendation
:Road into which the change of direction
leads
;Distance to change of direction and visual
distance display
=Change-of-direction symbol
When a change of direction is to be made, you
will see symbol =for the change of direction
and distance graphic ;. The distance indicator
shortens towards the top of the display as you
approach the point of the announced change of
direction. The change of direction starts once
distance display ;reaches zero.
Change of direction with lane recommen-
dation
:Road into which the change of direction
leads
;Distance to change of direction and visual
distance display
=Change-of-direction symbol
?Lane recommendation
Other status indicators of the naviga-
tion system
:Additional information
Other possible additional information:
RNew Route...or Calculating Route...
A new route is calculated.
RRoad Not Mapped
The vehicle position is inside the area of the
digital map but the road is not recognized, e.g.
newly built streets, car parks or private land.
RNo Route
No route could be calculated to the selected
destination.
RO
You have reached the destination or an inter-
mediate destination.
Radio menu
:Frequency range
;Station with preset position
=Name of artist
?Name of track
The multifunction display shows station ;with
station frequency or station name. The preset
Menus and submenus159
On-board computer and displays
Z
Page 167 of 294
The selected unit of measurement for distance
applies to:
RDigital speedometer in theTripmenu
ROdometer and the trip odometer
RTrip computer
RRange
RNavigation instructions in the Navimenu
RCruise control
RDistance Pilot DISTRONIC
RASSYST PLUS service interval display
Switching the additional speedometer
on/off
If the additional speedometer is switched on,
the speed is shown in the status bar in the mul-
tifunction display instead of the outside tem-
perature.
The additional speedometer displays the speed
in the respective unit that is not shown in the
multifunction display.
XPressòon the steering wheel to open the
menu list.
XPress :or9 on the steering wheel to
select the Settingsmenu.
XConfirm by pressing aon the steering
wheel.
XPress :or9 to select the Instru‐ment Clustersubmenu.
XPressato confirm.
XPress :or9 to select the Addi‐tional Speedometer [km/h]function.
The current selection appears.
XTo switch on/off: pressaagain.
Restoring the factory settings
XPress òon the steering wheel to open the
menu list.
XPress :or9 on the steering wheel to
select the Settingsmenu.
XConfirm by pressing aon the steering
wheel.
XPress :or9 to select the FactorySettingssubmenu.
XPressato confirm.
The Reset All Settings?function
appears.
XPress :or9 to select NoorYes.
XPress ato confirm the selection.
If you have selected Yes, the multifunction
display shows a confirmation message.
For safety reasons, the Daytime Running
Lightsfunction in theLightssubmenu is only
reset when the vehicle is stationary.
AMG menu
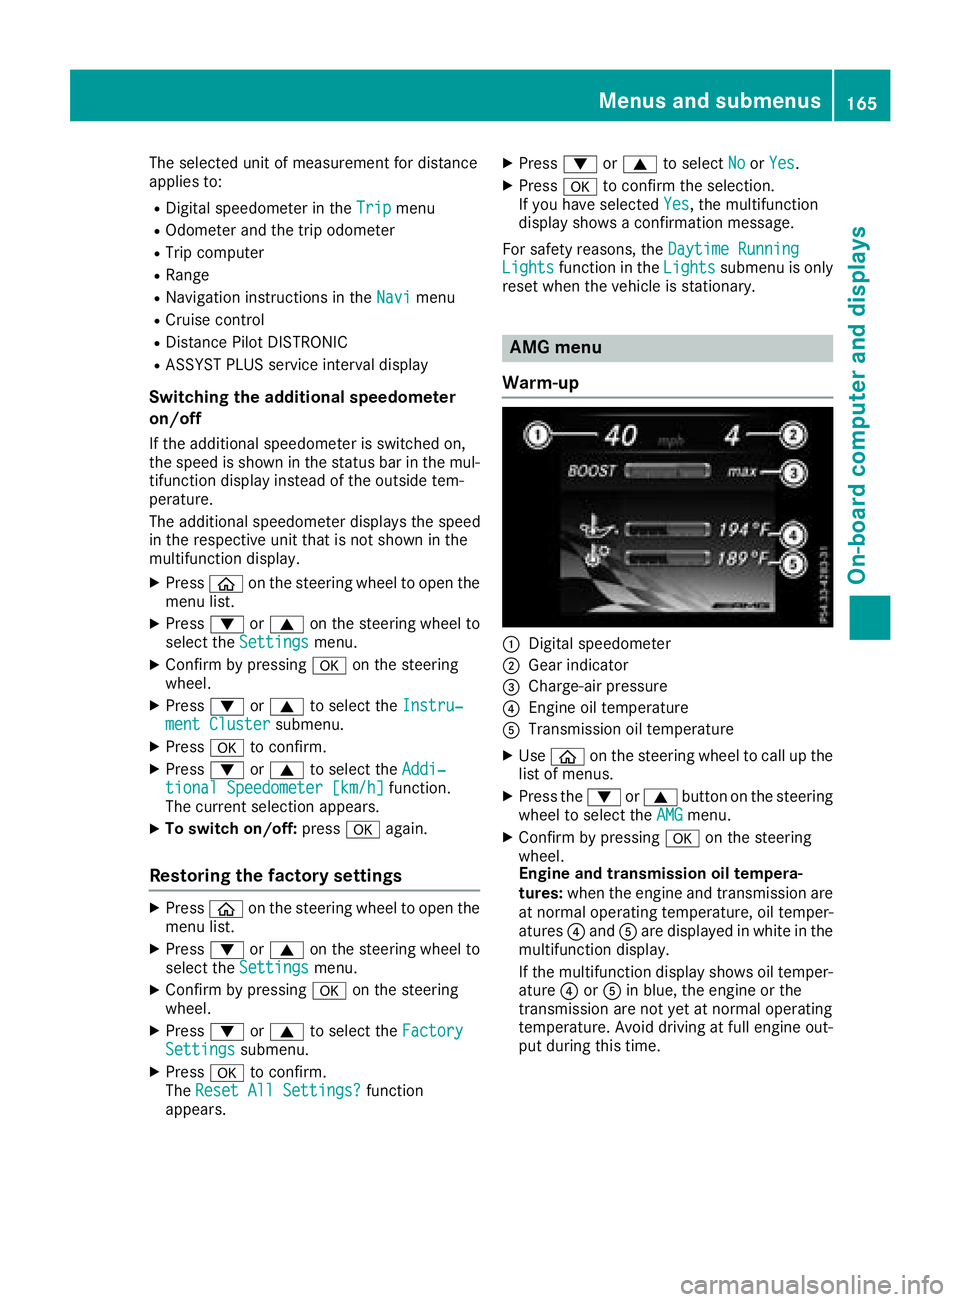
Warm-up
:Digital speedometer
;Gear indicator
=Charge-air pressure
?Engine oil temperature
ATransmission oil temperature
XUse ò on the steering wheel to call up the
list of menus.
XPress the :or9 button on the steering
wheel to select the AMGmenu.
XConfirm by pressing aon the steering
wheel.
Engine and transmission oil tempera-
tures: when the engine and transmission are
at normal operating temperature, oil temper-
atures ?and Aare displayed in white in the
multifunction display.
If the multifunction display shows oil temper-
ature ?orA in blue, the engine or the
transmission are not yet at normal operating
temperature. Avoid driving at full engine out-
put during this time.
Menus and submenus165
On-board computer and displays
Z
Page 168 of 294
G-Meter
The G-Meter shows you the forces that are exer-
ted on the driver during the journey, both later-
ally and in the direction of travel.
The maximum values are indicated in red in theguideline system.
XPress òon the steering wheel to open the
menu list.
XPress the :or9 button on the steering
wheel to select the AMGmenu.
XConfirm by pressing aon the steering
wheel.
XPress the 9button repeatedly until the G-
Meter appears.
The maximum values of the G-Meter are
saved.
XTo reset the G-Meter: pressaagain.
XUsing :or9 select Yeson the steer-
ing wheel.
XPress ato confirm.
The maximum values of the G-Meter are
deleted.
If the ignition remains switched off for longer
than four hours, the G-Meter will be automati-
cally reset.
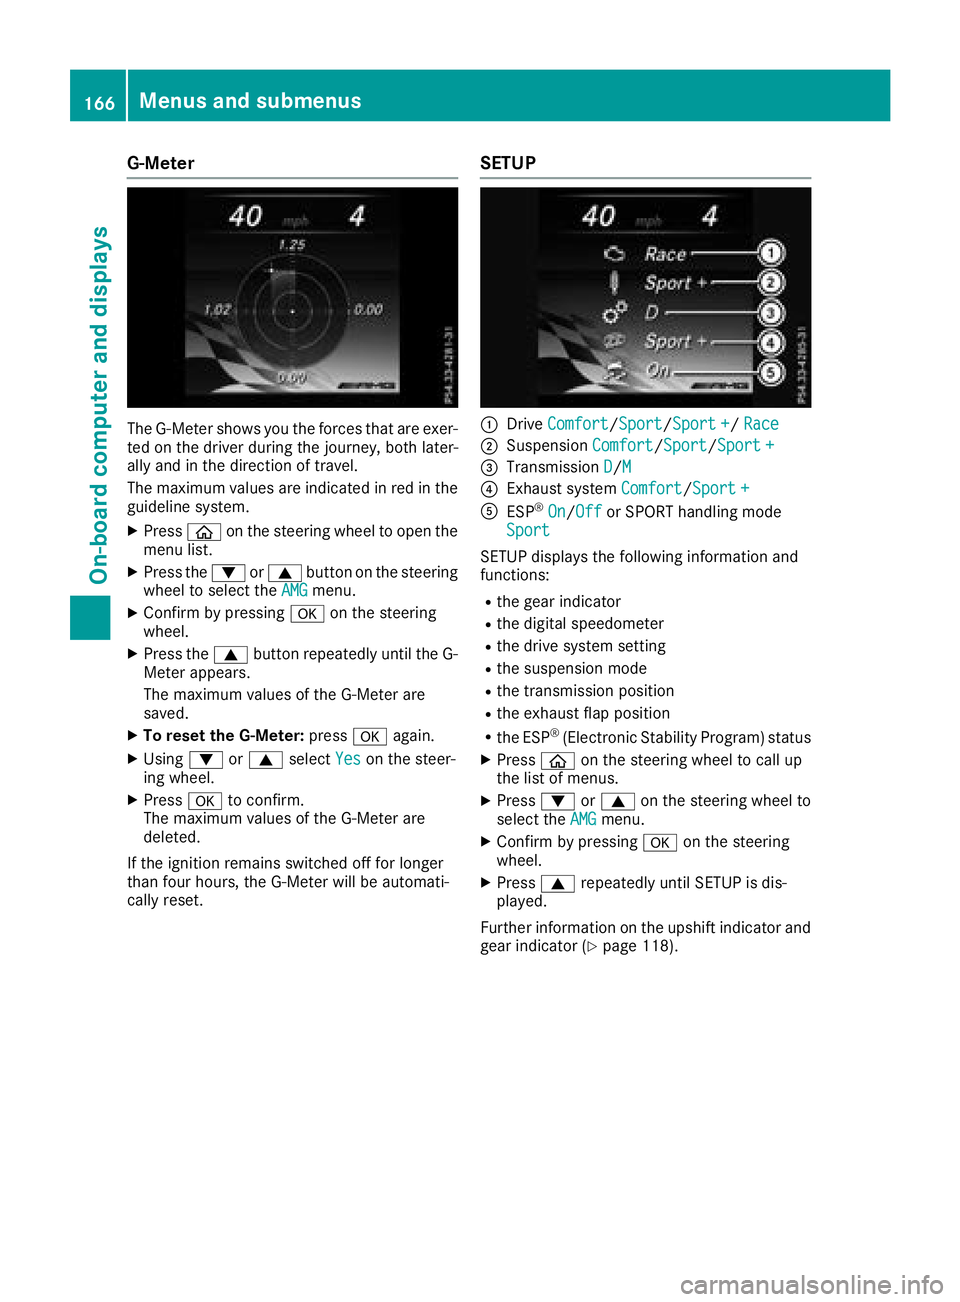
SETUP
:Drive Comfort/Sport/Sport +/ Race
;Suspension Comfort/Sport/Sport +
=Transmission D/M
?Exhaust system Comfort/Sport +
AESP®On/Offor SPORT handling mode
Sport
SETUP displays the following information and
functions:
Rthe gear indicator
Rthe digital speedometer
Rthe drive system setting
Rthe suspension mode
Rthe transmission position
Rthe exhaust flap position
Rthe ESP®(Electronic Stability Program) status
XPress òon the steering wheel to call up
the list of menus.
XPress :or9 on the steering wheel to
select the AMGmenu.
XConfirm by pressing aon the steering
wheel.
XPress 9repeatedly until SETUP is dis-
played.
Further information on the upshift indicator and
gear indicator (
Ypage 118).
166Menus and submenus
On-board computer and displays
Page 170 of 294
Resetting the RACETIMER
XPress the:or9 button to select Stop.
The RACETIMER is stopped.
XPress the :or9 button to select
Reset.
XPress ato confirm.
All laps are deleted.
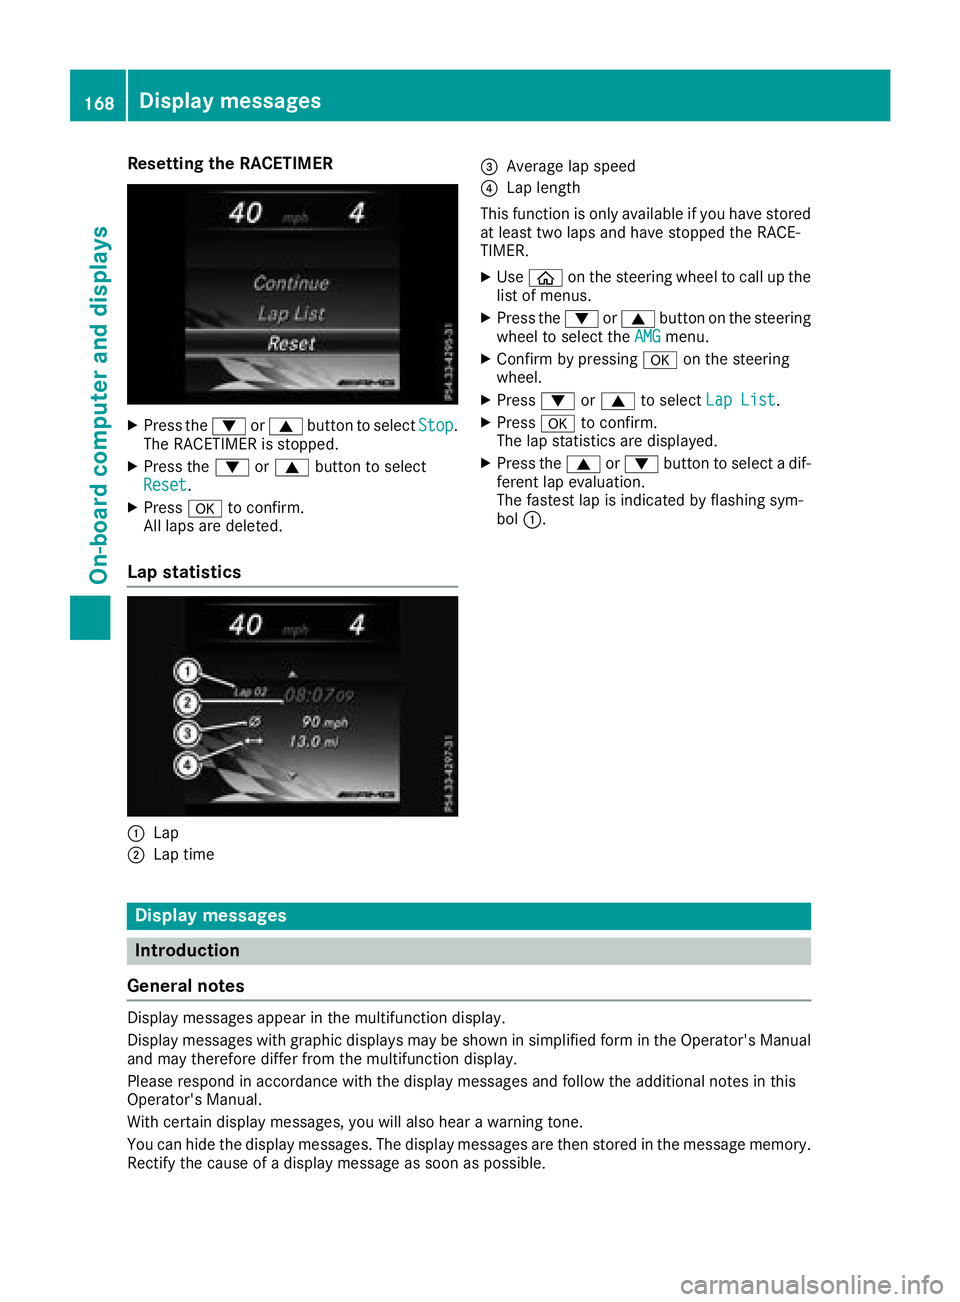
Lap statistics
:Lap
;Lap time
=Average lap speed
?Lap length
This function is only available if you have stored
at least two laps and have stopped the RACE-
TIMER.
XUse ò on the steering wheel to call up the
list of menus.
XPress the :or9 button on the steering
wheel to select the AMGmenu.
XConfirm by pressing aon the steering
wheel.
XPress :or9 to select Lap List.
XPressato confirm.
The lap statistics are displayed.
XPress the 9or: button to select a dif-
ferent lap evaluation.
The fastest lap is indicated by flashing sym-
bol :.
Display messages
Introduction
General notes
Display messages appear in the multifunction display.
Display messages with graphic displays may be shown in simplified form in the Operator's Manual
and may therefore differ from the multifunction display.
Please respond in accordance with the display messages and follow the additional notes in this
Operator's Manual.
With certain display messages, you will also hear a warning tone.
You can hide the display messages. The display messages are then stored in the message memory.
Rectify the cause of a display message as soon as possible.
168Display messages
On-board computer and displays