2018 MERCEDES-BENZ AMG GT COUPE instrument cluster
[x] Cancel search: instrument clusterPage 125 of 294
positionhork, otherwise park position j
is engaged automatically.
The transmission could be damaged.
!Always secure the vehicle correctly against
rolling away. Otherwise, the vehicle or its driv-
etrain could be damaged.
To ensure that the vehicle is secured against
rolling away unintentionally:
Rthe electric parking brake must be applied.
Rthe transmission must be in position j.
Rthe SmartKey must be removed from the igni-
tion lock or the Start/Stop button must be
pressed.
Rthe front wheels must be turned towards the
curb on steep uphill or downhill gradients.
Rthe empty vehicle must be secured at the
front axle with a wheel chock or similar, for
example, on uphill or downhill gradients.
Ra laden vehicle must also be secured at the
rear axle with a wheel chock or similar, for
example, on uphill or downhill gradients.
Switching off the engine
Important safety notes
GWARNING
The automatic transmission switches to neu-
tral position Nwhen you switch off the engine.
The vehicle may roll away. There is a risk of an
accident.
After switching off the engine, always switch
to parking position P. Prevent the parked vehi-
cle from rolling away by applying the parking
brake.
AMG SPEEDSHIFT DCT 7-speed sport
transmission
!Do not remove the SmartKey while the vehi-
cle is in motion. Otherwise, at low speeds,
parking lock jwill be activated automati-
cally.
Do not open the driver's door while the vehi-
cle is in motion. At low speeds, transmission
position jis engaged automatically.
This could cause damage to the transmission
and the parking lock.
XApply the electric parking brake.
XShift the transmission to jusing the button
on the center console.
Using the Start/Stop button
XPress the Start/Stop button (Ypage 105)
The engine stops and all the indicator lamps in
the instrument cluster go out.
If the driver's door is closed, this is the same
as key position 1. If the driver's door is open,
this is the same as key position u, i.e. the
SmartKey having been removed.
If you switch the engine off with the trans-
mission in position korh, the transmis-
sion automatically shifts to i.
If you move the E-SELECT lever to ibefore
switching off the engine, the transmission
remains in ifor 30 minutes.
If you open the driver's or front-passenger
door during this period, the transmission
automatically shifts to jand the electric
parking brake is automatically applied.
The engine can be switched off in an emer-
gency while the vehicle is in motion by press-
ing and holding the Start/Stop button for
three seconds. This function operates inde-
pendently of the ECO start/stop automatic
engine switch-off function.
Using the SmartKey
XTurn the SmartKey to key position uin the
ignition lock and remove it.
The immobilizer is activated.
If you move the E-SELECT lever to ibefore
switching off the engine, the transmission
remains in ifor approximately 30 minutes.
If you open the driver's or front-passenger
door during this time, the transmission shifts
automatically to j.
The t
ransmission remains in iif:
Rthe SmartKey is in the ignition lock and
Ryou use the E ‑SELECT lever to shift the
transmission to ibefore switching the
engine off
This still applies if you open the driver's or
front-passenger door.
Further information on transmission position
i when operating with a SmartKey is avail-
able under "Automatic car wash"
(
Ypage 239).
Parking123
Driving and parking
Z
Page 126 of 294
Electric parking brake
General notes
GWARNING
If you leave children unsupervised in the vehi-
cle, they could set it in motion by, for example:
Rrelease the parking brake.
Rshift the automatic transmission out of the
parking position P.
Rstart the engine.
In addition, they may operate vehicle equip-
ment and become trapped. There is a risk of
an accident and injury.
When leaving the vehicle, always take the
SmartKey with you and lock the vehicle. Never
leave children unsupervised in the vehicle.
The function of the electric parking brake is
dependent on the on-board voltage. If the on-
board voltage is low or there is a malfunction in
the system, it may not be possible to apply the
released parking brake.
XIf this is the case, only park the vehicle on
level ground and secure it to prevent it rolling
away.
XShift the automatic transmission to position
j.
It may not be possible to release an applied
parking brake if the on-board voltage is low or
there is a malfunction in the system. Contact a
qualified specialist workshop.
The electric parking brake performs a function
test at regular intervals while the engine is
switched off. The sounds that can be heard while
this is occurring are normal.
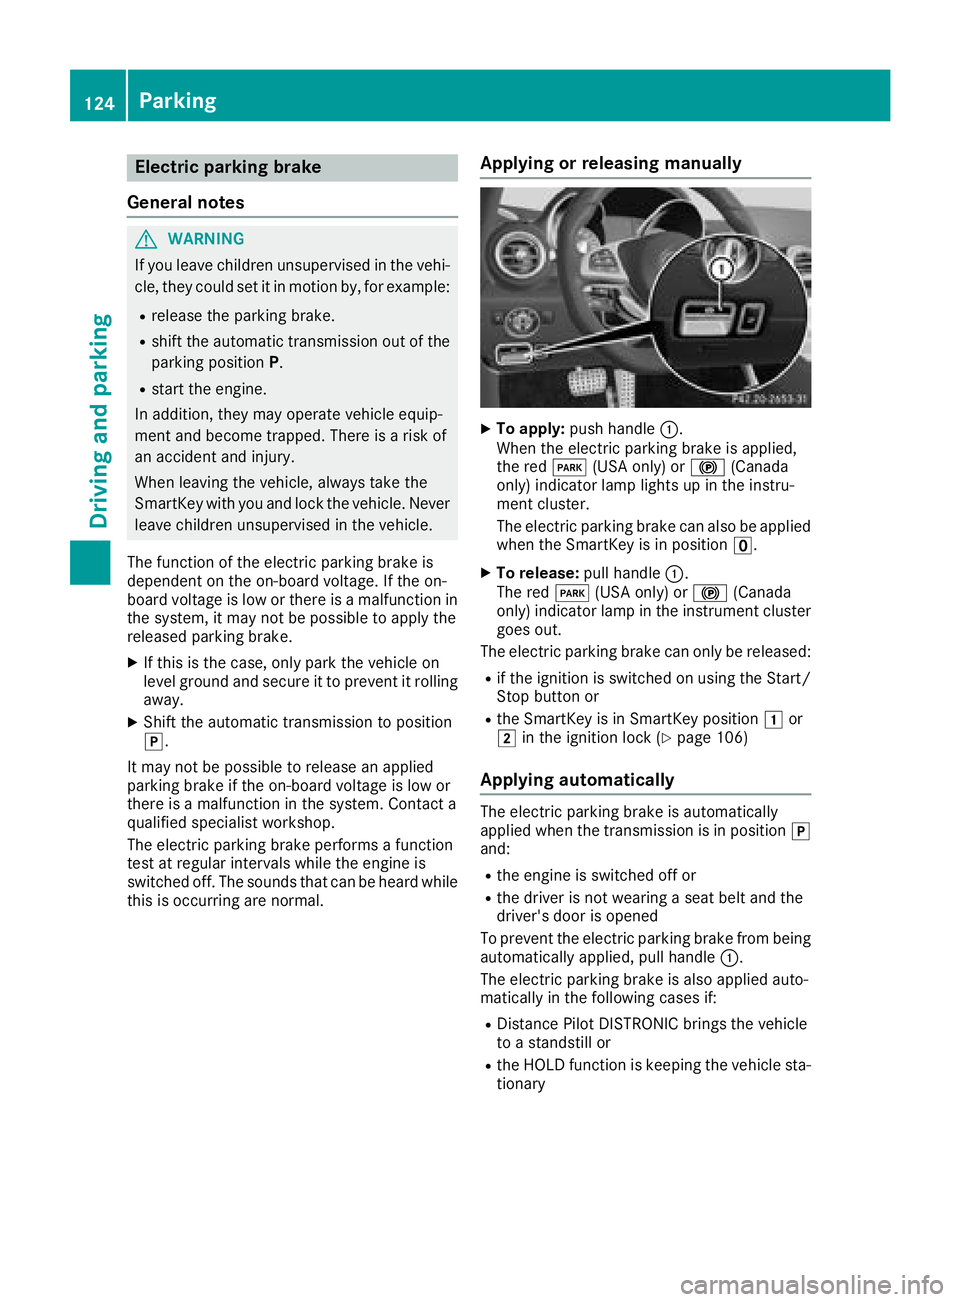
Applying or releasing manually
XTo apply: push handle :.
When the electric parking brake is applied,
the red F(USA only) or !(Canada
only) indicator lamp lights up in the instru-
ment cluster.
The electric parking brake can also be applied
when the SmartKey is in position u.
XTo release:pull handle:.
The red F(USA only) or !(Canada
only) indicator lamp in the instrument cluster goes out.
The electric parking brake can only be released:
Rif the ignition is switched on using the Start/
Stop button or
Rthe SmartKey is in SmartKey position 1or
2 in the ignition lock (Ypage 106)
Applying automatically
The electric parking brake is automatically
applied when the transmission is in position j
and:
Rthe engine is switched off or
Rthe driver is not wearing a seat belt and the
driver's door is opened
To prevent the electric parking brake from being
automatically applied, pull handle :.
The electric parking brake is also applied auto-
matically in the following cases if:
RDistance Pilot DISTRONIC brings the vehicle
to a standstill or
Rthe HOLD function is keeping the vehicle sta-
tionary
124Parking
Driving and parking
Page 127 of 294
In addition, at least one of the following condi-
tions must be fulfilled:
Rthere is a system malfunction
Rthe power supply is insufficient
Rthe vehicle is stationary for a lengthy period
The red F(USA only) or !(Canada only)
indicator lamp in the instrument cluster lights
up.
The electric parking brake is not automatically
engaged if the engine is switched off by the ECO
start/stop function.
Releasing automatically
The electric parking brake is released when the
following conditions are fulfilled:
Rthe engine is running
Rthe seat belt tongue is engaged in the belt
buckle
Rthe transmission is in position hork and
you depress the accelerator pedal or shift
from position jtoh ork
Rif the transmission is in position k, the tail-
gate must be closed
If the seat belt tongue is not engaged in the seat
belt buckle, the following conditions must be
fulfilled:
Rthe driver's door and front-passenger door
are closed
Ryou move the transmission out of position j
or you have previously driven at a speed
above 2 mph (3 km/h)
Rif the transmission is in position k, the tail-
gate must be closed
When the electric parking brake is released, the red F (USA only) or !(Canada only) indi-
cator lamp goes out in the instrument cluster.
Emergency braking
The vehicle can also be braked during an emer-
gency by using the electric parking brake.
XWhile driving, push handle :of the electric
parking brake (Ypage 124).
The vehicle is braked as long as you keep
handle :of the electric parking brake
pressed. The longer electric parking brake
handle :is depressed, the greater the brak-
ing force. During braking:
Ra warning tone sounds
Rthe
Please Release Parking Brakemes-
sage appears
Rthe red F(USA only) or !(Canada
only) indicator lamp in the instrument cluster
flashes
When the vehicle has been braked to a stand-
still, the electric parking brake is engaged.
Parking the vehicle for a long period
General notes
If you leave the vehicle parked for longer than
four weeks, the battery may be damaged by
exhaustive discharging.
If you leave the vehicle parked for longer than six
weeks, the vehicle may suffer damage as a
result of lack of use.
XVisit a qualified specialist workshop and seek
advice.
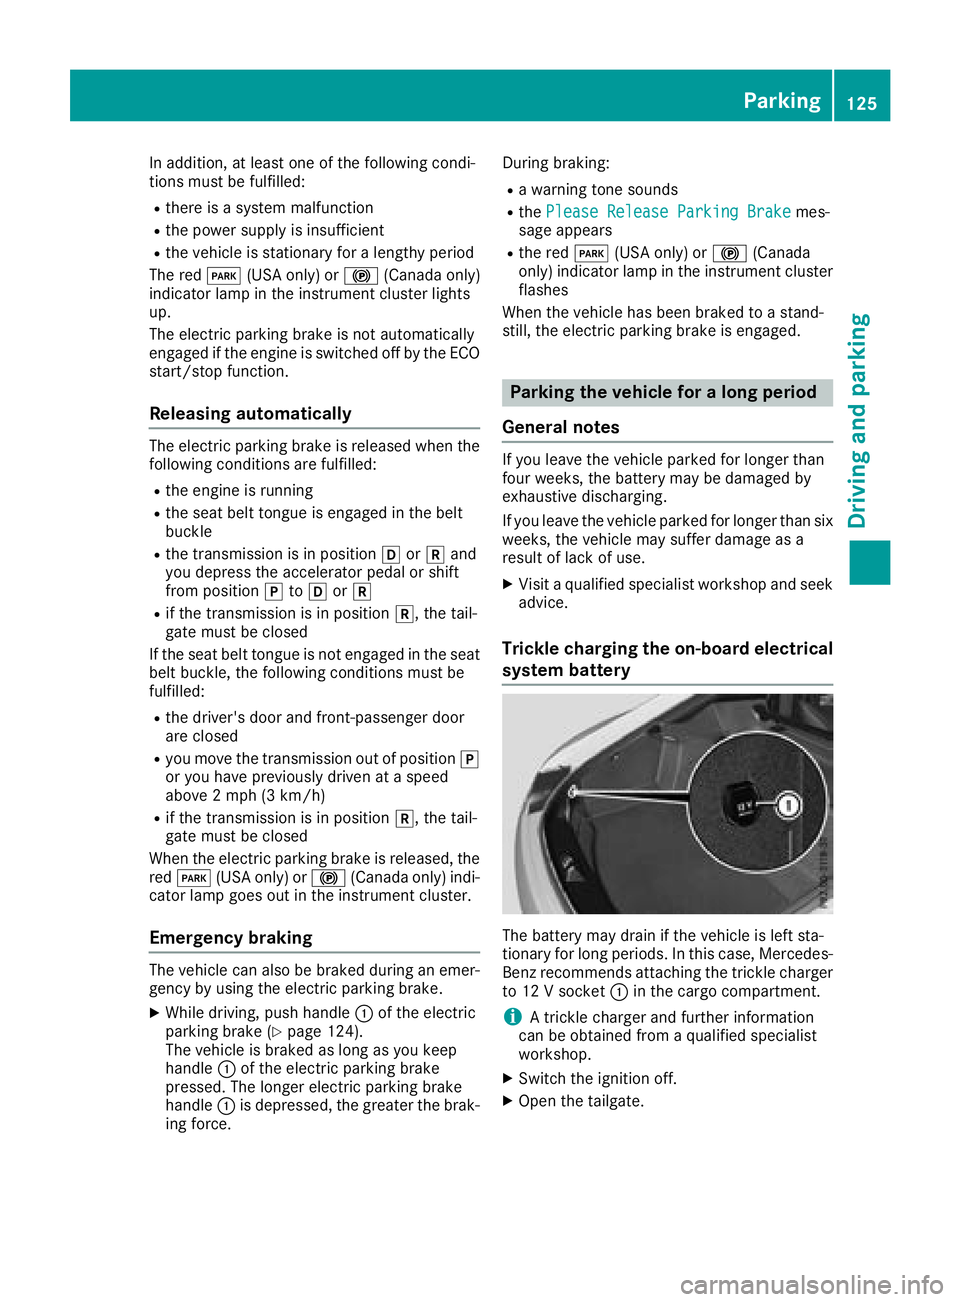
Trickle charging the on-board electrical
system battery
The battery may drain if the vehicle is left sta-
tionary for long periods. In this case, Mercedes-
Benz recommends attaching the trickle charger
to 12 V socket :in the cargo compartment.
iA trickle charger and further information
can be obtained from a qualified specialist
workshop.
XSwitch the ignition off.
XOpen the tailgate.
Parking125
Driving and parking
Z
Page 130 of 294

Observe the following rules when driving on salt-
treated roads:
RIn order to prevent any salt build-up, apply the
brakes occasionally while paying attention to
the traffic conditions.
RCarefully depress the brake pedal and the
beginning and end of a journey.
RMaintain a greater distance to the vehicle
ahead.
Servicing the brakes
!The brake fluid level may be too low, if:
Rif the red brake warning lamp lights up in
the instrument cluster and
Ryou hear a warning tone while the engine is
running
Observe additional warning messages in the
multifunction display.
The brake fluid level may be too low due to
brake pad wear or leaking brake lines.
Have the brake system checked immediately. Consult a qualified specialist workshop to
arrange this.
All checks and maintenance work on the brake
system must be carried out at a qualified spe-
cialist workshop.
Have brake pads installed and brake fluid
replaced at a qualified specialist workshop.
If the brake system has only been subject to
moderate loads, you should test the functional-
ity of your brakes at regular intervals.
Information on BAS (Brake Assist) (
Ypage 58).
For safety reasons, Mercedes-Benz recom-
mends only installing the following brake disks
and brake pads/linings:
Rbrake disks that have been approved by
Mercedes-Benz
Rbrake pads/linings that have been approved
by Mercedes-Benz or that are of an equivalent
standard of quality
Other brake disks or brake pads/linings can
compromise the safety of your vehicle.
Always replace all brake disks and brake pads/
linings on an axle at the same time. Always
install new brake pads/linings when replacing
brake disks.
The vehicle is equipped with lightweight brake
disks to which the wheel assembly with rim and
threaded connection is matched. The use of brake disks other than those
approved by Mercedes-Benz can change the
track width and is subject to approval, if appli-
cable.
Shock-type loads when handling the brake
discs, such as when changing wheels, can lead
to a reduction in comfort when driving with light-
weight brake discs. Avoid shock-type loads on
the lightweight brake disks, particularly on the
brake plate.
Mercedes-Benz recommends that you only use
brake fluid that has been specially approved for
your vehicle by Mercedes-Benz, or which corre-
sponds to an equivalent quality standard. Brake
fluid which has not been approved for
Mercedes-Benz vehicles or which is not of an
equivalent quality could affect your vehicle's
operating safety.
AMG high-performance and ceramic
brakes
The AMG brake systems are designed for heavy
loads. This may lead to noise when braking. This
will depend on:
RSpeed
RBraking force
REnvironmental conditions, such as tempera-
ture and humidity
The wear of individual components of the brake
system, such as the brake pads/linings or brake
discs, depends on the individual driving style
and operating conditions.
For this reason, it is impossible to state a mile-
age that will be valid under all circumstances. An aggressive driving style will lead to high wear.
You can obtain more information on this from a
qualified specialist workshop.
New and replaced brake pads and discs only
reach their optimum braking effect after several
hundred kilometers of driving. Compensate for
this by applying greater force to the brake pedal.
Keep this in mind, and adapt your driving and
braking accordingly during this break-in period.
Excessive heavy braking results in correspond-
ingly high brake wear. Observe the brake wear
warning lamp in the instrument cluster and note
any brake status messages in the multifunction
display. Especially for high performance driving,
it is important to maintain and have the brake
system checked regularly.
128Driving tips
Driving and parking
Page 133 of 294
Setting a speed
Keep in mind that it may take a brief moment
until the vehicle has accelerated or braked to
the speed set.
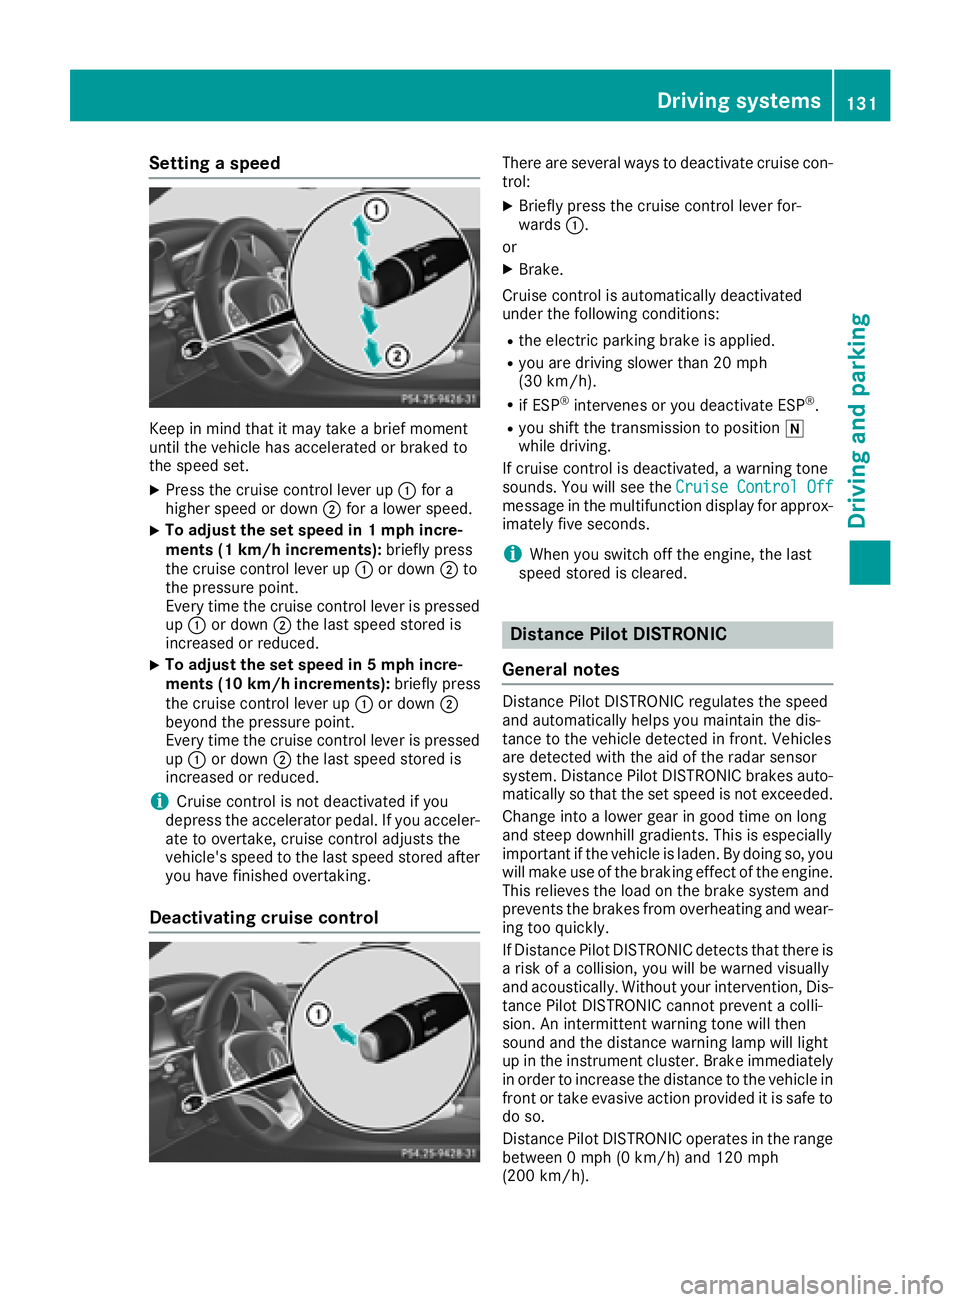
XPress the cruise control lever up:for a
higher speed or down ;for a lower speed.
XTo adjust the set speed in 1 mph incre-
ments (1 km/h increments): briefly press
the cruise control lever up :or down ;to
the pressure point.
Every time the cruise control lever is pressed
up : or down ;the last speed stored is
increased or reduced.
XTo adjust the set speed in 5 mph incre-
ments (10 km/h increments): briefly press
the cruise control lever up :or down ;
beyond the pressure point.
Every time the cruise control lever is pressed
up : or down ;the last speed stored is
increased or reduced.
iCruise control is not deactivated if you
depress the accelerator pedal. If you acceler-
ate to overtake, cruise control adjusts the
vehicle's speed to the last speed stored after
you have finished overtaking.
Deactivating cruise control
There are several ways to deactivate cruise con-
trol:
XBriefly press the cruise control lever for-
wards :.
or
XBrake.
Cruise control is automatically deactivated
under the following conditions:
Rthe electric parking brake is applied.
Ryou are driving slower than 20 mph
(30 km/h).
Rif ESP®intervenes or you deactivate ESP®.
Ryou shift the transmission to position i
while driving.
If cruise control is deactivated, a warning tone
sounds. You will see the Cruise Control Off
message in the multifunction display for approx-
imately five seconds.
iWhen you switch off the engine, the last
speed stored is cleared.
Distance Pilot DISTRONIC
General notes
Distance Pilot DISTRONIC regulates the speed
and automatically helps you maintain the dis-
tance to the vehicle detected in front. Vehicles
are detected with the aid of the radar sensor
system. Distance Pilot DISTRONIC brakes auto-
matically so that the set speed is not exceeded.
Change into a lower gear in good time on long
and steep downhill gradients. This is especially
important if the vehicle is laden. By doing so, you
will make use of the braking effect of the engine.
This relieves the load on the brake system and
prevents the brakes from overheating and wear-
ing too quickly.
If Distance Pilot DISTRONIC detects that there is a risk of a collision, you will be warned visually
and acoustically. Without your intervention, Dis-
tance Pilot DISTRONIC cannot prevent a colli-
sion. An intermittent warning tone will then
sound and the distance warning lamp will light
up in the instrument cluster. Brake immediately in order to increase the distance to the vehicle in
front or take evasive action provided it is safe to
do so.
Distance Pilot DISTRONIC operates in the range
between 0 mph (0 km/h) and 120 mph
(200 km/ h).
Driving system s131
Driving an d parking
Z
Page 165 of 294
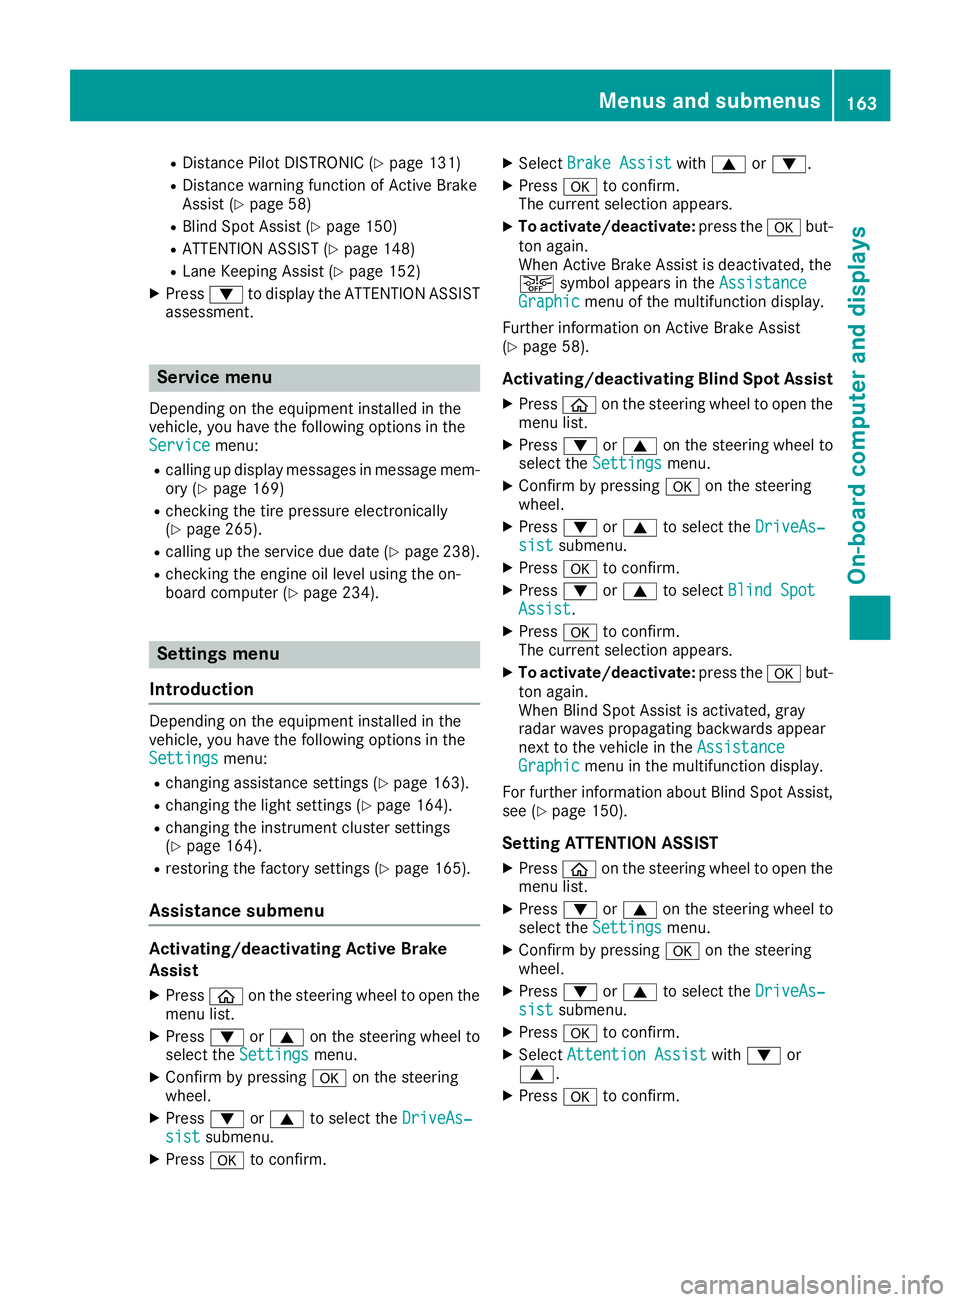
RDistance Pilot DISTRONIC (Ypage 131)
RDistance warning function of Active Brake
Assist (Ypage 58)
RBlind Spot Assist (Ypage 150)
RATTENTION ASSIST (Ypage 148)
RLane Keeping Assist (Ypage 152)
XPress:to display the ATTENTION ASSIST
assessment.
Service menu
Depending on the equipment installed in the
vehicle, you have the following options in the
Service
menu:
Rcalling up display messages in message mem- ory (Ypage 169)
Rchecking the tire pressure electronically
(Ypage 265).
Rcalling up the service due date (Ypage 238).
Rchecking the engine oil level using the on-
board computer (Ypage 234).
Settings menu
Introduction
Depending on the equipment installed in the
vehicle, you have the following options in the
Settings
menu:
Rchanging assistance settings (Ypage 163).
Rchanging the light settings (Ypage 164).
Rchanging the instrument cluster settings
(Ypage 164).
Rrestoring the factory settings (Ypage 165).
Assistance submenu
Activating/deactivating Active Brake
Assist
XPress òon the steering wheel to open the
menu list.
XPress :or9 on the steering wheel to
select the Settingsmenu.
XConfirm by pressing aon the steering
wheel.
XPress :or9 to select the DriveAs‐sistsubmenu.
XPressato confirm.
XSelect Brake Assistwith9 or:.
XPress ato confirm.
The current selection appears.
XTo activate/deactivate: press theabut-
ton again.
When Active Brake Assist is deactivated, the
æ symbol appears in the Assistance
Graphicmenu of the multifunction display.
Further information on Active Brake Assist
(
Ypage 58).
Activating/deactivating Blind Spot Assist
XPress òon the steering wheel to open the
menu list.
XPress :or9 on the steering wheel to
select the Settingsmenu.
XConfirm by pressing aon the steering
wheel.
XPress :or9 to select the DriveAs‐sistsubmenu.
XPressato confirm.
XPress :or9 to select Blind SpotAssist.
XPressato confirm.
The current selection appears.
XTo activate/deactivate: press theabut-
ton again.
When Blind Spot Assist is activated, gray
radar waves propagating backwards appear
next to the vehicle in the Assistance
Graphicmenu in the multifunction display.
For further information about Blind Spot Assist,
see (
Ypage 150).
Setting ATTENTION ASSIST
XPress òon the steering wheel to open the
menu list.
XPress :or9 on the steering wheel to
select the Settingsmenu.
XConfirm by pressing aon the steering
wheel.
XPress :or9 to select the DriveAs‐sistsubmenu.
XPressato confirm.
XSelect Attention Assistwith: or
9.
XPress ato confirm.
Menus and submenus163
On-board computer and displays
Z
Page 166 of 294
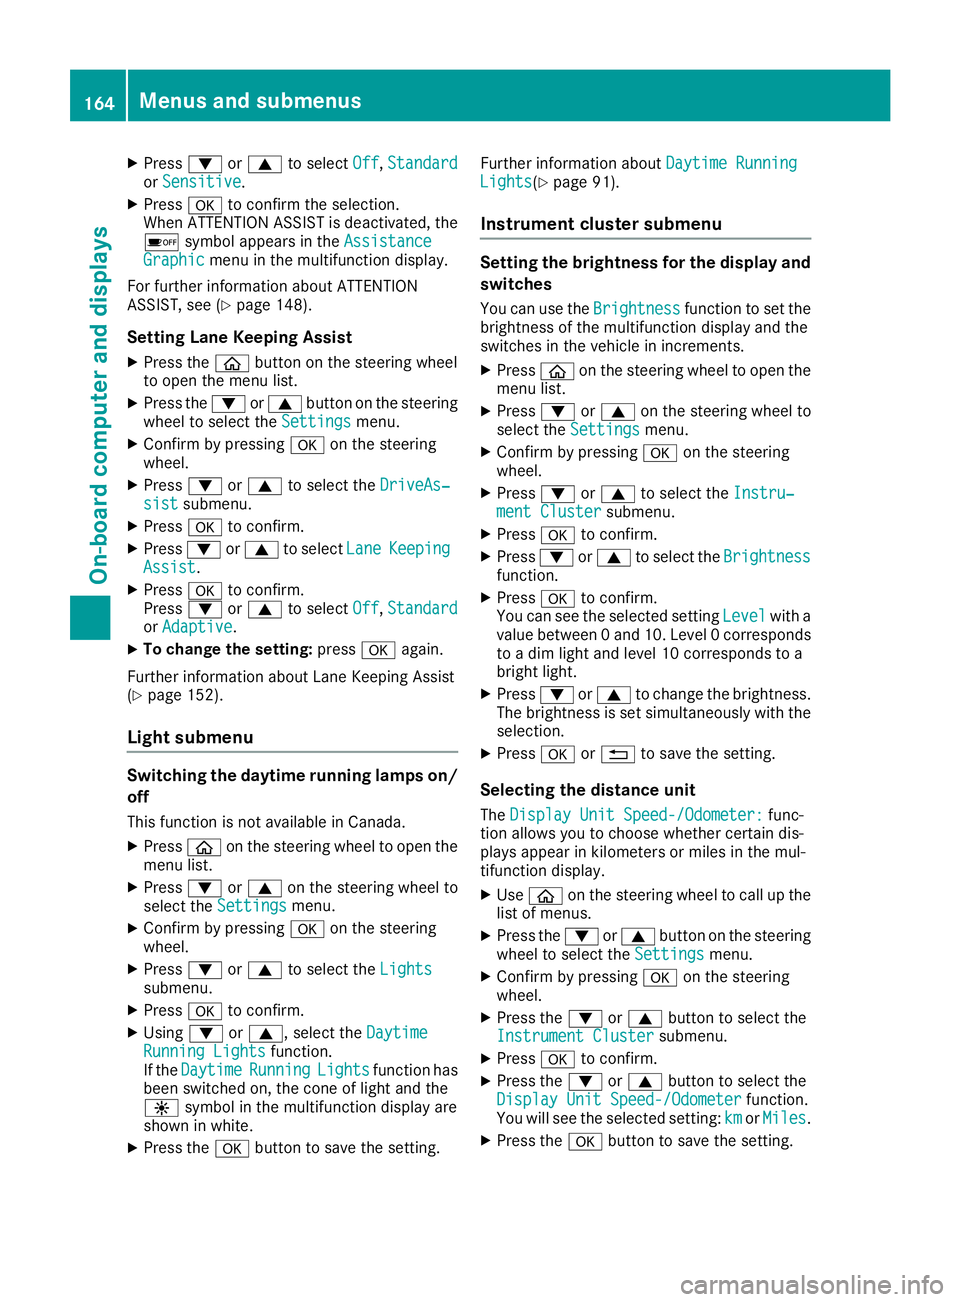
XPress:or9 to select Off,Standardor Sensitive.
XPress ato confirm the selection.
When ATTENTION ASSIST is deactivated, the
é symbol appears in the Assistance
Graphicmenu in the multifunction display.
For further information about ATTENTION
ASSIST, see (
Ypage 148).
Setting Lane Keeping Assist
XPress the òbutton on the steering wheel
to open the menu list.
XPress the :or9 button on the steering
wheel to select the Settingsmenu.
XConfirm by pressing aon the steering
wheel.
XPress :or9 to select the DriveAs‐sistsubmenu.
XPressato confirm.
XPress :or9 to select LaneKeepingAssist.
XPressato confirm.
Press :or9 to select Off,Standardor Adaptive.
XTo change the setting: pressaagain.
Further information about Lane Keeping Assist
(
Ypage 152).
Light submenu
Switching the daytime running lamps on/ off
This function is not available in Canada.
XPress òon the steering wheel to open the
menu list.
XPress :or9 on the steering wheel to
select the Settingsmenu.
XConfirm by pressing aon the steering
wheel.
XPress :or9 to select the Lightssubmenu.
XPressato confirm.
XUsing :or9, select the DaytimeRunning Lightsfunction.
If the DaytimeRunningLightsfunction has
been switched on, the cone of light and the
W symbol in the multifunction display are
shown in white.
XPress the abutton to save the setting. Further information about
Daytime Running
Lights(Ypage 91).
Instrument cluster submenu
Setting the brightness for the display and
switches
You can use theBrightnessfunction to set the
brightness of the multifunction display and the
switches in the vehicle in increments.
XPress òon the steering wheel to open the
menu list.
XPress :or9 on the steering wheel to
select the Settingsmenu.
XConfirm by pressing aon the steering
wheel.
XPress :or9 to select the Instru‐ment Clustersubmenu.
XPressato confirm.
XPress :or9 to select the Brightnessfunction.
XPressato confirm.
You can see the selected setting Levelwith a
value between 0 and 10. Level 0 corresponds
to a dim light and level 10 corresponds to a
bright light.
XPress :or9 to change the brightness.
The brightness is set simultaneously with the
selection.
XPress aor% to save the setting.
Selecting the distance unit
TheDisplay Unit Speed-/Odometer:func-
tion allows you to choose whether certain dis-
plays appear in kilometers or miles in the mul-
tifunction display.
XUse ò on the steering wheel to call up the
list of menus.
XPress the :or9 button on the steering
wheel to select the Settingsmenu.
XConfirm by pressing aon the steering
wheel.
XPress the :or9 button to select the
Instrument Clustersubmenu.
XPress ato confirm.
XPress the :or9 button to select the
Display Unit Speed-/Odometerfunction.
You will see the selected setting: kmorMiles.
XPress the abutton to save the setting.
164Menus and submenus
On-board computer and displays
Page 172 of 294

Safety systems
Display messagesPossible causes/consequences andMSolutions
!÷
Currently Unavaila‐ble See Operator'sManual
ABS (Anti-lock Braking System) and ESP®(Electronic Stability Pro-
gram) are temporarily not available.
Other driving systems and driving safety systems may also malfunc-
tion.
In addition, the ÷and! warning lamps light up in the instru-
ment cluster.
For example, the on-board voltage may be insufficient.
GWARNING
The brake system continues to function normally, but without the
functions listed above. The wheels could therefore lock if you brake
hard, for example.
The steerability and braking characteristics may be severely affected.
The braking distance in an emergency braking situation can increase.
If ESP
®is not operational, ESP®is unable to stabilize the vehicle.
There is an increased risk of skidding and an accident.
XDrive on carefully.
Carefully drive on a suitable stretch of road, making slight steering
movements at a speed above 12 mph (20 km/h).
If the display message disappears, the functions mentioned above are available again.
If the multifunction display still shows the display message:
XDrive on carefully.
XVisit a qualified specialist workshop immediately.
!÷
Inoperative SeeOperator's Manual
ABS and ESP®are malfunctioning.
Other driving systems and driving safety systems may also malfunc-
tion.
The $ (USA only) or J(Canada only), ÷and! warning
lamps in the instrument cluster may also light up.
GWARNING
The brake system continues to function normally, but without the
functions listed above. The wheels could therefore lock if you brake
hard, for example.
The steerability and braking characteristics may be severely affected.
The braking distance in an emergency braking situation can increase.
If ESP
®is not operational, ESP®is unable to stabilize the vehicle.
There is an increased risk of skidding and an accident.
XDrive on carefully.
XVisit a qualified specialist workshop immediately.
170Display messages
On-board computer and displays