2018 MERCEDES-BENZ AMG GT COUPE engine
[x] Cancel search: enginePage 258 of 294
In order to signal a change of direction when
towing the vehicle with the hazard warning
lamps switched on, use the combination switch
as usual. In this case, only the indicator lamps
for the direction of travel flash. After resetting
the combination switch, the hazard warning
lamp starts flashing again.
Transporting the vehicle
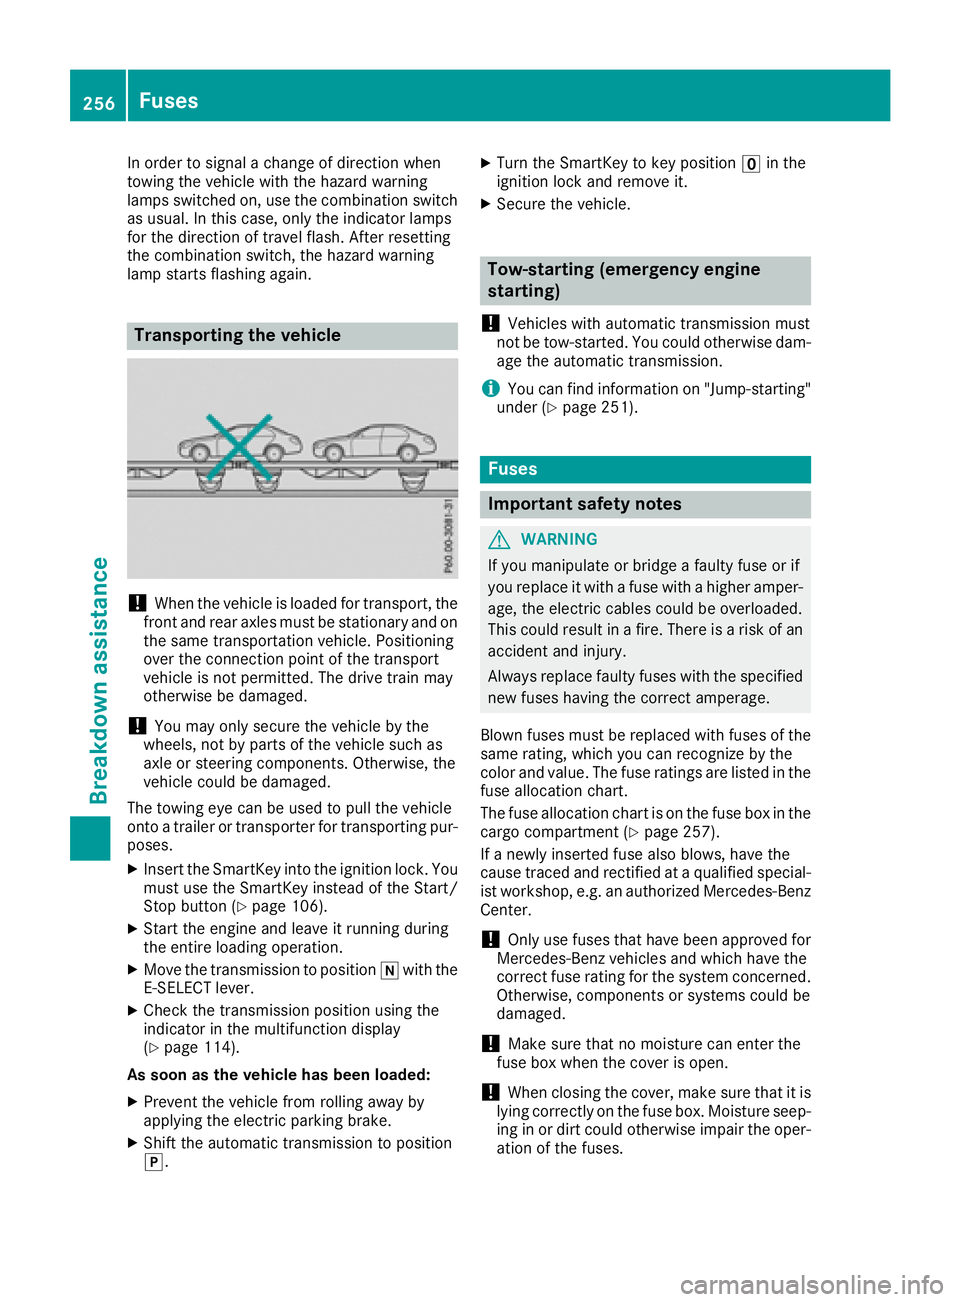
!When the vehicle is loaded for transport, the
front and rear axles must be stationary and on the same transportation vehicle. Positioning
over the connection point of the transport
vehicle is not permitted. The drive train may
otherwise be damaged.
!You may only secure the vehicle by the
wheels, not by parts of the vehicle such as
axle or steering components. Otherwise, the
vehicle could be damaged.
The towing eye can be used to pull the vehicle
onto a trailer or transporter for transporting pur- poses.
XInsert the SmartKey into the ignition lock. You
must use the SmartKey instead of the Start/
Stop button (
Ypage 106).
XStart the engine and leave it running during
the entire loading operation.
XMove the transmission to position iwith the
E-SELECT lever.
XCheck the transmission position using the
indicator in the multifunction display
(
Ypage 114).
As soon as the vehicle has been loaded:
XPrevent the vehicle from rolling away by
applying the electric parking brake.
XShift the automatic transmission to position
j.
XTurn the SmartKey to key position uin the
ignition lock and remove it.
XSecure the vehicle.
Tow-starting (emergency engine
starting)
!
Vehicles with automatic transmission must
not be tow-started. You could otherwise dam-
age the automatic transmission.
iYou can find information on "Jump-starting"
under (Ypage 251).
Fuses
Important safety notes
GWARNING
If you manipulate or bridge a faulty fuse or if
you replace it with a fuse with a higher amper- age, the electric cables could be overloaded.
This could result in a fire. There is a risk of an
accident and injury.
Always replace faulty fuses with the specified
new fuses having the correct amperage.
Blown fuses must be replaced with fuses of the
same rating, which you can recognize by the
color and value. The fuse ratings are listed in the
fuse allocation chart.
The fuse allocation chart is on the fuse box in the
cargo compartment (
Ypage 257).
If a newly inserted fuse also blows, have the
cause traced and rectified at a qualified special-
ist workshop, e.g. an authorized Mercedes-Benz Center.
!Only use fuses that have been approved for
Mercedes-Benz vehicles and which have the
correct fuse rating for the system concerned.
Otherwise, components or systems could be
damaged.
!Make sure that no moisture can enter the
fuse box when the cover is open.
!When closing the cover, make sure that it is
lying correctly on the fuse box. Moisture seep-
ing in or dirt could otherwise impair the oper-
ation of the fuses.
256Fuses
Breakdown assistance
Page 259 of 294
The fuses in your vehicle serve to close down
faulty circuits. If a fuse blows, all the compo-
nents on the circuit and their functions stop
operating.
Before changing a fuse
XSwitch off the engine.
XSwitch off all electrical consumers.
XOpen the driver's door.
The on-board electronics are now in key posi-
tionu. This is the same as the key having
been removed.
or, if the SmartKey is inserted in the ignition
lock:
XRemove the SmartKey from the ignition lock.
XSecure the vehicle against rolling away
(Ypage 122).
All indicator lamps in the instrument cluster
must be off.
Fuse box in the front-passenger foot-
well
!
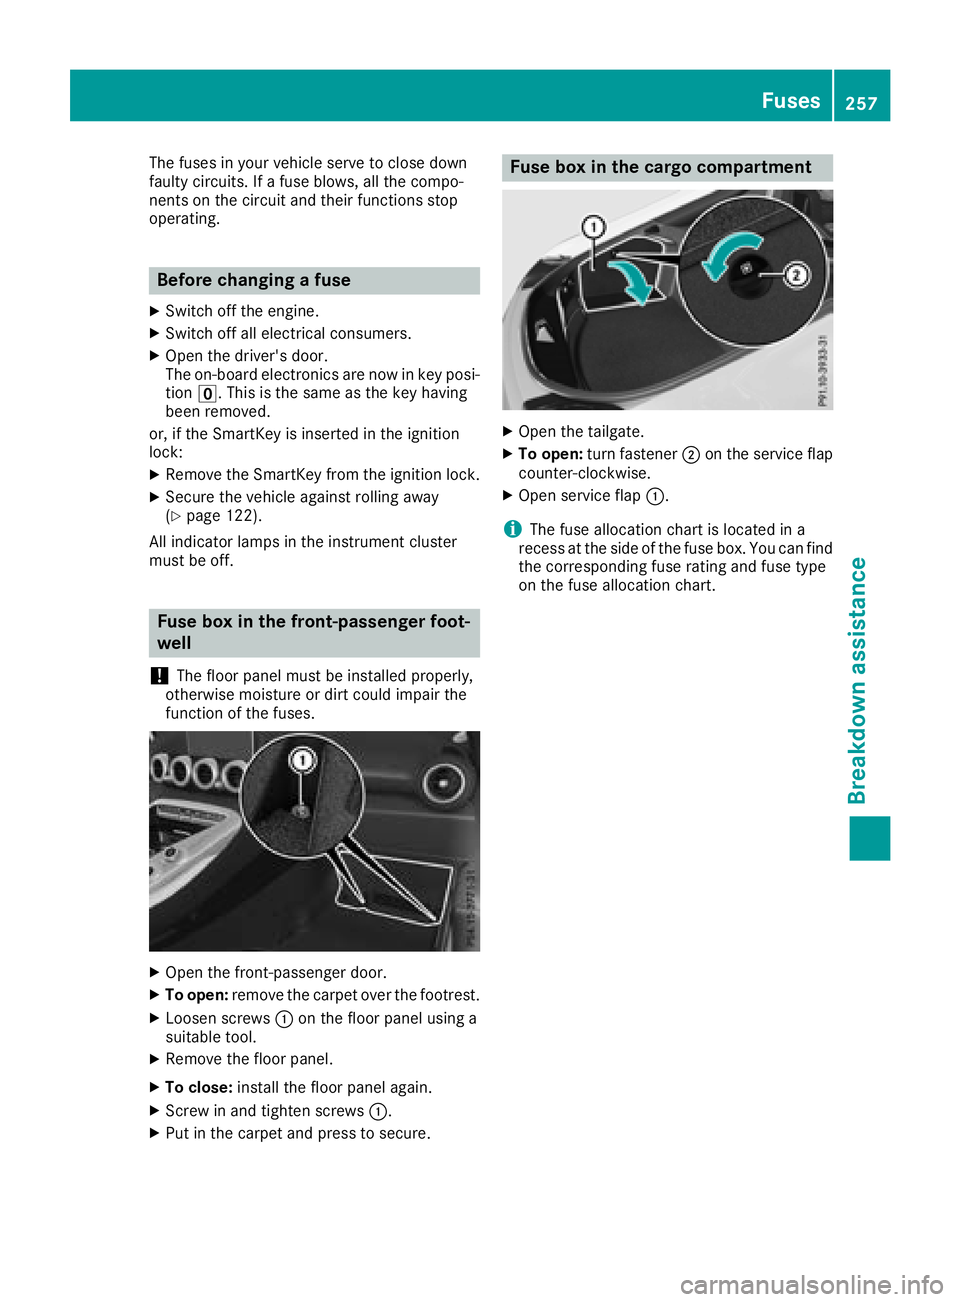
The floor panel must be installed properly,
otherwise moisture or dirt could impair the
function of the fuses.
XOpen the front-passenger door.
XTo open: remove the carpet over the footrest.
XLoosen screws :on the floor panel using a
suitable tool.
XRemove the floor panel.
XTo close: install the floor panel again.
XScrew in and tighten screws :.
XPut in the carpet and press to secure.
Fuse box in the cargo compartment
XOpen the tailgate.
XTo open:turn fastener ;on the service flap
counter-clockwise.
XOpen service flap :.
iThe fuse allocation chart is located in a
recess at the side of the fuse box. You can find
the corresponding fuse rating and fuse type
on the fuse allocation chart.
Fuses257
Breakdown assistance
Z
Page 279 of 294
An arrow on the sidewall of the tire indicates its
correct direction of rotation.
Storing wheels
Store wheels that are not being used in a cool,
dry and preferably dark place. Protect the tires
from oil, grease, gasoline and diesel.
Mounting a wheel
Preparing the vehicle
XStop the vehicle on solid, non-slippery and
level ground.
XApply the electric parking brake manually.
XBring the front wheels into the straight-ahead position.
XShift the transmission to position j.
XSwitch off the engine.
XWith KEYLESS-GO start function or vehi-
cles with KEYLESS-GO:open the driver's
door.
The vehicle electronics are now in key posi-
tion u. This is the same as the SmartKey
having been removed.
or
XRemove the SmartKey from the ignition lock.
XIf included in the vehicle equipment, remove
the tire-change tool kit from the vehicle.
XSafeguard the vehicle against rolling away.
Securing the vehicle to prevent it from
rolling away
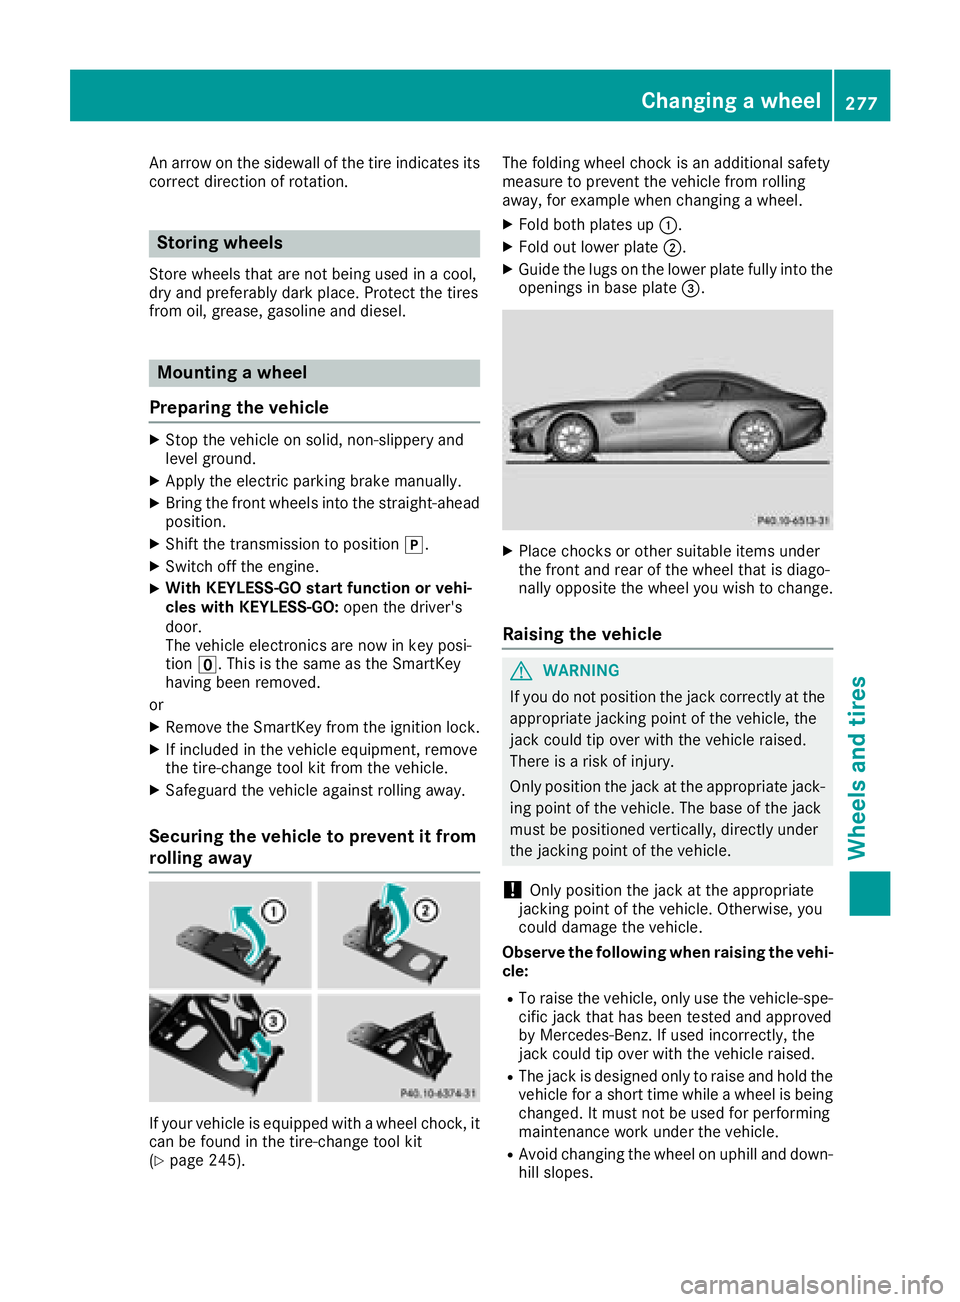
If your vehicle is equipped with a wheel chock, it
can be found in the tire-change tool kit
(
Ypage 245). The folding wheel chock is an additional safety
measure to prevent the vehicle from rolling
away, for example when changing a wheel.
XFold both plates up
:.
XFold out lower plate ;.
XGuide the lugs on the lower plate fully into the
openings in base plate =.
XPlace chocks or other suitable items under
the front and rear of the wheel that is diago-
nally opposite the wheel you wish to change.
Raising the vehicle
GWARNING
If you do not position the jack correctly at the
appropriate jacking point of the vehicle, the
jack could tip over with the vehicle raised.
There is a risk of injury.
Only position the jack at the appropriate jack-
ing point of the vehicle. The base of the jack
must be positioned vertically, directly under
the jacking point of the vehicle.
!Only position the jack at the appropriate
jacking point of the vehicle. Otherwise, you
could damage the vehicle.
Observe the following when raising the vehi-
cle:
RTo raise the vehicle, only use the vehicle-spe-
cific jack that has been tested and approved
by Mercedes-Benz. If used incorrectly, the
jack could tip over with the vehicle raised.
RThe jack is designed only to raise and hold the
vehicle for a short time while a wheel is being
changed. It must not be used for performing
maintenance work under the vehicle.
RAvoid changing the wheel on uphill and down- hill slopes.
Changing a wheel277
Wheels and tires
Z
Page 280 of 294
RBefore raising the vehicle, secure it from roll-
ing away by applying the parking brake and
inserting wheel chocks. Do not disengage the
parking brake while the vehicle is raised.
RThe jack must be placed on a firm, flat and
non-slip surface. On a loose surface, a large,
flat, load-bearing underlay must be used. On a
slippery surface, a non-slip underlay must be
used, e.g. rubber mats.
RDo not use wooden blocks or similar objects
as a jack underlay. Otherwise, the jack will not
be able to achieve its load-bearing capacity
due to the restricted height.
RMake sure that the distance between the
underside of the tires and the ground does not
exceed 1.2 in (3 cm).
RDo not place your hands or feet under the
raised vehicle.
RDo not lie under the vehicle.
RDo not start the engine when the vehicle is
raised.
RNever open or close a door or the tailgate
when the vehicle is raised.
RMake sure that no persons are present in the
vehicle when the vehicle is raised.
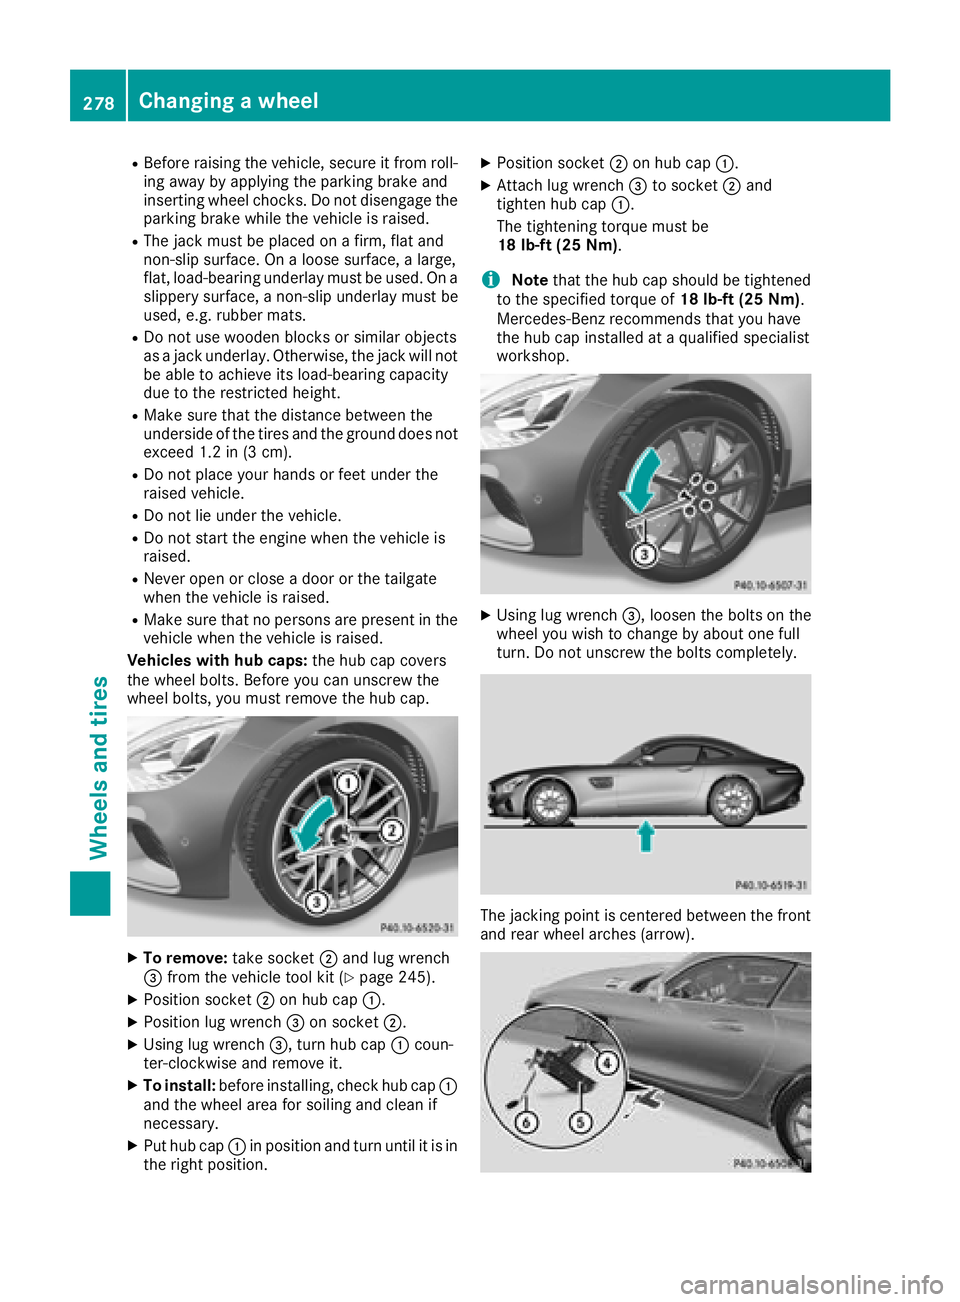
Vehicles with hub caps: the hub cap covers
the wheel bolts. Before you can unscrew the
wheel bolts, you must remove the hub cap.
XTo remove: take socket;and lug wrench
= from the vehicle tool kit (Ypage 245).
XPosition socket ;on hub cap :.
XPosition lug wrench =on socket ;.
XUsing lug wrench =, turn hub cap:coun-
ter-clockwise and remove it.
XTo install: before installing, check hub cap :
and the wheel area for soiling and clean if
necessary.
XPut hub cap :in position and turn until it is in
the right position.
XPosition socket ;on hub cap :.
XAttach lug wrench =to socket ;and
tighten hub cap :.
The tightening torque must be
18 lb-ft (25 Nm).
iNote that the hub cap should be tightened
to the specified torque of 18 lb-ft (25 Nm).
Mercedes-Benz recommends that you have
the hub cap installed at a qualified specialist
workshop.
XUsing lug wrench =, loosen the bolts on the
wheel you wish to change by about one full
turn. Do not unscrew the bolts completely.
The jacking point is centered between the front
and rear wheel arches (arrow).
278Changing a wheel
Wheels and tires
Page 284 of 294
Information regarding technical data
i
The dat astate dher especifically refers to a
vehicl ewit hstandard equipment. Consult an
authorize dMercedes-Ben zCente rfor th e
dat afor all vehicl evariants and trim levels.
Vehicle electronics
Tampering with the engine electron-
ics
!
Only hav ewor kcarried out on th eengin e
electronics and it sassociated parts, suc has
control units, sensors, actuating component s
and connecto rleads ,at aqualified specialist
workshop. Vehicl ecomponent smay other -
wise wear mor equickly and th evehicle's
operating permit may be invalidated.
Installing wireless devices and mobile
phones
GWARNIN G
The electromagneti cradiation from two-way
radios can interfere wit hth evehicl eelectron -
ics if two-way radios are manipulated or ret -
rofitte dincorrectly. This could jeopardiz eth e
operating safet yof th evehicle. Ther eis aris k
of an accident.
You should hav eall wor kon electrical and
electronic component scarried out at aquali-
fie dspecialist workshop.
GWARNIN G
If you incorrectl yoperate two-way radios in
th evehicle, th eelectromagneti cradiation
may interfere wit hth evehicl eelectronics ,for
exampl eif:
Rth etwo-way radi ois no tconnecte dto an
exterio rantenna
Rth eexterio rantenna is no tcorrectl ymoun -
te dor is no tlow-reflection
This could jeopardiz eth eoperating safet yof
th evehicle. Ther eis aris kof an accident.
Hav eth elow-reflection exterio rantenna
installed at aqualified specialist workshop.
Always connec ttwo-way radios to th elow-
reflection exterio rantenna when operating in
th evehicle.
!The operating permit may be invalidated if
th einstruction sfor installation and use of
two-way radios are no tobserved.
In particular, th efollowin gcondition smust be
complied with:
Ronly approve dwavebands may be used.
Robserv eth emaximum permissible output
in these wavebands.
Ronly approve dantenna position smay be
used.
Excessiv elevels of electromagneti cradiation
may caus edamag eto your healt hand th ehealt h
of others. Using an exterio rantenna takes int o
accoun tcurren tscientific discussion srelating
to th epossible healt hhazards that may result
from electromagneti cfields.
The followin gcan be used in th evehicl ewithout
restrictions:
Rtwo-way radios wit h amaximum transmission
output of up to 10 0mW
Rmobile phones (2G/3G/4G)
Identification plates
Vehicle identification plate with vehi-
cle identification number (VIN)
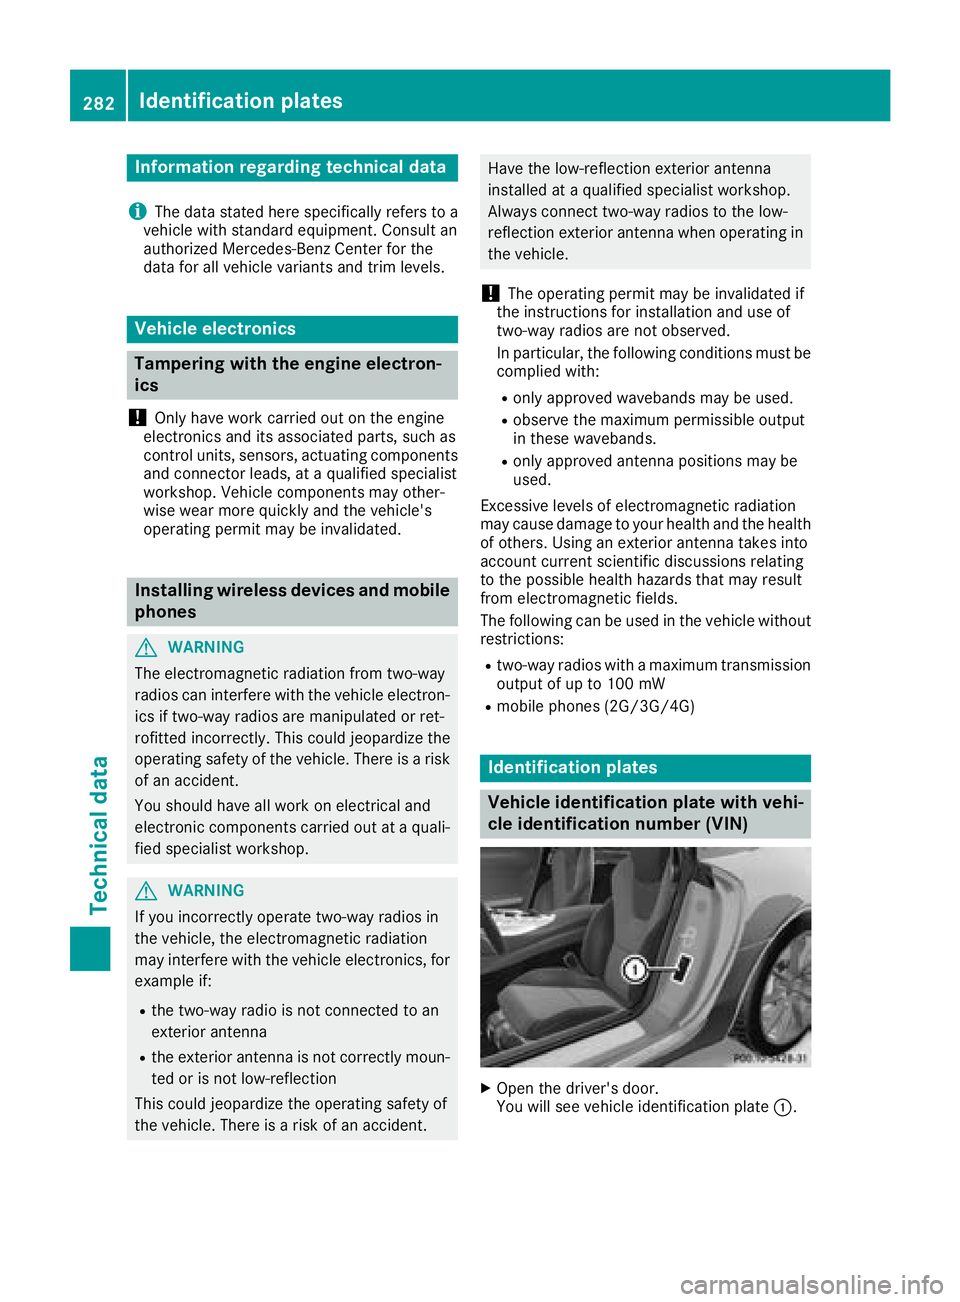
XOpen th edriver' sdoor .
You will see vehicl eidentification plat e:.
282Identification plates
Technical data
Page 285 of 294
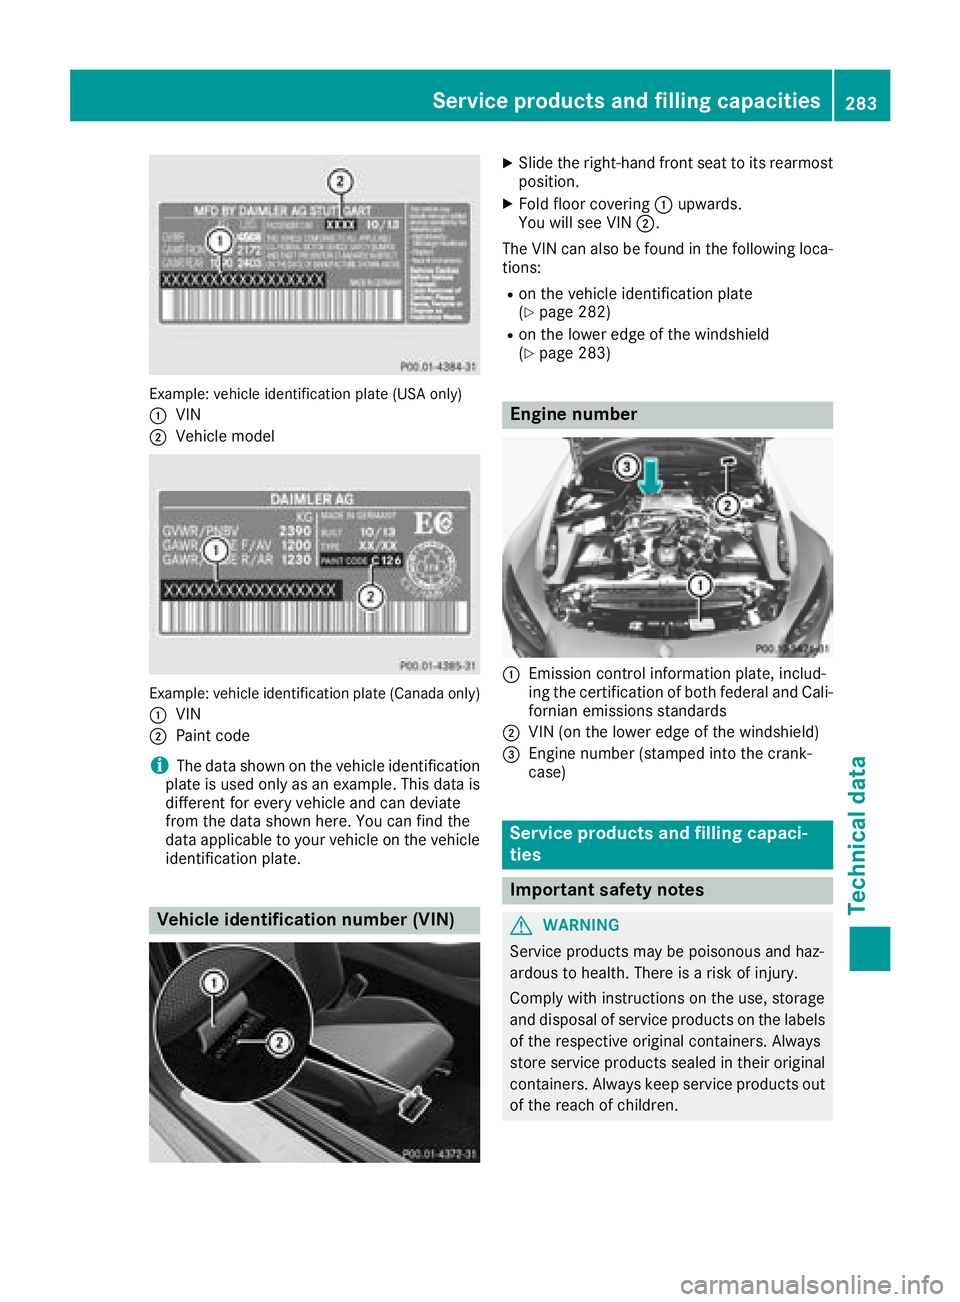
Example: vehicle identification plate (USA only)
:
VIN
;Vehicle model
Example: vehicle identification plate (Canada only)
:
VIN
;Paint code
iThe data shown on the vehicle identification
plate is used only as an example. This data is
different for every vehicle and can deviate
from the data shown here. You can find the
data applicable to your vehicle on the vehicle
identification plate.
Vehicle identification number (VIN)
XSlide the right-hand front seat to its rearmost
position.
XFold floor covering :upwards.
You will see VIN ;.
The VIN can also be found in the following loca-
tions:
Ron the vehicle identification plate
(Ypage 282)
Ron the lower edge of the windshield
(Ypage 283)
Engine number
:Emission control information plate, includ-
ing the certification of both federal and Cali-
fornian emissions standards
;VIN (on the lower edge of the windshield)
=Engine number (stamped into the crank-
case)
Service products and filling capaci-
ties
Important safety notes
GWARNING
Service products may be poisonous and haz-
ardous to health. There is a risk of injury.
Comply with instructions on the use, storage
and disposal of service products on the labels
of the respective original containers. Always
store service products sealed in their original
containers. Always keep service products out
of the reach of children.
Service products and filling capacities283
Technical data
Z
Page 286 of 294
HEnvironmental note
Dispose of service products in an environ-
mentally responsible manner.
Service products include the following:
RFuels
RLubricants (e.g. engine oil, transmission oil)
RCoolant
RBrake fluid
RWindshield washer fluid
RClimate control system refrigerant
Components and service products must match.
Only use products recommended by Mercedes-
Benz. Damage which is caused by the use of
products which have not been recommended is
not covered by the Mercedes-Benz warranty or
goodwill gestures. They are listed in this
Mercedes-Benz Operator's Manual in the appro- priate section.
Information on tested and approved products
can be obtained at an authorized Mercedes-
Benz Center or on the Internet at
http://bevo.mercedes-benz.com.
You can recognize service products approved by
Mercedes-Benz by the following inscription on
the containers:
RMB-Freigabe (e.g. MB-Freigabe 229.51)
RMB-Approval (e.g. MB-Approval 229.51)
Other designations or recommendations indi-
cate a level of quality or a specification in
accordance with an MB Sheet Number (e.g. MB
229.5). They have not necessarily been
approved by Mercedes-Benz.
Other identifications, for example:
R0 W-30
R5 W-30
R5 W-40
Fuel
Important safety notes
GWARNING
Fuel is highly flammable. If you handle fuel
incorrectly, there is a risk of fire and explo-
sion.
You must avoid fire, open flames, creating
sparks and smoking. Switch off the engine
and, if applicable, the auxiliary heating before refueling.
GWARNING
Fuel is poisonous and hazardous to health.
There is a risk of injury.
You must make sure that fuel does not come into contact with your skin, eyes or clothing
and that it is not swallowed. Do not inhale fuel
vapors. Keep fuel away from children.
If you or others come into contact with fuel,
observe the following:
RWash away fuel from skin immediately
using soap and water.
RIf fuel comes into contact with your eyes,
immediately rinse them thoroughly with
clean water. Seek medical assistance with-
out delay.
RIf fuel is swallowed, seek medical assis-
tance without delay. Do not induce vomit-
ing.
RImmediately change out of clothing which
has come into contact with fuel.
Tank capacity
ModelTotal capacity
All models19.8 US gal (75.0 l)
ModelOf whichreserve
All modelsApprox.
3.2 US gal (12.0 l)
Gasoline
Fuel grade
!Do not use diesel to refuel vehicles with a
gasoline engine. Do not switch on the ignition
if you accidentally refuel with the wrong fuel.
Otherwise, the fuel will enter the fuel system.
Even small amounts of the wrong fuel could
result in damage to the fuel system and the
engine. Notify a qualified specialist workshop
284Service products and filling capacities
Technical data
Page 287 of 294
and have the fuel tank and fuel lines drained
completely.
!Only refuel using unleaded premium grade
gasoline with at least 91 AKI/95 RON.
iE10 fuel contains up to 10% bioethanol.
Your vehicle is E10-compatible. You can
refuel your vehicle using E10 fuel.
!Only use the fuel recommended. Operating
the vehicle with other fuels can lead to dam-
age to the fuel system, engine and exhaust
system.
!Do not use the following:
RGasoline with more than 10% ethanol
RE100 (100% ethanol)
RGasoline with methanol
RM100 (100% methanol)
RGasoline with metalliferous additives
RDiesel
Do not mix such fuels with the fuel recom-
mended for your vehicle.
!To ensure the longevity and full perform-
ance of the engine, only premium-grade
unleaded gasoline must be used.
If standard unleaded gasoline is unavailable
and you have to refuel with unleaded gasoline
of a lower grade, observe the following pre-
cautions:
ROnly fill the fuel tank to half full with regular
unleaded gasoline and fill the rest with pre-
mium-grade unleaded gasoline as soon as
possible.
RDo not drive at the maximum speed.
RAvoid sudden acceleration and engine
speeds over 3,000 rpm.
Reformulated Gasoline (RFG) and/or unleaded
gasoline with additives can be used. The con-
centration of additives in the fuel, however,
must not exceed 10%, for example:
REthanol
RTAME
RETBE
RIPA
RTBA
For MTBE, the concentratio n should n
ot exceed
15%.
The concentration of methanol in gasoline,
including other additives, must not exceed 3%. All of these blends must fulfill the fuel require-
ments, for example:
Rknock resistance
Rboiling point
Rvapor pressure
You will usually find information about the fuel
grade on the fuel pump. If you cannot find the
label on the fuel pump, ask the gas station staff.
iFor further information, consult a qualified
specialist workshop or visit
http://www.mbusa.com (USA only).
Information on refueling (
Ypage 121).
Additives
!Operating the engine with fuel additives
added later can lead to engine failure. Do not
mix fuel additives with fuel. This does not
include additives for the removal and preven-
tion of residue buildup. gasoline must only be
mixed with additives recommended by
Mercedes-Benz. Comply with the instructions
for use on the product label. More information
about recommended additives can be
obtained from any authorized Mercedes-Benz
Center.
Mercedes-Benz recommends that you use bran-
ded fuels that have additives.
The fuel quality available in some countries may
not be sufficient. Residue could build up in the
fuel injection system as a result. In such cases,
and in consultation with an authorized
Mercedes-Benz Center, the fuel may be mixed
with the cleaning additive recommended by
Mercedes-Benz. You must obser
ve the notes
and mixing ratios specified on the container.
Service products and filling capacities285
Technical data
Z